# Getting Started
> Symcon documentation · English · generated on 2026-09-26
> Index: https://www.symcon.de/en/llms.txt
## Introduction
Source: https://www.symcon.de/en/service/documentation/introduction/
This is the documentation of IP-Symcon.
On the one hand it provides technical backgrounds, basic knowledge, and functionalities. On the other hand it supports the development of individual scripts and automation. Examples allow an easy access to the content. The document is available at all times online and offline.
The basic features of IP-Symcon are described on the [product page](https://www.symcon.de/en/product/) .
### How does IP-Symcon work?
#### Vendor Independence
IP-Symcon links diverse devices from different manufacturers within one application. The softwares unified pattern enables access to all devices.

#### Connection
IP-Symcon uses its own configurators and the manufacturers protocols to connect to the devices using a simple modular structure. It does not matter whether the manufacturers system is based on radio or cable. The software always interprets the connection with the same pattern: Device instance -> Gateway -> I/O

#### Device status
When the device is connected IP-Symcon can read and write its variables and states. The device can be controlled.

#### Management
The management console is the technical nerve center. It controls the devices that are configured and connected to the server. The intelligence and the explicite automation is configured and realized via scripts in the management console.

#### Visualization
In a next step, IP-Symcom provides the visualization of the configured devices. The visualization clearly shows all functions and data. Controlling via the visualization is no problem at all.

#### First Steps
The [Quick Access](https://www.symcon.de/en/llms/getting-started.md) explains most basics.
## Terms and Conditions
Source: https://www.symcon.de/en/service/documentation/introduction/terms-and-conditions/
> **Warning:** Our "General Terms and Conditions of the Software Purchase Agreement" can be downloaded at any time: [Download](https://www.symcon.de/assets/files/legal/EULA.pdf)
> **Note:** A detailed explanation of the rights of use can be found here: [Usage rights](https://www.symcon.de/en/llms/getting-started.md).
## Usage rights
Source: https://www.symcon.de/en/service/documentation/introduction/usage-rights/
> **Note:** The legally binding, general terms and conditions of the software purchase agreement can be downloaded from [Terms and Conditions](https://www.symcon.de/en/llms/getting-started.md)
> **Warning:** An IP-Symcon license entitles you to install IP-Symcon as often as desired within a private household. For commercial installations, a separate IP-Symcon license is required for each server/computer in operation. Only one productive installation per license can be in operation at any one time, which communicates with the server for push notifications or the Connect-Service. Any further installations can therefore only be used for programming and testing purposes. An IP-Symcon license is valid for all terminal devices (operating systems) on which IP-Symcon is available. A valid [subscription](https://www.symcon.de/en/llms/getting-started.md) is required for an online installation. If an installation of IP-Symcon is desired after the subscription has expired, a self-made backup is required.
> **Note:** The IP-Symcon Pro console can be [downloaded](https://www.symcon.de/en/downloads/) from the IP-Symcon server and automatically updated using the integrated update function without an IP-Symcon license.
## Subscription
Source: https://www.symcon.de/en/service/documentation/introduction/subscription/
A subscription provides the listed services during its duration. These are required by some modules for operation (e.g. Connect Service for Alexa Smart Home Skill)
### Services
The following services require an active subscription.
#### Installation/Update
An active subscription is required for new installations and updates of IP-Symcon.
#### Push Notification
Push notifications are sent to the mobile apps via our server.
#### Connect Service
Encrypted access is provided via our Connect Service server enabling the system to be securely accessed from anywhere.
### Period of validity
The duration (validity) of the subscription can be determined from one of the following three points:
* In the last email of a license or subscription order: "... valid until: DD.MM.YY "
* In our forum under "License Management". To do this, one has to register there.
* Inquire by email or using the contact form
* One month before the subscription expires, an email will be sent to inform about its soon expiration
> **Note:** A subscription is __not__ self-renewing.
> When the subscription expires, it can be purchased/renewed in the [IP-Symcon Shop](https://www.symcon.de/en/shop/) .
> One month before the expiration date, our system will automatically send a notification email.
> When ordering, the new time contingent is added to any remaining duration (similar to a prepaid card).
There is more information about the license used in the [Management Console](https://www.symcon.de/en/llms/components/management-console.md) via the information icon in the top right corner.
## Quick Start
Source: https://www.symcon.de/en/service/documentation/introduction/quickstart/
### Symcon
Symcon is a server software which aims to combine, link and automate different automation systems in one server. This means that systems that cannot communicate with one another are brought together in a uniform, clear configuration. Furthermore, Symcon offers a uniform [Visualization](https://www.symcon.de/en/llms/components/tile-visualization.md) and control, both for the browser and via [Mobile Apps](https://www.symcon.de/en/llms/components/tile-visualization.md) for iOS and Android. A comprehensive description is available on the [product page](https://www.symcon.de/en/product/) .
### Supported Systems
Symcon supports a wide variety of well-known manufacturers and protocols. An overview of the native systems can be seen in the [Module Reference](https://www.symcon.de/en/llms/modules/index.md). Additionally, the [Module Store](https://www.symcon.de/en/llms/components/management-console.md) is offered. This is a platform on which modules are submitted, quality controlled and made available by the community to the user free of charge.
### Symcon Editions
There are six different editions: Community, Professional, Expert, Basic, Industrial and Enterprise. These are valid indefinitely and offer the same system support. The editions differ in the number of variables, Visualizations and the included [Extensions](https://www.symcon.de/en/product/extensions/). A detailed list of all functions can be found in the [Function overview](https://www.symcon.de/en/product/editions/). An existing license can be upgraded to a higher version at any time. An [overwiev of the upgrades](https://www.symcon.de/en/shop/symcon/bundle-ips-upgrade/) can be viewed in the shop.
#### Subscription
A [Subscription](https://www.symcon.de/en/llms/getting-started.md) activates features, which are offered by our server. This includes, for example, push notifications, updates, [Connect Control](https://www.symcon.de/en/llms/modules/connect-control.md) (especially important for [Amazon Alexa](https://www.symcon.de/en/llms/modules/amazon-alexa.md) and [Google Assistant](https://www.symcon.de/en/llms/modules/google-assistant.md)). An expired subscription does not affect the running server, only the features associated with the subscription will be deactivated. A subscription can be extended at any time via the [Shop](https://www.symcon.de/en/shop/symcon/ips-subscription/).
### Free Version
It is possible to request a [free license](https://www.symcon.de/en/downloads/request/). For personal, non-commercial use, there is a permanently free Community Edition. To test the scope of a Professional or Enterprise Edition, there are demo versions available for one month.
### Hardware requirements
The Symcon server must run permanently. A [SymBox](https://www.symcon.de/en/shop/symbox/bundle-symbox/) , Windows, MacOS, Linux Ubuntu, Raspberry Pi or Docker (also QNAP, Synology) system is required for this. Which version of the respective operating system is required can be looked up in the [Version Overview](https://www.symcon.de/en/llms/getting-started/system-requirements.md) in the [System Requirements](https://www.symcon.de/en/llms/getting-started/system-requirements.md) area. Furthermore, so-called gateways are required as an interface for the built-in systems. Which gateways are supported can be looked up in the respective [Module Reference](https://www.symcon.de/en/llms/modules/index.md) and their device list. Some gateways are offered in the [Shop](https://www.symcon.de/en/shop/gateways/) or even as a [SymBox extension](https://www.symcon.de/en/shop/symbox/bundle-symbox/) .
#### SymBox Functionalities
The [SymBox](https://www.symcon.de/en/shop/symbox/bundle-symbox/) is the in-house server. This can be bought in a DIN rail housing for the electric cabinet or in an aluminum enclosure. In addition to the very low power consumption (max. 3W) the SymBox with SymOS offers a specially adapted operating system and tailored web interface for Symcon. In addition to updates and settings, the [Data Backup](https://www.symcon.de/en/llms/getting-started.md) can be conveniently managed with this. If a Symbox is in use, the SymOS can be reached in the local network via "[symbox.local](symbox.local:3777) ".
### Installation of Symcon
The installation is described for the respective system under [Installation](https://www.symcon.de/en/llms/getting-started.md). After a successful installation, the Symcon [Service](https://www.symcon.de/en/llms/components/service.md) starts automatically and is ready for configuration.
### Tray Functionalities
After installation, the [Tray Application](https://www.symcon.de/en/llms/components/tray.md) is now available on Windows and MacOS. Depending on the operating system, the tray application is located as a Symcon symbol in the respective system tray. Via the application The service can be started, stopped and updated. Under "Information" there is the possibility to set up [Remote Access](https://www.symcon.de/en/llms/components/remote-access.md).
### Configuration
[Management Console](https://www.symcon.de/en/llms/components/management-console.md) is used for configuration. This can be called up from anywhere in the network via a browser. To open it, "[IPServer]:3777/console/" just needs to be entered in the address line. If a SymBox is in use, this is [symbox.local:3777/console/](http://symbox.local:3777/console/) instead.
### Basics
The basic concepts and their handling are described in the area [Basics](https://www.symcon.de/en/llms/concepts.md). The next step are the [Components](https://www.symcon.de/en/llms/components/index.md), which explain the functionalities for control, automation and visualization.
### Visualization and Control
The [Tile Visualization](https://www.symcon.de/en/llms/components/tile-visualization.md) of the instances set up is created automatically and can be further adapted to one’s personal needs. Control takes place via the visualization. Another option to control the system are the [Free Mobile Apps](https://www.symcon.de/en/llms/components/tile-visualization.md) for iOS and Android.
All necessary information can be found under [Tile Visualization](https://www.symcon.de/en/llms/components/tile-visualization.md).
### Security
In order to cover the important aspect of security in home automation, external access is not possible by default factory settings. Further information on all security aspects can be looked up in the section [Security](https://www.symcon.de/en/llms/getting-started.md). In addition, a security widget checks the configuration and provides an overview of any passwords that may need to be set.
### Data backup
For [Data Backup](https://www.symcon.de/en/llms/getting-started.md) a [backup can be created](https://www.symcon.de/en/llms/getting-started.md). This can be installed onto a different or a new system. Exact steps for this can be found under [load backup](https://www.symcon.de/en/llms/getting-started.md). Such a backup is fully compatible even with a [Change of Platform](https://www.symcon.de/en/llms/getting-started.md).
### Connect Control
The [Connect Control](https://www.symcon.de/en/llms/modules/connect-control.md) is used for encrypted external communication. It enables secure control and [Visualization](https://www.symcon.de/en/llms/modules/index.md) outside of your local network. Certain functions and modules (e.g. [Amazon Alexa](https://www.symcon.de/en/llms/modules/amazon-alexa.md), [Push Notifications](https://www.symcon.de/en/llms/modules/notification-control.md)) require a permanent internet connection. This is also guaranteed by the encrypted Connect Control.
### Remote Access
The [Remote Access](https://www.symcon.de/en/llms/components/remote-access.md) offers the possibility to configure Symcon from the outside. Only after assigning a password the access from the outside, additionally to the local network access, will be activated. It is thus possible to carry out full remote maintenance. [Connect Control](https://www.symcon.de/en/llms/modules/connect-control.md) is required for this.
### More Information and Videos
Further information and examples can be found on the [Symcon YouTube Channel](https://www.youtube.com/c/symcongmbh) and under [Procedures](https://www.symcon.de/en/llms/how-to.md). In addition to the [Documentation](https://www.symcon.de/en/llms/getting-started.md), the [Forum](https://community.symcon.de/) also offers a large amount of information, script collections and ideas, as well as a broad base of professionals and newcomers.
## Video Tutorials
Source: https://www.symcon.de/en/service/documentation/introduction/video-tutorials/
For a quick introduction to IP-Symcon, here are some useful video tutorials:
> **Note:** [All videos can be found on our YouTube channel.](https://www.youtube.com/symcongmbh)
- [Our SymBox](https://www.youtube.com/playlist?list=PLFfIoKt1k0PUFjmnPsa-KxIR0XT0pO9j4)
- [Part 1 - Figures, data, facts](https://youtu.be/bNt-C2f_gNk)
- [Part 2: Commissioning + Recovery Tool](https://youtu.be/4MMVfNy2txM)
- [Part 3: KNX Demo & Pro Console](https://youtu.be/l8GI3wxGHqc)
- [Part 4: Tailscale VPN (Module)](https://youtu.be/nOiR9pN83RQ)
- [Basics](https://www.youtube.com/playlist?list=PLFfIoKt1k0PXuCWFio7PMbeMKyFM_zqXP)
- [Part 1: Basics](https://youtu.be/0nuUJ8YhY0k)
- [Part 2: Installations on Windows & Raspberry Pi](https://youtu.be/ba-h_CFgg_I)
- [Part 3: Symcon with Docker](https://youtu.be/Ei_OoIpmnQE)
- [Part 4: macOS & Synology Installation](https://youtu.be/lJhDhYrHyR0)
- [Part 5: Update with Portainer](https://youtu.be/io_6Cgtji14)
- [Part 6: Integrating & configuring devices](https://youtu.be/c6329rIbeRQ)
- [Part 7: User Interface & Navigation](https://youtu.be/PgD8mOFHGws)
- [Part 8: Variable display](https://youtu.be/mqIl7_FUKyM)
- [Part 9: Location Control Module](https://youtu.be/oTsHg3Mr-JA)
- [Logic plans](https://www.youtube.com/playlist?list=PLFfIoKt1k0PWWtvdDoVemqsNQPZD7I0K0)
- [Part 1: Introduction and Basics](https://youtu.be/BAK1sXK4FdY)
- [Part 2: Sublogic plans](https://youtu.be/0mTDruQ7l0Q)
- [Part 3: Switch-off delay - Sublogic diagram](https://youtu.be/NaTMManlVf0)
- [Part 4: Watchdog - Sublogic plan](https://youtu.be/yOcRwvYLGlw)
- [Part 5: Doorbell trigger - Sublogic diagram](https://youtu.be/P7GBz3RR9vk)
- [Part 6: min/max values logging - Sublogic plan](https://youtu.be/tRUXIyFtkkQ)
- [Visualization](https://www.youtube.com/playlist?list=PLFfIoKt1k0PXwU3-PCik9MJZqa58BRNEO)
- [WebFront functions and the WYSIWYG editor](https://www.youtube.com/watch?v=523XW-o7d1k)
- [Symcon Connect- The secure connection to IP-Symcon and WebFront](https://www.youtube.com/watch?v=nOB0TtsLt68)
- [IP-Symcon Webinar: Preview for visualization](https://www.youtube.com/watch?v=nOB0TtsLt68)
- [IP-Symcon Webinar: Public beta of the new visualization](https://www.youtube.com/watch?v=XmctZRAYeqA)
- [Developer Webinars](https://www.youtube.com/watch?v=7TH6SzA39vs&list=PLFfIoKt1k0PUcBtQMjtIG8aF5BOG-mykB)
- [Getting started for developers](https://www.youtube.com/live/c1c0eSEud5U?si=mlWJYPq07J8qi4MI)
- [Dynamic modules](https://www.youtube.com/live/7TH6SzA39vs?si=NdcMX_Yy8QL2GOS0)
- [Automatic testing](https://www.youtube.com/live/kTcuTO50Jzw?si=9M0uu7vM1acMNQcp)
- [Configuration forms and their elements](https://www.youtube.com/live/kYiiNurOD0o?si=EB6clhC8LSaeWHoN)
- [Configurator element and data flow](https://www.youtube.com/live/6dcsSfqIlnA?si=UOleUUAWbJV8w8YT)
- [Create actions](https://www.youtube.com/live/QskfaDICPWs?si=pc0B7DPdeIP5DhFV)
- [Git Basics](https://www.youtube.com/live/iwKZJGTTb48?si=NH0voV3FrDOoiI8G)
- [Changes to the PHP SDK for 7.0](https://www.youtube.com/live/ASh-bt55VAw?si=k0MY0FZYJ9szMU6b)
- [IP-Symcon Developer Webinar: HTML-SDK](https://www.youtube.com/live/-dIHZRYbqpA?si=HiS0qolTk8ixePbb)
- [Presentation in modules](https://www.youtube.com/live/c-QxdRlgS_c?si=XRd9TxaiECZxp1ZQ)
- [Basics - Webinars](https://www.youtube.com/playlist?list=PLFfIoKt1k0PUAuuzxXcdNn4WYEgGlry8b)
- [IP-Symcon Basics Webinar](https://www.youtube.com/watch?v=6G-OCdxt4co)
- [IP-Smcon Basics Webinar - Part 2](https://www.youtube.com/watch?v=kTcuTO50Jzw)
- [IP-Symcon Developer Webinar: Automated Module Testing](https://www.youtube.com/watch?v=kTcuTO50Jzw)
- [IP-Symcon Webinar Basics Visualization](https://www.youtube.com/watch?v=Iny7lJrqDvo)
- [IP-Symcon Webinar: Tabs & Widgets](https://www.youtube.com/watch?v=COg81XzSDOE)
- [Releases](https://www.youtube.com/playlist?list=PLFfIoKt1k0PWx3KRFqxhivVVw5f31HPeV)
- [Version 8.0 Preview](https://youtube.com/live/uxR4R7sgLSI)
- [Version 7.2](https://youtube.com/live/S70oZf_UnEM)
- [Version 7.1](https://youtube.com/live/GCPXUTM8dyE)
- [Version 7.0](https://www.youtube.com/watch?v=hbIEWVhO5cM)
- [Version 6.4](https://www.youtube.com/watch?v=PWMtBzJmap8)
- [IPSView & IPSWorkflows](https://www.youtube.com/watch?v=aToRyiR4J5M)
- [Energy Management with IP-Symcon](https://www.youtube.com/watch?v=44nygGzHE-Q)
- [Version 6.3](https://www.youtube.com/watch?v=kkVA_tpMBrk)
- [Version 6.2](https://www.youtube.com/watch?v=f-CPFL5I8hc)
- [Version 6.1](https://www.youtube.com/watch?v=sW35lmKgGJ8)
- [Version 6.0](https://www.youtube.com/watch?v=T7XVOTLowT4)
- [Version 5.5](https://www.youtube.com/watch?v=t274wQCMC18)
- [Version 5.4](https://www.youtube.com/watch?v=Y9K2CvwiAsk)
> **Note:** Missed the event? [Check it out!](https://www.symcon.de/en/events/)
- [Set up system](https://www.youtube.com/playlist?list=PLFfIoKt1k0PWOzjdFWn1_Hwq6pQYGAAJM)
- [Set up KNX devices incl. feedback addresses](https://www.youtube.com/watch?v=hDwXGSwMjvc)
- [Set up SymBox Pro with KNX Data Secure](https://www.youtube.com/watch?v=aA8mcKEyHOY)
- [KNX: Set up IP-Secure](https://www.youtube.com/watch?v=AZo_TwAyn-U&t=17s)
- [xComfort](https://www.youtube.com/watch?v=VC8fYf9LB-g)
- [dS-Setup](https://www.youtube.com/watch?v=mnR2ab6IMlQ)
- [Simens OZW setup](https://www.youtube.com/watch?v=2VoOVEPpbY0)
- [XML export using ETS6](https://www.youtube.com/watch?v=-hdo5nrTr3Y)
- [Setting up a BACnet device in IP-Symcon](https://www.youtube.com/watch?v=T6NsoRShn2o)
- [Setting up an MQTT client in IP-Symcon](https://www.youtube.com/watch?v=dVMgHm5LeX0)
- [Setting up an MQTT server in IP-Symcon](https://www.youtube.com/watch?v=5msmo1JSxSo)
- [Setting up a KNX system with configurator in IP-Symcon](https://www.youtube.com/watch?v=hgz7nv0SC-Q)
- [XML export using the ETS](https://www.youtube.com/watch?v=DeGCLestF_I)
- [Setting up a Z-Wave system in IP-Symcon](https://www.youtube.com/watch?v=7jFMxEpCGxU)
- [Setting up an LCN system in IP-Symcon](https://www.youtube.com/watch?v=tZMETUfw-_M)
- [Symbox - First setup of the IP-Symcon control center](https://www.youtube.com/watch?v=S9yKoKmow2s)
- [OPC- EXport using the ETS(from v5.6.5)](https://www.youtube.com/watch?v=lDebGVTDUnw)
- [Set up an Alexa controller in IP-Symcon in under 10 minutes](https://www.youtube.com/watch?v=AbvauPdbLa8)
- [Set up a HomeMatic system in IP-Symcon](https://www.youtube.com/watch?v=uDd-jdKm0CE)
- [HomeMatic firewall settings for a functional feedback channel](https://www.youtube.com/watch?v=sahJdNXUZZs)
- [Setting up a 1-wire system in IP-Symcon](https://www.youtube.com/watch?v=JbIdm5x0uxY)
- [Finding out the IP address in the ETS](https://www.youtube.com/watch?v=0nEpt1Y_2nc)
- [Setting up a KNX system in IP-Symcon](https://www.youtube.com/watch?v=kfv0HSX9PVM)
- [OPC export using the ETS(up to v 5.6.4)](https://www.youtube.com/watch?v=WnJ3qRI0qVE)
## Installation
Source: https://www.symcon.de/en/service/documentation/installation/
[Installation on Windows](https://www.symcon.de/en/llms/getting-started.md)
[Installation on MacOS](https://www.symcon.de/en/llms/getting-started.md)
[Installation on Linux](https://www.symcon.de/en/llms/getting-started.md)
[Installation on Raspberry Pi](https://www.symcon.de/en/llms/getting-started.md)
[Installation on Docker](https://www.symcon.de/en/llms/getting-started.md)
[Installation on QNAP](https://www.symcon.de/en/llms/getting-started.md)
[Installation on Synology](https://www.symcon.de/en/llms/getting-started.md)
[Installation on SymBox](https://www.symcon.de/en/llms/getting-started.md)
[Installation für Catan](https://www.symcon.de/en/llms/getting-started.md)
### Installation
The initial installation and activation on the various platforms. For this purpose IP-Symcon uses installation steps adapted to the respective system or platform.
Detailed information can be found on the respective system’s page.
> **Note:** In order to grant IP-Symcon access to certain functions, e.g. updates, from outside, it may be necessary to set them up in the firewall. Further information can be found under [Firewall](https://www.symcon.de/en/llms/getting-started.md)
### Update
IP-Symcon can be updated with a valid subscription.
How to initiate an update can be read on the respective system’s page.
For an update, the IP-Symcon server must be contacted to request the latest packages. If this fails, there are several possible causes:
* The subscription has expired. A new one should be purchased from the shop.
* The proxy settings are incorrect.
* The Internet connection is not established.
### Data Backup
To avoid data loss there are several ways to backup IP Symcon data.
These are described under [Backup](https://www.symcon.de/en/llms/getting-started.md).
### Change of Platform
IP-Symcon can move from one platform to another without a new setup.
The procedure is explained under [Change of Platform](https://www.symcon.de/en/llms/getting-started.md).
### Uninstalling
How to uninstall IP-Symcon can be read on the respective system’s page.
### Change License
Should the license change, it can be changed within IP-Symcon via the [management console](https://www.symcon.de/en/llms/components/management-console.md).
The necessary steps can be found under [Change License](https://www.symcon.de/en/llms/getting-started.md).
### Migration
Migration from an old version to a new version is possible without data loss.
In the left menu all previous migrations can be found.
Individual migrations should be performed from version to version.
## Windows
Source: https://www.symcon.de/en/service/documentation/installation/windows/
> **Warning:** The installation is only possible with a valid subscription. However, an existing backup can be used to restore the software even without subscription. See [Change of Platform](https://www.symcon.de/en/llms/getting-started.md)
> **Warning:** A regular backup is recommended to ensure that your system is as current as possible in case of a defect. Even more, an active subscription is required to download IP-Symcon anew in case of a complete loss of data.
### Installation
#### Version Requirements
The [version overview](https://www.symcon.de/en/llms/getting-started/system-requirements.md) shows which version of IP-Symcon is compatible with which Windows version.
#### Installation
__Download:__ [Setup (64-Bit)](https://download.symcon.de/stable/symcon/win/amd64)
IP-Symcon is one of the few programs that enables a clean installation and uninstalls without residue as it does not create a huge load of entries in the Windows registry. It merely stores the license key.
#### Remark
> **Warning:** An internet connection is required to install IP-Symcon. If no connection is available on the target computer, IP-Symcon needs to be installed on another computer and copied to the target computer afterwards.
#### Setup
The following window should appear after starting the setup:

The next step is reached after comfirming the dialog with "Next".
#### Provide Lizense Data
It is possible to either use a demo version or a complete license by entering a user name and the license file. Afterwards, "Next" finishes the dialog.
> **Note:** The user name usually corresponds to the e-mail address used in the ordering process.

The subscription is checked now.
It is only possible to install IP-Symcon with a valid subscription unless you install the demo version.
* When the subscription has expired, an extension can be ordered in the shop: [Shop](https://www.symcon.de/en/shop/)
* If no connection to the server can be established, please check to internet connection and the proxy settings.
After accepting the terms of license, a fitting path needs to be chosen (e.g., C:\IP-Symcon) and confirmed with "Next".
> **Note:** During installation the folder C:\ProgramData\Symcon is automatically created. It includes all server data, the individual data of the local installation. If wanted, it is possible to move the server data since version 6.0. Move Server Data
The button "Install" starts the copying of files.
After a click on "OK", the installation on the system is done. Depending on the activated options, the IP-Symcon service and the IP-Symcon tray application are started automatically.
The IP-Symcon WebFront should be reachable at http://ipadresse:3777/.
The IP-Symcon web based [Management Console](https://www.symcon.de/en/llms/components/management-console.md) can be called via http://ipadresse:3777/console/. Alternativly, the [Pro Console](https://www.symcon.de/en/llms/components/management-console.md) can be used.
#### Set Remote Access Password
[Remote Access](https://www.symcon.de/en/llms/components/remote-access.md) provides a tutorial for configuring remote access.
#### Update
The newest version can be downloaded and installed by right clicking on the tray icon and choosing "Check for Updates ‑> Download". The service needs to terminate once during the update and is automatically rebooted afterwards.

### Uninstallation
### Stop Service
The service can be stopped by clicking "Stop Service" in the context menu of the tray application.

#### Uninstall Service/Server
The dialog "Information" can be by the context menu. It should look like this:
__Windows__

"Uninstall" removes the service from the system.
#### Delete IP-Symcon
Finalize the uninstallation by deleting the complete IP-Symcon folder.
### Move Server Data
> **Warning:** The default folder should not be moved. However, in certain constellations it may be useful, e.g. for automatical backups.
The following steps are possible since version 6.0.
- Stop the IP-Symcon service
- Enter "regedit" in the Start Menu to open the registry editor
- Go to the path HKEY_LOCAL_MACHINE\SOFTWARE\WOW6432Node\IP-Symcon
- Create a new string here and name it "DataPath"
- Enter the new full path into the string "DataPath"
- Move the files from C:\ProgramData\Symcon to the new folder
- Verify that the folder C:\ProgramData\Symcon is either empty or does not exist any more
- Start the IP-Symcon service
From that time on, IP-Symcon starts from the new path.
> **Warning:** Extremely important: The folder C:\ProgramData\Symcon is required to be either not exist or be completely empty
## MacOS
Source: https://www.symcon.de/en/service/documentation/installation/macos/
> **Warning:** The installation is only possible with a valid subscription. However, an existing backup can be used to restore the software even without subscription. See [Change of Platform](https://www.symcon.de/en/llms/getting-started.md)
> **Warning:** A regular backup is recommended to ensure that your system is as current as possible in case of a defect. Even more, an active subscription is required to download IP-Symcon anew in case of a complete loss of data.
### Installation
#### System Requirements
The [version overview](https://www.symcon.de/en/llms/getting-started/system-requirements.md) shows which version of IP-Symcon is compatible with which MacOS version.
#### Installation
__Download:__ [Setup](https://download.symcon.de/stable/symcon/mac/i386)
Extract the ZIP file and copy its contents to the programs folder.
Start the program. Install service respectively and start.
The IP-Symcon WebFront should be reachable at http://ipadresse:3777/.
The IP-Symcon web based [Management Console](https://www.symcon.de/en/llms/components/management-console.md) can be called via http://ipadresse:3777/console/. Alternativly, the [Pro Console](https://www.symcon.de/en/llms/components/management-console.md) can be used.
#### Where is what?
* /Library/Application Support/Symcon (Settings, scripts, media...)
* /Library/Logs/Symcon (Logfiles...)
#### Set Remote Access Password
[Remote Access](https://www.symcon.de/en/llms/components/remote-access.md) provides a tutorial for configuring remote access.
### Update
The latest version can be downloaded and installed by clicking on the tray icon and choosing "Check for Updates ‑> Install Update". Once the installation is complete, the service needs to be stopped and restarted via the tray icon.

### Uninstallation
### Stopping Service/Server
The service can be stopped by clicking "Stop Service" in the context menu of the tray application.

#### Uninstall Service/Server
Via the "information" dialog the context menu can be opened. It should look like this:
__MacOS__

"Uninstall" removes the service from the system.
#### Delete IP-Symcon
To finalize the uninstallation, the complete IP-Symcon folder must be deleted or moved to the bin.
## Linux
Source: https://www.symcon.de/en/service/documentation/installation/linux/
> **Warning:** The installation is only possible with a valid subscription. However, an existing backup can be used to restore the software even without subscription. See [Change of Platform](https://www.symcon.de/en/llms/getting-started.md)
> **Warning:** A regular backup is recommended to ensure that your system is as current as possible in case of a defect. Even more, an active subscription is required to download IP-Symcon anew in case of a complete loss of data.
### Installation
#### Version Requirements
The [version overview](https://www.symcon.de/en/llms/getting-started/system-requirements.md) shows which version of IP-Symcon is compatible with which Linux version.
#### Preparation
Start with executing the following command and verify the correct time or set the time zone if needed
```php
date
```
If the time zone needs to be set
```php
sudo dpkg-reconfigure tzdata
```
#### Installation
```php
wget -qO- https://apt.symcon.de/install.sh | bash /dev/stdin
```
Execute the following commands:
```php
sudo apt-get update
sudo apt-get install symcon
```
The IP-Symcon WebFront should be reachable at http://ipadresse:3777/.
The IP-Symcon web based [Management Console](https://www.symcon.de/en/llms/components/management-console.md) can be called via http://ipadresse:3777/console/. Alternativly, the [Pro Console](https://www.symcon.de/en/llms/components/management-console.md) can be used.
#### Update
Update to the most current version:
```php
sudo apt-get update
sudo apt-get upgrade
```
#### How can I start and stop the IP-Symcon service?
```php
sudo /etc/init.d/symcon start
sudo /etc/init.d/symcon stop
sudo /etc/init.d/symcon restart
```
#### Where is what?
* /usr/bin/symcon - Executable
* /usr/share/symcon/ - Static Data (IP-Symcon installation)
* /var/lib/symcon/ - Variable Data (Settings, scripts, media...)
* /var/log/symcon/ - Log Files (Logfiles...)
#### How can I check if the service runs correctly?
```php
sudo ps x | grep symcon
```
#### How can I view/follow the log file?
tail -f /var/log/symcon/logfile.log
#### Set Remote Access Password
[Remote Access](https://www.symcon.de/en/llms/components/remote-access.md) provides a tutorial for configuring remote access.
#### Update
Update to the most current version:
```php
sudo apt-get update
sudo apt-get upgrade
```
#### How can I start and stop the IP-Symcon service?
```php
sudo /etc/init.d/symcon start
sudo /etc/init.d/symcon stop
sudo /etc/init.d/symcon restart
```
#### Where is what?
* /usr/bin/symcon - Executable
* /usr/share/symcon/ - Static Data (IP-Symcon installation)
* /var/lib/symcon/ - Variable Data (Settings, scripts, media...)
* /var/log/symcon/ - Log Files (Logfiles...)
#### How can I check if the service runs correctly?
```php
sudo ps x | grep symcon
```
#### How can I view/follow the log file?
```php
tail -f /var/log/symcon/logfile.log
```
#### Set Remote Access Password
[Remote Access](https://www.symcon.de/en/llms/components/remote-access.md) provides a tutorial for configuring remote access.
### Update
The following commands need to be used to update IP-Symcon to the newest version.
```php
sudo apt-get update
sudo apt-get upgrade
```
> **Note:** When updating from a version prior to 9.0, the new signing key needs to be downloaded once:
> wget -qO- https://apt.symcon.de/symcon.key | gpg --dearmor | sudo tee /usr/share/keyrings/symcon.gpg > /dev/null sudo chmod 644 /usr/share/keyrings/symcon.gpg
The service is terminated and rebooted automatically afterwards.
### Uninstallation
The IP-Symcon service needs to be terminated before uninstalling.
#### Terminate Service/Server
The command to terminate IP-Symcon server needs to be entered via console. This is identical for Linux and Raspberry Pi.
```php
sudo /etc/init.d/symcon stop
```

### Uninstall Service/Server
The shown command needs to be entered via console. This is identical for Linux and Raspberry Pi.
```php
sudo apt-get purge symcon
```

### Delete IP-Symcon
Finalize the uninstallation by deleting the complete IP-Symcon-Data folder (/var/lib/symcon).
## Raspberry Pi
Source: https://www.symcon.de/en/service/documentation/installation/raspberry-pi/
> **Warning:** The installation is only possible with a valid subscription. However, an existing backup can be used to restore the software even without subscription. See [Change of Platform](https://www.symcon.de/en/llms/getting-started.md)
> **Warning:** A regular backup is recommended to ensure that your system is as current as possible in case of a defect. Even more, an active subscription is required to download IP-Symcon anew in case of a complete loss of data.
### Installation
#### Version Requirements
The [version overview](https://www.symcon.de/en/llms/getting-started/system-requirements.md) shows which version of IP-Symcon is compatible with which Raspberry Pi version.
#### Preparation
Start with executing the following command and verify the correct time or set the time zone if needed
```php
date
```
If the time zone needs to be set
```php
sudo raspi-config
```
#### Installation
```php
wget -qO- https://apt.symcon.de/install.sh | bash /dev/stdin
```
Execute the following commands on the shell:
```php
sudo apt-get update
sudo apt-get install symcon
```
The IP-Symcon WebFront should be reachable at http://ipadresse:3777/.
The IP-Symcon web based [Management Console](https://www.symcon.de/en/llms/components/management-console.md) can be called via http://ipadresse:3777/console/. Alternativly, the [Pro Console](https://www.symcon.de/en/llms/components/management-console.md) can be used.
#### Update
Update to the most current version
```php
sudo apt-get update
sudo apt-get upgrade
```
#### How can I start and stop the IP-Symcon service?
```php
sudo /etc/init.d/symcon start
sudo /etc/init.d/symcon stop
sudo /etc/init.d/symcon restart
```
#### Where is what?
* /usr/bin/symcon - Executable
* /usr/share/symcon/ - Static Data (IP-Symcon installation)
* /var/lib/symcon/ - Variable Data (Settings, scripts, media...)
* /var/log/symcon/ - Log Files (Logfiles...)
#### How can I check if the service runs correctly?
```php
sudo ps x | grep symcon
```
#### How can I view/follow the log file?
```php
tail -f /var/log/symcon/logfile.log
```
#### Set Remote Access Password
[Remote Access](https://www.symcon.de/en/llms/components/remote-access.md) provides a tutorial for configuring remote access.
### Update
The following commands need to be used via terminal to update IP-Symcon to the newest version.
```php
sudo apt-get update
sudo apt-get upgrade
```
> **Note:** When updating from a version prior to 9.0, the new signing key needs to be downloaded once:
> wget -qO- https://apt.symcon.de/symcon.key | gpg --dearmor | sudo tee /usr/share/keyrings/symcon.gpg > /dev/null sudo chmod 644 /usr/share/keyrings/symcon.gpg
The service is terminated and rebooted automatically afterwards.
### Uninstallation
The IP-Symcon service needs to be terminated before uninstalling.
#### Terminate Service/Server
The command to terminate IP-Symcon server needs to be entered via console. This is identical for Linux and Raspberry Pi.
```php
sudo /etc/init.d/symcon stop
```

#### Uninstall Service/Server
The shown command needs to be entered via console. This is identical for Linux and Raspberry Pi.
```php
sudo apt-get purge symcon
```

#### Delete IP-Symcon
Finalize the uninstallation by deleting the complete IP-Symcon-Data folder (/var/lib/symcon).
## Docker
Source: https://www.symcon.de/en/service/documentation/installation/docker/
> **Warning:** The installation is only possible with a valid subscription.
> **Warning:** A regular backup is recommended to ensure that your system is as current as possible in case of a defect. Even more, an active subscription is required to download IP-Symcon anew in case of a complete loss of data.
> **Note:** There are specific installation instructions for [QNAP](https://www.symcon.de/en/llms/getting-started.md) and [Synology](https://www.symcon.de/en/llms/getting-started.md)
### Installation
#### Requirements
* Intel/AMD 64-Bit, ARM7, ARM64 CPU
* [Docker](https://www.docker.com/)
#### Hints
* As containers cannot be "updated", they need to be deleted and recreated in the new version. This does not cause complications as the data is stored outside of the container.
* Using KNX or HomeMatic requires the corresponding ports (KNX = 52000, HomeMatic = 5544) to be mapped. In addition, within the special switches NATSupport needs to be activated and the new property PublicIP needs to be set to the IP address of the Docker Host. If this is not done, no responses are received!
#### Limitations
* Currently, the language is set to de_DE
* Currently, the time zone is set to Europe/Berlin
* If the container should not run interactive but detached, the flag -d needs to be used
* Currently only port 3777 is mapped. If further ports are required, these need to be set as well!
#### Install
```php
docker pull symcon/symcon:stable
```
#### Start
```php
docker run --rm \
--name symcon \
--hostname symcon \
-p 3777:3777 \
-v /opt/symcon/data:/var/lib/symcon \
-v /opt/symcon/log:/var/log/symcon \
-v /opt/symcon:/root \
symcon/symcon:stable
```
The IP-Symcon WebFront should be reachable at http://ipadresse:3777/.
The IP-Symcon web based [Management Console](https://www.symcon.de/en/llms/components/management-console.md) can be called via http://ipadresse:3777/console/. Alternativly, the [Pro Console](https://www.symcon.de/en/llms/components/management-console.md) can be used.
### Update
1. Execute Install again
2. Execute Start again
* This will delete and recreate the container
* Data is stored outside the container and is persistant
### Comfortable Updates with Portainer
The tool "Portainer" helps with updating Docker containers and enables updating with the press of a button. The web based tool is available for free and can be installed as Docker container.
#### Install
```php
docker volume create portainer_data
docker run -d -p 9000:9000 -v /var/run/docker.sock:/var/run/docker.sock -v portainer_data:/data portainer/portainer
```
> **Note:** It may be required to run the command "docker run" as "sudo docker run"
After the installation, the interface as available under http://127.0.0.1:9000/. Eventually, the IP address needs to be adjusted. During the first configuration, a password needs to be defined and a connection needs to be established to the local server in a next step. After succesfull installation, the interface should look as shown below.

In the tab "Containers", the "symcon" container can be selected. The option "Recreate" enables a comfortable update. In this process, the container will be deleted, the new image downloaded, and installed with the same settings. Depending on the internet connection, this may take some minutes.

It is important, that the option "Pull latest image" is activated in the confirmation dialog.

After the update, the following message is displayed for a short time.

#### NATSupport for KNX and HomeMatic
Due to the container structure KNX and HomeMatic messages contain an IP address as response address that is used only internally and as such, responses could not be received as intended. To receive these messages correctly, NATSupport needs to be set up.
1. The [Special Switches](https://www.symcon.de/en/llms/developer/special-switches.md) "NATSupport" needs to be activated and IP-Symcon restarted afterwards.
2. The port of the affected system needs to be mapped to the container. For KNX, this is 52000 by default and for HomeMatic this is 5544 by default. So, for example, the port 52000 would need to be mapped to 52000 for KNX.
3. A new field "PublicIP" appears in the affected I/O or Splitter instances. The external IP of Docker needs to be entered here. For KNX, this needs to be set at the splitter "EIB Gateway" and for HomeMatic at the I/O "HomeMatic Socket".
## QNAP
Source: https://www.symcon.de/en/service/documentation/installation/qnap/
> **Warning:** The installation is only possible with a valid subscription.
> **Warning:** A regular backup is recommended to ensure that your system is as current as possible in case of a defect. Even more, an active subscription is required to download IP-Symcon anew in case of a complete loss of data.
### Installation
#### Requirements
* NAS with Container Station support
#### Install
* Open Container Station
* Search for symcon/symcon in the Docker Hub and install/create the image (choose a tag, e.g., latest)

* Choose a name and open Advanced Settings

* Adjust Share Settings (/root, /var/lib/symcon, /var/log/symcon need to be stated!)

* Adjust Network Settings (3777 to 3777 TCP)

* Confirm with Create to create and start the container
The IP-Symcon WebFront should be reachable at http://ipadresse:3777/.
The IP-Symcon web based [Management Console](https://www.symcon.de/en/llms/components/management-console.md) can be called via http://ipadresse:3777/console/. Alternativly, the [Pro Console](https://www.symcon.de/en/llms/components/management-console.md) can be used.
### Update
Updating requires the removal and recreation of the container, as described under [Install](https://www.symcon.de/en/llms/getting-started.md). The tool "Portainer" can significantly simplify updating. A tutorial can be found in the [Docker Area](https://www.symcon.de/en/llms/getting-started.md) .
### Uninstallation
For the uninstallation, the container needs to be stop and removed afterwards. The linked directories for the files need to be removed manually.
### Hints
#### NATSupport for KNX and HomeMatic
Due to the container structure KNX and HomeMatic messages contain an IP address as response address that is used only internally and as such, responses could not be received as intended. To receive these messages correctly, NATSupport needs to be set up.
1. The [Special Switches](https://www.symcon.de/en/llms/developer/special-switches.md) "NATSupport" needs to be activated and IP-Symcon restarted afterwards.
2. The port of the affected system needs to be mapped to the container. For KNX, this is 52000 by default and for HomeMatic this is 5544 by default. So, for example, the port 52000 would need to be mapped to 52000 for KNX.
3. A new field "PublicIP" appears in the affected I/O or Splitter instances. The external IP of Docker needs to be entered here. For KNX, this needs to be set at the splitter "EIB Gateway" and for HomeMatic at the I/O "HomeMatic Socket".
## Synology
Source: https://www.symcon.de/en/service/documentation/installation/synology/
> **Warning:** The installation is only possible with a valid subscription.
> **Warning:** A regular backup is recommended to ensure that your system is as current as possible in case of a defect. Even more, an active subscription is required to download IP-Symcon anew in case of a complete loss of data.
### Installation
#### Requirements
* NAS with Container Manager support
#### Install
* Search for Symcon in the registry and download the image (choose a tag, e.g., latest)

* Choose the new image under Image and click Start
* Choose a name

* Adjust the Volume Settings (/root, /var/lib/symcon, /var/log/symcon need to be stated!)

* Adjust Port Settings (3777 to 3777)

* Confirm with OK, click Next and start the container with Apply
The IP-Symcon WebFront should be reachable at http://ipadresse:3777/.
The IP-Symcon web based [Management Console](https://www.symcon.de/en/llms/components/management-console.md) can be called via http://ipadresse:3777/console/. Alternativly, the [Pro Console](https://www.symcon.de/en/llms/components/management-console.md) can be used.
### Update
Updating requires the removal and recreation of the container, as described under [Install](https://www.symcon.de/en/llms/getting-started.md). The tool "Portainer" can significantly simplify updating. A tutorial can be found in the [Docker Area](https://www.symcon.de/en/llms/getting-started.md) .
### Uninstallation
For the uninstallation, the container needs to be stop and removed afterwards. The linked directories for the files need to be removed manually.
### Hints
#### NATSupport for KNX and HomeMatic
Due to the container structure KNX and HomeMatic messages contain an IP address as response address that is used only internally and as such, responses could not be received as intended. To receive these messages correctly, NATSupport needs to be set up.
1. The [Special Switches](https://www.symcon.de/en/llms/developer/special-switches.md) "NATSupport" needs to be activated and IP-Symcon restarted afterwards.
2. The port of the affected system needs to be mapped to the container. For KNX, this is 52000 by default and for HomeMatic this is 5544 by default. So, for example, the port 52000 would need to be mapped to 52000 for KNX.
3. A new field "PublicIP" appears in the affected I/O or Splitter instances. The external IP of Docker needs to be entered here. For KNX, this needs to be set at the splitter "EIB Gateway" and for HomeMatic at the I/O "HomeMatic Socket".
## SymBox
Source: https://www.symcon.de/en/service/documentation/installation/symbox/
> **Warning:** The installation is only possible with a valid subscription. However, an existing backup can be used to restore the software even without subscription. See [Change of Platform](https://www.symcon.de/en/llms/getting-started.md)
> **Warning:** A regular backup is recommended to ensure that your system is as current as possible in case of a defect. Even more, an active subscription is required to download IP-Symcon anew in case of a complete loss of data.
### Installation/Update/Reset
For more informations see the [Installation manual](https://www.symcon.de/assets/files/product/symbox-en.pdf) .
## Catan
Source: https://www.symcon.de/en/service/documentation/installation/catan/
Important installation notes
The WBM is most easily accessed by connecting the Catan C1 to the PC via USB and then opening https://169.254.252.10/.
The Catan C1 currently does not support DHCP. Therefore, the IP address and gateway must be set manually. We recommend using the LAN1/LAN2 network ports (top sockets). The gateway is usually at .1. That means if your IP address is 192.168.178.250, then the gateway would be 192.168.178.1.
Before installing the Symcon app, it is mandatory to install the current firmware (version 2026.0.3 LTS). It is available for download on the Phoenix Contact website (Controller Catan C1) in the Firmware section. Installation is performed in the WBM under "System -> Update".
A prerequisite for installing the Symcon app is that the switch under "App Management -> Configuration -> Allow only signed apps" is disabled, as the Symcon app does not yet have a signature.
After installing the Symcon app, configuring the firewall under "Security -> Firewall" is recommended to ensure functionality after the PLCnext update to 2026.6, which enables the firewall by default. For this, create a new rule under "IP Input Rules" with "To Port" set to "3777" and the comment "Symcon". Depending on the system used, additional ports may need to be opened. Alternatively, the firewall can be disabled after the PLCnext update to 2026.6.
If a "Timeout" error appears while setting the license, it is very likely that the gateway is not configured correctly or internet access is blocked by the company firewall.
If the message "SSL peer certificate or SSH remote key was not OK: SSL certificate problem: certificate is not yet valid" appears while setting the license, the system time is incorrect. In this case, check in the WBM under "Configuration -> Date&Time" whether at least one NTP server is configured and set to Active. Date and time are displayed at the top of the same page and should be current. If no NTP server is configured or it is not active, create a new server (for example, "pool.ntp.org"). Due to a current WBM bug, activation is currently only possible in Firefox.
If problems occur during installation, support is always available to assist with the initial setup.
### Installation
> **Note:** Symcon can also be purchased and installed via the [PLCnext Store](https://plcnextstore.com).
__Download:__ [Appfile (64-Bit)](https://download.symcon.de/stable/symcon/catan/arm64)
Symcon is installed as a PLCnext Technology App. The installation is carried out in WBM under Settings -> App Management. The option "Only allow signed apps" must first be deactivated under Configuration. The Symcon app file can now be installed using the corresponding button.
Once the process is complete, the web-based [Management console](https://www.symcon.de/en/llms/components/management-console.md) can be accessed via http://ipadresse:3777/console/. There you can change the [License](https://www.symcon.de/de/service/dokumentation/installation/lizenz-aendern/#Lizenz_ändern) in the information menu at the top right.
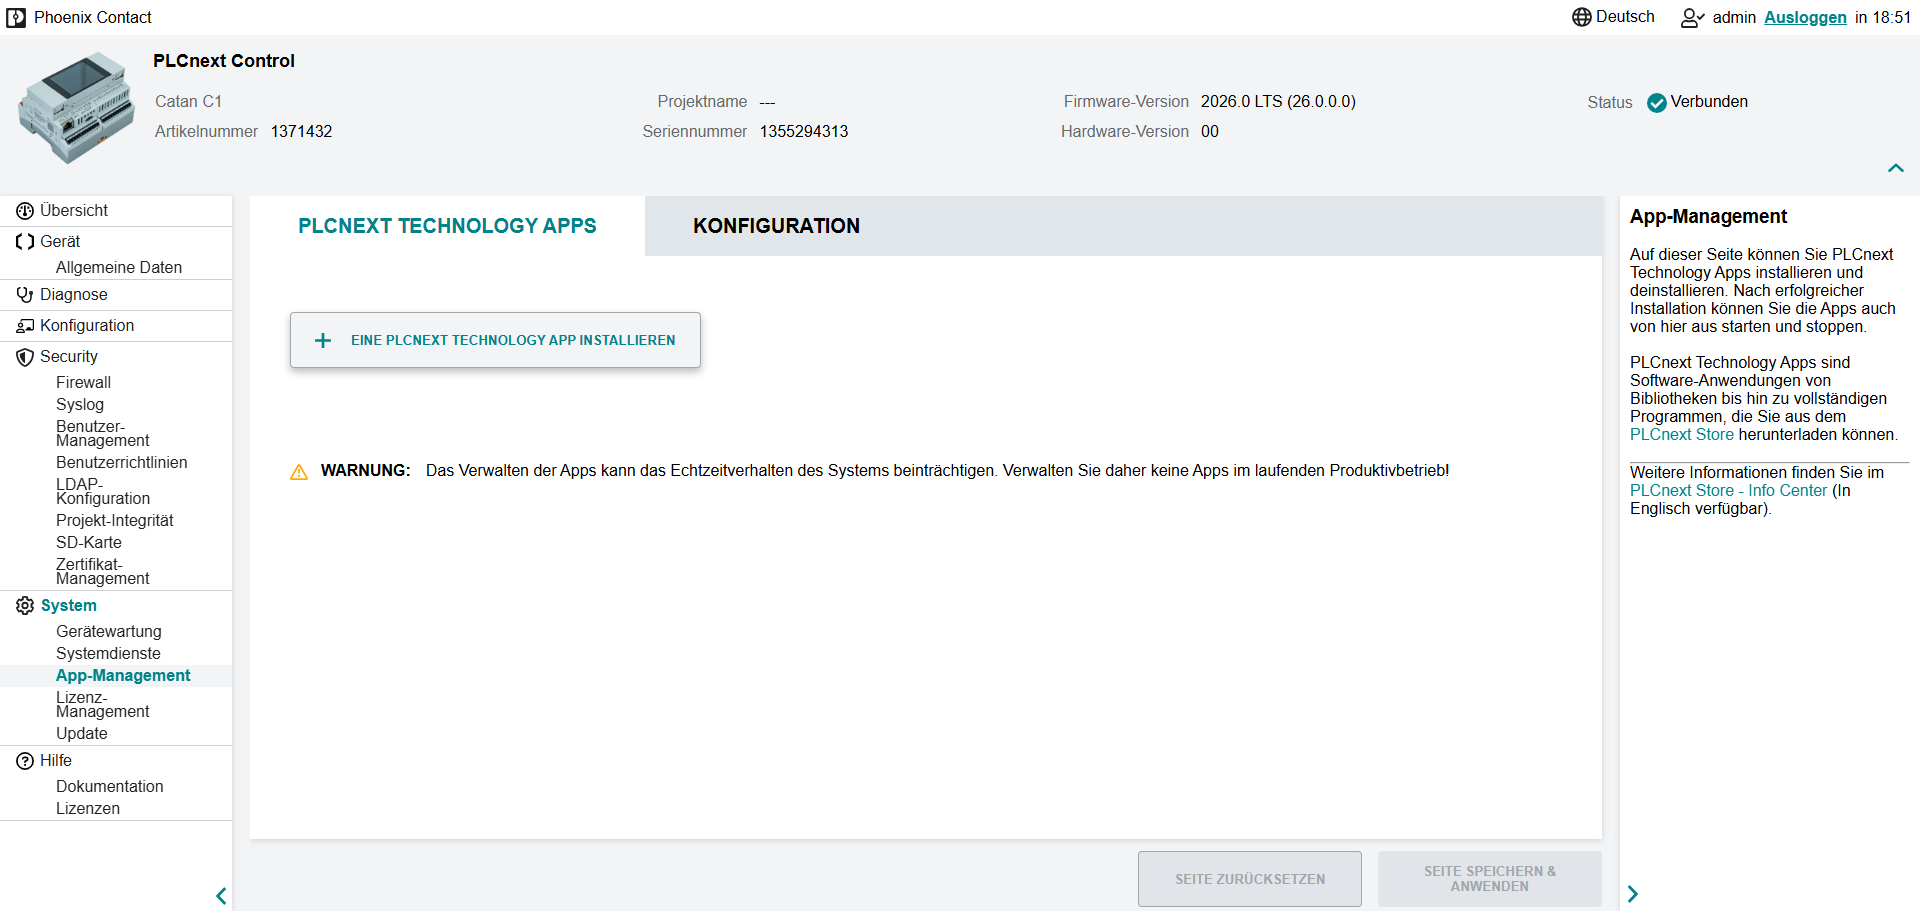
A description of the special functions can be found [here](https://www.symcon.de/en/llms/modules/catan.md).
### Update
__Current version:__ [App file (64-bit)](https://download.symcon.de/stable/symcon/catan/arm64)
To install an update, the .app file of the latest version must be reinstalled. Symcon is restarted during the installation. All data is retained.
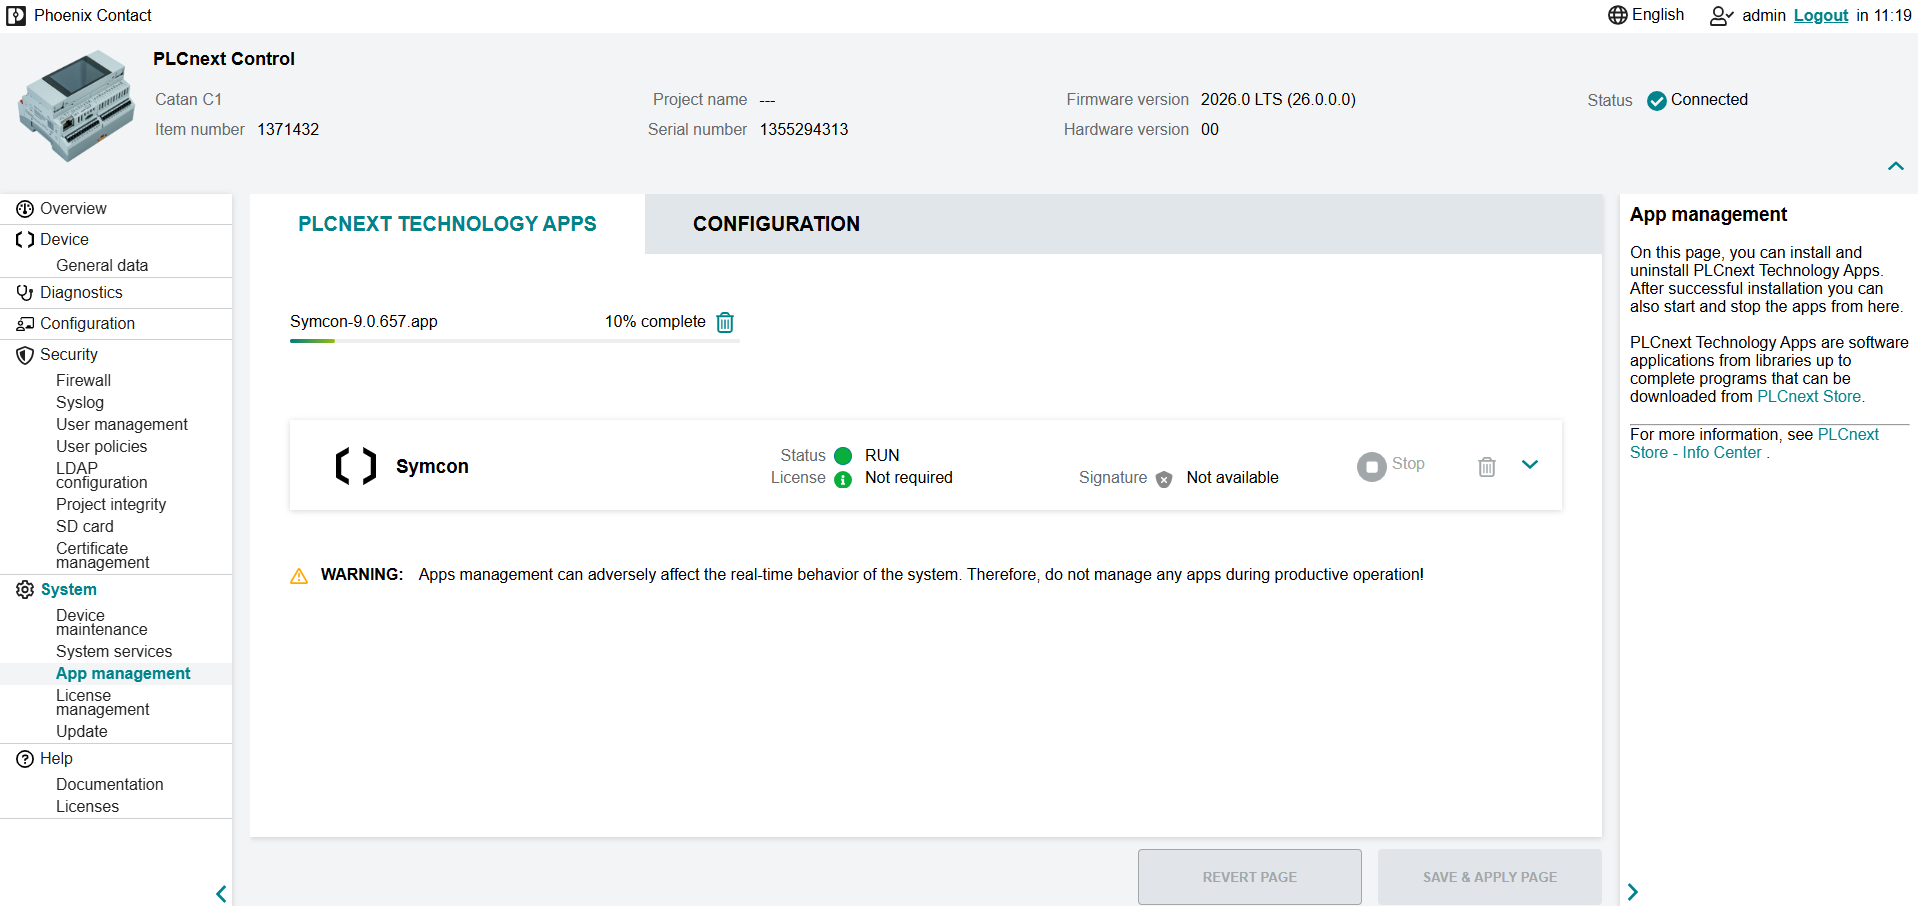
### Where_is_what
#### Where is what?
* /opt/plcnext/apps/home/data/60002171301055/data/ - Variable Data (Settings, scripts, media...)
* /tmp/appsdata/60002171301055/logs/ - Log Files (Logfiles...)
### Uninstall
Symcon can be uninstalled via the WBM under Settings -> App Management. To do this, the Symcon app must be selected. The uninstallation can be started via the trash can icon. All data will be lost when uninstalling.
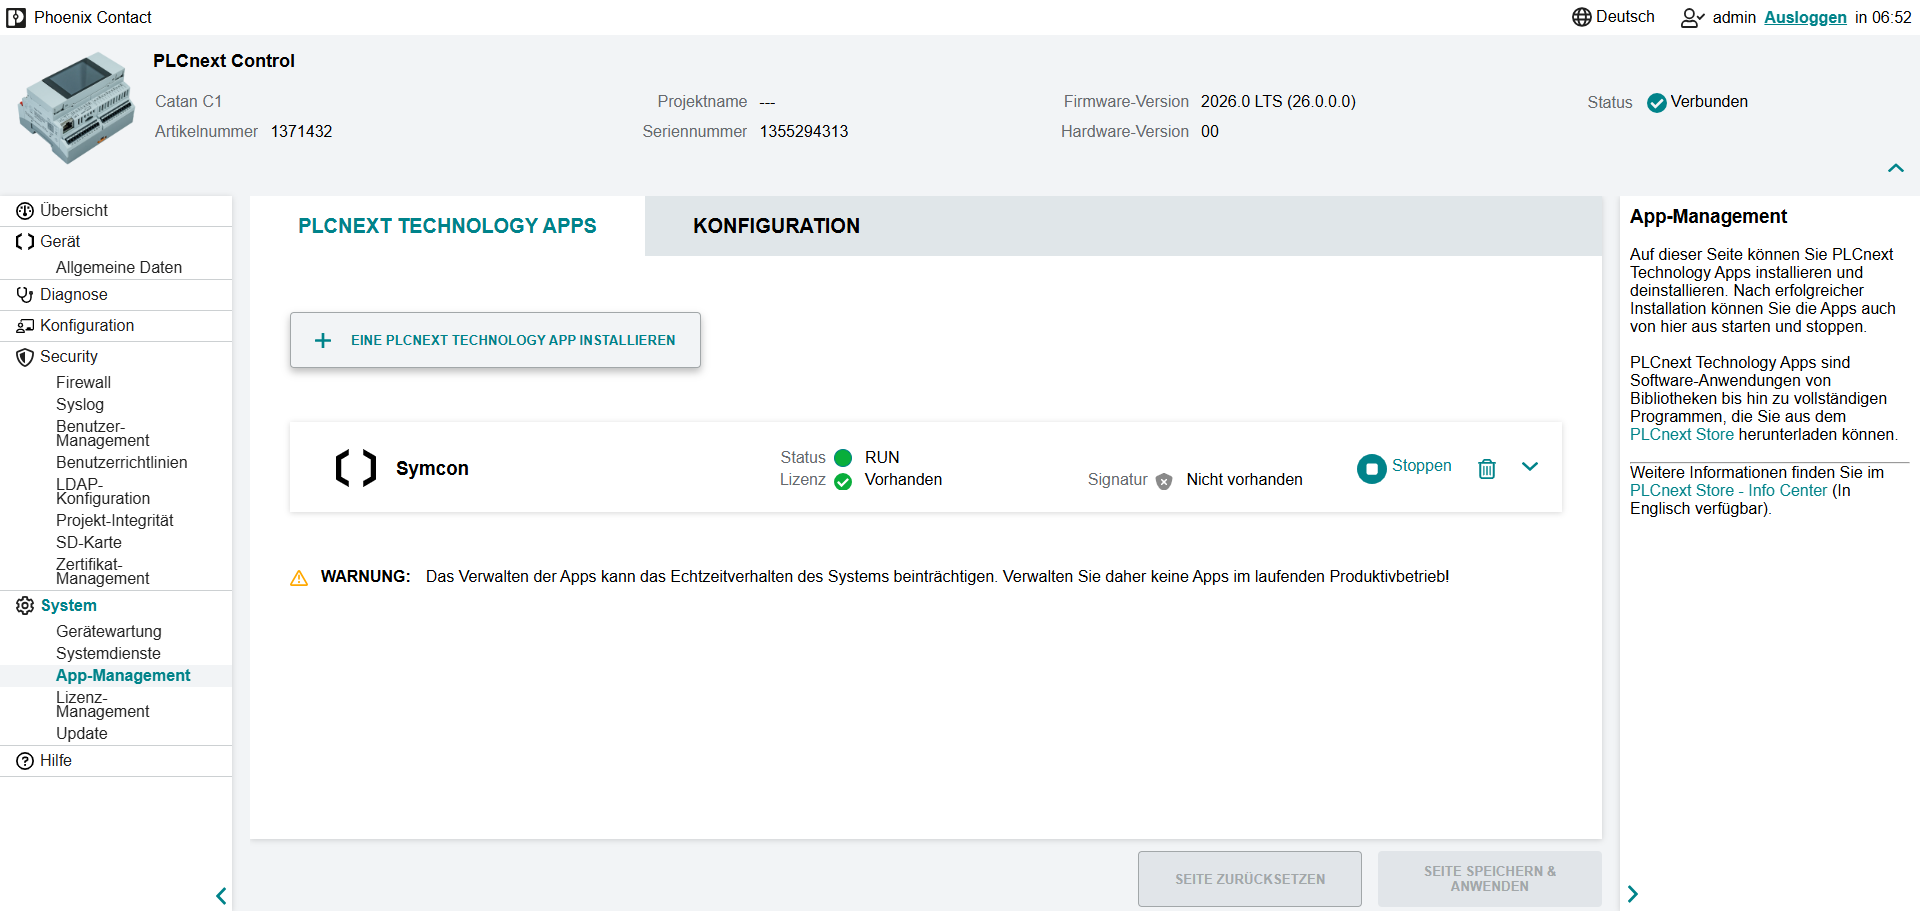
## Firewall
Source: https://www.symcon.de/en/service/documentation/installation/firewall/
In order for IP-Symcon to be able to communicate with the various services from the Internet, the following settings must be made on a firewall.
### Recommended settings
| Address | Port | Protocol | Function |
| --------------------------------------- | ----- | -------- | ------------------------------------------------------------------------------------ |
| apt.symcon.de | 443 | TCP | Installation, Updates |
| api.symcon.de | 443 | TCP | Module Store, Personal area |
| symcon-store.s3.eu-west-1.amazonaws.com | 443 | TCP | Module Store (Data) |
| live.symcon.de | 443 | TCP | Installation, updates, connect, push notifications, display of the subscription term |
| zwdb.symcon.de | 443 | TCP | Z-Wave device database |
| dwd.symcon.de | 443 | TCP | WebFront DWD weather |
| ipmagic.de | 50000 | TCP | IP-Symcon Connect |
| github.com | 443 | TCP | Module Control (sofern genutzt) |
### Settings only relevant to SymBox
| Address | Port | Protocol | Function |
| ---------- | ----- | -------- | ------------------- |
| ipmagic.de | 60000 | TCP | SymOS Connect |
| ipmagic.de | 53671 | TCP | SymOS Connect (KNX) |
| ipmagic.de | 53672 | TCP | SymOS Connect (KNX) |
| ipmagic.de | 54114 | TCP | SymOS Connect (LCN) |
### CloudFront-Edge-Server
The *.symcon.de addresses are mapped via AWS in the EU West 1 zone (Ireland). The endpoints terminate on AWS CloudFront and have a TTL of 60 seconds. In the case of dynamic resolution, it must therefore be ensured that the firewall determines the currently used IP addresses often enough.
Current lists of the IP addresses used can be found here: [Locations and IP address ranges of CloudFront edge servers](https://docs.aws.amazon.com/de_de/AmazonCloudFront/latest/DeveloperGuide/LocationsOfEdgeServers.html)
## Change of Platform
Source: https://www.symcon.de/en/service/documentation/installation/change-of-platform/
A change of platform is possible without any problems. No data or settings are lost in the process.
### Steps for a Change of Platform
The following steps need to be executed to change from an initial platform to a target platform.
* Install IP-Symcon on the target platform.
* Terminate IPS service on the initial and the target platform.
* [Create backup](https://www.symcon.de/en/llms/getting-started.md) on the initial platform.
* Use [Load backup](https://www.symcon.de/en/llms/getting-started.md) to integrate the produced backup on the target platform.
* Start the service on the target platform.
> **Warning:** Watch out for the IP-Symcon versions of the initial and the target platform. If the versions are different, migrations need to be done eventually. For example, changing from version 3.4 to a higher version is impossible otherwise.
## License Management
Source: https://www.symcon.de/en/service/documentation/installation/change-license/
### License Management
For easier handling and overview, it is possible to manage your license at the homepage in the License Management.
Among others, the remaining duration of a subscription can be checked or the license file can be sent again in the License Management.
The License Management can be found in the [Personal Area](https://account.symcon.de/) . This can be reached via the person icon on the top right of the homepage. After logging in, the License Management can be opened.

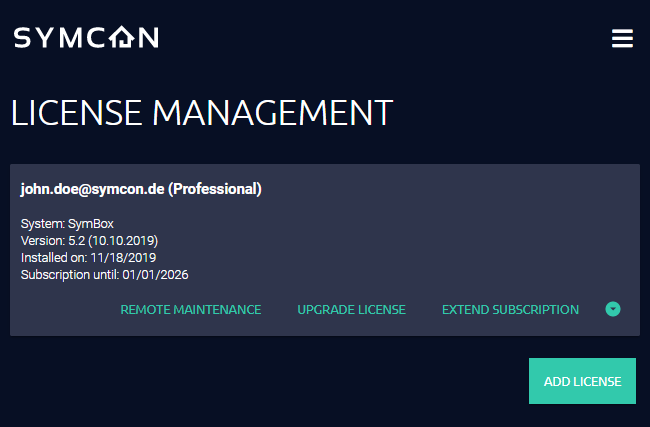
> **Warning:** The accounts of forum and homepage are currently separate. Combining these accounts is planned in the future.
### Change License
> **Warning:** After any change to the license, the IP-Symcon Service needs to be restarted.
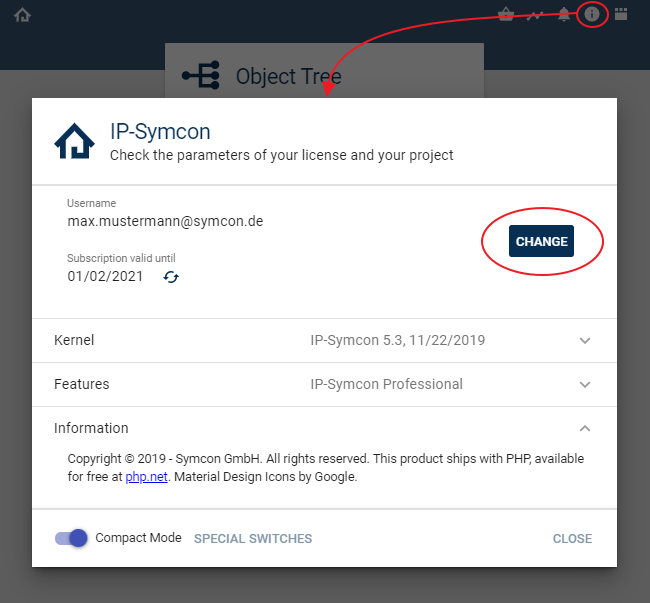
#### Since Version 5.0
The license can be changed in the [Management Console](https://www.symcon.de/en/llms/components/management-console.md) in the information dialog.
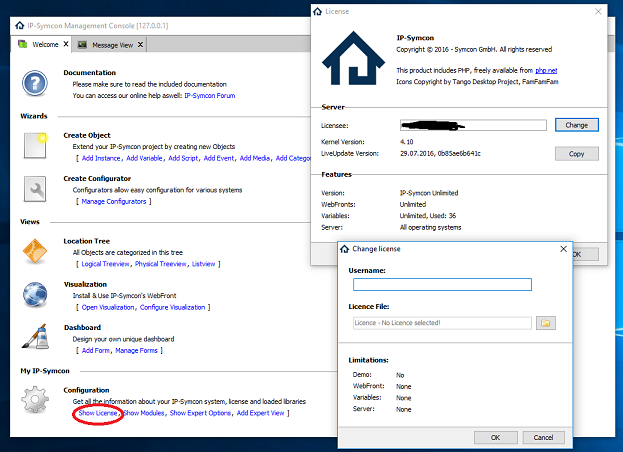
#### From Version 4.0 up to Version 4.4
The license can be changed in the [management console](https://www.symcon.de/en/llms/components/management-console.md) in "My IP-Symcon -> Show License".
#### Up to Version 3.4
A new license that was obtained due to a license upgrade can be entered by choosing the option "Information" in the context menu of the tray application. The context menu can be launched with a right click on the tray application.
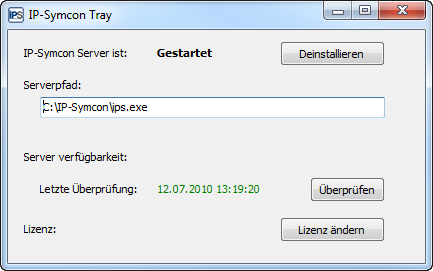
The button "Change license" can open the dialog. Here, the user name and the new license file can be chosen. After confirmation, the new license is stored. Restart the IP-Symcon service to activate the new license.
## Security
Source: https://www.symcon.de/en/service/documentation/security/
IP-Symcon includes diverse security features that set a password or a special service for different sections. Read this article carefully to prevent illegal external access.
> **Note:** The factory settings are only secure while IP-Symcon cannot be accesses externally. If IP-Symcon should be accessible externally some settings need to be adjusted accordingly!
### Remote Access (Password)
__Factory Settings:__ _deactivated_ (secure)
The management of IP-Symcon can be accessed remotely via the management console. Direct access from the outside of the local network is only possible when a password is set.
Further informations: [Set Remote Access](https://www.symcon.de/en/llms/components/remote-access.md)
### Connect Service
__Factory Settings:__ _activated_ (secure)
The Connect service can access the management console and the visualization comfortably from outside when a subscription is active.
The visualization may only be accessed when a password was previously set or the visualization was explicitly marked as public.
The management console can access the configuration only when a password is set for [remote access](https://www.symcon.de/en/llms/components/remote-access.md) .
Further informations: [Connect Control](https://www.symcon.de/en/llms/modules/connect-control.md)
### Visualization (Password)
__Factory Settings:__ _deactivated_ (secure)
The factory settings allow access to the visualization without password in internal networks. A set password secures the webbased visualization and the mobile apps. A password or explicit clearance is required if the visualization should be accessible from the Connect service or be accessible from the outside.
Further informations:[Tile-Visualizations Security](https://www.symcon.de/en/llms/components/tile-visualization.md) / [WebFront-Visualizations Security](https://www.symcon.de/en/llms/components/webfront-visualization.md)
> **Note:** Requests from the following networs are considered internal ([Private IP Adresses](https://en.wikipedia.org/wiki/Private_network#Private_IPv4_addresses)). For internal networks no visualization password is required, if the option "Require password only for external connections" is enabled. If connections are being routed through a NAT it is recommended to leave this options disabled.
### User Folder (User Name/Password)
__Factory Settings:__ _deactivated_ (insecure)
If the User folder contains individual content it is recommended the secure the content. Usage of the User folder is strongly discouraged.
Further informations: [User Folder Security](https://www.symcon.de/en/llms/modules/webserver.md)
### SymOS (Password)
__Factory Settings:__ _activated_ (secure)
SymOS is the operating system of the SymBox. It is possible to protect the access to its web surface via password. The web surface can set the password. If the SymOS surface should be available externally setting a password is urgently recommended.
Further informations: [SymBox Tutorial PDF - Chapter 4.4.6. Security](https://www.symcon.de/assets/files/product/symbox-en.pdf)
### SymOS Connect
__Factory Settings:__ _activated_ (secure)
Via SymOS Connect it is possible to connect to the SymOS operating system. The external connection is in general only possible if a SymOS password is set.
> **Note:** Some functions require internet access and a properly configured [Firewall](https://www.symcon.de/en/llms/getting-started.md).
## Backup & Restore
Source: https://www.symcon.de/en/service/documentation/backup-and-restore/
Two different kinds of backups are possible.
__Backup:__ A backup that stores all relevant user data like media files, scripts, databases, etc.
__settings.json:__ The configuration file is the core element in every installation of IP-Symcon. The file is saved automatically.
### Backup
A backup will include all relevant user data. A complete backup is not done automatically.
Creating and loading a backup is explained in [Create Backup](https://www.symcon.de/en/llms/getting-started.md) and [Restore Backup](https://www.symcon.de/en/llms/getting-started.md).
### Automatical backup of the configuration file (settings.json)
The file "settings.json" in the IP-Symcon folder contains all relevant settings of IP-Symcon. The file is the core element of the configuration. A copy of the file is stored in the folder "backup" every day at 0:00 and can be accessed in case of an error. A maximum of 25 files are stored in the folder. When the limit is exceeded, the oldest file is deleted.
The backup of the file is automatically stored with the name "settings1234567890.json", where "1234567890" is replaced with the current Unix timestamp. Thus, the highest number corresponds to the most current backup.
> **Warning:** The automatical backup of the configuration file does not replace a regular complete backup. See [Create backup](https://www.symcon.de/en/llms/getting-started.md)
### Restore configuration file (settings.json) in case of an error
Different circumstances can cause errors, e.g.:
* Unwanted modifications (e.g., wrong instances, deleted variables, ...)
* The settings are unexpectedly "lost", "deleted", or "empty". (In most cases, this is caused by an unexpected termination of the software, e.g., in case of a power outage)
To restore the configuration file the following steps are necessary:
* Terminate the IP-Symcon service
* Copy any "settings1234567890.json" from the folder "backup" into the main folder (e.g., the file with the highest number in the file name)
* Delete the current "settings.json"
* Rename the copied "settings1234567890.json" into "settings.json"
* Start the IP-Symcon service again
> **Note:** If the chosen backup of the configuration file does not work, try another backup. If no backup works, ask for help in the forum. When you ask for help, you need to attach __at least one logfile__. Posts without logfiles cannot be processed.
### How often is a backup file written?
Since version 4.0, IP-Symcon has various mechanisms to minimize the write cycles.
This is required if the IP-Symcon is operated on storage media that are showing signs of wear.
This is the case, for example, with a Raspberry Pi with an SD card.
### Media and settings.json
In general, the settings.json is saved cyclically every 10 minutes (see [special switch](https://www.symcon.de/en/llms/developer/special-switches.md)) and when the service starts/stops.
Media files (e.g. from Image Grabber) are cached and are only written at start/stop.
### Variable Raw Data and Aggregation
IP-Symcon writes variable raw data, which is saved in the archive, to the hard disk every minute. Since these are constantly growing datasets this is intended. In turn, the aggregation data is only written if an aggregation period is complete. The respective incomplete aggregation periods are restored at startup from the variable raw data. For this reason, starting with many archived variables also takes a little longer.
### Logfiles
Log files, which cause the majority of write cycles, are handled differently depending on the system. Normally these end up on the hard drive. However, the SymOS on the SymBox maps /var/log/symcon to a RAM drive, which means that the storage medium is not worn out unnecessarily and the longevity is extended.
## Restore Backup
Source: https://www.symcon.de/en/service/documentation/backup-and-restore/restore-backup/
If your installation of IP-Symcon is in a non-repairable state, it is possible to load a backup. Backups can also be used to move from one platform to another.
### Change to another platform
The structure of the backup is independent of the system and thus can be used to move IP-Symcon from one platform to another.
> **Warning:** When changing from IP-Symcon <=3.4 to IP-Symcon 4.0 or higher, the database needs to be converted into the new CSV format by using the Windows installer. Afterwards, the backup can be migrated to the new platform.
#### Load Backup
SymOS (SymBox)
Windows (Desktop/Server)
MacOS
Linux (Ubuntu)
Raspberry Pi
Docker/Synology/QNAP
Catan C1
##### SymOS - Load Backup
The backup can be chosen on the web interface in "Settings -> Backup". Afterwards, IP-Symcon (NOT SymOS) needs to reboot. For further informations, see [4.4.4 Backup](https://www.symcon.de/assets/files/product/symbox-en.pdf)
##### Windows - Load Backup
The setup automatically installs the required redistibutables. If IP-Symcon was copied into the system some required redistibutables may be missing. The required redistibutables are:
* [Visual Studio 2015/2017/2019 C++ Redistributable x64](https://learn.microsoft.com/en-us/cpp/windows/latest-supported-vc-redist?view=msvc-170) ([Direct Download](https://download.visualstudio.microsoft.com/download/pr/b929b7fe-5c89-4553-9abe-6324631dcc3a/296F96CD102250636BCD23AB6E6CF70935337B1BBB3507FE8521D8D9CFAA932F/VC_redist.x64.exe) )
* Bonjour64 Installer ([Direct Download](https://data.symcon.de/Bonjour64.msi) )
The following steps need to be executed to load the backup:
* Stop the IP-Symcon service. (Right click on tray icon -> "Stop Service")
* Extract the backup.zip into the folder C:\ProgramData\Symcon
* The easiest way to access the folder is via "Right click on the tray icon -> Information -> Server Data -> Open"
* Restart the IP-Symcon service. (Right click on tray icon -> "Start Service")
##### MacOS - Load Backup
* Stop the IP-Symcon service.
* Move the backup.zip file into the folder "/Library/Application Support/Symcon" and extract via double click.
* Delete the archive and restart the IP-Symcon service.
##### Linux - Load Backup
Stop the IP-Symcon service:
```php
sudo /etc/init.d/symcon stop
```
Extract the file backup.zip in the home folder into the folder "/var/lib/symcon/":
```php
sudo unzip backup.zip -d /var/lib/symcon/
```
Restart the IP-Symcon service:
```php
sudo /etc/init.d/symcon start
```
##### Raspberry Pi - Load Backup
Stop the IP-Symcon service:
```php
sudo /etc/init.d/symcon stop
```
Extract the file backup.zip in the home folder into the folder "/var/lib/symcon/":
```php
sudo unzip backup.zip -d /var/lib/symcon/
```

Restart the IP-Symcon service:
```php
sudo /etc/init.d/symcon start
```
##### Docker/Synology/QNAP - Load Backup
First, the IP-Symcon container needs to be stopped. It can be stopped via the container management of the used system.
Afterwards, the mounted IP-Symcon folder which references the folder "/var/lib/symcon" needs to be opened.
The volume on which the folder was "mounted" can be seen in the settings of the image. According to the installation tutorial, the default is in the format "/Symcon/[MeinIPSymcon]/Data".
Extract the backup and copy it into the folder.
Restart the IP-Symcon container.
##### Catan C1 - Load Backup
* Stop the Symcon App. The app can be stopped in WBM under Settings -> App Management.
* If a ZIP file from another system is available, extract it into a folder first.
* Copy all files via [WinSCP](https://winscp.net/eng/download.php) into the following folder:
```php
/opt/plcnext/apps/home/data/60002171301055/data/
```
* Make sure that settings.json is exactly in the data/ folder and not in a further subfolder.
* Start the Symcon App.
#### Hints
The following things should be checked and adjusted eventually:
* The [server needs to be reactivated](https://www.symcon.de/en/llms/modules/notification-control.md) for Push notifications
* Absolute paths in scripts and media files
* Occupied interfaces (e.g., serial ports) on the new system
* IP adresses like the 'Event Server' for the HomeMatic CCU or 'WebServer'
* Required additional programs, drivers, or services (e.g., _BidCOS_)
## Create Backup
Source: https://www.symcon.de/en/service/documentation/backup-and-restore/create-backup/
A backup stores all user files. It should be created within regular intervals.
### Create Backup
SymOS (SymBox)
Windows (Desktop/Server)
MacOS
Linux (Ubuntu)
Raspberry Pi
Docker/Synology/QNAP
Catan C1
#### SymOS - Create Backup
Start the web surface, enter the menu "Settings", and click "Backup". The folder structure is created automatically and backup.zip is downloaded. Further informations can be found within the manual of the SymBox under [4.4.4 Backup](https://www.symcon.de/assets/files/product/symbox-en.pdf).
#### Windows - Create Backup
The whole content of the folder C:\ProgramData\Symcon needs to be compressed as backup.zip.
1. Stop the Service via Tray Icon.
2. Open the Data folder via "Tray Icon -> Information -> Server Data -> Open" and select all files and folders.
3. Compress the files via "Right click -> Send to -> Compressed (zipped) folder" to create a .zip file. The file needs to be renamed to backup.zip.
4. The backup should be copied or moved to an appropriate medium.
5. Start the Service via Tray Icon.
> **Note:** If a message about empty folders appears while creating the Zip file, it can be ignored safely. Missing empty folders are created by IP-Symcon on demand.

#### MacOS - Create Backup
The whole content of the folder "/Library/Application Support/Symcon" needs to be compressed as backup.zip.
1. Stop the IP-Symcon Service.
2. Select "Finder -> Go to -> Go to folder" and enter the path "/Library/Application Support/Symcon".
3. Mark all required folders and files in the opened folder (usually all files and folders).
4. An Archive.zip is created on the desktop via "Clipboard -> Compress X objects".
5. Rename the file into backup.zip.
6. The backup should be copied or moved to an appropriate medium.
7. Start the IP-Symcon Service.
#### Linux - Create Backup
The whole content of the folder "/var/lib/symcon" needs to be compressed as backup.zip.
__zip may need to be installed.__
```php
sudo apt-get install zip
```
__First, stop the IP-Symcon Service.__
```php
sudo /etc/init.d/symcon stop
```
__Go to the Symcon folder and compress the folder.__
```php
cd /var/lib/symcon/ //Go to IP-Symcon folder
zip -r ~/backup.zip * //Compress the whole folder into backup.zip
```
The backup.zip is stored in the home folder. It can be copied or moved anywhere.
__Start the IP-Symcon Service.__
```php
sudo /etc/init.d/symcon start
```
#### Raspberry Pi - Create Backup
The whole content of the folder "/var/lib/symcon" needs to be compressed as backup.zip.
__zip may need to be installed.__
```php
sudo apt-get install zip
```
__First, stop the IP-Symcon Service.__
```php
sudo /etc/init.d/symcon stop
```
__Go to the Symcon folder and compress the folder.__
```php
cd /var/lib/symcon/ //Go to IP-Symcon folder
zip -r ~/backup.zip * //Compress the whole folder into backup.zip
```

The backup.zip is stored in the home folder. It can be copied or moved anywhere.
__Stop the IP-Symcon Service.__
```php
sudo /etc/init.d/symcon start
```
#### Docker/Synology/QNAP - Create Backup
The whole content of the folder "/var/lib/symcon" needs to be compressed as backup.zip.
As an example we use a Synology system.
__First, stop the IP-Symcon container.__
The container needs to be stopped via the container management of the used system.
__Afterwards, the mounted Symcon folder needs to be opened to pack the folder.__
The volume on which the folder was "mounted" can be seen in the settings of the image. According to the installation tutorial, the default is in the format "/Symcon/[MeinIPSymcon]/Data".
Finally, select all content and select "Compress" via right click.

The backup.zip is stored on the file system and can be downloaded.
__Start the IP-Symcon container.__
#### Catan C1 - Create Backup
* Stop the Symcon App. The app can be stopped in WBM under Settings -> App Management.
* Copy all files via [WinSCP](https://winscp.net/eng/download.php) from the following folder:
```php
/opt/plcnext/apps/home/data/60002171301055/data/
```
* Compress all files into a ZIP file to transfer them to another target system.
* Start the Symcon App.
> **Note:** The "session" folder sometimes cannot be copied. This problem can be safely ignored
---
# System Requirements
> Symcon documentation · English · generated on 2026-09-26
> Index: https://www.symcon.de/en/llms.txt
Source: https://www.symcon.de/en/service/documentation/introduction/system-requirements/
### Hardware
A system with one of the listed operating systems is required to use IP-Symcon. In addition, a LAN connection is vital for most gateways. Energy saving components are recommended as the system is permanently active. Our own [SymBox](https://www.symcon.de/en/product/symbox/) is also suitable for most projects.
### Software
IP-Symcon can be configured as server on most operating systems. A special app for mobile operating systems (iOS, Android) presents the visualization that is provided by the IP-Symcon server.
A complete list of the compatibility between IP-Symcon versions and operating systems is available in the [version overview](https://www.symcon.de/en/llms/getting-started/system-requirements.md).
### Limitations of different operating systems
#### Limitations to SymBox, Raspberry Pi, Linux, MacOS, and NAS systems
* The compatibility functions are deactivated by default. See [special switches](https://www.symcon.de/en/llms/developer/special-switches.md) for reactivation, if you need compatibility with IP-Symcon 3.4 or older.
* No [MediaPlayer](https://www.symcon.de/en/llms/modules/amazon-alexa.md) (currently only in Windows)
* [Text to Speech](https://www.symcon.de/en/llms/modules/text-to-speech.md): The TTS module can currently only be started within a Windows environment. Alternatively, the module "Text To Speech (AWS Polly)" from the Module Store can be used. It works for all operating systems.
* [System Information](https://www.symcon.de/en/llms/concepts/automations.md): The function [Sys_GetSpooler](https://www.symcon.de/en/llms/concepts/automations.md) is only available in Windows.
## Version Overview
Source: https://www.symcon.de/en/service/documentation/introduction/system-requirements/version-overview/
* Version Policy
* Version 9.0
* Version 8.1
* Version 8.0
* Version 7.2
* Version 7.1
* Version 7.0
* Version 6.4
* Version 6.3
* Version 6.2
* Version 6.1
* Version 6.0
* Version 5.5
* Version 5.4
* Version 5.3
* Version 5.2
* Version 5.1
* Version 5.0
* Version 4.4
* Version 4.3
* Version 4.2
* Version 4.1
* Version 4.0
* Version 3.4
### Version Policy
| Operating System | Planned Support |
| ---------------- | ----------------------------------------------------------- |
| SymOS | Always |
| Windows Desktop | All with the required PHP support |
| Windows Server | All with the required PHP support |
| MacOS | Latest two versions at development start |
| Linux (Ubuntu) | Latest LTS (Long Term Support) version at development start |
| Raspberry Pi | Current release at development start |
| Docker | Docker compatible container |
| QNAP | Docker compatible container |
| Synology | Docker compatible container |
### Version 9.0
| Operating System | Supported | Version | Remark |
| ---------------- | ------------ | ----------------------------------- | ---------------------------------------------------------------------------------------------------------- |
| SymOS | yes | 9.0 | operating system for the SymBox |
| Windows Desktop | yes | Windows 8 and above | 64bit version only |
| Windows Server | yes | Windows Server 2012 and above | 64bit version only |
| MacOS | yes | Version 13 and above | Intel/Apple M1 |
| Linux (Ubuntu) | yes | Ubuntu 24.04 | 64bit version only |
| Raspberry Pi | yes | Raspberry Pi OS (Bookworm or newer) | 32bit/64bit (no Pi 1, Zero 1) |
| Docker | yes | Intel/AMD 64-Bit, ARM7, ARM64 CPU | specific processor architecture required; see [Docker](https://www.symcon.de/en/llms/getting-started.md) |
| QNAP | yes | Intel/AMD 64-Bit CPU | specific processor architecture required; see [QNAP](https://www.symcon.de/en/llms/getting-started.md) |
| Synology | yes | Intel/AMD 64-Bit CPU | specific processor architecture required; see [Synology](https://www.symcon.de/en/llms/getting-started.md) |
| iOS | control only | iOS 13 and above | visualization via app |
| Android | control only | Android 5.0 and above | visualization via app |
### Version 8.1
| Operating System | Supported | Version | Remark |
| ---------------- | ------------ | ----------------------------------- | ---------------------------------------------------------------------------------------------------------- |
| SymOS | yes | 8.1 | operating system for the SymBox |
| Windows Desktop | yes | Windows 8 and above | 64bit version only |
| Windows Server | yes | Windows Server 2012 and above | 64bit version only |
| MacOS | yes | Version 13 and above | Intel/Apple M1 |
| Linux (Ubuntu) | yes | Ubuntu 24.04 | 64bit version only |
| Raspberry Pi | yes | Raspberry Pi OS (Bookworm or newer) | 32bit/64bit (no Pi 1, Zero 1) |
| Docker | yes | Intel/AMD 64-Bit, ARM7, ARM64 CPU | specific processor architecture required; see [Docker](https://www.symcon.de/en/llms/getting-started.md) |
| QNAP | yes | Intel/AMD 64-Bit CPU | specific processor architecture required; see [QNAP](https://www.symcon.de/en/llms/getting-started.md) |
| Synology | yes | Intel/AMD 64-Bit CPU | specific processor architecture required; see [Synology](https://www.symcon.de/en/llms/getting-started.md) |
| iOS | control only | iOS 13 and above | visualization via app |
| Android | control only | Android 5.0 and above | visualization via app |
### Version 8.0
| Operating System | Supported | Version | Remark |
| ---------------- | ------------ | ----------------------------------- | ---------------------------------------------------------------------------------------------------------- |
| SymOS | yes | 8.0 | operating system for the SymBox |
| Windows Desktop | yes | Windows 8 and above | 64bit version only |
| Windows Server | yes | Windows Server 2012 and above | 64bit version only |
| MacOS | yes | Version 13 and above | Intel/Apple M1 |
| Linux (Ubuntu) | yes | Ubuntu 24.04 | 64bit version only |
| Raspberry Pi | yes | Raspberry Pi OS (Bullseye or newer) | 32bit/64bit (no Pi 1, Zero 1) |
| Docker | yes | Intel/AMD 64-Bit, ARM7, ARM64 CPU | specific processor architecture required; see [Docker](https://www.symcon.de/en/llms/getting-started.md) |
| QNAP | yes | Intel/AMD 64-Bit CPU | specific processor architecture required; see [QNAP](https://www.symcon.de/en/llms/getting-started.md) |
| Synology | yes | Intel/AMD 64-Bit CPU | specific processor architecture required; see [Synology](https://www.symcon.de/en/llms/getting-started.md) |
| iOS | control only | iOS 12 and above | visualization via app |
| Android | control only | Android 5.0 and above | visualization via app |
### Version 7.2
| Operating System | Supported | Version | Remark |
| ---------------- | ------------ | ----------------------------------- | ---------------------------------------------------------------------------------------------------------- |
| SymOS | yes | 7.2 | operating system for the SymBox |
| Windows Desktop | yes | Windows 7 and above | 64bit version only |
| Windows Server | yes | Windows Server 2008 R2 and above | 64bit version only |
| MacOS | yes | Version 13 and above | Intel/Apple M1 |
| Linux (Ubuntu) | yes | Ubuntu 24.04 | 64bit version only |
| Raspberry Pi | yes | Raspberry Pi OS (Bullseye or newer) | 32bit/64bit (no Pi 1, Zero 1) |
| Docker | yes | Intel/AMD 64-Bit, ARM7, ARM64 CPU | specific processor architecture required; see [Docker](https://www.symcon.de/en/llms/getting-started.md) |
| QNAP | yes | Intel/AMD 64-Bit CPU | specific processor architecture required; see [QNAP](https://www.symcon.de/en/llms/getting-started.md) |
| Synology | yes | Intel/AMD 64-Bit CPU | specific processor architecture required; see [Synology](https://www.symcon.de/en/llms/getting-started.md) |
| iOS | control only | iOS 11 and above | visualization via app |
| Android | control only | Android 5.0 and above | visualization via app |
### Version 7.1
| Operating System | Supported | Version | Remark |
| ---------------- | ------------ | --------------------------------------- | ---------------------------------------------------------------------------------------------------------- |
| SymOS | yes | 7.1 | operating system for the SymBox |
| Windows Desktop | yes | Windows 7 and above | 64bit version only |
| Windows Server | yes | Windows Server 2008 R2 and above | 64bit version only |
| MacOS | yes | Version 12 and above | Intel/Apple M1 |
| Linux (Ubuntu) | yes | Ubuntu 22.04 | 64bit version only |
| Raspberry Pi | yes | Raspberry Pi OS (Bullseye or newer) | 32bit/64bit |
| Docker | yes | Intel/AMD 64-Bit, ARM6, ARM7, ARM64 CPU | specific processor architecture required; see [Docker](https://www.symcon.de/en/llms/getting-started.md) |
| QNAP | yes | Intel/AMD 64-Bit CPU | specific processor architecture required; see [QNAP](https://www.symcon.de/en/llms/getting-started.md) |
| Synology | yes | Intel/AMD 64-Bit CPU | specific processor architecture required; see [Synology](https://www.symcon.de/en/llms/getting-started.md) |
| iOS | control only | iOS 11 and above | visualization via app |
| Android | control only | Android 5.0 and above | visualization via app |
### Version 7.0
| Operating System | Supported | Version | Remark |
| ---------------- | ------------ | --------------------------------------- | ---------------------------------------------------------------------------------------------------------- |
| SymOS | yes | 7.0 | operating system for the SymBox |
| Windows Desktop | yes | Windows 7 and above | 64bit version only |
| Windows Server | yes | Windows Server 2008 R2 and above | 64bit version only |
| MacOS | yes | Version 12 and above | Intel/Apple M1 |
| Linux (Ubuntu) | yes | Ubuntu 22.04 | 64bit version only |
| Raspberry Pi | yes | Raspberry Pi OS (Bullseye or newer) | 32bit/64bit |
| Docker | yes | Intel/AMD 64-Bit, ARM6, ARM7, ARM64 CPU | specific processor architecture required; see [Docker](https://www.symcon.de/en/llms/getting-started.md) |
| QNAP | yes | Intel/AMD 64-Bit CPU | specific processor architecture required; see [QNAP](https://www.symcon.de/en/llms/getting-started.md) |
| Synology | yes | Intel/AMD 64-Bit CPU | specific processor architecture required; see [Synology](https://www.symcon.de/en/llms/getting-started.md) |
| iOS | control only | iOS 11 and above | visualization via app |
| Android | control only | Android 5.0 and above | visualization via app |
### Version 6.4
| Operating System | Supported | Version | Remark |
| ---------------- | ------------ | --------------------------------------- | ---------------------------------------------------------------------------------------------------------- |
| SymOS | yes | 6.4 | operating system for the SymBox |
| Windows Desktop | yes | Windows 7 and above | 64bit version only |
| Windows Server | yes | Windows Server 2008 R2 and above | 64bit version only |
| MacOS | yes | Version 10.15 and above | Intel/Apple M1 |
| Linux (Ubuntu) | yes | Ubuntu 20.04 | 64bit version only |
| Raspberry Pi | yes | Raspberry Pi OS (Bullseye or newer) | 32bit/64bit |
| Docker | yes | Intel/AMD 64-Bit, ARM6, ARM7, ARM64 CPU | specific processor architecture required; see [Docker](https://www.symcon.de/en/llms/getting-started.md) |
| QNAP | yes | Intel/AMD 64-Bit CPU | specific processor architecture required; see [QNAP](https://www.symcon.de/en/llms/getting-started.md) |
| Synology | yes | Intel/AMD 64-Bit CPU | specific processor architecture required; see [Synology](https://www.symcon.de/en/llms/getting-started.md) |
| iOS | control only | iOS 9.3 and above | visualization via app |
| Android | control only | Android 5.0 and above | visualization via app |
### Version 6.3
| Operating System | Supported | Version | Remark |
| ---------------- | ------------ | --------------------------------------- | ---------------------------------------------------------------------------------------------------------- |
| SymOS | yes | 6.3 | operating system for the SymBox |
| Windows Desktop | yes | Windows 7 and above | 64bit version only |
| Windows Server | yes | Windows Server 2008 R2 and above | 64bit version only |
| MacOS | yes | Version 10.15 and above | Intel/Apple M1 |
| Linux (Ubuntu) | yes | Ubuntu 20.04 | 64bit version only |
| Raspberry Pi | yes | Raspberry Pi OS (Bullseye or newer) | 32bit/64bit |
| Docker | yes | Intel/AMD 64-Bit, ARM6, ARM7, ARM64 CPU | specific processor architecture required; see [Docker](https://www.symcon.de/en/llms/getting-started.md) |
| QNAP | yes | Intel/AMD 64-Bit CPU | specific processor architecture required; see [QNAP](https://www.symcon.de/en/llms/getting-started.md) |
| Synology | yes | Intel/AMD 64-Bit CPU | specific processor architecture required; see [Synology](https://www.symcon.de/en/llms/getting-started.md) |
| iOS | control only | iOS 9.3 and above | visualization via app |
| Android | control only | Android 5.0 and above | visualization via app |
### Version 6.2
| Operating System | Supported | Version | Remark |
| ---------------- | ------------ | --------------------------------------- | ---------------------------------------------------------------------------------------------------------- |
| SymOS | yes | 6.2 | operating system for the SymBox |
| Windows Desktop | yes | Windows 7 and above | 64bit version only |
| Windows Server | yes | Windows Server 2008 R2 and above | 64bit version only |
| MacOS | yes | Version 10.15 and above | Intel/Apple M1 |
| Linux (Ubuntu) | yes | Ubuntu 20.04 | 64bit version only |
| Raspberry Pi | yes | Raspberry Pi OS (Bullseye or newer) | 32bit/64bit |
| Docker | yes | Intel/AMD 64-Bit, ARM6, ARM7, ARM64 CPU | specific processor architecture required; see [Docker](https://www.symcon.de/en/llms/getting-started.md) |
| QNAP | yes | Intel/AMD 64-Bit CPU | specific processor architecture required; see [QNAP](https://www.symcon.de/en/llms/getting-started.md) |
| Synology | yes | Intel/AMD 64-Bit CPU | specific processor architecture required; see [Synology](https://www.symcon.de/en/llms/getting-started.md) |
| iOS | control only | iOS 9.3 and above | visualization via app |
| Android | control only | Android 5.0 and above | visualization via app |
### Version 6.1
| Operating System | Supported | Version | Remark |
| ---------------- | ------------ | --------------------------------------- | ---------------------------------------------------------------------------------------------------------- |
| SymOS | yes | 6.1 | operating system for the SymBox |
| Windows Desktop | yes | Windows 7 and above | 64bit version only |
| Windows Server | yes | Windows Server 2008 R2 and above | 64bit version only |
| MacOS | yes | Version 10.15 and above | Intel/Apple M1 |
| Linux (Ubuntu) | yes | Ubuntu 20.04 | 64bit version only |
| Raspberry Pi | yes | Raspberry Pi OS (Buster or newer) | 32bit/64bit |
| Docker | yes | Intel/AMD 64-Bit, ARM6, ARM7, ARM64 CPU | specific processor architecture required; see [Docker](https://www.symcon.de/en/llms/getting-started.md) |
| QNAP | yes | Intel/AMD 64-Bit CPU | specific processor architecture required; see [QNAP](https://www.symcon.de/en/llms/getting-started.md) |
| Synology | yes | Intel/AMD 64-Bit CPU | specific processor architecture required; see [Synology](https://www.symcon.de/en/llms/getting-started.md) |
| iOS | control only | iOS 9.3 and above | visualization via app |
| Android | control only | Android 5.0 and above | visualization via app |
### Version 6.0
| Operating System | Supported | Version | Remark |
| ---------------- | ------------ | --------------------------------------- | ---------------------------------------------------------------------------------------------------------- |
| SymOS | yes | 6.0 | operating system for the SymBox |
| Windows Desktop | yes | Windows 7 and above | 64bit version only |
| Windows Server | yes | Windows Server 2008 R2 and above | 64bit version only |
| MacOS | yes | Version 10.15 and above | Intel/Apple M1 |
| Linux (Ubuntu) | yes | Ubuntu 20.04 | 64bit version only |
| Raspberry Pi | yes | Raspberry Pi OS (Buster or newer) | 32bit/64bit |
| Docker | yes | Intel/AMD 64-Bit, ARM6, ARM7, ARM64 CPU | specific processor architecture required; see [Docker](https://www.symcon.de/en/llms/getting-started.md) |
| QNAP | yes | Intel/AMD 64-Bit CPU | specific processor architecture required; see [QNAP](https://www.symcon.de/en/llms/getting-started.md) |
| Synology | yes | Intel/AMD 64-Bit CPU | specific processor architecture required; see [Synology](https://www.symcon.de/en/llms/getting-started.md) |
| iOS | control only | iOS 9.3 and above | visualization via app |
| Android | control only | Android 5.0 and above | visualization via app |
### Version 5.5
| Operating System | Supported | Version | Remark |
| ---------------- | ------------ | -------------------------------- | ---------------------------------------------------------------------------------------------------------- |
| SymOS | yes | 5.5 | operating system for the SymBox |
| Windows Desktop | yes | Windows 7 and above | 64bit version only |
| Windows Server | yes | Windows Server 2008 R2 and above | 64bit version only |
| MacOS | yes | Version 10.14 and above | |
| Linux (Ubuntu) | yes | Ubuntu 20.04 | 64bit version only |
| Raspberry Pi | yes | Raspbian Buster | |
| Docker | yes | Intel/AMD 64-Bit CPU | specific processor architecture required; see [Docker](https://www.symcon.de/en/llms/getting-started.md) |
| QNAP | yes | Intel/AMD 64-Bit CPU | specific processor architecture required; see [QNAP](https://www.symcon.de/en/llms/getting-started.md) |
| Synology | yes | Intel/AMD 64-Bit CPU | specific processor architecture required; see [Synology](https://www.symcon.de/en/llms/getting-started.md) |
| iOS | control only | iOS 9.3 and above | visualization via app |
| Android | control only | Android 5.0 and above | visualization via app |
### Version 5.4
| Operating System | Supported | Version | Remark |
| ---------------- | ------------ | -------------------------------- | ---------------------------------------------------------------------------------------------------------- |
| SymOS | yes | 1.8 | operating system for the SymBox |
| Windows Desktop | yes | Windows 7 and above | 64bit version only |
| Windows Server | yes | Windows Server 2008 R2 and above | 64bit version only |
| MacOS | yes | Version 10.13 and above | |
| Linux (Ubuntu) | yes | Ubuntu 18.04 | 64bit version only |
| Raspberry Pi | yes | Raspbian Buster | |
| Docker | yes | Intel/AMD 64-Bit CPU | specific processor architecture required; see [Docker](https://www.symcon.de/en/llms/getting-started.md) |
| QNAP | yes | Intel/AMD 64-Bit CPU | specific processor architecture required; see [QNAP](https://www.symcon.de/en/llms/getting-started.md) |
| Synology | yes | Intel/AMD 64-Bit CPU | specific processor architecture required; see [Synology](https://www.symcon.de/en/llms/getting-started.md) |
| iOS | control only | iOS 9.3 and above | visualization via app |
| Android | control only | Android 5.0 and above | visualization via app |
### Version 5.3
| Operating System | Supported | Version | Remark |
| ---------------- | ------------ | -------------------------------- | ---------------------------------------------------------------------------------------------------------- |
| SymOS | yes | 1.7 | operating system for the SymBox |
| Windows Desktop | yes | Windows 7 and above | 64bit version only |
| Windows Server | yes | Windows Server 2008 R2 and above | 64bit version only |
| MacOS | yes | Version 10.13 and above | |
| Linux (Ubuntu) | yes | Ubuntu 18.04 | 64bit version only |
| Raspberry Pi | yes | Raspbian Buster | |
| Docker | yes | Intel/AMD 64-Bit CPU | specific processor architecture required; see [Docker](https://www.symcon.de/en/llms/getting-started.md) |
| QNAP | yes | Intel/AMD 64-Bit CPU | specific processor architecture required; see [QNAP](https://www.symcon.de/en/llms/getting-started.md) |
| Synology | yes | Intel/AMD 64-Bit CPU | specific processor architecture required; see [Synology](https://www.symcon.de/en/llms/getting-started.md) |
| iOS | control only | iOS 9.3 and above | visualization via app |
| Android | control only | Android 5.0 and above | visualization via app |
### Version 5.2
| Operating System | Supported | Version | Remark |
| ---------------- | ------------ | -------------------------------- | ---------------------------------------------------------------------------------------------------------- |
| SymOS | yes | 1.6 | operating system for the SymBox |
| Windows Desktop | yes | Windows 7 and above | 64bit version only |
| Windows Server | yes | Windows Server 2008 R2 and above | 64bit version only |
| MacOS | yes | Version 10.12 and above | |
| Linux (Ubuntu) | yes | Ubuntu 18.04 | 64bit version only |
| Raspberry Pi | yes | Raspbian Buster | |
| Docker | yes | Intel/AMD 64-Bit CPU | specific processor architecture required; see [Docker](https://www.symcon.de/en/llms/getting-started.md) |
| QNAP | yes | Intel/AMD 64-Bit CPU | specific processor architecture required; see [QNAP](https://www.symcon.de/en/llms/getting-started.md) |
| Synology | yes | Intel/AMD 64-Bit CPU | specific processor architecture required; see [Synology](https://www.symcon.de/en/llms/getting-started.md) |
| iOS | control only | iOS 9.3 and above | visualization via app |
| Android | control only | Android 5.0 and above | visualization via app |
### Version 5.1
| Operating System | Supported | Version | Remark |
| ---------------- | ------------ | -------------------------------- | ---------------------------------------------------------------------------------------------------------- |
| SymOS | yes | 1.5 | operating system for the SymBox |
| Windows Desktop | yes | Windows 7 and above | 64bit version only |
| Windows Server | yes | Windows Server 2008 R2 and above | 64bit version only |
| MacOS | yes | Version 10.11 and above | |
| Linux (Ubuntu) | yes | Ubuntu 18.04 | 64bit version only |
| Raspberry Pi | yes | Raspbian Stretch | |
| Docker | yes | Intel/AMD 64-Bit CPU | specific processor architecture required; see [Docker](https://www.symcon.de/en/llms/getting-started.md) |
| QNAP | yes | Intel/AMD 64-Bit CPU | specific processor architecture required; see [QNAP](https://www.symcon.de/en/llms/getting-started.md) |
| Synology | yes | Intel/AMD 64-Bit CPU | specific processor architecture required; see [Synology](https://www.symcon.de/en/llms/getting-started.md) |
| iOS | control only | iOS 9.3 and above | visualization via app |
| Android | control only | Android 5.0 and above | visualization via app |
### Version 5.0
| Operating System | Supported | Version | Remark |
| ---------------- | ------------ | -------------------------------- | ---------------------------------------------------------------------------------------------------------- |
| SymOS | yes | 1.4 | operating system for the SymBox |
| Windows Desktop | yes | Windows 7 and above | 64bit version only |
| Windows Server | yes | Windows Server 2008 R2 and above | 64bit version only |
| MacOS | yes | Version 10.11 and above | |
| Linux (Ubuntu) | yes | Ubuntu 18.04 | 64bit version only |
| Raspberry Pi | yes | Raspbian Stretch | no Raspbian Jessie |
| Docker | yes | Intel/AMD 64-Bit CPU | specific processor architecture required; see [Docker](https://www.symcon.de/en/llms/getting-started.md) |
| QNAP | yes | Intel/AMD 64-Bit CPU | specific processor architecture required; see [QNAP](https://www.symcon.de/en/llms/getting-started.md) |
| Synology | yes | Intel/AMD 64-Bit CPU | specific processor architecture required; see [Synology](https://www.symcon.de/en/llms/getting-started.md) |
| iOS | control only | iOS 9.3 and above | visualization via app |
| Android | control only | Android 5.0 and above | visualization via app |
### Version 4.4
| Operating System | Supported | Version | Remark |
| ---------------- | ------------ | -------------------------------- | ------------------------------- |
| SymOS | yes | 1.3 | operating system for the SymBox |
| Windows Desktop | yes | Windows 7 and above | |
| Windows Server | yes | Windows Server 2008 R2 and above | |
| MacOS | yes | Version 10.11 and above | |
| Linux (Ubuntu) | yes | Ubuntu 16.04 | 64bit version only |
| Raspberry Pi | yes | Raspbian Stretch | no Raspbian Jessie |
| iOS | control only | | visualization via app |
| Android | control only | | visualization via app |
### Version 4.3
| Operating System | Supported | Version | Remark |
| ---------------- | ------------ | -------------------------------- | ------------------------------- |
| SymOS | yes | 1.2 | operating system for the SymBox |
| Windows Desktop | yes | Windows 7 and above | |
| Windows Server | yes | Windows Server 2008 R2 and above | |
| MacOS | yes | Version 10.10 and above | |
| Linux (Ubuntu) | yes | Ubuntu 16.04 | 64bit version only |
| Raspberry Pi | yes | Raspbian Jessie | no Raspbian Stretch |
| iOS | control only | | visualization via app |
| Android | control only | | visualization via app |
### Version 4.2
| Operating System | Supported | Version | Remark |
| ---------------- | ------------ | ----------------------------- | ------------------------------- |
| SymOS | yes | 1.1 | operating system for the SymBox |
| Windows Desktop | yes | Windows Vista and above | |
| Windows Server | yes | Windows Server 2008 and above | |
| MacOS | yes | Version 10.9 and above | |
| Linux (Ubuntu) | yes | Ubuntu 16.04 | 64bit version only |
| Raspberry Pi | yes | Raspbian Jessie | no Raspbian Stretch |
| iOS | control only | | visualization via app |
| Android | control only | | visualization via app |
### Version 4.1
| Operating System | Supported | Version | Remark |
| ---------------- | ------------ | ----------------------------- | ------------------------------- |
| SymOS | yes | 1.1 | operating system for the SymBox |
| Windows Desktop | yes | Windows Vista and above | |
| Windows Server | yes | Windows Server 2008 and above | |
| MacOS | yes | Version 10.9 and above | |
| Linux (Ubuntu) | yes | Ubuntu 16.04 | 64bit version only |
| Raspberry Pi | yes | Raspbian Jessie | no Raspbian Wheezy |
| iOS | control only | | visualization via app |
| Android | control only | | visualization via app |
### Version 4.0
| Operating System | Supported | Version | Remark |
| ---------------- | ------------ | ----------------------------- | ------------------------------- |
| SymOS | yes | 1.0 | operating system for the SymBox |
| Windows Desktop | yes | Windows Vista and above | |
| Windows Server | yes | Windows Server 2008 and above | |
| MacOS | yes | Version 10.8 and above | |
| Linux (Ubuntu) | yes | Ubuntu 14.04 | 64bit version only |
| Raspberry Pi | yes | Raspbian Wheezy | no Raspbian Jessie |
| iOS | control only | | visualization via app |
| Android | control only | | visualization via app |
### Version 3.4
| Operating System | Supported | Version | Remark |
| ---------------- | ------------ | ----------------------------- | --------------------- |
| Windows Desktop | yes | Windows 2000 and above | |
| Windows Server | yes | Windows Server 2003 and above | |
| iOS | control only | | visualization via app |
| Android | control only | | visualization via app |
---
# Migrationen
> Symcon documentation · English · generated on 2026-09-26
> Index: https://www.symcon.de/en/llms.txt
---
# Procedures
> Symcon documentation · English · generated on 2026-09-26
> Index: https://www.symcon.de/en/llms.txt
Source: https://www.symcon.de/en/service/documentation/procedures/
In the following section, basic and often used functions are explained.
A general start is found at [Quick Start](https://www.symcon.de/en/llms/getting-started.md).
## Add object
Source: https://www.symcon.de/en/service/documentation/procedures/add-object/
In order to "Add a new object", the "+" in the lower right corner of the object tree must be clicked. The following dialog and selection of various objects appears:

Alternatively, "right mouse button" can be used within the object tree to click on the desired position in the tree. The following context menu opens:

## Replace devices
Source: https://www.symcon.de/en/service/documentation/procedures/replace-devices/
If a device is defective and has to be physically replaced, this can be implemented in IP-Symcon without creating a new instance. This has the advantage that the object IDs of the instance and the associated variables do not change. This means that any linked scripts do not have to be adapted to the new IDs.
### Replace Device within an Instance
Devices are addressed and integrated in IP-Symcon via so-called instances.
System-specific addresses are often available on the configuration page of the respective entity.
This can be changed without changing the object ID.
> **Note:** If the system used has a configurator, it can be updated and also adopts the changes
### Examples
#### KNX
For replacement, the configuration of the defective device must be opened in IP-Symcon and the three-level address of the old device must be exchanged with that of the new one. The address can be checked in the configurator.
* Open the KNX configurator
* "Search" but do not "Create" an instance
* Memorise the new address and open the configuration of the old device
* Enter new address (see screenshot) and save with "Apply".
* Return to the configurator and update via "Search".
The new address should now have an InstanceID.

The three-level address in the marked area must be replaced and saved with "Apply".
#### Homematic
For replacement, the configuration of the defective device must be opened in IP-Symcon and the address of the old device must be replaced with that of the new one. The address is either on the device itself or can be selected via "Search".

The address in the highlighted area must be replaced and saved with "Apply".
#### OneWire
For replacement, the configuration of the defective device must be opened in IP-Symcon and the 16-digit address of the old device must be replaced for that of the new one. The address can be checked in the configurator.
* Open OneWire configurator
* "Search" but do not "Create" an instance
* Memorise the new address and open the configuration of the old device
* Enter new address (see screenshot) and save with "Apply".
* Return to the configurator and update via "Search".
The new address should now have an InstanceID.

The 16-digit address in the marked area must be replaced and saved with "Apply".
#### Z-Wave
For replacement, the configuration of the defective device must be opened in IP-Symcon and the NodeID of the old device must be replaced for that of the new one. The NodeID can be checked in the configurator.
* Open Z-Wave Configurator
* Teach device but do not "Create" an instance
* Memorise NodeID and open the configuration of the old device
* Enter new NodeID (see screenshot) and save with "Apply".
* Return to the configurator and "Refresh"
The new NodeID should now have an InstanceID.

The NodeID in the marked area must be replaced and saved with "Apply".
## Integrate devices
Source: https://www.symcon.de/en/service/documentation/procedures/integrate-devices/
Devices are addressed in IP-Symcon via so-called instances.
> **Note:** The principle of creating the devices has changed fundamentally from version 1 onwards. I/O instances, splitters or similar no longer have to be created/connected. IP-Symcon does this automatically. IP-Symcon also creates the status variables automatically.
### Create instance
[Configurators](https://www.symcon.de/en/llms/concepts.md) are available for the following systems for a more convenient configuration of devices. The appropriate configurator can be added to the object tree within the web-based Management Console using the "+" button.
* [digitalStrom](https://www.symcon.de/en/llms/modules/digitalstrom.md)
* [Eaton xComfort](https://www.symcon.de/en/llms/modules/xcomfort.md)
* [KNX](https://www.symcon.de/en/llms/modules/knx.md)
* [HomeMatic](https://www.symcon.de/en/llms/modules/homematic.md)
* [LCN](https://www.symcon.de/en/llms/modules/lcn.md)
* [MQTT](https://www.symcon.de/en/llms/modules/mqtt.md)
* [Siemens OZW](https://www.symcon.de/en/llms/modules/siemens-ozw.md)
* [Z-Wave](https://www.symcon.de/en/llms/modules/z-wave.md)
* [1-Wire](https://www.symcon.de/en/llms/modules/1-wire.md)
For all other systems, the respective device must be added by creating a suitable instance.
The creation dialog can be accessed in the object tree using the "+" -> "Instance" button.
IP-Symcon takes care of creating the required gateways, splitters and I/O's.
In the "Messages" tab it can be checked whether an instance has an error. A message with a yellow or red background is interesting. This means there is still one setting missing for an instance to work. A "double click" on the respective message leads directly to the section of IP-Symcon where the said setting is still required.
Access to the gateway and I/O interfaces belonging to each device is possible via the "Configure gateway" or "Configure interface" gear wheel in the device "Configuration" tab. The required settings can be checked there and improved if necessary.
The "[Module reference](https://www.symcon.de/en/llms/modules/index.md) " area contains the setup instructions for the respective devices/instances, either as a description or as a video tutorial.
## Search devices
Source: https://www.symcon.de/en/service/documentation/procedures/search-devices/
IP-Symcon has a very convenient function that allows the user to quickly and easily add new devices to the system. The prerequisite is that the new, to be taught devices send messages of their own accord (e.g. wireless temperature sensors). Alternatively, the user can - or must - press a "teach button" or simply a button on the remote control. With some systems, such as the 1-Wire system, IP-Symcon can specifically search for connected, unknown devices. According to the motto: "Hello, who is it?". And the devices respond with: "It's me, the brightness sensor".
> **Note:** Devices can be searched for via the [Configurators](https://www.symcon.de/en/llms/concepts.md) of the respective systems.
### Examples
The following example shows the received devices of the HomeMatic system:

> **Note:** It may take several minutes for all devices to appear in the list!
A green background indicates a new module. It can then be selected by double-clicking.
Depending on the properties of the device, IP-Symcon automatically creates variables that reflect the functionality. The names and the location can be changed at any time.
The following example shows the three variables of a wireless switch or remote control of the HomeMatic system:

With the HomeMatic system, it must also be specified for the search whether wireless or wired devices are to be searched for.
If the BidCoS serial number is known, it can also be entered directly:

> **Note:** Please note that its variables are only filled with values the second time a data record is received from the respective device.
## Connect Systems via Events
Source: https://www.symcon.de/en/service/documentation/procedures/connect-systems-via-events/
IP-Symcon offers the very comfortable option to transfer values from one system directly to another. For this purpose an [Event](https://www.symcon.de/en/llms/concepts.md) can be added, which can set another value to the trigger value when the trigger value is changed. It is irrelevant whether the two values belong to different systems. In the example below, a KNX dimmer value is transferred to a Z-Wave dimmer.
### Example
A KNX dimmer value can be transmitted to a Z-Wave lamp with dimmer value. For this purpose, a change of the KNX value is reacted to and the new value is transferred to the dimming value of the Z-Wave lamp which is then being switched.
In the object tree, the two device instances have already been created and are functioning properly on their own. Now an event must be created. To do this, an event can be added via the "+" at the bottom right of the object tree.
The event must be configured as follows.
The dimming value, whose value is to be transferred on change, is selected as the triggering variable. In this example it is the value of DPT 005.001.
Under Action, the intensity of the Z-Wave lamp with dimmer actuator is selected as "Target". As action type "Switch variable" and as action "Switch to triggering value" must be selected.
By clicking "OK" the event is created and the configuration is saved.

From now on, every time the KNX dimmer value changes, the intensity of the Z-Wave instance will be dimmed to the same value.
The object tree should then look like this.

## Reuse scripts
Source: https://www.symcon.de/en/service/documentation/procedures/reuse-scripts/
> **Note:** This is an example that can also be mapped with events. This article is more about [System variables](https://www.symcon.de/en/llms/concepts/automations.md) and reusability of script sections.
This example is about a corridor light control that is the same on all floors. If possible, this should not be programmed three times.
One possibility would be to create 3 scripts and then copy and paste the content of one script into the individual scripts. This is certainly possible for a quick fix. However, this also leads to a certain redundancy and if something needs to be improved at one point in the script, this does not have to be done once but three times.
As an example for code reusing, a script with the name "light control (xComfort, Corridor, Motion detector, Brightness control)" can be created. The name should be descriptive and include what systems, devices and status it uses.
The following code could be the content:
```php
//If no movement - see "System Variables" documentation for meaning of $_IPS['VALUE']
if(!$_IPS['VALUE']) {
MXC_SwitchMode($lampID, false);
}
//If motion was detected
else {
//Only after sunset
if(!GetValueBoolean($istTag)) {
//If it is between 10:30 p.m. and 06:00 a.m
| if((time() > strtotime("22:30")) || (time() < strtotime("06:00"))) { |
MXC_DimSet($lampID, 15);
}
else {
MXC_DimSet($lampID, 50);
}
}
}
```
This script must be called by a [triggering event](https://www.symcon.de/en/llms/concepts.md) - here usually by one/several motion detectors. The light is then set to a different dimming level depending on the time of day. As soon as the motion detector no longer detects any movement and sends the FALSE impulse, the device switches off.
The logic is thus outsourced and only scripts have to be created that set the missing variables and are called by an event. Below is an example:
```php
//Triggering of the event by motion detector variable!
//Unique Device-ID
$lampID = 54321 /*[ground floor\corridor\ceiling lamp]*/;
//Day/night variable from the location control
$isDay = 56789 /*[IsDay]*/;
includeScript(12345 /*[scenarios\light control]*/);
//Function to insert script content
function includeScript($scriptID) {
$s = IPS_GetScript($scriptID);
include($s['ScriptFile']);
}
```
In this way, "function templates" can be created and then fed with the necessary IDs. In these scripts then are the IDs of the devices/variables for which IP-Symcon creates complete and meaningful names (provided the object tree structure was created [properly](https://www.symcon.de/en/llms/concepts.md)).
If required, the script can also be adapted for other systems and the correct function can be called dynamically using the [transferred InstanceID](https://www.symcon.de/en/llms/functions/management-instances.md) or the system-specific changes can be made.
## Password protected category in WebFront
Source: https://www.symcon.de/en/service/documentation/procedures/password-protected-category-in-webfront/
In order to protect certain categories from the object tree in the WebFront with a password, the following steps must be observed.
The category to be saved must be moved away from the rest of the WebFront in the object tree .
Then a [new WebFront must be set up](https://www.symcon.de/en/llms/components/webfront-visualization.md). Once this is done, any password can be set up in the [Security of the WebFront](https://www.symcon.de/en/llms/getting-started.md) .
In the second WebFront, everything must be removed via the [Editor](https://www.symcon.de/en/llms/components/webfront-visualization.md) and the category that is to display the password-protected content needs to be added.
The second WebFront must then be added to the first WebFront as an external page via a path.

The call to the external page then looks as follows.

## Use links
Source: https://www.symcon.de/en/service/documentation/procedures/use-links/
The following example illustrates the principle of [Links](https://www.symcon.de/en/llms/concepts.md). For example, a number of smoke detectors are installed and connected in a house.
For safety reasons, the smoke detectors are now to be checked every three months. An initial check was quite time-consuming. When structuring the visualization, the structure was sensibly designed according to floor -> room -> device. However, each room now has to be checked individually in order to check each smoke detector. This seems too time-consuming.

A category called "Smoke detectors" is now created next to the floors and all smoke detectors are moved to this category using "drag and drop".
Because all smoke detectors have been assigned to a new category in Symcon, they are no longer visible in the individual rooms in the visualization. Unfortunately, this means that the smoke detectors are now missing in the individual rooms in which they are installed.
Symcon offers the option of creating links to individual objects. To create these links, right-click on a selected object in the object tree - in this case, a smoke detector.

As soon as "Link object" is clicked, the object has been moved to the clipboard for linking. A link to the originally selected object can now be created anywhere in the object tree by right-clicking and selecting "Insert object". This can be repeated with all smoke detectors and the smoke detectors can be easily checked in the visualization without constantly clicking back and forth. Nevertheless, they can still be found in their respective rooms. In addition, links can be given their own name and icon by right-clicking on "Edit object".
## Send push notifications to different user groups
Source: https://www.symcon.de/en/service/documentation/procedures/send-push-notifications-to-different-user-groups/
The procedure for sending push notifications to different user groups is explained below.
In this example, a user group consists of several terminal devices (smartphones) registered to a WebFront.
### Setup
User groups for push notifications are implemented in IP-Symcon via separate WebFronts or WebFront visualizations.
> **Warning:** In order to be able to set up more than one WebFront, an __IP-Symcon Professional__ or __IP-Symcon Unlimited__ version is required.
How an additional WebFront can be set up can be seen under "[Set up additional WebFront](https://www.symcon.de/en/llms/components/webfront-visualization.md) ".
These WebFronts can then be set up separately according to personal needs.
> **Note:** In order to be able to use the same instances in different WebFronts, [Links](https://www.symcon.de/en/llms/concepts.md) are required. See "[Use links](https://www.symcon.de/en/llms/how-to.md) " for an example.
### Registration in the user groups
As described above, user groups are implemented via WebFronts. It is sufficient to register once in the respective WebFront with the app on the smartphone that is to be registered. This automatically adds the device to the respective user group. From this point on, the smartphone app automatically receives every push notification. In this way, the smartphone can be registered with any number of user groups.
> **Warning:** Logging into the respective WebFront via the mobile phone browser does not result in an entry in the user group.
### Logout from a user group
__Logout from individual user group:__
In the WebFront visualization, the registered devices can be managed in the "Notifications" tab. This means that a single smartphone can be deregistered from a user group.
__Logout from all user groups:__
If a smartphone is to be deregistered from all user groups, this can be done via the "Notification Control" core instance.
All mobile devices that are registered in a WebFront can be seen in the configuration tab. Is the device deleted here, the smartphone is logged off from all user groups.
### Sending push notifications
A push notification can be created with [WFC_PushNotification](https://www.symcon.de/en/llms/modules/webfront-visualization.md). This needs the ObjectID of the respective WebFront to which the push notification is to be sent. All smartphones registered on this WebFront then receive the notification via the app.
### Tips & Tricks
If a password is set up for the respective WebFront via the "Security" tab, it is easy to prevent "accidentally" registering for a user group.
### Application Examples
A household with multiple WebFronts.
* __A WebFront for administrators:__ Only administrators are in this user group and are notified of supposed system problems.
* __A WebFront for a single family member:__ Includes personal interests and sends messages that only interest that person.
* __A WebFront for all family members:__ The refrigerator reports "The milk is empty, someone has to go shopping", The weather module reports "It's about to rain" or a burglar alarm.
## How can I...?
Source: https://www.symcon.de/en/service/documentation/procedures/how-can-i/
> **Warning:** Many of these scripts use special IP-Symcon functions.
> The [Command Reference](https://www.symcon.de/en/llms/functions/index.md)/[Module Reference](https://www.symcon.de/en/llms/modules/index.md) entail further information on how exactly these functions work.
[... switch on a device and switch it off again after 60 seconds](https://www.symcon.de/en/llms/how-to.md)
[... get a list of module names including GUID](https://www.symcon.de/en/llms/how-to.md)
[... configure an instance from PHP](https://www.symcon.de/en/llms/how-to.md)
[... find out the remaining number of seconds of a ScriptTimer](https://www.symcon.de/en/llms/how-to.md)
[... directly include a script by ID](https://www.symcon.de/en/llms/how-to.md)
[... Output UpdateTime in a separate string variable (1 script - n variables)](https://www.symcon.de/en/llms/how-to.md)
[... create a timer & variable from PHP](https://www.symcon.de/en/llms/how-to.md)
[... download a file from the Internet](https://www.symcon.de/en/llms/how-to.md)
[... load a folder recursively into the MediaPlayer playlist](https://www.symcon.de/en/llms/how-to.md)
[... export a variable profile](https://www.symcon.de/en/llms/how-to.md)
### ... switch on a device and switch it off again after 60 seconds
```php
if($_IPS['SENDER'] == "TimerEvent")
{
//From function
...
//Turn off the timer
IPS_SetScriptTimer($_IPS['SELF'], 0);
} else {
//To function
...
//Turn on the timer
IPS_SetScriptTimer($_IPS['SELF'], 60);
}
```
### ... get a list of module names and GUID
```php
foreach(IPS_GetModuleList() as $mid)
{
$m = IPS_GetModule($mid);
echo $mid."=".$m['ModuleName']."\n";
}
```
### ... configure an instance from PHP
```php
//Change property
WWWReader_SetPage($id,"http://www.google.com");
//Apply changes
IPS_ApplyChanges($id);
//Get new URL
WWWReader_UpdatePage($id);
```
### ... find out the remaining number of seconds of a ScriptTimer
```php
echo GetTimeRemaining($_IPS['SELF']); //Find out by yourself
function GetTimeRemaining($id)
{
$eid=@IPS_GetEventIDByName("ScriptTimer", $id);
if($eid === false) {
return -1;
} else {
$e=IPS_GetEvent($eid);
if($e['NextRun'] == 0)
{
return -1;
} else {
return $e['NextRun'] - microtime(true);
}
}
}
```
### ... directly include a script by ID
```php
//Include script with ID 14871
include(IPS_GetScriptFile(14871));
```
### ... Output UpdateTime in a separate string variable (1 script - n variables)
```php
//Evaluate event
if($_IPS['SENDER'] != "Variable")
return;
SetValue(CreateVariableIDByName($_IPS['VARIABLE'], 'Updated', 3), date("d.m.y H:i:s"));
function CreateVariableIDByName($id, $name, $type)
{
$vid = @IPS_GetVariableIDByName($name, $id);
if($vid===false) {
$vid = IPS_CreateVariable($type);
IPS_SetParent($vid, $id);
IPS_SetName($vid, $name);
IPS_SetInfo($vid, "This Variable was created by Script #".$_IPS['SELF']);
}
return $vid;
}
```
### ... create a timer & variable from PHP
> **Note:** When the script runs, it sets a timer that starts every six hours and then puts a variable with the time of day as a value between 0-3 into the variable.
```php
//NOTE:
//~~~~~~~~
//This script sets itself up automatically when run
//
//- A variable is set depending on the time of day (0-3)
// 0 = 0-6
// 1 = 6-12
// 2 = 12-18
// 3 = 19-24
//-----------------------------------------------------------------------------
//From this point nothing needs to be changed
//-----------------------------------------------------------------------------
if($_IPS['SENDER'] == "Execute")
{
$eventid = @IPS_GetEventIDByName("Timer", $_IPS['SELF']);
if($eventid === false)
{
$eventid = IPS_CreateEvent(1); //Cyclic
IPS_SetEventActive($eventid, true);
IPS_SetName($eventid, "Timer");
IPS_SetEventScript($eventid, $_IPS['SELF']);
IPS_SetEventCyclic($eventid, 0, 0, 0, 0, 3, 6);
}
$variableid = @IPS_GetVariableIDByName("Daytime", $_IPS['SELF']);
if($variableid === false)
{
$variableid = IPS_CreateVariable(1);
IPS_SetName($variableid, "Daytime");
IPS_SetParent($variableid, $_IPS['SELF']);
}
}
SetValue(IPS_GetVariableIDByName("Daytime", $_IPS['SELF']), floor(date("H") / 6));
```
### ... download a file from the Internet
```php
$remoteImage = "https://www.google.com/images/srpr/logo3w.png";
$localImage = IPS_GetKernelDir()."\\media\\image.jpg";
//Download
$content = @file_get_contents($remoteImage);
if((strpos($http_response_header[0], "200") === false))
{
return;
}
//Save to computer
file_put_contents( $localImage, $content );
```
### ... load a folder recursively into the MediaPlayer playlist
```php
function WAC_PlayDir($id, $dir)
{
function ReadRecursive($dir, $subdir = "") {
$result = Array();
$files = scandir($dir."/".$subdir);
foreach($files as $file)
{
if(($file != ".") && ($file != "..")) {
if(is_dir($dir."/".$subdir."/".$file)) {
$res = ReadRecursive($dir, $subdir."/".$file);
$result = array_merge($res, $result);
} else {
$filedir = $subdir."/".$file;
$filedir = substr($filedir, 1, strlen($filedir));
$result[] = $filedir;
}
}
}
return $result;
}
$allowed = Array("mp3", "wma");
$files = ReadRecursive($dir);
//Use PHP's random number generator
//shuffle($files);
WAC_ClearPlaylist($id);
foreach($files as $file)
{
$ext = pathinfo($dir."/".$file, PATHINFO_EXTENSION);
if(in_array(strtolower($ext), $allowed))
{
WAC_AddFile($id, $dir."/".$file);
}
}
WAC_Play($id);
}
```
### ... export a variable profile
```php
getVariableProfileCreationCode("~Temperature.FHT");
getVariableProfileCreationCode("~Temperature.FHT", "TemperatureTest");
// first function parameter: Profile name, second parameter (optional): new profile name
function getVariableProfileCreationCode ($profileName, $newProfileName = "")
{
$profile = IPS_GetVariableProfile($profileName);
if ($profile !== false)
{
$profileName = (strlen($newProfileName) > 0) ? $newProfileName : $profileName;
echo 'IPS_CreateVariableProfile("'.$profileName.'", '.$profile['ProfileType'].');'."\n";
echo 'IPS_SetVariableProfileText("'.$profileName.'", "'.$profile['Prefix'].'", "'.$profile['Suffix'].'");'."\n";
echo 'IPS_SetVariableProfileValues("'.$profileName.'", '.$profile['MinValue'].', '.$profile['MaxValue'].', '.$profile['StepSize'].');'."\n";
echo 'IPS_SetVariableProfileDigits("'.$profileName.'", '.$profile['Digits'].');'."\n";
echo 'IPS_SetVariableProfileIcon("'.$profileName.'", "'.$profile['Icon'].'");'."\n";
foreach ($profile['Associations'] as $association)
{
echo 'IPS_SetVariableProfileAssociation("'.$profileName.'", '.$association['Value'].', "'.$association['Name'].'", "'.$association['Icon'].'", '.$association['Color'].');'."\n";
}
echo "\n";
}
}
```
## Keyboard Shortcuts
Source: https://www.symcon.de/en/service/documentation/procedures/keyboard-shortcuts/
### General Keyboard Shortcuts
| __Shortcut__ | __Description__ |
| ------------ | --------------------- |
| Esc | Close the current tab |
### Keyboard Shortcuts in Script Editor
| __Shortcut__ | __Description__ |
| -------------------------- | -------------------------- |
| F3 | Search next |
| Shift + F3 | Search previous |
| Ctrl + A | Select all |
| Ctrl + C | Copy text via Ctrl + V |
| Ctrl + E | Execute |
| Ctrl + F | Search |
| Ctrl + H | Replace |
| Ctrl + O | Select object |
| Ctrl + R | Rename script |
| Ctrl + S | Save |
| Ctrl + D | Display events |
| Ctrl + X | Move text via Ctrl + V |
| Ctrl + Shift + K | Delete row |
| Ctrl + V | Insert text from clipboard |
| Ctrl + Z | Undo |
| Ctrl + Shift + Z, Ctrl + Y | Redo |
| Ctrl + Space | Display function list |
| Ctrl + Shift + F | Search in all scripts |
| Ctrl + Shift + H | Replace in all scripts |
### Tastenkombinationen im Objektbaum
| __Shortcut__ | __Description__ |
| ------------ | ---------------------------------------------------- |
| Enter | Open object or edit object if it cannot be opened |
| Del | Delete object |
| Alt + 0 | Add category |
| Alt + 1 | Add instance |
| Alt + 2 | Add variable |
| Alt + 3 | Add script |
| Alt + 4 | Add event |
| Alt + 5 | Add media |
| Alt + 6 | Add link |
| Ctrl + C | Copy object via Ctrl + V, copy ObjectID to clipboard |
| Ctrl + L | Create link to object via Ctrl + V |
| Ctrl + X | Move object via Ctrl + V |
| Ctrl + V | Copy, insert, or move object |
| Ctrl + E | Execute object |
| Ctrl + F | Search ID |
| Ctrl + R, F2 | Rename object |
| Ctrl + Enter | Edit object |
## Save CSV data from WebFront to Excel
Source: https://www.symcon.de/en/service/documentation/procedures/save-csv-data-from-webfront-to-excel/
Graphs in the WebFront are displayed using CSV data sets. In order to make these available in a neat and legible form for further use in Excel, there is the "Text-To-Columns" functionality.
This works for any CSV data set. The CSV data broken up in this way can, for example, be used for Excel graphics or the like of.
### Example
#### Step 1 - CSV Export Copy Record
Within the WebFront the graph symbol and then the menu item "CSV" have to be clicked on. In the popup (see picture) the data records simply have to be marked and copied with "Ctrl + C".

#### Step 2 - Paste
The data needs to be pasted into an empty table with "Ctrl + V". If necessary, the font color must be changed to black, as the white font color may have been adopted.

#### Step 3 - Text to Columns
The "Text to Columns" function is used to split the data records.
To do this, the "Data" tab must be selected and all data records highlighted.
Then the "Text to columns" button must be clicked on and a dialog opens.

#### Step 4 - Dialog
The dialog proceeds in 3 steps.

Click "Next".

Select a semicolon as it separates the records. Click "Next".

Click "Finish".
#### Result
The table should then look like this.

## Using FTP
Source: https://www.symcon.de/en/service/documentation/procedures/using-ftp/
It is possible to access files that are stored on an FTP server via script.
### Prepare FTP server
If this was not done already, it is required to set up and configure an FTP server. The explanation will be given for the tool [FileZilla Server](https://filezilla-project.org/download.php?type=server) . However, the process is similar for other tools.
During the installation, FileZilla Server already initializes an FTP server on the local host, if needed.

When launching the tool, the shown dialog is opened. It is used to connect to the created FTP server. If the default settings from the installation were used, the data can be used as shown in the screenshot, i.e., "Host": "localhost", "Port": 14147, and no password.
> **Note:** In most cases, the firewall needs to be configured to allow access to the FTP server. The process is explained for Filezilla [here](https://wiki.filezilla-project.org/Network_Configuration)
#### Creating a Group
The next step is setting up a group for users. Groups can be used to categorize users and provide different rights or accessible folders. However, it is also possible to simply create a single group that is used for all users, thus providing the same rights to every user.


The Groups settings can be accessed via the menu "Edit->Groups". In the shown dialog, a new group can be added via "Add" below the initially empty list of groups. After entering a name and confirming the choice, a new group is created.


In the category "Shared folders", the folder that is meant to be accessed via FTP is chosen by clicking "Add" below the initially empty list of directories. This will open a dialog to select a folder.

After adding a shared folder, it is possible to configure the rights of accessing the folder. By default, the files in the folder and its subdirectories can be read but not modified.
#### Creating a User


New users are added in the Users settings that are accessed via "Edit->Users". A new user is added by clicking "Add" below the initially empty list of users. In the shown dialog, a user name and a group is chosen. After confirming the choice, the user is added.

A password can be set for the newly created user by activating the checkbox "Password" and entering a chosen password.
> **Note:** If only one user exists, the creation of a group can be skipped. Instead, the user is assigned a shared folder directly.
### Access a File from the FTP Server via Script
```php
// Read content
$address = "ftp://my-user:password@localhost/test.txt";
$content = file_get_contents($address);
```
```php
echo $content;
// Write content
$targetAddress = "ftp://my-user:password@localhost/test.txt";
$newContent = "Hello World! This is new content.";
file_put_contents($zielAdresse, $neuerInhalt);
```
A file on an FTP server can be accessed like it was a local file. Merely the address of the file changes. The code example reads and outputs the content of the file "test.txt" on the local FTP server. The address is structered as follows: "ftp://<user>(:<password>)@<servername>/<path-to-file>".
> **Note:** It is also possible to use special FTP functions when accessing an FTP server as shown [here](https://www.php.net/manual/en/book.ftp.php)
## Replace I/O of a gateway
Source: https://www.symcon.de/en/service/documentation/procedures/replace-io-of-a-gateway/
Sometimes it is necessary to replace the I/O instance of a gateway.
This would be the case if, for example, TCP-based communication is to be used instead of serial. Or another/new gateway is used.
> **Note:** A list of the different I/O's can be found under [Instances -> Connection components](https://www.symcon.de/en/llms/concepts.md) .
The easiest way to access the gateway for the respective device instance is via ‘Configure gateway’ in the upper area of the instance configuration.
In the instance configuration of the gateway, the parent instance, in this case the I/O instance, can now be adjusted via ‘Change interface’ in the upper area.
In the dialogue box that appears, you can select an existing compatible I/O or alternatively create a new I/O by clicking on ‘New’.


## E-Mail notification
Source: https://www.symcon.de/en/service/documentation/procedures/e-mail-notification/
IP-Symcon offers the possibility to send e-mails via [SMTP-Instance](https://www.symcon.de/en/llms/modules/smtp.md). For example, this offers the possibility to inform whether the front door or a window (requiring sensors) was opened in the SmartHome, whether a certain person is present (requiring the Presence Control Module) or the general status of various data and consumption. On the one hand, this can provide increased security (e.g. if a burglar tampers with a window or door) or, on the other hand, it can also increase comfort (e.g. general SmartHome information). Notifications at a specific point in time (e.g. as a reminder, monthly report) can also be implemented.
### Create Instance
In order to send an email at a specific time, an [Instance](https://www.symcon.de/en/llms/concepts.md) must first be created. Instances represent, for example, devices that are connected to IP-Symcon. These can be both configured and receive functions.
A new SMTP instance can be created by clicking on "+" in the [Object tree](https://www.symcon.de/en/llms/components/management-console.md) of the [Management Console](https://www.symcon.de/en/llms/components/management-console.md) or by selecting the item "Add object" -> "Instance" from the context menu. The second option has the advantage that the instance is created directly below the selected object in the object tree and does not have to be sorted afterwards.
In the "Add Instance" menu, "Email" can be searched for via the quick filter and "Email, Send (SMTP)" can be added.

The personal access data must be entered on the "E-Mail, Send (SMTP)" configuration page.

"Host", "Port" and "Use SSL" (encryption) must be configured. With the respective provider the correct settings (keyword: SMTP) can be searched for.
The username and password of the e-mail account must be entered under "Use authentication". The "Sender Name" can be chosen freely. This will later be displayed as the sender in the recipient's mailbox.
E-mail addresses must be entered for "Sender address" and for "Recipient".
> **Note:** The "Sender address" is the address that is later displayed as the sender address when an e-mail arrives, while "Recipient" is the address to which IP-Symcon sends a message.
After everything has been filled out correctly, the configuration must be saved with "Apply". A test message can now be sent to the "recipient" email address within the test environment in the lower area of the configuration page.
#### Examples
#### 1. Email at a specific time
In this example, a reminder email is supposed to be sent at a specific time.
##### Create Event
A [Cyclic Event](https://www.symcon.de/en/llms/concepts.md) must be created. Events can start specific operations on specific conditions or times.
A new event can be created by clicking on "+" in the [Object tree](https://www.symcon.de/en/llms/components/management-console.md) of the [Management Console](https://www.symcon.de/en/llms/components/management-console.md) or by selecting the item "Add object" -> "Event" -> "Cyclic" via the context menu. The second option has the advantage that the instance is created directly below the selected object in the object tree and does not have to be sorted in afterwards.

Now it has to be entered exactly when the reminder is to be sent by e-mail. This is useful if, for example, one wants to be reminded by e-mail during work in the office (Monday to Friday) that a certain medication needs to be taken after the lunch break (at 2:20 p.m.).

The previously created SMTP instance must be selected for "Action" "Switch instance" and for "Target". "SMTP_SendMail" must be selected for "Function", otherwise no e-mail will be sent. The message that is to be sent by e-mail at the selected time can now be entered under Parameter. An e-mail will now be sent every day from Monday to Friday, reminding about medication intake.
#### 2. Email for specific event
In this example, an e-mail is to be sent which is linked to a specific event.
For example, an e-mail should be sent on the go, if a window or door was opened without permission and a burglar might be at work.
##### Create Variable and Event
To implement the example, an event can be linked to an existing status variable or a self-created variable. [Variables](https://www.symcon.de/en/llms/concepts.md) are data holders that enable switching on and off (e.g. the door sensor) to work and be displayed in the WebFront.
In this example, the self-created variable represents an imaginary door sensor.
A new variable can be created by clicking on "+" in the [Object tree](https://www.symcon.de/en/llms/components/management-console.md) of the [Management Console](https://www.symcon.de/en/llms/components/management-console.md) or by selecting the item "Add object" -> "Variable" -> "Add variable" via the context menu. The second option has the advantage that the variable is created directly below the object selected by in the object tree and does not have to be sorted in afterwards.
"Boolean" must now be selected for "Type" in the "Add variable" menu, because an e-mail should be sent when the door sensor is activated.

Then "~Presence" can be selected as "Own Profile", since the presence of a person or an open door in the house should be displayed.
Then a name for the variable must be chosen. It is recommended to choose descriptive names (e.g.: "Presence").
Now, instead of a "Cyclic" a "Triggered event" must be created. In the configuration of the event, the created presence variable must be selected under "Variable".

“Trigger” in this example is “At specific value”. The "Value" must be set to "True" (True=Present; False=Away) and "Run subsequent events" must be checked.

In "Action" "Switch instance" and in "Target" the previously created SMTP instance must be selected. "SMTP_SendMail" must be selected for "Function", otherwise no e-mail will be sent. The message that is to be sent by e-mail at the selected time must now be entered in the parameter. Now an email is sent when the variable is set to true (imaginary door opened).
---
# Basics
> Symcon documentation · English · generated on 2026-09-26
> Index: https://www.symcon.de/en/llms.txt
Source: https://www.symcon.de/en/service/documentation/basics/
### Objects
IP-Symcon contains seven different types of objects:
__Objects can be categories, instances, variables, automations, events, media, or links.__
> **Note:** Every object is identified by a fixed and unchangable ID (identification number). This leads to multiple advantages:
>
> * Every object is unique and distintively identifiable
> * The name of an object can be changed at any time
> * Bigger projects are processed faster
> * Extensive functions of object management
> * Performant links within the software
### Properties of an object
The properties or settings of an object can be called via double click or "Right click" -> "Edit object".

__ObjectID__
Every object within IP-Symcon posesses a unique and unchangable identification number (ObjectID). Thus, every object is distinctively identifiable and referencable.

__Name__
This is the name of the object. The name is also used when the object is shown in [Visualizations](https://www.symcon.de/en/llms/modules/index.md).
__Location__
The location is the parent object in the object tree and defines its position in the object tree as well as the WebFront.
> **Note:** Certain instances, e.g., configurators, are positioned in specific special categories. These instances cannot be moved.
#### Visual Settings
These settings define the behavior in the WebFront.
__Icon__
This is a symbol that is used in [Visualizations](https://www.symcon.de/en/llms/modules/index.md). For further informations, see [Icons](https://www.symcon.de/en/llms/components/icons.md).
__Show object__
The check box controls whether the object is shown in the [Visualizations](https://www.symcon.de/en/llms/modules/index.md) or remains hidden.
__Show title (since Symcon 9.1)__
Controls whether the title of the object's tile is shown or hidden in the visualization.
__Show maximize button (since Symcon 9.1)__
Controls whether the maximize button of the object's tile is shown or hidden in the visualization.
__Activate object__
Theis option controls if an object is active. If it is deactivated, the object is shown in grey in the [Visualizations](https://www.symcon.de/en/llms/modules/index.md) and cannot be controlled.
#### Advanced Settings
Additional optional settings
__Description__
This is a description of the object. It can be used to store important notes and provide a direct description.
__Ident__
Objects possess an additional identifier Ident. Unlike a name, every value of Ident within a category of the logical tree view needs to be distinct.
### Context Menu
The context menu in the [Object Tree](https://www.symcon.de/en/llms/components/management-console.md) provides a multitude of functions.
> **Note:** In addition to the described functions, each object type provides additional type specific options, see Object Type Specific Context Entries
#### Add Object
Add a new object. A dialog is opened that configures all relevant settings step by step.
For further information, see [Add Object](https://www.symcon.de/en/llms/how-to.md).

#### Open object
If the object has an object specific action, it is called. For instances, the configuration is opened, for automations the corresponding editor, media shows a preview. Otherwise, the option is deactivated. If possible a double click opens the object. Otherwise it edits the object.
#### Rename Object
Change the name of an object. The ObjectID and Ident remain unchanged. Multiple objects can have the same name.
#### Edit Object
Every object offers the option "Edit Object". It can be used to read different informations and configure settings.

#### Sort Object
Position the object at any position in the object tree. This option also controls the position in the [Visualizations](https://www.symcon.de/en/llms/modules/index.md).

> **Note:** The "Position" column can be displayed permanantly with the "Columns" option. Thus, objects can be sorted faster via double click on the Position value instead of clicking "Sort object" for each object in the context menu.
#### Copy ObjectID
Copy the ObjectID into the clipboard. It is useful to insert the IDs into scripts. ("Right click->Insert" or "Ctrl + V" in the editor)
#### Link Object
Create a link to the object. Multiple links can refer to the same object. The position of the link object is chosen in the dialog window.

#### Duplicate Object
Create an identical object with its own distinct ObjectID.
#### Move Object
Open a dialog to select the new selection of the object and place it there.
#### Delete Object
Delete the object and all its children, if applicable.
### Object Type Specific Context Entries
#### Search for references (All except for category)
Open a dialog that either states that there are no references or lists all references.
The depending criteria are checked depending on the object type:
| Object Type | Where is checked for the reference/ID? |
| ----------- | ---------------------------------------------------------------------------- |
| Variable | The IDs for "VariableAction" and "VariableCustomAction" are checked. |
| PHP Script | The content of the PHP Script is checked for the ID. |
| Event | The content and the trigger are checked for the ID. |
| Link | The TargetID/Value is checked. |
| Instance | IDs of possible Objects that are used on the configuration page are checked. |
#### Test Commands (Instances only)
Open a dialog to test the most relevant [Actions](https://www.symcon.de/en/llms/concepts/automations.md) of an instance.
__For Experts:__ With the keyboard combination Ctrl + C, the currently set action can be copied as PHP Code and can be inserted into a script editor.
#### Change Variable (Variables only)
Open the dialog for setting a variable value.
#### Execute Automation (Automations only)
Executes the automation without opening it.
Eventual output is shown in a dialog.
#### Jump to source object (Links only)
Jump to the source object within the object tree.
## Categories
Source: https://www.symcon.de/en/service/documentation/basics/categories/
To simplify the handling of multiple active devices and keep an overview over a multitude of instances, categories can be used. The instances within the location tree can be assigned to different categories.
### Setup
A category can be created with the "+" at the bottom left or via "right click"->"__Add object__"->"__Category__". In a next step, the category can be configured. This includes the name and location. A suitable name could refer to the area where the according devices are localized. _For example, in a one family house, the categories could refer to the floors._
> **Warning:** When a category is deleted, consider that all subcategories and devices within that category are removed from the location tree as well.
### Configuration
The created category can be found in the [Object Tree](https://www.symcon.de/en/llms/components/management-console.md). Further categories can be created in the same way, e.g., multiple categories for different floors.
With a right click on the chosen main categorie and "Add Object -> Add Category", the main location is already selected as location. Afterwards, the subcategory can be configured, e.g., naming it "living room". This procedure can be repeated multiple times.
The order of the categories can be modified with "Right click -> Sort Objects".
Nesting categories within each other can also be done via Drag and Drop.
> **Note:** We recommend to use the structure __Category/Subcategory/Device__ as follows:
> __Floor / Room / Device__
### Hint
For a better overview, this naming should be done from the start as more devices are added over time. Every device name should explain itself und contain no previously named components.
E.g., Ground Floor / Living Room / Ceiling Lamp (North)
### WebFront
An additional advantage of this structure is the automatic direct visualization within the WebFront.
When a shown category contains visible subcategories, a navigation bar for categories is shown automatically.
When a subcategory is selected, the object area shows its content.
When the shown subcategory contains further subcategories, the navigation is extended automatically.
Categories that are linked with the "Link" object are shown in the navigation bar as well. The property "Show Navigation" can be used to hide the navigation bar when needed.
## Instances
Source: https://www.symcon.de/en/service/documentation/basics/instances/
Instances usually represent devices that are connected to IP-Symcon. Other instances include non-physical modules like [Text To Speech](https://www.symcon.de/en/llms/modules/text-to-speech.md) or [Mediaplayer](https://www.symcon.de/en/llms/modules/amazon-alexa.md) . The states of devices are represented via [Variables](https://www.symcon.de/en/llms/concepts.md) in the [Management Console](https://www.symcon.de/en/llms/components/management-console.md) and [WebFront](https://www.symcon.de/en/llms/components/webfront-visualization.md).
### Inclusion
New devices can be added via the "Add Instance" dialog or the configurators within the management console. In addition, IP-Symcon automatically creates further instances that establish the communication between devices and IP-Symcon when required. These parent instances are exchangable and reconfigurable without including the device another time. For example, if the communication protocol should be changed from radio to serial, it can be changed in the corresponding gateway or I/O instance. From then on, the devices that are connected via the corresponding gateway are handled accordingly. However, the state variables, the existing scripts, or the originally created instance for those devices are unaffected.
### Parent Instances
Parent instances know and use the required protocols and interface properties to provide a connection between the devices and IP-Symcon. These instances need to be gateway or I/O instances.
If parent instances are required for a connection, IP-Symcon automatically creates and configures them. Eventually, further configuration is required, e.g., setting the IP address.
The fastest way to access the parent instance of a device/module is to use the gear within the corresponding configuration tab.
As shown in the example below, the two devices "AKM-868" and "LGS-868" communicate via radio with their parent instance "ProJet Gateway". The gateway itself communicates with its parent I/O instance "Client Socket IPS 868" via LAN.
The communication of the I/O instance could easily be changed from LAN to serial (which only makes sense if the new gateway communicates with IP-Symcon via a serial cable). The change can be done by changing the mode within "ProJet Gateway" to "Connection via: Serial". IP-Symcon automatically creates a new serial port instance that is connected to the gateway. The parent instance "Serial Port IPS 868" could be accessed via the gear on the configuration tab of the gateway. The two devices AKM and LGS would be completely unaffected by this change.

### Types of Inclusion
Instances are always included into IP-Symcon with a similar pattern.
There are three types of inclusion.
| Type | Description | Example Systems |
| ----- | ------------------------------- | ----------------- |
| 1:1:n | 1 I/O - 1 Gateway - n Instances | EnOcean |
| 1:m:n | 1 I/O - m Gateway - n Instances | LCN |
| 1:n | 1 I/O - n Instances | Register Variable |
### Connection Components
__I/O:__
I/O describes the type of communication between the gateway and the server (IP-Symcon).
| Type | Description |
| ------------- | ------------------------------------------------------------ |
| Client Socket | TCP client based communication |
| UDP Socket | UPD client based communication |
| Serial Port | serial based communication |
| Virtual I/O | emulation of a Serial Port, a Client Socket, or a UDP socket |
| WWW Reader | HTTP(Get) requests |
| HID | HID based communication (USB) |
| Server Socket | TCP server based communication |
__Gateway/Splitter:__
One or more instances of devices can be connected to one gateway. The gateway handles the communication between the devices and I/O.
> **Warning:** If a non-standard configuration is used, it needs to be controlled if the according I/O instance fits the corresponding configuration, e.g., LAN is used instead of a serial connection. In that case, the I/O instance needs to be changed.
### GUID
Every instance has a unique GUID that determines the type, e.g., an AKM-868 or WDT-868.
The GUID is a UUID and has the format 8-4-4-4-12. The numbers describe the amount of letters. Each letter is either 0-9 or A-F. Hypens and braces are required and only capital letters are allowed. (Example: {12345678-90AB-CDEF-1234-567890ABCDEF})
> **Warning:** The GUID should not be confused with die 5-digit ObjectID, which distinctly identifies an individual object but not its type.
### Create instance
The creation of an instance and the inclusion of devices is described here:
[Include Device](https://www.symcon.de/en/llms/how-to.md)
### Example
This is an example with the physical tree view.
Device instance "PTM200 Button"
-> (parent) gateway instance "EnOcean Gateway"
-> (parent) I/O instance "Client Socket (EnOcean Gateway #36011)"

## Configurators
Source: https://www.symcon.de/en/service/documentation/basics/instances/configurators/
Configurators are a special type of instances. When a configurator is available for a system, it drastically simplifies the configuration of IP-Symcon. Configurators can be created for multiple strands/lines/gateways. A configurator can be created from the Welcome tab of the IP-Symcon management console.

Currently, configurators are available for the following systems:
* [1-Wire](https://www.symcon.de/en/llms/modules/1-wire.md)
* [digitalStrom](https://www.symcon.de/en/llms/modules/digitalstrom.md)
* [Eaton xComfort](https://www.symcon.de/en/llms/modules/xcomfort.md)
* [KNX](https://www.symcon.de/en/llms/modules/knx.md)
* [EnOcean](https://www.symcon.de/en/llms/modules/enocean.md)
* [HomeMatic](https://www.symcon.de/en/llms/modules/homematic.md)
* [IPS-868](https://www.symcon.de/en/llms/modules/ips-868.md)
* [LCN](https://www.symcon.de/en/llms/modules/lcn.md)
* [M-Bus](https://www.symcon.de/en/llms/modules/mbus.md)
* [MQTT](https://www.symcon.de/en/llms/modules/mqtt.md)
* [Siemens Logo](https://www.symcon.de/en/llms/modules/sps-siemens-vipa-logo.md)
* [Siemens OZW](https://www.symcon.de/en/llms/modules/siemens-ozw.md)
* [Z-Wave](https://www.symcon.de/en/llms/modules/z-wave.md)
| Color | Meaning | Remark |
| ----- | ---------------------------------------------------------------------- | -------------------------------------------------------------------- |
| Green | New device that was not configured in IP-Symcon yet | Device can be added as instance |
| Red | Device is not available any more, but is still configured in IP-Symcon | Instance can be removed from IP-Symcon |
| Gray | The existing instance is configured differently than recommended | The Create button changes to Review to show the recommended settings |
| White | Device available and configured in IP-Symcon | No further actions required |
### Screenshots
#### 1-Wire Configurator

#### digitalStrom Configurator

#### xComfort Configurator

#### KNX Configurator

#### EnOcean Configurator

#### HomeMatic Configurator

#### IPS-868 Configurator

#### LCN Configurator


#### M-Bus Configurator

#### MQTT Configurator

#### Siemens Logo

#### Siemens OZW Configurator

#### Z-Wave Configurator

## Variables
Source: https://www.symcon.de/en/service/documentation/basics/variables/
A variable is a container for a value. The value can be boolean, float, integer, or string. Usually, variables contain status values of devices. In addition, new user defined variables can be created to store individual values which could be used for visualization or scripts.
> **Note:** [System Variables](https://www.symcon.de/en/llms/concepts/automations.md) are no normal variables in the usual sense as they are only available within scripts.
IP-Symcon uses variables to exchange or store data. Variables that contain status values enable the use of devices, e.g., show the temperature of a thermometer in the visualization or activate and deactivate the lighting.
### Description
There are two types of variables within IP-Symcon:
#### Status Variables
Every instance of a device can have one or more status variables that are created automatically. These variables store the status of the device, e.g., on/off, temperature in °C, humidity, or battery.
The timing of updates and changes to a status or its value depend on the specific system. While a weather station periodically sends environmental data, the status of other systems like window contacts needs to be requested. The request interval is set in the configuration of the corresponding instance.
It is important to realize that status variables cannot be changed by the user. The variables merely reflect the status and datasets of the device.
[w]Do not delete status variables. Deleting can cause unpredictable behavior of an instance.[/w]
__Example 1:__
When changing the wanted room temperature for a heating control system, a command is executed that sends the wanted value to the device. The status variable "Temperature" itself is not changed as it merely shows the current temperature. The required commands can be found in the corresponding [Module Reference](https://www.symcon.de/en/llms/modules/index.md). Alternatively, the command "[RequestAction](https://www.symcon.de/en/llms/functions/access-variables.md) " can be executed directly on the variable. IP-Symcon will check for the dedicated command by itself and execute it.
__Example 2:__
A more abstract example in form of a motor vehicle: To accellerate or decellerate the vehicle, the corresponding pedals need to be pushed. It is not sufficient to set the speedometer needle to the desired speed.
> **Note:** Conclusion: Status variables merely provide information about the device and are explicitely marked as "Read Only".
#### User Defined Variables
User defined variables can be created individually and contain one of four data types (see Table Variable Types ). User defined variables can be manipulated by the user.
__Example 1:__
Integrating a previously unknown device, e.g., an AV amplifier, into IP-Symcon can be done with user defined variables.
__Example 2:__
A user defined variable can be used to convert data, e.g., the temperature in Celsius(°C) into Fahrenheit(°F).
### Variable Types
| Variable Type | Description | Example |
| ------------- | --------------------- | ------------------------------ |
| Boolean | True / False | On or Off |
| Float | Floating-point number | 231.956 |
| Integer | Whole numbers | -10, -4, 0, 32, 472 |
| String | Text | “Hello IP-Symcon. Hello World” |
### Create new variables
[Video](https://youtu.be/wNz7sKdhMKA?rel=0&cc_load_policy=1)
A variable can be created in the object tree via "+" or "Right click" -> "Add object" -> "Variable". When using the second approach, the variable is created directly below the chosen object und does not need to be categorized afterwards. A variable type and a [presentation](https://www.symcon.de/en/llms/concepts.md) are chosen in the following window. [Logging](https://www.symcon.de/en/llms/modules/archive-control.md) can also be activated for the variable. The [Aggregation](https://www.symcon.de/en/llms/modules/archive-control.md) decides the type of logging.
Before confirming the creation with "OK", the variable should have a meaningful name. Optionally, a description and an [Icon](https://www.symcon.de/en/llms/components/icons.md) can be chosen for the variable. The location of the variable is set with the dialog "Location" or can be changed afterwards via Drag and Drop in the object tree.

### Visualization of Variables
The display of the variables in the visualization can be adjusted so that a variable is displayed as a selection or slider, for example. These options can also be changed at a later date. A more detailed description of the options can be found here: [Variable visualizations](https://www.symcon.de/en/llms/concepts.md)
### Edit Variable Values
The profile of a variable or its logging can be changed via double click on the name of the variable.
The "Surveillance Mode" can record the values of a variable or change it. It is accesed with a double click on the value of the variable. It is also possible to choose "Modify Variable" via context menu.
This function is meant primarily for testing. For example, it can be verified if the heating is activated on the simulated temperature or check the visualization of the variable in the WebFront.
The following picture shows the window for the "Surveillance Mode" that shows the ongoing changes to the variable and enables the modification. A modification can be repeated by clicking the button "Write".

> **Warning:** The value of a status variable can be modified even though it is marked as "Read Only". When modifying the value all corresponding [Events](https://www.symcon.de/en/llms/concepts.md) are executed. The modification can be used to test user defined scripts but does not change the actual values of the physical device.
### Variable Actions
A [Variable Action](https://www.symcon.de/en/llms/concepts.md) can be assigned to a variable via "Custom Action". It is called when the variable is clicked in the visualization, e.g., WebFront or a mobile app. In addition, the variable action is executed if the variable is switched, e.g., via the function [RequestAction](https://www.symcon.de/en/llms/functions/access-variables.md) .
## Variable Actions
Source: https://www.symcon.de/en/service/documentation/basics/variables/variable-actions/
A variable action is executed when a variable is clicked via visualization.
The prepared [Action Script](https://www.symcon.de/en/llms/concepts/automations.md) is executed. Additional data like the new "desired" value and the ID are passed via [System Variables](https://www.symcon.de/en/llms/concepts/automations.md).
### Choose Variable Action
It is possible to choose an action with the "Edit variable" dialog by choosing "Custom action". The dialog "Edit Variable" is accessible when creating a variable, via double click on the variable within the object tree, or via right click on the variable and choosing "Edit object".
> **Note:** Some variables of added modules contain a "Default action". It can be overwritten with a "Custom action".

With the "+", a variable action can be created which only handles that the variable changes accordingly if it is clicked in the WebFront. This automatically created action script is displayed as "(Automatically created)"

### Create Variable Action
A chosen variable action is an action script.
For more information, refer to [PHP Scripts](https://www.symcon.de/en/llms/concepts/automations.md) and [Action Scripts](https://www.symcon.de/en/llms/concepts/automations.md).
## Variable Presentations
Source: https://www.symcon.de/en/service/documentation/basics/variables/variable-presentations/
_Requires Symcon >= 8.0_
Each variable has a variable presentation. Variable presentations are used to convert variable values such as True, False or 0, 1, 2, 3 into a human-readable form and to provide them with the necessary context data (e.g. °C). The variable presentation therefore specifies how a variable is displayed in the visualization. It also determines the control element with which the variable value can be changed.
### Select presentation
A presentation can be selected in the "Edit variable" dialog in the "Variable presentation" section. This dialog can be accessed when creating a variable or afterwards via "Object tree" -> "Double-click" or via "Object tree" -> "Right-click" -> "Edit object".
> **Note:** Some variables of added modules contain a "standard display". This can be overwritten by clicking on the "Overwrite default" button. The original status can then be restored using the "Reset to default" button.

The selection icon for the "Display" entry opens the display dialog in which a display can be selected. All presentations are always displayed in the presentation dialog. If the configuration of the current variable does not allow a display, it is grayed out. When you move the mouse over the grayed-out element, a text is displayed describing which requirements must be met in order for the presentation to be displayed .
Each display offers many different parameters to customize it according to the requirements. The available parameters and their function are described in more detail under the respective entries under [Object presentation](https://www.symcon.de/en/llms/components/object-presentation.md).
### Preview
Each adjustment can be observed directly in the preview next to the display selection. The preview can be opened in fullscreen by clicking on the magnifying glass icon. Here, as in the normal visualization, the size of the tile can be adjusted using the pencil icon to see how the display behaves in different sizes.
### Templates
If the parameters of a display are changed, these only apply to the currently selected variable. If several variables are to use the same parameters, templates can be used. Templates can be selected under the field for presentations. If a template has been selected, the presentation uses the parameters of the template, even if these are adjusted later. However, parameters can still be changed in the variable dialog. If the parameters no longer correspond to the values of the template or the higher-level presentation, "(Custom)" is displayed in the Template field and the set parameters apply exactly to this variable again. Custom templates can be created and edited in the [Template manager](https://www.symcon.de/en/llms/concepts.md).
## Template Manager
Source: https://www.symcon.de/en/service/documentation/basics/variables/variable-presentations/template-manager/
_Requires Symcon >= 8.0_
The template manager can be opened via the "+" in the table list.

### Structure
The template manager consists of a tree on the left-hand side, in which templates can be selected, grouped according to presentations, and a central detail area, which adapts to the current selection in the tree. If no entry is selected, all presentations are displayed as a preview in the detail area. As an alternative to the selection in the tree, a specific presentation can be opened here by clicking on the "Open" symbol at the top right of each tile. If a presentation is selected, the detail area shows a preview for each template of this presentation and also enables direct opening here. The "Who uses this presentation?" button at the bottom of the detail area displays all variables that use this presentation. Once a template has been selected, a corresponding configuration form appears, similar to the variable configuration form, in which the parameters of the template can be configured. The name of the template can also be customized. As each template is identified in the background by a unique ID and not the name, the name can be changed without hesitation. It only serves to make it easier for the user to understand. In the lower area, a list of variables that use this template can be displayed via "Who uses this template?". A new template can be created via "Duplicate", which is initially configured with the same parameters.
> **Note:** Information about the individual parameters of the presentations can be found in the [Object presentations](https://www.symcon.de/en/llms/components/object-presentation.md).
### create templates

A template can be added via the "+" in the list on the left-hand side. The desired display is selected in a dialog and the template is then configured. If a display is selected, you can alternatively click on the "+" on the right-hand side to directly create a template for the selected display.
To build on an existing template, select it and click on "Duplicate" at the bottom.
### Delete templates
User-defined templates can be deleted via the trash can icon next to the name in the list on the left-hand side. The templates provided by IP-Symcon cannot be deleted.
## Variable Profiles
Source: https://www.symcon.de/en/service/documentation/basics/variables/variable-profiles/
> **Warning:** Variablen Profiles are still supported. However, version 8.0 introduced [Variable Presentations](https://www.symcon.de/en/llms/concepts.md) as modern and flexible way to configure the presentation of variables. Variable Profiles can still be used via the presentation [Legacy Profile](https://www.symcon.de/en/llms/components/object-presentation.md).
Every variable can have a variable profile. Variable profiles are primaryly used to make variable values like True, False, or 0, 1, 2, 3, ... easier readable by adding context, e.g., adding °C to temperatures. Thus, the variable profile defines how a variable is visualized.
### Choose Profile
Starting from version 8.0, a variable profile is assigned via the [variable presentation](https://www.symcon.de/en/llms/concepts.md) [Legacy Profile](https://www.symcon.de/en/llms/components/object-presentation.md). The dialog "Edit Variable" is accessible when creating a variable, via double click on the variable within the object tree, or via right click on the variable and choosing "Edit Object".
Within the "Variable presentation" section, first select the presentation "Legacy Profile". Afterwards, the desired profile can be chosen under "Presentation parameters".

### Create Profile
If no included profile suits a variable, it is possible to create individual profiles. A created profile can be used for any number of variables.
To edit a variable profile, the profile manager needs to be opened. It can be opened via "+" -> "Profile Manager" at the tab list or via the "Edit Variable" dialog using the finger button next to the profile selector under "Presentation parameters".

It is possible to choose a pre-defined profile, to duplicate a profile, or create a new one. A new profile is created by clicking the "+" at the bottom left. Afterwards, the profile needs to be named. After saving the profile, it will appear in the list.


> **Note:** Even though the variable profiles are differentiated after type (Boolean, Integer, Float, String), a profile name needs to be unique
> **Note:** Examples for different visualizations of variable profiles in the WebFront are available at [Object Depiction](https://www.symcon.de/en/llms/components/object-presentation.md)
> **Warning:** Included profiles can be recognized by the tilde (~) in front of the profile name. These profiles are created from the system and cannot be edited. The tilde must not be used in individual profile names.
The following changes to a profile are possible:
| Parameter | Type | Description |
| ------------ | -------------- | ----------------------------------------------------------------------------------------------------------------------------------------------------------------------------------------------------------------------------------------------------------------------------------------------------------------------------------------------------------------------------------------------------------------------------------------------------------------------------------------------------------------------------------------------------------------------------------------------------------------------------------------------------------------------------------------------------------------------------------------------------------------------------------------------------------------------------------------------------------------------------------------------------------------------------------------------------------------------------------------------------------------------------------------------------------------------------------------------------------------------------------------------------------------------------------------------------------------------------------------------------------------------------------------------------------------------------------------------------------------------------------------------------------------------------------------------------------- |
| Prefix | All types | String in front of the current value, e.g., a fixed description |
| Suffix | All types | String after the current value, e.g., °C; Special case: When using % the value is converted into a percentage by using Min/Max. (Value = (Value – Min) * 100 / (Max – Min)) |
| Min Value | Integer, Float | Smallest possible value of the variable for the visualization |
| Max Value | Integer, Float | Biggest possible value of the variable for the visualization |
| Step Size | Integer, Float | The step size determines the number of clickable selections within the visualization. Consider a profile with Min = 0, Max = 100. A step size of 25 would make the values 0, 25, 50, 75, 100 available. If the step size is 0 and assoziations are available, all assoziation texts are listed. In this case, the usually shown arrows for selection are not available. This field is only evaluated if an action or an action script is assigned to the visualized variable. |
| Digits | Float | Defines the number of decimal places. |
| Default Icon | All types | If no icon is available via assoziations the default icon is used. If the parameter is not set, the object Icon is used. All available icons are listed here: [WebFront Icons](https://www.symcon.de/en/llms/components/icons.md) |
| Associations | All types | __Boolean:__ A text and an icon can be chosen for each possible value (True, False) which is shown instead of the real value. This only affects the visualization. The value of the variable remains the same. __Integer/Float__: 1. Like Boolean, it is possible to choose a text and an icon. In the simplest case, a text and an icon needs to be defined for each value. 2. The second possibility is to omit values and only choose a text and an icon for some values. In that case, the visualized text and icon correspond to the next lowest assoziated value. For example, if the assoziated values are 0, 50, and 100, the assoziations would refer to the following values: 0(0-49), 50(50-99), and 100(100). 3. It is possible to generate an expression that contains the current value. The placeholder %d (int) or %f (float) are used as placeholder for the current value. For example would be "LightValue%d" shown as "LightValue4". __Remark:__ If one of the two parameters (Text / Icon) is left empty, the normal value or the default icon are used. To show an empty text, you need to use a space character. __String (since version 6.0):__ A text and an icon can be chosen for each String value. The order of associations is based on the order of creation. Sorting is not possible. Thus, putting new associations in order requires the deletion and recreation of all following associations. |
> **Warning:** Profiles are only used for visualization. If the current value of a variable is outside of the interval between Min and Max or is not described by the specified assoziations, it is possible that the output of the variable is wrong or is not shown at all.
> **Warning:** The maximum number of simultaneous associations per profile is 128.
### Example
When Min=0 and Max=20 is defined in the profile and the suffix % is used, but the variable value is 40, the shown visualizaion is 200%. The values for Min/Max do not limit the variables!
> **Note:** Depending on the variable type the used placeholder is %d or %f. The number of decimal places can be influenced by using the following format: %.2f for two decimal places.
> **Note:** To use a percentage symbol (%) within an assoziation text, a double percentage symbol (%%) needs to be entered.
> **Note:** A possibility to use the variables in a formatted way in scripts is the function [GetValueFormatted](https://www.symcon.de/en/llms/functions/access-variables.md) .
## Events
Source: https://www.symcon.de/en/service/documentation/basics/events/
An event is an automatic action that is connected to a condition.
Executed events modify binded objects. The binding is done by attaching the event to the corresponding object in the IP-Symcon management console. (see: [Binding Types](https://www.symcon.de/en/llms/concepts.md))
Events are executed depending on the event type and the configured condition. (see: Event Types)
### Binding to Action Target
Die bound object is used as target for an [Action](https://www.symcon.de/en/llms/concepts/automations.md) . As is common with actions, an action can be selected depending on the target and configured.
The action of an event determines what happens when the event is triggered. For more information, see [Actions](https://www.symcon.de/en/llms/concepts/automations.md)

### Event Types
There are three event types.
| Event Type | Description |
| ----------------------------------------------- | ------------------------------------------------------------- |
| [Trigger](https://www.symcon.de/en/llms/concepts.md) | An event that is connected to a specific variable. |
| [Cyclic](https://www.symcon.de/en/llms/concepts.md) | The event is run at a defined time point once or repeatedly. |
| [Schedule](https://www.symcon.de/en/llms/concepts.md) | A schedule that is configured in the WebFront runs the event. |
> **Note:** Access to system variables:
> IP-Symcon automatically offers a number of variables that can be accessed within a script.
> However, these are only available if the script was called by an event.
> See:
> [System Variables](https://www.symcon.de/en/llms/concepts/automations.md)
### Conditions
Conditions expand events by further options that need to be fulfilled for the event to trigger. This can be used to realized multiple conditions.
Additional conditions can be added in the expansion panel "Further Conditions". In this panel, new conditions can be added by clicking "Add".
The types Variable, Date, Day of the week, and Time can be selected. For the type "Variable", a variable needs to be selected. Afterwards, the remaining options will appear.
Finally, the comparison operator (see table [Comparison Operators](https://www.symcon.de/en/llms/concepts.md)) and the compared value need to be defined before confirming the condition with "OK".
In the table, all defined conditions are listed. An X symbol shows that a condition is currently not fulfilled while a dash icon symbolizes that it is fulfilled. The gear icon can be clicked to modify the condition, the trash icon will remove it.
In the dropdown "Evaluation" it can be defined whether all conditions need to be fulfilled for the event to trigger or if a single conditions suffices.
The Live State shows if the event would currently trigger based on the conditions or not.
#### Comparison Operators
Comparison Operators describe the behavior when a comparison is fulfilled and when it is not fulfilled.
| Operator | Explanation |
| -------------------- | ----------------------------------------------------------------------------------------------------------------------------------- |
| Equal (=) | Fulfilled if the current value is equal to the comparison value. (e.g., true = true, 123 = 123) |
| Not Equal (≠) | Fulfilled if the current value is not equal to the comparison value. (e.g., false ≠ true, 123 ≠ 122 or 124) |
| Greater (>) | Fulfilled if the current value is truly greater than the comparison value. (e.g., 123 > 122, 09:00 > 08:59) |
| Greater or Equal (≥) | Fulfilled if the current value is greater or equal than the comparison value. (e.g., 123 ≥ 122 or 123, 09:00 ≥ 08:59 or 09:00) |
| Less (<) | Fulfilled if the current value is truly less than the comparison value. (e.g., 123 < 124, 09:00 < 09:01) |
| Less or Equal (≤) | Fulfilled if the current value is less or equal than the comparison value. (e.g., 123 ≤ 124 or 123, 09:00 ≤ 09:01 or 09:00) |
#### Example
A lamp should only be switched on when a motion sensor is activated.
In addition, this should only trigger if it is too dark (Brightness Value below 500) and it is between 09:00 and 17:00.
First, a triggered event is created. The motion sensor is defined as trigger on the value "Present" and the lamp is selected as target instance, switching its value to "On".

In the tab "Further Conditions", the additional rules are created via "Add".
The light value "Brightness" is configured as "less" than 500.

The time is configured as "greater or equal" to 09:00.

The time is configured as "less or equal" to 17:00.

In the overview, all three rules are listed and the live state shows if the light would be switched on if the motion sensor would trigger at this moment.

## Trigger
Source: https://www.symcon.de/en/service/documentation/basics/events/trigger/
This event type is executed when the connected variable is updated, independently of the time point of execution.
There are five usable triggers.
> **Note:** Scripts that are run by a trigger event can use these [System Variables](https://www.symcon.de/en/llms/concepts/automations.md).
### Trigger

| Type of trigger | Description |
| ------------------------------------------------------------------ | --------------------------------------------------------------------------------------------------------------------------------------- |
| On Change | The event is executed whenever the variable changes. |
| On Update | The event is executed for every received variable value. It is also run when the received and the current value are identical. |
| On Limit Drop/On Limit Exceed (Option "Execute subsequent events") | The event is executed when the value of the variable drops below or rises above a threshold. The threshold is set in the field "Value". |
| On specific Value (Option "Execute subsequent events") | The event is executed when the variable reaches a specific value that is specified in "Value". |
### Options
#### Execute subsequent events
__Trigger once on repeatedly fulfilled condition__: The event is executed once. The event can only be executed again after the condition was not fulfilled at least once. After it was not fulfilled, dropping below, rising above, or reaching the specified value executes the event again.
__Trigger every time on repeatedly fulfilled condition__: The event is executed on every variable update as long as the condition is fulfilled.
## Cyclic
Source: https://www.symcon.de/en/service/documentation/basics/events/cyclic/
This type of event is executed at a specific time and is repeated cyclically. The point of time is defined by a combination of "Day Pattern" and "Time Pattern".
> **Note:** Scripts that are run by a cyclic event offer these [System Variables](https://www.symcon.de/en/llms/concepts/automations.md)
#### Day Pattern:
There are 5 different options

| Day Pattern | Description |
| --------------- | -------------------------------------------------------------------------------------------------------------------- |
| Day Interval | Defines a day interval (1 = every day; 2 = every second day; ...) in which the event is executed. |
| Week Interval | Defines a week interval (1 = every week; 2 = every second week; ...) and the days in which the event is executed. |
| Month Interval | Defines a month interval (1 = every month; 2 = every second month; ...) and the days in which the event is executed. |
| One day a year | Defines a specific day in the year on which the event is executed. |
| On specific day | Defines a specific date on which the event is executed. |
#### Time Pattern:
There are 4 different options

| Time Pattern | Description |
| ---------------- | --------------------------------------------------------- |
| At specific time | Defines a specific time on which the event is executed. |
| Secondly | Defines a second interval on which the event is executed. |
| Minutely | Defines a minute interval on which the event is executed. |
| Hourly | Defines an hour interval on which the event is executed. |
#### Special Options:
__From/To:__
It is possible to define start and end time.
| Setting | Description |
| --------------- | ---------------------------------------------------------- |
| On Day Pattern | Defines the date interval in which the event is active. |
| On Time Pattern | Defines the daily interval in which the event is active. |
| From | Start Time = Defines the beginning of the interval. |
| To | End Time = Defines the end of the interval. |
| "Do not end" | No end time. If deactivated, the "To" option is displayed. |
### Examples:
#### Every friday at 09:00:
Day Pattern = Weekly with value one and Friday checked
Time Pattern = At specific time with 09:00:00
#### Every 5 minutes from 12:02:10 until 16:00:00:
Day Pattern = Daily with value 1
Time Pattern = Minutely with value 5
From: 12:02:10 To: 16:00:00
No hook at "Do not end"
First execution at 12:02:10
Second execution at 12:07:10
...
--continuing until-->
...
Last execution at 15:57:10
## Schedule
Source: https://www.symcon.de/en/service/documentation/basics/events/schedule/
The schedule is a graphical tool for the configuration of weekly procedures.
The plan for the week, the group type, the actions, and the connection type are chosen in the management console.
The schedule actions and its changes are defined in the visualization "WebFront" or the configuration of the schedule.
### Group Types
There are four options

| Type | Description |
| ------------------------------------------------------- | --------------------------------------------------------------------------------------------------------------- |
| Single group: Whole week (Mon - Sun) | All week days are summarised in a single group. |
| Two groups: Work days (Mon-Fri) and weekend (Sat + Sun) | Splits the week into two groups and allows the days from Mon-Fri and Sat+Sun to be configured independently. |
| Seven groups: One group for each day | Every week day can be configured individually. |
| Advanced | The week days can be combined as required. Each combination is summarized into one group and can be configured. |
### Actions
The schedule offers actions depending on the selected target. At least two schedule actions need to be configured. As part of the schedule action, an [Action](https://www.symcon.de/en/llms/concepts/automations.md) is defined for the target.
#### Add schedule action
A schedule action can be added by clicking on "Add". For the schedule action, a name, a color, and an [Action](https://www.symcon.de/en/llms/concepts/automations.md) are selected.

### Configuration of the schedule actions
The durations of the actions can be configured within the Management Console or the WebFront.
Within the grafical interface, the following applies:
__Single Click__ configures an existing state.
__Click & Pull__ creates a new state.


> **Note:** The selected action is only executed when the action changes.
> **Warning:** Important remark:
> Previously set actions are not undone by an action change.
> This means, when an action activates a light, it is not automatically deactivated when the action changes unless the deactivation is described explicitely.
#### Bind to flow script
If the action "Run Automation" is selected for a [Flow Script](https://www.symcon.de/en/llms/concepts/automations.md), the action "On Schedule Action" can be used to execute a number of actions on a specific schedule action. When the first schedule is added as trigger, the "On Schedule Action"-actions are added automatically.

### Example with flow script
This is an example flow script which is executed via schedule.

#### Bind to PHP Script
If the action "Run Automation" is selected for a [System Variable](https://www.symcon.de/en/llms/concepts/automations.md) $_IPS['ACTION'].
### Example with script
This is an example PHP script which is executed via schedule.
```php
//switch over the state IDs
switch ($_IPS['ACTION']) {
case 1: //ID 1
SetValueBoolean(39540 /*[Test Environment\WorkDay]*/, true);
echo "Hello World, on a work day";
break;
case 2: //ID 2
SetValueBoolean(39540 /*[Test Environment\WorkDay]*/, false);
echo "Hello World, Yay week end!!";
break;
}
```
#### Hint for Experts
It is possible to check the currently active schedule action via script.
```php
$e = IPS_GetEvent($id);
$actionID = false;
// Loop through all groups
foreach($e['ScheduleGroups'] as $g) {
// Check if the group is responsible for today
if($g['Days'] & date("N") > 0) {
// Search for current trigger point. We exploit the property that the trigger points are sorted ascendingly.
foreach($g['Points'] as $p) {
if(date("H") * 3600 + date("i") * 60 + date("s") >= $p['Start']['Hour'] * 3600 + $p['Start']['Minute'] * 60 + $p['Start']['Second']);
} else {
break; // Once passed, we can abort.
}
}
break; // The loop can be canceled once we have found our day. Every day must be in exactly one group.
}
}
var_dump($actionID);
```
## Media
Source: https://www.symcon.de/en/service/documentation/basics/media/
IP-Symcon supports sound and image files, charts, documents, streams, and views from IPSStudio as media.

### Add media
The tutorial for the configuration of each type of media is contained within the corresponding subcategory.
It is possible to add the following types of media:
[Image/Sound](https://www.symcon.de/en/llms/concepts.md)
[Charts](https://www.symcon.de/en/llms/concepts.md)
[Documents](https://www.symcon.de/en/llms/concepts.md)
[Streams](https://www.symcon.de/en/llms/concepts.md)
[Views from IPSStudio](https://ipsview.brownson.at/)
## Image/Sound
Source: https://www.symcon.de/en/service/documentation/basics/media/image-sound/
### Add Image or Sound Files
The dialog "Add object -> Media -> Image or Sound" is used to add an image or sound file to the media pool.
Any image or sound file from the hard drive, network, internet, etc. can be chosen for upload and will be copied into the media pool of IP-Symcon.


Added Image/Sound objects are available in the object tree.
A preview can be shown with a double click on the media object in the object tree.


#### Allowed file extensions
| Ending | since version |
| ------ | ------------- |
| .jpg | 3.4 |
| .jpeg | 3.4 |
| .gif | 3.4 |
| .png | 3.4 |
| .ico | 3.4 |
| .webp | 8.1 |
> **Note:** All files can be added - however, the correct display in the tile visualization is only guaranteed for these types
## Charts
Source: https://www.symcon.de/en/service/documentation/basics/media/charts/
Charts can present one or more variables as graphs. Using variables in a chart requires that the variables are logged. Configuring the logging of variables is explained in the [Archive Control](https://www.symcon.de/en/llms/modules/archive-control.md).
### Configuration in IP-Symcon
A new chart can be added via Right click -> "Add object" -> "Media" -> "Chart" at the selected location. The selected (logged) variables are used as data source for the individual graphs.
#### Edit chart
General properties of the chart.
| Option | Description |
| ---------------- | ---------------------------------------------------------------------------------------------------------------------------------------------------- |
| Add | Add a single variable -> Opens the "Configure graph" dialog. If a graph already exits, this dialog can be opened by clicking on the gear in the list |
| Name | Name of the Chart |
| Location | Selection of the location for the chart |
| Type | Selection the type of presentation as line, bar, or bool chart |
| Visual Settings | Here, the icon, visibility, and activation can be configured |
| Advanced Setting | A description can be provided here |
#### Configure graph
A graph represents a single dataset for the chart.
| Field | Description |
| ------------ | ----------------------------------------------------------------------------------------------------------------------------------------------------------------------- |
| Axis Profile | Selection of the [Variable Profile](https://www.symcon.de/en/llms/concepts.md) . The defined Min and Max values are used for scaling the Y-axis (not available for Bool Chart) |
| Axis Side | Selection if the labels for this graph should be at the left or at the right (not available for Bool Chart) |
| Fill Color | Selection of the desired fill color - Transparency possible |
| Line Color | Selection of the desired line color |
| Offset | An offset by the respective time unit (see below for examples) |
| Title | Meaningful title which is shown in the legend. If the title is empty, the name of the variable is displayed |
| Variable | Selection of the displayed variable |
### Display
__Display as Popup Graph__
To display a popup graph, the chart needs to be moved to the desired [category](https://www.symcon.de/en/llms/concepts.md) in the object tree.
__Display as Full Screen Graph__
A full screen graph is displayed by adding the chart as [graph element](https://www.symcon.de/en/llms/components/webfront-visualization.md) with the WebFront editor.
### Additional Options for Presentation
Selectable options that can be activated within the graph to change the presentation.
| Abbreviation | Meaning | Description |
| ------------ | ------------ | ------------------------------------------------------------------------------------------------------------------------------------------------------------------------------------- |
| CON | Continuous | The X axis is adjusted such that the right border is set to the most current value. This shows the biggest possible amount of current data |
| DYN | Dynamic | If activated: The Y axis is scaled according to the minimum and maximum value of the chart If deactivated: The borders of the Y axis are taken from the selected variable profile |
| HD | High Density | If activated: An increased precision of average values is used for the presentation of the graph. See table __Average Intervals__ |
| Legend | Legend | (Charts only) (De-)Activates the legend |
| MIN/MAX | Min/Max | (Automatically generated graphs for variables only) Two additional graphs with the minimum and maximum values are shown |
| RAW | Raw data | If activated: The raw data is displayed. If deactivated: The aggregated values are shown |
__Average Intervals__
| Timespan | Regular | High Density (HD) |
| -------- | --------- | ----------------- |
| Decade | Years | Months |
| Year | Months | Days |
| Month | Days | Hours |
| Week | Days | Hours |
| Day | Hours | 5 minutes |
| Hour | 5 minutes | 1 minute |
### Example 1 (Type: Bar)
This example shows the comparison of energy costs of a heating system.
The same variable was chosen twice, but one (blue) uses a time offset of -1.
In the week presentation, a comparison between the current and the previous week is shown, in the year presentation, a comparison to the previous year, ...


### Example 2 (Type: Line)
This example displays the gain of a solar collector as well as a sum of the current consumption. The values for these two graphs can be read at the left axis. In addition the exterior temperature is integrated, which uses the right axis.


### Example 3 (Type: Bool)
This example shows a bool chart that shows the state of a motion sensor over the course of four consecutive hours.


## Documents
Source: https://www.symcon.de/en/service/documentation/basics/media/documents/
_Requires Symcon >= 4.3_
### Add Media Document
A new media file of the type document can be added via the "Add Object -> Media -> Document" dialog.
A new file can be created or an existing one from the hard disk, network, etc. can be selected, which IP-Symcon then copies into the media pool.
Added documents can be viewed and opened in the object tree under "Media Files".

#### Allowed file extensions
| Ending | since version |
| ------ | ------------- |
| .doc | 4.3 |
| .docx | 5.2 |
| .pdf | 4.3 |
| .txt | 4.3 |
| .xls | 4.3 |
| .xlsx | 5.2 |
> **Note:** All files can be added, but later support via WebFront will only be available for the specified file types
## Streams
Source: https://www.symcon.de/en/service/documentation/basics/media/streams/
### Add Media Stream
It is possible to add MJPEG and RTSP streams to the WebFront by using the special media type Stream. Further information and the address can be found in the documentation of the utilized web camera. The size of the stream can be parameterized by the configuration of the web camera. The complete address, including the username and password, needs to be entered within the corresponding dialog of IP-Symcon.
> **Warning:** RTSP streams can currently only be displayed in Chrome, Firefox, Opera, Edge, Android (incl. apps since version 5.1), Safari (since version 5.5), and iOS (incl. apps since version 5.5).
> **Note:** RTSP streams need to be h264 encoded. As IP-Symcon acts as distributor for RTSP streams, limits are applied depending on the used [edition](https://www.symcon.de/en/product/editions/).
> **Note:** For **Axis** cameras: To use streams in the tile visualization, you must open “Plain Config” in “Advanced Options” and activate the setting **Image.I0.MPEG.H264.PSEnabled**. Then save with **Save** and reload the tile visualization to load the stream correctly.

## Links
Source: https://www.symcon.de/en/service/documentation/basics/links/
### Description
Links are connected to other existing objects and represent those objects in a different location. This is done without changing the existing structures and sortings.
All properties of the original object are shown.
Only the following properties of a link can be changed:
- Name
- [Icons](https://www.symcon.de/en/llms/components/icons.md) for the WebFront
- Visibility Settings for the WebFront
All objects within the object tree can be linked:
- Categories
- Instances
- Variables
- Scripts
- Events
- Media
> **Warning:** Links of links are not possible. However, multiple links of one object are possible.
### Application
Links are primarily used to position objects in the WebFront in desired locations. Thus, instead of positioning the object itself in the locations, a link of an object is placed there instead.
Another possibility is the creation of an overview tab that centrally shows the properties of multiple distributed objects in a single location.
A link is created by right clicking the object to be linked -> "Link Object" -> Choose a location for the link.
> **Note:** Only the top level categories of the object tree can be accessed within the iOS or Android app. Links can be used to bring objects within subcategories back to the "surface".
### Example
A complex example is found in [Use Links](https://www.symcon.de/en/llms/how-to.md)
---
# Automations
> Symcon documentation · English · generated on 2026-09-26
> Index: https://www.symcon.de/en/llms.txt
Source: https://www.symcon.de/en/service/documentation/basics/automations/
Automations are used to define individually adjusted behavior. IP-Symcon supports flow scripts and PHP scripts. Flow scripts use integrated actions that can be clicked together easily. A PHP script is the option for experts and uses the programming language PHP.
Automations in IP-Symcon:
* [Flow Scripts](https://www.symcon.de/en/llms/concepts/automations.md)
* [PHP Scripts (for experts)](https://www.symcon.de/en/llms/concepts/automations.md)
## Flow Scripts
Source: https://www.symcon.de/en/service/documentation/basics/automations/flow-scripts/
A flow script is a sequence of [Actions](https://www.symcon.de/en/llms/concepts/automations.md) . These can be used without a single line of source code and thus are useable without any programming knowledge.
### Add Flow Script
A new flow script can be added via "+" -> "Automation" -> "Flow Script". It is recommended to give the flow script a unique and meaningful name.
The name can be changed at any time and the flow script can be moved within the tree view via Drag & Drop. Alternatively, the flow script can be directly created at the wanted position via "Right click" -> "Add Object" -> "Automation" -> "Flow Script".

### Add Trigger
A trigger is an event and defines when a flow script is executed. The specific configuration is explained at [Events](https://www.symcon.de/en/llms/concepts.md).
| Column | Description |
| -------------- | ------------------------------------------ |
| Name | The name of the trigger in the object tree |
| Next Execution | When or how the trigger is triggered |
| Gear | Open the configuration for the trigger |
| Garbage Bin | Delete the trigger |

### Add Action
An action is specific for a selected target. An action can trigger a multitude of processes, e.g., switching a device, a condition for further subactions, or a break in the flow that is continued after some time. As such, complex processes can be constructed without a single line of source code.
| Column | Description |
| ------------ | -------------------------------------------------------------------------------------------------------- |
| Step | The position of the action within the flow script. Some actions have substeps |
| Target | Displays the target of the action. It can be an object or a general action, e.g., waiting or a condition |
| Action | A description of the action to be executed |
| Last Runtime | The runtime of the step during the last execution of the flow script |
| Gear | Open the configuration of the action |
| Garbage Bin | Delete the action |


> **Note:** If a red exclamation mark appears in the list, the last execution was erroneous. The error message can be displayed with a click on the exclamation mark.
#### Context Menu
A right click on the list of actions shows additional options in a context menu.
| List | Description |
| ----------------------- | -------------------------------------------------------------------------------------------------------------------------- |
| Add Action before/after | An action is added before or after the clicked row. |
| Duplicate | The clicked action is duplicated, with subactions if applicable. The duplicated action is position after the original one. |
### General Elements
| Menu Entry | Description |
| ------------- | --------------------------------------------------------------------------------------------------------------------------------------------------------------------------------------------------------------------------------------- |
| Diagnose Runs | Opens a dialog that is used for an analysis of previous executions. Erroneous, aborted and succesful actions are listed here, see [below](https://www.symcon.de/en/llms/concepts/automations.md) |
| Settings | The behavior of the flow script can be defined here, see [Behavior during Execution](https://www.symcon.de/en/llms/concepts/automations.md) and [Behavior on Error](https://www.symcon.de/en/llms/concepts/automations.md) |
| Save | Save the current configuration of the flow script |
| Run | Save and run the flow script |
| Stop | Stop the current execution of the flow script |
#### Analyze Execution
The execution of a flow script goes through different status. These are described textually and coded with a color. In addition, a single execution can be expanded. This displays the actions that were executed during that run.
| Status | Description |
| ------------ | -------------------------------------------------------------------- |
| Queued | The execution is still in the queue (Color: White) |
| Running | The execution is still running (Color: White) |
| Aborted | The execution was aborted (Color: Yellow) |
| Done | The execution finished succesfully (Color: Green) |
| Done (Error) | The execution finished but some steps had errors (Color: Yellow) |
| Error | The execution was aborted due to an error (Color: Red) |
| Skipped | Is caused by "Reject further execution when running" (Color: Yellow) |
#### Behavior on running executions
This option describes the behavior if the flow script is executed again while another execution is still running.
| Behavior | Description |
| ---------------------------------------- | ---------------------------------------------------------------------------------------------- |
| Reject further execution when running | New executions are ignored while another execution is still running |
| Abort current execution on new execution | The current execution is aborted on a new execution |
| Add execution into queue | Multiple executions of the flow scripts are added to a queue and executed one after the other. |
#### Behavior on Error
| Behavior | Description |
| --------------------------------- | ----------------------------------------------------------------------------------------------------------------------------------------------------------------------------------------------------------------------------------------------------------------------- |
| Abort remaining steps on Error | On an error, the whole execution is aborted |
| Continue remaining steps on Error | On an error, the execution is continued |
| Retry this step on Error | On an error, the erroneous step is repeated up to the defined number of retries or until succesful. The option "Continue execution even if all retries have failed" defines whether the step is skipped on retries without success or if the whole execution is aborted |
## Actions
Source: https://www.symcon.de/en/service/documentation/basics/automations/flow-scripts/actions/
An action is a command that can be used without complex programming or a script. Depending on a selected target, multiple fitting actions are listed. Each action provides individual configuration and options.
### Add Action
Actions are used in [Flow Scripts](https://www.symcon.de/en/llms/concepts/automations.md), [Events](https://www.symcon.de/en/llms/concepts.md), [Instance Configuration](https://www.symcon.de/en/llms/concepts.md) and the ["Test Commands" Dialog](https://www.symcon.de/en/llms/concepts.md). How they are added and configured is explained in the corresponding section. However, all possibilities are configured in the same way:
* Step 1: Select a target - This loads and displays possible actions
* Step 2: Selecting an action - The actual selection of an action (Quick Filter Search is possible)
** The actions are sorted into different categories and thus enable a quick access
* Step 3: Configuration of Parameters - The actual values for the action are set here
## Logic Scripts
Source: https://www.symcon.de/en/service/documentation/basics/automations/logic-scripts/
_Requires Symcon >= 7.0_
Logic Scripts is a tool that can be used to create individual logic scripts and automations in IP-Symcon. Typical use cases are
- Group switches for light
- Staircase automation
- Sensor evaluation
#### add logic script
A new logic script can be added via "+" -> "Automation" -> "Logic Script". It is recommended to give the logic scipt a meaningful name.
The name can be changed at any time and the logic script can be moved to a different position in the object tree using drag & drop.
Alternatively, the creation can be done directly at the desired position via "right click" -> "Add object" -> "Automation" -> "Logic Script".

### Components of the editor
The logic script editor is divided into the following areas:
| Name | Description |
| ------------ | ----------------------------------------------------------------------------------------------------------------------------------------------------------------------------------------------------------------------------------------------------------------------------------------------------------------------------------------------- |
| Menu | The menu provides central functions such as saving, zooming or executing a logic script. |
| Panels | The Logic Script Editor provides 2 panels: - The repository with the list of all available modules - The PropertyEditor for displaying and editing properties Use drag & drop to change the position of the panels; 4 predefined positions are available. If you place several panels in one position, tabs are automatically created. |
| Drawing area | The drawing area is the central component of the editor and allows you to place and edit the individual modules. |
## Menu
Source: https://www.symcon.de/en/service/documentation/basics/automations/logic-scripts/menu/

The following functions are available:
| Name | Description |
| ------------------------- | ------------------------------------------------------------------------------------------------------------------------------------------------------------------------------------------------------------------------------------------------------------------------------------------------------------------------------------------------------------------------------------------------------------- |
| Administration | Click the Administration button to display the available actions for the logic script. After activating the button, the administration menu opens. The following actions are available: - Export logic script - Import logic script |
| Zoom | The Logic Script Editor offers the option of zooming in and out of a view in 10% increments; details can be found in the Drawing area section. |
| Undo and Redo | Menu group for canceling or restoring changes, details can be found in the artboard area. |
| Navigate back and forward | - Menu group for navigating in the history, these controls are only available in History mode. - Press the Back button to navigate back in the history. After pressing the button, the next older data in the history is loaded and displayed. - Press the Forward button to navigate forwards in the history. After pressing the button, the next newer data in the history is loaded and displayed. |
| Edit | Press the Edit button to activate the edit mode of the Logic Script Editor. After activating the button, the logic script can be edited. |
| Live | Press the Live button to activate the live mode of the Logic Script Editor. After activating the button, the current values of the logic script execution are displayed on the drawing area. |
| History | Click the History button to activate the history mode of the Logic Script Editor. After activating the button, you can navigate through the history of the individual executions. |
| Execute | Press the Execute button to start a manual execution of the logic script. After activating the button, the Automation Logic Script is executed in IP-Symcon and the current values are displayed on the drawing area. |
| Save | Click the Save button to save your changes to the logic script. After activating the button, the logic script is saved on the IP-Symcon server. When switching to live or history mode, the logic script is saved automatically. |
| Info | Press the Info button to display the program information. After activating the button, the dialog with the license and program information is displayed. |
## Property Editor
Source: https://www.symcon.de/en/service/documentation/basics/automations/logic-scripts/property-editor/
The Property Editor panel displays all available properties of a control element.

Each property consists of a name (left column) and an associated value (for technicians: key-value pair; right column).
When you create a new object on the drawing area, its properties are assigned default values from IP-Symcon. To customize properties to your needs:
1. Click in the respective value fields and change the values.
2. Save your changes from time to time (this may take a few seconds depending on your connection speed).
### Overview
## Outputs
Source: https://www.symcon.de/en/service/documentation/basics/automations/logic-scripts/property-editor/outputs/
To define the outputs of a mapping module, press the menu button of the Outputs property of your mapping module. The definition of the inputs is loaded and displayed:

To configure an output of the mapping module:
1. Add a new entry to the selection using +.
2. Select the entries one after the other and edit their properties (see below).
3. Once you have defined all outputs, exit the editor by clicking the Back button.
### The following options are available
| Name | Description |
| --------- | --------------------------------------------------------------------------------------------------------- |
| Name | Name of the output |
| Data type | Defines the data type of the output, the following options are available: Boolean, Integer, Float, String |
## The Properties
Source: https://www.symcon.de/en/service/documentation/basics/automations/logic-scripts/property-editor/the-properties/
The properties described here are important for your work with IPS logic scripts.
A description of specific properties of a module can also be found in [Repository](https://www.symcon.de/en/llms/concepts/automations.md) .
### Group: Entity
| Name | Description |
| ---------- | ------------------------------------------- |
| EntityName | The name of the object in the logic script. |
### Group: Variable
| Name | Description |
| ---- | ---------------------------------- |
| ID | ID of the variable in IP-Symcon. |
| Name | Name of the variable in IP-Symcon. |
### Group: Instance
| Name | Description |
| ---- | ---------------------------------- |
| ID | ID of the instance in IP-Symcon. |
| Name | Name of the instance in IP-Symcon. |
## Inputs
Source: https://www.symcon.de/en/service/documentation/basics/automations/logic-scripts/property-editor/inputs/
To define the inputs of a mapping module, press the menu button of the Inputs property of your mapping module. The definition of the inputs is loaded and displayed:

To configure an input of the mapping module:
1. Add a new entry to the selection using +.
2. Select the entries one after the other and edit their properties (see below).
3. When you have defined all inputs, exit the editor by clicking the Back button.
The following options are available
| Name | Description |
| --------- | -------------------------------------------------------------------------------------------------------- |
| Name | Name of the input |
| Data type | Defines the data type of the input, the following options are available: Boolean, Integer, Float, String |
## Mappings
Source: https://www.symcon.de/en/service/documentation/basics/automations/logic-scripts/property-editor/mappings/
To define the individual mappings of a mapping module, press the Edit button of your mapping module. The definition of the mappings is loaded and displayed:

The editor provides a column for each input and for each output; when evaluating the module, the first entry in the list is used where all values at the input match.
To configure a mapping of the mapping module:
1. Add a new entry to the selection using +.
2. Select the value for the mapping for each input.
3. With "Active" you can deactivate a mapping without having to delete it immediately.
4. Select the desired value for each output.
5. Description provides a brief documentation of the current mapping line. This entry has no effect on the actual execution of the module.
6. Once you have defined all outputs, exit the editor by clicking the Back button.
## Repository
Source: https://www.symcon.de/en/service/documentation/basics/automations/logic-scripts/repository/
The panel repository offers all available logic script modules, which can be placed on the drawing area simply by "drag and drop".
The repository offers the following options for finding modules:
### Alphabetical sorting
Select the Alphabetical sorting option to sort all available modules in the repository by name.

### Grouped by usage
Select the option Grouped by usage () to group all available modules in the repository according to their usage:

### Search by ID
Select the Search by ID option to search for all available modules that can be used for a specific ID in IP-Symcon.

Click on the "Search" button to search for modules for an IP-Symcon object. After clicking on the "Search" button, the dialog for searching for an ID is opened:

After selecting an ID and confirming with OK, all available modules for the selected object are displayed.
### Expert mode
Select the option Expert mode () to activate the "Expert mode", after activating the option the repository also displays rarely used modules.
> **Note:** An overview of the relevant IP-Symcon properties, regardless of the object type, can be found in the section The properties
### Overview of the modules
For a better overview, the editor modules have been grouped according to their use.
## Actions
Source: https://www.symcon.de/en/service/documentation/basics/automations/logic-scripts/repository/actions/
Modules of the "Actions" group enable the execution of IP-Symcon Automation scripts or various other IP-Symcon actions.
## Custom Action
Source: https://www.symcon.de/en/service/documentation/basics/automations/logic-scripts/repository/actions/custom-action/
The "Custom action" module offers the option of executing any PHP code.

### Properties
| Name | Description |
| ---------------- | ----------------------------------------------------------------------------------------------------------- |
| Number of inputs | Number of inputs that the module should provide. |
| PHP code | PHP code to be executed. The inputs can be referenced in the PHP code via the variables $value1 to $value8. |
### data points input
| Name | Description |
| ------- | -------------------------------------------------------------------------------------------- |
| Value x | Depending on the "Number of inputs" property, 1 to 8 data points are available at the input. |
## Function call
Source: https://www.symcon.de/en/service/documentation/basics/automations/logic-scripts/repository/actions/function-call/
The "Function call" module offers the option of calling an IP Symcon instance function.

### Properties
| Name | Description |
| ------------- | --------------------------------------------------- |
| ID | ID of the instance where a function is to be called |
| Function name | Name of the function to be called. |
> **Note:** After entering a valid ID, the DropDown function already provides all possible function names.
### data points input
| Name | Description |
| ---------- | ---------------------------------------------------------------- |
| Parameters | The inputs of the module vary depending on the selected function |
## IRTrans
Source: https://www.symcon.de/en/service/documentation/basics/automations/logic-scripts/repository/actions/irtrans/
The "IRTrans" module offers the option of controlling an IRTrans instance. Up to 3 buttons can be controlled.

### Properties
| Name | Description |
| -------------- | -------------------------------------------------- |
| Remote control | Remote control to be used for sending the buttons. |
| Instance ID | Instance to be used for sending the IR commands. |
> **Note:** If commands are to be sent to different devices, several IRTrans modules must be used
### data points input
| Name | Description |
| -------- | -------------------------- |
| Button 1 | 1st IR command to be sent. |
| Button 2 | 2nd IR command to be sent. |
| Button 3 | 3rd IR command to be sent. |
## Log Message
Source: https://www.symcon.de/en/service/documentation/basics/automations/logic-scripts/repository/actions/log-message/
The "Log message" module offers the option of writing a message to the IP-Symcon log.

### Properties
| Name | Description |
| ------ | ------------------------------------------------------- |
| Sender | Text to be used in the Sender field of the log message. |
### data points input
| Name | Description |
| ------- | ------------------------------------------------------------------------------------------------------------- |
| Send | TRUE on this input triggers the sending of the message. If the input is not connected, a mail is always sent. |
| Message | Text for the log message. |
## Mail Notification
Source: https://www.symcon.de/en/service/documentation/basics/automations/logic-scripts/repository/actions/mail-notification/
The "Mail" module offers the option of sending mail messages.

### Properties
| Name | Description |
| --------------- | --------------------------------------------------------- |
| InstanceID Mail | ID of the SMTP instance to be used for sending the mails. |
### data points input
| Name | Description |
| ------- | ------------------------------------------------------------------------------------------------------------- |
| Send | TRUE on this input triggers the sending of the message. If the input is not connected, a mail is always sent. |
| Subject | Text to be used in the subject of the message. |
| Message | Text for the mail message. |
## Push Notification
Source: https://www.symcon.de/en/service/documentation/basics/automations/logic-scripts/repository/actions/push-notification/
The "Push Notification" module offers the option of sending a push notification to a mobile device.

### Properties
| Name | Description |
| ----------------------- | ---------------------------------------------------------------------------------------------------- |
| Notification instance | ID of the notification instance (notification control) to be used for sending the push notification. |
| Object for notification | ID of the object (view or WebFront configurator) to which the push notification is to be sent. |
### data point input
| Name | Description |
| ------- | -------------------------------------------------------------------------------------------------------------------------- |
| Send | TRUE on this input triggers the sending of the message. If the input is not connected, a notification is always triggered. |
| Subject | Text to be used in the subject of the message. |
| Message | Text for the message. |
## Script execution
Source: https://www.symcon.de/en/service/documentation/basics/automations/logic-scripts/repository/actions/script-execution/
The "Script" module offers the option of integrating other scripts or automations into the logic script.

### Properties
| Name | Description |
| ---------- | ---------------------------------------------------------- |
| ScriptID | ID of the script. |
| Sender | Value for the SENDER variable when the script is called. |
| VariableID | Value for the variable VARIABLE when the script is called. |
### data points input
| Name | Description |
| ----- | ------------------------------------------------------- |
| Value | Value for the variable VALUE when the script is called. |
## Variable with ID
Source: https://www.symcon.de/en/service/documentation/basics/automations/logic-scripts/repository/actions/variable-with-id/
The "Variable with ID" module offers the option of changing a variable that is only referenced at logic script runtime via the ID of the variable.

### data points input
| Name | Description |
| -------- | --------------------------------- |
| Variable | ID of the variable to be changed. |
| Value | Value to be set. |
## Condition
Source: https://www.symcon.de/en/service/documentation/basics/automations/logic-scripts/repository/condition/
Modules of the "Condition" group enable the conditional execution of parts of the logic script.
## Conditional value
Source: https://www.symcon.de/en/service/documentation/basics/automations/logic-scripts/repository/condition/conditional-value/
The "Conditional value" module only sets a value if a condition at the input has been evaluated to TRUE.

### Data points input
| Name | Description |
| --------- | --------------------------------------------- |
| Value | Value to be set. |
| Condition | Logical value that is checked as a condition. |
### data point output
| Name | Description |
| ----- | ------------------------------------------------------------------------------------------------------------------------------- |
| Value | Value to be set. The following branch of the logic script is only executed if the condition at the input was evaluated to TRUE. |
## Condition
Source: https://www.symcon.de/en/service/documentation/basics/automations/logic-scripts/repository/condition/condition/
The "Condition" (If) module offers the option of integrating a conditional branch into the logic diagram. If the condition at the input is fulfilled, the "Fulfilled" output returns the value "True", otherwise the "Not fulfilled" output returns the value "True". The other output does not return a value.

### data points input
| name | description |
| --------- | --------------------------------------------- |
| Condition | Logical value that is checked as a condition. |
### data points output
| Name | Description |
| ------------- | ----------------------------------------------------------------------------- |
| Fulfilled | The following branch is only executed if the condition is evaluated to TRUE. |
| Not fulfilled | The following branch is only executed if the condition is evaluated to FALSE. |
## Documentation: Comment
Source: https://www.symcon.de/en/service/documentation/basics/automations/logic-scripts/repository/documentation-comment/
The "Comment" module offers the option of inserting text to comment on the logic script.

### Properties
| Name | Description |
| ---- | ------------- |
| Text | Comment Text. |
## Events
Source: https://www.symcon.de/en/service/documentation/basics/automations/logic-scripts/repository/events/
Modules in the "Events" group enable the logic script to be executed automatically when the value of a variable changes.
## On change
Source: https://www.symcon.de/en/service/documentation/basics/automations/logic-scripts/repository/events/on-change/
The "On change" module enables the logic script to be executed when a specific variable has been changed (new value is assigned to the variable).

### data points input
| Name | Description |
| ----- | ------------------------------------------------------------------------------------ |
| Value | Data point of the variable whose change is to trigger execution of the logic script. |
### data point output
| Name | Description |
| ------------- | --------------------------------------------------------------------------------------------------------------------------------------------------------------------------------------- |
| Value | Data point of the variable. The following branch of the logic script is only executed if the associated variable has been changed. |
| Triggering | Data point of the module that returns TRUE if the linked variable has been changed. The following branch of the logic script is only executed if the variable has been changed. |
| No triggering | Data point of the module that returns TRUE if the linked variable has not been changed. The following branch of the logic script is only executed if the variable has not been changed. |
### application example
Given are 1 Homematic motion detector and 1 Homematic actuator for switching a light:

View of the two actuators in the WebFront

A logic script is now to be created in Logic Scripts that automatically switches a light on or off again when the motion detector is triggered.
You can implement this behavior by using a With change, predefined instance modules for setting the values can be found in the object tree of the logic script designer.

In this specific case, the logic script is called up each time the status variable of the motion detector is changed and applies its status to the light.
## On update
Source: https://www.symcon.de/en/service/documentation/basics/automations/logic-scripts/repository/events/on-update/
The "On update" module enables the logic script to be executed when a specific variable is updated (same value or different value is assigned to the variable).

### data points input
| Name | Description |
| ----- | ------------------------------------------------------------------------------------ |
| Value | Data point of the variable whose update is to trigger execution of the logic script. |
### data point output
| Name | Description |
| ------------- | --------------------------------------------------------------------------------------------------------------------------------------------------------------------------------------- |
| Value | Data point of the variable. The following branch of the logic script is only executed if the associated variable has been updated. |
| Triggering | Data point of the module that returns TRUE if the linked variable has been updated. The following branch of the logic script is only executed if the variable has been updated. |
| No triggering | Data point of the module that returns TRUE if the linked variable has not been updated. The following branch of the logic script is only executed if the variable has not been updated. |
## At specific value
Source: https://www.symcon.de/en/service/documentation/basics/automations/logic-scripts/repository/events/at-specific-value/
The "At specific value" module enables the logic script to be executed when a variable reaches a specific value.

### Properties
| Name | Description |
| ------------------------- | --------------------------------------------------------------------------------------------------------------------------------------------------------------------------------------------------------------------------------------------------------------------------------------------------- |
| Value for triggering | Value at which the module should trigger. |
| Trigger subsequent events | If this option is activated, the module triggers each time the variable is updated if the value corresponds to the specified limit. If the option is deactivated, the module only triggers once; the module only triggers again if the value exceeds or falls below the limit and reaches it again. |
### data points input
| Name | Description |
| ----- | ------------------------------------------------------------------------------------ |
| Value | Data point of the variable whose change is to trigger execution of the logic script. |
### data point output
| Name | Description |
| ------------- | ----------------------------------------------------------------------------------------------------------------------------------------------------------------------------------------------------------------- |
| Value | Data point of the variable. The following branch of the logic script is only executed if the "Update" output also returns TRUE. |
| Triggering | Data point of the module that returns TRUE if the value of the linked variable has reached the specified value. The subsequent branch of the logic script is only executed if the value has been reached. |
| No triggering | Data point of the module that returns TRUE if the value of the linked variable has not reached the specified value. The subsequent branch of the logic script is only executed if the value has not been reached. |
## When exceeded
Source: https://www.symcon.de/en/service/documentation/basics/automations/logic-scripts/repository/events/when-exceeded/
The "When exceeded" module enables the logic script to be executed when a variable exceeds a certain value.

### Properties
| Name | Description |
| ------------------------- | -------------------------------------------------------------------------------------------------------------------------------------------------------------------------------------------------------------------------------------------------------------------------------- |
| Value for triggering | Value above which the module should trigger. |
| Trigger subsequent events | If this option is activated, the module triggers every time the variable changes if the value is above the specified limit. If the option is deactivated, the module only triggers once; the module only triggers again if the value falls below the limit and exceeds it again. |
### data points input
| Name | Description |
| ----- | ---------------------------------------------------------------------------------------- |
| Value | Data point of the variable whose exceeding should trigger execution of the logic script. |
### data point output
| Name | Description |
| ------------- | ------------------------------------------------------------------------------------------------------------------------------------------------------------------------------------------------------------------- |
| Value | Data point of the variable. The following branch of the logic script is only executed if the "Update" data point also returns TRUE. |
| Triggering | Data point of the module that returns TRUE if the value of the linked variable has exceeded the specified value. The subsequent branch of the logic script is only executed if the value has been exceeded. |
| No triggering | Data point of the module that returns TRUE if the value of the linked variable has not exceeded the specified value. The subsequent branch of the logic script is only executed if the value has not been exceeded. |
## When falling below
Source: https://www.symcon.de/en/service/documentation/basics/automations/logic-scripts/repository/events/when-falling-below/
The "When falling below" module enables the logic script to be executed when a variable falls below a certain value.

### Properties
| Name | Description |
| ------------------------- | ------------------------------------------------------------------------------------------------------------------------------------------------------------------------------------------------------------------------------------------------------------------------------- |
| Value for triggering | Value below which the module should trigger. |
| Trigger subsequent events | If this option is activated, the module triggers each time the variable changes if the value is below the specified limit. If the option is deactivated, the module only triggers once; the module only triggers again if the value exceeds the limit and falls below it again. |
### data points input
| Name | Description |
| ----- | ----------------------------------------------------------------------------------------- |
| Value | Data point of the variable whose undershoot should trigger execution of the logic script. |
### data point output
| Name | Description |
| ------------- | ------------------------------------------------------------------------------------------------------------------------------------------------------------------------------------------------------------------------------------------ |
| Value | Data point of the variable. The following branch of the logic script is only executed if the "Update" output also returns TRUE. |
| Triggering | Data point of the module that returns TRUE if the value of the linked variable has fallen below the specified value. The subsequent branch of the logic script is only executed if the value has fallen below the specified value. |
| No triggering | Data point of the module that returns TRUE if the value of the linked variable has not fallen below the specified value. The subsequent branch of the logic script is only executed if the value has not fallen below the specified value. |
## weekly schedule (1 group)
Source: https://www.symcon.de/en/service/documentation/basics/automations/logic-scripts/repository/events/weekly-schedule-1-group/
The module "Weekly schedule (1 group)" offers the possibility to link the logic script with an IP-Symcon weekly schedule with 1 group.

### Properties
| Name | Description |
| ----------------- | ------------------------------------------------------------------------------------------------ |
| Number of actions | Number of actions available for configuring the weekly schedule in the visualization. |
| Actions | List of weekly schedule actions. Each weekly schedule action can be assigned a name and a color. |
### data points output
| Name | Description |
| -------- | ----------------------------------------------------------------------------------------------------------------------------------------------------------------------------------------------------------------------------------------- |
| Action x | Data point of the respective weekly plan action, if the corresponding action is triggered, the data point is evaluated to TRUE. The subsequent branch of the logic script is only executed if this data point has been evaluated to TRUE. |
## Weekly schedule (2 groups)
Source: https://www.symcon.de/en/service/documentation/basics/automations/logic-scripts/repository/events/weekly-schedule-2-groups/
The module "Weekly schedule (2 groups)" offers the possibility to link the logic script with an IP-Symcon weekly schedule with 2 groups.

### Properties
| Name | Description |
| ----------------- | ------------------------------------------------------------------------------------------------ |
| Number of actions | Number of actions available for configuring the weekly schedule in the visualization. |
| Actions | List of weekly schedule actions. Each weekly schedule action can be assigned a name and a color. |
### data points output
| Name | Description |
| -------- | ----------------------------------------------------------------------------------------------------------------------------------------------------------------------------------------------------------------------------------------- |
| Action x | Data point of the respective weekly plan action, if the corresponding action is triggered, the data point is evaluated to TRUE. The subsequent branch of the logic script is only executed if this data point has been evaluated to TRUE. |
## Weekly schedule (7 groups)
Source: https://www.symcon.de/en/service/documentation/basics/automations/logic-scripts/repository/events/weekly-schedule-7-groups/
The module "Weekly schedule (7 groups)" offers the possibility to link the logic script with an IP-Symcon weekly schedule with 7 groups.

### Properties
| Name | Description |
| ----------------- | ------------------------------------------------------------------------------------------------ |
| Number of actions | Number of actions available for configuring the weekly schedule in the visualization. |
| Actions | List of weekly schedule actions. Each weekly schedule action can be assigned a name and a color. |
### data points output
| Name | Description |
| -------- | ----------------------------------------------------------------------------------------------------------------------------------------------------------------------------------------------------------------------------------------- |
| Action x | Data point of the respective weekly plan action, if the corresponding action is triggered, the data point is evaluated to TRUE. The subsequent branch of the logic script is only executed if this data point has been evaluated to TRUE. |
## Information
Source: https://www.symcon.de/en/service/documentation/basics/automations/logic-scripts/repository/information/
Module der Gruppe "Informationen" ermöglichen die Einbindung von diversen IP-Symcon Informationen in den Logic Script.
## Script Information
Source: https://www.symcon.de/en/service/documentation/basics/automations/logic-scripts/repository/information/script-information/
The "ScriptInfo" module offers the option of integrating information on the current script execution.

### data points output
| Name | Description |
| -------- | ------------------------------------------------------------------------------------------------------------- |
| Sender | The sender variable of the current script execution (value of the IP-Symcon script variable $_IPS['SENDER']). |
| Variable | The variable ID of the current script execution (value of the IP-Symcon script variable $_IPS['VARIABLE']). |
| Value | The value variable of the current script execution (value of the IP-Symcon script variable $_IPS['VALUE']). |
### application example
A typical application example for the "ScriptInfo" module is the realization of an action script for a variable.
The logic script receives the value of the visualization and assigns it to the relevant variable.
Further information on the subject of [action scripts](https://www.symcon.de/en/llms/concepts/automations.md).
The logic script is assigned to the variable as an action script by integrating the variable into the logic script and selecting the "As action script" option in the property editor.
Alternatively, the logic script script can also be manually assigned to the variable in the console.
In this example, the value of the "Entertainment" variable is set first (operation via the WebFront or IPSView client) and then the value is used to control an amplifier and a Sonos player using an automation script.

## System Information
Source: https://www.symcon.de/en/service/documentation/basics/automations/logic-scripts/repository/information/system-information/
The "SystemInfo" module provides information about the IP-Symcon system.

### data points output
| Name | Description |
| --------- | ------------------------------------------ |
| Timestamp | Unix Timestamp of the current system time. |
## Variable Inforamtion
Source: https://www.symcon.de/en/service/documentation/basics/automations/logic-scripts/repository/information/variable-inforamtion/
The "VariableInfo" module provides information on a variable.

### data points input
| Name | Description |
| ----- | ----------------------------------------------------------------------------------------------- |
| Value | Connection to the data point value of a variable from which the information is to be displayed. |
### data point output
| Name | Description |
| ----------- | -------------------------------------------------- |
| Last update | Unix Timestamp of the last update of the variable. |
| Last change | Unix timestamp of the last change to the variable. |
| ID | ID of the variable. |
## Constant
Source: https://www.symcon.de/en/service/documentation/basics/automations/logic-scripts/repository/constant/
The "Constant" module offers the option of integrating fixed values into the logic script; a data type, a value and a name for the display can be assigned to the module in the properties.

### Properties
| Name | Description |
| --------- | ----------------------------------------------- |
| Display | Name displayed in the diagram for the constant. |
| Value | Value of the constant as a string. |
| Data type | Data type of the constant. |
### data points output
| Name | Description |
| ----- | ------------------------- |
| Value | The value of the constant |
### application example
Given are 1 Homematic actuator for switching a light, 1 Homematic actuator for dimming a light and an IP-Symcon 868 actuator for operating an RGB strip:

The actuators can be switched separately via the WebFront:

A logic script is now to be created in Logic Scripts that sets a specific lighting scenario and assigns predefined values to the individual lighting fixtures.
You can realize these values by using constants, predefined instance modules for setting the values can be found in the [Object tree](https://www.symcon.de/en/llms/concepts/automations.md) of the Logic Script Designer.

In this specific case, the RGB luminaire is assigned the color blue, the wall light is switched off and the dimmer is set to 50%.
## Logic
Source: https://www.symcon.de/en/service/documentation/basics/automations/logic-scripts/repository/logic/
Modules in the "Logic" group enable the integration of logic modules.
## Not
Source: https://www.symcon.de/en/service/documentation/basics/automations/logic-scripts/repository/logic/not/
The "Not" module offers the option of implementing a logical NOT in the logic script.

### data points input
| Name | Description |
| ----- | --------------------------- |
| Value | Data point for input value. |
### data point output
| Name | Description |
| -------- | -------------------------------------------------------------------------------------------------------- |
| Inverted | Returns TRUE if the value at input Value is FALSE and returns FALSE if the value at input Value is TRUE. |
## Or
Source: https://www.symcon.de/en/service/documentation/basics/automations/logic-scripts/repository/logic/or/
The "Or" module offers the option of implementing a logical OR link in the logic script.

### Properties
| Name | Description |
| ---------------- | ------------------------------ |
| Number of inputs | Provides 2 to 8 module inputs. |
### data points input
| Name | Description |
| ------- | --------------------------------- |
| Value 1 | Data point for comparison value 1 |
| Value 2 | Data point for comparison value 2 |
### data point output
| Name | Description |
| ------ | ----------------------------------------------- |
| Result | Returns TRUE if the value of one input is TRUE. |
### Application example
Given are 2 Homematic actuators for controlling a garden irrigation system and 1 Homematic actuator that acts as the main switch for the irrigation system:

A logic script is now to be created in Logic Scripts that automatically controls the garden pump. If one of the two irrigation actuators is activated, the main switch should also be activated. If both actuators are off, the main switch should also be deactivated.
You can implement this behavior using an Or module; predefined modules for the instances can be found in the object tree of the logic script editor.

How it works:
- A change to the "STATE" outputs of the irrigation circuit automatically calls up the logic script as soon as one of the two irrigation actuators is switched (regardless of whether via a visualization, a weekly schedule or another script).
- If one of the two actuators has been activated, the or returns TRUE and activates the main switch .
- If both actuators are deactivated, the OR returns FALSE and deactivates the main switch again.
> **Note:** For automatic execution of the logic script when the variable is changed, you must set the "Logic Script execution" property of the "Read instance" module to the value "On change"

## And
Source: https://www.symcon.de/en/service/documentation/basics/automations/logic-scripts/repository/logic/and/
The "And" module offers the option of implementing a logical AND link in the logic script.

### Properties
| Name | Description |
| ---------------- | ------------------------------ |
| Number of inputs | Provides 2 to 8 module inputs. |
### data points input
| Name | Description |
| ------- | --------------------------------- |
| Value 1 | Data point for comparison value 1 |
| Value 2 | Data point for comparison value 2 |
### data point output
| Name | Description |
| ------ | ------------------------------------------------------ |
| Result | Returns *TRUE* if the value at all inputs are *TRUE*. |
## Mapping table
Source: https://www.symcon.de/en/service/documentation/basics/automations/logic-scripts/repository/mapping-table/
The "Mapping table" module offers the option of mapping up to 8 inputs with a complex mapping logic to up to 8 outputs. You can define the values for the respective outputs for various combinations of values at the inputs.

### Properties
| Name | Description |
| -------- | ------------------------------------------------------------------------------------------------------------ |
| Inputs | Definition of the inputs. Up to 8 inputs can be defined, each input must be assigned a name and a data type. |
| Outputs | Definition of outputs. Up to 8 outputs can be defined, each output must be assigned a name and a data type. |
| Mappings | Definition of the mappings. |
### data points input
| Name | Description |
| ------- | ------------------------------------------ |
| Input x | Data points defined in the Inputs property |
### Data points output
| Name | Description |
| -------- | ------------------------------------------- |
| Output x | Data points defined in the Outputs property |
## Mathmatics
Source: https://www.symcon.de/en/service/documentation/basics/automations/logic-scripts/repository/mathmatics/
Modules in the "Mathematics" group enable the calculation of mathematical expressions in the logic script.
## Addition
Source: https://www.symcon.de/en/service/documentation/basics/automations/logic-scripts/repository/mathmatics/addition/
The "Addition" module offers the option of adding 2 values.

### Properties
| Name | Description |
| ---------------- | ------------------------------------- |
| Number of inputs | Provides 2 to 8 inputs of the module. |
### data points input
| Name | Description |
| ------- | ----------------------- |
| Value 1 | Data point for value 1. |
| Value 2 | Data point for value 2. |
### data point output
| Name | Description |
| ------ | ------------------ |
| Result | Sum of the inputs. |
## Division
Source: https://www.symcon.de/en/service/documentation/basics/automations/logic-scripts/repository/mathmatics/division/
The "Division" module offers the option of dividing 2 values.

### data points input
| Name | Description |
| ------- | ---------------------- |
| Value 1 | Data point for value 1 |
| Value 2 | Data point for value 2 |
### data point output
| Name | Description |
| ------ | ------------------------------------------------- |
| Result | Result from the calculation of value 1 by value 2 |
## Formula
Source: https://www.symcon.de/en/service/documentation/basics/automations/logic-scripts/repository/mathmatics/formula/
The "Formula" module offers the option of calculating up to 8 values based on a user-defined formula with up to 8 different input values.

### Properties
| Name | Description |
| ----------------- | ----------------------------------------------------------------------------------------------------------------------------------------------------------------------------------------------------------------------------------------------------------------------------------------------------------------------------------------- |
| Formula | PHP code to be executed when the module is called. The values of the input are available via the variables $value1, $value2, $value3, $value4, $value5, $value6, $value7 and $value8. The result can be returned to the logic script via the variables $result1, $result2, $result3, $result4, $result5, $result6, $result7 and $result8. |
| Number of outputs | Number of data points at the output (value range 1-8) |
| Number of inputs | Number of data points at the input (value range 1-8) |
### data points input
| Name | Description |
| ------- | ---------------------- |
| Value 1 | Data point for value 1 |
| Value 2 | Data point for value 2 |
| Value 3 | Data point for value 3 |
| Value 4 | Data point for value 4 |
| Value 5 | Data point for value 5 |
| Value 6 | Data point for value 6 |
| Value 7 | Data point for value 7 |
| Value 8 | Data point for value 8 |
### data point output
| Name | Description |
| -------- | ------------------------------------------------------------ |
| Result 1 | Result 1 from the calculation with the user-defined formula. |
| Result 2 | Result 2 from the calculation with the user-defined formula. |
| Result 3 | Result 3 from the calculation with the user-defined formula. |
| Result 4 | Result 4 from the calculation with the user-defined formula. |
| Result 5 | Result 5 from the calculation with the user-defined formula. |
| Result 6 | Result 6 from the calculation with the user-defined formula. |
| Result 7 | Result 7 from the calculation with the user-defined formula. |
| Result 8 | Result 8 from the calculation with the user-defined formula. |
## Maximum
Source: https://www.symcon.de/en/service/documentation/basics/automations/logic-scripts/repository/mathmatics/maximum/
The "Maximum" module offers the option of calculating the maximum from up to 4 different values.

### data points input
| Name | Description |
| ------- | ---------------------- |
| Value 1 | Data point for value 1 |
| Value 2 | Data point for value 2 |
| Value 3 | Data point for value 3 |
| Value 4 | Data point for value 4 |
### data point output
| Name | Description |
| ------ | ------------------------------------------ |
| Result | Maximum of input values Value 1 to Value 4 |
## Minimum
Source: https://www.symcon.de/en/service/documentation/basics/automations/logic-scripts/repository/mathmatics/minimum/
The "Minimum" module offers the option of calculating the minimum from up to 4 different values.

### data points input
| Name | Description |
| ------- | ---------------------- |
| Value 1 | Data point for value 1 |
| Value 2 | Data point for value 2 |
| Value 3 | Data point for value 3 |
| Value 4 | Data point for value 4 |
### data point output
| Name | Description |
| ------ | ------------------------------------------ |
| Result | Minimum of input values value 1 to value 4 |
## Modulo
Source: https://www.symcon.de/en/service/documentation/basics/automations/logic-scripts/repository/mathmatics/modulo/
The "Modulo" module offers the option of calculating the modulo of 2 values.

### data points input
| Name | Description |
| ------- | ---------------------- |
| Value 1 | Data point for value 1 |
| Value 2 | Data point for value 2 |
### data point output
| Name | Description |
| ------ | -------------------------------------------------- |
| Result | Result from the calculation Value 1 modulo Value 2 |
## Multiplication
Source: https://www.symcon.de/en/service/documentation/basics/automations/logic-scripts/repository/mathmatics/multiplication/
The "Multiplication" module offers the option of multiplying 2 values.

### data points input
| Name | Description |
| ------- | ---------------------- |
| Value 1 | Data point for value 1 |
| Value 2 | Data point for value 2 |
### data point output
| Name | Description |
| ------ | ------------------------------------------------- |
| Result | Result from the calculation value 1 times value 2 |
## Rounding
Source: https://www.symcon.de/en/service/documentation/basics/automations/logic-scripts/repository/mathmatics/rounding/
The "Rounding" module offers the option of rounding a value.

### Properties
| Name | Description |
| ------ | ----------------------------- |
| Digits | Number of digits to round to. |
### data points input
| Name | Description |
| ------- | --------------------------- |
| Value 1 | Data point for input value. |
### data point output
| Name | Description |
| ------ | ------------------------------------------ |
| Result | Result from the calculation Value rounded. |
## Subtraction
Source: https://www.symcon.de/en/service/documentation/basics/automations/logic-scripts/repository/mathmatics/subtraction/
The "Subtraction" module offers the option of subtracting 2 values.

### data points input
| Name | Description |
| ------- | ---------------------- |
| Value 1 | Data point for value 1 |
| Value 2 | Data point for value 2 |
### data point output
| Name | Description |
| ------ | ------------------------------------------------- |
| Result | Result from the calculation Value 1 minus Value 2 |
## Sublogic scripts
Source: https://www.symcon.de/en/service/documentation/basics/automations/logic-scripts/repository/sublogic-scripts/
"Sublogic scripts" make it possible to group several modules into a new unit and assign parameters and data points to them. This group of modules can then be addressed in the "main logic script" as an independent module, and it is also possible to export or import these sublogic scripts into a file.
## Sublogic script Parameter
Source: https://www.symcon.de/en/service/documentation/basics/automations/logic-scripts/repository/sublogic-scripts/parameter/
The "Parameter" module offers the option of creating a parameter for a sublogic script. Parameters can subsequently be set in the properties of the sublogic script module.

### Properties
| Name | Description |
| ------------- | ---------------------------------------------------------------------------------------------------------- |
| Display | Name of the parameter, specifies the name of the parameter as it should be displayed in the property list. |
| Data type | Data type of the parameter |
| Default value | Default value of the parameter to be assigned after the initial creation of the module. |
### data points output
| Name | Description |
| ----- | ------------------------------------------------------------------------------------ |
| Value | Current value of the parameter that can subsequently be used in the Sublogic Script. |
## Sublogic Script Output
Source: https://www.symcon.de/en/service/documentation/basics/automations/logic-scripts/repository/sublogic-scripts/sublogic-script-output/
The "Output" module offers the option of creating an output data point for a sublogic script. Outputs are made available as data points of the sublogic script module and can be connected to other modules there.

### Properties
| Name | Description |
| --------- | ------------------------------------------------------------------------------------------------------------------- |
| Display | Name of the output, specifies the name of the data point as it should be displayed in the main logic script module. |
| Data type | Data type of the parameter |
### data point input
| Name | Description |
| ----- | ------------------------------------------------------------------- |
| Value | Value to be made available to the main logic script via the output. |
## Sublogic script Input
Source: https://www.symcon.de/en/service/documentation/basics/automations/logic-scripts/repository/sublogic-scripts/sublogic script-input/
The "Input" module offers the option of creating a data point input for a sublogic script. Inputs are made available as data points of the sublogic script module and can be connected to other modules there.

### Properties
| Name | Description |
| --------- | ------------------------------------------------------------------------------------------------------------------ |
| Display | Name of the input, specifies the name of the data point as it should be displayed in the main logic script module. |
| Data type | Data type of the parameter |
| Mandatory | Specifies whether the input must be connected. |
### data points input
| Name | Description |
| ------------- | -------------------------------------------------- |
| Default value | Default value if the data point was not connected. |
### data point output
| Name | Description |
| ----- | ----------------------------------------------------------------------------------- |
| Value | Current value that was transferred to the data point of the sublogic script module. |
## Sublogic script Module
Source: https://www.symcon.de/en/service/documentation/basics/automations/logic-scripts/repository/sublogic-scripts/sublogic script-module/
The "Sublogic script" module offers the option of combining several modules into one unit and inserting them into your main logic script.

The following functions are available:
| Name | Description |
| ----------- | ------------------------------------------------------------------------------------------------------------------------------------------------------------------------ |
| Open / Edit | Click on Open / Edit to open a sublogic script for editing. After clicking the button, the sublogic script is opened and can be edited. |
| Back | Click on Back to exit the sublogic script editor. After clicking the button, the current changes to the sublogic script are saved and the main logic script is reloaded. |
## Timer
Source: https://www.symcon.de/en/service/documentation/basics/automations/logic-scripts/repository/timer/
Modules of the "Timer" group to automatically execute the logic script via a timer.
## Once a day
Source: https://www.symcon.de/en/service/documentation/basics/automations/logic-scripts/repository/timer/once-a-day/
The "Timer cyclic second" module allows you to implement a timer that calls up the logic script every day at a specific time.

### Properties
| Name | Description |
| ---- | ------------------------------ |
| Time | Time for triggering the timer. |
### data points input
| Name | Description |
| ------ | -------------------------------------------------------------------------------------------------------------------------------------------------------- |
| Active | Activation of the timer; if TRUE, the timer is activated and triggers the logic script at the set time every day. |
| Hour | Data point of the module that controls the hour of triggering. If the input is not connected, the value of the "Time" property is used for triggering. |
| Minute | Data point of the module that controls the minute of triggering. If the input is not connected, the value of the "Time" property is used for triggering. |
### data point output
| Name | Description |
| ------------- | ------------------------------------------------------------------------------------------------------------------------------------------------------------------------------------------------------------------------ |
| Triggering | Data point of the module that returns TRUE when the module has triggered. This occurs every second when the timer is active. The subsequent branch of the logic script is only executed if the timer has been triggered. |
| No triggering | Data point of the module that returns TRUE if the module has not triggered. The subsequent branch of the logic script is only executed if the timer has not been triggered. |
## One time Timer
Source: https://www.symcon.de/en/service/documentation/basics/automations/logic-scripts/repository/timer/one-time-timer/
The "One-time timer" module enables the time-delayed execution of certain parts of the logic diagram.

### data points input
| Name | Description |
| -------------- | ------------------------------------------------------------------------------------------------------------------------------------------------------------------------------------------------------ |
| Restart/Active | Activation of the timer, if TRUE the timer is activated and triggers the logic diagram again after a certain time. If the timer is already running, the remaining time is reset to the original value. |
| Start | Start the timer, if TRUE the timer is activated if it is not yet active and triggers the logic plan again after a certain time. |
| Time (seconds) | Time in seconds after which the timer should be triggered. |
### data points output
| Name | Description |
| ----------------- | -------------------------------------------------------------------------------------------------------------------------------------------------------------------------- |
| Triggering | Data point of the module that returns TRUE when the module has triggered. The following branch of the logic script is only executed if the timer has been triggered. |
| No triggering | Data point of the module that returns TRUE if the module has not triggered. The following branch of the logic script is only executed if the timer has not been triggered. |
| Timer running | Data point of the module that returns TRUE if the timer has been started but has not yet been triggered. |
| Remaining seconds | Returns the number of seconds that must elapse before the timer is triggered. |
### application example
Given are 1 Homematic push-button and 1 Homematic actuator for switching a light:

A logic script is now to be created in the logic script that switches on a light when the push-button is triggered and switches it off again after one minute.
You can implement this requirement by using a one-time timer module; predefined instance modules for the push-button or activating the light can be found in the object tree of the logic script designer.
.
Functionality:
- The PRESS_SHORT variable of a Homematic push-button always has the value TRUE; when the push-button is pressed, the value of the variable is updated and only the date/time of the variable is updated. This update can be evaluated with the On update module and used to control other modules.
- In the current example, the light is switched on when the PRESS_SHORT variable is updated and at the same time a timer with 60 seconds is triggered by setting the "Active" input in the One-time timer module.
- The logic plan script is executed a second time by this timer after 60 seconds and switches the light off again via the Non module.
## Timer Variable
Source: https://www.symcon.de/en/service/documentation/basics/automations/logic-scripts/repository/timer/timer-variable/
The "Timer Variable" module enables the implementation of a timer based on a variable. After activating the timer, the remaining time until the timer is triggered is counted down.

### data points input
| Name | Description |
| -------------- | ----------------------------------------------------------------------------------------------------------------- |
| Active | Activation of the timer, if TRUE the timer is activated and triggers the logic script again after a certain time. |
| Reset | Deactivation of the timer; if TRUE, an active timer can be canceled. |
| Time (seconds) | Time in seconds after which the timer should be triggered. |
### data points output
| Name | Description |
| ------------- | -------------------------------------------------------------------------------------------------------------------------------------------------------------------------------------------------------------------------- |
| Value | This data point of the module must be connected to a variable of type integer. The variable realizes the display of the remaining timer time. |
| Triggering | Data point of the module that returns TRUE when the module has triggered. This occurs every second when the timer is active. The subsequent branch of the logic script is only executed when the timer has been triggered. |
| No triggering | Data point of the module that returns TRUE if the module has not triggered. The subsequent branch of the logic script is only executed if the timer has not been triggered. |
| Done | Data point of the module that returns TRUE if the timer has ended. The following branch of the logic script is only executed if the timer has ended. |
### application example
Given are 1 Homematic button, 1 Homematic actuator for switching a light and a variable for displaying the remaining time of a staircase timer (normal variable of type integer, which has a profile with suffix "Sec" assigned).

A logic script is now to be created in Logic Scripts that switches on a light when the push-button is triggered and switches it off again after one minute. In addition, the remaining time in seconds should also be visualized
You can implement this requirement by using a Timer Variable module; predefined instance modules for the push-button or activating the light can be found in the object tree of the Logic Script Designer.

How it works:
- The PRESS_SHORT variable of a Homematic push-button always has the value TRUE; when the push-button is pressed, the value of the variable is updated and only the date/time of the variable is updated. This update can be evaluated with the On update module and used to control other modules.
- In the current example, when the PRESS_SHORT variable is updated, the light is switched on and at the same time a timer with 60 seconds is triggered by setting the "Active" input in the Timer Variable module, which uses the "Remaining time" variable to count down the seconds.
- The logic script script is executed by this timer every second and updates the value in the "Remaining time" variable.
- Once the timer has reached the value 0, the lamp is switched off again via the "Done" output and a non-module.
## Timer cyclic minute
Source: https://www.symcon.de/en/service/documentation/basics/automations/logic-scripts/repository/timer/timer-cyclic-minute/
The "Timer cyclic minute" module allows you to implement a timer that calls up the logic script cyclically at the set interval.

### Properties
| Name | Description |
| -------- | --------------------------------------------- |
| Interval | Interval in minutes for triggering the timer. |
### data points input
| Name | Description |
| -------- | -------------------------------------------------------------------------------------------------------------------------------------------------- |
| Active | Activation of the timer; if TRUE, the timer is activated and triggers the logic script every minute at the specified interval. |
| Interval | Data point of the module for controlling the interval. If the input is not connected, the value of the "Interval" property is used for triggering. |
### data point output
| Name | Description |
| ------------- | ------------------------------------------------------------------------------------------------------------------------------------------------------------------------------------------------------------------------ |
| Triggering | Data point of the module that returns TRUE when the module has triggered. This occurs every second when the timer is active. The subsequent branch of the logic script is only executed if the timer has been triggered. |
| No triggering | Data point of the module that returns TRUE if the module has not triggered. The following branch of the logic script is only executed if the timer has not been triggered. |
## Timer cyclic second
Source: https://www.symcon.de/en/service/documentation/basics/automations/logic-scripts/repository/timer/timer-cyclic-second/
The "Timer cyclic second" module enables the implementation of a timer that calls up the logic script cyclically with the set interval.

### Properties
| Name | Description |
| -------- | --------------------------------------------- |
| Interval | Interval in seconds for triggering the timer. |
### data points input
| Name | Description |
| -------- | -------------------------------------------------------------------------------------------------------------------------------------------------- |
| Active | Activation of the timer; if TRUE, the timer is activated and triggers the logic script at the specified interval every second. |
| Interval | Data point of the module for controlling the interval. If the input is not connected, the value of the "Interval" property is used for triggering. |
### data point output
| Name | Description |
| ------------- | ------------------------------------------------------------------------------------------------------------------------------------------------------------------------------------------------------------------------ |
| Triggering | Data point of the module that returns TRUE when the module has triggered. This occurs every second when the timer is active. The subsequent branch of the logic script is only executed if the timer has been triggered. |
| No triggering | Data point of the module that returns TRUE if the module has not triggered. The following branch of the logic script is only executed if the timer has not been triggered. |
## Timer cyclic hour
Source: https://www.symcon.de/en/service/documentation/basics/automations/logic-scripts/repository/timer/timer-cyclic-hour/
The "Timer cyclic hour" module enables the implementation of a timer that calls up the logic script cyclically with the set interval.

### Properties
| Name | Description |
| -------- | ------------------------------------------- |
| Interval | Interval in hours for triggering the timer. |
### data points input
| Name | Description |
| -------- | -------------------------------------------------------------------------------------------------------------------------------------------------- |
| Active | Activation of the timer; if TRUE, the timer is activated and triggers the logic script at the specified interval every hour. |
| Interval | Data point of the module for controlling the interval. If the input is not connected, the value of the "Interval" property is used for triggering. |
### data point output
| Name | Description |
| ------------- | ------------------------------------------------------------------------------------------------------------------------------------------------------------------------------------------------------------------------ |
| Triggering | Data point of the module that returns TRUE when the module has triggered. This occurs every second when the timer is active. The subsequent branch of the logic script is only executed if the timer has been triggered. |
| No triggering | Data point of the module that returns TRUE if the module has not triggered. The subsequent branch of the logic script is only executed if the timer has not been triggered. |
## Conversion
Source: https://www.symcon.de/en/service/documentation/basics/automations/logic-scripts/repository/conversion/
Modules in the "Conversion" group enable the integration of modules for converting data into another format.
## Date to String
Source: https://www.symcon.de/en/service/documentation/basics/automations/logic-scripts/repository/conversion/date-to-string/
The module "Date to String" offers the possibility to convert a Unix timestamp into a string.

### Properties
| Name | Description |
| ----------- | ------------------------------------------------- |
| Date format | Format to be used for the conversion to a string. |
> **Note:** Any PHP format can be entered for converting a date. Details on the possible formats can be found in the PHP documentation.
> Some general formats are already predefined and can be selected via the dropdown
### data points input
| Name | Description |
| --------- | ------------------------------- |
| Timestamp | Unix timestamp to be converted. |
### data points output
| Name | Description |
| ----- | ------------------------------ |
| Value | Converted timestamp as string. |
## Date to time
Source: https://www.symcon.de/en/service/documentation/basics/automations/logic-scripts/repository/conversion/date-to-time/
The module "Date to Time" offers the possibility to split a Unix timestamp into the individual time components.

### data points input
| Name | Description |
| --------- | ------------------------------- |
| Timestamp | Unix timestamp to be converted. |
### data points output
| Name | Description |
| ------ | ------------------------------------ |
| Year | The year from the Unix timestamp. |
| Month | The month from the Unix timestamp. |
| Day | The day from the Unix timestamp. |
| Hour | The hours from the Unix timestamp. |
| Minute | The minutes from the Unix timestamp. |
| Second | The seconds from the Unix timestamp. |
## Format message
Source: https://www.symcon.de/en/service/documentation/basics/automations/logic-scripts/repository/conversion/format-message/
The "Format message" module offers the option of assembling a string with one or more variable values. The module supports up to 8 different variables.

### Properties
| Name | Description |
| ---------------- | ------------------------------------------------------- |
| Number of inputs | Number of inputs that the module should make available. |
| Format String | PHP Format String for formatting the string |
### data points input
| Name | Description |
| ------- | ------------------------------- |
| Value 1 | Value 1 for forming the message |
| Value 2 | Value 2 for forming the message |
| Value 3 | Value 3 for forming the message |
| Value 4 | Value 4 for forming the message |
| Value 5 | Value 5 for forming the message |
| Value 6 | Value 6 for forming the message |
| Value 7 | Value 7 for forming the message |
| Value 8 | Value 8 for forming the message |
### data points output
| Name | Description |
| ------ | -------------------------------------------------------------- |
| Result | Result message from the format string and the input variables. |
## Invert value
Source: https://www.symcon.de/en/service/documentation/basics/automations/logic-scripts/repository/conversion/invert-value/
The "Invent value" module offers the option of inverting a value. The respective minimum or maximum can either be configured via the properties of the module or, alternatively, the module also offers inputs for the values.

### Properties
| Name | Description |
| ------------- | -------------------------------------------------------------------------------------------------------------------------------------------- |
| Outputs Range | Activates the data points at the "In range" and "Not in range" output. These data points are not activated by default. |
| Inputs Limit | Activates the data points at the input for the limits ("Minimum input" and "Maximum input"). These data points are not activated by default. |
| Maximum Input | Specifies the maximum for the inversion of the value, is only used if the data points for the limits are not activated. |
| Minimum input | Specifies the minimum for the inversion of the value, is only used if the data points for the limits are not activated. |
### data points input
| Name | Description |
| ------------- | --------------------------------------------------------------------------------------------------------------------- |
| Value | Value to be inverted |
| Minimum input | Minimum value for the inversion. This data point is only available if the "Inputs limit" property has been activated. |
| Maximum input | Maximum value for the inversion. This data point is only available if the "Inputs Limit" property has been activated. |
### data point output
| Name | Description |
| ------------ | ----------------------------------------------------------------------------------------------------------------------------------------------------------------------- |
| Value | Converted value |
| In range | Returns __TRUE__ if the value to be inverted was within the minimum and maximum. This data point is only available if the "Outputs range" property has been activated. |
| Not in range | Returns __TRUE__ if the value to be inverted was outside the minimum and maximum. This data point is only available if the "Outputs range" property has been activated. |
## Value to Boolean
Source: https://www.symcon.de/en/service/documentation/basics/automations/logic-scripts/repository/conversion/wert-zu-boolean/
The "Value to Boolean" module offers the option of converting a value into a Boolean.

### Data points input
| Name | Description |
| ----- | ---------------------- |
| Value | Value to be converted. |
### data points output
| Name | Description |
| ----- | --------------------------- |
| Value | Converted value as Boolean. |
## Value to float
Source: https://www.symcon.de/en/service/documentation/basics/automations/logic-scripts/repository/conversion/wert-zu-float/
The "Value to float" module offers the option of converting a value into a float.

### data points input
| Name | Description |
| ----- | ---------------------- |
| Value | Value to be converted. |
### data points output
| Name | Description |
| ----- | ------------------------- |
| Value | Converted value as float. |
## Value to integer
Source: https://www.symcon.de/en/service/documentation/basics/automations/logic-scripts/repository/conversion/value-to-integer/
The "Value to integer" module offers the option of converting a value to an integer.

### data points input
| Name | Description |
| ----- | ---------------------- |
| Value | Value to be converted. |
### data points output
| Name | Description |
| ----- | ------------------------------ |
| Value | Converted value as an integer. |
## Value to string
Source: https://www.symcon.de/en/service/documentation/basics/automations/logic-scripts/repository/conversion/value-to-string/
The "Value to string" module offers the option of converting a value into a string.

### data points input
| Name | Description |
| ----- | ---------------------- |
| Value | Value to be converted. |
### data points output
| Name | Description |
| ----- | ---------------------------- |
| Value | Converted value as a string. |
## Convert range
Source: https://www.symcon.de/en/service/documentation/basics/automations/logic-scripts/repository/conversion/convert-range/
The "Convert range" module offers the option of converting a value from one value range to another value range. For example, it is possible to use the module to convert a value in the range 0 to 1 to the value range 0 to 100.

### Properties
| name | description |
| ------------------ | -------------------------------------------------------------------------------------------------------------------------------------------- |
| Outputs range | Activates the data points at the "In range" and "Not in range" output. These data points are not activated by default. |
| Inputs Limit | Activates the data points at the input for the limits ("Minimum input" and "Maximum input"). These data points are not activated by default. |
| Maximum input | Specifies the maximum for the input range of the value, is only used if the data points for the limits are not activated. |
| Minimum input | Specifies the minimum for the input range of the value, is only used if the data points for the limits are not activated. |
| Maximum output | Specifies the maximum for the output range of the value, is only used if the data points for the limits are not activated. |
| Minimum output | Specifies the minimum for the output range of the value, is only used if the data points for the limits are not activated. |
| Rounding to digits | Specifies the number of digits to be used for rounding the converted value. |
### data points input
| Name | Description |
| -------------- | -------------------------------------------------------------------------------------------------------------------------------- |
| Value | Value to be inverted |
| Minimum input | Minimum value for the input range. This data point is only available if the "Connector for limits" property has been activated. |
| Maximum input | Maximum value for the input range. This data point is only available if the "Connector for limits" property has been activated. |
| Minimum output | Minimum value for the output range. This data point is only available if the "Connector for limits" property has been activated. |
| Maximum output | Maximum value for the output range. This data point is only available if the "Connector for limits" property has been activated. |
### Output data points
| Name | Description |
| ------------ | ---------------------------------------------------------------------------------------------------------------------------------------------------------------------------------- |
| Value | Converted value |
| In range | Returns "true" if the value to be converted was within the minimum and maximum. This data point is only available if the "Connector for range check" property has been activated. |
| Not in range | Returns "true" if the value to be converted was outside the minimum and maximum. This data point is only available if the "Connector for range check" property has been activated. |
## Time to Date
Source: https://www.symcon.de/en/service/documentation/basics/automations/logic-scripts/repository/conversion/time-to-date/
The module "Time to Date" offers the possibility to convert single time components into a Unix timestamp.

### data points input
| Name | Description |
| ------- | ------------------------------------------------------------------------------------ |
| Year | The year for the Unix timestamp (if no value is set, the current year is used). |
| Month | The month for the Unix timestamp (if no value is set, the current month is used). |
| Day | The day for the Unix timestamp (if no value is set, the current day is used). |
| Hour | The hours for the Unix timestamp (if no value is set, the current hour is used). |
| Minute | The minutes for the Unix timestamp (if no value is set, the current minute is used). |
| Seconds | The seconds for the Unix timestamp (if no value is set, the current second is used). |
### data points output
| Name | Description |
| --------- | ---------------------------------------------------------- |
| Timestamp | Unix timestamp formed from the individual time components. |
## Read/ write variables
Source: https://www.symcon.de/en/service/documentation/basics/automations/logic-scripts/repository/read-write-variables/
Modules in the "Read/write variables" group enable variables or instances to be read and set in IP-Symcon.
## Read Instance
Source: https://www.symcon.de/en/service/documentation/basics/automations/logic-scripts/repository/read-write-variables/read-instance/
The "Read instance" module offers the option of integrating instances as logic script input; variables of the corresponding instance can be used to control other modules.

### Properties
| Name | Description |
| ---------------------- | ------------------------------------------------------------------------------- |
| ID | The ID of the instance in IP-Symcon. |
| Logic Script execution | Enables the automatic execution of the logic script when a variable is changed. |
The following values are available for selection during logic script execution:
- None - no automatic execution of the logic script
- On change - automatic execution of the logic script when the value of a linked variable changes.
- On update - automatic execution of the logic script when the value of a linked variable is updated.
- As action script - the logic script script is stored as an action script for each variable linked in the instance. When operated in the GUI (WebFront or IPSView), the logic script is called up with the new value.
Additional information on the topic of [action scripts](https://www.symcon.de/en/llms/concepts/automations.md).
### data points output
| Name | Description |
| ----------------------- | ------------------------------------------------------------------ |
| Value instance variable | The values of all instance variables are available as data points. |
## Write Instance
Source: https://www.symcon.de/en/service/documentation/basics/automations/logic-scripts/repository/read-write-variables/write-instance/
The "Write Instance" module offers the option of integrating instances as an output of the logic script.

### Properties
| Name | Description |
| ---- | ------------------------------------ |
| ID | The ID of the instance in IP-Symcon. |
### data points input
| Name | Description |
| ----------------------- | ---------------------------------------------------------------------------------- |
| Value instance variable | Instance variables that have an action script stored are available as data points. |
## Read Variable
Source: https://www.symcon.de/en/service/documentation/basics/automations/logic-scripts/repository/read-write-variables/read-variable/
The "Read Variable" module offers the option of integrating normal variables as logic script input.

### Properties
| Name | Description |
| ---------------------- | --------------------------------------------------------------------------------- |
| ID | The ID of the variable in IP-Symcon. |
| Logic Script execution | Enables the automatic execution of the logic script when the variable is changed. |
The following values are available for selection for logic script execution:
- None - no automatic execution of the logic script
- On change - automatic execution of the logic script when the value of the variable changes.
- On update - automatic execution of the logic script when the value of the variable is updated.
- As action script - the logic script script is stored as an action script for the variable. When operated in the GUI (WebFront or IPSView), the logic script is called up with the new value.
Additional information on the topic of [action scripts](https://www.symcon.de/en/llms/concepts/automations.md).
### data points output
| Name | Description |
| ----- | -------------------------- |
| Value | The value of the variable. |
## Write Variable
Source: https://www.symcon.de/en/service/documentation/basics/automations/logic-scripts/repository/read-write-variables/write-variable/
The "Write Variable" module offers the option of integrating normal variables as an output of the logic script.

### Properties
| Name | Description |
| ----------------- | ------------------------------------------------------------------------------------------------------------------------------------------ |
| ID | The ID of the variable in IP-Symcon. |
| Use action script | If TRUE, the action script is used to set the variable value. If no action script is available, the value of the variable is set directly. |
| Sender | Value for the SENDER variable when the action script is called. |
### data points input
| Name | Description |
| ----- | -------------------------- |
| Value | The value of the variable. |
## Logic Script Variable
Source: https://www.symcon.de/en/service/documentation/basics/automations/logic-scripts/repository/read-write-variables/workflow-variable/
The "Logic Script Variable" module offers the option of having a variable created by the logic script itself.

### Properties
| Name | Description |
| ----------------------------- | --------------------------------------------------------------------------------------------------------------------------------------------------------------------------------------------------------------------------- |
| Data type | Data type of the variable |
| Default value | Value of the variable to be assigned after the initial creation of the variable. |
| Profile name | Name of the profile that is to be assigned to the variable after the initial creation of the variable. |
| Variable name | Name of the variable |
| Logic Script as action script | If this option is activated, the logic script itself is called up to set a value via a visualization. In this case, you must take care of assigning the new value in the logic script, otherwise the value will not be set. |
### data points input
| Name | Description |
| ----- | ---------------------- |
| Value | Value of the variable. |
### data points output
| Name | Description |
| ------ | ----------------------------------------------- |
| Value | Current value of the variable |
| Update | Signals an update of the variable via the input |
| Change | Signals a change of the variable via the input |
## Compare
Source: https://www.symcon.de/en/service/documentation/basics/automations/logic-scripts/repository/compare/
Modules in the "Compare" group allow you to compare values in the logic script.
## Equal
Source: https://www.symcon.de/en/service/documentation/basics/automations/logic-scripts/repository/compare/equal/
The "Equal" module offers the opportunity to compare different values for equality or inequality.

### data points input
| Name | Description |
| ------- | --------------------------------- |
| Value 1 | Data point for comparison value 1 |
| Value 2 | Data point for comparison value 2 |
### data point output
| Name | Description |
| --------- | ------------------------------------------------------------------------------------- |
| Equals | Returns TRUE if the value at input value 1 is equal to the value at input value 2. |
| Not equal | Returns TRUE if the value at input value 1 is not equal to the value at input value 2 |
## Larger/smaller
Source: https://www.symcon.de/en/service/documentation/basics/automations/logic-scripts/repository/compare/larger-smaller/
The "Larger/smaller" module offers the option of comparing different values for Larger, Larger equal, Equal, Smaller equal or Smaller.

### Data points input
| Name | Description |
| ------- | --------------------------------- |
| Value 1 | Data point for comparison value 1 |
| Value 2 | Data point for comparison value 2 |
### data point output
| Name | Description |
| ------------------------ | -------------------------------------------------------------------------------------------------- |
| Greater | Returns TRUE if the value at input value 1 is greater than the value at input value 2. |
| Greater than or equal to | Returns TRUE if the value at input Value 1 is greater than or equal to the value at input Value 2. |
| Equal | Returns TRUE if the value at input Value 1 is equal to the value at input Value 2. |
| Less than or equal to | Returns TRUE if the value at input Value 1 is less than or equal to the value at input Value 2. |
| Smaller | Returns TRUE if the value at input Value 1 is smaller than the value at input Value 2. |
## In value range
Source: https://www.symcon.de/en/service/documentation/basics/automations/logic-scripts/repository/compare/in-value-range/
The "In value range" module offers the option of checking whether a value is within a certain value range. The limits for the value range can be defined via properties or via separate module inputs.

### Properties
| Name | Description |
| ------------- | ---------------------------------------------------------------------------------------------------------------------------------------- |
| Inputs Limits | Activates the data points at the input for the limits ("Lower Limit" and "Upper Limit"). These data points are not activated by default. |
| Upper Limit | Specifies the maximum for the input range of the value, is only used if the data points for the limits are not activated. |
| Lower Limit | Specifies the minimum for the input range of the value, is only used if the data points for the limits are not activated. |
### data points input
| Name | Description |
| ----------- | ------------------------------------------------------------------------------------------------------------------------ |
| Value | Value to be evaluated |
| Lower Limit | Minimum value for the input range. This data point is only available if the "Input limits" property has been activated. |
| Upper Limit | Maximum value for the input range. This data point is only available if the "Inputs Limits" property has been activated. |
### data point output
| Name | Description |
| ------------- | ------------------------------------------------------------------------------------------------- |
| In range | Returns TRUE if the value to be converted was within the minimum and maximum range. |
| Not in range | Returns TRUE if the value to be converted was outside the minimum and maximum. |
| Limited value | If the value is outside the upper or lower limit, the value is corrected to the respective limit. |
## Drawing Area
Source: https://www.symcon.de/en/service/documentation/basics/automations/logic-scripts/drawing-area/
The drawing area is located in the middle of the Logic Script Editor. Here you can combine the individual modules into a logic script.

The drawing area is intuitive to use; the functionality is very similar to other programs with graphical components. In this section you will find an overview of the available functions and actions.
### Place object
To place a new object on the drawing area:
1. Select the object in the object tree or from the Repository menu.
2. Drag the selected control element onto the drawing area (drag & drop).
The object is drawn with the default values from IP-Symcon (size, color ...). You must then customize it for your purposes (see below).
### select / deselect objects
To select a single object:
1. Click on the object.
To select several objects at the same time:
1. Hold down ____ while clicking on different objects.
To select all objects on the drawing area at the same time:
1. Press __+A__.
You can recognize selected objects by the eight handles (boxes) on the frame:

To cancel the selection again:
1. Click on an empty area of the drawing area.
The entire selection made is canceled.
### Change properties
The stored values and properties of the selected object are saved in the [Property-Editor](https://www.symcon.de/en/llms/concepts/automations.md). You can change them there as required.
If you have selected several objects at the same time, you can change the properties that appear in all selected objects (properties that only appear in individual objects are not displayed). Your change will then be applied to all currently selected objects at the same time.
### cut, copy, paste, delete
Logic Scripts supports the standard commands for manipulating objects and content:
| Name | Description |
| ------ | -------------------------------------------------------- |
| Cut | Cut context menu or the key combination __+X__. |
| Copy | Copy context menu or the key combination __+C__. |
| Paste | Paste context menu or the key combination __+V__. |
| Delete | Delete context menu or the ____ key. |
### Undo / Redo
Logic Scripts supports "Undo / Redo", i.e. canceling or restoring changes:
| Name | Description |
| ------- | ----------------------------------------------------------- |
| Undo | Menu+Undo or the key combination __+Z__. |
| Restore | Menu+Restore or the key combination __++Z__. |
### Zooming a logic script
The Logic Scripts Designer offers the option to zoom in and out of a view in steps of 10%. This only changes the display in the Designer; the display on the client is not changed.
| Name | Description |
| -------- | ------------------------------------------------------------------------------------------------------------------------------------------------------------------------ |
| Zoom In | Select Menu+Zoom In or press the ++ key combination to enlarge the display by one level. |
| Zoom Out | Select Menu+Zoom Out or press the +- key combination to reduce the display by one level. |
| Zoom | Select Menu+Zoom to set the zoom functionality to a specific value. After pressing the button, a drop-down window is displayed that allows you to select the zoom level. |
## PHP Scripts
Source: https://www.symcon.de/en/service/documentation/basics/automations/php-scripts/
A PHP script is a concatenation of more or less complex commands. IP-Symcon uses and supports every functionality of the programming language PHP. Numerous examples and further documentation are found in our community forum and throughout the internet.
### Add PHP Script
A new PHP script can be added to a project via "+" -> "Automation" -> "PHP Script". It is recommended to give the PHP script a unique and meaningful name.
The name can be changed at any time and the PHP script can be moved within the tree view via Drag & Drop. Alternatively, the PHP script can be directly created at the wanted position via "Right Click" -> "Add object" -> "Automation" -> "PHP Script.

### Edit and Execute PHP Scripts
A PHP script is required to begin with a PHP Tag ( **Note:** A list of all [keyboard-shortcuts](https://www.symcon.de/en/llms/how-to.md).
## Action Scripts
Source: https://www.symcon.de/en/service/documentation/basics/automations/php-scripts/action-scripts/
Action scripts are scripts that are called when a [Variable](https://www.symcon.de/en/llms/concepts.md) is clicked in a [Visualization](https://www.symcon.de/en/llms/modules/index.md) (e.g., WebFront, Mobile).
The action script needs to be linked to the corresponding variable as "Custom Action".
Special variables for called scripts are shown in [System Variables](https://www.symcon.de/en/llms/concepts/automations.md).
An action script can be used by multiple variables. The most common variant is shown below: "Set Variable only".
### Select Action Script
The selection of an action script is the same as the selection of a [Variable Action](https://www.symcon.de/en/llms/concepts.md) .
> **Note:** Some variables of added modules contain a "Default Action". It can be overwritten by a "Custom Action".

### Create Action Script
An action script is a regular script file. It becomes an action script by linking it to a variable.
An action script should describe the switching process or at least a command that sets the variable to the requested state:
#### Example 1
```php
//Set Variable only
SetValue($_IPS['VARIABLE'], $_IPS['VALUE']);
```
#### Example 2
```php
//Set variable accordingly when switching was sucessful
if (FS20_SwitchMode(12345, (boolean)$_IPS['VALUE'])) {
SetValue($_IPS['VARIABLE'], $_IPS['VALUE']);
}
```

### Bad Action Scripts
Some criterias should be regarded when creating an action script. Otherwise, unexpected behavior could appear.
#### Setting a Variable without Checking for Sucessful Switching
Most functions return a "True" when they succeed. This should be checked.
If this is not done, the state of IP-Symcon and the device are not consistent any more. Thus, the configured automatic control could fail.
```php
//Variable is set to new value even if the switching was not sucessful.
//This can lead to consistency faults.
FS20_SwitchMode(12345, (boolean)$_IPS['VALUE']);
SetValue($_IPS['VARIABLE'], $_IPS['VALUE']);
```
#### Switching a Device via Event when the Variable changes
There should be no additional event to switch a device after the corresponding variable was changed. This approach cannot detect switching problems of the device. Thus, error messages are hidden and the variable value could be different from the device value.
Consider a dimmer that is set from 0% to 50% via WebFront.
The variable is instantly set to 50% und the switch command is executed asynchonously by the additional event. The action script cannot detect if the switch command failed and the variable within IP-Symcon stays at 50% even though the device value is 0%.

## System Variables
Source: https://www.symcon.de/en/service/documentation/basics/automations/php-scripts/system-variables/
System variables are variables that are available in every PHP script. The user can utilize them to create efficient PHP scripts that can solve generic tasks. The according system variables are set automatically when the PHP script is called, depending on the trigger. The following tables providing an overview over the variables which are available in which PHP scripts.
> **Warning:** __Regard upper and lower case when writing these variables (Case Sensitive)!__
### General System Variables
The following system variables are always available.
| System Variable | Description |
| --------------- | ----------------------------------------------------------------------------------------------------------------------------------------------------------------------------------------------------------------------------------------- |
| $_IPS['SELF'] | ScriptID of the current PHP script |
| $_IPS['THREAD'] | ThreadID of the current PHP script |
| $_IPS['SENDER'] | Trigger of the current PHP script. Further global variables are possible, depending on the value. Possible values are further specified at [Additional System Variables](https://www.symcon.de/en/llms/concepts/automations.md) |
### Additional System Variables
The following system variables are available, depending on the value of $_IPS['SENDER'].
* Execute
* HeatingControl
* RegisterVariable
* RunScript
* Shutdown
* ShutterControl
* Startup
* StatusEvent
* TimerEvent
* Variable
* VoIP (since version 5.2)
* Watchdog
* WebFront
* WebHook (since version 4.0)
* WebInterface
* WebOAuth (since version 4.0)
#### Action
When the PHP script was executed by a [RequestAction](https://www.symcon.de/en/llms/functions/access-variables.md) .
| system variable | description |
| ----------------- | ------------------------------------------------------------------------------------------------------------- |
| $_IPS['SENDER'] | By default, this "Action" can be set individually with [RequestActionEx](https://www.symcon.de/en/llms/functions/access-variables.md) |
| $_IPS['VALUE'] | Value with which the variable was called |
| $_IPS['VARIABLE'] | ID of the variable that is to be switched |
#### Execute
When the [PHP script](https://www.symcon.de/en/llms/concepts/automations.md) was run from the administration console.
No additional system variables.
#### HeatingControl
When the PHP script was called from an event of [HeatingControl](https://www.symcon.de/en/llms/modules/heating-control.md).
| System Variable | Description |
| ------------------ | ---------------------------------------------------- |
| $_IPS['INSTANCES'] | IDs of the sending instances |
| $_IPS['INVERTS'] | States if a device is inverted (true/false) |
| $_IPS['VALUE'] | States if a device should heat (true) or not (false) |
#### RegisterVariable
When the PHP script was called by a [RegisterVariable](https://www.symcon.de/en/llms/modules/registervariable.md) instance.
| System Variable | Description |
| ----------------------------------------------- | ------------------------------------------------------------------------ |
| $_IPS['INSTANCE'] | ID of the triggering RegisterVariable instance |
| $_IPS['VALUE'] | Value of the puffer that was received from the splitter or I/O module |
| $_IPS['CLIENTIP'] (only for I/O ServerSocket) | Received IP adress of the Client |
| $_IPS['CLIENTPORT'] (only for I/O ServerSocket) | Receiving port of the Client |
| $_IPS['TYPE'] | Status of the receiving port (0 = Data; 1 = Connected; 2 = Disconnected) |
#### RunScript
When the PHP script was called by an [IPS_RunScript](https://www.symcon.de/en/llms/functions/process-control.md) function. In addition, [IPS_RunScriptEx](https://www.symcon.de/en/llms/functions/process-control.md) can be called to pass additional parameters.
No additional system variables.
#### Shutdown
During IP-Symcon Shutdown (see [EventControl](https://www.symcon.de/en/llms/modules/event-control.md)).
No additional variables.
#### ShutterControl
When the PHP script was called by a [ShutterControl Module](https://www.symcon.de/en/product/application-examples/shutter-control/).
| System Variable | Description |
| ------------------ | ------------------------------------------------------------------------ |
| $_IPS['DIRECTION'] | Moving direction: 0 = Stop 1 = Up 2 = Down |
| $_IPS['DURATION'] | Moving duration in milliseconds |
| $_IPS['INSTANCE'] | InstanceID that was set in ShutterControl |
| $_IPS['INSTANCE2'] | InstanceID #2 that was set in ShutterControl |
#### Startup
During IP-Symcon Startup (see [EventControl](https://www.symcon.de/en/llms/modules/event-control.md)).
No additional system variables.
#### StatusEvent
When the PHP script is called by a state change of an instance.
Further informations are found at [EventControl](https://www.symcon.de/en/llms/modules/event-control.md) and [IPS_GetInstance](https://www.symcon.de/en/llms/functions/management-instances.md).
| System Variable | Description |
| ------------------- | ---------------------------------------------------------------------------------------------------------------------- |
| $_IPS['INSTANCE'] | InstanceID for state change |
| $_IPS['STATUS'] | State of the instance. A list of possible values is found here: [IPS_GetInstance](https://www.symcon.de/en/llms/functions/management-instances.md) |
| $_IPS['STATUSTEXT'] | A short text according to the state |
#### TimerEvent
When the PHP script was called by a [cyclic](https://www.symcon.de/en/llms/concepts.md) or a [schedule](https://www.symcon.de/en/llms/concepts.md) event.
| System Variable | Description |
| --------------- | ---------------------------------------------- |
| $_IPS['ACTION'] | ID of the calling action (only schedule event) |
| $_IPS['EVENT'] | ID of the triggered event |
| $_IPS['TARGET'] | ID of the superior object |
#### Variable
When the PHP script was called be a [trigger event](https://www.symcon.de/en/llms/concepts.md).
| System Variable | Description |
| ------------------------------------------ | ----------------------------------------------- |
| $_IPS['EVENT'] | ID of the calling event |
| $_IPS['OLDCHANGED'] (since Version 5.1) | Timestamp of the last change of the old value |
| $_IPS['OLDVALUE'] | Value of the affected variable before switching |
| $_IPS['OLDUPDATED'] (since Version 5.1) | Timestamp of the last update of the old value |
| $_IPS['TARGET'] | ID of the superior object |
| $_IPS['TRIGGER'] | Type of the calling event |
| $_IPS['VALUE'] | Value of the affected variable when switching |
| $_IPS['VARIABLE'] | ID of the affected variable |
#### VoIP (since Version 5.2)
When the PHP script is executed by an event of the VoIP Module
| System Variable | Description |
| ------------------------------------- | ------------------------------------------------------------------------------------------------------------------------------------------------------------------------------------------------------------------------------------------------------------------- |
| $_IPS['CONNECTION'] | ChannelID of the connection |
| $_IPS['DATA'] | The variable can contain the following values depending on $_IPS['EVENT']: Incoming: Phone number from which the call is made PlayFinish: File name of the played file DTMF: Value of the pressed key |
| $_IPS['EVENT'] | The variable can contain the following values: Incoming: Incoming call Connect: Established connection Disconnect: Terminating connection PlayFinish: Audio file has finished playing DTMF: Received a DTMF sound |
| $_IPS['INSTANCE'] (ab Version 5.4) | InstanceID of the VoIP Instance |
#### Watchdog
When the PHP script is called by the [Watchdog](https://www.symcon.de/en/llms/modules/event-control.md).
| System Variable | Description |
| ------------------- | ----------------------------------------------------- |
| $_IPS['STATUSTEXT'] | The passed state text |
| $_IPS['VALUE'] | Value of the variable that is outside of its interval |
| $_IPS['VARIABLE'] | ID of the variable that is outside of its interval |
#### WebFront
When the PHP script was called by the [WebFront](https://www.symcon.de/en/llms/components/webfront-visualization.md), [Tile Visualization](https://www.symcon.de/en/llms/components/tile-visualization.md), or IPSView.
| System Variable | Description |
| ------------------------------------------ | ---------------------------------------------- |
| $_IPS['CONFIGURATOR'] | ID of the currently used visualization |
| $_IPS['VALUE'] (only for action script) | New value of the variable |
| $_IPS['VARIABLE'] (only for action script) | ID of the changing variable |
#### WebHook (since Version 4.0)
When the PHP script was called by a [WebHook control](https://www.symcon.de/en/llms/modules/webhook-control.md).
| System Variable | Description |
| ---------------- | ---------------------------------- |
| $_SERVER['HOOK'] | Complete URL of the called WebHook |
Furthermore, the WebHook type provides the same variables as WebInterface.
#### WebOAuth (since Version 4.0)
When the PHP script was called by a OAuth Control.
| System Variable | Description |
| ----------------- | ----------------------------------- |
| $_SERVER['OAUTH'] | Complete URL of the called WebOAuth |
Furthermore, the WebOAuth type provides the same variables as WebInterface.
#### WebInterface
When the PHP script was called by the [Webserver](https://www.symcon.de/en/llms/modules/webserver.md), e.g., in the 'user' folder.
| System Variable | Description |
| -------------------------- | -------------------------------------------------------------------------------------------------------------------------------------- |
| $_IPS['INSTANCE'] | ID of the calling Webserver instance |
| $_GET | Received data via GET |
| $_POST | Received data via POST |
| $_SERVER['DOCUMENT_ROOT'] | Contains the Document Root folder that contains the currently executed PHP script as it is set within the configuration of the server. |
| $_SERVER['PHP_AUTH_PW'] | If HTTP authentication is used, this variable contains the password the user provided |
| $_SERVER['PHP_AUTH_USER'] | If HTTP authentication is used, this variables contains the user name the user provided |
| $_SERVER['PHP_SELF'] | File/Path of the started PHP script |
| $_SERVER['QUERY_STRING'] | If available, the query string that was used to access the website |
| $_SERVER['REMOTE_ADDR'] | The IP adress that the user used to access the website |
| $_SERVER['REMOTE_PORT'] | The port that the user used to access the website |
| $_SERVER['REQUEST_METHOD'] | Contains the request method that was used for the access, e.g., "GET", "HEAD", "POST", or "PUT" |
| $_SERVER['REQUEST_URI'] | The URI that was used to access the current website, e.g., "/index.html" |
| $_SERVER['SCRIPT_NAME'] | Contains the path of the current PHP script. This can be useful for websites that link to themselves |
In addition, all request headers are added in capital letters with a HTTP_* prefix. Minus symbols (-) are changed to underscore symbols (_). For example, the header 'User-Agent is provided as $_SERVER['HTTP_USER_AGENT'].
---
# Components – Overview
> Symcon documentation · English · generated on 2026-09-26
> Index: https://www.symcon.de/en/llms.txt
Source: https://www.symcon.de/en/service/documentation/components/
IP-Symcon is composed of several software components that are described in more detail in the following subsections.
---
# Remote Access
> Symcon documentation · English · generated on 2026-09-26
> Index: https://www.symcon.de/en/llms.txt
Source: https://www.symcon.de/en/service/documentation/components/remote-access/
By default, access is possible in the local network without username/password. External access (for example through Symcon Connect) is completely disabled. To allow external access or password protection in the local network, remote access can be activated. A secure password (at least eight characters with special characters) should be assigned. Once remote access has been enabled, the system can be accessed through the [Management Console](https://www.symcon.de/en/llms/components/management-console.md) by entering the username (license username) and password.
> **Note:** The license username used here is not identical to the account username on the homepage. The username requested here is always the license email address.
> **Note:** If too many password errors occur, password validation will be slowed down initially and completely disabled later on.
To access IP-Symcon remotely from another machine you will need the [Management Console](https://www.symcon.de/en/llms/components/management-console.md). As soon as the [Management Console](https://www.symcon.de/en/llms/components/management-console.md) is launched, the [Connection Wizard](https://www.symcon.de/en/llms/components/management-console.md) will be displayed, which automatically finds all IP-Symcon servers in their local networks. After selecting the server, the user name and password must be entered in order to establish a connection.
> **Note:** For access from outside the local network the [Connect Control](https://www.symcon.de/en/llms/modules/connect-control.md) can be used with an active subscription. Alternatively, if sufficient network knowledge is available, this can be achieved by configuring a port forwarding in the router.
### Activating / deactivating remote access
In order to activate remote access, a password must be assigned. If remote access is deactivated again, the remote access password must simply be left "empty" and saved.
[SymOS (SymBox)](https://www.symcon.de/en/llms/components/remote-access.md)
[Windows (desktop / server)](https://www.symcon.de/en/llms/components/remote-access.md)
[MacOS](https://www.symcon.de/en/llms/components/remote-access.md)
[Linux (Ubuntu)](https://www.symcon.de/en/llms/components/remote-access.md)
[Raspberry Pi](https://www.symcon.de/en/llms/components/remote-access.md)
[Docker](https://www.symcon.de/en/llms/components/remote-access.md)
[QNAP](https://www.symcon.de/en/llms/components/remote-access.md)
[Synology](https://www.symcon.de/en/llms/components/remote-access.md)
> **Note:** Since version 4.4, remote access can also be activated within a demo license. When accessing the demo version via IPSStudio or Mediola, the user name must be left blank and only the password entered.
#### SymOS
Via the web interface, a password can be set via "Settings -> Remote Access".

#### Windows
Through the tray application a dialog can be opened via "Right-Click -> Information". At the bottom of the dialog, an item "Remote Access" can be found. There, the password can be set.

#### MacOS
Through the tray application a dialog can be opened via "Click -> Information". At the bottom of the dialog, an item "Remote Access" can be found. There, the password can be set.
#### Linux
The license must be set up correctly in the Management Console. The following command must then be executed:
```php
sudo nano /root/.symcon
```
There should be several entries. The following must be inserted in a new line. (Do not leave empty lines!)
```php
Password=c3ltY29u
```
Then save and exit. The Service must be restarted.
The password c3ltY29u is "symcon" encoded in Base64. The password must be Base64 encoded. This tool can be used for this purpose: [https://www.base64encode.org/](https://www.base64encode.org/)
#### Raspberry Pi
The license must be set up correctly in the Management Console. The following command must then be executed:
```php
sudo nano /root/.symcon
```
There should be several entries. The following must be inserted in a new line. (Do not leave empty lines!)
```php
Password=c3ltY29u
```
Then save and exit. The service must be restarted.
The password c3ltY29u is "symcon" encoded in Base64. The password must be Base64 encoded. This tool can be used for this purpose: [https://www.base64encode.org/](https://www.base64encode.org/)
#### Docker
The license must be configured in the Management Console. Afterwards, the following command must be executed:
```php
sudo nano /opt/symcon/.symcon
```
> **Note:** The path is based on the one defined during the [Installation](https://www.symcon.de/en/llms/getting-started.md) of IP-Symcon. It can vary.
There should be several entries. The following must be inserted in a new line. (Do not leave empty lines!)
```php
Password=c3ltY29u
```
Then save and exit. The service must be restarted.
The password c3ltY29u is "symcon" encoded in Base64. The password must be Base64 encoded. This tool can be used for this purpose: [https://www.base64encode.org/](https://www.base64encode.org/)
#### QNAP
The license must be configured in the Management Console. Afterwards, an editor must be used to update the .symcon file. It can be found in the Root volume selecting during installation.
```php
/Symcon/MeinIPSymcon/.symcon
```
> **Note:** The path is based on the one defined during the [Installation](https://www.symcon.de/en/llms/getting-started.md) of IP-Symcon. It can vary.
There should be several entries. The following must be inserted in a new line. (Do not leave empty lines!)
```php
Password=c3ltY29u
```
Then save and exit. The service must be restarted.
The password c3ltY29u is "symcon" encoded in Base64. The password must be Base64 encoded. This tool can be used for this purpose: [https://www.base64encode.org/](https://www.base64encode.org/)
#### Synology
The license must be configured in the Management Console. Afterwards, an editor must be used to update the .symcon file. It can be found in the Root volume selecting during installation.

> **Note:** The path is based on the one defined during the [Installation](https://www.symcon.de/en/llms/getting-started.md) of IP-Symcon. It can vary.
There should be several entries. The following must be inserted in a new line. (Do not leave empty lines!)
```php
Password=c3ltY29u
```
Then save and exit. The service must be restarted.
The password c3ltY29u is "symcon" encoded in Base64. The password must be Base64 encoded. This tool can be used for this purpose: [https://www.base64encode.org/](https://www.base64encode.org/)
---
# Tray
> Symcon documentation · English · generated on 2026-09-26
> Index: https://www.symcon.de/en/llms.txt
Source: https://www.symcon.de/en/service/documentation/components/tray/
The IP-Symcon Tray Application is the interface to the IP-Symcon Service, which runs in the background. Specific settings can be administrated via the context menu. This includes, for example, starting and stopping the service and opening the Management Console.
> **Note:** The Tray is only available for MacOS and Windows operating systems.
The following other settings can be made via the Tray Application:
* [Start Live Update](https://www.symcon.de/en/llms/getting-started.md)
* [Uninstall Service](https://www.symcon.de/en/llms/getting-started.md)
* [Change License](https://www.symcon.de/en/llms/getting-started.md)
* [Change Remote Access](https://www.symcon.de/en/llms/components/remote-access.md)
---
# Service
> Symcon documentation · English · generated on 2026-09-26
> Index: https://www.symcon.de/en/llms.txt
Source: https://www.symcon.de/en/service/documentation/components/service/
The Service is the centerpiece of IP-Symcon. It always runs in the background and is usually automatically launched when starting the operating system. This means that no user needs to be logged into a computer/server, to guarantee perfect operation.
### Configuration File
The configuration (settings.json) of IP-Symcon is saved every 10 minutes or when properly shutting down. Should the power supply fail, the configuration file could become corrupt or broken.
In this case, IP-Symcon will try to use automatically saved copies of the settings.json until a working copy is found. If no functional configuration file is found, the service does not start and outputs an error message.
## PHP
Source: https://www.symcon.de/en/service/documentation/components/service/php/
IP-Symcon uses PHP as its script language. As PHP is fully integrated, all of its advantages can be made use of. Among others, this means that multiple scripts can run at the same time.
#### Version History
| IP-Symcon Version | Integrated PHP Version |
| ----------------- | ----------------------- |
| from 1.0 | 5.1.x (x86 thread safe) |
| from 2.2 | 5.3.x (x86 thread safe) |
| from 2.5 | 5.4.x (x86 thread safe) |
| from 4.0 | 5.6.x (x86 thread safe) |
| from 5.0 | 7.2.x (x64 thread safe) |
| from 5.1 | 7.3.x (x64 thread safe) |
| from 5.5 | 7.4.x (x64 Thread Safe) |
| from 7.0 | 8.2.x (x64 Thread Safe) |
In addition to the standard PHP functions, special IP-Symcon functions are available, through which IP-Symcon-specific settings (see [Command Reference](https://www.symcon.de/en/llms/functions/index.md)) or devices configured in IP-Symcon, can be accessed (see [Module Reference](https://www.symcon.de/en/llms/modules/index.md)).
The "php.ini" known from PHP ( ) is equally available in IP-Symcon. IP-Symcon configures "extension" entries automatically, based on the available extensions that were placed in the "IP-Symcon/ext" folder.
### Global include
In order to make functions, constants, etc. available globally across all scripts, these must be defined in the file "__autoload.php". These must be present in the "IP-Symcon/scripts" folder.
Multiple files can be read in within the "__autoload.php".
> **Note:** Inputting commands or files via "__autoinclude.inc.php" is possible, but the file is overwritten during each new update or new installation.
> **Warning:** The PHP function "auto_prepend_file" cannot be used, as it is already called and used by IP-Symcon. This should/can only be used once throughout the system.
#### Example
```php
__autoload.php
require_once(IPS_GetKernelDir() . "/scripts/globalfunction.ips.php");
```
### Configure
All possible configuration parameters can be taken from the PHP handbook. A useful setting for the case that some scripts (e.g. ShutterControl) eventually require it, is the extension of the maximum script runtime. When adjusting this setting, one must make sure that only a limited number of PHP scripts are run in IP-Symcon at the same time. Should all slots be occupied, due to a script having a long runtime, other scripts will be placed into a queue and only run with a delay. "Sleep" commands should therefore always be avoided and exchanged for "timer" commands.
> **Warning:** IP-Symcon must be restarted after any changes are made to "php.ini"!
#### Example
__Increase maximum script runtime to 5 minutes.__
```php
[PHP]
max_execution_time=300
```
## Interfaces
Source: https://www.symcon.de/en/service/documentation/components/service/interfaces/
### Hardware Modules
sorted according to connections and alphabetical order
| Components | Manufacturer | Connections | Supported devices |
| ---------------------------------------------------------------------------------------------------------------------------------------------------------------------- | ----------------------------------------------------------------------------------------------------------- | ----------------- | ------------------------------------------------- |
| [1-Wire](https://www.symcon.de/en/llms/modules/1-wire.md) | Maxim Dallas | Wired | [Device List](https://www.symcon.de/en/llms/modules/1-wire.md) |
| [ALLNET](https://www.symcon.de/en/llms/modules/allnet.md) | ALLNET | Wired | [Device List](https://www.symcon.de/en/llms/modules/allnet.md) |
| [digitalSTROM](https://www.symcon.de/en/llms/modules/digitalstrom.md) | AIZO | Wired | [Device List](https://www.symcon.de/en/llms/modules/digitalstrom.md) |
| [DMX/Artnet](https://www.symcon.de/en/llms/modules/dmx-artnet.md) | among others DMX4ALL | Wired | [Device List](https://www.symcon.de/en/llms/modules/dmx-artnet.md) |
| [KNX](https://www.symcon.de/en/llms/modules/knx.md) | among others Siemens AG, EIBMarkt, Gira, Jung, Merten, Weinzerl | wired | [Device List](https://www.symcon.de/en/llms/modules/knx.md) |
| [eKey](https://www.symcon.de/en/llms/modules/ekey.md) | eKey | Wired | [Device List](https://www.symcon.de/en/llms/modules/ekey.md) |
| IR remote control | among others [IRTrans](https://www.symcon.de/en/llms/concepts/automations.md), [WinLIRC](https://www.symcon.de/en/llms/modules/winlirc.md) | Wired | [Device List](https://www.symcon.de/en/llms/modules/irtrans.md) |
| [LCN](https://www.symcon.de/en/llms/modules/lcn.md) | Issendorff | Wired | [Device List](https://www.symcon.de/en/llms/modules/lcn.md) |
| [ModBus TCP](https://www.symcon.de/en/llms/modules/modbus-rtu-tcp.md), [ModBus RTU](https://www.symcon.de/en/llms/modules/modbus-rtu-tcp.md), [ModBus RTU over TCP](https://www.symcon.de/en/llms/modules/modbus-rtu-tcp.md) | e.g. Wago/Beckhoff SPS | Wired | [Device List](https://www.symcon.de/en/llms/modules/modbus-rtu-tcp.md) |
| [M-Bus](https://www.symcon.de/en/llms/modules/mbus.md) | e.g. ALLMESS | Wired | [Device List](https://www.symcon.de/en/llms/modules/mbus.md) |
| [SPS Siemens Vipa Logo](https://www.symcon.de/en/llms/modules/sps-siemens-vipa-logo.md) | Siemens AG | Wired | [Device List](https://www.symcon.de/en/llms/modules/sps-siemens-vipa-logo.md) |
| [Siemens OZW](https://www.symcon.de/en/llms/modules/siemens-ozw.md) | Siemens AG | Wired | [Device List](https://www.symcon.de/en/llms/modules/siemens-ozw.md) |
| [UVR1611](https://www.symcon.de/en/llms/modules/technische-alternative.md) | Technical Alternative | Wired | [Device List](https://www.symcon.de/en/llms/modules/technische-alternative.md) |
| Velleman Board | Velleman | Wired | ------------------------------------------------- |
| [WuT](https://www.symcon.de/en/llms/modules/wut.md) | W&T (Wiesemann & Theis) | Wired | ------------------------------------------------- |
| [EnOcean](https://www.symcon.de/en/llms/modules/enocean.md) | EnOcean Alliance | Wireless (868Mhz) | page://szUQAzDnAQT63wLx |
| [FHZ1X00PC](https://www.symcon.de/en/llms/modules/fhz1x00pc.md) (FS20, HMS, FHT, KS300) | ELV | Wireless (868Mhz) | [Device List](https://www.symcon.de/en/llms/modules/fhz1x00pc.md) |
| [HomeMatic](https://www.symcon.de/en/llms/modules/homematic.md) | ELV | Wireless (868Mhz) | [Device List](https://www.symcon.de/en/llms/modules/homematic.md) |
| [IPS-868](https://www.symcon.de/en/llms/modules/ips-868.md) | IP-Symcon/ProJet | Wireless (868Mhz) | [IPS-868](https://www.symcon.de/en/llms/modules/ips-868.md) |
| [XBee](https://www.symcon.de/en/llms/modules/xbee.md) | ZigBee | Wireless (868Mhz) | ------------------------------------------------- |
| [xComfort](https://www.symcon.de/en/llms/modules/xcomfort.md) | Eaton | Wireless (868Mhz) | [Device List](https://www.symcon.de/en/llms/modules/xcomfort.md) |
| [Z-Wave](https://www.symcon.de/en/llms/modules/z-wave.md) | among others ACT, Popp, Düwi, Merten, Innovus, Fibaro | Wireless (868Mhz) | [Device List](https://www.symcon.de/en/llms/modules/z-wave.md) |
| [FS10-weather](https://www.symcon.de/en/llms/modules/fs10-weather.md) | ELV | Wireless (433Mhz) | ------------------------------------------------- |
### Virtual Modules
in alphabetical order
| Designation | Functions | Special Features |
| ----------------------------------------------------------- | --------------------------------------------------------------------------------------------------------------------------------------- | --------------------------------------------------------- |
| [Archive Control](https://www.symcon.de/en/llms/modules/archive-control.md) | Saves, manages and provides logged variables. | |
| [Calendar Control](https://www.symcon.de/en/llms/modules/calendar-control.md) | Manages planned presence/absence and provides available variables. | |
| [Connect Control](https://www.symcon.de/en/llms/modules/connect-control.md) | Opens an encrypted tunnel to the Connect Service, which permits a secured remote access. | Requires an active subscription |
| [Cutter](https://www.symcon.de/en/llms/modules/cutter.md) | Processes binary data and cuts/synchronizes them. Can be used with the interface modules. | |
| [Event Control](https://www.symcon.de/en/llms/modules/event-control.md) | Reaction to particular events, such as system start/stop, in order to save/input particular system conditions | |
| [Heating Control](https://www.symcon.de/en/llms/modules/heating-control.md) | 2-point regulator that switches heating actuators based on actual and set temperatures, in order to regulate using preset temperatures. | |
| [IMAP](https://www.symcon.de/en/llms/modules/imap.md) | Serves an IMAP-based retrieval of e-mails. | |
| [Location Control](https://www.symcon.de/en/llms/modules/location-control.md) | Calculates various twilight times, based on longitude and latitude. | |
| [MediaPlayer](https://www.symcon.de/en/llms/modules/amazon-alexa.md) | WAV, MP3, WMA, Shoutcast, IceCast, WMALive | Several sound cards simultaneously |
| [Module Control](https://www.symcon.de/en/llms/modules/module-control.md) | Provides various modules, integrated over a git repository. | |
| [Notification Control](https://www.symcon.de/en/llms/modules/notification-control.md) | Manages all devices registered for push notifications. | Push Notifications require an active subscription |
| [POP3](https://www.symcon.de/en/llms/modules/pop3.md) | Serves the POP3-retrieval of e-mails. | |
| [Presence Control](https://www.symcon.de/en/llms/modules/presence-control.md) | Offers the possibility of assessing a presence in a particular area | |
| [RegisterVariable](https://www.symcon.de/en/llms/modules/registervariable.md) | Provides a data transfer and processing interface | |
| [SMTP](https://www.symcon.de/en/llms/modules/smtp.md) | Serves to send e-mails via SMTP. | |
| [SMS](https://www.symcon.de/en/llms/modules/sms.md) | Serves to send SMSs with help of an external SMS provider. | |
| [System Information](https://www.symcon.de/en/llms/concepts/automations.md) | CPU Load, hard drive capacity, battery power, printer queue | |
| [Shutter Control](https://www.symcon.de/en/product/application-examples/shutter-control/) | Positions your shutters to an exact percentage value, even if your module can only move up or down. | Must be taught once |
| [TextParser](https://www.symcon.de/en/llms/modules/textparser.md) | Extracts data from a text that, e.g., was delivered by the WWW Reader. | |
| [Text To Speech](https://www.symcon.de/en/llms/modules/text-to-speech.md) | Synthesizes language for direct output from a loudspeaker or into a desired WAV file with various formats/qualities. | requires SAPI 5.1 or higher (XP, W2k3, Vista) |
| [Util Control](https://www.symcon.de/en/llms/modules/util-control.md) | This module is an interface between the IP-Symcon service and the management console. | |
| [WebHook Control](https://www.symcon.de/en/llms/modules/webhook-control.md) | Offers the possibility of retrieving scripts via the browser. | Can be used externally when combined with Connect Control |
| [WebServer](https://www.symcon.de/en/llms/modules/webserver.md) | Provides a further port for the relevant WebFront. | SSL-encryption activated |
### Language Assistance Systems
in alphabetical order
| System | Manufacturer | Special Features |
| ------------------------------------------------------- | ------------ | ----------------------- |
| [Amazon Alexa](https://www.symcon.de/en/llms/modules/amazon-alexa.md) | Amazon | Requires Symcon Connect |
| [Google Assistant](https://www.symcon.de/en/llms/modules/google-assistant.md) | Google | Requires Symcon Connect |
### Visual Modules
in alphabetical order
| Designation | Functions |
| ------------------------------------------------------------- | ----------------------------------------------------------------------------------------------------------- |
| [Dummy Module](https://www.symcon.de/en/llms/modules/dummy-module.md) | Optically creates an instance in WebFront. |
| [Image Grabber](https://www.symcon.de/en/llms/modules/image-grabber.md) | Automatically creates webcam images as media objects and thereby makes them directly available to WebFront. |
| [Popup Module](https://www.symcon.de/en/llms/modules/popup-module.md) | Creates a pop-up in WebFront and displays linked objects. |
| [Skin Control](https://www.symcon.de/en/llms/modules/skin-control.md) | This module manages available skins and allocates them to various WebFronts. |
| [WebFront Visualization](https://www.symcon.de/en/llms/components/webfront-visualization.md) | Manages a WebFront and offers various possible settings. |
### [Interface Modules](https://www.symcon.de/en/llms/modules/index.md)
in alphabetical order
| Designation | Functions | Special Features |
| ------------------------------------------------------- | ------------------------ | ----------------------------------- |
| [Client Socket](https://www.symcon.de/en/llms/modules/clientsocket.md) | ------------------------ | TCP-Client |
| [HID](https://www.symcon.de/en/llms/modules/hid.md) | ------------------------ | ----------------------------------- |
| [HTTPClient](https://www.symcon.de/en/llms/modules/httpclient.md) | Retrieves/reads websites | Proxy, Basic Authentication Support |
| [Multicast Socket](https://www.symcon.de/en/llms/modules/multicastsocket.md) | ------------------------ | Multicast-Client |
| [Serial Port](https://www.symcon.de/en/llms/modules/serialport.md) | ------------------------ | RS232/RS485 |
| [Server Socket](https://www.symcon.de/en/llms/modules/serversocket.md) | ------------------------ | TCP-Server |
| [UDP Socket](https://www.symcon.de/en/llms/modules/udpsocket.md) | ------------------------ | UDP-Client |
---
# Management Console
> Symcon documentation · English · generated on 2026-09-26
> Index: https://www.symcon.de/en/llms.txt
Source: https://www.symcon.de/en/service/documentation/components/management-console/
The Management Console is the tool for setting up and configuring the complete logics of the IP-Symcom Server. There are two versions of the Management Console: The web based Management Console and the [Pro Console](https://www.symcon.de/en/llms/components/management-console.md).
### Web-based Management Console
since IP-Symcon 5.0
The web-based Management Console is platform-independent and can be accessed via browser. Officially recommended browsers are: Google Chrome, Apple Safari and Opera
#### Connect to the IP-Symcon Server
The web-based Management Console can be opened in a browser via "[IP]:3777/console/" .
#### The Start Page
Widgets are shown on the start page of the Management Console. These are individually configurable and offer an initial view of the many activities of the system.

##### Configuring Widgets
At the start page, one can display and remove widgets using the cogwheel button.

##### View changer
Using the button on the top right, one can quickly switch between the start page and the Tab List.

##### Tab List
Diverse tabs can be opened in the tab list. This includes the [Object Tree](https://www.symcon.de/en/llms/components/management-console.md), the [Messages](https://www.symcon.de/en/llms/components/management-console.md) , or the configuration of [Instances](https://www.symcon.de/en/llms/concepts.md) or [Automations](https://www.symcon.de/en/llms/concepts/automations.md). The Plus Icon at the right of the tab list can open new tabs. If multiple tabs of objects with the same name are open, the path to those objects is displayed as well, so the corresponding object can be properly identified.

##### Visualization
The [WebFront](https://www.symcon.de/en/llms/components/webfront-visualization.md) can be opened directly via the button on the top right.

##### Information
A variety of information can be retrieved using the information button.
These include kernel and feature information, as well as a button to the [Special Switches](https://www.symcon.de/en/llms/developer/special-switches.md).

##### Device Search
Discovery instances can be configured via the Device Search button.
These inform about newly connected devices and simplify the configuration of new devices.

##### Module Store
New modules can be installed via the Module Store. These modules expand the functionality and enable the usage of new functions or additional devices.

## Device Search
Source: https://www.symcon.de/en/service/documentation/components/management-console/device-search/
The Device Search button can be used to set up Discoveries and view Configurators. These provide information about newly connected devices and simplify the setup of new devices.
### Set Up Discovery
The Device Search can be accessed via the bell icon at the top right of the console.
#### Initial Setup

New Discoveries can be set up by ticking the box on the left side.
If there is a basket on the right edge, it is a Discovery from the [Module Store](https://www.symcon.de/en/llms/components/management-console.md). These can be opened by clicking on the basket.
When setting up a Discovery, the required IO/splitter instances are automatically created.
#### Additional Setup

Additional Discovery Systems can be added via "Select Systems".

Configurators can be created and configured automatically using previously established Discoveries. The created configurators are displayed in the Device Search.
The configuration for the established Discoveries/Configurators can be opened using the arrows on the right side.
#### Create a Configurator
System-specific [Configurators](https://www.symcon.de/en/llms/concepts.md) can be created in the respective Discovery. To do this, the appropriate entry must first be selected from the list. Then "Create" has to be clicked.
The Discovery automatically mirrors the complete configuration of the Configurator making it immediately functional.

### Various Statuses
The Device Search icon shows directly whether, for example, a new device can be created.
There are three statuses for this, which are indicated by the icon on the console.
#### Status unchanged
If no new devices have been detected, all devices that can be created have been created or marked as "seen", only the standard symbol is displayed.

#### No Discovery is Set Up
No Discovery instance has been set up yet.

#### New Devices Can Be Created
When new devices are recognized, their number is shown in a green circle.
If no setup is desired, this message can be hidden in the Device Search window with "Mark new devices as seen"

[setupdiscovery]:/images/dokumentation/komponenten/webverwaltungskonsole-geraetesuche-discoveryeinrichten.png
## Messages
Source: https://www.symcon.de/en/service/documentation/components/management-console/messages/
The Messages tab displays information about operations that are currently happening on the IP-Symcon server. Here, changes, activities, and also error messages are collected and can be filtered.
> **Note:** By double-clicking or "right-click -> open" on a variable within the message windows, it can be changed.
### Configuration
The messages can be accessed via Message Log Widget or the plus in the tab list.
This is done by simply clicking "Open" in the widget or openening the Message Log with the plus in the tab list.


### Color codes
The different messages are displayed in color in the message window.
__Transparent background:__
A default message. (MESSAGE)
__Gray background:__
A custom message. (CUSTOM)
__Green background:__
A success message. (SUCCESS)
__Purple background:__
A notification message. (NOTIFY)
__Yellow background:__
A warning message. (WARNING)
__Red background:__
An [Error Message](https://www.symcon.de/en/llms/components/management-console.md). (ERROR)
### Menu Items
#### Start/Stop
Starts and stops the recording of messages. Thus, the previous messages can be analyzed calmly.
#### Clear
Clears all previous messages.
#### Limit Messages
The maximum number of displayed messages. When the limit is reached, the oldest messages are removed before new ones are added. This can cause the list to scroll automatically, even if the AutoScroll feature has been disabled.
#### AutoScroll
When enabled, the window automatically scrolls to the most recent messages.
#### Filter
Here you can select which type of messages should be displayed.
#### Quick filter
The "Sender" and "Message" columns are searched for the content of the input field. The search is activated when entering the search field itself, but can be activated/deactivated by clicking on "Quick filter".
Searching for multiple terms is not possible.
## Error Messages
Source: https://www.symcon.de/en/service/documentation/components/management-console/messages/error-messages/
An error message is displayed either directly or in the message log. Error messages are shown in red in the message window.
All error messages that appear in the message log are also saved in the log file in the "logs" folder.
> **Note:** The following applies: If an error message is not displayed directly, it will be displayed in the message log.
#### Examples for a direct output of the error messages:
* Execute in the Script Editor
* Execute in WebFront and the app
* Execute one’s own action (Script / PHP Module) via WebFront and app
* Executing Web Hooks and OAuth Hooks
#### Examples of error messages in the log:
* Events (cyclic, trigger)
* Script timer
* Timers of instances (including PHP modules)
* Error in the start and stop script in the Event Control
* Error when evaluating a Register Variable
## Module Store
Source: https://www.symcon.de/en/service/documentation/components/management-console/module-store/
New modules can be installed via the Module Store. These modules expand the range of functions and thus enable the use of new functions or additional devices.
> **Note:** Search all available modules in the [Module Store](https://www.symcon.de/en/module-store/) in the browser
.
### Open Module Store
The module store can be reached via the basket in the upper right corner of the console.

Initially, the Module Store shows different categories in which modules are offered and provides a search function. If modules have already been installed via the Module Store, they can be accessed via a corresponding special category.

### Find modules
There are various options for finding a suitable module. On the one hand, the search function can be used. A search term can be entered here and confirmed by pressing the Enter key or clicking on the magnifying glass. Matching modules are then displayed.

Alternatively, a category can be selected by clicking on it to display the modules it contains. Categories can contain sub-categories, which can then also be selected. One can return to a previous category by clicking on it in the top bar. A click on "Module Store" returns one to the start screen.

These two methods can also be combined. One can search for a term in a certain category or limit a search result afterwards by using categories.
> **Note:** If a search term is used, then sub-categories are also searched. Without a search term, only modules from the current category are displayed, but not their subcategories.
### Install modules
If modules are to be installed, the associated card must first be clicked. Following, a dialog opens which explains the currently selected modules.

| Element | Description |
| ------------------- | -------------------------------------------------------------------------------------------------------------------- |
| Author | The author of the modules |
| Categories | The categories in which the modules are contained |
| Description | The description of the modules. In addition, there is a link to the documentation and a list of the included modules |
| Version information | The current version number and a description of what is new about that version |
| Beta settings | If the modules have a beta version, this can be used to switch to the beta version |
At the bottom of the dialog there is the "Install" button to install the modules and "Cancel" to close the dialog again.
If a beta version is to be installed, the beta settings can be expanded and "Switch to beta" may be clicked on. The module information will then be adapted to the beta version and this can be installed by clicking on "Install".
> **Warning:** Beta versions are not checked by the Symcon-Team.
### Update and remove modules
If modules have been installed, a special category "Installed" appears on the start screen of the module store. All installed modules are listed here. If there are new versions for modules this is highlighted.

If an installed module is clicked on, the installation dialog appears again. One now has the additional option of deleting the modules by clicking on "Remove".
If there is a new version, one can install it using "Update". If one desires to change the channel afterwards, i.e. from the regular stable version to beta or the other way around, this can be done via the beta settings and is confirmed with "change channel". If the current version is installed, one can download it again via "Reinstall".
## Object Tree
Source: https://www.symcon.de/en/service/documentation/components/management-console/object-tree/
The Object Tree is used to overview and manage all objects and instances. The structure used here is also used as foundation for the [WebFront](https://www.symcon.de/en/llms/components/webfront-visualization.md). Objects can be used Drag & Drop.
> **Note:** The explanation of the context menu of the different instances can be found in the [Basics](https://www.symcon.de/en/llms/concepts.md).
### Configuration
The Object Tree can be accessed via Object Tree Widget or the plus in the tab list.
This is done by simply clicking "Open" in the widget or openening the Object Tree with the plus in the tab list.


### Color Codes
In the Object Tree the status of the objects is displayed with color codes.
__Black font:__
Everything is normal and the object is displayed in the WebFront.
__Light gray font:__
Everything is normal and the object does not appear in the WebFront.
__Gray exclamation mark:__
The object is inactive.
__Light gray exclamation mark:__
A parent instance of the object is inactive.
__Red exclamation mark:__
The object has an error condition.
__Light red exclamation mark:__
A parent instance has an error condition.
### Additional Functions
When hovering over time or a status icon, a tool tip with the current date or the type of complication is displayed.
### Menu Items
#### Plus Button
Via the dialog "+" at the bottom right, new objects can be created. Alternatively, by right-clicking on the desired position in the object tree, an object can be added to this position. The respective object types are described in more detail in the [Basics](https://www.symcon.de/en/llms/concepts.md).
#### ID
You can search for an ObjectID using the search input. If found, the object tree automatically jumps to the ID you are looking for and selects it.
#### Filter
When entering text into the search field, the quick filter is automatically activated. It can be switched on and off again by clicking on the quick filter. It is searched in the column "Name". If the column "Description" is visible, it is searched as well.
#### Types
The visibility of specific object types can be activated or deactivated to focus the overview on specific types. If something is hidden, this button is highlighted in gray.
#### Columns
Overview functionality to enable and disable the displayed columns.
#### Quick filter
When entering the search field, the quick filter is automatically activated. This can be switched on and off again by clicking on the quick filter. It is only searched in the column "Location/Object".
## Object Tree (physical)
Source: https://www.symcon.de/en/service/documentation/components/management-console/object-tree-physical/
The physical view of the object tree only shows unconnected and I/O instances at the top level. In the I/O area, the devices are shown in the structure of the actual physical connection. The structure is illustrated under Parent Instances. (I/O -> Gateway -> Device). Only instances are displayed.
Unconnected instances include those that are not physically present.
> **Note:** The explanation of the context menu of the various instances can be looked up in the [Basics](https://www.symcon.de/en/llms/concepts.md).
### Setup
The object tree can be opened via the plus in the tab bar.

### Color codes
In the object tree the status of the objects is shown with color codes
__Black font:__
Everything is normal and the object is displayed in the WebFront.
__Light grey font:__
Everything is normal and the object is not displayed in the WebFront.
__Grey exclamation mark:__
The object is inactive.
__Light grey exclamation mark:__
A higher-level instance of the object is inactive.
__Red exclamation mark:__
The object has an error state.
__Light red exclamation mark:__
A higher-level instance has an error state.
### Adjusting connections
Using drag & drop, an instance can be moved to another compatible connection and will then be assigned to it. If the target instance is not compatible, the move will be prevented.
### Further functionalities
If a time or an exclamation mark is hovered over in the object tree, a tooltip appears which shows, for example, the entire date or the type of fault.
### Menu items
#### ID
An ObjectID can be searched for using the search dialog. If it is found, the object tree automatically jumps to the ID one is looking for and selects it.
#### Filter
With entry to the search field the filter is automatically activated. This can be activated/ deactivated by clicking on "Filter". The search is only carried out in the “Name” column.
#### Types
Here the visibility of certain objects in the object tree can be switched on and off in order to set the overview or focus on certain types. If something is hidden, this button is highlighted in grey.
#### Columns
Overview functionality to activate and deactivate the displayed columns.
## Pro Console
Source: https://www.symcon.de/en/service/documentation/components/management-console/pro-console/
The Pro Console is an expert tool to setup and configure the complete logic of the IP-Symcon server. It includes all features of the [web based Management Console](https://www.symcon.de/en/llms/components/management-console.md) and additional expert options.
### Installation
The Pro Console can be installed for Windows, MacOS, and Linux Ubuntu.
> **Note:** The Pro Console was introduced with IP-Symcon 5.4. However, it is function since IP-Symcon 5.0. For older versions, not all functions are available.
#### Windows
The current Pro Console for Windows can be downloaded [here](https://download.symcon.de/stable/console/win/amd64) .
#### MacOS
The current Pro Console for MacOS can be downloaded [here](https://download.symcon.de/stable/console/mac/amd64) .
#### Ubuntu
If not already done, add the Symcon Repo:
```php
wget -qO- https://apt.symcon.de/install.sh | bash /dev/stdin
```
Execute the following commands:
```php
sudo apt-get update
sudo apt-get install symcon-console
```
### Connect to the IP-Symcon Server
The Pro Console uses the [Connection Wizard](https://www.symcon.de/en/llms/components/management-console.md). Here, a server can be selected and connected to via "Connect" or double click.

#### Un- and Redock
In the Pro Console, individual tabs can be un- and redocked at will. Thus, an individual work space be be designed to keep everything in sight at once. Additionally, single tabs can be shown in a seperate window by rightclicking on it and selecting "Open in New Window".


### Start with Parameters
Usually, the Pro Console directly launches the [Connection Wizard](https://www.symcon.de/en/llms/components/management-console.md). This behaviour can be adjusted via parameters.
| Parameter | Description | Example for Windows |
| --------------------------------------------------------- | --------------------------------------------------------------------------------------------------------------------------------- | ----------------------------------------------------------------------------------------------------------------- |
| --server=[Console] | Directly connects to a server. [Console] needs to be replaced with the address of the web based Management Console of the Server. | "IP-Symcon Management Console.exe" --server=http://127.0.0.1:3777/console/ |
## Connection Wizard
Source: https://www.symcon.de/en/service/documentation/components/management-console/connection-wizard/
The Connection Wizard helps to connect the [Pro Console](https://www.symcon.de/en/llms/components/management-console.md) to an IP-Symcon server. The available servers are displayed in a list.
### Servers
All servers found in the local network or entered into the [License Management](https://www.symcon.de/en/llms/getting-started.md) are listed here consecutively. To display the servers from the License Management, the corresponding Symcon account needs to be logged in. The login is done via click on the person icon top right. There, username and password from the personal area of the Symcon homepage need to be entered. Regard, that this login is seperate from the community forum and the remote access. With "Search again", it is possible to scan for new servers in the local network.

### No Servers Found
If no servers are shown in the list, there may be several reasons.
__IP-Symcon Server from the License Management do not appear__
It should be verified that the correct user is logged in. If a user is logged in, it says "Logged in as ..." next to the person icon. If that label is not visible, no user is logged in and thus no licenses from the License Management can be shown.
__IP-Symcon Server is not powered on/started__
Please start IP-Symcon on the server. Verify that the server is connected and started correctly.
__IP-Symcon server is not properly connected to the network__
It should be checked if a network connection between both computers is available.
__Firewall settings incorrect__
Both client and server side access must be allowed in the firewall for Port 1900 / UDP.
For the connection with the management console additionally, under normal circumstances, port 82/TCP or 3777/TCP must be allowed.
---
# Tile Visualization
> Symcon documentation · English · generated on 2026-09-26
> Index: https://www.symcon.de/en/llms.txt
Source: https://www.symcon.de/en/service/documentation/components/tile-visualization/
_Requires Symcon >= 7.0_
The Tile Visualization provides a representation of your system that visualizes the entire Object Tree or just a part of it. The visualization can be used via browser or via apps.
### Connecting with the visualization
Connecting is one of the few points where apps and browsers differ:
[Connecting with Apps](https://www.symcon.de/en/llms/components/tile-visualization.md)
[Connecting with Browser](https://www.symcon.de/en/llms/components/tile-visualization.md)
### Main View
The visualization represents objects from IP-Symcon as tiles and is oriented to the Object Tree. One page of the visualization thus corresponds to the content of one category. How the individual object types are displayed is described in the [object-presentation](https://www.symcon.de/en/llms/components/object-presentation.md)

### Tiles
Tiles have different display modes.
**Minimized view**
When tiles are displayed under a category alongside others, they use the minimized view. These are described in the [object-presentation](https://www.symcon.de/en/llms/components/object-presentation.md) described in more detail. The size of the tile can also have an influence on the content of the tile.

**Maximized view**
Each tile can be maximized using the two arrows in the upper right corner. Depending on the object type and configuration, a maximized view is available. If there is none, the object itself or all child objects are displayed in a list. Even if there is an extended display, you can switch to the list display at any time by clicking the list icon in the upper right corner.

### Elements of the visualization
The visualization is divided into different areas:

**Appbar**
At the top of the screen is the appbar. On the left side, an overview of the categories can be accessed via the navigation menu. On the right side is the search by default and buttons for edit mode, notifications, sharing the visualization and settings. In the [instance configuration](https://www.symcon.de/en/llms/components/tile-visualization.md) these options can be deactivated or even more presentations like the current date can be added.
**Start Area**
Below the appbar is the start area. The content can be changed in the [instance configuration](https://www.symcon.de/en/llms/components/tile-visualization.md) can be customized. A welcome message is displayed here by default. Additionally, a number of automations and favorites can be displayed here. For narrower screens such as smartphones, the display is slightly adjusted to make better use of the available space.
**Category Bar**
The category bar summarizes all categories that are in the current category. If needed, the bar wraps around to show all all of them. In the [instance configuration](https://www.symcon.de/en/llms/components/tile-visualization.md), the category bar can be hidden, allowing categories to be displayed with the other objects below them in the object area.
**Object Area**
Here all objects from IP-Symcon like variables and instances are displayed as tiles. The position and size of these can be changed at any time. Likewise the content of the individual tiles can be adapted. This information is stored in grid configurations for different screen sizes. More details can be found in section [Individualization](https://www.symcon.de/en/llms/components/tile-visualization.md).
**Sidebar**
The sidebar can be opened via the icon in the top left corner. All categories are displayed here in a tree view and can be used for navigation. Next to the name of the visualization, a button can be used to switch between the available visualizations of the server.

### Setup
To set up the tile visualization, a tile visualization instance must exist. By default, an instance is created with the installation and is located in the object tree under "Visualization Instances".

If further tile visualizations are to be set up, this can be added in the object tree via the "+" -> "Instance" -> "Tile Visualization". This creates a new tile visualization, which can be configured completely independently.
### Configuration
Basically, the tile visualization runs without any further configuration. However, various settings can be made. Information about the individual settings and configuration options can be found at [instance configuration](https://www.symcon.de/en/llms/components/tile-visualization.md). The configuration can be opened by double-clicking on the visualization tile in the object tree.
### Multiple visualizations
In IP-Symcon Basic one visualization is available. In IP-Symcon Professional Edition, a total of up to five tile visualizations can be created, which can be accessed independently via the visualization start page and secured with a password if required. A visualization can be created as a stand-alone entity - for example, for a visualization object -, represent a special view for the maintenance technician, or simply create a security-specific separation. The same options are available per visualization and can be customized as desired. In the Unlimited Edition, any number of visualizations can be created.
## Individualization
Source: https://www.symcon.de/en/service/documentation/components/tile-visualization/individualization/
_Requires Symcon >= 7.0_
## Edit layout
Source: https://www.symcon.de/en/service/documentation/components/tile-visualization/individualization/edit-layout/
_Requires Symcon >= 7.0_
### Default values
The position of the tiles results from the position of the corresponding objects in the Object Tree. The positioning runs from top left to right and from top to bottom.
All tiles have an assigned default size. The initial default sizes result from the selected [grid-configuration](https://www.symcon.de/en/llms/components/tile-visualization.md). This is selected based on the device type of screen size and orientation to choose the best possible initial values for the tiles. These default sizes can be adjusted for each display type of a tile in the settings under Visualization>Grid Settings. The resolution of the grid on which the tiles are arranged can also be determined here.
The width of the grid is fixed. Since it is possible to scroll vertically, the height of the grid is not limited.

### Edit Mode
On each page of the visualization, the Edit Mode can be activated via the pencil icon in the appbar. The position of the tiles can be changed by Drag & Drop. The size can be changed by dragging the points on the edges. When the edit mode is activated, three new options are offered in the appbar. The current changes can be saved or discarded. In addition, the layout can be reset to the default sizes. The reset only applies to the currently edited category. Once a layout has been saved, it can no longer be changed by position changes in the console. A hint to this effect appears the first time you adjust the layout. If there is empty space between the tiles, it can be removed via the recycle bin.

## Edit Tiles
Source: https://www.symcon.de/en/service/documentation/components/tile-visualization/individualization/edit-tiles/
_Requires Symcon >= 7.0_
The presentation of the individual objects results in principle from the object type and with variables approximately still from the variable profile. For more details, refer to the section [Object-Presentation](https://www.symcon.de/en/llms/components/object-presentation.md). How instances are represented is determined by the subordinate variables. IP-Symcon automatically selects the appropriate element. To configure the appearance of a tile you have to open it and switch to the edit mode with the pencil.

## Designs
Source: https://www.symcon.de/en/service/documentation/components/tile-visualization/individualization/designs/
_Requires Symcon >= 7.0_
You can switch between different designs in the settings under Visualization using the cogwheel on the right in the appbar.
> **Note:** Background and text color as well as font of the HTMLBox are influenced by the design.

### edit designs

As of version 8.1, the designs can be edited using the pencil in the corner of the tiles. Individual colors can be changed as desired and saved locally via "Save changes". The settings can be downloaded as a file and uploaded to another visualization using the corresponding buttons. Settings can be reset at any time using the arrow symbol.
### Parameter
| Color | Description |
| -------------------- | --------------------------------------------------------------------------------------------------------------------------------------------------------------------------------------------------------------------------------------------- |
| Accent Color | The color of interactive elements (sliders, buttons) |
| Tile | The color of the tiles |
| Background | The color of the background on which the tiles are displayed |
| Background Text | The color of text and icons displayed on the background |
| Appbar | The color of the bar at the top of the visualization |
| Appbar Text | The color of text and icons on the appbar |
| Automatic title size | The size of the titles of the individual tiles (Per Tile: Each tile adjusts its title size optimally. Per Category: Within a category, all title sizes are uniform and based on the smallest title. Fixed Size: All titles have a fixed size) |
| Fixed title size | Visible with automatic title size “Fixed size” (Big, Medium, Small) |
| Accent Text | The color of text and icons on controls in the accent color |
| Tile Text | The color of icons and text on standard tiles |
| Dark Tile Text | The color of text and icons on tiles that are darker than the default due to dynamic background colors |
| Light Tile Text | The color of text and icons on tiles that are lighter than the default due to dynamic background colors |
| Error Color | The background color of error banners and faulty tiles |
| Error Text | The color of texts and icons on error banners |
| Corner Radius | The size of the corners of the tiles (from 0 - pointed to 10 - very flattened) |
## Grid Configuration
Source: https://www.symcon.de/en/service/documentation/components/tile-visualization/individualization/grid-configuration/
_Requires Symcon >= 7.0_
Grid configurations are used to display the visualization uniformly on different devices. The configurations store position and size of the tiles as well as their configuration. In the settings the tile resolution and the default sizes per grid configuration can be changed.

There are three grid configurations, each with default sizes optimized for one type of device: Computer, Tablet and Mobile. The appropriate grid configuration is selected based on the operating system and screen size. If necessary, the grid configuration can be selected manually.
### Orientation
All grid configurations store the settings in combination with the orientation. Thus, configurations for portrait and landscape orientation can be made for each grid configuration. In the app, the appropriate grid configuration for the current orientation is selected. In the browser, only the Landscape orientation is available.
### Grid Settings
The default settings for the currently selected grid configuration can be adjusted in the grid settings. In the app, both the Portrait and Landscape settings are available; in the browser, only the Landscape orientation is available.

In the dropdown at the top, you can select what the standard size should be configured for. All [Object Presentations](https://www.symcon.de/en/llms/components/object-presentation.md) and "All Tiles" are available. When selecting "All tiles", the size of the displayed tile can be adjusted in the same way as [Edit layout](https://www.symcon.de/en/llms/components/tile-visualization.md), the general default size for all presentations can be configured. If an object presentation is selected, an individual default size can be configured for this. The "Use the default size for this tile type" switch deactivates the individual default size and therefore uses the general default size for this object display.
This results in the following size for each tile in the visualization:
* If this has been set via [Edit layout](https://www.symcon.de/en/llms/components/tile-visualization.md) an individual size has been defined for the tile, this will be used
* If "Use the default size for this tile type" is deactivated, the individual default size is used for this object display
* If "Use the default size for this tile type" is activated, the general standard size configured via "All Tiles" is used for this object display.
The "Grid Resolution" slider can be used to define the resolution of the grid on which the tiles are placed. A higher resolution therefore enables a more detailed adjustment of width and height.
Clicking the "Reset Grid Settings" button resets the default sizes and grid resolution to the default values for the current grid configuration and orientation.
### Synchronization
The configuration can be synchronized on all devices via the Symcon server. This way, each end device loads the same grid configuration. The synchronization can also be switched to manual. The customized grid configuration is then synchronized via a button in the settings. If no changes are to be made to the end device, a read-only mode can also be activated. The settings for the different synchronization modes can be found in the [Instance configuration](https://www.symcon.de/en/llms/components/tile-visualization.md).
### Buttons for synchronization
| Button | Description |
| -------------------- | ------------------------------------------------------------ |
| Upload configuration | Uploads the local configuration to the server |
| Delete locally | Deletes the local configuration |
| Delete Globally | Deletes the local configuration and the server configuration |
## Instance Configuration
Source: https://www.symcon.de/en/service/documentation/components/tile-visualization/instance-configuration/
_Requires Symcon >= 7.0_
#### Start category
The Selected category defines from where the visualization is built.
#### Show welcome message
The greeting is displayed in the start area of the visualization and can be configured via various parameters.
| Show greeting | Description |
| ------------- | ----------------------------------------------------------------------------------------------------------- |
| Automatic | The text is adjusted based on the time of day and can optionally be extended with a name. |
| None | The greeting will be hidden. If no favorites or automations are available, the entire start area is hidden. |
| Variable | The greeting text is set to the value of a variable. The type is not relevant here. |
#### Display mode of the Visualization
| Display Mode | Description |
| --------------- | ---------------------------------------------------------------------------------------------------------------------------------------------- |
| Tiles (Default) | All objects are displayed as tiles. Where possible, [Summarized_Presentations](https://www.symcon.de/en/llms/components/object-presentation.md) are shown. |
| Tiles (List) | All objects are displayed as tiles. Initially, all instances are displayed as [list](https://www.symcon.de/en/llms/components/object-presentation.md). |
| List (Legacy) | All objects are displayed in a large list without tiles. |
Translated with DeepL.com (free version)

#### Category Display
This setting serves as a basis and can be [overwritten](https://www.symcon.de/en/llms/components/tile-visualization.md) individually for each category.
| Presentation | Description |
| -------------------------- | ------------------------------------------------------------------------------------------------------------------------------------------------------------------------------------------------------- |
| Category bar (single line) | All subcategories of the current category are displayed in one line at the top of the screen. If the number of categories exceeds the width of the screen, it can be scrolled horizontally. |
| Category bar (multi-line) | All subcategories of the current category are displayed in a line at the top of the screen. If the number of categories exceeds the width of the screen, the categories are displayed in several lines. |
| Tiles | Categories are displayed as tiles like all other objects. This means that the size and position can be changed freely. |
| Only in sidebar | The categories are only displayed in the [sidebar](https://www.symcon.de/en/llms/components/tile-visualization.md) |

#### Configuration Synchronization
How synchronization works is explained in the section [Grid Configuration](https://www.symcon.de/en/llms/components/tile-visualization.md).
| Mode | Description |
| --------- | ------------------------------------------------------------------------------------------------------- |
| Automatic | Every change to the layout is immediately synchronized with the server and therefore all devices |
| Manual | Local changes must be uploaded in the settings so that they can also be synchronized with other devices |
| Read only | The configuration can only be changed locally the devices and cannot be uploaded to the server |
### Automations
Here a list of [Automations](https://www.symcon.de/en/llms/concepts/automations.md), which are then available in the start bar.
Each automation can be given its own name and icon.

### Favorites
Any objects can be added as favorites. They are displayed as normal tiles in the upper part of the screen. In the version for large screens, these can be accessed via the heart button.

### Appbar
If there is not enough space for the configured elements, surplus elements are combined in a menu.

### Chart display

Here you can set the default settings for charts.
What exactly which term means can be found under [Display types of charts](https://www.symcon.de/service/documentation/basics/media/charts/#Display types).
### Further configuration
| Page | Description |
| ------------------------------------------------------------------------ | ------------------------------------------------------------------------------------ |
| [Notifications](https://www.symcon.de/en/llms/components/tile-visualization.md) | Allows push messages to be sent and configured devices to be managed. |
| [Security](https://www.symcon.de/en/llms/components/tile-visualization.md) | Allows you to set a password for access control and a special IP AutoStart function. |
| [Virtual Hosts](https://www.symcon.de/en/llms/components/tile-visualization.md) | Allow visualizations to be distributed across different virtual hosts |
## Notifications
Source: https://www.symcon.de/en/service/documentation/components/tile-visualization/instance-configuration/notifications/
The tab provides an overview of the registered devices. It is possible to select whether the respective device receives messages.
A test message can also be sent.

### registration to push messages service
Once a mobile device successfully logs into a visualization for the first time, that device is automatically added to the push message service for that instance. If no push messages are to be sent to this device, then this device must be explicitly deactivated for reception in the list. It should be noted that the registration to the push message service remains unaffected if the password for the visualization is changed. If a device is completely removed from the list, it will be treated as an unknown device the next time it logs in and will be added to the push message service again.
### Notification Control
Messages will be sent via Notification Control.
More information can be found at [Notification Control](https://www.symcon.de/en/llms/modules/notification-control.md) .
## Security
Source: https://www.symcon.de/en/service/documentation/components/tile-visualization/instance-configuration/security/
Access to a visualization can be secured in various ways. Further security information can be found at [Security](https://www.symcon.de/service/documentation/security/).

### Access
Each of the available access types offers different setting options.
##### With password (secure)
A password can be assigned as access protection for each visualization instance. This password is required before accessing the respective visualization via browser and mobile apps. In addition, the special option can be activated so that the password is not required within the local network. This password only applies to access to the system and its components. It is possible to query the available visualizations at any time without a password.
##### Without password (insecure)
Without a password, external access is blocked by default. However, if the visualization should be deliberately accessible to the public, this can be deactivated with the option "Allow external access, even if no password is set".
##### With login (secure)
> **Note:** Access with login is a paid extension that can be purchased for any existing IP-Symcon license. For a suitable demo version, please contact our [Support](https://www.symcon.de/en/contact-us/#RBAC%20Extension). The extension can be purchased directly in the [Shop](https://www.symcon.de/en/shop/enterprise/ips-enterprise-rbac).
Access with login allows only authorized users or users with an authorized role to open the visualization. The required authorization for users and roles can be assigned via the respective buttons. To display a visualization only for authorized users, the corresponding option can be activated. Users and roles can be managed via the [Authorization control](https://www.symcon.de/en/llms/modules/permission-control.md).
#### Autostart for IP address
A special function is the auto-start, which opens a visualization directly without a password prompt if the IP address matches one of the IP addresses entered in this list. This function can be used, for example, to open a visualization directly on a touch panel without the normal selection dialog being displayed and without having to answer the password prompt. Please note that this function should only be used within a secure network.
> **Note:** The CIDR notation is also supported, so that e.g. 192.168.1.0/24 contains all addresses from 192.168.1.1 to 192.168.1.255.
> **Warning:** This function is not available if requests are sent to IP-Symcon via a reverse proxy or via the Connect service, as the origin cannot then be verified safely and reliably. An exception is the CIDR value 0.0.0.0/0, which redirects all requests regardless of their origin and is therefore fundamentally insecure. This is also evaluated for the above exceptions and therefore forwards all requests regardless of their origin.
##### call via URL
There are situations (e.g. in connection with NAT) where the autostart via IP does not work. In these cases, a URL can be called directly.
```php
// Basic structure for the URL call
http://:3777/#
// Example as start with the Chromium Browser
// VisualizationInstanceID: = 12345
chromium-browser --start-fullscreen 192.168.1.123:3777/#12345
```
## Virtual Hosts
Source: https://www.symcon.de/en/service/documentation/components/tile-visualization/instance-configuration/virtual-hosts/
> **Note:** Virtual Hosts is a paid extension that can be purchased for any existing Symcon license. For a suitable demo version, please contact our [Support](https://www.symcon.de/en/contact-us/#BACnet%20Extension). The extension can be purchased directly in the [Shop](https://www.symcon.de/en/shop/enterprise/ips-enterprise-vhosts).
Virtual hosts can be used to define a list of hosts that can access the visualization. If the visualization is called from a host that is not in the list, the visualization is not displayed. If the list is empty, the visualization is visible for all hosts.

With the above configuration of two visualizations, the start pages are displayed as follows.

## Apps
Source: https://www.symcon.de/en/service/documentation/components/tile-visualization/apps/
_Requires Symcon >= 7.0_
The apps can be downloaded from the respective appstore (iOS, [Android](https://play.google.com/store/apps/details?id=de.symcon.visualization)). The mobile apps do not differ in functionality from the visualization in the browser. Only the setup process is different.
### Connecting to the Tile Visualization via the Apps
There are three ways to connect to a visualization. These are explained below. Also, the app can be opened directly in a demo visualization.
#### Automatic search
If the mobile device is connected to the same network as the IP-Symcon server, it can be found with the automatic search. The first tile shows the found IP-Symcon Servers. These can be tapped and then the corresponding visualization can be selected. If a password is set for the visualization, it must be entered now. If there is only one IP-Symcon server with a visualization in the network, it will be opened directly.

#### QR code
The QR code needed for scanning can be obtained from the visualization widget in the management console or from an already opened visualization. To scan the code, the necessary permissions must be granted in the app. After the code is scanned, the desired visualization can be selected and the password can be entered.

#### Add manually
To add an IP-Symcon server manually just enter the IP address and port of the server into the input field. Alternatively you can use the connect address or your own DynDNS address.

### Settings
All configured servers and visualizations are saved on the device. New servers can be set up via the gear in the appbar under the item 'Server'. If a server is selected, the pencil in the lower right corner can be used to edit the saved visualizations.

## Browser
Source: https://www.symcon.de/en/service/documentation/components/tile-visualization/browser/
_Requires Symcon >= 7.0_
### Connecting to the tile visualization in the browser
The tile visualization can be opened via "[ServerIP]:3777/" in a browser. If the WebFront visualization is still set as default, the Tile-Visualization can be accessed via "[ServerIP]:3777/tile/".
### Select visualization

A list of the visualizations available on this server will then appear in the browser. If a visualization is password protected, this is symbolized by a lock icon. With one click the visualization to be opened can be selected. If the visualization is not password protected, it will be opened directly.

Otherwise a text field appears for entering the password. There the password must be entered and finally confirmed with Enter. If the password is correct, the visualization will be opened.
---
# WebFront Visualization
> Symcon documentation · English · generated on 2026-09-26
> Index: https://www.symcon.de/en/llms.txt
Source: https://www.symcon.de/en/service/documentation/components/webfront-visualization/
> **Warning:** The WebFront is still supported. However, since version 7.0, the [Tile Visualization](https://www.symcon.de/en/llms/components/tile-visualization.md) was introduced as modern visualization. Even though the WebFront is still usable and is maintained regarding errors and compatibility, there will be no new features. It is recommended to use the Tile Visualization.
> **Note:** The WebFront does not have to be configured and can be used completely without any advanced settings. All possibilities presented here are optional and can be used by experienced users, in order to better adapt visualizations to their needs.
The WebFront offers a simple and attractive way to display and switch devices, display images, and run scripts.
### WebFront Versions
| Version | Description |
| ------------------------- | -------------------------------------------------------------------------------------------------------------------------------------------------------------------------------------------------------------------------------------------------------------------------------------------------------------------------------------------- |
| WebFront (incl. Editor) | The HTML5 Version of the WebFront can be opened and operated with the current versions of common web browsers. These include: * Google Chrome (25+) [officially recommended] * Mozilla Firefox (34+) * Apple Safari (OS X 10.9+) * Opera (12+, CSS3 animations only with Opera Next) * Microsoft Internet Explorer (10+) |
| WebFront (without Editor) | * Apple iOS (7.0+) * Google Android (4.0+) |
| Mobile (iOS) | IP-Symcon Mobile is a native app that can be downloaded directly from the AppStore. All iOS devices with iOS 6.x or later are supported. IP-Symcon Mobile for iPhone, iPod touch and iPad in the iTunes App Store |
| Mobile (Android) | The Android counterpart to IP-Symcon Mobile is also a native app that can be downloaded directly via Google Play. IP-Symcon Mobile for Android devices at Google Play |
### Installation
The WebFront is immediately available and can be opened by clicking "Open Visualization". The WebFront is also be available to all other devices with browsers
in the network. If the computer on which the IP-Symcon Server is installed is called Home Server, the WebFront is available under the address http://Home Server:82/
in the local network. If the computer’s IP address, e.g., 192.168.1.2, is known, the WebFront can also be opened under the address http://192.168.1.2:82/.
### Configuration
The WebFront generally runs without any further necessary configuration. However, various settings can be changed. The relevant documentation can be taken from the subpages of this document. The general, version-comprehensive configuration is described in more detail below.
A choice of icons for objects in WebFront can be found under [Icons](https://www.symcon.de/en/llms/components/icons.md).
### Open configuration
Configuration can be started directly from the welcome page of the IP-Symcon [Management Console](https://www.symcon.de/en/llms/components/management-console.md). The configuration can be opened via the menu item ‘Configure WebFront’.

### Configurators
IP-Symcon Basic contains a configurator that only supports limited changes. Up to five different configurators can be created in the IP-Symcon Professional Edition that can be retrieved on their own using the WebFront start page and be secured with a password, if desired. A configurator can be created as an independent unit, e.g. for a visualizations object, represent a special view for a maintenance technician, or simply create a security-specific separation. The same options are available for each configurator, which can be adapted as desired. As many configurators as you like can be created in the Unlimited Edition.
## Web
Source: https://www.symcon.de/en/service/documentation/components/webfront-visualization/web/
_Requires Symcon >= 3.0_
> **Warning:** The __IP-Symcon Professional__ or __IP-Symcon Unlimited__ edition is required to configure WebFronts
> **Warning:** Only objects, which were previously created in the [Object Tree](https://www.symcon.de/en/llms/components/management-console.md) of the [Management Console](https://www.symcon.de/en/llms/components/management-console.md), can be added and displayed in the WebFront. The WebFront Editor cannot create new categories or objects. It is only used to arrange existing objects according to your individual preferences.
> **Note:** Scripts that are executed via the WebFront provide these [System Variables](https://www.symcon.de/en/llms/concepts/automations.md)
### Operation
At the top of the screen you can select elements that were set up in the WebFront. By default, these are IP-Symcon for building control and weather to display the current weather data and forecasts of the German Weather Service. Clicking a module name displays its content in the middle section. The current module name is highlighted. The middle section displays the main elements of a module. The other bars at the top of the screen offer control options for the currently selected category.
### WebFront-Editor
[Video](https://www.youtube.com/embed/523XW-o7d1k?rel=0&cc_load_policy=1)
### Configuring
The configuration is divided into several parts. Different settings can be adjusted in each tab. This article primarily presents the settings options for the regular WebFront.
The following settings can be adjusted in the individual tabs:
| Tab | Description |
| --------------------------------------------------------------- | ---------------------------------------------------------------------------------- |
| [Editor](https://www.symcon.de/en/llms/components/webfront-visualization.md) (since 5.0) | Starts the WebFront editor |
| [Appearance](https://www.symcon.de/en/llms/components/webfront-visualization.md) | Configuration of a title and icon in the login screen |
| [Security](https://www.symcon.de/en/llms/getting-started.md) | A password for access control and a special IP AutoStart function can be set |
| [Notifications](https://www.symcon.de/en/product/notifications/) | Allows sending test messages to configured devices and removing registered devices |
| [Structure](https://www.symcon.de/en/llms/components/webfront-visualization.md) (up to 4.4) | Configuration of the individual elements of a WebFront |
### Setting Up Another WebFront
> **Warning:** To use more than one WebFront, you need an __IP-Symcon Professional__ or __IP-Symcon Unlimited__ edition.
In the “Visualization” section of the management console, you can display an overview of all WebFront configurators via “configure visualization”. To create a new configurator and thus a new WebFront, you have to click "New". The name of the configurator instance is also the name of the WebFront in the browser.
## Notifications
Source: https://www.symcon.de/en/service/documentation/components/webfront-visualization/web/notifications/
The tab provides an overview of the registered devices. It can be selected whether the respective devices receive messages.
Also, a test message can be sent.

### Registering to the push message service
The first time a mobile device successfully logs in to a WebFront, that device will automatically be added to the push message service for this Configurator. If no push messages are to be sent to this device, then this device must be explicitly deactivated for reception in the configurator. Note that if the password for the configurator is changed or the mobile access is completely disabled, the registration to the push message service remains untouched. If a device is completely removed from the list, it will be handled as an unknown device at the next login and added to the push message service again.
### Notification Control
The messages are sent via Notification Control.
Further information can be found under [Notification Control](https://www.symcon.de/en/llms/modules/notification-control.md).
## Appearance
Source: https://www.symcon.de/en/service/documentation/components/webfront-visualization/web/appearance/
### Appearance
The appearance tab takes care of the visual presentation and possible default settings of the WebFront.

### Name, Icon, Visibility
Via "Configure" various default settings can be selected.
### Skin
Since IP Symcon 3.0 it is possible to design the WebFront via skins. Further information is available in the [Skin Control](https://www.symcon.de/en/llms/modules/skin-control.md).
### Nesting
Since IP-Symcon 5.5 this option is enabled by default und enables the presentation of nested elements, e.g., instances below instances. The mobile apps with version 5.5 or newer also support this option. After activation, this option cannot be disabled again as it should removed in the long term.
### Default Popup Graph Settings
Default settings for popup graphs can be defined here. The exact meaning of the options is explained in [Display types of charts](https://www.symcon.de/en/llms/concepts.md)
## Editor
Source: https://www.symcon.de/en/service/documentation/components/webfront-visualization/web/editor/
The editor can be opened from the WebFront configurator via the button "Open WebFront Editor" under "Editor".

> **Warning:** A Professional license or higher is required to use all features of the WebFront editor. Otherwise, the extent is severely limited.
### Usage of the editor

Within the editor, the [WebFront](https://www.symcon.de/en/llms/components/webfront-visualization.md) is displayed as usual and is extended by configuration elements. With a click on the plus, an element can be added. Added elements can be configured via a click on the pen. A dialog is opened where the parameters of the element can be configured. The individual parameters of the different elements are explained in their individual documentation pages. After adjusting the parameters, these are confirmed by clicking the check mark. Alternatively, an element can deleted by clicking the trash can in the dialog. Finally, the changes need to be confirmed by clicking the green check mark at the top left. Otherwise, the changes are not saved.
### Overview of available elements
| Element | Description |
| ------------------------------------------------------ | -------------------------------------------------------------------------------------------------------------------------------------------------------------------------------------------------------------------------------------------------------------------------------------------------------------------------------------------------------------------------------------------- |
| [Category](https://www.symcon.de/en/llms/components/webfront-visualization.md) | This element displays a category and all its sub-objects in the WebFront. The ID of the category to be displayed can be changed through the start category parameter. |
| [Graph](https://www.symcon.de/en/llms/components/webfront-visualization.md) | With this element, the graphs set in the Archive Module are displayed directly. Normally, graphs can be called using the icon located at the left of the value of the variable. If graphs should be embedded directly, for example in [TabPanes](https://www.symcon.de/en/llms/components/webfront-visualization.md) or [SplitPanes](https://www.symcon.de/en/llms/components/webfront-visualization.md), this can be done using the graph element. |
| [External Page](https://www.symcon.de/en/llms/components/webfront-visualization.md) | This element inserts an external site in the WebFront via an IFrame. The URL parameter and interval are available. |
| [Content Changer](https://www.symcon.de/en/llms/components/webfront-visualization.md) | The Content Changer allows switching between multiple [Images](https://www.symcon.de/en/llms/concepts.md), [Streams](https://www.symcon.de/en/llms/concepts.md), [HTML Boxes](https://www.symcon.de/en/llms/components/object-presentation.md), [Text Boxes](https://www.symcon.de/en/llms/components/object-presentation.md) or mail instances ([IMAP](https://www.symcon.de/en/llms/modules/imap.md), [POP3](https://www.symcon.de/en/llms/modules/pop3.md)) within a single page. |
| [SplitPane](https://www.symcon.de/en/llms/components/webfront-visualization.md) | Using the SplitPanes, the WebFront view can be split into two parts and any other element can be inserted in each part. Thus, if SplitPanes are inserted in SplitPanes, a QuadView can be simulated. |
| [TabPane](https://www.symcon.de/en/llms/components/webfront-visualization.md) | TabPanes can be used to create custom menu bars at the upper area, which refers to other items. |
| [Weather (DWD)](https://www.symcon.de/en/llms/components/webfront-visualization.md) | Displays the weather of the DWD with the ability to select specific areas of Germany and to switch between a normal image or a radar image. |
| [Time Widget](https://www.symcon.de/en/llms/components/webfront-visualization.md) | Displays the current time. |
| [Info Widget](https://www.symcon.de/en/llms/components/webfront-visualization.md) | Can either be used to display a static icon or linked to a variable which content / icon is displayed. |
| [Logout Widget](https://www.symcon.de/en/llms/components/webfront-visualization.md) | This element adds a widget with which you can return to the WebFronts selection screen. |
| [Idle Widget](https://www.symcon.de/en/llms/components/webfront-visualization.md) | This element adds an invisible widget, which switches to a specific page after a period of inactivity. |
## External Page
Source: https://www.symcon.de/en/service/documentation/components/webfront-visualization/web/editor/external-page/
This item allows the display of external websites. Both locally stored pages and external websites can be displayed. It is also possible to have the page updated automatically at a certain interval.

### External Websites
External websites are specified in the normal URL format, e.g.: [https://www.symcon.de](https://www.symcon.de).
### Properties
* __Title:__ Title for the item in the TabPane navigation. By default, "External Page" will be displayed.
* __Icon:__ Icon that appears next to the title in the TabPane navigation. By default, no icon will be displayed.
* __URL:__ Specify the address of the page which content will be displayed.
* __Interval:__ Optionally, an automatic refresh interval for the page can be specified in seconds.
* __Security:__ Optionally, the Sandboxing option can be disabled. In some cases, this may cause the external page to disable your WebFront and to present itself in full size.
## Graph
Source: https://www.symcon.de/en/service/documentation/components/webfront-visualization/web/editor/graph/
A full-screen graph will be shown directly in the [WebFront](https://www.symcon.de/en/llms/components/webfront-visualization.md).
A single logged [variable](https://www.symcon.de/en/llms/concepts.md) or a [chart object](https://www.symcon.de/en/llms/concepts.md) can be presented.

### Properties
* __Title:__ Title for the item in the TabPane navigation. If no individual name is specified, the object name of the selected variables will be displayed.
* __Icon:__ Icon that appears next to the title in the TabPane navigation. By default, no icon will be displayed.
* __Period of Time:__ The display area of the graph can be set to hour, day, week, month, or year.
* __Variable:__ Here a logged variable or chart media file to be displayed can be selected.
* __Show extreme values:__ This option specifies whether the graph is displayed with or without extreme value curves, if available.
* __Dynamic Scaling:__ If the dynamic scaling is enabled, the graph will be dynamically scaled according to the minimum and maximum values in the time range. Otherwise, scaling will be performed according to the minimum and maximum specified in the variable profile of the selected variable.
* __High Density:__ Increases the data point density, which makes the graph more accurate. Works only with line charts or logged variables on "Standard" -Logging.
* __Show legend:__ Turn the legend on / off.
* __Intervall (sec):__ The displayed graph will be automatically updated in seconds according to the interval set here. By default, this happens every 300 seconds.
## Idle Widget
Source: https://www.symcon.de/en/service/documentation/components/webfront-visualization/web/editor/idle-widget/
The Idle Widget offers the possibility to create an invisible timer in the widget area of a TabPane. This is visible only in the editor mode and changes the displayed page after a defined inactivity time.
> **Warning:** [SplitPanes](https://www.symcon.de/en/llms/components/webfront-visualization.md) and the [TabPane](https://www.symcon.de/en/llms/components/webfront-visualization.md) itself can not be jumped directly. These are purely cosmetical elements. However, elements within the [SplitPane](https://www.symcon.de/en/llms/components/webfront-visualization.md) or [TabPane](https://www.symcon.de/en/llms/components/webfront-visualization.md) can be selected as target, e.g., added categories.
### Properties

* __Timeout (sec):__ The current page will be changed to the target page after the defined time of inactivity.
* __Page:__ The target page that is selected when the Idle Widget triggers.
## Info Widget
Source: https://www.symcon.de/en/service/documentation/components/webfront-visualization/web/editor/info-widget/
The Info-Widget offers the possibility to display in the widget - area of a TabPane, a fixed icon, a dynamic icon for a variable or a textual variable value. In addition, a script can be selected that will be executed by clicking on the widget.
### Display Variants
| Icon - Display | Text presentation |
| ------------------------------------ | ------------------------------------ |
|  |  |
* A fixed icon can be selected in order to display the Icon property. It should be noted that neither type nor variable may be specified.
* A dynamic icon will be displayed when a variable is specified and type is set to Icon. Which icons will be displayed and which icons are available by default is described under [Icons](https://www.symcon.de/en/llms/components/icons.md). If the "transparent" icon is displayed, then the widget is hidden. In this way, information - icons can be dynamically inserted, e.g.: when a device needs a battery change.
* The current variable value is formatted textually using the [variable profile](https://www.symcon.de/en/llms/concepts.md) associated with the variable if a variable is specified and the type is set to text.
### Properties
* __Icon:__ Here a fixed icon can be selected for display.
* __Type:__ The type determines whether a variable should be displayed as text or as an icon.
* __Variable:__ Here you can select a variable that will be displayed according to the selected type.
* __When clicking:__ A script, which is executed by clicking on the widget, can be set here.
## Content Changer
Source: https://www.symcon.de/en/service/documentation/components/webfront-visualization/web/editor/content-changer/
The Content Changer is used to display the following objects:
* Email-instances ([IMAP](https://www.symcon.de/en/llms/modules/imap.md), [POP3](https://www.symcon.de/en/llms/modules/pop3.md))
* String-variables with variable profile [~TextBox](https://www.symcon.de/en/llms/components/object-presentation.md) or [~HTMLBox](https://www.symcon.de/en/llms/components/object-presentation.md)
* Media-objects of the type [Image](https://www.symcon.de/en/llms/concepts.md) or [Streams](https://www.symcon.de/en/llms/concepts.md)
### Presentation

If a displayable object is selected as source object in the configurator, only that object will be displayed. Otherwise, all displayable immediate child objects of the selected source object will be selected for display. If more than one displayable child object is found, a selection list for switching between the child objects will be displayed. For editable string variables of Type ~TextBox, a button will also be displayed to call the on-screen keyboard in order to edit the text. Switching between the objects to be displayed can also take place automatically if a change interval is specified.
### Properties
* __Title:__ Title for the item in the TabPane navigation. If no individual value is specified, the name of the selected object is shown.
* __Icon:__ Icon that appears next to the title in the TabPane navigation. By default, no icon will be displayed.
* __Source object:__ The object that is displayed directly or whose child objects are shown.
* __Change interval:__ Interval in seconds, in which automatic switching takes place between the displayed objects. The default value "0" disables the function.
* __Upscale:__ _This option indicates, whether images to be displayed are automatically scaled up when space is available. By default, it is not scaled up.
* __Downscale:__ If this option is activated, images will be automatically downscaled if there is not enough space available. The option is enabled by default.
* __Maintaining the aspect ratio:__ If scaling up or downscaling is enabled, this option allows you to set whether or not to maintain the aspect ratio of the scaled images when scaling. By default, the aspect ratio will be maintained.
## Category
Source: https://www.symcon.de/en/service/documentation/components/webfront-visualization/web/editor/category/
The category element allows the display of objects that can be found in a category as well as the navigation in subcategories.

### Object area
The object area displays the child objects of the selected category. Further information and possible display modes can be found in the [Object Presentation](https://www.symcon.de/en/llms/components/object-presentation.md) area.
### Navigation bar
If the displayed category has visible subcategories, a navigation bar with subcategories will be displayed automatically. If a subcategory is selected in the navigation, its content will be displayed in the object area. If a category displayed in this way also has visible subcategories, the navigation will be expanded automatically. Naturally, categories that were linked via [Link object](https://www.symcon.de/en/llms/concepts.md) will also be displayed in the navigation bar. The "Show Navigation" property can be used to hide the category bar if required.
### Properties
* __Title:__ Title for the item in the TabPane navigation. If no individual value is specified, the name of the selected object will be displayed automatically. If the value is set, but the text is left in blank, the title will not be displayed.
* __Icon:__ Icon that appears next to the title in the TabPane navigation. By default, no icon will be displayed.
* __Start category:__ Category whose content will be represented by the element. By default, the main category will be displayed as "ID 0".
* __Show Navigation:__ This option defines that the navigation bar is displayed, provided there are subcategories below the start category. By default, the navigation bar will be displayed.
### Special features
* If the title is set to an empty text and no icon is specified, the category module won´t be displayed in the navigation, but it remains accessible via [WFC_SwitchPage](https://www.symcon.de/en/llms/modules/webfront-visualization.md).
* If a category should be displayed in WebFront with icon but without title, a space must be entered in the title (" ").
## Logout Widget
Source: https://www.symcon.de/en/service/documentation/components/webfront-visualization/web/editor/logout-widget/
The Logout Widget offers the option of displaying a button in the widget area of a TabPane. When used, one will be brought back to the WebFront login.
### Properties
* __Timeout (sec.):__ Timeout, which automatically logs out in the event of inactivity. If the value = 0, it is switched off.
## TabPane
Source: https://www.symcon.de/en/service/documentation/components/webfront-visualization/web/editor/tabpane/
The TabPane is an element that allows navigation between all other types of elements as well as displaying widgets.
### Representation

At the top of the TabPane there is a navigation bar, with a content area below. In the navigation bar on the left side, if selected, the _"sub-icon"_ and the _"subtitle"_ are displayed first. Right next to it follows the navigation area, which displays the clickable fields for all TabPane child elements with their icon and title, if set. Clicking on a field, displays the content of the associated element in the content area. At the left edge of the navigation bar the is the widget area, which displays all widgets that are children of the TabPane.
The TabPane is typically used as the topmost element of a WebFront configuration because of the navigation capabilities it provides. Of course, a TabPane can also include more TabPanes.
If the image width is insufficient to display all navigation fields, clickable arrows will be displayed automatically to scroll within the navigation area. In this case, the width of the navigation area is reduced to 100 pixels. Next, the widget area is shortened.
### Properties
* __Title:__ Title of the TabPane in the navigation of possible parent TabPanes. By default, "Tab Pane" will be displayed.
* __Icon:__ Icon that is displayed next to the title in the navigation of possible parent TabPanes. By default, no icon will be displayed.
* __Subtitle:__ Text that appears at the left edge of the navigation bar. By default, no text is displayed.
* __Subicon:__ Icon that appears at the left edge of the navigation bar. By default, no icon is selected.
## SplitPane
Source: https://www.symcon.de/en/service/documentation/components/webfront-visualization/web/editor/splitpane/
The SplitPane is a layout element that can split two sub-elements horizontally or vertically. In this way it is possible to display, for example a Content Changer with camera views next to a category. As SplitPanes and other layout elements such as other SplitPanes and TabPanes can be inserted below, infinite and individual layout adjustments are possible.

### Subdivision of sub-elements
The "Subdivision" property allows you to set whether the two sub-elements of the SplitPane should be displayed one above the other (horizontal division) or side by side (vertical division). The available space for each sub-element is defined by the properties _"Size"_, _"Size unit"_ and _"Ratio Target"_. _"Ratio Target"_ defines whether the first or second sub-element should be configured via _"Size"_ and _"Size unit"_. The target element is then assigned the space specified by the _"Size"_ property in the set _"Size unit"_.
### Example
An image with a picture width of 640 pixels should be displayed to the right side of a category. In order to do this, you assign the vertical value to the SplitPane property, set the _"Ratio target"_ to the second element, _"Size"_ to 640, and _"Size unit"_ to pixel. Now create a sub-element of type category and a sub-element of type content changer in the WebFront configurator below the SplitPane. For the sub-elements, the position should be set so that the category Position 0 and the content changer are given Position 1. Now the sub-elements can be configured to display the desired category and image.
### Properties
| Property | Description |
| ------------ | ------------------------------------------------------------------------------------------------------------------------------------------------------------------------------------------------------------- |
| Title | Title for the item in the TabPane navigation. By default, "SplitPane" will be displayed. |
| Icon | Icon that appears next to the title in the TabPane navigation. By default, no icon will be displayed. |
| Subdivision | Here you can select whether the division of the two sub-elements should be horizontal or vertical. By default, it is divided horizontally. |
| Size | The size of the sub-element selected for the division according to the size unit. The default value is 50. |
| Size unit | Here you can select whether the size refers to percent or to pixels. By default, percent will be taken. |
| Target ratio | This property allows you to choose whether the first or the second sub-element of the SplitPane will be displayed according to the specified size specification. By default, the first item will be selected. |
| Show margin | With this property, it can be defined whether if a margin should be shown to separate the sub-elements. By default, the margin is shown. |
## Time Widget
Source: https://www.symcon.de/en/service/documentation/components/webfront-visualization/web/editor/time-widget/
The Time Widget allows you to view the current date and time in the widget area of a TabPane. If no custom display format is set, the presentation depends on the language set in the web browser. You can choose between the standard formats "Hidden", "Short", "Medium", "Long" and "Complete" for the date format and the time format. A custom format can be entered, according to the datePattern-table at [dojotoolkit.org/reference-guide/dojo/date/locale/format.html](http://dojotoolkit.org/reference-guide/dojo/date/locale/format.html).

### Properties
* __Date format:__ A predefined pattern for date formatting the can be selected here.
* __Time format:__ Like date formating, a predefined pattern for time formatting can be selected here.
* __User-defined format:__ Optionally, a custom format can be specified here.
## Weather (DWD)
Source: https://www.symcon.de/en/service/documentation/components/webfront-visualization/web/editor/weather-dwd/
The weather element allows displaying the weather forecast of the German Weather Service for Germany and the individual federal states in text and image.

### Navigation Bar
The navigation bar is located in the upper area. If the property "Region" is set, you can switch between the weather report for Germany and the selected state. In addition, the forecast period can be changed between today, tomorrow, 3rd day and 4th day.
### Forecast Area
In the forecast area, the forecast text is shown on the right and an appropriate weather map on the left.
### Properties
* __Title:__ Title for the item in the TabPane navigation. By default, "Weather" will be displayed.
* __Icon:__ Icon that appears next to the title in the TabPane navigation. By default, no icon will be displayed.
* __Region:__ Optionally, a federal state can be selected here, its weather forecast can be displayed instead of the Germany-wide forecast in the navigation bar.
## Security
Source: https://www.symcon.de/en/service/documentation/components/webfront-visualization/web/security/
In this tab a password query for the WebFront and its editor can be set up.
Further security information can be found under [Security](https://www.symcon.de/en/llms/getting-started.md) .

### Enable editor
Activates the WYSIWYG editor. This option is enabled by default for a fast initial setup and configuration. If the setup is finished, the editor should also be disabled.
The editor will be likewise protected by the password set here.
> **Warning:** Hidden objects are invisibly loaded into the WebFront and can therefore be viewed, for example to via the developer console of the web-browser with the appropriate know-how. This is not an error, but a necessity to realize a rapid change in the visibility through the command [IPS_SetHidden](https://www.symcon.de/en/llms/functions/management-objects.md). As soon as the WYSIWYG editor is activated in the WebFront Configurator, the complete object tree is transferred, for example to realize the start/home category selection. This enables anyone with access to this WebFront to change the start category. After a successful use of the WYSIWYG editor, this should therefore be deactivated in the WebFront configurator.
### Required password
For each configurator, a password can be assigned as access protection. This password is required before accessing the respective configurator, or during the configuration within the mobile apps. In addition, the special option can be activated, in which the password is not required within the local network. This password is only valid for accessing the system and its components. The query of the available configurators (Mobile) and the WebFront start page (overview) it is available at any time without a password.
### Autostart for IP-address
A special function is the autostart, which opens a configurator directly without a password request if the IP address matches one of the entered IP addresses in this list. This function can be used for example to open a WebFront directly on a touch panel without having to display the normal selection dialog and without having to answer the password prompt. It is important to remember to use this feature only within a secure network.
> **Note:** Since IP-Symcon 5.5 the CIDR notation is also supported. For example, 192.168.1.0/24 includes all addresses from 192.168.1.1 to 192.168.1.255.
> **Warning:** This function is not available if IP-Symcon is accessed via a Reverse Proxy or the Connect Service as the origin cannot be verified securely. An exception is the CIDR value Wert 0.0.0.0/0, which forwards all requests, independently of the origin.
#### Call via URL
There are some situations (e.g., in connection with NAT) when autostart via IP is not working. In these cases a URL with the WebFront password can be used.
```php
// Basic framework for a call via URL
http://:3777/?password=#
// Example by starting with the Chromium Browser
// Password: "secret", WebFrontInstanceID: = 12345
chromium-browser --start-fullscreen 192.168.1.123:3777/?password=secret#12345
```
> **Warning:** There is a security risk, because the URL is visible and includes the WebFront password as plain text.
## Structure (deprecated)
Source: https://www.symcon.de/en/service/documentation/components/webfront-visualization/web/structure/
> **Warning:** This functionality is only avaiable until version 4.4 avaiable. It was replaced in total by the [editor](https://www.symcon.de/en/llms/components/webfront-visualization.md).
The configurator can contain __elements__, which start in the visualization as a tab from the top left margin and additionally contain __widgets__, which start in an extra area at the top right margin. This area is similar to the SysTray of Windows.
An element or widget can be inserted via the __Add__ button and configured accordingly. An element consists of a unique ID that is automatically assigned, a position, and a configuration corresponding to the element.
The ID can be defined by the user when the same is created, so that the element can be better recognized during actions. The ID has no relation to the objectIDs of the instances or variables.
The position indicates the position in the tab or the widget bar and must have a value greater than or equal to zero. If two elements have the same position number, the order is defined by the title of the element.

### Overview of available elements
| Element | Description |
| ------------------------------------------------------ | ------------------------------------------------------------------------------------------------------------------------------------------------------------------------------------------------------------------------------------------------------------------------------------------------------- |
| [Category](https://www.symcon.de/en/llms/concepts.md) | This element displays a category and all its sub-objects in the WebFront. The ID of the category to be displayed can be changed through the start category parameter. |
| [Graph](https://www.symcon.de/en/llms/components/webfront-visualization.md) | With this element, the graphs set in the Archive Module are displayed directly. Normally, graphs can be called using the icon located at the left of the value of the variable. If graphs should be embedded directly, for example in TabPanes or SplitPanes, this can be done using the graph element. |
| [External Page](https://www.symcon.de/en/llms/components/webfront-visualization.md) | This element inserts an external site in the WebFront via an IFrame. The URL parameter and interval are available. |
| [Content Changer](https://www.symcon.de/en/llms/components/webfront-visualization.md) | The Content Changer allows you to switch multiple media files, strings, HTMLBoxes, StringBoxes, mail instances, or external sites within a single page. |
| [SplitPane](https://www.symcon.de/en/llms/components/webfront-visualization.md) | Using the SplitPanes (formerly Container), the WebFront view can be split into two parts and any other element can be inserted in each part. Thus, if SplitPanes are inserted in SplitPanes, a QuadView can be simulated. |
| [TabPane](https://www.symcon.de/en/llms/components/webfront-visualization.md) | TabPanes can be used to create custom menu bars at the upper area, which refers to other items. |
| [Weather (DWD)](https://www.symcon.de/en/llms/components/webfront-visualization.md) | Displays the weather of the DWD with the ability to select specific areas of Germany and to switch between a normal image or a radar image. |
| [Time Widget](https://www.symcon.de/en/llms/components/webfront-visualization.md) | Displays the current time. |
| [Info Widget](https://www.symcon.de/en/llms/components/webfront-visualization.md) | Can either be used to display a static icon or linked to a variable which content / icon is displayed. |
| [Logout Widget](https://www.symcon.de/en/llms/components/webfront-visualization.md) | This element adds a widget with which you can return to the WebFronts selection screen. |
| [Idle Widget](https://www.symcon.de/en/llms/components/webfront-visualization.md) | This element adds an invisible widget, which switches to a specific page after a period of inactivity. |
## Mobile
Source: https://www.symcon.de/en/service/documentation/components/webfront-visualization/mobile/
The mobile visualization for mobile devices can be downloaded from the respective AppStore. There, the latest description of the functions of the app can be found as well. (__Android:__ [IP Symcon Mobile on Google Play](https://play.google.com/store/apps/details?id=de.symcon.visualization) / __iOS:__ [IP Symcon Mobile for iPhone, iPod touch, and iPad in the iTunes App Store](https://apps.apple.com/us/app/symcon-visualization/id1566124129) )
This page is intended to be a description and reference for frequently asked questions and functions that differ between the apps. Furthermore, no app is eligible for full compatibility with the WebFront. These serve as an extension to IP Symcon for quick and easy access to the basic functions of the system. For a complete visualization the WebFront can and must be used. No change is planned here as the mobile applications would become slower with ever-increasing functions. But that would collide with the main feature "speed".
The documentation for the push messages can be found in the section [Notification Control](https://www.symcon.de/en/llms/modules/notification-control.md)
> **Warning:** It should be noted that access to the system via the mobile apps is deactivated by default. It is indicated by the error message "No valid configurator!". In the desired WebFront Configurator mobile use must be activated.
### Functions that are intentionally unavailable
* User-defined icons are not loaded, as this would mean a considerable loss of speed, which would be further decreased as several icon sizes would be required, for example, for the Retina display, which only few users have at hand.
* Multiple nesting is not available. The aim is to make optimum use of the display area on mobile devices.
### Functions that differ from the WebFront
* Boolean-variables are shown as on/off (switch, checkbox) by default. This can be managed in through the WebFront visualization instance, so only ~Switch profils have this representation.
### WebFront Release Link
The app can be started directly and linked to a WebFront via WebFront release links.
If the corresponding WebFront does not exist in the app, a configurator will be set up automatically.
There are 2 types of links:
For servers without SSL: __symcon://www.webfront.info/#98765__
For servers with SSL: __symcons://my.ssl-server.com/#12345__
If the server/configurator is not in the app list, it will be added and opened automatically.
Thus, for example, without manual settings being necessary, the visitor at home or even the conference participant can be given quicker access to the local WebFront.
### Known bugs
* When SSL is enabled, externally loaded content (such as images) can not be loaded if the certificate is not accepted by the browser.
* Certain profiles and status/variables (for example HomeMatic Window Contacts or LCN Relays) can be switched in the Mobile App. This possibility of the action is displayed in color (green/red) in the WebFront and means that either an action script is defined or that a standard action is available. If the behavior is to be changed, this topic gives the corresponding answer in the forum: [Changeability of Fixed Variables](https://community.symcon.de/t/veraenderbarkeit-von-unveraenderlichen-variablen/24061)
### Hints
* If a JSON error occurs while loading, check if at least IP-Symcon 3.1 #3367 has been installed.
## Legacy Icons
Source: https://www.symcon.de/en/service/documentation/components/webfront-visualization/legacy-icons/
> **Note:** The WebFront uses the Legacy Icons and not the usual icons of the tile visualization.
### Icon type
It is differentiated between ‘normal’ and ‘adaptive’ icons. Normal icons do not change their appearance, whereas adaptive icons adapt their appearance to the set variable, depending on the value.
In this way, adaptive icons orientate themselves around the min/max values set in the profile. These are handled as 0-100%. Should it be handled as 100-0%, the term ‘.Reversed’ must be entered into the profile name.
Individual adaptive icons (e.g. Intensity-25), can also be entered directly and are then integrated as a ‘normal’ icon.
### Customized Icons included
From version IP-Symcon 3.0, customized icons are integrated via skins.
Further information can be found in the developer’s area as SDK: [Skins SDK](https://www.symcon.de/en/llms/developer/sdk-tools.md)
### Selection in the Management Console
The icon selection in the management console is optimised for the current icons. Still, the legacy icons can be chosen by entering the icon name manually into the corresponding field.
### Icon overview
The following icons are contained in WebFront and can be selected at the relevant locations in IP-Symcon. A special case is the icon __Transparent__. If that icon is selected, other icons of lower in rank (see above) are not displayed. This style element can be used in order to, e.g., not display an icon of a linked category object, even though the category has an icon.
### Icons
`aircraft`, `alert`, `arrowRight`, `backspace`, `basement`, `bath`, `battery`, `bed`, `bike`, `book`, `bulb`, `calendar`, `camera`, `car`, `caret`, `cat`, `climate`, `clock`, `close`, `closeall`, `cloud`, `cloudy`, `cocktail`, `cross`, `database`, `dining`, `distance`, `doctorBag`, `dog`, `doll`, `dollar`, `door`, `download`, `drops`, `duck`, `edit`, `electricity`, `energyProduction`, `energySolar`, `energyStorage`, `erlenmeyerFlask`, `euro`, `execute`, `eyes`, `factory`, `favorite`, `female`, `fitness`, `flag`, `flame`, `floorLamp`, `flower`, `fog`, `garage`, `gas`, `gauge`, `gear`, `graph`, `groundFloor`, `handicap`, `heart`, `help`, `hollowArrowDown`, `hollowArrowLeft`, `hollowArrowRight`, `hollowArrowUp`, `hollowDoubleArrowDown`, `hollowDoubleArrowLeft`, `hollowDoubleArrowRight`, `hollowDoubleArrowUp`, `hollowLargeArrowDown`, `hollowLargeArrowLeft`, `hollowLargeArrowRight`, `hollowLargeArrowUp`, `hourglass`, `houseRemote`, `image`, `information`, `intensity`, `internet`, `ips`, `jalousie`, `key`, `keyboard`, `kitchen`, `leaf`, `light`, `lightning`, `link`, `lock`, `lockClosed`, `lockOpen`, `macro`, `mail`, `male`, `melody`, `menu`, `minus`, `mobile`, `moon`, `motion`, `move`, `music`, `network`, `notebook`, `ok`, `pacifier`, `paintbrush`, `pants`, `party`, `people`, `plug`, `plus`, `popcorn`, `power`, `presence`, `radiator`, `raffstore`, `rainfall`, `recycling`, `remote`, `repeat`, `return`, `robot`, `rocket`, `script`, `shift`, `shower`, `shuffle`, `shutter`, `sink`, `sleep`, `sleet`, `snow`, `snowflake`, `sofa`, `speaker`, `speedo`, `stars`, `sun`, `sunny`, `tV`, `talk`, `tap`, `teddy`, `tee`, `telephone`, `temperature`, `thunder`, `title`, `topFloor`, `tree`, `turnLeft`, `turnRight`, `umbrella`, `unicorn`, `ventilation`, `wC`, `warning`, `wave`, `wellness`, `windDirection`, `windSpeed`, `window`, `xBMC`
### Adaptive Icons
`aircraft`, `alert`, `arrowRight`, `backspace`, `basement`, `bath`, `battery-0`, `battery-50`, `battery-100`, `battery`, `bed`, `bike`, `book`, `bulb`, `calendar`, `camera`, `car`, `caret`, `cat`, `climate`, `clock`, `close`, `closeall`, `cloud`, `cloudy`, `cocktail`, `cross`, `database`, `dining`, `distance`, `doctorBag`, `dog`, `doll`, `dollar`, `door-0`, `door-100`, `door`, `download`, `drops`, `duck`, `edit`, `electricity`, `energyProduction`, `energySolar`, `energyStorage-0`, `energyStorage-25`, `energyStorage-50`, `energyStorage-75`, `energyStorage-100`, `energyStorage`, `erlenmeyerFlask`, `euro`, `execute`, `eyes-0`, `eyes-100`, `eyes`, `factory`, `favorite`, `female`, `fitness`, `flag`, `flame`, `floorLamp-0`, `floorLamp-100`, `floorLamp`, `flower`, `fog`, `garage-0`, `garage-25`, `garage-100`, `garage`, `gas`, `gauge`, `gear`, `graph`, `groundFloor`, `handicap`, `heart`, `help`, `hollowArrowDown`, `hollowArrowLeft`, `hollowArrowRight`, `hollowArrowUp`, `hollowDoubleArrowDown`, `hollowDoubleArrowLeft`, `hollowDoubleArrowRight`, `hollowDoubleArrowUp`, `hollowLargeArrowDown`, `hollowLargeArrowLeft`, `hollowLargeArrowRight`, `hollowLargeArrowUp`, `hourglass-0`, `hourglass-30`, `hourglass-60`, `hourglass-100`, `hourglass`, `houseRemote`, `image`, `information`, `intensity-0`, `intensity-25`, `intensity-50`, `intensity-75`, `intensity-100`, `intensity`, `internet`, `ips`, `jalousie-0`, `jalousie-50`, `jalousie-100`, `jalousie`, `key`, `keyboard`, `kitchen`, `leaf`, `light-0`, `light-1`, `light-25`, `light-50`, `light-75`, `light-100`, `light`, `lightning`, `link`, `lock-0`, `lock-100`, `lock`, `lockClosed`, `lockOpen`, `macro`, `mail`, `male`, `melody`, `menu`, `minus`, `mobile`, `moon`, `motion`, `move`, `music`, `network`, `notebook`, `ok`, `pacifier`, `paintbrush`, `pants`, `party`, `people`, `plug`, `plus`, `popcorn`, `power`, `presence-0`, `presence-100`, `presence`, `radiator`, `raffstore-0`, `raffstore-50`, `raffstore-100`, `raffstore`, `rainfall`, `recycling`, `remote`, `repeat`, `return`, `robot`, `rocket`, `script`, `shift`, `shower`, `shuffle`, `shutter`, `sink`, `sleep`, `sleet`, `snow`, `snowflake`, `sofa`, `speaker-0`, `speaker-1`, `speaker-25`, `speaker-50`, `speaker-100`, `speaker`, `speedo-0`, `speedo-25`, `speedo-50`, `speedo-75`, `speedo-100`, `speedo`, `stars`, `sun`, `sunny`, `tV`, `talk`, `tap`, `teddy`, `tee`, `telephone`, `temperature-0`, `temperature-25`, `temperature-50`, `temperature-75`, `temperature-100`, `temperature`, `thunder`, `title`, `topFloor`, `tree`, `turnLeft`, `turnRight`, `umbrella`, `unicorn`, `ventilation`, `wC`, `warning`, `wave`, `wellness`, `windDirection`, `windSpeed-0`, `windSpeed-30`, `windSpeed-60`, `windSpeed-100`, `windSpeed`, `window-0`, `window-100`, `window`, `xBMC`
> **Note:** The following icons are only available from IP-Symcon 5.0/Symcon Mobile 5.0: Bath, Bike, Book, Cloudy, Doll, Door, Download, EnergyProduction, EnergySolar, EnergyStorage, Favorite, Fitness, FloorLamp, Gas, Handicap, Heart, Help, Link, Menu, Pants, Party, People, Presence, Raffstore, Remote, Sink, Sleet, Sunny, Teddy, Tee, Thunder, Umbrella
---
# Object Presentation
> Symcon documentation · English · generated on 2026-09-26
> Index: https://www.symcon.de/en/llms.txt
Source: https://www.symcon.de/en/service/documentation/components/object-presentation/
### Active Elements
Individual switchable elements can be presented in different ways.
### Passive Elements
Individual elements that cannot be switched have different presentations.
### Events
Allows the execution of logic, depending on date and time or the update of other objects.
### External Elements
External files like [Media](https://www.symcon.de/en/service/documentation/basics/media) can be displayed within the visualization.
### Summarized Presentations
Multiple elements can be summarized intelligently to a single presentation.
### Legacy-Presentations
These are outdated presentations which redirect to their actual presentations.
## Enumeration
Source: https://www.symcon.de/en/service/documentation/components/object-presentation/enumeration/
An Enumeration is a list of values that can be selected.
### Requirements
An Enumeration is a [Variable](https://www.symcon.de/en/llms/concepts.md) with the [presentation](https://www.symcon.de/en/llms/concepts.md) Enumeration. To use this presentation, the variable must fulfill the following conditions:
* configured [Variable action](https://www.symcon.de/en/llms/concepts.md)
#### Parameter
| Parameter | Description |
| ------------ | ----------------------------------------------------------------------------------------------------------------------------------------------------------------------------------------------------------------------------------------------------------------- |
| Default Icon | The [Icon](https://www.symcon.de/en/llms/components/icons.md) used for the variable |
| Options | The individual [Options](https://www.symcon.de/./#Options) of the enumeration |
| Layout | The layout of the options in a tile. Possible layouts are Column, Row, and Grid. Grid is not available for variables of type Boolean. This parameter is only evaluated for [appearance as own tile](https://www.symcon.de/./#As_own_Tile), not for appearance within a list. |
| Display... | The displayed content for each option. "Caption", "Icon", and "Caption and Icon" can be selected. (since Symcon 8.2) |
##### Options
| Parameter | Description |
| -------------- | -------------------------------------------------------------------------------------------------------------- |
| Value | The option is applied for this variable value |
| Label | Text displayed for this option |
| Overwrite icon | If set, the default icon for this presentation is overwritten if the variable has the value of this option |
| Icon | Icon for the variable if the variable has the value of this option (only available if "Overwrite icon" is set) |
| Color | Color that is used to display this option inside the enumeration |
### Display as legacy profile
If a variable uses the presentation [Legacy profile](https://www.symcon.de/en/llms/components/object-presentation.md), it is displayed as an Enumeration if it also fulfills the following conditions:
* [Variable profile](https://www.symcon.de/en/llms/concepts.md) with the following parameters:
* step size to 0 (only for integer/float, otherwise no option for step size)
* at least 1 association set
* minimum value and maximum value irrelevant

### Appearance in Tile Visualization
#### As own Tile

#### Within a List

### Appearance in the WebFront

## Trigger Event
Source: https://www.symcon.de/en/service/documentation/components/object-presentation/trigger-event/
_Requires Symcon >= 7.0_
A triggered event can be activated or deactivated in the visualization.
#### Requirements
A triggered event is a [Event](https://www.symcon.de/en/llms/concepts.md) of the type [Trigger](https://www.symcon.de/en/llms/concepts.md).
### Appearance in Tile Visualization
#### As own Tile

#### Within a List

### Appearance in the WebFront
Trigger events are not displayed in the WebFront.
## Automation
Source: https://www.symcon.de/en/service/documentation/components/object-presentation/automation/
Automations can be executed via a button.
#### Requirements
A configured [Automation](https://www.symcon.de/en/llms/concepts/automations.md) can be executed in the visualization
> **Note:** In the display as a separate tile, the icon of the button is based on the [Icon](https://www.symcon.de/en/llms/components/icons.md) of the Automation
### Appearance in Tile Visualization
#### As own Tile

#### Within a List

### Appearance in the WebFront

## Image
Source: https://www.symcon.de/en/service/documentation/components/object-presentation/image/
Any images can be integrated into the visualization.
#### Requirements
An Image is a [Medium](https://www.symcon.de/en/llms/concepts.md) of type [Image](https://www.symcon.de/en/llms/concepts.md).
### Appearance in Tile Visualization
#### As own Tile

#### Within a List

### Appearance in the WebFront

## Date/Time
Source: https://www.symcon.de/en/service/documentation/components/object-presentation/datetime/
_Requires Symcon >= 4.1_
With Date/Time, a point in time can be displayed and adjusted if necessary.
#### Requirements
A Date/Time is a [variable](https://www.symcon.de/en/llms/concepts.md) with the [presentation](https://www.symcon.de/en/llms/concepts.md) Date/Time. To use this presentation, the variable must fulfill the following conditions:
* integer type
#### Parameter
| Parameters | Description |
| -------------------- | -------------------------------------------------------------------------------------------------------------------------------------- |
| Date Display | Determines how the date is formatted. Possible options are: "None", "Year, Month and Day", "Month and Day", and "Year and Month" |
| Format Month as | If the month is to be displayed in the date, its formatting can be adjusted. The following are possible: "Text" and "Number" |
| Show Day of the Week | Determines whether the day of the week is also displayed in the format |
| Time Display | Determines how the time should be formatted. The following are possible: "None", "‘Hours and Minutes" and "Hours, Minutes and Seconds" |
### Display as legacy profile
If a variable uses the presentation [Legacy profile](https://www.symcon.de/en/llms/components/object-presentation.md), it is displayed as a date/time if one of the following [Variable profiles](https://www.symcon.de/en/llms/concepts.md) is selected:
* ~UnixTimestamp
* ~UnixTimestampDate
* ~UnixTimestampTime
The different profiles correspond to fixed parameter combinations.
#### ~UnixTimestamp
- Date Display: Year, Month and Day
- Format Month as: Text
- Show Day of Week: No
- Time Display: Hours and Minutes
#### ~UnixTimestampDate
- Show date: Year, Month and Day
- Format Month as: Text
- Show Day of the Week: No
- Show Time: None
#### ~UnixTimestampDate
- Date Display: None
- Time Display: Hour and Minutes
If the variable has a [variable action](https://www.symcon.de/en/llms/concepts.md), the time can be adjusted in the visualization
### Appearance in Tile Visualization
> **Note:** In the grid settings, the various displays can be configured separately as "Date", "Time" and "Date and Time"
#### As own Tile

#### Within a List

### Appearance in the WebFront

## Duration
Source: https://www.symcon.de/en/service/documentation/components/object-presentation/duration/
_Requires Symcon >= 8.0_
Duration can be used to format the time until/since a point in time or a simple value as a duration.
#### Requirements
Duration is a [variable](https://www.symcon.de/en/llms/concepts.md) with the [presentation](https://www.symcon.de/en/llms/concepts.md) duration. To use this presentation, the variable must fulfill the following conditions:
* type integer or float
* no configured [variable action](https://www.symcon.de/en/llms/concepts.md)
#### Parameter
| Parameter | Description |
| ----------------- | ------------------------------------------------------------------------------------------------------------------------------------------------------------------------------------------------------------------------------------------------------------------------------------------------------------------------ |
| Display Type | Defines how the displayed value is created. **Value in variable:** The duration in seconds which should be formatted **Duration until value in variable:** The duration until the time coded as a Unix timestamp **Duration since value in variable:** The duration since the time coded as a Unix timestamp |
| Format | The format for in which the duration is formatted. The following are possible: "seconds only", "minutes and seconds", and "hours, minutes and seconds" |
| Show Milliseconds | Determines whether milliseconds should also be displayed |
> **Note:** If the display type includes a point in time, the displayed value is updated automatically.
### Appearance in tile visualization
#### As own tile

#### Within a list

### Appearance in the WebFront
This display is not supported by the WebFront. Instead, the unformatted value of the variable is displayed.
## Chart
Source: https://www.symcon.de/en/service/documentation/components/object-presentation/chart/
The course of several variables can be displayed in a Chart.
[Video](https://www.youtube.com/embed/W64WqjSUEWA?rel=0&cc_load_policy=1)
#### Requirements
A chart is a [Medium](https://www.symcon.de/en/llms/concepts.md) of the type [Chart](https://www.symcon.de/en/llms/concepts.md).
### Appearance in Tile Visualization
#### As own Tile

> **Note:** If a Tile is sufficiently large, it is displayed analogous to the fullscreen display instead
#### In Fullscreen

#### Within a List

### Appearance in the WebFront


## Document
Source: https://www.symcon.de/en/service/documentation/components/object-presentation/document/
A Document can be downloaded by selecting the button.
#### Requirements
A Document is a [Medium](https://www.symcon.de/en/llms/concepts.md) of type [Document](https://www.symcon.de/en/llms/concepts.md).
### Appearance in Tile Visualization
#### As own Tile

#### Within a List

### Appearance in the WebFront

## Single Element
Source: https://www.symcon.de/en/service/documentation/components/object-presentation/single-element/
_Requires Symcon >= 7.0_
Enables the display of an element from a List as a single tile.
#### Requirements
Each [Instance](https://www.symcon.de/en/llms/concepts.md) can be displayed as a Single Element. The presentation is automatically selected if an instance only has one sub-object. Alternatively, it can be selected for each instance with multiple objects via "[Edit Tiles](https://www.symcon.de/en/llms/components/tile-visualization.md)".
### Appearance in Tile Visualization
#### As own Tile

If the Tile is opened, all objects of the instance are displayed as [List](https://www.symcon.de/en/llms/components/object-presentation.md).

### Appearance in the WebFront
This display is not supported by the WebFront. Instead, the instance is displayed as [List](https://www.symcon.de/en/llms/components/object-presentation.md).
## Energy Manager
Source: https://www.symcon.de/en/service/documentation/components/object-presentation/energy-manager/
_Requires Symcon >= 7.0_
The Energy Manager intelligently switches devices when enough energy is available. This presentation makes it possible to change the priority of individual appliances using drag & drop or to exclude them from the calculation. In addition, the intelligent optimization like Overnight Charge or Cheap Charge can be configured within a dialog.
#### Requirements
The Energy Manager requires an [Instance](https://www.symcon.de/en/llms/concepts.md) of the module [Energy Manager](https://www.symcon.de/en/llms/modules/energy-manager.md).
### Appearance in Tile Visualization
#### As own Tile

#### Dialog for Intelligent Optimization

#### Within a List

### Appearance in the WebFront
This display is not supported by the WebFront. Instead, the instance is displayed as [List](https://www.symcon.de/en/llms/components/object-presentation.md).
## Energy Distribution
Source: https://www.symcon.de/en/service/documentation/components/object-presentation/energy-distribution/
_Requires Symcon >= 7.0_
The Energy Distribution shows the flow of generated and consumed energy.
#### Requirements
The Energy Distribution display requires a [Instance](https://www.symcon.de/en/llms/concepts.md) of the module [Energy Distribution](https://www.symcon.de/en/llms/components/object-presentation.md).
### Appearance in Tile Visualization
#### As own Tile

#### Within a List

### Appearance in the WebFront
This display is not supported by the WebFront. Instead, the instance is displayed as [List](https://www.symcon.de/en/llms/components/object-presentation.md).
## Color
Source: https://www.symcon.de/en/service/documentation/components/object-presentation/color/
A color can be displayed and possibly configured with a Color.
### Requirements
An Color is a [Variable](https://www.symcon.de/en/llms/concepts.md) with the [presentation](https://www.symcon.de/en/llms/concepts.md) Color. To use this presentation, the variable must fulfill the following conditions:
* Type Integer or String
#### Parameter
| Parameter | Description |
| ------------------ | --------------------------------------------------------------------------------------------------------------------------------------------------------------------------------------------- |
| Encoding | Used encoding for the color, only adjustable for variables of type String |
| Default Values | List with default values that are offered in a selection, only available for variables with [Variable Action](https://www.symcon.de/en/llms/concepts.md). Not available if 'xy' encoding is selected |
| Color Sapce | The color space from which a color can be selected. This defines a triangle |
| Custom Color Space | List in which the red, green, blue value and white point of a custom color space can be defined. |
| Color Curve | If a color curve is selected, the selection of the color is limited to this |
| Custom Color Curve | A list of coordinates that define the |
### Display as legacy profile
If a variable uses the presentation [Legacy profile](https://www.symcon.de/en/llms/components/object-presentation.md), it is displayed as a color if it also fulfills the following conditions:
* selected [Variable profile](https://www.symcon.de/en/llms/concepts.md) "~HexColor"
### Appearance in Tile Visualization
#### As own Tile with Variable Action


> **Note:** When selecting the pipette in the middle of the circle, a dialog opens to set the color alternatively in detail
#### As own Tile without Variable Action

#### Within a List with Variable Action

When the pen is selected, a dialog opens, analogous to the display as a separate tile.
#### Within a List without Variable Action

### Appearance in the WebFront
#### With Variable Action

Selecting the brush on the right opens a color selection dialog:

#### Without Variable Action

## Content Changer
Source: https://www.symcon.de/en/service/documentation/components/object-presentation/content-changer/
A content changer allows subordinate objects to be displayed within a single tile. The individual objects can be changed by clicking or automatically after a certain time.
#### Requirements
An object of the type [Category](https://www.symcon.de/en/llms/concepts.md) for which the content changer presentation was selected in the visualization in [edit mode](https://www.symcon.de/en/llms/components/tile-visualization.md).
### Appearance in tile visualization

### Configuration
When a content changer is edited in the visualization, the following parameters are available.
| name | description |
| ---------------- | ------------------------------------------------------------------------------------------------------------------------- |
| Active Elements | Here you can select from all visible elements of the category which should be displayed. |
| Automatic Change | If active, the content changer jumps to the next element after a specified duration. The maximum duration is 100 seconds. |
| Name Format | The name to be displayed as the title of the tile. (Active object, category, active object and category) |

### Appearance in the WebFront
This presentation is displayed like a normal category.

Something similar can be achieved via the [Content changer](https://www.symcon.de/en/llms/components/webfront-visualization.md) in the WebFront Editor.
## IPSView
Source: https://www.symcon.de/en/service/documentation/components/object-presentation/ipsview/
IPSViews can be seamlessly integrated into the visualization.
> **Note:** The extension [IPSView](https://ipsview.brownson.at/) must be purchased separately for use
#### Requirements
An IPSView is a [Medium](https://www.symcon.de/en/llms/concepts.md) of type IPSView.
### Appearance inTile Visualization
#### Als own Tile

#### Within a List

### Appearance in the WebFront

## Shutter
Source: https://www.symcon.de/en/service/documentation/components/object-presentation/shutter/
For a Shutter, the degree of opening and optionally the degree of inclination of the slats can be set.
### Requirements
A Shutter can be set either as [Variable](https://www.symcon.de/en/llms/concepts.md) or as [Instance](https://www.symcon.de/en/llms/concepts.md).
#### As a Variable
A variable with the [presentation](https://www.symcon.de/en/llms/concepts.md) shutter must fulfill the following requirements:
* Integer type
* Configured [Variable action](https://www.symcon.de/en/llms/concepts.md)
#### Parameter
| Parameter | Description |
| ------------------------ | ------------------------------------------------------------------------------------------------------------------------------------------------------------------------------------ |
| Usage type | Determines whether the slider is used to control the rotation of slats or the opening degree of a shutter. The Usage Type parameter determines which other parameters are available. |
| Open at | The value at which the shutter is considered open (only for the Open Usage Type) |
| Closed at | The value at which the shutter is considered closed (only for Open Usage Type) |
| Inside at | The value at which the slats are considered to be turned inwards (only for Rotation Usage Type) |
| Outside at | The value at which the slats are considered to be rotated outwards (only for Rotation Usage Type) |
| Rotation | The fixed rotation of the displayed slats (only for Open Usage Type) |
| Maximum Rotation Inside | The maximum inward rotation value of the slats in degrees (only for Rotation Usage Type) |
| Maximum Rotation Outside | The maximum outward rotation value of the slats in degrees (only for Rotation Usage Type) |
| Sun Position | Determines whether and where a sun should be displayed next to the shutter. The height of the sun depends on the time of day. A moon is displayed at night. |
#### As Instance
An instance can be displayed as a blind if the following child objects are present:
* Position (optional): Variable as described above with the ~Shutter profile
* Degree of rotation (optional): Variable as described above with the ~Lamella profile
At least one optional variable must exist.
> **Note:** The default size of Shutters can be configured separately in the grid settings for variables as "Shutter Variable" and instances as "Shutter"
#### Display as legacy profile
If a variable uses the presentation [Legacy profile](https://www.symcon.de/en/llms/components/object-presentation.md), it is displayed as a shutter if one of the following [Variable profiles](https://www.symcon.de/en/llms/concepts.md) is selected:
* ~Shutter
* ~Lamella
The different profiles correspond to fixed parameter combinations.
#### ~Shutter
* Usage Type: Open
* Open At: 0
* Closed At: 100
* Rotation: -55°
* Sun Position: Right
#### ~Lamella
* Usage Tyoe: Rotation
* Inside At: 0
* Outside At: 100
* Maximum Rotation Inside: -55°
* Maximum Rotation Outside: 55°
* Sun Position: Right
### Appearance in Tile Visualization
#### As own Tile

#### Within a List
In the list view, the visualization falls back to the presentation [List](https://www.symcon.de/en/llms/components/object-presentation.md).

### Appearance in the WebFront
This presentation is not supported by the WebFront. Instead, variables are displayed as [Slider](https://www.symcon.de/en/llms/components/object-presentation.md) and instances are displayed as [List](https://www.symcon.de/en/llms/components/object-presentation.md).
## Category
Source: https://www.symcon.de/en/service/documentation/components/object-presentation/category/
A category can be opened to view the objects it contains.
#### Requirements
An object of the type [Category](https://www.symcon.de/en/llms/concepts.md).
### Appearance in tile visualization
In the [Instance configuration](https://www.symcon.de/en/llms/components/tile-visualization.md) 'Tiles' can be selected for 'Default category display'. This default setting can be overwritten in [edit mode](https://www.symcon.de/en/llms/components/tile-visualization.md) in the visualization for each object.

### Configuration
When a category is edited in the visualization, the following parameters are available.
| Name | Description |
| ------------------- | --------------------------------------------------------------------------------------------------------------------------------------------------------------------------------------------------------------------------- |
| Background | If the category contains an image as [Media object](https://www.symcon.de/en/llms/concepts.md), this can be selected here as the background. The media object can also be made invisible via the 'Visual settings' in the console. |
| Icon as full screen | If active, the [Icon](https://www.symcon.de/en/llms/components/icons.md) of the category object is displayed in the center of the tile |

### Appearance in the WebFront

## Category Bar
Source: https://www.symcon.de/en/service/documentation/components/object-presentation/category-bar/
A category can be opened to view the objects it contains.
#### Requirements
An object of the type [Category](https://www.symcon.de/en/llms/concepts.md).
### Appearance in tile visualization
In the [Instance configuration](https://www.symcon.de/en/llms/components/tile-visualization.md) 'Category Bar (Single Line)' or 'Category Bar (Multiline)' can be selected for 'Default Category Display'. This default setting can be overwritten for each object in [edit mode](https://www.symcon.de/en/llms/components/tile-visualization.md) in the visualization. In addition to the object name, the [Icon](https://www.symcon.de/en/llms/components/icons.md) of the category is also displayed.

### Appearance in the WebFront

## Legacy Profile
Source: https://www.symcon.de/en/service/documentation/components/object-presentation/legacy-profile/
This [Variable presentation](https://www.symcon.de/en/llms/concepts.md) evaluates a [variable profile](https://www.symcon.de/en/llms/concepts.md) and translates it to the actual presentation.
##### Prerequisites
One [variable](https://www.symcon.de/en/llms/concepts.md) uses the "Legacy Profile" variable presentation. The presentation has no further prerequisites.
##### Parameter
| Parameter | Description |
| --------- | --------------------------------------------------------------------- |
| Profile | The underlying [variable profile](https://www.symcon.de/en/llms/concepts.md) |
The following variable presentations can be realized via Legacy Profile. The exact requirements can be found on the individual pages for the corresponding presentation:
- [Enumeration](https://www.symcon.de/en/llms/components/object-presentation.md)
- [Date/Time](https://www.symcon.de/en/llms/components/object-presentation.md)
- [Color](https://www.symcon.de/en/llms/components/object-presentation.md)
- [HTML Box](https://www.symcon.de/en/llms/components/object-presentation.md)
- [Shutter](https://www.symcon.de/en/llms/components/object-presentation.md)
- [Switch](https://www.symcon.de/en/llms/components/object-presentation.md)
- [Slider](https://www.symcon.de/en/llms/components/object-presentation.md)
- [Value display](https://www.symcon.de/en/llms/components/object-presentation.md)
- [Value input](https://www.symcon.de/en/llms/components/object-presentation.md)
### Convert
In the "Edit variable" dialog, a legacy presentation can be converted to its actual presentation via the corresponding button under the Variable presentation item.

## Light
Source: https://www.symcon.de/en/service/documentation/components/object-presentation/light/
_Requires Symcon >= 7.0_
In the presentation Light, status, brightness, tuneable white and color can be visualized in a single tile.
#### Requirements
An [Instance](https://www.symcon.de/en/llms/concepts.md) can be displayed as light if the following child objects are present:
* Status:
* Uses the [variable presentation](https://www.symcon.de/en/llms/concepts.md) [Switch](https://www.symcon.de/en/llms/components/object-presentation.md)
* Variable Usage of the variable is "On/Off"
* Brightness (optional):
* Uses the [variable presentation](https://www.symcon.de/en/llms/concepts.md) [Slider](https://www.symcon.de/en/llms/components/object-presentation.md)
* Variable Usage of the variable is "Intensity"
* Tuneable White (optional):
* Uses the [variable presentation](https://www.symcon.de/en/llms/concepts.md) [Slider](https://www.symcon.de/en/llms/components/object-presentation.md)
* Variable Usage of the variable is "Color Temperature"
* Color (optional):
* Uses the [variable presentation](https://www.symcon.de/en/llms/concepts.md) [Color](https://www.symcon.de/en/llms/components/object-presentation.md)
* configured [Variable action](https://www.symcon.de/en/llms/concepts.md)
At least one optional variable must exist.
### Appearance in Tile Visualization
#### As own Tile


#### Within a List
In the list view, the visualization falls back to the presentation [List](https://www.symcon.de/en/llms/components/object-presentation.md).

### Appearance in the WebFront
This presentation is not supported by the WebFront. Instead, the instance is displayed as [List](https://www.symcon.de/en/llms/components/object-presentation.md).
## List
Source: https://www.symcon.de/en/service/documentation/components/object-presentation/list/
A list view can display any objects one below the other.
#### Requirements
Each [Instance](https://www.symcon.de/en/llms/concepts.md) can be displayed as a List.
> **Note:** If values are simply to be summarized without there being a suitable parent instance, a [Dummy module](https://www.symcon.de/en/llms/modules/dummy-module.md) can be used for structuring
### Appearance in Tile Visualization
#### As own Tile

#### Within a List

### Appearance in the WebFront

## Media Player
Source: https://www.symcon.de/en/service/documentation/components/object-presentation/media-player/
_Requires Symcon >= 7.0_
A Media Player can display various parameters for media playback and switch them if necessary:
- Play and pause media playback
- Stop media playback (optional)
- Jump to the next or previous element (optional)
- Display and adjust the progress of the current element (optional)
- Set volume (optional)
- Mute (optional)
- Set repeat (optional)
- Activate shuffle playback (optional)
- Display cover (optional)
- Show artist (optional)
- Show title (optional)
- Display and adjust current playlist including current position (optional)
### Requirements
A Media Player can be created either as [Variable](https://www.symcon.de/en/llms/concepts.md) or as [Instance](https://www.symcon.de/en/llms/concepts.md).
#### As a Variable
A variable that is to be displayed as a Media Player must fulfill the following requirements:
* Type Integer
* Set up [Variable action](https://www.symcon.de/en/llms/concepts.md)
* selected [Variable profile](https://www.symcon.de/en/llms/concepts.md):
* ~PlaybackNoStop: Only supports play and pause
* ~Playback: Supports playing, pausing and stopping
* ~PlaybackPreviousNextNoStop: Supports playing, pausing and jumping to the next or previous element
* ~PlaybackPreviousNext: Supports playing, pausing, stopping and jumping to the next or previous element
All other functions of the media player are not supported when displayed as variable.
#### As Instance
An instance can be displayed as a Media Player if the following child objects are present:
* Playback:
* Variable as described above
* Progress (optional):
* Variable of type integer
* Uses the [variable presentation](https://www.symcon.de/en/llms/concepts.md) [Slider](https://www.symcon.de/en/llms/components/object-presentation.md)
* usage type of the variable is "Progress"
* If the variable has a variable action, the position can be adjusted, otherwise it is only displayed
* Volume (optional):
* Uses the [variable presentation](https://www.symcon.de/en/llms/concepts.md) [Slider](https://www.symcon.de/en/llms/components/object-presentation.md)
* Variable Usage of the variable is "Volume"
* Mute (optional):
* Uses the [variable presentation](https://www.symcon.de/en/llms/concepts.md) [Switch](https://www.symcon.de/en/llms/components/object-presentation.md)
* Variable Usage of the variable is "Mute"
* Repeat (optional):
* [Enumeration](https://www.symcon.de/en/llms/components/object-presentation.md)
* Variable type Integer
* Variable profile "~Repeat"
* Shuffle (optional):
* [Enumeration](https://www.symcon.de/en/llms/components/object-presentation.md)
* Variable type Boolean
* Variable profile "~Shuffle"
* Cover (optional):
* [Image](https://www.symcon.de/en/llms/components/object-presentation.md)
* Artist (optional):
* Variable of type String
* Variable profile "~Artist"
* Title (optional):
* Variable of type String
* Variable profile "~Song"
* Playlist (optional):
* Variable of type String
* Variable profile "~Playlist"
* If the variable has a variable action, the position is customizable, otherwise it is only displayed
* The value for the playlist is a JSON-encoded object with the following parameters:
| parameter | type | description |
| ------------------ | ------- | --------------------------------------- |
| entries | Array | Entries of the playlist |
| current (optional) | Integer | The index of the currently active entry |
Structure of the entries
| Parameters | Type | Description |
| ----------------------------- | ------- | ----------------------------------------------------------------------------------------- |
| song (optional) | String | Title of the entry |
| artist (optional) | String | Artist of the entry |
| duration (optional) | Integer | Duration of the entry in seconds |
| Additional entries (optional) | any | Any other parameters can be added for the functionality. However, these are not displayed |
### Appearance in Tile Visualization
#### As own Tile

#### Within a List
In the list view, the visualization falls back to the presentation [List](https://www.symcon.de/en/llms/components/object-presentation.md).

### Appearance in the WebFront
This display is not supported by the WebFront. Instead, variables are displayed as [Enumeration](https://www.symcon.de/en/llms/components/object-presentation.md) and instances are displayed as [List](https://www.symcon.de/en/llms/components/object-presentation.md).
## Messages
Source: https://www.symcon.de/en/service/documentation/components/object-presentation/messages/
Messages visualizes the current messages and the number of unread.
#### Requirements
The presentation Messages requires an [Instance](https://www.symcon.de/en/llms/concepts.md) of the module [IMAP](https://www.symcon.de/en/llms/modules/imap.md) or [POP3](https://www.symcon.de/en/llms/modules/pop3.md).
### Appearance in Tile Visualization
#### As own Tile

#### Within a List
In the list view, the visualization falls back to the presentation [List](https://www.symcon.de/en/llms/components/object-presentation.md).

### Appearance in the WebFront

## Popup
Source: https://www.symcon.de/en/service/documentation/components/object-presentation/popup/
Several objects can be displayed together in a Popup.
#### Prerequisites
A Popup is set up as [Popup Module Instance](https://www.symcon.de/en/llms/modules/popup-module.md). Displayed objects are placed or linked below the popup module.
### Appearance in Tile Visualization
A popup display in the visualization tile will follow in future versions, but is currently not available.
### Appearance in the WebFront


## Switch
Source: https://www.symcon.de/en/service/documentation/components/object-presentation/switch/
_Requires Symcon >= 5.0_
A Switch can be switched on (true) or off (false).
#### Requirements
A Switch is a [variable](https://www.symcon.de/en/llms/concepts.md) with the [presentation](https://www.symcon.de/en/llms/concepts.md) Switch. To use this presentation, the variable must fulfill the following conditions:
* Type Boolean
* Set up [Variable action](https://www.symcon.de/en/llms/concepts.md)
#### Parameter
| Parameter | Description |
| ------------------------------- | -------------------------------------------------------------------------------------------------------------------------------------------------------------------- |
| Individual icons based on value | If set, individual icons can be selected for true and false. Otherwise, a single icon is selected, which is always displayed |
| Icon | Icon which is permanently displayed on the switch (only available if "Individual icons based on value" is not set) |
| Icon for true | Icon which is displayed on the switch if the variable has the value true (only available if "Individual icons based on value" is set) |
| Icon for false | Icon which is displayed on the switch if the variable has the value false (only available if "Individual icons based on value" is set) |
| Color of glow while active | Configures the colour of the glow around the switch when it is active, i.e., when the variable has the value true |
| Intensity of glow while active | Configures the intensity of the glow around the switch when it is active, i.e., when the variable has the value true |
| Variable Usage | Use of the variable in summarized presentations. The value does not have a direct effect on the display of the variable, but only on its use in summarized displays. |
### Display as Legacy Profile
If a variable uses the presentation [Legacy profile](https://www.symcon.de/en/llms/components/object-presentation.md), it is displayed as a Switch if it also fulfills the following conditions:
* no [Variable profile](https://www.symcon.de/en/llms/concepts.md) set or variable profile "~Switch" or "~Mute"
When using a variable profile, some parameters of the slider are derived
#### Variable Usage
The use depends on the profile name.
* On/Off for profile name
* ~Switch
* No profile
* Mute Switch for profile name "~Mute"
### Appearance in Tile Visualization
#### As own Tile

#### Within a List

### Appearance in the WebFront
Falls die Darstellung über ein Legacy-Profil erfolgt, unterscheidet das WebFront ob kein Variablenprofil gesetzt ist oder das Profil "~Switch" und hat für jeden Fall eine eigene Darstellung.
If the appearance occurs via Legacy profile, the WebFront distinguishes whether no variable profile is set or the "~Switch" profile and has a separate display for each case
#### With Presentation "Switch" or Profile ~Switch

#### Without Profile

## Slider
Source: https://www.symcon.de/en/service/documentation/components/object-presentation/slider/
A slider can be used to set a specific value.
#### Prerequisites
An Slider is a [Variable](https://www.symcon.de/en/llms/concepts.md) with the [presentation](https://www.symcon.de/en/llms/concepts.md) Slider. To use this presentation, the variable must fulfill the following conditions:
* Type Integer or Float
* configured [Variable action](https://www.symcon.de/en/llms/concepts.md)
#### Parameter
| Parameter | Description |
| --------------------------------------------- | ------------------------------------------------------------------------------------------------------------------------------------------------------------------------------------------------------------------------------------------------------------------------ |
| Minimum Value | Minimum value of the slider |
| Maximum Value | Maximum value of the slider |
| Step Size | Size of a single step in the slider. At 0, the slider has no fixed step size. |
| Gradient | Defines the appearance of the gradient |
| Custom Gradient | Colors can be selected for specific values in the list. The gradient of the slider then consists of a gradient over the defined colors. (only visible and usable if gradient = "Custom") |
| Variable Usage | Use of the variable in summarized presentations. The value does not have a direct effect on the display of the variable, but only on its use in summarized displays. |
| Prefix | Is written in front of the variable value during formatting |
| Suffix | Is written after the variable value during formatting |
| Display Type | With "Percentage", the values are displayed as a percentage. This means that the minimum value is displayed as 0 and the maximum value as 100, regardless of their absolute values. Other values are also scaled accordingly. No conversion takes place with "Absolute". |
| Thousands Separator | Defines the thousands separator used when formatting the value |
| Digits | The number of decimal places that are displayed when formatting the value (only available for variables of type Float) |
| Decimal Separator | Defines the decimal separator used when formatting the value (only available for variables of type Float) |
| Icon | The [Icon](https://www.symcon.de/en/llms/components/icons.md) that is used for the variable |
| Use updated parameters for specific intervals | Activates a list of intervals that can override the formatting in specific value ranges (not usable if Display Type = "Percentage") |
| Intervals | A list of intervals for overwriting the formatting in specific value ranges |
##### Intervals
| Parameters | Description |
| ----------------- | ------------------------------------------------------------------------------------------------------------------------------------------------------------------------------------------------------------------------------------ |
| Interval Start | The interval is applied from this value |
| Interval End | The interval is applied up to this value. If there is an interval with a start at this value, the other interval is used for the exact value for End and the defined interval is only used for values that are smaller than the end. |
| Display | If "Formatted Value" is selected, the value is formatted with adjusted parameters; if "Constant" is selected, the display is replaced by a constant value. |
| Constant | Defines the text that is to be displayed without further formatting for values within this interval. (only available if Display = "Constant") |
| Conversion Factor | Before formatting, the value is divided by the conversion factor (only available if display = "Formatted Value") |
| Overwrite Prefix | If the switch is activated, the prefix defined in the interval is used instead of the prefix of the main configuration (only available if display = "Formatted Value") |
| Prefix | Prefix used within the interval (only available if the "Overwrite Prefix" switch is active) |
| Overwrite Suffix | If the switch is activated, the suffix defined in the interval is used instead of the suffix of the main configuration (only available if display = "Formatted Value") |
| Suffix | Suffix used within the interval (only available if the "Overwrite Suffix" switch is active) |
| Overwrite Digits | If the switch is activated, the digits defined in the interval is used instead of the digits of the main configuration (only available if display = "Formatted Value") |
| Digits | Decimal places used within the interval (only available if the "Overwrite Digits" switch is active) |
| Overwrite Icon | If the switch is activated, the icon defined in the interval is used instead of the icon of the main configuration |
| Icon | Icon used within the interval (only available if the "Overwrite icon" switch is active) |
### Display as Legacy Profile
If a variable uses the presentation [Legacy profile](https://www.symcon.de/en/llms/components/object-presentation.md), it is displayed as a slider if it also fulfills the following conditions:
* Does not fulfill the conditions of any of the following presentations:
* [Shutter](https://www.symcon.de/en/llms/components/object-presentation.md)
* [Enumeration](https://www.symcon.de/en/llms/components/object-presentation.md)
* [Variable profile](https://www.symcon.de/en/llms/concepts.md) with the following parameters:
* Max value > Min value
* Any increment, but has an influence on the increment of the slider
When using a variable profile, some parameters of the slider are derived
#### Gradient
The gradient depends on the profile name.
* Temperature for profile name
* ~Temperature
* ~Temperature.Difference
* ~Temperature.Fahrenheit
* ~Temperature.Room
* Color temperature for profile name "~TWColor"
* Default otherwise
#### Variable Usage
The use depends on the profile name.
* Temperature for profile name
* ~Temperature
* ~Temperature.Difference
* ~Temperature.Fahrenheit
* ~Temperature.Room
* Color temperature for profile name "~TWColor"
* Intensity if profile name begins with "~Intensity." begins
* Volume for profile name "~Volume"
* Progress for profile name "~Progress"
* None of these otherwise
#### Display type
"Percentage" if suffix "%", otherwise "Absolute"
### Appearance in visualization tile
#### As own tile

#### Within a list

### Appearance in the WebFront
The WebFront differentiates according to the display type and has a separate display for each case:
#### Display type "Absolute"

#### Display type "Percentage"

## Stream
Source: https://www.symcon.de/en/service/documentation/components/object-presentation/stream/
Streams represent the video output, for example from a surveillance camera.
#### Requirements
A Stream is a [Medium](https://www.symcon.de/en/llms/concepts.md) of type [Stream](https://www.symcon.de/en/llms/concepts.md).
### Appearance in Tile Visualization
#### As own Tile

#### Within a List

### Appearance in the WebFront

## Scenes
Source: https://www.symcon.de/en/service/documentation/components/object-presentation/scenes/
_Requires Symcon >= 7.0_
Various device settings can be saved together as a scene and called up again.
#### Requirements
Scenes require an [Instance](https://www.symcon.de/en/llms/concepts.md) of the module [Scene Control](https://www.symcon.de/en/llms/modules/scene-control.md).
### Appearance in Tile Visualization
#### As own Tile

#### In Full Screen

#### Within a List
In the list view, the visualization falls back to the presentation [List](https://www.symcon.de/en/llms/components/object-presentation.md).

### Appearance in the WebFront
This presentation is not supported by the WebFront. Instead, the instance is displayed as [List](https://www.symcon.de/en/llms/components/object-presentation.md).
## Thermostat
Source: https://www.symcon.de/en/service/documentation/components/object-presentation/thermostat/
A Thermostat allows setting a desired temperature combined with a display of the current temperature.
#### Requirements
An [Instance](https://www.symcon.de/en/llms/concepts.md) can be displayed as a Thermostat if the following child objects are present:
* Set temperature:
* uses the [variable presentation](https://www.symcon.de/en/llms/concepts.md) [Slider](https://www.symcon.de/en/llms/components/object-presentation.md)
* usage type of the variable is "Temperature"
* Current temperature:
* Uses the [variable presentation](https://www.symcon.de/en/llms/concepts.md) [Value Presentation](https://www.symcon.de/en/llms/components/object-presentation.md)
* usage type of the variable is "Temperature"
### Appearance in Tile Visualization
#### As own Tile

#### Within a List
In the list view, the visualization falls back to the presentation [List](https://www.symcon.de/en/llms/components/object-presentation.md).

### Appearance in the WebFront
This presentation is not supported by the WebFront. Instead, the instance is displayed as [List](https://www.symcon.de/en/llms/components/object-presentation.md).
## Sound
Source: https://www.symcon.de/en/service/documentation/components/object-presentation/sound/
Audio files can be integrated and played back in the visualization.
#### Requirements
A Sound is a [Medium](https://www.symcon.de/en/llms/concepts.md) of the type [Sound](https://www.symcon.de/en/llms/concepts.md).
### Appearance in Tile Visualization
#### As own Tile
The progress bar and the stop button can be omitted depending on the size of the tile.

#### Within a List

### Appearance in the WebFront
The display may vary depending on the browser.

## Web Content
Source: https://www.symcon.de/en/service/documentation/components/object-presentation/web-content/
Web Content can display any HTML content and therefore offers experts the option of displaying individual elements. By default, CSS displays text within the presentation in the same way as the rest of the visualization. In addition, the address of any website can be entered to display it in the visualization.
#### Requirements
Web Content is a [Variable](https://www.symcon.de/en/llms/concepts.md) with the [presentation](https://www.symcon.de/en/llms/concepts.md) Web Content. To use this presentation, the variable must fulfill the following conditions:
* Type String
* No configured [Variable action](https://www.symcon.de/en/llms/concepts.md)
### Parameters
| Parameters | Description |
| -------------- | ----------------------------------------------------------------------------------------------------------------------------------------------------------------------------- |
| Display Type | For "HTML content", the variable value is interpreted and displayed as HTML. For "Website", the address of a website can be specified as long as it does not block embedding. |
| Remove Padding | If activated, the borders of the tile are removed. |
### Display as legacy profile
If a variable uses the presentation [Legacy profile](https://www.symcon.de/en/llms/components/object-presentation.md), it is displayed as Web Content if it also fulfills the following conditions:
* Selected [variable profile](https://www.symcon.de/en/llms/concepts.md) ~HTMLBox
### Appearance in Tile Visualization
#### As own Tile

#### Within a List

### Appearance in the WebFront

## Value Presentation
Source: https://www.symcon.de/en/service/documentation/components/object-presentation/value-presentation/
Displays a value, optionally with background color or value progression.
### Requirements
A value presentation is a [variable](https://www.symcon.de/en/llms/concepts.md) with the [presentation](https://www.symcon.de/en/llms/concepts.md) value presentation. To use this presentation, the variable must fulfill the following conditions:
* No set up [Variable action](https://www.symcon.de/en/llms/concepts.md)
### Parameters
Depending on the variable type (Boolean, Integer, Float, String), different parameters are available. The following apply to all of them.
| Parameter | Description |
| ------------- | --------------------------------------------------------------------------------------- |
| Default icon | The icon that is displayed. It can be overwritten by other parameters |
| Default color | The color with which the value is highlighted |
| Prefix | Is written in front of the variable value during formatting (Not available for Boolean) |
| Suffix | Is written after the variable value during formatting (Not available for Boolean) |
#### Float and Integer
| Parameter | Description |
| --------------------------------------------- | ------------------------------------------------------------------------------------------------------------------------------------------------------------------------------------------------------------------------------------------------------------------------ |
| Usage type | Use of the variable in summarized presentations. The value does not have a direct effect on the display of the variable, but only on its use in summarized displays. |
| Display type | With "Percentage", the values are displayed as a percentage. This means that the minimum value is displayed as 0 and the maximum value as 100, regardless of their absolute values. Other values are also scaled accordingly. No conversion takes place with "Absolute". |
| Thousands separator | Defines the thousands separator used when formatting the value |
| Minimum value | Minimum value of the variable (only usable if display type = "Percentage") |
| Maximum value | Maximum value of the variable (only usable if display type = "Percentage") |
| Decimal places | The number of decimal places that are displayed when formatting the value (only available for variables of type Float) |
| Decimal separator | Defines the decimal separator used when formatting the value (only available for variables of type Float) |
| Icon | The [Icon](https://www.symcon.de/en/llms/components/icons.md) that is used for the variable |
| Use updated parameters for specific intervals | Activates a list of intervals that can override the formatting in specific value ranges (not usable if display type = "Percentage") |
| Intervals | A list of Intervals for overwriting the formatting in specific value ranges |
##### Intervals
| Parameters | Description |
| ------------------------ | ------------------------------------------------------------------------------------------------------------------------------------------------------------------------------------------------------------------------------------ |
| Start of interval | The interval is applied from this value |
| End of interval | The interval is applied up to this value. If there is an interval with a start at this value, the other interval is used for the exact value for End and the defined interval is only used for values that are smaller than the end. |
| Display | If "Formatted value" is selected, the value is formatted with adjusted parameters; if "Constant" is selected, the display is replaced by a constant value. |
| Constant | Defines the text that is to be displayed without further formatting for values within this interval. (only available if display = "Constant") |
| Conversion factor | Before formatting, the value is divided by the conversion factor (only available if display = "Formatted value") |
| Overwrite prefix | If the switch is activated, the prefix defined in the interval is used instead of the prefix of the main configuration (only available if display = "Formatted value") |
| Prefix | Prefix used within the interval (only available if the "Overwrite prefix" switch is active) |
| Overwrite suffix | If the switch is activated, the suffix defined in the interval is used instead of the suffix of the main configuration (only available if display = "Formatted value") |
| Suffix | Suffix used within the interval (only available if the "Overwrite suffix" switch is active) |
| Overwrite decimal places | If the switch is activated, not the decimal places of the main configuration are used, but the decimal places defined in the interval (only available if display = "Formatted value" and variable of type Float) |
| Digits | Decimal places used within the interval (only available if the "Overwrite decimal places" switch is active) |
| Overwrite icon | If the switch is activated, the icon defined in the interval is used instead of the icon of the main configuration |
| Icon | Icon used within the interval (only available if the "Overwrite icon" switch is active) |
| Overwrite color | If the switch is activated, the color defined in the interval is used instead of the color of the main configuration |
| Color | Color used within the interval (only available if the "Overwrite color" switch is active) |
#### Boolean and String
| Parameters | Description |
| ---------- | -------------------------------------------------------------------------------------------------------------------------------------------------------- |
| Multiline | (String only) Displays the variable value in multiple lines |
| Options | The individual Options of the display, which allow specific texts, colors and icons to be displayed for different variable values |
##### Options
| Parameter | Description |
| -------------- | -------------------------------------------------------------------------------------------------------------- |
| Value | The option is applied for this variable value |
| Label | Text displayed for this option |
| Overwrite icon | If set, the default icon for this presentation is overwritten if the variable has the value of this option |
| Icon | Icon for the variable if the variable has the value of this option (only available if "Overwrite icon" is set) |
| Color | Color that is used to display this option inside the enumeration |
#### Value progression
If the [Logging](https://www.symcon.de/en/llms/modules/archive-control.md) is activated for the variable, a preview of the value history is displayed.
### Display as legacy profile
If a variable uses the presentation [Legacy profile](https://www.symcon.de/en/llms/components/object-presentation.md), it is displayed as a value presentation if it fulfills the following conditions:
* Does not fulfill the conditions of one of the following presentations:
* [Date/Time](https://www.symcon.de/en/llms/components/object-presentation.md)
* [Color Presentation](https://www.symcon.de/en/llms/components/object-presentation.md)
* [Multi-row Textbox](https://www.symcon.de/en/llms/components/object-presentation.md)
* [HTML Box](https://www.symcon.de/en/llms/components/object-presentation.md)
When using a variable profile, some parameters of the value display are derived
#### Use of the variables
The usage type depends on the profile name.
* Temperature for profile name
* ~Temperature
* ~Temperature.Difference
* ~Temperature.Fahrenheit
* ~Temperature.Room
#### Display type
“Percentage” if suffix ‘%’, otherwise ”Absolute”
### Appearance in tile visualization
#### As own tile

#### Within a list

### Appearance in the WebFront
No preview of the value history is displayed in the WebFront.

## Value Input
Source: https://www.symcon.de/en/service/documentation/components/object-presentation/value-input/
_Requires Symcon >= 5.0_
A Value Input allows you to change values as free text.
### Requirements
A Value Input is a [variable](https://www.symcon.de/en/llms/concepts.md) with the [presentation](https://www.symcon.de/en/llms/concepts.md) Value Input. To use this spresentation, the variable must fulfill the following conditions:
* configured [Variable action](https://www.symcon.de/en/llms/concepts.md)
* Variable type Integer, Float, or String
#### Parameters
| Parameter | Description |
| --------------- | --------------------------------------------------------------------------------------------------------------------------------------------------- |
| Prefix | Is written in front of the variable value during formatting |
| Suffix | Is written after the variable value during formatting |
| Multiline Input | If active, input over multiple lines is possible. Otherwise, the input is restricted to a single line (only available for variables of type String) |
> **Note:** If the variable is numeric, inputs that are not numbers are filtered out
### Display as legacy profile
If a variable uses the presentation [Legacy profile](https://www.symcon.de/en/llms/components/object-presentation.md), it is displayed as a Value Input
* no [Variable profile](https://www.symcon.de/en/llms/concepts.md) or variable profile "~TextBox"
When using a variable profile, the parameter "Multiline Input" is active for the variable profile "~TextBox" and inactive otherwise.
### Appearance in Tile Visualization
#### As own Tile

#### Within a List

### Appearance in the WebFront

## Schedule Event
Source: https://www.symcon.de/en/service/documentation/components/object-presentation/event-schedule/
A Schedule Event can be viewed and configured in the visualization.
#### Requirements
A Schedule Event is an [Event](https://www.symcon.de/en/llms/concepts.md) of type [Schedule](https://www.symcon.de/en/llms/concepts.md).
### Appearance in Tile Visualization
#### Als own Tile

#### Within a List

### Appearance in the WebFront

## Cyclic Event
Source: https://www.symcon.de/en/service/documentation/components/object-presentation/event-cyclic/
A Cyclic Event can be viewed and configured in the visualization.
#### Requirements
A cyclic event is an [Event](https://www.symcon.de/en/llms/concepts.md) of type [Cyclic](https://www.symcon.de/en/llms/concepts.md).
### Appearance in Tile Visualization
#### As own Tile

#### In Full Screen

#### Within a List

### Appearance in the WebFront

---
# Icons
> Symcon documentation · English · generated on 2026-09-26
> Index: https://www.symcon.de/en/llms.txt
Source: https://www.symcon.de/en/service/documentation/components/icons/
Each object in Symcon can have an icon. In addition, icons can be present within [Variable presentations](https://www.symcon.de/en/llms/concepts.md) or inherited through linked structures (see [Links](https://www.symcon.de/en/llms/concepts.md)).
Icons are prioritized in the following order:
1. the icon assigned to the link object (when linking)
2. the icon assigned to the (linked) object
3. depending on the object type:
* For automations: the icon *caret-right*
* For media: the icon *image*
* For variables: Icon based on the presentation
Icons that are set based on the variable presentation are automatically updated when the variable value changes.
If an inherited icon is to be explicitly removed, the [special icon *Transparent*](https://www.symcon.de/./#The_Icon_Transparent) can be selected.
[Video](https://www.youtube.com/embed/G5MLo4PMEpE?rel=0&cc_load_policy=1)
### Icon Overview
The more than 3000 classic icons from Font Awesome can be used in the tile visualization: [Usable icons](https://fontawesome.com/search?f=classic&s=light&o=r). These icons are displayed in the Light style. In addition, all [Brand icons](https://fontawesome.com/search?ip=brands&o=r) can be used. Finally, there are a number of icons that have been specially created for use in Symcon:
`heatpump`, `marquee-closed`, `marquee-half`, `marquee-open`, `terrace-door-closed`, `terrace-door-open`, `terrace-door-tilted`, `volant-closed`, `volant-half`, `volant-open`, `window-left-closed-right-closed`, `window-left-closed-right-open`, `window-left-closed-right-tilted`, `window-left-closed`, `window-left-open-right-closed`, `window-left-open-right-open`, `window-left-open-right-tilted`, `window-left-open`, `window-left-tilted-right-closed`, `window-left-tilted-right-open`, `window-left-tilted-right-tilted`, `window-left-tilted`, `window-right-closed`, `window-right-open`, `window-right-tilted`, `window-roof-closed`, `window-roof-open`
The [Legacy icons](https://www.symcon.de/en/llms/components/webfront-visualization.md) can be used in the WebFront.
### The icon *Transparent*
The *Transparent* icon is a special case. If this icon is selected, another icon that is lower in the hierarchy (see above) can be overwritten so that no icon is displayed. This can be used as a style element, e.g. to not display an icon for linked object categories, even though the category had an icon assigned.
---
# Command Reference – Overview
> Symcon documentation · English · generated on 2026-09-26
> Index: https://www.symcon.de/en/llms.txt
Source: https://www.symcon.de/en/service/documentation/command-reference/
The Command Reference includes commands that are provided by IP-Symcon and are used for the management of itself.
This is a list of IP-Symcon specific commands.
> **Note:** __For a list of module-specific commands, refer to the [Module Reference](https://www.symcon.de/en/llms/modules/index.md).__
---
# Process Control
> Symcon documentation · English · generated on 2026-09-26
> Index: https://www.symcon.de/en/llms.txt
Source: https://www.symcon.de/en/service/documentation/command-reference/process-control/
## IPS_Execute
Source: https://www.symcon.de/en/service/documentation/command-reference/process-control/ips-execute/
`bool IPS_Execute(string $ProgramPath, string $Parameter, bool $Dummy, bool $Wait)`
Starts an external program
**Parameters**
- `$ProgramPath` (string): Full path to the program
- `$Parameter` (string): Parameter which is to be passed to the program (optional)
- `$Dummy` (bool): Always specify true, parameter is not evaluated, this was only used in version 1.x.
- `$Wait` (bool): Specifies whether to wait for the end of the program
**Returns** (bool): The return value of stderr/stdout if the __Wait__ parameter is True, otherwise the return is an empty string.
Specifies whether to wait for the end of the program
**Example**
```php
//Start a batch file
IPS_Execute("C:/autoexec.bat", "", false, false);
```
## IPS_ExecuteEx
Source: https://www.symcon.de/en/service/documentation/command-reference/process-control/ips-executeex/
`string IPS_ExecuteEx(string $ProgramPath, string $Parameter, bool $ShowWindow, bool $Wait, int $SessionID)`
Starts an external program in the user context
**Parameters**
- `$ProgramPath` (string): Full path to the program
- `$Parameter` (string): Parameter which is to be passed to the program (optional)
- `$ShowWindow` (bool): __True__ if the window should be displayed; __False__ if the window should not be visible
- `$Wait` (bool): Specifies whether to wait for the end of the program
- `$SessionID` (int): The user session ID, which is to be used (from Under XP from 0, 2003/Vista 1)
**Returns** (string): Empty string
The user session ID, which is to be used (from Under XP from 0, 2003/Vista 1)
**Example**
```php
//Notepad started
IPS_ExecuteEx("notepad", "", false, false, 0);
```
## IPS_RunAction
Source: https://www.symcon.de/en/service/documentation/command-reference/process-control/ips-runaction/
`bool IPS_RunAction(string $ActionID, array $ActionParameters)`
executes a single action
**Parameters**
- `$ActionID` (string): GUID of the executed action
- `$ActionParameters` (array): List of Parameters for the executed action
**Returns** (bool): If the command succeeds, it returns __TRUE__, otherwise __FALSE__.
List of Parameters for the executed action
**Example**
```php
// Execute Script with the ID 12345
IPS_RunAction("{7938A5A2-0981-5FE0-BE6C-8AA610D654EB}", ["TARGET" => 12345, "ENVIRONMENT" => "Default", "PARENT" => $_IPS['SELF']]);
// Show all actions and their GUIDs
foreach(json_decode(IPS_GetActions(), true) as $action) {
echo $action['id'] . " -> " . $action['caption'] . PHP_EOL;
// var_dump($action); <-- Shows more details, for example: restrictions
}
```
## IPS_RunActionWait
Source: https://www.symcon.de/en/service/documentation/command-reference/process-control/ips-runactionwait/
`string IPS_RunActionWait(string $ActionID, array $ActionParameters)`
executes a single action and waits for the result
**Parameters**
- `$ActionID` (string): ID of the executed action
- `$ActionParameters` (array): List of Parameters for the executed action
**Returns** (string): Error message of the execution
List of Parameters for the executed action
**Example**
```php
// Execute the script with the ID 12345
$error = IPS_RunActionWait("{7938A5A2-0981-5FE0-BE6C-8AA610D654EB}", ["TARGET" => 12345, "ENVIRONMENT" => "Default", "PARENT" => $_IPS['SELF']]);
if ($error === "") {
echo "Action was executed succesfully";
}
else {
echo "There was an error during execution: " . $error;
}
```
## IPS_RunScript
Source: https://www.symcon.de/en/service/documentation/command-reference/process-control/ips-runscript/
`bool IPS_RunScript(int $ScriptID)`
starts another IP-Symcon script
**Parameters**
- `$ScriptID` (int): Unique ID of the script
**Returns** (bool): If the command succeeds, it returns __TRUE__, otherwise __FALSE__.
Unique ID of the script
**Example**
```php
IPS_RunScript(12345 /*[Garden lighting On]*/);
```
## IPS_RunScriptEx
Source: https://www.symcon.de/en/service/documentation/command-reference/process-control/ips-runscriptex/
`bool IPS_RunScriptEx(int $ScriptID, array $Parameter)`
starts another IP-Symcon script and passes variables
**Parameters**
- `$ScriptID` (int): Unique ID of the script
- `$Parameter` (array): Key (string) => Value (variant) pair can be accessed in the newly executed script.
**Returns** (bool): If the command succeeds, it returns __TRUE__, otherwise __FALSE__.
Key (string) => Value (variant) pair can be accessed in the newly executed script.
**Example**
```php
//Script, that will launch another script with parameter passing.
IPS_RunScriptEx(12345 /*[Temp]*/, Array("Title" => "Temp.", "Tmin" => 10.0));
//Script that was called. Parameters are available as individual variables in the
//global variable $_IPS. The variable name corresponds to the array index
//given name.
$Headline = $_IPS['Title']. "progress"; //Results: Temp.progress
$MaxTemp = $Tmin + 30.0;
```
## IPS_RunScriptText
Source: https://www.symcon.de/en/service/documentation/command-reference/process-control/ips-runscripttext/
`bool IPS_RunScriptText(string $ScriptText)`
starts text as IP-Symcon script
**Parameters**
- `$ScriptText` (string): String which is called as script.
**Returns** (bool): If the command succeeds, it returns __TRUE__, otherwise __FALSE__.
String which is called as script.
**Example**
```php
// Prints "Hello World" in the message view
IPS_RunScriptText("echo 'Hello World';");
```
## IPS_RunScriptTextEx
Source: https://www.symcon.de/en/service/documentation/command-reference/process-control/ips-runscripttextex/
`bool IPS_RunScriptTextEx(string $ScriptText, array $Parameter)`
starts a text as IP-Symcon script and passes variables
**Parameters**
- `$ScriptText` (string): String that is executed as script
- `$Parameter` (array): Key (string) => Value (variant) Pairs that can be accessed in the executed script
**Returns** (bool): If the command succeeds, it returns __TRUE__, otherwise __FALSE__.
Key (string) => Value (variant) Pairs that can be accessed in the executed script
**Example**
```php
// Prints "Hello World" in the message view
IPS_RunScriptTextEx('echo $_IPS["start"] . " ". $_IPS["end"];', Array("start" => "Hello", "end" => "World"));
```
## IPS_RunScriptTextWait
Source: https://www.symcon.de/en/service/documentation/command-reference/process-control/ips-runscripttextwait/
`string IPS_RunScriptTextWait(string $ScriptText)`
starts a text as IP-Symcon script and waits for its execution
**Parameters**
- `$ScriptText` (string): String that is executed as script
**Returns** (string): Result of the executed script
String that is executed as script
**Example**
```php
// Prints "Hello World" in the message view
echo IPS_RunScriptTextWait("echo 'Hello World';");
```
## IPS_RunScriptTextWaitEx
Source: https://www.symcon.de/en/service/documentation/command-reference/process-control/ips-runscripttextwaitex/
`string IPS_RunScriptTextWaitEx(string $ScriptText, array $Parameter)`
starts a text as IP-Symcon script, passes variables, and waits for the execution of the script
**Parameters**
- `$ScriptText` (string): String that is executed as script
- `$Parameter` (array): Key (string) => Value (variant) Pairs that can be accessed in the executed script
**Returns** (string): Result of the executed script
Key (string) => Value (variant) Pairs that can be accessed in the executed script
**Example**
```php
//Script that executes text as script and passes parameters
echo IPS_RunScriptTextWaitEx('echo $_IPS["title"]. "course" . PHP_EOL; echo $_IPS["Tmin"] + 30.0;', Array("title" => "Temp.", "Tmin" => 10.0));
```
## IPS_RunScriptWait
Source: https://www.symcon.de/en/service/documentation/command-reference/process-control/ips-runscriptwait/
`string IPS_RunScriptWait(int $ScriptID)`
starts another IP-Symcon script and waits for the result
**Parameters**
- `$ScriptID` (int): Unique ID of the script
**Returns** (string): Result of current script
Unique ID of the script
**Example**
```php
echo IPS_RunScriptWait(12345 /*[Script A]*/);
```
## IPS_RunScriptWaitEx
Source: https://www.symcon.de/en/service/documentation/command-reference/process-control/ips-runscriptwaitex/
`string IPS_RunScriptWaitEx(int $ScriptID, array $Parameter)`
starts another IP-Symcon script, passes variables, and waits for the result
**Parameters**
- `$ScriptID` (int): Unique ID of the script
- `$Parameter` (array): Key (string) => Value (variant) pair can be accessed in the newly executed script.
**Returns** (string): Result of current script
Key (string) => Value (variant) pair can be accessed in the newly executed script.
**Example**
```php
//Script, that will launch another script with parameter passing.
echo IPS_RunScriptWaitEx(12345 /*[Temp]*/, Array("Title" => "Temp.", "Tmin" => 10.0));
//Script that was called. Parameters are available as individual variables in the
//global variable $_IPS. The variable name corresponds to the array index
//given name.
$Headline = $_IPS['Title']. "progress"; //Results: Temp.progress
$MaxTemp = $Tmin + 30.0;
```
## IPS_SemaphoreEnter
Source: https://www.symcon.de/en/service/documentation/command-reference/process-control/ips-semaphoreenter/
`bool IPS_SemaphoreEnter(string $Name, int $WaitingTime)`
allows the synchronization with other simultaneously run scripts
**Parameters**
- `$Name` (string): Name that describes the semaphore
- `$WaitingTime` (int): Milliseconds to wait until the command terminates
**Returns** (bool): __TRUE__ if the semaphore was entered. __FALSE__ if the semaphore before the expiration of the waiting period could not be accessed.
Milliseconds to wait until the command terminates
**Example**
```php
if (IPS_SemaphoreEnter("CriticalPoint", 1000))
{
// ...Run critical Commands
//Release semaphore again!
IPS_SemaphoreLeave("CriticalPoint");
}
else
{
// ...No execution possible. Another script uses the "CriticalPoint"
// for more than 1 second, so our wait time is exceeded.
}
```
## IPS_SemaphoreLeave
Source: https://www.symcon.de/en/service/documentation/command-reference/process-control/ips-semaphoreleave/
`bool IPS_SemaphoreLeave(string $Name)`
allows the synchronization with other simultaneously run scripts
**Parameters**
- `$Name` (string): Name that describes the semaphore.
**Returns** (bool): If the command succeeds, it returns __TRUE__, otherwise __FALSE__.
Name that describes the semaphore.
**Example**
```php
//See IPS_SemaphoreEnter()
```
## IPS_Sleep
Source: https://www.symcon.de/en/service/documentation/command-reference/process-control/ips-sleep/
`bool IPS_Sleep(int $WaitingTime)`
delays a script for a specified duration
**Parameters**
- `$WaitingTime` (int): Specifies the waiting time in milliseconds
**Returns** (bool): If the command succeeds, it returns __TRUE__, otherwise __FALSE__.
Specifies the waiting time in milliseconds
**Example**
```php
// Delayed data output to the COM port
COMPort_SendText($id, chr(0x1b)); // Sent ESC to LC-Display
IPS_Sleep(200); // Wait 200ms
COMPort_SendText($id, "0"); // Delete LC-Display
IPS_Sleep(200); // Wait 200ms
COMPort_SendText($id, "Good day!"); // Return Text
// Wait 2 seconds with PHP alternatives
sleep(2);
IPS_Sleep(2000);
usleep(2000000);
```
---
# Management of Events
> Symcon documentation · English · generated on 2026-09-26
> Index: https://www.symcon.de/en/llms.txt
Source: https://www.symcon.de/en/service/documentation/command-reference/management-events/
## IPS_CreateEvent
Source: https://www.symcon.de/en/service/documentation/command-reference/management-events/ips-createevent/
`int IPS_CreateEvent(int $EventType)`
create a new event
**Parameters**
- `$EventType` (int)
| Value | Description |
| ----- | ------------------------------- |
| 0 | creates a __"triggered"__ event |
| 1 | creates a __"cyclical"__ event |
**Returns** (int): ID of the newly created event
| Value | Description |
| ----- | ------------------------------- |
| 0 | creates a __"triggered"__ event |
| 1 | creates a __"cyclical"__ event |
**Example**
```php
$eid = IPS_CreateEvent(0); //triggered event
IPS_SetEventTrigger($eid, 1, 15754); //On change of variable with ID 15 754
IPS_SetParent($eid, $_IPS['SELF']); //Assigning the event
IPS_SetEventActive($eid, true); //Activate the event
eid = IPS_CreateEvent(1); //triggered event
IPS_SetEventCyclic($eid, 2, 1, 0, 3, 6); //Every day, every 6 hours
IPS_SetEventCyclicDateBounds($eid,
mktime(0, 0, 0, 12, 1, date("Y")),
mktime(0, 0, 0, 12, 31,date("Y"))); //1.12 - 31.12 of every year
IPS_SetEventCyclicTimeBounds($eid,
mktime(15, 0, 0),
mktime(23, 30, 0)); //15:00 till 23:30
IPS_SetParent($eid, $_IPS['SELF']); //Assigning the event
IPS_SetEventActive($eid, true); //Activate the event
// Required since IP-Symcon 6.0, if the event shall execute an automation (e.g. a PHP-Script)
IPS_SetEventAction($eid, '{7938A5A2-0981-5FE0-BE6C-8AA610D654EB}', []);
```
## IPS_DeleteEvent
Source: https://www.symcon.de/en/service/documentation/command-reference/management-events/ips-deleteevent/
`bool IPS_DeleteEvent(int $EventID)`
deletes an event
**Parameters**
- `$EventID` (int): ID of the event to be deleted
**Returns** (bool): If the command succeeds, it returns __TRUE__, otherwise __FALSE__.
ID of the event to be deleted
**Example**
```php
IPS_DeleteEvent($EventID);
```
## IPS_EventExists
Source: https://www.symcon.de/en/service/documentation/command-reference/management-events/ips-eventexists/
`bool IPS_EventExists(int $EventID)`
checks if an event exists
**Parameters**
- `$EventID` (int): ID of the event to be tested
**Returns** (bool): If the EventID exists in the system, __TRUE__ is returned, otherwise __FALSE__.
ID of the event to be tested
**Example**
```php
if (IPS_EventExists(34881))
echo "A event with this ID exists!";
```
## IPS_GetEvent
Source: https://www.symcon.de/en/service/documentation/command-reference/management-events/ips-getevent/
`array IPS_GetEvent(int $EventID)`
_Requires Symcon >= 3.1_
returns extensive information about an event
**Parameters**
- `$EventID` (int): ID of the event
**Returns** (array): The following information are available as key => value pairs:
| Index | Type | Description |
| ------------------------------ | ------- | -------------------------------------------------------------------------------------------------------------------------------------------------------------------------------------------------------------------------------- |
| __CyclicDateType__ | integer | Date type. See [IPS_SetEventCyclic](https://www.symcon.de/en/llms/functions/management-events.md) |
| __CyclicDateValue__ | integer | Date interval. See [IPS_SetEventCyclic](https://www.symcon.de/en/llms/functions/management-events.md) |
| __CyclicDateDay__ | integer | Day of date. See [IPS_SetEventCyclic](https://www.symcon.de/en/llms/functions/management-events.md) |
| __CyclicDateDayValue__ | integer | Day of date, interval. See [IPS_SetEventCyclic](https://www.symcon.de/en/llms/functions/management-events.md) |
| __CyclicDateFrom__ | array | Unix Timestamp of the start day of the event, 0 = Always. See [IPS_SetEventCyclicDateBounds](https://www.symcon.de/en/llms/functions/management-events.md) |
| __CyclicDateTo__ | array | Unix Timestamp of final day of the event, 0 = Never. See [IPS_SetEventCyclicDateBounds](https://www.symcon.de/en/llms/functions/management-events.md) |
| __CyclicTimeType__ | integer | Time type. See [IPS_SetEventCyclic](https://www.symcon.de/en/llms/functions/management-events.md) |
| __CyclicTimeValue__ | integer | Time interval. See [IPS_SetEventCyclic](https://www.symcon.de/en/llms/functions/management-events.md) |
| __CyclicTimeFrom__ | array | Unix Timestamp of the start time for the event, 0 = Midnight. See [IPS_SetEventCyclicTimeBounds](https://www.symcon.de/en/llms/functions/management-events.md) |
| __CyclicTimeTo__ | array | Unix timestamp of the end time for the event, 0 = Midnight. See [IPS_SetEventCyclicTimeBounds](https://www.symcon.de/en/llms/functions/management-events.md) |
| __EventActionID__ | string | ID of the executed [Action](https://www.symcon.de/en/llms/concepts/automations.md) |
| __EventActionParameters__ | array | Parameter of the executed [Action](https://www.symcon.de/en/llms/concepts/automations.md) |
| __EventConditions__ | array | Array of conditions. See [IPS_SetEventCondition](https://www.symcon.de/en/llms/functions/management-events.md) and [IPS_SetEventConditionRule](https://www.symcon.de/en/llms/functions/management-events.md) |
| __EventID__ | integer | ID of the event |
| __EventLimit__ | integer | Remaining number of executions. 0 = No Limit |
| __EventScript__ | string | Always an empty string, since this field is only present for compatibility reasons. The execution is always controlled via the action, which is configured via [IPS_SetEventScheduleAction](https://www.symcon.de/en/llms/functions/management-events.md). |
| __EventActive__ | boolean | TRUE if the event is active |
| __EventType__ | integer | Event Type: (0: trigger 1: cyclic 2: schedule) |
| __LastRun__ | float | Unix timestamp of the last run, 0 = Never |
| __NextRun__ | float | Unix timestamp of the next run, 0 = Never |
| __LastActionID__ | integer | Action ID from the weekly schedule of the last execution, 0 = No action was executed |
| __NextActionID__ | integer | Action ID from the weekly schedule for the next execution, 0 = No action will be executed next time |
| __ScheduleActions__ | array | Array of actions of the schedule. See [IPS_SetEventScheduleActionEx](https://www.symcon.de/en/llms/functions/management-events.md) |
| __ScheduleGroups__ | array | Array of groups with switch points of the schedule. See [IPS_SetEventScheduleGroup](https://www.symcon.de/en/llms/functions/management-events.md) and [IPS_SetEventScheduleGroupPoint](https://www.symcon.de/en/llms/functions/management-events.md) |
| __TriggerSubsequentExecution__ | boolean | Allow to run again in triggering without value change |
| __TriggerType__ | integer | Value for the trigger type: See [IPS_SetEventTrigger](https://www.symcon.de/en/llms/functions/management-events.md) |
| __TriggerValue__ | variant | Value that is used for the trigger check, depending on the used trigger type |
| __TriggerVariableID__ | integer | VariableID to be used as a trigger |
ID of the event
**Example**
```php
$EventID = 46413;
$EventInfo = IPS_GetEvent($EventID);
print_r($EventInfo);
/* returns e.g.:
Array
(
[EventID] => 41227
[EventType] => 2
[EventActive] => 1
[EventLimit] => 0
[EventConditions] => Array
(
[0] => Array
(
[ID] => 0
[ParentID] => 0
[VariableRules] => Array
(
[0] => Array
(
[ID] => 1
[VariableID] => 29025
[Comparison] => 4
[Value] => 500
)
)
[DateRules] => Array
(
[0] => Array
(
[ID] => 0
[Comparison] => 0
[Value] => Array
(
[Day] => 8
[Month] => 8
[Year] => 2001
)
)
[1] => Array(3)
(
[ID] => 1
[Comparison] => 4
[Value] => Array
(
[Day] => 1
[Month] => 1
[Year] => 2021
)
)
)
[TimeRules] => Array
(
[0] => Array
(
[ID] => 1
[Comparison] => 3
[Value] => Array
(
[Hour] => 9
[Minute] => 0
[Second] => 0
)
)
[1] => Array
(
[ID] => 2
[Comparison] => 5
[Value] => Array
(
[Hour] => 17
[Minute] => 0
[Second] => 0
)
)
)
[DayOfTheWeekRules] => Array
(
[0] => Array
(
[ID] => 0
[Comparison] => 0
[Value] => 3
)
)
[Operation] => 1
)
)
[TriggerType] => 0
[TriggerVariableID] => 0
[TriggerValue] =>
[TriggerSubsequentExecution] =>
[CyclicDateType] => 0
[CyclicDateValue] => 0
[CyclicDateDay] => 0
[CyclicDateDayValue] => 0
[CyclicDateFrom] => Array
(
[Day] => 0
[Month] => 0
[Year] => 0
)
[CyclicDateTo] => Array
(
[Day] => 0
[Month] => 0
[Year] => 0
)
[CyclicTimeType] => 0
[CyclicTimeValue] => 0
[CyclicTimeFrom] => Array
(
[Hour] => 0
[Minute] => 0
[Second] => 0
)
[CyclicTimeTo] => Array
(
[Hour] => 0
[Minute] => 0
[Second] => 0
)
[ScheduleActions] => Array
(
[0] => Array
(
[ID] => 0
[Name] => Kalt
[Color] => 255
[ScriptText] =>
[ActionID] => {3644F802-C152-464A-868A-242C2A3DEC5C}
[ActionParameters] => Array
(
[VALUE] => 2
)
)
[1] => Array
(
[ID] => 1
[Name] => Warm
[Color] => 16711680
[ScriptText] =>
[ActionID] => {3644F802-C152-464A-868A-242C2A3DEC5C}
[ActionParameters] => Array
(
[VALUE] => 0
)
)
)
[ScheduleGroups] => Array
(
[0] => Array
(
[ID] => 0
[Days] => 127
[Points] => Array
(
[0] => Array
(
[ID] => 13
[Start] => Array
(
[Hour] => 0
[Minute] => 0
[Second] => 0
)
[ActionID] => 1
)
[1] => Array
(
[ID] => 14
[Start] => Array
(
[Hour] => 12
[Minute] => 0
[Second] => 0
)
[ActionID] => 0
)
)
)
)
[EventScript] =>
[LastRun] => 0
[NextRun] => 0
[LastActionID] => 0
[NextActionID] => 0
)
*/
```
## IPS_GetEventIDByName
Source: https://www.symcon.de/en/service/documentation/command-reference/management-events/ips-geteventidbyname/
`int IPS_GetEventIDByName(string $EventName, int $ParentID)`
determines the ID of an event by its name
**Parameters**
- `$EventName` (string): Name of the event
- `$ParentID` (int): Object whose child objects are searched for the event
**Returns** (int): ID of the found event, otherwise FALSE.
Object whose child objects are searched for the event
**Example**
```php
$EventID = @IPS_GetEventIDByName("TimerABC", $ParentID);
if ($EventID === false)
echo "Event not found!";
else
echo "The Event ID is: ". $EventID;
```
## IPS_GetEventList
Source: https://www.symcon.de/en/service/documentation/command-reference/management-events/ips-geteventlist/
`array IPS_GetEventList()`
returns a list of all existing events
**Returns** (array): An array of integer values of all IDs of the events in IP Symcon
The command determines the IDs of all registered events in IP Symcon. The IDs are listed in an array. If no event exists, the array is empty.
**Example**
```php
$allEvents = IPS_GetEventList();
print_r($allEvents);
/* returns e.g.:
Array
(
[0] => 37659
[1] => 18326
etc. ...
)
*/
```
## IPS_GetEventListByType
Source: https://www.symcon.de/en/service/documentation/command-reference/management-events/ips-geteventlistbytype/
`array IPS_GetEventListByType(int $EventType)`
returns a list of all events of a given type
**Parameters**
- `$EventType` (int)
| Value | Description |
| ----- | ------------------- |
| 0 | __triggered event__ |
| 1 | __cyclical event__ |
**Returns** (array): An array of integer values of all IDs of the event of the type __EventType__ in IP Symcon.
| Value | Description |
| ----- | ------------------- |
| 0 | __triggered event__ |
| 1 | __cyclical event__ |
**Example**
```php
$allEvents = IPS_GetEventListByType(1); // list only cyclical events
print_r($allEvents);
/* returns e.g.:
Array
(
[0] => 37659
[1] => 18326
etc. …
)
*/
```
## IPS_IsConditionPassing
Source: https://www.symcon.de/en/service/documentation/command-reference/management-events/ips-isconditionpassing/
`bool IPS_IsConditionPassing(string $Condition)`
_Requires Symcon >= 6.1_
checks if a condition is fulfilled
**Parameters**
- `$Condition` (string): A list of JSON encoded conditions in the format of [SelectCondition](https://www.symcon.de/en/llms/developer/sdk-tools/sdk-php/configuration-forms.md)
**Returns** (bool): __TRUE__, if the condition is fulfilled, otherwise __FALSE__
A list of JSON encoded conditions in the format of [SelectCondition](https://www.symcon.de/en/llms/developer/sdk-tools/sdk-php/configuration-forms.md)
**Example**
```php
if (IPS_IsConditionPassing($Condition)) {
// Only do something if the condition is fulfilled
};
```
## IPS_SetEventAction
Source: https://www.symcon.de/en/service/documentation/command-reference/management-events/ips-seteventaction/
`bool IPS_SetEventAction(int $EventID, string $ActionID, array $ActionParameters)`
_Requires Symcon >= 6.0_
set the executed action
**Parameters**
- `$EventID` (int): ID of the event to be changed
- `$ActionID` (string): ID of the executed action
- `$ActionParameters` (array): List of Parameters for the executed action
**Returns** (bool): If the command succeeds, it returns __TRUE__, otherwise __FALSE__.
List of Parameters for the executed action
**Example**
```php
// Multiply the target variable of the event by 3
IPS_SetEventAction($EreignisID, "{A3153696-013A-41B1-A001-5E8085D95465}", ["FACTOR" => 3]);
// Execute the target automation of the event
IPS_SetEventAction($EreignisID, "{7938A5A2-0981-5FE0-BE6C-8AA610D654EB}", []);
```
## IPS_SetEventActive
Source: https://www.symcon.de/en/service/documentation/command-reference/management-events/ips-seteventactive/
`bool IPS_SetEventActive(int $EventID, bool $Active)`
activates/deactivates an event
**Parameters**
- `$EventID` (int): ID of the event to be changed
- `$Active` (bool): Indicates whether the event should be activated (__TRUE__) or deactivated (__FALSE__)
**Returns** (bool): If the command succeeds, it returns __TRUE__, otherwise __FALSE__.
Indicates whether the event should be activated (__TRUE__) or deactivated (__FALSE__)
**Example**
```php
IPS_SetEventActive($EventID, true); // Activates the event
```
## IPS_SetEventCondition
Source: https://www.symcon.de/en/service/documentation/command-reference/management-events/ips-seteventcondition/
`bool IPS_SetEventCondition(int $EventID, int $ConditionID, int $ParentID, int $Operation)`
_Requires Symcon >= 4.4_
modifies the conditions of an event
**Parameters**
- `$EventID` (int): ID of the event to be changed
- `$ConditionID` (int): Unique ID for this condition. The root condition needs to have the ID 0. The ID only needs to be unique for this event.
- `$ParentID` (int): ID of the parent condition. On creation of the root condition, this parameter needs to be 0.
- `$Operation` (int)
| Value | Description |
| ----- | -------------------------- |
| 0 | AND |
| 1 | OR |
| 2 | NAND (not implemented yet) |
| 3 | NOR (not implemented yet) |
**Returns** (bool): If the command succeeds, it returns __TRUE__, otherwise __FALSE__.
| Value | Description |
| ----- | -------------------------- |
| 0 | AND |
| 1 | OR |
| 2 | NAND (not implemented yet) |
| 3 | NOR (not implemented yet) |
**Example**
```php
// Create root condition with the operation OR for event with ID 12345
IPS_SetEventCondition(12345, 0, 0, 1);
// Create a child condition with the operation AND
IPS_SetEventCondition(12345, 1, 0, 0);
// Delete child condition
IPS_SetEventCondition(12345, 1, -1, 0);
```
## IPS_SetEventConditionDateRule
Source: https://www.symcon.de/en/service/documentation/command-reference/management-events/ips-seteventconditiondaterule/
`bool IPS_SetEventConditionDateRule(int $EventID, int $ConditionID, int $RuleID, int $Comparison, int $Day, int $Month, int $Year)`
_Requires Symcon >= 4.4_
modifies the rule of a condition of an event for date comparisons
**Parameters**
- `$EventID` (int): ID of the event to be changed
- `$ConditionID` (int): ID of the condition that contains the rule
- `$RuleID` (int): Unique ID for this group. IDs need to be unique for this condition only.
- `$Comparison` (int)
| Wert | Beschreibung |
| ---- | ------------ |
| 0 | == |
| 1 | != |
| 2 | > |
| 3 | >= |
| 4 | < |
| 5 | <= |
- `$Day` (int): Day with which the current date is compared
- `$Month` (int): Month with which the current date is compared
- `$Year` (int): Year with which the current date is compared
**Returns** (bool): If the command succeeds, it returns __TRUE__, otherwise __FALSE__.
Year with which the current date is compared
**Example**
```php
//Add an AND condition
IPS_SetEventCondition(12345, 0, 0, 0)
// Adds / modifies the rule with the ID 2 for the event with the ObjectID 12345
// It is the first half of the year -> current date < 01.07.2018
IPS_SetEventConditionDateRule(12345, 0, 2, 4, 1, 7, 2018);
// Delete the rule with ID 1
IPS_SetEventConditionDateRule(12345, 0, 1, 0, -1, 0, 0);
```
## IPS_SetEventConditionDayOfTheWeekRule
Source: https://www.symcon.de/en/service/documentation/command-reference/management-events/ips-seteventconditiondayoftheweekrule/
`bool IPS_SetEventConditionDayOfTheWeekRule(int $EventID, int $ConditionID, int $RuleID, int $Comparison, int $Weekday)`
_Requires Symcon >= 5.2_
modifies the rule of a condition of an event for weekday comparisons
**Parameters**
- `$EventID` (int): ID of the event to be changed
- `$ConditionID` (int): ID of the condition that contains the rule
- `$RuleID` (int): Unique ID for this group. IDs need to be unique for this condition only.
- `$Comparison` (int)
| Value | Description |
| ----- | ----------- |
| 0 | == |
| 1 | != |
| 2 | > |
| 3 | >= |
| 4 | < |
| 5 | <= |
- `$Weekday` (int)
| Value | Description |
| ----- | ----------- |
| 0 | Delete |
| 1 | Monday |
| 2 | Tuesday |
| 3 | Wednesday |
| 4 | Thursday |
| 5 | Friday |
| 6 | Saturday |
| 7 | Sunday |
**Returns** (bool): If the command succeeds, it returns __TRUE__, otherwise __FALSE__.
| Value | Description |
| ----- | ----------- |
| 0 | Delete |
| 1 | Monday |
| 2 | Tuesday |
| 3 | Wednesday |
| 4 | Thursday |
| 5 | Friday |
| 6 | Saturday |
| 7 | Sunday |
**Example**
```php
//Add an AND condition
IPS_SetEventCondition(12345, 0, 0, 0)
// Adds / modifies the rule with the ID 2 for the event with the object ID 12345
// It is greater than or equal to Thursday i.e.: Thursday to Sunday included
IPS_SetEventConditionDayOfTheWeekRule(12345, 0, 2, 3, 4);
// Adds / modifies the rule with the ID 3 for the event with the object ID 12345
// It is unequal to Sunday
IPS_SetEventConditionDayOfTheWeekRule(12345, 0, 3, 1, 7);
// Delete the rule with ID 2
IPS_SetEventConditionDayOfTheWeekRule(12345, 0, 2, 0, 0);
```
## IPS_SetEventConditionTimeRule
Source: https://www.symcon.de/en/service/documentation/command-reference/management-events/ips-seteventconditiontimerule/
`bool IPS_SetEventConditionTimeRule(int $EventID, int $ConditionID, int $RuleID, int $Comparison, int $Hour, int $Minute, int $Second)`
_Requires Symcon >= 4.4_
modifies the rule of a condition of an event for time comparisons
**Parameters**
- `$EventID` (int): ID of the event to be changed
- `$ConditionID` (int): ID of the condition that contains the rule
- `$RuleID` (int): Unique ID for this group. IDs need to be unique for this condition only.
- `$Comparison` (int)
| Value | Description |
| ----- | ----------- |
| 0 | == |
| 1 | != |
| 2 | > |
| 3 | >= |
| 4 | < |
| 5 | <= |
- `$Hour` (int): Hour value (0..23) with which the current time is compared
- `$Minute` (int): Minute value (0..59) with which the current time is compared
- `$Second` (int): Second value (0..59) with which the current time is compared
**Returns** (bool): If the command succeeds, it returns __TRUE__, otherwise __FALSE__.
Second value (0..59) with which the current time is compared
**Example**
```php
// Create a root condition
IPS_SetEventCondition(12345, 0, 0, 0);
// Adds/modifies the rule with the ID 2 for the event with the object ID 12345
// It has to be exactly 10:30 p.m. for this rule to be met.
IPS_SetEventConditionTimeRule(12345, 0, 2, 1, 22, 30, 0);
// Delete the rule with ID 1
IPS_SetEventConditionTimeRule(12345, 0, 1, 0, -1, 0, 0);
```
## IPS_SetEventConditionVariableDynamicRule
Source: https://www.symcon.de/en/service/documentation/command-reference/management-events/ips-seteventconditionvariabledynamicrule/
`bool IPS_SetEventConditionVariableDynamicRule(int $EventID, int $ConditionID, int $RuleID, int $VariableID, int $Comparison, int $CompareVariableID)`
_Requires Symcon >= 6.1_
modify a static condition rule of an event for variable comparison
**Parameters**
- `$EventID` (int): ID of the event to be changed
- `$ConditionID` (int): ID of the condition that contains the rule
- `$RuleID` (int): Unique ID for this rule. IDs only need to be unique for this group.
- `$VariableID` (int): ID of the checked variable
- `$Comparison` (int)
| Value | Description |
| ----- | ----------- |
| 0 | == |
| 1 | != |
| 2 | > |
| 3 | >= |
| 4 | < |
| 5 | <= |
- `$CompareVariableID` (int): ID of the variable that the value should be compared to
**Returns** (bool): If the command succeeds, it returns __TRUE__, otherwise __FALSE__.
ID of the variable that the value should be compared to
**Example**
```php
// Create root condition for event with ID 12345
IPS_SetEventCondition(12345, 0, 0, 0);
// Add a rule with ID 2: Variable 23456 < Variable 34567
IPS_SetEventConditionVariableDynamicRule(12345, 0, 2, 23456, 4, 34567);
// Delete rule with ID 2
IPS_SetEventConditionVariableDynamicRule(12345, 0, 2, 0, 0, 0);
```
## IPS_SetEventConditionVariableRule
Source: https://www.symcon.de/en/service/documentation/command-reference/management-events/ips-seteventconditionvariablerule/
`bool IPS_SetEventConditionVariableRule(int $EventID, int $ConditionID, int $RuleID, int $VariableID, int $Comparison, mixed $Value)`
_Requires Symcon >= 4.4_
modify a condition rule of an event for variable comparison
**Parameters**
- `$EventID` (int): ID of the event to be changed
- `$ConditionID` (int): ID of the condition that contains the rule
- `$RuleID` (int): Unique ID for this rule. IDs only need to be unique for this group.
- `$VariableID` (int): ID of the checked variable
- `$Comparison` (int)
| Value | Description |
| ----- | ----------- |
| 0 | == |
| 1 | != |
| 2 | > |
| 3 | >= |
| 4 | < |
| 5 | <= |
- `$Value` (mixed): Value the checked variable is compared to
**Returns** (bool): If the command succeeds, it returns __TRUE__, otherwise __FALSE__.
Value the checked variable is compared to
**Example**
```php
// Create root condition for event with ID 12345
IPS_SetEventCondition(12345, 0, 0, 0);
// Add a rule with ID 2: Variable 23456 < 75
IPS_SetEventConditionVariableRule(12345, 0, 2, 23456, 4, 75);
// Delete rule with ID 2
IPS_SetEventConditionVariableRule(12345, 0, 2, 0, 0, 0);
```
## IPS_SetEventConditionVariableStaticRule
Source: https://www.symcon.de/en/service/documentation/command-reference/management-events/ips-seteventconditionvariablestaticrule/
`bool IPS_SetEventConditionVariableStaticRule(int $EventID, int $ConditionID, int $RuleID, int $VariableID, int $Comparison, mixed $Value)`
_Requires Symcon >= 6.1_
modify a static condition rule of an event for variable comparison
**Parameters**
- `$EventID` (int): ID of the event to be changed
- `$ConditionID` (int): ID of the condition that contains the rule
- `$RuleID` (int): Unique ID for this rule. IDs only need to be unique for this group.
- `$VariableID` (int): ID of the checked variable
- `$Comparison` (int)
| Value | Description |
| ----- | ----------- |
| 0 | == |
| 1 | != |
| 2 | > |
| 3 | >= |
| 4 | < |
| 5 | <= |
- `$Value` (mixed): Value the checked variable is compared to
**Returns** (bool): If the command succeeds, it returns __TRUE__, otherwise __FALSE__.
Value the checked variable is compared to
**Example**
```php
// Create root condition for event with ID 12345
IPS_SetEventCondition(12345, 0, 0, 0);
// Add a rule with ID 2: Variable 23456 < 75
IPS_SetEventConditionVariableStaticRule(12345, 0, 2, 23456, 4, 75);
// Delete rule with ID 2
IPS_SetEventConditionVariableStaticRule(12345, 0, 2, 0, 0, 0);
```
## IPS_SetEventCyclic
Source: https://www.symcon.de/en/service/documentation/command-reference/management-events/ips-seteventcyclic/
`bool IPS_SetEventCyclic(int $EventID, int $DateType, int $DateInterval, int $DateDay, int $DateDayInterval, int $TimeType, int $TimeInterval)`
configures a cyclic event
**Parameters**
- `$EventID` (int): ID of the event to be changed
- `$DateType` (int)
| Value | Description |
| ----- | -------------------------------------------------- |
| 0 | No date type. Daily execution. |
| 1 | Once. IPS_SetEventCyclicDateBounds for target date |
| 2 | Daily |
| 3 | Weekly |
| 4 | Monthly |
| 5 | Annually |
- `$DateInterval` (int)
| Value | Description |
| ----- | ----------------------------- |
| 0 | 0 (No Evaluation) |
| 1 | 0 (No Evaluation) |
| 2 | Every X days |
| 3 | Every X weeks |
| 4 | Every X months |
| 5 | 1 = January ... 12 = December |
- `$DateDay` (int)
| Value | Description |
| ----- | ---------------------------------------------------------------- |
| 0 | 0 (No Evaluation) |
| 1 | 0 (No Evaluation) |
| 2 | 0 (No Evaluation) |
| 3 | see table: Daily values (desired daily values must be added) |
| 4 | see table: Daily values, 0 for every __Xth__ day of the month |
| 5 | 0 (No Evaluation) |
_Table: Daily values_
| Day | Value |
| --------- | ----- |
| Monday | 1 |
| Tuesday | 2 |
| Wednesday | 4 |
| Thursday | 8 |
| Friday | 16 |
| Saturday | 32 |
| Sunday | 64 |
- `$DateDayInterval` (int)
| Value | Description |
| ----- | --------------------------------------------------------------------------------------- |
| 0 | 0 (No Evaluation) |
| 1 | 0 (No Evaluation) |
| 2 | 0 (No Evaluation) |
| 3 | 0 (No Evaluation) |
| 4 | Every __Xth DateDay__ of the month or every __Xth__ day of the month if __DateDay__ = 0 |
| 5 | Every __Xth__ day of the specified month |
- `$TimeType` (int)
| Value | Description |
| ----- | ----------------------------------------------------------------------------------------- |
| 0 | Once. [IPS_SetEventCyclicTimeBounds](https://www.symcon.de/en/llms/functions/management-events.md) for target time |
| 1 | every second |
| 2 | every minute |
| 3 | hourly |
- `$TimeInterval` (int)
| Value | Description |
| ----- | ------------------- |
| 0 | 0 (No Evaluation) |
| 1 | Every __X__ seconds |
| 2 | Every __X__ minutes |
| 3 | Every __X__ hours |
**Returns** (bool): If the command succeeds, it returns __TRUE__, otherwise __FALSE__.
| Value | Description |
| ----- | ------------------- |
| 0 | 0 (No Evaluation) |
| 1 | Every __X__ seconds |
| 2 | Every __X__ minutes |
| 3 | Every __X__ hours |
**Example**
```php
IPS_SetEventCyclic($eid, 2, 1, 0, 0, 3, 6); //Every day all 6 hours
IPS_SetEventCyclic($eid, 0, 0, 0, 2, 2 ,2); //Every 2 minutes
IPS_SetEventCyclic($eid, 3, 2, 1+4, 0, 0, 0); //Every 2 weeks at Monday+Wednesday
IPS_SetEventCyclicTimeBounds($eid, mktime(15, 0, 0), 0); //always at 3 pm
```
## IPS_SetEventCyclicDateBounds
Source: https://www.symcon.de/en/service/documentation/command-reference/management-events/ips-seteventcyclicdatebounds/
`bool IPS_SetEventCyclicDateBounds(int $EventID, float $FromDate, float $ToDate)`
set the start and end date of a cyclic event (deprecated)
**Parameters**
- `$EventID` (int): ID of the cyclic event to be changed
- `$FromDate` (float): Date as a Unix timestamp
- `$ToDate` (float): Date as a Unix timestamp
**Returns** (bool): If the command succeeds, it returns __TRUE__, otherwise __FALSE__.
Date as a Unix timestamp
**Example**
```php
//Assign no start/ end date to the event.
IPS_SetEventCyclicDateBounds($EventID, 0, 0);
```
## IPS_SetEventCyclicDateFrom
Source: https://www.symcon.de/en/service/documentation/command-reference/management-events/ips-seteventcyclicdatefrom/
`bool IPS_SetEventCyclicDateFrom(int $EventID, int $Day, int $Month, int $Year)`
_Requires Symcon >= 3.1_
sets the start date
**Parameters**
- `$EventID` (int): ID of the cyclic event to be changed
- `$Day` (int): Start day (0, 1..31)
- `$Month` (int): Start month (0, 1..12)
- `$Year` (int): Start year (0, 1970..2038)
**Returns** (bool): If the command succeeds, it returns __TRUE__, otherwise __FALSE__.
Start year (0, 1970..2038)
**Example**
```php
//No start date for the event
IPS_SetEventCyclicDateFrom($EventID, 0, 0, 0);
```
## IPS_SetEventCyclicDateTo
Source: https://www.symcon.de/en/service/documentation/command-reference/management-events/ips-seteventcyclicdateto/
`bool IPS_SetEventCyclicDateTo(int $EventID, int $Day, int $Month, int $Year)`
_Requires Symcon >= 3.1_
sets the end date
**Parameters**
- `$EventID` (int): ID of the cyclic event to be changed
- `$Day` (int): End day (0, 1..31)
- `$Month` (int): End month (0, 1..12)
- `$Year` (int): End year (0, 1970..2038)
**Returns** (bool): If the command succeeds, it returns __TRUE__, otherwise __FALSE__.
End year (0, 1970..2038)
**Example**
```php
//Set 1st January 2020 as end date for the event
IPS_SetEventCyclicDateTo($EventID, 1, 1, 2020);
```
## IPS_SetEventCyclicTimeBounds
Source: https://www.symcon.de/en/service/documentation/command-reference/management-events/ips-seteventcyclictimebounds/
`bool IPS_SetEventCyclicTimeBounds(int $EventID, float $FromTime, float $ToTime)`
set the start and end time for a cyclic event (deprecated)
**Parameters**
- `$EventID` (int): ID of the cyclic event to be changed
- `$FromTime` (float): Time as a Unix timestamp
- `$ToTime` (float): Time as a Unix timestamp
**Returns** (bool): If the command succeeds, it returns __TRUE__, otherwise __FALSE__.
Time as a Unix timestamp
**Example**
```php
//Assign no start / end times to the event.
IPS_SetEventCyclicTimeBounds($EventID, 0, 0);
//Start event at 7:30
IPS_SetEventCyclicTimeBounds($EventID, mktime(7, 30, 0), 0);
```
## IPS_SetEventCyclicTimeFrom
Source: https://www.symcon.de/en/service/documentation/command-reference/management-events/ips-seteventcyclictimefrom/
`bool IPS_SetEventCyclicTimeFrom(int $EventID, int $Hour, int $Minute, int $Second)`
_Requires Symcon >= 3.1_
set the start time
**Parameters**
- `$EventID` (int): ID of the cyclic event to be changed
- `$Hour` (int): Start hour (0..23)
- `$Minute` (int): Start minute (0..59)
- `$Second` (int): Start second (0..59)
**Returns** (bool): If the command succeeds, it returns __TRUE__, otherwise __FALSE__.
Start second (0..59)
**Example**
```php
//Set 7:15:00 as start time
IPS_SetEventCyclicTimeFrom($EventID, 7, 15, 0);
```
## IPS_SetEventCyclicTimeTo
Source: https://www.symcon.de/en/service/documentation/command-reference/management-events/ips-seteventcyclictimeto/
`bool IPS_SetEventCyclicTimeTo(int $EventID, int $Hour, int $Minute, int $Second)`
_Requires Symcon >= 3.1_
sets the end time
**Parameters**
- `$EventID` (int): ID of the cyclic event to be changed
- `$Hour` (int): End hour (0..23)
- `$Minute` (int): End minute (0..59)
- `$Second` (int): End second (0..59)
**Returns** (bool): If the command succeeds, it returns __TRUE__, otherwise __FALSE__.
End second (0..59)
**Example**
```php
//No end time for the event
IPS_SetEventCyclicTimeTo($EventID, 0, 0, 0);
```
## IPS_SetEventLimit
Source: https://www.symcon.de/en/service/documentation/command-reference/management-events/ips-seteventlimit/
`bool IPS_SetEventLimit(int $EventID, int $Number)`
limits the amount of event calls
**Parameters**
- `$EventID` (int): ID of the event to be changed
- `$Number` (int): The number of executions before the event is deactivated. 0 = No Limit
**Returns** (bool): If the command succeeds, it returns __TRUE__, otherwise __FALSE__.
The number of executions before the event is deactivated. 0 = No Limit
**Example**
```php
IPS_SetEventLimit($EventID, 0); //No limitation
```
## IPS_SetEventScheduleAction
Source: https://www.symcon.de/en/service/documentation/command-reference/management-events/ips-seteventscheduleaction/
`bool IPS_SetEventScheduleAction(int $EventID, int $ScheduleActionID, string $Name, int $Color, string $ScriptContent)`
_Requires Symcon >= 3.2_
modifies the action table of a schedule event and set the action to "Execute PHP Code"
**Parameters**
- `$EventID` (int): ID of the event to be changed
- `$ScheduleActionID` (int): Unique ID for this schedule action. The ID is used for sorting. IDs only need to be unique for this event.
- `$Name` (string): Name of the given schedule action
- `$Color` (int): Color value as HTML color code, e.g., 0x0000FF for blue
- `$ScriptContent` (string): PHP code without PHP tags ( … ?\>)
**Returns** (bool): If the command succeeds, it returns __TRUE__, otherwise __FALSE__.
PHP code without PHP tags ( … ?\>)
**Example**
```php
//Creation of actions
IPS_SetEventScheduleAction($EventID, 0, "Warm", 0xFF0000, "FHT_SetTemperature(\$_IPS['TARGET'], 22.5);");
IPS_SetEventScheduleAction($EventID, 1, "Cold", 0x0000FF, "FHT_SetTemperature(\$_IPS['TARGET'], 17);");
IPS_SetEventScheduleAction($EventID, 2, "Eco", 0x00FF00, "FHT_SetTemperature(\$_IPS['TARGET'], 20);");
//Delete action with ID 2
IPS_SetEventScheduleAction($EventID, 2, "", 0, "");
```
## IPS_SetEventScheduleActionEx
Source: https://www.symcon.de/en/service/documentation/command-reference/management-events/ips-seteventscheduleactionex/
`bool IPS_SetEventScheduleActionEx(int $EventID, int $ScheduleActionID, string $Name, int $Color, string $ActionID, array $ActionParameters)`
_Requires Symcon >= 6.0_
modifies the action table of a schedule event
**Parameters**
- `$EventID` (int): ID of the event to be changed
- `$ScheduleActionID` (int): Unique ID for this schedule action. The ID is used for sorting. IDs only need to be unique for this event.
- `$Name` (string): Name of the given schedule action
- `$Color` (int): Color value as HTML color code, e.g., 0x0000FF for blue
- `$ActionID` (string): ID of the executed action
- `$ActionParameters` (array): List of Parameters for the executed action
**Returns** (bool): If the command succeeds, it returns __TRUE__, otherwise __FALSE__.
List of Parameters for the executed action
**Example**
```php
//Creating schedule actions
IPS_SetEventScheduleActionEx($EreignisID, 0, "Warm", 0xFF0000, "{3644F802-C152-464A-868A-242C2A3DEC5C}", ["VALUE" => 22.5]);
IPS_SetEventScheduleActionEx($EreignisID, 1, "Cold", 0xFF0000, "{3644F802-C152-464A-868A-242C2A3DEC5C}", ["VALUE" => 17]);
IPS_SetEventScheduleActionEx($EreignisID, 2, "Eco", 0xFF0000, "{3644F802-C152-464A-868A-242C2A3DEC5C}", ["VALUE" => 20]);
//Delete schedule action with the ID 2
IPS_SetEventScheduleAction($EreignisID, 2, "", 0, "", []);
```
## IPS_SetEventScheduleGroup
Source: https://www.symcon.de/en/service/documentation/command-reference/management-events/ips-seteventschedulegroup/
`bool IPS_SetEventScheduleGroup(int $EventID, int $GroupID, int $Days)`
_Requires Symcon >= 3.2_
modifies the grouping of days for a schedule event
**Parameters**
- `$EventID` (int): ID of the event to be changed
- `$GroupID` (int): Unique ID for this group. The ID is used for sorting. IDs only need to be unique for this event.
- `$Days` (int): Sum of the day values that belong to the group. The day values are found in the table in [IPS_SetEventCyclic](https://www.symcon.de/en/llms/functions/management-events.md).
**Returns** (bool): If the command succeeds, it returns __TRUE__, otherwise __FALSE__.
Sum of the day values that belong to the group. The day values are found in the table in [IPS_SetEventCyclic](https://www.symcon.de/en/llms/functions/management-events.md).
**Example**
```php
//Create schedule event
$EventID = IPS_CreateEvent(2);
//Create groups
IPS_SetEventScheduleGroup($EventID, 0, 31); //Mo - Fr (1 + 2 + 4 + 8 + 16)
IPS_SetEventScheduleGroup($EventID, 1, 96); //Sa + Su (32 + 64)
//Delete group with ID 1
IPS_SetEventScheduleGroup($EventID, 1, 0);
```
## IPS_SetEventScheduleGroupPoint
Source: https://www.symcon.de/en/service/documentation/command-reference/management-events/ips-seteventschedulegrouppoint/
`bool IPS_SetEventScheduleGroupPoint(int $EventID, int $GroupID, int $PointID, int $StartHour, int $StartMinute, int $StartSecond, int $ActionID)`
_Requires Symcon >= 3.2_
modify a switch point of the group of a schedule event
**Parameters**
- `$EventID` (int): ID of the event to be changed
- `$GroupID` (int): Unique ID for this group. The ID is used for sorting. IDs only need to be unique for this event.
- `$PointID` (int): Unique ID for this switch point. IDs only need to be unique for this group.
- `$StartHour` (int): Start hour (0..23)
- `$StartMinute` (int): Start minute (0..59)
- `$StartSecond` (int): Start second (0..59)
- `$ActionID` (int): ID of the action which should be executed at the start time. The ID needs to be valid.
**Returns** (bool): If the command succeeds, it returns __TRUE__, otherwise __FALSE__.
ID of the action which should be executed at the start time. The ID needs to be valid.
**Example**
```php
//Create switch points for the group with ID 0 (= Mo - Fr)
IPS_SetEventScheduleGroupPoint($EventID, 0, 0, 8, 0, 0, 0); //Call action with ID 0 (=Warm) at 8:00:00
IPS_SetEventScheduleGroupPoint($EventID, 0, 1, 22, 30, 0, 2); //Call action with ID 2 (=Eco) at 22:30:00
//Delete switch point with ID 1 from group with ID 0 (= Mo - Fr)
IPS_SetEventScheduleGroupPoint($EventID, 0, 1, -1, -1, -1, 0);
```
## IPS_SetEventScript
Source: https://www.symcon.de/en/service/documentation/command-reference/management-events/ips-seteventscript/
`bool IPS_SetEventScript(int $EventID, string $EventScript)`
set the action to "Execute PHP Code" and define the code to be executed
**Parameters**
- `$EventID` (int): ID of the event to be changed
- `$EventScript` (string): PHP code without PHP tags ( ... ?\>)
**Returns** (bool): If the command succeeds, it returns __TRUE__, otherwise __FALSE__.
PHP code without PHP tags ( ... ?\>)
**Example**
```php
//Assign the script content to the event
IPS_SetEventScript($EventID, "echo linked object: ".$_IPS['TARGET']);
```
## IPS_SetEventTrigger
Source: https://www.symcon.de/en/service/documentation/command-reference/management-events/ips-seteventtrigger/
`bool IPS_SetEventTrigger(int $EventID, int $TriggerType, int $TriggerVariableID)`
define the trigger for a trigger event
**Parameters**
- `$EventID` (int): ID of the event to be changed
- `$TriggerType` (int)
| Value | Description |
| ----- | ----------------------------------------------------------------------------------------------------------------------------------------- |
| 0 | On Variable Update |
| 1 | On Variable Change |
| 2 | On Limit Exceed - Value is determined by [IPS_SetEventTriggerValue](https://www.symcon.de/en/llms/functions/management-events.md) |
| 3 | On Limit Drop - Value is determined by [IPS_SetEventTriggerValue](https://www.symcon.de/en/llms/functions/management-events.md) |
| 4 | On specific Value - Value is determined by [IPS_SetEventTriggerValue](https://www.symcon.de/en/llms/functions/management-events.md) |
- `$TriggerVariableID` (int): VariableID on whose change or update should be responded
**Returns** (bool): If the command succeeds, it returns __TRUE__, otherwise __FALSE__.
VariableID on whose change or update should be responded
**Example**
```php
IPS_SetEventTrigger($EventID, 0, 12345); //OnUpdate for variable 12345
```
## IPS_SetEventTriggerSubsequentExecution
Source: https://www.symcon.de/en/service/documentation/command-reference/management-events/ips-seteventtriggersubsequentexecution/
`bool IPS_SetEventTriggerSubsequentExecution(string $EventID, bool $AllowSubsequentExecutions)`
define if a trigger event should multiple times fir exceed/drop
**Parameters**
- `$EventID` (string): ID of the event to be changed
- `$AllowSubsequentExecutions` (bool): __TRUE__ if permitted, otherwise __FALSE__
**Returns** (bool): If the command succeeds, it returns __TRUE__, otherwise __FALSE__.
__TRUE__ if permitted, otherwise __FALSE__
**Example**
```php
IPS_SetEventTriggerSubsequentExecution($EventID, true); //Allow
```
## IPS_SetEventTriggerValue
Source: https://www.symcon.de/en/service/documentation/command-reference/management-events/ips-seteventtriggervalue/
`bool IPS_SetEventTriggerValue(int $EventID, mixed $TriggerValue)`
set the value the trigger variable is compared to
**Parameters**
- `$EventID` (int): ID of the event to be changed
- `$TriggerValue` (mixed): Value/ type, depending on TriggerVariableID
**Returns** (bool): If the command succeeds, it returns __TRUE__, otherwise __FALSE__.
Value/ type, depending on TriggerVariableID
**Example**
```php
IPS_SetEventTriggerValue($EventID, true); //Trigger only for TRUE values
```
---
# Management of Instances
> Symcon documentation · English · generated on 2026-09-26
> Index: https://www.symcon.de/en/llms.txt
Source: https://www.symcon.de/en/service/documentation/command-reference/management-instances/
## Debug
Source: https://www.symcon.de/en/service/documentation/command-reference/management-instances/debug/
## IPS_DisableDebugFile
Source: https://www.symcon.de/en/service/documentation/command-reference/management-instances/debug/ips-disabledebugfile/
`bool IPS_DisableDebugFile(int $InstanceID)`
_Requires Symcon >= 5.2_
deactivates the writing of debug logs to a file
**Parameters**
- `$InstanceID` (int): Instance ID
**Returns** (bool): If the command succeeds, it returns __TRUE__, otherwise __FALSE__.
Instance ID
**Example**
```php
// Deactivates the writing of debug logs for instance 12345
IPS_DisableDebugFile(12345);
```
## IPS_EnableDebugFile
Source: https://www.symcon.de/en/service/documentation/command-reference/management-instances/debug/ips-enabledebugfile/
`bool IPS_EnableDebugFile(int $InstanceID)`
_Requires Symcon >= 5.2_
activates the writing of debug logs to a file
**Parameters**
- `$InstanceID` (int): Instance ID
**Returns** (bool): If the command succeeds, it returns __TRUE__, otherwise __FALSE__.
Instance ID
**Example**
```php
// Activates the writing of debug logs for instance 12345
IPS_EnableDebugFile(12345);
// filename
debug_12345.log
```
## IPS_CreateInstance
Source: https://www.symcon.de/en/service/documentation/command-reference/management-instances/ips-createinstance/
`int IPS_CreateInstance(string $ModuleID)`
creates an instance
**Parameters**
- `$ModuleID` (string): ModuleID of the object to create
**Returns** (int): ID of the newly created instance
ModuleID of the object to create
**Example**
```php
//FS20 Create Instance
$InsID IPS_CreateInstance("{48FCFDC1-11A5-4309-BB0B-A0DB8042A969}");
IPS_SetName($InsID, "Standing lamp"); // Name instance
IPS_SetParent($InsID, 12345); // Sort instance under the object with ID "12345"
//Configuration
IPS_SetProperty($InsID, "HomeCode", "12345678"); //Change property "HomeCode"
IPS_ApplyChanges($InsID); //Apply changes -> The instance uses the changed HomeCode
```
## IPS_DeleteInstance
Source: https://www.symcon.de/en/service/documentation/command-reference/management-instances/ips-deleteinstance/
`bool IPS_DeleteInstance(int $InstanceID)`
deletes an instance
**Parameters**
- `$InstanceID` (int): ID of the instance to delete
**Returns** (bool): If the command succeeds, it returns __TRUE__, otherwise __FALSE__.
ID of the instance to delete
**Example**
```php
// Delete the Instance 47788
IPS_DeleteInstance(47788);
```
## IPS_GetInstance
Source: https://www.symcon.de/en/service/documentation/command-reference/management-instances/ips-getinstance/
`array IPS_GetInstance(int $InstanceID)`
returns extensive information about a specific instance
**Parameters**
- `$InstanceID` (int): InstanceID to be returned
**Returns** (array): The following information is available as key => value pairs:
| Index | Type | Description |
| ----------------------------- | ------- | ------------------------------------------------------------- |
| __InstanceID__ | integer | InstanceID |
| __ConnectionID__ | integer | ID of the connected instance |
| __InstanceStatus__ | integer | Status code of the instance |
| __InstanceSupportsSearching__ | boolean | Does the instance support the search mode |
| __InstanceIsSearching__ | boolean | Instance is in search mode |
| __InstanceChanged__ | integer | Unix Timestamp of the last application of configuration |
| __ModuleInfo__ | array | Module Information |
### Status of Instance
| Code | Status |
| ----- | ----------------------------- |
| 101 | Instance will be created |
| 102 | Instance is activ |
| 103 | Instance will be deleted |
| 104 | Instance is inactiv |
| 105 | Instance was not created |
| 106 | Instance is in standby |
| >=200 | Instance is marked als faulty |
### Module Information
| Index | Type | Description |
| ---------- | ------- | ----------------------------------------------------------------------------------------------------------------- |
| ModuleID | string | ModuleID of Instance |
| ModuleName | string | ModuleName of Instance |
| ModuleType | integer | ModuleType of Instance (0: Core, 1: I/O, 2: Splitter, 3: Device, 4: Configurator, 5: Discovery, 6: Visualization) |
InstanceID to be returned
**Example**
```php
print_r(IPS_GetInstance(19668));
/* returns e.g.:
Array
(
[InstanceID] => 19668
[InstanceStatus] => 102
[LastChange] => 0
[ModuleInfo] => Array
(
[ModuleID] => {48FCFDC1-11A5-4309-BB0B-A0DB8042A969}
[ModuleName] => FS20
[ModuleType] => 3
)
[ConnectionID] => 29416
)
*/
```
## IPS_GetInstanceIDByName
Source: https://www.symcon.de/en/service/documentation/command-reference/management-instances/ips-getinstanceidbyname/
`int IPS_GetInstanceIDByName(string $InstanceName, int $ParentID)`
returns the ID of an instance by its name
**Parameters**
- `$InstanceName` (string): Name of the searched instance
- `$ParentID` (int): Object whose child objects are searched
**Returns** (int): ID of the found instance, otherwise __FALSE__
Object whose child objects are searched
**Example**
```php
$InstanceID = @IPS_GetInstanceIDByName("Rainfall", $ParentID);
if ($InstanceID === false)
echo "Instance not found!";
else
echo "The Instance ID is: ". $InstanceID;
```
## IPS_GetInstanceList
Source: https://www.symcon.de/en/service/documentation/command-reference/management-instances/ips-getinstancelist/
`array IPS_GetInstanceList()`
returns a list of all existing instances
**Returns** (array): An array of integer values of all IDs of the instances in IP-Symcon
The command determines the IDs of all registered IPS instances in IP-Symcon. The IDs are listed in an array. If no instance exists, the array is empty.
**Example**
```php
$allInstances = IPS_GetInstanceList();
print_r($allInstances);
/* returns e.g.:
Array
(
[0] => 37659
[1] => 18326
etc. ...
*/
```
## IPS_GetInstanceListByModuleID
Source: https://www.symcon.de/en/service/documentation/command-reference/management-instances/ips-getinstancelistbymoduleid/
`array IPS_GetInstanceListByModuleID(string $ModuleID)`
returns all instances with a specific module ID
**Parameters**
- `$ModuleID` (string): ModuleID of the instances to be returned
**Returns** (array): An array of integer values of all found IDs
ModuleID of the instances to be returned
**Example**
```php
//FS20 Transmitter
$guid = "{48FCFDC1-11A5-4309-BB0B-A0DB8042A969}";
//List
print_r(IPS_GetInstanceListByModuleID($guid));
```
## IPS_GetInstanceListByModuleType
Source: https://www.symcon.de/en/service/documentation/command-reference/management-instances/ips-getinstancelistbymoduletype/
`array IPS_GetInstanceListByModuleType(int $ModuleType)`
returns a list of all instances with a specific type
**Parameters**
- `$ModuleType` (int)
| Wert | Beschreibung |
| ---- | -------------- |
| 0 | Kern |
| 1 | I/O |
| 2 | Splitter |
| 3 | Geräte |
| 4 | Konfigurator |
| 5 | Discovery |
| 6 | Visualisierung |
**Returns** (array): An array of integer values of all IDs of the instances of the type __InstanceType__ in IP Symcon
| Wert | Beschreibung |
| ---- | -------------- |
| 0 | Kern |
| 1 | I/O |
| 2 | Splitter |
| 3 | Geräte |
| 4 | Konfigurator |
| 5 | Discovery |
| 6 | Visualisierung |
**Example**
```php
$allInstances = IPS_GetInstanceListByModuleType(1); // lists only I/O Instances
print_r($allInstances);
/* returns e.g.:
Array
(
[0] => 37659
[1] => 18326
etc. ...
*/
```
## IPS_InstanceExists
Source: https://www.symcon.de/en/service/documentation/command-reference/management-instances/ips-instanceexists/
`bool IPS_InstanceExists(int $InstanceID)`
checks if a specific instance exists
**Parameters**
- `$InstanceID` (int): ID of the Instance to be tested
**Returns** (bool): If the InstanceID exists in the system, __TRUE__ is returned, otherwise __FALSE__.
ID of the Instance to be tested
**Example**
```php
if (IPS_InstanceExists(45724))
echo "Instance already exists!";
```
## Configuration
Source: https://www.symcon.de/en/service/documentation/command-reference/management-instances/configuration/
## IPS_ApplyChanges
Source: https://www.symcon.de/en/service/documentation/command-reference/management-instances/configuration/ips-applychanges/
`bool IPS_ApplyChanges(int $InstanceID)`
applies a changed configuration
**Parameters**
- `$InstanceID` (int): ID of the instance
**Returns** (bool): If the command succeeds, it returns __TRUE__, otherwise __FALSE__.
ID of the instance
**Example**
```php
if(IPS_HasChanges(12345))
{
IPS_ApplyChanges(12345);
}
```
## IPS_GetConfiguration
Source: https://www.symcon.de/en/service/documentation/command-reference/management-instances/configuration/ips-getconfiguration/
`string IPS_GetConfiguration(int $InstanceID)`
_Requires Symcon >= 2.7_
reads a configuration
**Parameters**
- `$InstanceID` (int): ID of the instance
**Returns** (string): If the command is executed successfully, it returns the configuration of the instance as string.
ID of the instance
**Example**
```php
// Read the configuration of instance 12345 and output it via "echo".
$config = IPS_GetConfiguration(12345);
echo $config;
// Examplary output of a ModBus instance
{"DataType":3,"WriteAddress":0,"ReadAddress":0,"Poller":3600000,"ReadOnly":false,"EmulateStatus":true,"Factor":0.0}
```
## IPS_GetConfigurationForm
Source: https://www.symcon.de/en/service/documentation/command-reference/management-instances/configuration/ips-getconfigurationform/
`string IPS_GetConfigurationForm(int $InstanceID)`
_Requires Symcon >= 2.7_
reads a configuration form
**Parameters**
- `$InstanceID` (int): ID of the instance
**Returns** (string): If the command is executed successfully, it returns the configuration form of the instance as JSON coded string.
ID of the instance
**Example**
```php
// Read the configuration form of instance 12345 and output it
$configpage = json_decode(IPS_GetConfigurationForm(12345));
var_dump ($configpage->elements);
// Examplary output
array(2) {
[0]=>
object(stdClass)#2 (2) {
["type"]=>
string(5) "Label"
["label"]=>
string(28) "Minimum needed daily changes"
}
[1]=>
object(stdClass)#3 (3) {
["type"]=>
string(13) "NumberSpinner"
["name"]=>
string(19) "RequiredSwitchCount"
["caption"]=>
string(5) "Count"
}
}
```
## IPS_GetProperty
Source: https://www.symcon.de/en/service/documentation/command-reference/management-instances/configuration/ips-getproperty/
`mixed IPS_GetProperty(int $InstanceID, string $Property)`
_Requires Symcon >= 2.7_
reads the current value of a property
**Parameters**
- `$InstanceID` (int): ID of the instance
- `$Property` (string): Name of the property
**Returns** (mixed): Current value of the property
Name of the property
**Example**
```php
echo IPS_GetProperty($id, "Open"); // Is the I/O instance active?
```
## IPS_HasChanges
Source: https://www.symcon.de/en/service/documentation/command-reference/management-instances/configuration/ips-haschanges/
`bool IPS_HasChanges(int $InstanceID)`
checks if the configuration was changed
**Parameters**
- `$InstanceID` (int): ID of the instance
**Returns** (bool): __TRUE__ if there are changes, otherwise __FALSE__
ID of the instance
**Example**
```php
if(IPS_HasChanges(12345))
IPS_ApplyChanges(12345);
```
## IPS_ResetChanges
Source: https://www.symcon.de/en/service/documentation/command-reference/management-instances/configuration/ips-resetchanges/
`bool IPS_ResetChanges(int $InstanceID)`
resets the modified configuration to the current configuration
**Parameters**
- `$InstanceID` (int): ID of the instance
**Returns** (bool): If the command succeeds, it returns __TRUE__, otherwise __FALSE__.
ID of the instance
**Example**
```php
if(IPS_HasChanges(12345))
{
IPS_ResetChanges(12345);
}
```
## IPS_SetConfiguration
Source: https://www.symcon.de/en/service/documentation/command-reference/management-instances/configuration/ips-setconfiguration/
`bool IPS_SetConfiguration(int $InstanceID, string $Configuration)`
_Requires Symcon >= 2.7_
set a new configuration
**Parameters**
- `$InstanceID` (int): ID of the instance
- `$Configuration` (string): The configuration as string
**Returns** (bool): If the command succeeds, it returns __TRUE__, otherwise __FALSE__.
The configuration as string
**Example**
```php
// Set the configuration for the ModBus instance with the ID 12345
IPS_SetConfiguration(12345, '{"DataType":3,"WriteAddress":1,"ReadAddress":0,"Poller":3600000,"ReadOnly":false,"EmulateStatus":true,"Factor":0.0}');
IPS_ApplyChanges(12345); // Apply new configuration
```
## IPS_SetProperty
Source: https://www.symcon.de/en/service/documentation/command-reference/management-instances/configuration/ips-setproperty/
`bool IPS_SetProperty(int $InstanceID, string $Property, mixed $Value)`
_Requires Symcon >= 2.7_
set a planned value for a property
**Parameters**
- `$InstanceID` (int): ID of the instance
- `$Property` (string): Name of the property
- `$Value` (mixed): New planned value of the property
**Returns** (bool): If the command succeeds, it returns __TRUE__, otherwise __FALSE__.
New planned value of the property
**Example**
```php
IPS_SetProperty($id, "Open", true); // I/O instance should be active
IPS_ApplyChanges($id); // Apply new configuration
// For creating this table
$moduleID) {
//create
$iids = IPS_GetInstanceListByModuleID($moduleID);
if (sizeof($iids) > 0) {
$iid = $iids[0];
}
else {
$iid = IPS_CreateInstance($moduleID);
}
$properties = json_decode(IPS_GetConfiguration($iid), true);
ksort($properties, SORT_STRING | SORT_FLAG_CASE);
//build text
echo "__" . $moduleName . "__" . PHP_EOL;
echo PHP_EOL;
echo "Property | Type | Default Value" . PHP_EOL;
echo "-------------------------- | ------- | --------------------" . PHP_EOL;
foreach($properties as $key => $value) {
if ($moduleName == "WebServer") {
switch($key) {
case "Certificate":
case "DHParameters":
case "PrivateKey":
$value = "_removed_";
break;
}
}
echo str_pad($key, 27) . "| " . str_pad(gettype($value), 8) . "| ". $value . PHP_EOL;
}
echo PHP_EOL;
echo PHP_EOL;
//cleanup
$childrenIDs = IPS_GetChildrenIDs($iid);
foreach($childrenIDs as $childrenID) {
IPS_DeleteVariable($childrenID);
}
IPS_DeleteInstance($iid);
}
```
## References
Source: https://www.symcon.de/en/service/documentation/command-reference/management-instances/references/
## IPS_GetReferenceList
Source: https://www.symcon.de/en/service/documentation/command-reference/management-instances/references/ips-getreferencelist/
`array IPS_GetReferenceList(int $InstanceID)`
returns the IDs of all references
**Parameters**
- `$InstanceID` (int): Instance ID
**Returns** (array): An array of integer values of all IDs of the referenced objects
Instance ID
**Example**
```php
IPS_GetReferenceList(12345);
```
## Status Variables
Source: https://www.symcon.de/en/service/documentation/command-reference/management-instances/status-variables/
> **Warning:** The documentation of this function only for compatibility reasons and should not be used in IPSymcon 2.5 and newer versions. Since version 2.5, the functionality is only emulated and should be replaced by other functions. Since version 4.0, these functions can only be accessed if the [Special Switch](https://www.symcon.de/en/llms/developer/special-switches.md) "Compatibility Functions" is activated.
> **Note:** Since version 2.5 all objects have the field "Ident" which can be used by the function [IPS_GetObjectIDByIdent](https://www.symcon.de/en/llms/functions/management-objects.md).
Status variables are normal IP-Symcon variables that are tied to an instance. Status variables are marked as "Read Only" and cannot be modified by scripts. They can only be changed by the tied instance.
Unlike regular variables, status variables are uniquely identifiable with their instance and unchangeable name. This method should be preffered to using object names as these can be changed by the user and can be different in every IP-Symcon environment.
In contrast, the status variables can be accessed via VariableIdents which enables access independently of the environment.
To access status variables, the function [IPS_GetObjectIDByIdent](https://www.symcon.de/en/llms/functions/management-objects.md) should be used.
## Connection
Source: https://www.symcon.de/en/service/documentation/command-reference/management-instances/connection/
## IPS_ConnectInstance
Source: https://www.symcon.de/en/service/documentation/command-reference/management-instances/connection/ips-connectinstance/
`bool IPS_ConnectInstance(int $InstanceID, int $ParentID)`
creates a (data) connection between two instances
**Parameters**
- `$InstanceID` (int): ID of the instance
- `$ParentID` (int): ID of the newly connected instance
**Returns** (bool): If the command succeeds, it returns __TRUE__, otherwise __FALSE__.
ID of the newly connected instance
**Example**
```php
IPS_ConnectInstance(12345, 23456);
```
## IPS_DisconnectInstance
Source: https://www.symcon.de/en/service/documentation/command-reference/management-instances/connection/ips-disconnectinstance/
`bool IPS_DisconnectInstance(int $InstanceID)`
disconnects a (data) connection between two instances
**Parameters**
- `$InstanceID` (int): ID of the instance
**Returns** (bool): If the command succeeds, it returns __TRUE__, otherwise __FALSE__.
ID of the instance
**Example**
```php
IPS_DisconnectInstance(12345);
```
## IPS_GetCompatibleInstances
Source: https://www.symcon.de/en/service/documentation/command-reference/management-instances/connection/ips-getcompatibleinstances/
`bool IPS_GetCompatibleInstances(int $InstanceID)`
returns compatible instances to an instance
**Parameters**
- `$InstanceID` (int): ID of the instance
**Returns** (bool): Array of integer values for all compatible InstanceIDs to the __InstanceID__
ID of the instance
**Example**
```php
print_r(IPS_GetCompatibleInstances(12345));
/* returns e.g.:
Array
(
[0] => 22222
[1] => 33333
[2] => 44444
[3] => 55555
etc. ...
)
*/
```
## IPS_IsInstanceCompatible
Source: https://www.symcon.de/en/service/documentation/command-reference/management-instances/connection/ips-isinstancecompatible/
`bool IPS_IsInstanceCompatible(int $InstanceID, int $ParentID)`
checks if a connection between two instances is possible
**Parameters**
- `$InstanceID` (int): ID of the instance
- `$ParentID` (int): ID of the potential parent instance
**Returns** (bool): __TRUE__ if the instance is compatible, otherwise __FALSE__
ID of the potential parent instance
**Example**
```php
if (IPS_IsInstanceCompatible(12345, 23456))
echo "Instance is compatible to another instance!";
```
---
# Management of Categories
> Symcon documentation · English · generated on 2026-09-26
> Index: https://www.symcon.de/en/llms.txt
Source: https://www.symcon.de/en/service/documentation/command-reference/management-categories/
## IPS_CategoryExists
Source: https://www.symcon.de/en/service/documentation/command-reference/management-categories/ips-categoryexists/
`bool IPS_CategoryExists(int $CategoryID)`
checks if a category exists
**Parameters**
- `$CategoryID` (int): ID of the category to be tested
**Returns** (bool): If the CategoryID exists in the system, __TRUE__ is returned, otherwise __FALSE__.
ID of the category to be tested
**Example**
```php
if (IPS_CategoryExists(45724))
echo "Category already exists!";
```
## IPS_CreateCategory
Source: https://www.symcon.de/en/service/documentation/command-reference/management-categories/ips-createcategory/
`int IPS_CreateCategory()`
creates a new category
**Returns** (int): ID of the newly created category
This command creates a new category. No parameters are required. After the commands execution, a new category appears in the category tree of IP Symcon. The category is intially named "Unnamed Object (ID: 12345)" or similar, depending on its ID. The command [IPS_SetName](https://www.symcon.de/en/llms/functions/management-objects.md) can be used to provide a meaningful name to the new category.
If the category is meant to be a subcategory, it can be moved to its designated parent by using the command [IPS_SetParent](https://www.symcon.de/en/llms/functions/management-objects.md).
The function returns an ID that can clearly identify the generated category.
**Example**
```php
// Create a new category called "Rain sensing"
$CatID = IPS_CreateCategory(); // Creating a Category
IPS_SetName($CatID, "Rain sensing"); // Category name
```
## IPS_DeleteCategory
Source: https://www.symcon.de/en/service/documentation/command-reference/management-categories/ips-deletecategory/
`bool IPS_DeleteCategory(int $CategoryID)`
deletes an existing category
**Parameters**
- `$CategoryID` (int): ID of the category to be deleted
**Returns** (bool): If the command succeeds, it returns __TRUE__, otherwise __FALSE__.
ID of the category to be deleted
**Example**
```php
// Delete the category 47788
IPS_DeleteCategory(47788);
```
## IPS_GetCategoryIDByName
Source: https://www.symcon.de/en/service/documentation/command-reference/management-categories/ips-getcategoryidbyname/
`int IPS_GetCategoryIDByName(string $CategoryName, int $ParentID)`
searches and returns the ID of an existing category by its name
**Parameters**
- `$CategoryName` (string): Name of the searched category
- `$ParentID` (int): Object whose child objects are searched
**Returns** (int): ID of the found category, otherwise __FALSE__
Object whose child objects are searched
**Example**
```php
$CatID = @IPS_GetCategoryIDByName("Rain Sensing ", $ParentID);
if ($CatID === false)
echo "Category not found!";
else
echo "The Category ID is: ". $CatID;
```
## IPS_GetCategoryList
Source: https://www.symcon.de/en/service/documentation/command-reference/management-categories/ips-getcategorylist/
`array IPS_GetCategoryList()`
returns a list of all existing categories
**Returns** (array): An array that contains all IDs of the categories in IP Symcon as integer values
The command determines the IDs of all categories within IP Symcon. The IDs are listed in an array. If no category exists, the array is empty.
**Example**
```php
$allCategories = IPS_GetCategoryList();
print_r($allCategories);
/* returns e.g.:
Array
(
[0] => 0
[1] => 37659
[2] => 18326
etc. ...
)
*/
```
---
# Management of Links
> Symcon documentation · English · generated on 2026-09-26
> Index: https://www.symcon.de/en/llms.txt
Source: https://www.symcon.de/en/service/documentation/command-reference/management-links/
## IPS_CreateLink
Source: https://www.symcon.de/en/service/documentation/command-reference/management-links/ips-createlink/
`int IPS_CreateLink()`
_Requires Symcon >= 2.1_
creates a new link
**Returns** (int): ID of the newly created link
The command creates a new link. It requires no parameters. After the execution a new link named "Unnamed Object (ID: 48490)" or similar, depending on the ID, appears in the category tree of IP Symcon. The command [IPS_SetName](https://www.symcon.de/en/llms/functions/management-objects.md) can be used to give a meaningful name to the new link. The name should not be used for identification. For this purpose, the ID should be preferred.
Furthermore, the link should be linked to another object. This can be done via the function [IPS_SetLinkTargetID](https://www.symcon.de/en/llms/functions/management-links.md).
The function returns an ID that can help to clearly identify the generated link.
**Example**
```php
//Creating a new category called "Rain sensing"
$LinkID = IPS_CreateLink(); //Create link
IPS_SetName($LinkID, "Rain sensing"); //Name the link
IPS_SetParent($LinkID, 12345); //Set a parent
IPS_SetLinkTargetID($LinkID, 54321); //Attach the link
```
## IPS_DeleteLink
Source: https://www.symcon.de/en/service/documentation/command-reference/management-links/ips-deletelink/
`bool IPS_DeleteLink(int $LinkID)`
_Requires Symcon >= 2.1_
deletes an existing link
**Parameters**
- `$LinkID` (int): ID of the link to be deleted
**Returns** (bool): If the command succeeds, it returns __TRUE__, otherwise __FALSE__.
ID of the link to be deleted
**Example**
```php
//Delete the Link 47788
IPS_DeleteLink(47788);
```
## IPS_GetLink
Source: https://www.symcon.de/en/service/documentation/command-reference/management-links/ips-getlink/
`array IPS_GetLink(int $LinkID)`
_Requires Symcon >= 2.1_
retuns extensive information about a link
**Parameters**
- `$LinkID` (int): ID of the link
**Returns** (array): The following information are available as key => value pairs:
| Index | Type | Description |
| -------------------------- | ------- | --------------------------------------------------------------------------------------------------------------------------------------------------------------- |
| __LinkID__ | integer | ObjectID |
| __LinkChildID__(until 3.4) | integer | ID of the object with which this link is connected. See: [IPS_SetLinkTargetID](https://www.symcon.de/en/llms/functions/management-links.md) (since 4.0 permanently replaced by TargetID) |
| __TargetID__(since 2.6) | integer | ID of the object with which this link is connected. See: [IPS_SetLinkTargetID](https://www.symcon.de/en/llms/functions/management-links.md) |
ID of the link
**Example**
```php
//Since Version 4.0
print_r(IPS_GetLink(19668));
/* returns e.g.:
Array
(
[LinkID] => 19668
[TargetIDID] => 14444
)
*/
print_r(IPS_GetLinkCompatibility(19668));
/* returns e.g.:
Array
(
[LinkID] => 19668
[LinkChildID] => 14444
[TargetID] => 14444
)
*/
//Up to Version 3.4
print_r(IPS_GetLink(19668));
/* returns e.g.:
Array
(
[LinkID] => 19668
[LinkChildID] => 14444
[TargetID] => 14444
)
*/
```
## IPS_GetLinkIDByName
Source: https://www.symcon.de/en/service/documentation/command-reference/management-links/ips-getlinkidbyname/
`int IPS_GetLinkIDByName(string $LinkName, int $ParentID)`
_Requires Symcon >= 2.1_
returns the ID of a link by its name
**Parameters**
- `$LinkName` (string): Name of the link
- `$ParentID` (int): Object whose children are searched
**Returns** (int): ID of the found link otherwise FALSE
Object whose children are searched
**Example**
```php
$LinkID = @IPS_GetLinkIDByName("Linked rain sensing", $ParentID);
if ($LinkID === false)
echo "Link not found!";
else
echo "The Link ID is: ". $LinkID;
```
## IPS_GetLinkList
Source: https://www.symcon.de/en/service/documentation/command-reference/management-links/ips-getlinklist/
`array IPS_GetLinkList()`
_Requires Symcon >= 2.1_
returns a list of all existing links
**Returns** (array): An array of all IDs of links in IP-Symcon presented as integer.
The command determines the IDs of all available links in IP-Symcon. The IDs are listed in an array. If no link exists, the array is empty.
**Example**
```php
$allLinks = IPS_GetLinkList();
print_r($allLinks);
/* returns e.g.:
Array
(
[0] => 0
[1] => 37659
[2] => 18326
etc. ...
)
*/
```
## IPS_LinkExists
Source: https://www.symcon.de/en/service/documentation/command-reference/management-links/ips-linkexists/
`bool IPS_LinkExists(int $LinkID)`
_Requires Symcon >= 2.1_
checks if a link exists already
**Parameters**
- `$LinkID` (int): ID of the link to be checked
**Returns** (bool): If the LinkID exists in the system, __TRUE__ is returned, otherwise __FALSE__.
ID of the link to be checked
**Example**
```php
if (IPS_LinkExists(45724))
echo "Link exists!";
```
## IPS_SetLinkTargetID
Source: https://www.symcon.de/en/service/documentation/command-reference/management-links/ips-setlinktargetid/
`bool IPS_SetLinkTargetID(int $LinkID, int $LinkedObject)`
_Requires Symcon >= 2.6_
set the target for a link
**Parameters**
- `$LinkID` (int): ID of the Link
- `$LinkedObject` (int): ID of the target object for the link
**Returns** (bool): If the command succeeds, it returns __TRUE__, otherwise __FALSE__.
ID of the target object for the link
**Example**
```php
IPS_SetLinkTargetID($LinkID, 12345); //Refer to object 12345
```
---
# Management of Media
> Symcon documentation · English · generated on 2026-09-26
> Index: https://www.symcon.de/en/llms.txt
Source: https://www.symcon.de/en/service/documentation/command-reference/management-media/
## IPS_CreateMedia
Source: https://www.symcon.de/en/service/documentation/command-reference/management-media/ips-createmedia/
`int IPS_CreateMedia(int $MediaType)`
creates a new media object in the media pool
**Parameters**
- `$MediaType` (int)
| Value | Description |
| ----- | --------------------------- |
| 0 | creates an __IPSView Form__ |
| 1 | creates an __Image Object__ |
| 2 | creates a __Sound Object__ |
| 3 | creates a __Stream Object__ |
| 4 | creates a __Chart Object__ |
| 5 | creates a __Document Object__ |
**Returns** (int): ID of the newly created media object
| Value | Description |
| ----- | --------------------------- |
| 0 | creates an __IPSView Form__ |
| 1 | creates an __Image Object__ |
| 2 | creates a __Sound Object__ |
| 3 | creates a __Stream Object__ |
| 4 | creates a __Chart Object__ |
| 5 | creates a __Document Object__ |
**Example**
```php
$ImageFile = "C:\\Pictures\\Alarm_symbol.png"; // Image file
$MediaID = IPS_CreateMedia(1); // create the image in the media pool
IPS_SetMediaFile($MediaID, $ImageFile); // connect the image in the media pool with image file
IPS_SetName($MediaID, "Alarm"); // Name media object
IPS_SetParent($MediaID, 12345); // Sort object to its parent
```
## IPS_DeleteMedia
Source: https://www.symcon.de/en/service/documentation/command-reference/management-media/ips-deletemedia/
`bool IPS_DeleteMedia(int $MediaID, bool $DeleteFile)`
removes a media object from the media pool
**Parameters**
- `$MediaID` (int): ID of the media object to be deleted
- `$DeleteFile` (bool): __TRUE__ if the file should be deleted, __FALSE__ if the file should be moved to the 'deleted' folder.
**Returns** (bool): If the command succeeds, it returns __TRUE__, otherwise __FALSE__.
__TRUE__ if the file should be deleted, __FALSE__ if the file should be moved to the 'deleted' folder.
**Example**
```php
IPS_DeleteMedia($MediaID, true);
```
## IPS_GetMedia
Source: https://www.symcon.de/en/service/documentation/command-reference/management-media/ips-getmedia/
`array IPS_GetMedia(int $MediaID)`
returns extensive information about a specific media object
**Parameters**
- `$MediaID` (int): The ID of the media object
**Returns** (array): The following information are available as key => value pairs:
| Index | Type | Description |
| ------------------------------- | ------- | -------------------------------------------------------------------------------- |
| __IsAvailable__(up to 3.4) | boolean | TRUE if media file is available (replaced by MediaIsAvailable since version 4.0) |
| __IsLinked__(up to 3.4) | boolean | TRUE if the file is located outside the Media folder (removed since version 4.0) |
| __LastUpdate__(up to 3.4) | float | Unix timestamp of last update (replaced by MediaUpdated since version 4.0) |
| __MediaCRC__ | string | CRC32 of the file |
| __MediaFile__ | string | Path to the file |
| __MediaID__ | integer | MediaID |
| __MediaIsAvailable__(since 4.0) | boolean | TRUE if media file is available |
| __MediaSize__ | integer | Size in bytes |
| __MediaType__ | integer | Media Type (0: Form 1: Image 2: Sound 3: Stream 4: Chart, 5: Document) |
| __MediaUpdated__(since 4.0) | integer | Unix timestamp of last update |
| __SendEvent__(up to 3.4) | boolean | TRUE if automatic file changes should be sent (removed since version 4.0) |
The ID of the media object
**Example**
```php
// Since Version 4.0
print_r(IPS_GetMedia(45699));
/* returns e.g.:
Array
(
[MediaCRC] => E2D2C1D1
[MediaFile] => media\45699.bin
[MediaID] => 45699
[MediaIsAvailable] => 1
[MediaIsCached] =>
[MediaSize] => 8192
[MediaType] => 0
[MediaUpdated] => 1214421546
)
*/
print_r(IPS_GetMediaCompatibility(45699));
/* returns e.g.:
Array
(
[IsAvailable] => 1
[IsLinked] =>
[LastUpdate] => 1214421546
[MediaCRC] => E2D2C1D1
[MediaFile] => media\45699.bin
[MediaID] => 45699
[MediaSize] => 8192
[MediaType] => 0
[SendEvent] =>
)
*/
// Up to Version 3.4
print_r(IPS_GetMedia(45699));
/* returns e.g.:
Array
(
[IsAvailable] => 1
[IsLinked] =>
[LastUpdate] => 1214421546
[MediaCRC] => E2D2C1D1
[MediaFile] => media\45699.bin
[MediaID] => 45699
[MediaSize] => 8192
[MediaType] => 0
[SendEvent] =>
)
*/
```
## IPS_GetMediaContent
Source: https://www.symcon.de/en/service/documentation/command-reference/management-media/ips-getmediacontent/
`string IPS_GetMediaContent(int $MediaID)`
_Requires Symcon >= 3.1_
returns the content of a media object
**Parameters**
- `$MediaID` (int): ID of the media object whose content should be returned
**Returns** (string): Returns the content of the media object coded in Base64
ID of the media object whose content should be returned
**Example**
```php
$Content = base64_decode(IPS_GetMediaContent(12345));
```
## IPS_GetMediaID
Source: https://www.symcon.de/en/service/documentation/command-reference/management-media/ips-getmediaid/
`int IPS_GetMediaID(string $MediaName)`
returns the ID of a media object
**Parameters**
- `$MediaName` (string): Name of the searched media object
**Returns** (int): ID of the searched media object, 0 if no object is found
Name of the searched media object
**Example**
```php
$MediaID = IPS_GetMediaID("Rain");
if ($MediaID == 0)
echo "Media object not found!";
else
echo "The ID of the media object is ". $MediaID;
```
## IPS_GetMediaIDByFile
Source: https://www.symcon.de/en/service/documentation/command-reference/management-media/ips-getmediaidbyfile/
`int IPS_GetMediaIDByFile(string $MediaPath)`
return the ID of a media object by its file
**Parameters**
- `$MediaPath` (string): Relative media path as seen from main program path
**Returns** (int): ID of the searched media object, otherwise 0
Relative media path as seen from main program path
**Example**
```php
$MediaID = @IPS_GetMediaIDByFile("media\\help.png");
if ($MediaID == 0)
echo "Picture not found!";
else
echo "The Media ID is: ". $MediaID;
```
## IPS_GetMediaIDByName
Source: https://www.symcon.de/en/service/documentation/command-reference/management-media/ips-getmediaidbyname/
`int IPS_GetMediaIDByName(string $MediaName, int $ParentID)`
returns the ID of a media object by its name
**Parameters**
- `$MediaName` (string): Name of the searched media
- `$ParentID` (int): ID of the object whose children are searched for the media object
**Returns** (int): ID of the found media object, otherwise FALSE
ID of the object whose children are searched for the media object
**Example**
```php
$MediaID = @IPS_GetMediaIDByName("MyPicture", 12345);
if ($MediaID === false)
echo "Picture not found!";
else
echo "The Media ID is: ". $MediaID;
```
## IPS_GetMediaList
Source: https://www.symcon.de/en/service/documentation/command-reference/management-media/ips-getmedialist/
`array IPS_GetMediaList()`
returns a list of all media objects in the media pool
**Returns** (array): An array that contains all IDs of the media objects in IP Symcon as integers
The command determines the IDs of all registered media objects in the media pool. The IDs are listed in an array. If no media object exists, the array is empty.
The objects of all media types are listed. To restrict the array by a media type, the command [IPS_GetMediaListByType](https://www.symcon.de/en/llms/functions/management-media.md) can be used.
**Example**
```php
$allMediaObjects = IPS_GetMediaList();
print_r($allMediaObjects);
/* returns e.g.:
Array
(
[0] => 37659
[1] => 18326
etc. ...
*/
```
## IPS_GetMediaListByType
Source: https://www.symcon.de/en/service/documentation/command-reference/management-media/ips-getmedialistbytype/
`array IPS_GetMediaListByType(int $MediaType)`
returns a list of all media objects of a specific type
**Parameters**
- `$MediaType` (int)
| Value | Description |
| ----- | --------------- |
| 0 | IPSView Form |
| 1 | Image object |
| 2 | Sound object |
| 3 | Stream object |
| 4 | Chart object |
| 5 | Document object |
**Returns** (array): An array of integer values of all IDs of the media objects with the type __MediaType__ in IP Symcon.
| Value | Description |
| ----- | --------------- |
| 0 | IPSView Form |
| 1 | Image object |
| 2 | Sound object |
| 3 | Stream object |
| 4 | Chart object |
| 5 | Document object |
**Example**
```php
$allImageObjects = IPS_GetMediaListByType(1); // list only Image objects
print_r($allImageObjects);
/* returns e.g.:
Array
(
[0] => 37659
[1] => 18326
etc. ...
)
*/
```
## IPS_MediaExists
Source: https://www.symcon.de/en/service/documentation/command-reference/management-media/ips-mediaexists/
`bool IPS_MediaExists(int $MediaID)`
checks if a specific media object is contained within the media pool already
**Parameters**
- `$MediaID` (int): ID of the media object
**Returns** (bool): If the MediaID exists in the system, __TRUE__ is returned, otherwise __FALSE__.
ID of the media object
**Example**
```php
if (IPS_MediaExists(34881))
echo "A media object with this ID exists!";
```
## IPS_SendMediaEvent
Source: https://www.symcon.de/en/service/documentation/command-reference/management-media/ips-sendmediaevent/
`bool IPS_SendMediaEvent(int $MediaID)`
send a notification that a media object was changed
**Parameters**
- `$MediaID` (int): ID of the media object
**Returns** (bool): If the command succeeds, it returns __TRUE__, otherwise __FALSE__.
ID of the media object
**Example**
```php
IPS_SendMediaEvent(12345);
```
## IPS_SetMediaCached
Source: https://www.symcon.de/en/service/documentation/command-reference/management-media/ips-setmediacached/
`bool IPS_SetMediaCached(int $MediaID, bool $CacheActivated)`
activates that a media object is only modified in the internal memory
**Parameters**
- `$MediaID` (int): ID of the media object
- `$CacheActivated` (bool): __TRUE__, if the media object should only be modified in the cache, otherwise __FALSE__
**Returns** (bool): If the command succeeds, it returns __TRUE__, otherwise __FALSE__.
__TRUE__, if the media object should only be modified in the cache, otherwise __FALSE__
**Example**
```php
$MediaID = IPS_CreateMedia(1); // Create image within the media pool
IPS_SetMediaCached($MediaID, true);
// Caching is activated for the media object
// The object is read from the physical memory on the first access
// Future accesses are done in the internal memory only.
```
## IPS_SetMediaContent
Source: https://www.symcon.de/en/service/documentation/command-reference/management-media/ips-setmediacontent/
`bool IPS_SetMediaContent(int $MediaID, string $Content)`
_Requires Symcon >= 3.1_
set the content of a media object
**Parameters**
- `$MediaID` (int): ID of the media object whose content is set
- `$Content` (string): Base64 coded content
**Returns** (bool): If the command succeeds, it returns __TRUE__, otherwise __FALSE__.
Base64 coded content
**Example**
```php
$MediaID = IPS_CreateMedia(1); //Create image
IPS_SetMediaFile($MediaID, "BlackPixel.gif", False);
IPS_SetMediaContent($MediaID, "R0lGODlhAQABAIAAAAUEBAAAACwAAAAAAQABAAACAkQBADs=");
```
## IPS_SetMediaFile
Source: https://www.symcon.de/en/service/documentation/command-reference/management-media/ips-setmediafile/
`bool IPS_SetMediaFile(int $MediaID, string $FileName, bool $FileMustExist)`
bind a media file to a media object
**Parameters**
- `$MediaID` (int): ID of the media object
- `$FileName` (string): Filename/path of the file to link to
- `$FileMustExist` (bool): __TRUE__, if existence should be checked, otherwise __FALSE__
**Returns** (bool): If the command succeeds, it returns __TRUE__, otherwise __FALSE__.
__TRUE__, if existence should be checked, otherwise __FALSE__
**Example**
```php
$ImageFile = "Alarm symbol.png"; // Image file
$MediaID = IPS_CreateMedia(1); // create the image in the media pool
IPS_SetMediaFile($MediaID, $ImageFile, true); // bind the image in the media pool with image file
```
---
# Management of Modules
> Symcon documentation · English · generated on 2026-09-26
> Index: https://www.symcon.de/en/llms.txt
Source: https://www.symcon.de/en/service/documentation/command-reference/management-modules/
## IPS_GetCompatibleModules
Source: https://www.symcon.de/en/service/documentation/command-reference/management-modules/ips-getcompatiblemodules/
`array IPS_GetCompatibleModules(string $ModuleID)`
returns all modules that are compatible to a specific module
**Parameters**
- `$ModuleID` (string): ID of the module
**Returns** (array): An array of all IDs of modules that are valid parents to __ModuleID__ given as strings
ID of the module
**Example**
```php
print_r(IPS_GetCompatibleModules("{57040540-4432-4220-8D2D-4676B57E223D}"));
/* returns e.g.:
Array
(
[0] => {AC6C6E74-C797-40B3-BA82-F135D941D1A2}
[1] => {6179ED6A-FC31-413C-BB8E-1204150CF376}
[2] => {3CFF0FD9-E306-41DB-9B5A-9D06D38576C3}
[3] => {82347F20-F541-41E1-AC5B-A636FD3AE2D8}
etc. ...
)
*/
```
## IPS_GetLibrary
Source: https://www.symcon.de/en/service/documentation/command-reference/management-modules/ips-getlibrary/
`array IPS_GetLibrary(string $LibraryID)`
returns extensive information about a library
**Parameters**
- `$LibraryID` (string): ID of the library
**Returns** (array): The following information is available as key => value pairs:
| Index | Type | Description |
| ------------- | ------- | ----------------------------------------------- |
| __Author__ | string | Name of author |
| __Build__ | integer | Serial number for versioning |
| __Date__ | integer | Unix timestamp |
| __LibraryID__ | string | LibraryID |
| __Name__ | string | Name of library |
| __URL__ | string | Internet address of the library |
| __Version__ | integer | HighByte: Major version, LowByte: Minor Version |
ID of the library
**Example**
```php
print_r(IPS_GetLibrary("{4414D465-0A32-49AC-929A-D948CBCDE06E}"));
/* returns e.g.:
Array
(
[LibraryID] => {4414D465-0A32-49AC-929A-D948CBCDE06E}
[Author] => Symcon GmbH
[URL] => www.symcon.de
[Version] => 512
[Name] => SzenenSteuerung
[Version] => 1.1
[Build] => 0
[Date] => 0
)
*/
```
## IPS_GetLibraryList
Source: https://www.symcon.de/en/service/documentation/command-reference/management-modules/ips-getlibrarylist/
`array IPS_GetLibraryList()`
returns a list of all libraries
**Returns** (array): An array of all the GUIDs of the libraries in IP-Symcon given as strings
The command determines the IDs of all available libraries in IP-Symcon. The IDs are listed in an array of strings.
**Example**
```php
print_r(IPS_GetLibraryList());
/* returns e.g.:
Array
(
[0] => {FF95B199-B3BD-424C-9AEF-3F004BC672B6}
[1] => {6EC74E99-C6FD-4E03-9195-E7BD90E6C07E}
[2] => {2CE84600-0A3C-438C-AC22-86439A1E5DF0}
etc. ...
)
*/
```
## IPS_GetLibraryModules
Source: https://www.symcon.de/en/service/documentation/command-reference/management-modules/ips-getlibrarymodules/
`array IPS_GetLibraryModules(string $LibraryID)`
returns a list of modules in a library
**Parameters**
- `$LibraryID` (string): ID of the shown library
**Returns** (array): An array of all the GUIDs of a library in IP-Symcon given as strings
ID of the shown library
**Example**
```php
print_r(IPS_GetLibraryModules("{7DC57F9A-C095-4CDE-A6F0-2CB35A29A8FE}"));
/* returns e.g.:
Array
(
[0] => {57040540-4432-4220-8D2D-4676B57E223D}
[1] => {48FCFDC1-11A5-4309-BB0B-A0DB8042A969}
[2] => {56800073-A809-4513-9618-1C593EE1240C}
[3] => {2FD7576A-D2AD-47EE-9779-A502F23CABB3}
etc. ...
)
*/
```
## IPS_GetModule
Source: https://www.symcon.de/en/service/documentation/command-reference/management-modules/ips-getmodule/
`array IPS_GetModule(string $ModuleID)`
returns extensive information about a module
**Parameters**
- `$ModuleID` (string): ID of the module
**Returns** (array): The following information are available as key => value pairs:
| Index | Type | Description |
| ---------------------- | -------- | --------------------------------------------------------------------------------------------------------- |
| __Aliases__ | array | Array of alternative names (string) for the module |
| __ChildRequirements__ | array | Array of GUIDs (string), which are expected by child objects |
| __ParentRequirements__ | array | Array of GUIDs (string), which are expected by parent objects |
| __Implemented__ | array | Array of GUIDs (string) offered by the module |
| __LibraryID__ | string | LibraryID in which the module is included |
| __ModuleID__ | string | ID of the module |
| __ModuleName__ | string | Name of module |
| __ModuleType__ | integer | Type of module (0: Core, 1: I/O, 2: Splitter, 3: Device, 4: Configurator, 5: Discovery, 6: Visualization) |
| __Prefix__ | string | Prefix of the module for calling the corresponding PHP functions (since Version 6.1) |
| __Translation__ | array | Translations for ModuleName and Aliases (since Version 7.0) |
| __URL__ | string | URL to the documentation website |
| __Vendor__ | string | System/Manufacturer designation |
ID of the module
**Example**
```php
int_r(IPS_GetModule("{BAEA5454-4256-48AA-982B-538201A374D4}"));
/* returns e.g.:
Array
(
[ParentRequirements] => Array
(
[0] => {42DFD4E4-5831-4A27-91B9-6FF1B2960260}
)
[ChildRequirements] => Array
(
)
[Implemented] => Array
(
[0] => {8A4D3B17-F8D7-4905-877F-9E69CEC3D579}
)
[Vendor] => KNX
[Aliases] => Array
(
[0] => DPT 013.x
)
[Translation] => Array
(
[de] => Array
(
[KNX DPT 13] => KNX DPT 13
[DPT 013.x - 4-Byte Signed Value] => DPT 013.x - 4-Byte vorzeichenbehaftet Wert
)
)
[URL] => https://www.symcon.de/service/dokumentation/modulreferenz/knx/
[LibraryID] => {0945206A-47AA-4FDD-9093-99051E410E82}
[ModuleID] => {BAEA5454-4256-48AA-982B-538201A374D4}
[ModuleName] => KNX DPT 13
[ModuleType] => 3
)
*/
```
## IPS_GetModuleList
Source: https://www.symcon.de/en/service/documentation/command-reference/management-modules/ips-getmodulelist/
`array IPS_GetModuleList()`
returns a list of all modules
**Returns** (array): An array of all the GUIDs of the modules in IP-Symcon given as strings
The command determines the IDs of all available modules in IP-Symcon. The IDs are listed in an array of strings.
**Example**
```php
print_r(IPS_GetModuleList());
/* returns e.g.:
Array
(
[0] => {2D8B0172-166C-45B0-B979-61A787809E22}
[1] => {CCC52C33-D77A-4AE9-A6CF-462F152532A0}
[2] => {11842D31-3CA4-4F1B-BBA9-E4A0FE1873AF}
[3] => {4CB91589-CE01-4700-906F-26320EFCF6C4}
etc. ...
)
*/
//Output of all module names with GUID
foreach(IPS_GetModuleList() as $guid)
{
$module = IPS_GetModule($guid);
// Limit modules to Core library
if($module['LibraryID'] == "{0945206A-47AA-4FDD-9093-99051E410E82}") {
$pair[$module['ModuleName']] = $guid;
}
}
ksort($pair);
foreach($pair as $key=>$guid)
{
echo $key." = ".$guid."\n";
}
/*
ALL2x = {D805EC4C-7D17-4E84-98D3-A441AA71ACA3}
ALL3690 = {BBD04875-8CC5-412A-B848-B2AB6F08C425}
ALL3691 = {07CAE61E-01FA-4086-A2D1-55C442D8C8BF}
ALL4000 = {2D8B0172-166C-45B0-B979-61A787809E22}
ALLUniversal = {FB6B8DD0-CD8E-4CE7-8613-D7BD6436720A}
Archive Control = {43192F0B-135B-4CE7-A0A7-1475603F3060}
CMI = {AAAB8DD0-CD8E-4CE7-8613-D913371701AE}
Calendar Control = {1B9A5AF2-F2D2-4827-A13D-FFA6AB350371}
Client Socket = {3CFF0FD9-E306-41DB-9B5A-9D06D38576C3}
Connect Control = {9486D575-BE8C-4ED8-B5B5-20930E26DE6F}
Cutter = {AC6C6E74-C797-40B3-BA82-F135D941D1A2}
DMX Gateway = {B1E43BF6-770A-4FD7-B4FE-6D265F93746B}
DMX Output = {E19C2E41-7347-4A3B-B7D9-A9A88E0D133E}
DMX RGB = {1AF36760-644E-4DA9-8776-01BA6DF6178E}
DNSSD Control = {780B2D48-916C-4D59-AD35-5A429B2355A5}
Dummy Module = {485D0419-BE97-4548-AA9C-C083EB82E61E}
EnOcean Configurator = {9BA823CF-83C6-4A5F-DBC2-295CA971833E}
EnOcean D20500 = {8DFBE8BC-FC2D-61F0-375C-C8C2A13CDC1A}
EnOcean D20501 = {927296DC-B74F-F0B8-2C4E-6B98236EDD94}
EnOcean D20502 = {B4D91880-71C1-626B-94D7-521565495264}
EnOcean Discovery = {29E1D618-F3CB-6868-59C6-4DCD02F8C78D}
EnOcean EEP A50201RX = {432FF87E-4497-48D6-8ED9-EE7104A50201}
EnOcean EEP A50202RX = {432FF87E-4497-48D6-8ED9-EE7104A50202}
EnOcean EEP A50203RX = {432FF87E-4497-48D6-8ED9-EE7104A50203}
EnOcean EEP A50204RX = {432FF87E-4497-48D6-8ED9-EE7104A50204}
EnOcean EEP A50205RX = {432FF87E-4497-48D6-8ED9-EE7104A50205}
EnOcean EEP A50206RX = {432FF87E-4497-48D6-8ED9-EE7104A50206}
EnOcean EEP A50207RX = {432FF87E-4497-48D6-8ED9-EE7104A50207}
EnOcean EEP A50208RX = {432FF87E-4497-48D6-8ED9-EE7104A50208}
EnOcean EEP A50209RX = {432FF87E-4497-48D6-8ED9-EE7104A50209}
EnOcean EEP A5020ARX = {432FF87E-4497-48D6-8ED9-EE7104A5020A}
EnOcean EEP A5020BRX = {432FF87E-4497-48D6-8ED9-EE7104A5020B}
EnOcean EEP A50210RX = {432FF87E-4497-48D6-8ED9-EE7104A50210}
EnOcean EEP A50211RX = {432FF87E-4497-48D6-8ED9-EE7104A50211}
EnOcean EEP A50212RX = {432FF87E-4497-48D6-8ED9-EE7104A50212}
EnOcean EEP A50213RX = {432FF87E-4497-48D6-8ED9-EE7104A50213}
EnOcean EEP A50214RX = {432FF87E-4497-48D6-8ED9-EE7104A50214}
EnOcean EEP A50215RX = {432FF87E-4497-48D6-8ED9-EE7104A50215}
EnOcean EEP A50216RX = {432FF87E-4497-48D6-8ED9-EE7104A50216}
EnOcean EEP A50217RX = {432FF87E-4497-48D6-8ED9-EE7104A50217}
EnOcean EEP A50218RX = {432FF87E-4497-48D6-8ED9-EE7104A50218}
EnOcean EEP A50219RX = {432FF87E-4497-48D6-8ED9-EE7104A50219}
EnOcean EEP A5021ARX = {432FF87E-4497-48D6-8ED9-EE7104A5021A}
EnOcean EEP A5021BRX = {432FF87E-4497-48D6-8ED9-EE7104A5021B}
EnOcean EEP A50220RX = {432FF87E-4497-48D6-8ED9-EE7104A50220}
EnOcean EEP A50230RX = {432FF87E-4497-48D6-8ED9-EE7104A50230}
EnOcean EEP A50401RX = {432FF87E-4497-48D6-8ED9-EE7104A50401}
EnOcean EEP A50402RX = {432FF87E-4497-48D6-8ED9-EE7104A50402}
EnOcean EEP A50403RX = {432FF87E-4497-48D6-8ED9-EE7104A50403}
EnOcean EEP A50601RX = {432FF87E-4497-48D6-8ED9-EE7104A50601}
EnOcean EEP A50602RX = {432FF87E-4497-48D6-8ED9-EE7104A50602}
EnOcean EEP A50603RX = {432FF87E-4497-48D6-8ED9-EE7104A50603}
EnOcean EEP A50701RX = {432FF87E-4497-48D6-8ED9-EE7104A50701}
EnOcean EEP A50702RX = {432FF87E-4497-48D6-8ED9-EE7104A50702}
EnOcean EEP A50703RX = {432FF87E-4497-48D6-8ED9-EE7104A50703}
EnOcean EEP A50801RX = {432FF87E-4497-48D6-8ED9-EE7104A50801}
EnOcean EEP A50802RX = {432FF87E-4497-48D6-8ED9-EE7104A50802}
EnOcean EEP A50803RX = {432FF87E-4497-48D6-8ED9-EE7104A50803}
EnOcean EEP A50901RX = {432FF87E-4497-48D6-8ED9-EE7104A50901}
EnOcean EEP A50902RX = {432FF87E-4497-48D6-8ED9-EE7104A50902}
EnOcean EEP A50904RX = {432FF87E-4497-48D6-8ED9-EE7104A50904}
EnOcean EEP A50905RX = {432FF87E-4497-48D6-8ED9-EE7104A50905}
EnOcean EEP A50906RX = {432FF87E-4497-48D6-8ED9-EE7104A50906}
EnOcean EEP A50907RX = {432FF87E-4497-48D6-8ED9-EE7104A50907}
EnOcean EEP A50908RX = {432FF87E-4497-48D6-8ED9-EE7104A50908}
EnOcean EEP A51001RX = {432FF87E-4497-48D6-8ED9-EE7104A51001}
EnOcean EEP A51002RX = {432FF87E-4497-48D6-8ED9-EE7104A51002}
EnOcean EEP A51003RX = {432FF87E-4497-48D6-8ED9-EE7104A51003}
EnOcean EEP A51004RX = {432FF87E-4497-48D6-8ED9-EE7104A51004}
EnOcean EEP A51005RX = {432FF87E-4497-48D6-8ED9-EE7104A51005}
EnOcean EEP A51006RX = {432FF87E-4497-48D6-8ED9-EE7104A51006}
EnOcean EEP A51007RX = {432FF87E-4497-48D6-8ED9-EE7104A51007}
EnOcean EEP A51008RX = {432FF87E-4497-48D6-8ED9-EE7104A51008}
EnOcean EEP A51009RX = {432FF87E-4497-48D6-8ED9-EE7104A51009}
EnOcean EEP A5100ARX = {432FF87E-4497-48D6-8ED9-EE7104A5100A}
EnOcean EEP A5100BRX = {432FF87E-4497-48D6-8ED9-EE7104A5100B}
EnOcean EEP A5100CRX = {432FF87E-4497-48D6-8ED9-EE7104A5100C}
EnOcean EEP A5100DRX = {432FF87E-4497-48D6-8ED9-EE7104A5100D}
EnOcean EEP A51010RX = {432FF87E-4497-48D6-8ED9-EE7104A51010}
EnOcean EEP A51011RX = {432FF87E-4497-48D6-8ED9-EE7104A51011}
EnOcean EEP A51012RX = {432FF87E-4497-48D6-8ED9-EE7104A51012}
EnOcean EEP A51013RX = {432FF87E-4497-48D6-8ED9-EE7104A51013}
EnOcean EEP A51014RX = {432FF87E-4497-48D6-8ED9-EE7104A51014}
EnOcean EEP A51015RX = {432FF87E-4497-48D6-8ED9-EE7104A51015}
EnOcean EEP A51016RX = {432FF87E-4497-48D6-8ED9-EE7104A51016}
EnOcean EEP A51017RX = {432FF87E-4497-48D6-8ED9-EE7104A51017}
EnOcean EEP A51018RX = {432FF87E-4497-48D6-8ED9-EE7104A51018}
EnOcean EEP A51019RX = {432FF87E-4497-48D6-8ED9-EE7104A51019}
EnOcean EEP A5101ARX = {432FF87E-4497-48D6-8ED9-EE7104A5101A}
EnOcean EEP A5101BRX = {432FF87E-4497-48D6-8ED9-EE7104A5101B}
EnOcean EEP A5101CRX = {432FF87E-4497-48D6-8ED9-EE7104A5101C}
EnOcean EEP A5101DRX = {432FF87E-4497-48D6-8ED9-EE7104A5101D}
EnOcean EEP A5101FRX = {432FF87E-4497-48D6-8ED9-EE7104A5101F}
EnOcean EEP A51020RX = {432FF87E-4497-48D6-8ED9-EE7104A51020}
EnOcean EEP A51021RX = {432FF87E-4497-48D6-8ED9-EE7104A51021}
EnOcean EEP A51022RX = {BBE179DE-1241-CB89-6803-492049D5546B}
EnOcean EEP A51023RX = {9880FC1A-AD89-5749-12A0-AF6C99D50B28}
EnOcean EEP A51101RX = {432FF87E-4497-48D6-8ED9-EE7104A51101}
EnOcean EEP A51102RX = {432FF87E-4497-48D6-8ED9-EE7104A51102}
EnOcean EEP A51103RX = {432FF87E-4497-48D6-8ED9-EE7104A51103}
EnOcean EEP A51104RX = {432FF87E-4497-48D6-8ED9-EE7104A51104}
EnOcean EEP A51200RX = {432FF87E-4497-48D6-8ED9-EE7104A51200}
EnOcean EEP A51201RX = {432FF87E-4497-48D6-8ED9-EE7104A51201}
EnOcean EEP A51202RX = {432FF87E-4497-48D6-8ED9-EE7104A51202}
EnOcean EEP A51203RX = {432FF87E-4497-48D6-8ED9-EE7104A51203}
EnOcean EEP A51301RX = {432FF87E-4497-48D6-8ED9-EE7104A51301}
EnOcean EEP A51302RX = {432FF87E-4497-48D6-8ED9-EE7104A51302}
EnOcean EEP A51303RX = {432FF87E-4497-48D6-8ED9-EE7104A51303}
EnOcean EEP A51304RX = {432FF87E-4497-48D6-8ED9-EE7104A51304}
EnOcean EEP A51305RX = {432FF87E-4497-48D6-8ED9-EE7104A51305}
EnOcean EEP A51401RX = {432FF87E-4497-48D6-8ED9-EE7104A51401}
EnOcean EEP A51402RX = {432FF87E-4497-48D6-8ED9-EE7104A51402}
EnOcean EEP A51403RX = {432FF87E-4497-48D6-8ED9-EE7104A51403}
EnOcean EEP A51404RX = {432FF87E-4497-48D6-8ED9-EE7104A51404}
EnOcean EEP A51405RX = {432FF87E-4497-48D6-8ED9-EE7104A51405}
EnOcean EEP A51406RX = {432FF87E-4497-48D6-8ED9-EE7104A51406}
EnOcean EEP A51407RX = {B3A8A26C-FF2F-491E-9279-E981959293C0}
EnOcean EEP A51408RX = {2C9E6E3A-319F-7ADF-024C-E8DEA7209A52}
EnOcean EEP A51409RX = {29CBDDA5-6CA6-4C17-9360-1979DCBD1E43}
EnOcean EEP A5140ARX = {1F3E63B6-F354-44FF-98DE-BEB63F36310C}
EnOcean EEP A52006 = {D25790E7-DC98-7EE3-4D74-2F0484392795}
EnOcean EEP A52012RX = {432FF87E-4497-48D6-8ED9-EE7104A52012}
EnOcean EEP A52012TX = {432FF87E-4497-48D6-8ED9-AA7104A52012}
EnOcean EEP A53001RX = {432FF87E-4497-48D6-8ED9-EE7104A53001}
EnOcean EEP A53002RX = {432FF87E-4497-48D6-8ED9-EE7104A53002}
EnOcean EEP A53003RX = {432FF87E-4497-48D6-8ED9-EE7104A53003}
EnOcean EEP A53004RX = {432FF87E-4497-48D6-8ED9-EE7104A53004}
EnOcean EEP A53701RX = {432FF87E-4497-48D6-8ED9-EE7104A53701}
EnOcean EEP A53808RX = {432FF87E-4497-48D6-8ED9-EE7104A53808}
EnOcean EEP A53809RX = {432FF87E-4497-48D6-8ED9-EE7104A53809}
EnOcean EEP D20100 = {8328F257-35B7-4034-AA23-20B0A30CAF11}
EnOcean EEP D20101 = {5F30BDCD-487F-44EE-9795-82C5DD429F2D}
EnOcean EEP D20102 = {C3825266-A6DE-44B6-97B4-C0BCFB6BD52B}
EnOcean EEP D20103 = {EAF7026C-A0DB-4B25-8DFD-D4FAB7A3EFCF}
EnOcean EEP D20104 = {5B38D44B-A570-4381-B719-8BFB58387AA1}
EnOcean EEP D20105 = {19FDCECC-0735-4ADA-8304-3AF53C919668}
EnOcean EEP D20106 = {1881B19B-A03C-437D-934D-28C598F13C39}
EnOcean EEP D20107 = {06DFB7CC-9945-4E1D-B08D-C505F4A7D2B4}
EnOcean EEP D20108 = {C885AB2C-7D83-4274-9420-EFEA5B8B0908}
EnOcean EEP D20109 = {BFDADCB0-BAB5-45BC-BF7A-1D19EA0FF31D}
EnOcean EEP D2010A = {6A37AC89-EFF0-40D8-88A1-8B24478FEE76}
EnOcean EEP D2010B = {F054B2EB-D812-47ED-B73C-22FBC0ADA667}
EnOcean EEP D2010C = {0389DA40-1B2A-446C-9448-03DED7977DC0}
EnOcean EEP D2010D = {744C3ACE-4680-4E1D-966F-CC959B25DFD6}
EnOcean EEP D2010E = {7E11E659-98E1-45A1-A9DB-29D337423C92}
EnOcean EEP D2010F = {AE62BF01-6C90-4FC2-8E1E-75EB5516BCF0}
EnOcean EEP D20110 = {699264EC-BEF1-4426-B501-687EA30C03B1}
EnOcean EEP D20111 = {21DDC756-E3CD-4B2D-B2F4-86092918A832}
EnOcean EEP D20112 = {47804DFF-5534-4256-8938-2C5D018736A3}
EnOcean EEP D20113 = {783B1089-4A50-4973-A522-C5288B9E1909}
EnOcean EEP D20114 = {A08C2716-CF6A-472C-A303-5C37C57A65BB}
EnOcean EEP D20300 = {8DA41914-45A6-8F0C-C935-178F76A36C42}
EnOcean EEP D2030A = {B24CF984-5CD7-B0D7-9661-41E6F2CEA0E7}
EnOcean EEP D20310 = {C14DBE59-E9B6-C9B7-7DEF-D98B8ADBA6F3}
EnOcean EEP D20601 = {6E5F79FE-3F0B-4CCE-8786-E8DD8893185B}
EnOcean EEP D20700 = {832ABD55-1173-B194-EB3F-D23681113A01}
EnOcean EEP D21101 = {3B1E2E8A-7C09-F58C-2841-3EF2D7C67F7A}
EnOcean EEP D21102 = {ED6AB19B-5A4A-80FD-BC4B-C07EE7F9915A}
EnOcean EEP D21103 = {7973060A-0241-E1E5-6E4B-CACBB08ACA76}
EnOcean EEP D21104 = {CC1482D1-6AD9-2199-C5E5-AD4EB6926455}
EnOcean EEP D21105 = {360F32BD-D9D5-5233-966A-63EAF54F671C}
EnOcean EEP D21106 = {8B2F1F85-A51C-0606-7CF3-8F980FEADB12}
EnOcean EEP D21107 = {F84B8E1B-B0DF-9383-1F6E-56EFAFB405A8}
EnOcean EEP D21108 = {1828E2A3-D83B-1433-46BF-AD0F11FF07DC}
EnOcean EEP D21430 = {1858BB3E-78BD-B090-7798-F1C0C26D912E}
EnOcean EEP D21500 = {75CA6030-43B9-8CF6-5901-E2DEF86E5249}
EnOcean EEP D23200 = {F60551AF-5D2B-4560-8BDD-7D1474C7A490}
EnOcean EEP D23201 = {C3B79AA9-54DB-4AE4-8ED4-3F954C723465}
EnOcean EEP D23202 = {0A03908E-694E-4CB1-BD35-AF7777504BFE}
EnOcean EEP D2A001 = {EA335B84-7E0A-F982-32CE-B50B60FC8E39}
EnOcean EEP D50001RX = {432FF87E-4497-48D6-8ED9-EE7104D50001}
EnOcean EEP F60101RX = {B9ED3CC4-A354-0420-A7D3-9AFC6C721FB3}
EnOcean EEP F60201RX = {432FF87E-4497-48D6-8ED9-EE7104F60201}
EnOcean EEP F60202RX = {432FF87E-4497-48D6-8ED9-EE7104F60202}
EnOcean EEP F60203RX = {432FF87E-4497-48D6-8ED9-EE7104F60203}
EnOcean EEP F60204RX = {432FF87E-4497-48D6-8ED9-EE7104F60204}
EnOcean EEP F60301RX = {432FF87E-4497-48D6-8ED9-EE7104F60301}
EnOcean EEP F60302RX = {432FF87E-4497-48D6-8ED9-EE7104F60302}
EnOcean EEP F60401RX = {432FF87E-4497-48D6-8ED9-EE7104F60401}
EnOcean EEP F60402RX = {432FF87E-4497-48D6-8ED9-EE7104F60402}
EnOcean EEP F60500RX = {74DB7CEE-18F9-478D-9FBC-CA857F807C50}
EnOcean EEP F60501RX = {432FF87E-4497-48D6-8ED9-EE7104F60501}
EnOcean EEP F60502RX = {8D42EFEE-119C-4CA8-BED2-66D18921749E}
EnOcean EEP F61000RX = {432FF87E-4497-48D6-8ED9-EE7104F61000}
EnOcean EEP F61001RX = {C31A7F85-4E76-E9C9-F920-2953DE737560}
EnOcean EltakoDimmer = {48909406-A2B9-4990-934F-28B9A80CD079}
EnOcean EltakoFABH130 = {03AEBCA9-1140-969E-7C72-728A1F30CD55}
EnOcean EltakoFABH65S = {0E8E3267-5CFA-4A52-AB3E-899170D16116}
EnOcean EltakoFAFT60 = {0BE195DC-6002-4D99-A566-3B9B0B57FAD6}
EnOcean EltakoFAH60 = {AF827EB8-08A3-434D-9690-424AFF06C698}
EnOcean EltakoFHK14 = {7C25F5A6-ED34-4FB4-8A6D-D49DFE636CDC}
EnOcean EltakoFKC = {40C99CC9-EC04-49C8-BB9B-73E21B6FDDDD}
EnOcean EltakoFRW = {40C99CC9-EC04-49C8-BB9B-73E21B6FEEEE}
EnOcean EltakoFSS12 = {7124C1BC-B260-4C5E-BF00-B38D3C7B5CB7}
EnOcean EltakoFTR65 = {40C99CC9-EC04-49C8-BB9B-73E21B6FFF65}
EnOcean EltakoFWS61 = {9E4572C0-C306-4F00-B536-E75B4950F094}
EnOcean EltakoFZS = {40C99CC9-EC04-49C8-BB9B-73E21B6FCCCC}
EnOcean EltakoRGBW = {71072C70-7ADF-6CC5-8D6F-7368132584F8}
EnOcean EltakoShutter = {1463CAE7-C7D5-4623-8539-DD7ADA6E92A9}
EnOcean EltakoSwitch = {FD46DA33-724B-489E-A931-C00BFD0166C9}
EnOcean Gateway = {A52FEFE9-7858-4B8E-A96E-26E15CB944F7}
EnOcean Hoppe = {1C8D7E80-3ED1-4117-BB53-9C5F61B1BEF3}
EnOcean Opus = {9B1F32CD-CD74-409A-9820-E5FFF064449A}
EnOcean PTM200 = {40C99CC9-EC04-49C8-BB9B-73E21B6FA265}
EnOcean PTM200RX = {63484585-F8AD-4780-BAFD-3C0353641046}
EnOcean RCM100 = {8492CEAF-ED62-4634-8A2F-B09A7CEDDE5B}
EnOcean STM100 = {FA1479DE-C0C1-433D-98BC-EA7C298D1AA5}
EnOcean STM250 = {B01DE819-EA69-4FC1-91AB-4D9FF8D55370}
EnOcean Shutter = {1463CAE7-C7D5-4623-8539-DD7ADA6E92AA}
EnOcean SmartDrive MX = {004A19B5-6E60-41A3-813C-7653ABAB6116}
EnOcean Thermokon SR0x = {B4249BC6-5BA8-45E3-B506-86680935D4EE}
EnOcean Thermokon Thanos = {54E114A3-F9B6-4747-A07E-D2A064629627}
EnOcean Valve Actuator = {004A19B5-6E60-41A3-813C-A11DC00B6116}
EnOcean alphaEOS SENSE TF-H = {F98CD462-0147-4A79-A0DF-448580E01629}
Event Control = {ED573B53-8991-4866-B28C-CBE44C59A2DA}
FHT = {A89F8DFA-A439-4BF1-B7CB-43D047208DDD}
FHZ = {57040540-4432-4220-8D2D-4676B57E223D}
FS10 = {6D508C91-F197-44A9-A1AB-A27F97A18A5F}
FS10 Gateway = {753E7267-7558-49D3-ACFB-86755C28318D}
FS20 = {48FCFDC1-11A5-4309-BB0B-A0DB8042A969}
FS20EX = {56800073-A809-4513-9618-1C593EE1240C}
HID = {E6D7692A-7F4C-441D-827B-64062CFE1C02}
HMS = {2FD7576A-D2AD-47EE-9779-A502F23CABB3}
HTTP Client = {4CB91589-CE01-4700-906F-26320EFCF6C4}
Heating Control = {FF7AF0F4-D616-4EF5-B73A-D49C56CF4C92}
Heating Control Legacy = {3F52FA69-77F5-4DE6-8B2A-347452AC5F8F}
HomeMatic Configurator = {5214C3C6-91BC-4FE1-A2D9-A3920261DA74}
HomeMatic Device = {EE4A81C6-5C90-4DB7-AD2F-F6BBD521412E}
HomeMatic Discovery = {3718244C-71A2-B20D-F754-DF5C79340AB4}
HomeMatic Socket = {A151ECE9-D733-4FB9-AA15-7F7DD10C58AF}
IMAP = {CABFCCA1-FBFF-4AB7-B11B-9879E67E152F}
IPS-868 AD = {134A1CFF-3CAA-4D2E-8517-F9BFDE7555C9}
IPS-868 Accelerometer = {304B6E9A-A518-43C6-80E8-D066879E7FD1}
IPS-868 AirQuality = {2B2842ED-0BB9-45FE-934C-1DFE07E1A724}
IPS-868 Configurator = {0A3CCE10-7613-1C54-0721-57023C98EFDA}
IPS-868 Counter = {134A1CFF-3CAA-4D2E-8517-F9BFDE7544C9}
IPS-868 DA = {134A1CFF-3CAA-4D2E-8517-F9BFDE7566C9}
IPS-868 Data = {984FFE86-71BE-48D3-943E-45277BECB52D}
IPS-868 Discovery = {F2B8A368-F9F2-7919-B299-79DC5B64B8A4}
IPS-868 Display = {9542B617-C603-4E8A-BFDE-DD69663F0226}
IPS-868 Display Input = {FBF6F86C-4901-4957-8D08-2B2CBC1DF71A}
IPS-868 Display Output = {C8CF38E9-BEAA-4149-A9ED-C8AAE04E8A6D}
IPS-868 Gateway = {995946C3-7995-48A5-86E1-6FB16C3A0F8A}
IPS-868 Input = {5509B26C-F2F7-428F-973B-FD5D07C80111}
IPS-868 Level = {C7A069AB-E2BE-4AD2-BB51-A7B52D6FAC4E}
IPS-868 Servo = {D2C92D2D-FC07-4545-AEBA-4294FD9D3035}
IPS-868 Servo Input = {7D07671F-65FF-4D9A-B521-9F0964DD9399}
IPS-868 Stripe = {7AF52E55-4994-44AE-9DB8-752895F1EB76}
IPS-868 Stripe Input = {26B22717-924E-4D58-B091-C98E49812238}
IPS-868 Thermo = {95D715AA-AB5A-4423-AD7B-5081EB542971}
IPS-868 Tracker = {50460BD9-FA93-4DE0-976A-55208C90DF15}
IPS-868 WatchDogTimer = {9F88A462-BFDA-47C5-990C-B9E20D2F861E}
IRTrans Device = {899DBC68-0147-4528-B95D-D43C568D4E56}
IRTrans Gateway = {0F0F74EF-2304-4C23-840F-EC1C5B9A9A82}
Image Grabber = {5A5D5DBD-53AB-4826-8B09-71E9E4E981E5}
JSON Decoder = {9F976F04-7DC4-BB2D-38CA-67C1AFC84C7A}
KNX Configurator = {33765ABB-CFA5-40AA-89C0-A7CEA89CFE7A}
KNX DPT 1 = {F3058AB2-AFDC-4479-A053-5F4599DF6F5B}
KNX DPT 10 = {2D26EF69-C3BC-4738-879D-FB493DD166BF}
KNX DPT 11 = {4A5AE804-59E2-41EA-ABCE-3BC80F33543C}
KNX DPT 12 = {AD992707-B7DC-4255-96DE-B70057CEC989}
KNX DPT 13 = {BAEA5454-4256-48AA-982B-538201A374D4}
KNX DPT 14 = {E8C3C9ED-A6FA-45FF-A942-A206FEEE360C}
KNX DPT 15 = {16B72DE7-3C8B-4709-8819-6A260E890A12}
KNX DPT 16 = {2146FF76-FAE6-46B6-9630-73E5F3FAE190}
KNX DPT 17 = {E8A0352C-B13F-4691-AAF5-586DE502569E}
KNX DPT 18 = {8B2A23B9-6B96-4F76-9EC8-5365BA7E9441}
KNX DPT 19 = {8456D139-6771-4821-8A37-9304BEAA1BFD}
KNX DPT 2 = {434A6354-235F-4484-8883-9FF30616E3FB}
KNX DPT 20 = {C9304609-D1CD-4F07-BE7C-E5546A91A5DF}
KNX DPT 200 = {04ED3286-C982-436F-A01E-8A03C2E976A8}
KNX DPT 201 = {5F14B9D5-297D-4C25-9E45-92BF7B7C3F02}
KNX DPT 202 = {22726542-A2B6-4FBB-BB98-BA5927932C23}
KNX DPT 203 = {3243B56D-DE90-4BED-8E07-E4DEE777C6AF}
KNX DPT 204 = {06E5F74A-BC1F-4F69-BBE6-8AD663058CD9}
KNX DPT 205 = {28837D84-085F-4701-ADA0-CF9A8F49F591}
KNX DPT 206 = {F5E3C9F5-A0E8-4919-BB38-0551AE5886A7}
KNX DPT 207 = {EE68B239-8E3A-4F54-9501-96CB4B2700A4}
KNX DPT 209 = {D9A125D0-8D82-4808-A024-0FC5E82799D6}
KNX DPT 21 = {8941E278-1901-478D-AFC8-807E3515DD28}
KNX DPT 210 = {68E7C9CE-724E-4CBE-8206-A61AD9A6A328}
KNX DPT 211 = {0636647E-EB02-4EE3-857E-0B69C0E8AA3D}
KNX DPT 212 = {4D8AD2DA-5669-4BEB-B9C7-983DA48A7777}
KNX DPT 213 = {DEA88D19-78B6-4D51-89FF-E3958151863D}
KNX DPT 214 = {AC33D286-FBBC-40BE-91CC-C470FB896C04}
KNX DPT 215 = {619D8815-1E90-4A7A-B51D-14DCB2FCE0E0}
KNX DPT 216 = {F5339A58-E891-4A22-AF29-3C801D3092EE}
KNX DPT 217 = {9CF216A5-370F-4BD9-92F0-B7BF87933A76}
KNX DPT 218 = {DB54CF66-4ED5-4457-A1EF-A3DF52EC135F}
KNX DPT 219 = {7EA00021-4300-4B9F-A274-863E1DD41695}
KNX DPT 22 = {DD0F4EF5-3C71-44F1-A346-397D34809D30}
KNX DPT 220 = {14BBE7DF-8442-4ED8-9D7D-C00B3E1B892A}
KNX DPT 221 = {3C16BD4B-45BF-435A-84DA-D7908F2D6140}
KNX DPT 222 = {3AD960E1-E129-4D96-BFAC-696AC149C629}
KNX DPT 223 = {EA6A0F52-ECEF-46D2-A942-96DDED471732}
KNX DPT 224 = {7245A626-1864-4834-A181-EE4FB4AD50DC}
KNX DPT 225 = {CC6C64D0-2F48-4497-A6A6-2120BAE5CD52}
KNX DPT 229 = {3F20B758-71DD-4C0B-A169-D4B59B023555}
KNX DPT 23 = {7CA94B7E-6460-4D68-8568-EE4B0912C5BF}
KNX DPT 230 = {88546CFE-1265-494C-B80C-1A3A6E1E671D}
KNX DPT 231 = {44A18680-880B-4ACC-9E84-8FB79FB9D727}
KNX DPT 232 = {DE2E3FBF-1588-4293-B76C-C90446D9E5F1}
KNX DPT 234 = {C667FC98-9FE4-4953-87ED-2B75F59704A4}
KNX DPT 235 = {960A48AD-36AB-4174-A298-F31E99014738}
KNX DPT 236 = {8A57A40D-AE55-42D5-BF33-4F1E0DDA1F8C}
KNX DPT 237 = {E3E1F95B-3356-4F6A-A419-9486125E023A}
KNX DPT 238 = {117D49A5-7D8F-4509-8669-F44972F072DD}
KNX DPT 239 = {F8AE906F-76E2-4464-96DA-B9A6D19049C9}
KNX DPT 240 = {CC5F383D-975B-44E9-BC18-C64FA2698CC0}
KNX DPT 241 = {A26BC82A-5953-4385-9FAA-5A5D3814D2B5}
KNX DPT 242 = {F565EF9F-30A5-4E1C-BA10-7BC15AB4EFB4}
KNX DPT 249 = {34B83F38-03F2-4D15-9031-70197CE9456E}
KNX DPT 25 = {9FB4BD67-5E67-4E94-B8C8-71D609048BBB}
KNX DPT 251 = {9165E3E2-8ED2-4152-BEFF-97793823FE4D}
KNX DPT 26 = {135F8FCF-DAFC-46AA-85EC-94C911FD21DF}
KNX DPT 27 = {EDE5D3E1-FB5A-48EE-A944-0A4ED0FBACC1}
KNX DPT 28 = {3E175751-4B84-4E8E-98C1-BF0D12835F2C}
KNX DPT 29 = {AA9ED268-3B37-4962-85BB-CBC73CB11618}
KNX DPT 3 = {EB931B1A-3A4A-47E9-AC67-D2A0D285B60C}
KNX DPT 30 = {2E7AADF5-F1DF-476D-B207-22D204C4AD28}
KNX DPT 31 = {5AD8B9C3-5A87-4426-B9A1-C7935022A680}
KNX DPT 4 = {6891595A-BF7C-4F4C-8A3B-7EA7346C8657}
KNX DPT 5 = {EBD0EE8D-DFA5-449F-BBE4-49CFC5F0EEB4}
KNX DPT 6 = {BAC22632-D6ED-4D88-82EA-726D700C4F2A}
KNX DPT 7 = {DCAFED37-B20B-4EEB-AA44-799C9B804557}
KNX DPT 8 = {7852DBDE-C68A-4A3E-88AF-155B99605371}
KNX DPT 9 = {95CDE37D-72CE-4360-BB91-573757C274A0}
KNX Discovery = {3519D734-79C9-4E7A-9E9B-91B6374D1C10}
KNX EIS Group = {D62B95D3-0C5E-406E-B1D9-8D102E50F64B}
KNX Gateway = {1C902193-B044-43B8-9433-419F09C641B8}
KNX RGB = {4D7F7548-0979-4ABD-9BB3-81F9477C0903}
KNX RGBW = {81F54858-72B1-4C2C-8CE3-7E00A3168378}
KNX Shutter = {24A9D68D-7B98-4D74-9BAE-3645D435A9EF}
KS300 = {9D21F700-6F67-4FBB-ACC2-AA42420A0486}
LCN Configurator = {0F64973F-4669-4272-BDB3-6338D0350269}
LCN Data = {A26E7E5A-A7C5-4063-8BE0-ED8BB26F8411}
LCN Display = {A26E7E5A-A7C5-4063-8BE0-ED8BB26F8522}
LCN Gateway = {9BDFC391-DEFF-4B71-A76B-604DBA80F207}
LCN Module = {0E31FED6-E465-4621-95D4-AAF2683C41EC}
LCN RGBW = {839D1208-D4BB-4FA7-86FA-AA9FBF96ED17}
LCN Shutter = {C81E019F-6341-4748-8644-1C29D99B813E}
LCN ShutterMotor = {C81E019F-6341-4748-8644-1C29D99B813F}
LCN Unit = {2D871359-14D8-493F-9B01-26432E3A710F}
LCN Value = {0102BDC9-3B85-4A11-968D-7D314DA07C06}
LevelJet = {D64B904C-5312-443C-A2F3-03201ED9811C}
Location Control = {45E97A63-F870-408A-B259-2933F7EABF74}
M-Bus Configurator = {73336CB8-B5E5-187E-8BB8-CC4F32BF127D}
M-Bus Device = {B53BE2E5-892D-4537-94AC-EAC68A469188}
M-Bus Discovery = {6BED8C28-002F-66B7-07B5-4145D4408F34}
M-Bus Gateway = {301AB802-23CD-4DE2-91D1-6E3BC9BF03FC}
MQTT Client = {F7A0DD2E-7684-95C0-64C2-D2A9DC47577B}
MQTT Client Configurator = {2408C0E0-E672-7FE5-414B-F78C9B9244E4}
MQTT Client Device = {91D174F2-AE0F-B8D8-5EF4-6232B9083CCF}
MQTT Server = {C6D2AEB3-6E1F-4B2E-8E69-3A1A00246850}
MQTT Server Configurator = {CC4F15B1-81C2-4F45-8D53-972F0C9C8103}
MQTT Server Device = {01C00ADD-D04E-452E-B66A-D253278743FE}
Media Player = {2999EBBB-5D36-407E-A52B-E9142A45F19C}
ModBus Address = {CB197E50-273D-4535-8C91-BB35273E3CA5}
ModBus Configurator = {8C1E6AC6-4C45-067A-3696-6B4284B75C4B}
ModBus Gateway = {A5F663AB-C400-4FE5-B207-4D67CC030564}
Module Control = {B8A5067A-AFC2-3798-FEDC-BCD02A45615E}
Multicast Socket = {BAB408E0-0A0F-48C3-B14E-9FB2FA81F66A}
Notification Control = {D4B231D6-8141-4B9E-9B32-82DA3AEEAB78}
OZW Configurator = {62BDA2F6-6206-4DC3-9431-4328B5890836}
OZW DataPoint = {422A36CD-5565-4CDC-9FC4-242D3C810901}
OZW Device = {CE54AFB0-625A-4F37-B5C1-EAF1FD2A1DA6}
OZW Gateway = {1D60A51E-FF04-4D82-9E0D-04B3A11EF13F}
OneWire Configurator = {F462BFF3-6772-4720-8450-49E6E2820643}
OneWire Discovery = {1739B440-4A46-F5FF-8640-F9DF3D14C06B}
OneWire F05 = {F1B54BB1-DC7D-42D9-A973-6CA4789E358F}
OneWire F10 = {685D4911-57CC-43AF-BA36-183EF2C8518F}
OneWire F12 = {50DB3978-CF6A-4BCE-87DF-5BB45D900628}
OneWire F1D = {88A63FF8-832B-48E3-B989-A416C7908E6A}
OneWire F20 = {5DF182B0-01DF-4D8A-82CD-E646FD9BF0B2}
OneWire F26 = {301FA314-65F8-4317-8BF5-729CF8664F54}
OneWire F28 = {766E337F-A707-48CC-A323-70D7E77E3F8C}
OneWire F29 = {6A75828A-25CD-4CF3-83EA-DAAB914030A7}
OneWire F2C = {E02955B3-49E4-47A9-A9ED-2C71401F6D6E}
OneWire F3A = {BD0F2622-F67C-4248-9A04-316DF13914C3}
OneWire Gateway = {CED1D815-2477-4B05-8F65-0E4475913063}
POP3 = {69CA7DBF-5FCE-4FDF-9F36-C05E0136ECFD}
Popup Module = {5EA439B8-FB5C-4B81-AA35-1D14F4EA9821}
Presence Control = {B263AFBC-950F-462C-95B1-E3ACACE0B9B0}
Register Variable = {F3855B3C-7CD6-47CA-97AB-E66D346C037F}
SMS = {96102E00-FD8C-4DD3-A3C2-376A44895AB1}
SMS REST = {96102E00-FD8C-4DD3-A3C2-376A44895AC2}
SMTP = {375EAF21-35EF-4BC4-83B3-C780FD8BD88A}
SSDP Control = {FFFFA648-B296-E785-96ED-065F7CEE6F29}
SSE Client = {2FADB4B7-FDAB-3C64-3E2C-068A4809849A}
Serial Port = {6DC3D946-0D31-450F-A8C6-C42DB8D7D4F1}
Server Socket = {8062CF2B-600E-41D6-AD4B-1BA66C32D6ED}
Shutter Control = {9512FC2C-7999-4BD0-B322-B6C49BD09127}
Shutter Control Legacy = {542CC907-CA63-4E7A-A8C7-92F74639FA4C}
Siemens Configurator = {691B4B06-C774-BA52-6C63-B88D5EDD79EB}
Siemens Device = {932076B1-B18E-4AB6-AB6D-275ED30B62DB}
Siemens Gateway = {1B0A36F7-343F-42F3-8181-0748819FB324}
Skin Control = {E8C1043A-E2C2-4CC8-88DC-CBF02D45E15E}
Store Control = {F45B5D1F-56AE-4C61-9AB2-C87C63149EC3}
TMEX = {ABEE57FB-E243-461D-B2F7-4D176ACB7C7C}
Text Parser = {4B00C7F7-1A6D-4795-A2D2-08151854D259}
Text To Speech = {684CC410-6777-46DD-A33F-C18AC615BB94}
ThermoJet = {C3380B6E-2351-4A19-9668-A17960F97E51}
UDP Socket = {82347F20-F541-41E1-AC5B-A636FD3AE2D8}
UVR1611 = {0A8F9D69-E78B-4EAB-8E26-C8A4ACF7FA25}
Universal RX = {23D1E4CD-77E9-4F4B-B8B3-53AE81222AF6}
Util Control = {B69010EA-96D5-46DF-B885-24821B8C8DBD}
Velleman USB = {8CE70CD0-6674-4907-B3CE-F6E5235C9938}
Virtual IO = {6179ED6A-FC31-413C-BB8E-1204150CF376}
VoIP = {A4224A63-49EA-445F-8422-22EF99D8F624}
WMRS200 = {DD2A4676-82C6-4154-9AAD-DE30668D53B0}
WMRS200 Gateway = {E4FDC411-95D5-453C-B731-0CEB0483E663}
WS Client = {D68FD31F-0E90-7019-F16C-1949BD3079EF}
WebFront Visualization = {3565B1F2-8F7B-4311-A4B6-1BF1D868F39E}
WebHook Control = {015A6EB8-D6E5-4B93-B496-0D3F77AE9FE1}
WebOAuth Control = {F99BF07D-CECA-438B-A497-E4B55F139D37}
WebServer = {D83E9CCF-9869-420F-8306-2B043E9BA180}
WinLIRC = {19E51FC2-064B-4A51-8995-11FEFF7F129A}
WuT Counter = {5F1C5261-07A2-4A7E-9AC4-88AF9ED29420}
WuT Gateway = {01CA6888-C833-484E-A3F3-806535421CB7}
WuT Input = {C3D0F82C-CD07-4AA8-AE5C-7AD983FE91F3}
WuT Output = {E85C40B3-C1E9-4A60-85C7-6CDDA3D8D7BF}
WuT ThermoHygro = {2EF634A4-D96D-4018-BD90-94E487A89D49}
XBee Gateway = {7FA47C08-E31B-44A6-9E50-20C4DDD3E081}
XBee Splitter = {9D5DCE79-1A97-4531-9D10-68839F4BEAAC}
Z-Wave Configurator = {2D7CA355-2C51-4430-8F67-4E397EAAEA19}
Z-Wave Discovery = {5754F842-9D3E-BF8D-E3FC-8B1237AEC7E5}
Z-Wave Gateway = {4EF72D56-BF9F-4347-8F0A-2035D241116F}
Z-Wave Module = {101352E1-88C7-4F16-998B-E20D50779AF6}
dS Apartment = {555C65F5-F436-467F-A2B1-DAA1BB02CA3B}
dS Configurator = {7CADC358-60B0-4D91-9825-27E9029B62C4}
dS Expert = {1822D865-2093-32A1-6999-280C82E669EB}
dS Joker = {DB54D0EC-64C4-4941-9B64-2337183C9C2E}
dS Light = {DB54D0DB-64C3-4930-9B53-2337183C9C1D}
dS Shutter = {3DDA1E2B-B807-4680-AB6D-E7E8FBD6093A}
dS Splitter = {8D7872F4-CAC3-409D-926B-CCF1BA9E937B}
dS Zone = {4E0FE8A0-1A1E-460A-9446-2D18B3635310}
ekey Fingerprint = {9AB0DD38-A396-4D35-81A1-2FB6A3992332}
xComfort Binary Input = {3040A77D-3E9C-42D4-A1B6-329EFE8086DB}
xComfort Configurator = {5DD921D4-4712-443F-B89F-03434A4DBF94}
xComfort Dimmer = {8050FEEC-C875-4BDD-9143-D15134B89D35}
xComfort Energy = {814067F0-EACB-43C3-99BD-5CB9B2F8FB9E}
xComfort Gateway = {D2DCE381-19A7-4D14-B819-49C0539BC350}
xComfort HRV = {E4693C3F-95F1-48B6-9443-4A6B3EE0FACA}
xComfort Heating = {586D59EE-04A8-4896-B49D-63B4DD9618EF}
xComfort Humidity = {3EBA1AB7-72CA-48D2-8F89-813E085D41BB}
xComfort Impulse = {A374DCF0-CEDE-4EB7-B6A8-E92787E19B25}
xComfort One Channel Heating = {62444FDF-FBF0-8F98-50B3-B1E85ADD86E2}
xComfort Remote = {DCBD8143-83AB-4068-8FC0-0C92A93AA8A8}
xComfort Room Control = {1A1C4C67-C99D-4D3E-8A34-23581CE8CCAA}
xComfort Shutter = {1B7B5B7D-CAA9-4AB5-B9D8-EC805EC955AD}
xComfort Switch = {27DD9788-802E-45B7-BA54-FB97141398F7}
xComfort Temperature = {591B4A05-E5BF-4EEA-BC34-36E6F1CC9D56}
xComfort Value RX = {DA2FCC12-2DE1-404A-8A5E-1C6AF05F96A2}
xComfort Value TX = {ED6A1E00-81C7-416F-9F97-1F2CC8F45B15}
*/
```
## IPS_GetModuleListByType
Source: https://www.symcon.de/en/service/documentation/command-reference/management-modules/ips-getmodulelistbytype/
`array IPS_GetModuleListByType(int $ModuleType)`
_Requires Symcon >= 3.3_
returns a list of all modules of a given type
**Parameters**
- `$ModuleType` (int)
| Value | Description |
| ----- | ------------- |
| 0 | Core |
| 1 | I/O |
| 2 | Splitter |
| 3 | Device |
| 4 | Configurator |
| 5 | Discovery |
| 6 | Visualization |
**Returns** (array): An array of all [GUIDs](https://www.symcon.de/en/llms/concepts.md) of modules in IP-Symcon of the type __Type__ given as strings
| Value | Description |
| ----- | ------------- |
| 0 | Core |
| 1 | I/O |
| 2 | Splitter |
| 3 | Device |
| 4 | Configurator |
| 5 | Discovery |
| 6 | Visualization |
**Example**
```php
print_r(IPS_GetModuleListByType(0));
/* returns, e.g.:
Array
(
[0] => {2D8B0172-166C-45B0-B979-61A787809E22}
[1] => {CCC52C33-D77A-4AE9-A6CF-462F152532A0}
[2] => {11842D31-3CA4-4F1B-BBA9-E4A0FE1873AF}
[3] => {4CB91589-CE01-4700-906F-26320EFCF6C4}
etc. ...
)
*/
```
## IPS_IsModuleCompatible
Source: https://www.symcon.de/en/service/documentation/command-reference/management-modules/ips-ismodulecompatible/
`bool IPS_IsModuleCompatible(string $ModuleID, string $ParentModuleID)`
checks if two modules are compatible to each other
**Parameters**
- `$ModuleID` (string): ID of the potential child module
- `$ParentModuleID` (string): ID of the potential parent module
**Returns** (bool): __TRUE__ if the modules are compatible, otherwise __FALSE__.
ID of the potential parent module
**Example**
```php
if (IPS_IsModuleCompatible("{48FCFDC1-11A5-4309-BB0B-A0DB8042A969}",
"{57040540-4432-4220-8D2D-4676B57E223D}"))
echo "FS20 module is compatible to the FHZ module!";
```
## IPS_LibraryExists
Source: https://www.symcon.de/en/service/documentation/command-reference/management-modules/ips-librarayexists/
`bool IPS_LibraryExists(string $LibraryID)`
Checks if the given library exists
**Parameters**
- `$LibraryID` (string): ID of the library
**Returns** (bool): If the LibraryID exists in the system, __TRUE__ is returned, otherwise __FALSE__.
ID of the library
**Example**
```php
if (IPS_LibraryExists("{7DC57F9A-C095-4CDE-A6F0-2CB35A29A8FE}"))
echo "ELV Library exists!";
```
## IPS_ModuleExists
Source: https://www.symcon.de/en/service/documentation/command-reference/management-modules/ips-moduleexists/
`bool IPS_ModuleExists(string $ModuleID)`
checks if the given module exists
**Parameters**
- `$ModuleID` (string): ID of the module
**Returns** (bool): If the ModuleID exists in the system, __TRUE__ is returned, otherwise __FALSE__.
ID of the module
**Example**
```php
if (IPS_ModuleExists("{48FCFDC1-11A5-4309-BB0B-A0DB8042A969}"))
echo "FS20 Module exists!";
```
---
# Management of Objects
> Symcon documentation · English · generated on 2026-09-26
> Index: https://www.symcon.de/en/llms.txt
Source: https://www.symcon.de/en/service/documentation/command-reference/management-objects/
## IPS_GetChildrenIDs
Source: https://www.symcon.de/en/service/documentation/command-reference/management-objects/ips-getchildrenids/
`array IPS_GetChildrenIDs(int $ObjectID)`
returns a list of all children objects
**Parameters**
- `$ObjectID` (int): ID of the object
**Returns** (array): An array of integer values that contains the IDs of all child objects
ID of the object
**Example**
```php
print_r(IPS_GetChildrenIDs(32102));
/* returns, e.g.,:
Array
(
[0] => 11650
[1] => 25578
[2] => 30202
etc. ...
)
*/
```
## IPS_GetLocation
Source: https://www.symcon.de/en/service/documentation/command-reference/management-objects/ips-getlocation/
`string IPS_GetLocation(int $ObjectID)`
returns the complete path to an object
**Parameters**
- `$ObjectID` (int): ID of the object
**Returns** (string): Path/ name of the object within the object tree
ID of the object
**Example**
```php
echo IPS_GetLocation(47359);
//returns, e.g., "FHT8b\LowBattery"
```
## IPS_GetName
Source: https://www.symcon.de/en/service/documentation/command-reference/management-objects/ips-getname/
`string IPS_GetName(int $ObjectID)`
returns the name of the object
**Parameters**
- `$ObjectID` (int): ID for which the name should be returned
**Returns** (string): Name of the object in the logical object tree
ID for which the name should be returned
**Example**
```php
echo IPS_GetName(47359);
// Returns e.g.: "My Table Lamp"
// Special case for unnamed events (since version 4.0)
echo IPS_GetName(48864 /*[TestScript\Unknown Object (ID: 48864)]*/);
// Returns e.g.: "When changing the variable, the variable "Test Folder\IRTrans USB/LAN/WLAN\Remote Control"
```
## IPS_GetObject
Source: https://www.symcon.de/en/service/documentation/command-reference/management-objects/ips-getobject/
`array IPS_GetObject(int $ObjectID)`
returns extensive information about an object
**Parameters**
- `$ObjectID` (int): The ID of the object
**Returns** (array): The following information are available as key => value pairs:
| Index | Type | Description |
| -------------------------------------- | ------- | ------------------------------------------------------------------------------------------------------------------------------------------------ |
| __ChildrenIDs__ | array | Object IDs of the children. See: [IPS_GetChildrenIDs](https://www.symcon.de/en/llms/functions/management-objects.md) |
| __HasChildren__ | boolean | TRUE if the object has child objects. See: [IPS_HasChildren](https://www.symcon.de/en/llms/functions/management-objects.md) |
| __ObjectID__ | integer | ID of the object |
| __ObjectIcon__ | string | File name of the icon without extension. See: [IPS_SetIcon](https://www.symcon.de/en/llms/functions/management-objects.md) |
| __ObjectIdent__ | string | Identifier of the Object. See: [IPS_SetIdent](https://www.symcon.de/en/llms/functions/management-objects.md) |
| __ObjectInfo__ | string | Description that can be provided by the user. See: [IPS_SetInfo](https://www.symcon.de/en/llms/functions/management-objects.md) |
| __ObjectIsDisabled__ (since 4.0) | boolean | TRUE if the object is disabled. See [IPS_SetDisabled](https://www.symcon.de/en/llms/functions/management-objects.md) |
| __ObjectIsHidden__ | boolean | TRUE if the object is hidden in the visualization. See [IPS_SetHidden](https://www.symcon.de/en/llms/functions/management-objects.md) |
| __ObjectIsHiddenMaximize__ (since 9.1) | boolean | TRUE if the maximize button of the object should be hidden in the visualization. See [IPS_SetHiddenMaximize](https://www.symcon.de/en/llms/functions/management-objects.md) |
| __ObjectIsHiddenTitle__ (since 9.1) | boolean | TRUE if the title of the object should be hidden in the visualization. See [IPS_SetHiddenTitle](https://www.symcon.de/en/llms/functions/management-objects.md) |
| __ObjectIsReadOnly__ | boolean | TRUE if the object is read-only. (Currently only used for state variables) |
| __ObjectName__ | string | Name of the Object. See: [IPS_SetName](https://www.symcon.de/en/llms/functions/management-objects.md) |
| __ObjectPosition__ | integer | Position of the object in the visualization. This value may not be unique. See: [IPS_SetPosition](https://www.symcon.de/en/llms/functions/management-objects.md) |
| __ObjectType__ | integer | Type of the object (0: Category, 1: Instance, 2: Variable, 3: Script, 4: Event, 5: Media, 6: Link) |
| __ObjectSummary__ | string | Short description of an object, which is generated by the module if needed |
| __ParentID__ | integer | Parent object. 0 = No parent object. See: [IPS_SetParent](https://www.symcon.de/en/llms/functions/management-objects.md) |
The ID of the object
**Example**
```php
print_r(IPS_GetObject(19668));
/* returns, e.g.,:
Array
(
[ParentID] => 26691
[ObjectID] => 43502
[ObjectType] => 1
[ObjectIdent] =>
[ObjectName] => MX FESLIM (ID: 1)
[ObjectInfo] => This is a device instance
[ObjectIcon] => IPS
[ObjectSummary] =>
[ObjectPosition] => 1
[ObjectIsReadOnly] =>
[ObjectIsHidden] =>
[ObjectIsHiddenTitle] =>
[ObjectIsHiddenMaximize] =>
[ObjectIsDisabled] =>
[ObjectIsLocked] =>
[HasChildren] => 1
[ChildrenIDs] => Array
(
[0] => 43430
[1] => 55892
[2] => 36597
[3] => 18993
[4] => 34524
[5] => 12269
[6] => 44450
[7] => 23394
[8] => 11693
[9] => 13654
)
)
*/
```
## IPS_GetObjectIDByIdent
Source: https://www.symcon.de/en/service/documentation/command-reference/management-objects/ips-getobjectidbyident/
`int IPS_GetObjectIDByIdent(string $ObjectIdent, int $ParentID)`
_Requires Symcon >= 2.5_
returns the ID of an object by its ident
**Parameters**
- `$ObjectIdent` (string): The searched object identificator
- `$ParentID` (int): ID of the object whose children object are searched
**Returns** (int): ID of the found object, otherwise __FALSE__
ID of the object whose children object are searched
**Example**
```php
// This function can be used to replace IPS_StatusVariableExists
// Example for IPS_StatusVariableExists($id, "StatusVariable");
echo !(@IPS_GetObjectIDByIdent("StatusVariable", $id) === false);
// In addition, the function can be used to replace IPS_GetStatusVariableID
// Example for IPS_GetStatusVariableID($id, "StatusVariable");
echo IPS_GetObjectIDByIdent("StatusVariable", $id);
$id = IPS_GetObjectIDByIdent($VariableIdent, $InstanceID);
$v = IPS_GetVariable($id);
// Array since 4.0
$sv = Array(
"VariableID" => $id,
"VariableIdent" => $VariableIdent,
"VariableName" => "N/A",
"VariablePosition" => 0,
"VariableProfile" => $v['VariableProfile'],
"VariableType" => $v['VariableType'],
"VariableHasAction" => ($v['VariableAction'] > 0),
"VariableUseAction" => ($v['VariableAction'] > 0)
);
// Array until 3.4
$sv = Array(
"VariableID" => $id,
"VariableIdent" => $VariableIdent,
"VariableName" => "N/A",
"VariablePosition" => 0,
"VariableProfile" => $v['VariableProfile'],
"VariableType" => $v['VariableValue']['ValueType'],
"VariableHasAction" => ($v['VariableAction'] > 0),
"VariableUseAction" => ($v['VariableAction'] > 0)
);
```
## IPS_GetObjectIDByName
Source: https://www.symcon.de/en/service/documentation/command-reference/management-objects/ips-getobjectidbyname/
`int IPS_GetObjectIDByName(string $ObjectName, int $ParentID)`
returns the ID of an object by its name
**Parameters**
- `$ObjectName` (string): The searched object name
- `$ParentID` (int): ID of the object whose children object are searched
**Returns** (int): ID of the found object, otherwise __FALSE__
ID of the object whose children object are searched
**Example**
```php
$ObjectID = @IPS_GetObjectIDByName("Rain sensing", $ParentID);
if ($ObjectID === false)
echo "Object not found!";
else
echo "The Object ID is: ". $ObjectID;
```
## IPS_GetObjectList
Source: https://www.symcon.de/en/service/documentation/command-reference/management-objects/ips-getobjectlist/
`array IPS_GetObjectList()`
returns a list of all existing objects
**Returns** (array): An Array of integer that contains the IDs of all objects within IP Symcon
This function determines the IDs of all objects registered within IP Symcon. The IDs are listed in an array.
**Example**
```php
print_r(IPS_GetObjectList());
/* returns, e.g.,:
Array
(
[0] => 0
[1] => 10573
[2] => 11363
[3] => 11650
[4] => 14114
etc. ...
)
*/
```
## IPS_GetParent
Source: https://www.symcon.de/en/service/documentation/command-reference/management-objects/ips-getparent/
`int IPS_GetParent(int $ObjectID)`
returns the ID of the parent of the object
**Parameters**
- `$ObjectID` (int): The ID of the object
**Returns** (int): The ID of the parent of the object
The ID of the object
**Example**
```php
echo IPS_GetParent(47359);
//returns, e.g.,: 0 for the main category
```
## IPS_HasChildren
Source: https://www.symcon.de/en/service/documentation/command-reference/management-objects/ips-haschildren/
`bool IPS_HasChildren(int $ObjectID)`
checks if an object has child objects
**Parameters**
- `$ObjectID` (int): The ID of the object
**Returns** (bool): __TRUE__ if the object has child objects, otherwise __FALSE__
The ID of the object
**Example**
```php
if (IPS_IsHasChildren(0))
echo "The root object has child objects!";
```
## IPS_IsChild
Source: https://www.symcon.de/en/service/documentation/command-reference/management-objects/ips-ischild/
`bool IPS_IsChild(int $ObjectID, int $ParentID, bool $Recursive)`
checks if an object is a child of a parent object
**Parameters**
- `$ObjectID` (int): The ID of the object
- `$ParentID` (int): The ID of the potential parent object
- `$Recursive` (bool): FALSE if only a direct parent-child relationship should be checked; TRUE if a relationship over multiple levels should also be checked
**Returns** (bool): __TRUE__ if the object is a child of the object with the ID ParentID, otherwise __FALSE__
FALSE if only a direct parent-child relationship should be checked; TRUE if a relationship over multiple levels should also be checked
**Example**
```php
if (IPS_IsChild(0, 12345, true))
echo "The object 12345 is a descendent of the root object!";
```
## IPS_ObjectExists
Source: https://www.symcon.de/en/service/documentation/command-reference/management-objects/ips-objectexists/
`bool IPS_ObjectExists(int $ObjectID)`
checks if a specific object exists
**Parameters**
- `$ObjectID` (int): The ID of the object
**Returns** (bool): If the command succeeds, it returns __TRUE__, otherwise __FALSE__.
The ID of the object
**Example**
```php
if (IPS_ObjectExists(34881))
echo "An object with that ID exists!";
```
## IPS_SetDisabled
Source: https://www.symcon.de/en/service/documentation/command-reference/management-objects/ips-setdisabled/
`bool IPS_SetDisabled(int $ObjectID, bool $Disabled)`
_Requires Symcon >= 4.0_
set an object as disabled for the visualizations
**Parameters**
- `$ObjectID` (int): The ID of the object
- `$Disabled` (bool): TRUE if the object should be disabled; FALSE if it should be enabled
**Returns** (bool): If the command succeeds, it returns __TRUE__, otherwise __FALSE__.
TRUE if the object should be disabled; FALSE if it should be enabled
**Example**
```php
IPS_SetDisabled(47381, true); // The object becomes disabled
```
## IPS_SetHidden
Source: https://www.symcon.de/en/service/documentation/command-reference/management-objects/ips-sethidden/
`bool IPS_SetHidden(int $ObjectID, string $Hidden)`
_Requires Symcon >= 2.1_
set the visibility for an object
**Parameters**
- `$ObjectID` (int): The ID of the object
- `$Hidden` (string): TRUE if invisible
**Returns** (bool): If the command succeeds, it returns __TRUE__, otherwise __FALSE__.
TRUE if invisible
**Example**
```php
IPS_SetHidden(47381, true); //hide object
```
## IPS_SetHiddenMaximize
Source: https://www.symcon.de/en/service/documentation/command-reference/management-objects/ips-sethiddenmaximize/
`bool IPS_SetHiddenMaximize(int $ObjectID, bool $Hidden)`
_Requires Symcon >= 9.1_
sets the visibility of the maximize button of an object
**Parameters**
- `$ObjectID` (int): The ID of the object
- `$Hidden` (bool): TRUE if maximize button is invisible
**Returns** (bool): If the command succeeds, it returns __TRUE__, otherwise __FALSE__.
TRUE if maximize button is invisible
**Example**
```php
IPS_SetHiddenMaximize(47381, true); //hide maximize button
```
## IPS_SetHiddenTitle
Source: https://www.symcon.de/en/service/documentation/command-reference/management-objects/ips-sethiddentitle/
`bool IPS_SetHiddenTitle(int $ObjectID, bool $Hidden)`
_Requires Symcon >= 9.1_
sets the visibility of the title of an object
**Parameters**
- `$ObjectID` (int): The ID of the object
- `$Hidden` (bool): TRUE if title is invisible
**Returns** (bool): If the command succeeds, it returns __TRUE__, otherwise __FALSE__.
TRUE if title is invisible
**Example**
```php
IPS_SetHiddenTitle(47381, true); //hide title
```
## IPS_SetIcon
Source: https://www.symcon.de/en/service/documentation/command-reference/management-objects/ips-seticon/
`bool IPS_SetIcon(int $ObjectID, string $Icon)`
_Requires Symcon >= 2.1_
set the icon of an object
**Parameters**
- `$ObjectID` (int): The ID of the object
- `$Icon` (string): Filename of the icon without path and extension
**Returns** (bool): If the command succeeds, it returns __TRUE__, otherwise __FALSE__.
Filename of the icon without path and extension
**Example**
```php
IPS_SetIcon(47381, "weather");
```
## IPS_SetIdent
Source: https://www.symcon.de/en/service/documentation/command-reference/management-objects/ips-setident/
`bool IPS_SetIdent(int $ObjectID, string $Ident)`
_Requires Symcon >= 2.5_
set the ident of an object
**Parameters**
- `$ObjectID` (int): ID of the object to be changed
- `$Ident` (string): New identifier for the object
**Returns** (bool): If the command succeeds, it returns __TRUE__, otherwise __FALSE__.
New identifier for the object
**Example**
```php
IPS_SetIdent(47381, "TEMPERATURE");
```
## IPS_SetInfo
Source: https://www.symcon.de/en/service/documentation/command-reference/management-objects/ips-setinfo/
`bool IPS_SetInfo(int $ObjectID, string $Info)`
set extended information of an object
**Parameters**
- `$ObjectID` (int): The ID of the object
- `$Info` (string): New description text for the object
**Returns** (bool): If the command succeeds, it returns __TRUE__, otherwise __FALSE__.
New description text for the object
**Example**
```php
IPS_SetInfo(47381, "USB sound card - Port A, basement - Green cable");
```
## IPS_SetName
Source: https://www.symcon.de/en/service/documentation/command-reference/management-objects/ips-setname/
`bool IPS_SetName(int $ObjectID, string $Name)`
set the name of an object
**Parameters**
- `$ObjectID` (int): The ID of the object
- `$Name` (string): New name for the object
**Returns** (bool): If the command succeeds, it returns __TRUE__, otherwise __FALSE__.
New name for the object
**Example**
```php
IPS_SetName(47381, "Safety precautions");
```
## IPS_SetParent
Source: https://www.symcon.de/en/service/documentation/command-reference/management-objects/ips-setparent/
`bool IPS_SetParent(int $ObjectID, int $ParentID)`
set the parent of an object
**Parameters**
- `$ObjectID` (int): The ID of the object
- `$ParentID` (int): ID of the new parent object
**Returns** (bool): If the command succeeds, it returns __TRUE__, otherwise __FALSE__.
ID of the new parent object
**Example**
```php
IPS_SetParent(47381, 15361);
```
## IPS_SetPosition
Source: https://www.symcon.de/en/service/documentation/command-reference/management-objects/ips-setposition/
`bool IPS_SetPosition(int $ObjectID, int $Position)`
_Requires Symcon >= 2.1_
set the position of an object
**Parameters**
- `$ObjectID` (int): The ID of the object
- `$Position` (int): Position value
**Returns** (bool): If the command succeeds, it returns __TRUE__, otherwise __FALSE__.
Position value
**Example**
```php
IPS_SetPosition(47381, 5);
```
---
# Program Information
> Symcon documentation · English · generated on 2026-09-26
> Index: https://www.symcon.de/en/llms.txt
Source: https://www.symcon.de/en/service/documentation/command-reference/program-information/
## IPS_FunctionExists
Source: https://www.symcon.de/en/service/documentation/command-reference/program-information/ips-functionexists/
`bool IPS_FunctionExists(int $FunctionName)`
_Requires Symcon >= 2.6_
checks if a specific function exists
**Parameters**
- `$FunctionName` (int): Name of the checked function
**Returns** (bool): If the command succeeds, it returns __TRUE__, otherwise __FALSE__.
Name of the checked function
**Example**
```php
if (IPS_FunctionExists("GetValue"))
echo "The function GetValue exists!";
```
## IPS_GetFunction
Source: https://www.symcon.de/en/service/documentation/command-reference/program-information/ips-getfunction/
`array IPS_GetFunction(int $FunctionName)`
_Requires Symcon >= 2.6_
returns extensive information about a function
**Parameters**
- `$FunctionName` (int): Name of the checked function
**Returns** (array): An array with the following __key => value__ pairs
| Index | Type | Description |
| ---------------- | ------ | --------------------------------- |
| __FunctionName__ | string | Function name |
| __Parameters__ | array | See Table "Parameter Information" |
| __Result__ | array | See Table "Result Information" |
_Table: Parameter Information_
| Index | Type | Description |
| ----------- | ------- | ---------------------------------------------------------------------------------------------- |
| Description | string | Name of the parameter |
| Enumeration | array | Named presentation of possible integer values |
| Type_ | integer | Variable Type of parameter/result: 0=Boolean, 1=Integer, 2=Float, 3=String, 4=Variant, 5=Array |
_Table: Result Information_
| Index | Type | Description |
| ----------- | ------- | ---------------------------------------------------------------------------------------------- |
| Description | string | Name of the parameter |
| Enumeration | array | Named presentation of possible integer values |
| Type_ | integer | Variable Type of parameter/result: 0=Boolean, 1=Integer, 2=Float, 3=String, 4=Variant, 5=Array |
Name of the checked function
**Example**
```php
// Request information about the functions IPS_GetFunction and IPS_CreateMedia
var_dump(IPS_GetFunction("IPS_GetFunction"));
var_dump(IPS_GetFunction("IPS_CreateMedia"));
// Result "IPS_GetFunction"
/*
array(3) {
["FunctionName"]=>
string(15) "IPS_GetFunction"
["Result"]=>
array(3) {
["Type_"]=>
int(5)
["Description"]=>
string(6) "Result"
["Enumeration"]=>
array(0) {
}
}
["Parameters"]=>
array(1) {
[0]=>
array(3) {
["Type_"]=>
int(3)
["Description"]=>
string(12) "FunctionName"
["Enumeration"]=>
array(0) {
}
}
}
*/
// Result "IPS_CreateMedia"
/*
array(3) {
["FunctionName"]=>
string(15) "IPS_CreateMedia"
["Result"]=>
array(3) {
["Type_"]=>
int(1)
["Description"]=>
string(6) "Result"
["Enumeration"]=>
array(0) {
}
}
["Parameters"]=>
array(1) {
[0]=>
array(3) {
["Type_"]=>
int(1)
["Description"]=>
string(9) "MediaType"
["Enumeration"]=>
array(6) {
[0]=>
string(6) "mtForm"
[1]=>
string(7) "mtImage"
[2]=>
string(7) "mtSound"
[3]=>
string(8) "mtStream"
[4]=>
string(7) "mtChart"
[5]=>
string(10) "mtDocument"
}
}
}
}
*/
```
## IPS_GetFunctionList
Source: https://www.symcon.de/en/service/documentation/command-reference/program-information/ips-getfunctionlist/
`array IPS_GetFunctionList(int $InstanceID)`
_Requires Symcon >= 2.6_
returns a list of all available functions
**Parameters**
- `$InstanceID` (int): ID of the instance whose functions are returned, 0 for all functions
**Returns** (array): An array of string values of all function names
ID of the instance whose functions are returned, 0 for all functions
**Example**
```php
$allFunctions = IPS_GetFunctionList(0);
print_r($allFunktions[48]); // return only function 48 (IPS_CreateScript)
/* returns:
Array
(
[FunctionName] => IPS_CreateScript
[Parameters] => Array
(
[0] => Array
(
[Description] => ScriptType
[Type_] => 1
)
)
[Result] => Array
(
[Description] => Result
[Type_] => 1
)
)
*/
//Export all IP Symcon functions with a parameter list
$instanceid = 0; //0 = All functions, otherwise filter on InstanceID
$fs = IPS_GetFunctionList($instanceid);
asort($fs);
$typestr = Array("boolean", "integer", "float", "string", "variant", "array");
foreach($fs as $f) {
$f = IPS_GetFunction($f);
echo sprintf("[%7s]", $typestr[$f['Result']['Type_']]) . " - ".$f['FunctionName']."(";
$a = Array();
foreach($f['Parameters'] as $p) {
if(isset($p['Enumeration']) && sizeof($p['Enumeration']) > 0) {
$b=Array();
foreach($p['Enumeration'] as $k => $v) {
$b[] = $k."=".$v;
}
$type = "integer/enum[".implode(", ", $b)."]";
} else {
$type = $typestr[$p['Type_']];
}
$a[]=$type." $".$p['Description'];
}
echo implode(", ", $a).");\n";
}
```
## IPS_GetFunctionListByModuleID
Source: https://www.symcon.de/en/service/documentation/command-reference/program-information/ips-getfunctionlistbymoduleid/
`array IPS_GetFunctionListByModuleID(string $ModuleID)`
returns a list of all available functions of a module
**Parameters**
- `$ModuleID` (string): GUID of the module
**Returns** (array): An array of string values of all functions
GUID of the module
**Example**
```php
// All functions of "DPT 200.x - Binary Value & Status" from KNX
print_r(IPS_GetFunctionListByModuleID("{04ED3286-C982-436F-A01E-8A03C2E976A8}"));
/* returns:
Array
(
[0] => IPS_RequestAction
[1] => IPS_StopSearch
[2] => IPS_StartSearch
[3] => IPS_IsSearching
[4] => KNX_WriteDPT200
[5] => IPS_GetConfigurationForm
[6] => IPS_SupportsSearching
[7] => KNX_RequestStatus
[8] => IPS_GetConfiguration
[9] => IPS_GetProperty
[10] => IPS_SetProperty
[11] => IPS_SetConfiguration
[12] => IPS_GetConfigurationForParent
[13] => IPS_HasChanges
[14] => IPS_ResetChanges
[15] => IPS_ApplyChanges
[16] => IPS_GetReferenceList
[17] => IPS_Translate
[18] => KNX_RenameVariables
)
*/
```
## IPS_GetKernelArchitecture
Source: https://www.symcon.de/en/service/documentation/command-reference/program-information/ips-getkernelarchitecture/
`string IPS_GetKernelArchitecture()`
_Requires Symcon >= 6.0_
supplies the architecture that IP-Symcon was created for
**Returns** (string): The architecture that IP-Symcon was created for
The function returns a string with the architecture which IP-Symcon was created for
**Example**
```php
echo IPS_GetKernelArchitecture ();
// Sample output:
/*
// MacOS, Windows 32Bit
i386
// Linux, Windows 64Bit
amd64
// Linux, Raspberry Pi
armhf
// Linux, Raspberry Pi
arm64
*/
```
## IPS_GetKernelDate
Source: https://www.symcon.de/en/service/documentation/command-reference/program-information/ips-getkerneldate/
`int IPS_GetKernelDate()`
_Requires Symcon >= 4.4_
returns the kernel creation date
**Returns** (int): The creation date in UnixTimeStamp
The function supplies an integer value, which outputs the creation date of the kernel as UnixTimeStamp.
**Example**
```php
echo IPS_GetKernelDate ();
// Sample output:
// 1511046903
```
## IPS_GetKernelDir
Source: https://www.symcon.de/en/service/documentation/command-reference/program-information/ips-getkerneldir/
`string IPS_GetKernelDir()`
returns the path to the IP Symcon program folder
**Returns** (string): The full path to the IP Symcon program folder
The function returns a string containing the full path to the IP Symcon program folder (Settings, Scripts, Media, ...). Depending on the operating system, the path contains a trailing slash ("/") or backslash ("\").
**Example**
```php
echo IPS_GetKernelDir();
// Examplary output:
/*
// Windows
// since Version 5.3
C:\ProgramData\Symcon\
// until Version 5.2
C:\Programs\IP-Symcon\
// Linux, RaspberryPi
/var/lib/symcon/
// MacOS
/Library/Application Support/Symcon/
*/
```
## IPS_GetKernelDirEx
Source: https://www.symcon.de/en/service/documentation/command-reference/program-information/ips-getkerneldirex/
`string IPS_GetKernelDirEx()`
_Requires Symcon >= 4.0_
returns the path to the IP Symcon installation folder
**Returns** (string): The full path to the IP Symcon installation folder
The function returns a string containing the full path to the IP Symcon installation folder. Depending on the operating system, the path contains a trailing slash ("/") or backslash ("\").
**Example**
```php
echo IPS_GetKernelDirEx();
// Examplary output:
/*
// Windows
C:\Programs\IP-Symcon\
// Linux, RaspberryPi
/usr/share/symcon/
// MacOS
/Applications/Symcon.app/Contents/Service/
*/
```
## IPS_GetKernelDirSpace
Source: https://www.symcon.de/en/service/documentation/command-reference/program-information/ips-getkerneldirspace/
`array IPS_GetKernelDirSpace()`
_Requires Symcon >= 6.2_
returns the total/free/available/disk space where IP-Symcon has its data
**Returns** (array): returns the total/free/available/disk space
The function returns an array containing the Keys Total/Free/Available.
Those contain the total/free/available disk space where all data of IP-Symcon is saved.
**Example**
```php
print_r(IPS_GetKernelDirSpace());
// Examplary output:
/*
Array
(
[Total] => 511582613504
[Free] => 96859312128
[Available] => 96859312128
)
*/
```
## IPS_GetKernelPlatform
Source: https://www.symcon.de/en/service/documentation/command-reference/program-information/ips-getkernelplatform/
`string IPS_GetKernelPlatform()`
_Requires Symcon >= 4.4_
supplies the operating system which IP-Symcon is running on
**Returns** (string): The operating system IP-Symcon is running on
The function returns a string with the operating system the IP-Symcon server is running on
**Example**
```php
echo IPS_GetKernelPlatform();
// Sample output:
/*
// SymBox
SymBox
// Windows
Windows
// Linux
Ubuntu
Ubuntu (Docker)
// RaspberryPi
Raspberry Pi
Raspberry Pi (Docker)
// MacOS
Mac
*/
```
## IPS_GetKernelRevision
Source: https://www.symcon.de/en/service/documentation/command-reference/program-information/ips-getkernelrevision/
`string IPS_GetKernelRevision()`
_Requires Symcon >= 4.4_
supplies a unique revision identifier
**Returns** (string): Unique revision identifier
The function returns a string with a unique revision identifier.
**Example**
```php
echo IPS_GetKernelRevision();
// Sample output:
// 8edcb65b27506d687dd6a4d1cee470f86e2d89e1
```
## IPS_GetKernelRunlevel
Source: https://www.symcon.de/en/service/documentation/command-reference/program-information/ips-getkernelrunlevel/
`int IPS_GetKernelRunlevel()`
_Requires Symcon >= 4.0_
returns the run level of the kernel
**Returns** (int): Run level of the kernel
This function returns the run level of the system.
| Run level | Return value | Description |
| ----------- | ------------ | --------------------------------------------------------------------------- |
| KR_CREATE | 10101 | Kernel is being created |
| KR_INIT | 10102 | Kernel is being initialized, i.e., modules are loaded and instances created |
| KR_READY | 10103 | Kernel is ready and running |
| KR_UNINIT | 10104 | Kernel is being shut down and everything is quit cleanly |
| KR_SHUTDOWN | 10105 | Kernel was shut down completely |
**Example**
```php
echo IPS_GetKernelRunlevel(); // returns, e.g., 10103, if the run level is KR_READY
```
## IPS_GetKernelStartTime
Source: https://www.symcon.de/en/service/documentation/command-reference/program-information/ips-getkernelstarttime/
`int IPS_GetKernelStartTime()`
_Requires Symcon >= 4.0_
returns the point of time when IP Symcon was started
**Returns** (int): Point of time of the most recent start of IP Symcon
The function returns the date and time of the start time of IP Symcon as Unix Timestamp.
**Example**
```php
// returns, e.g., 1204675012
echo IPS_GetKernelStartTime();
// returns, e.g., "2008.03.04 23:56:52"
echo date("Y.m.d H:i:s", IPS_GetKernelStartTime());
```
## IPS_GetKernelVersion
Source: https://www.symcon.de/en/service/documentation/command-reference/program-information/ips-getkernelversion/
`string IPS_GetKernelVersion()`
returns the version number of the used kernel
**Returns** (string): Program version. Major/ Minor version is seperated by a dot (".")
The function returns a string with the number of the IP Symcon program version. This information can be used to decide if a script can be run under the reported version.
**Example**
```php
echo IPS_GetKernelVersion(); // returns, e.g., "2.00"
```
## IPS_GetLogDir
Source: https://www.symcon.de/en/service/documentation/command-reference/program-information/ips-getlogdir/
`string IPS_GetLogDir()`
_Requires Symcon >= 4.0_
returns the path to the IP Symcon log folder
**Returns** (string): The full path to the IP Symcon log folder
The function returns a string containing the full path to the IP Symcon log folder. Depending on the operating system, the path contains a trailing slash ("/") or backslash ("\").
**Example**
```php
echo IPS_GetLogDir();
// Examplary output:
/*
//Windows
"C:\Programs\IP-Symcon\logs\"
// Linux, RaspberryPi
"/var/log/symcon/"
// MacOS
"/Library/Logs/Symcon"
*/
```
## IPS_GetSystemLanguage
Source: https://www.symcon.de/en/service/documentation/command-reference/program-information/ips-getsystemlanguage/
`string IPS_GetSystemLanguage()`
_Requires Symcon >= 6.1_
returns the system language of the operating system on which IP-Symcon is running
**Returns** (string): System language
The function returns a string of the system language of the operating system on which IP-Symcon is running.
**Example**
```php
echo IPS_GetSystemLanguage();
// example output:
/*
// German
de_DE
// English
en_US
*/
```
## IPS_GetUpdateChannel
Source: https://www.symcon.de/en/service/documentation/command-reference/program-information/ips-getupdatechannel/
`string IPS_GetUpdateChannel()`
_Requires Symcon >= 6.1_
returns the currently configured update channel
**Returns** (string): Currently configured update channel
The function returns a string with the currently configured update channel.
**Example**
```php
echo IPS_GetUpdateChannel(); //returns e.g.: stable, beta or testing
```
## IPS_LogMessage
Source: https://www.symcon.de/en/service/documentation/command-reference/program-information/ips-logmessage/
`bool IPS_LogMessage(string $Sender, string $Message)`
Writes a user defined message into the log file
**Parameters**
- `$Sender` (string): The sender
- `$Message` (string): The message
**Returns** (bool): If the command succeeds, it returns __TRUE__, otherwise __FALSE__.
The message
**Example**
```php
$ScriptStart = microtime(true);
// calculate a lot...
$ScriptTerm = microtime(true) - $ScriptStart;
IPS_LogMessage($_IPS['SELF'], "Term is ". $SkriptTerm. "sec");
```
---
# Management of Scripts
> Symcon documentation · English · generated on 2026-09-26
> Index: https://www.symcon.de/en/llms.txt
Source: https://www.symcon.de/en/service/documentation/command-reference/management-scripts/
## IPS_CreateScript
Source: https://www.symcon.de/en/service/documentation/command-reference/management-scripts/ips-createscript/
`int IPS_CreateScript(int $SkriptType)`
creates a script
**Parameters**
- `$SkriptType` (int)
| Value | Description |
| ----- | --------------------------- |
| 0 | generates a __PHP script__ |
| 1 | generates a __Flow Script__ |
| 2 | generates a __IPSWorkflow__ |
**Returns** (int): ID of the newly created script
| Value | Description |
| ----- | --------------------------- |
| 0 | generates a __PHP script__ |
| 1 | generates a __Flow Script__ |
| 2 | generates a __IPSWorkflow__ |
**Example**
```php
$ScriptID = IPS_CreateScript(0);
echo"The Script ID is: ". $ScriptID;
```
## IPS_DeleteScript
Source: https://www.symcon.de/en/service/documentation/command-reference/management-scripts/ips-deletescript/
`bool IPS_DeleteScript(int $ScriptID, bool $DeleteFile)`
deletes a script
**Parameters**
- `$ScriptID` (int): ID of the script
- `$DeleteFile` (bool): __TRUE__ if the file should be deleted. __FALSE__ if the file should be moved to the 'deleted' folder.
**Returns** (bool): If the command succeeds, it returns __TRUE__, otherwise __FALSE__.
__TRUE__ if the file should be deleted. __FALSE__ if the file should be moved to the 'deleted' folder.
**Example**
```php
IPS_DeleteScript($ScriptID, true); // Delete script including file
```
## IPS_GetScript
Source: https://www.symcon.de/en/service/documentation/command-reference/management-scripts/ips-getscript/
`array IPS_GetScript(int $ScriptID)`
return extensive information about a script
**Parameters**
- `$ScriptID` (int): ID of the script
**Returns** (array): The following information is available as key => value pairs:
| Index | Type | Description |
| ------------------------------ | ------- | ------------------------------------------------------------------------------------------------------------------------ |
| __IsBroken__ (until 3.4) | boolean | TRUE if an error occured during the last execution of the script, otherwise FALSE (since 4.0 replaced by ScriptIsBroken) |
| __LastExecute__ (until 3.4) | float | Unix timestamp of the last call (since 4.0 replaced by ScriptExecuted) |
| __ScriptIsBroken__ (since 4.0) | boolean | TRUE if an error occured during the last execution of the script, otherwise FALSE |
| __ScriptExecuted__ (since 4.0) | integer | Unix timestamp of the last call |
| __ScriptFile__ | string | Filename of the script |
| __ScriptID__ | integer | ID of the script |
| __ScriptType__ | integer | Type of the script (0: PHP script, 1: Flow script, 2: IPSWorkflow) |
ID of the script
**Example**
```php
// Since version 4.0
print_r(IPS_GetScript(46413));
/* Examplary output:
Array
(
[ScriptIsBroken] =>
[ScriptExecuted] => 1204933792
[ScriptFile] => 46413.ips.php
[ScriptID] => 46413
[ScriptType] => 0
)
*/
print_r(IPS_GetScriptCompatibility(46413));
/* Examplary output:
Array
(
[IsBroken] =>
[LastExecute] => 1204933792
[ScriptFile] => 46413.ips.php
[ScriptID] => 46413
[ScriptType] => 0
)
*/
// Until version 3.4
print_r(IPS_GetScript(46413));
/* Examplary output:
Array
(
[IsBroken] =>
[LastExecute] => 1204933792
[ScriptFile] => 46413.ips.php
[ScriptID] => 46413
[ScriptType] => 0
)
*/
```
## IPS_GetScriptContent
Source: https://www.symcon.de/en/service/documentation/command-reference/management-scripts/ips-getscriptcontent/
`string IPS_GetScriptContent(int $ScriptID)`
_Requires Symcon >= 3.1_
returns the content of a script
**Parameters**
- `$ScriptID` (int): ID of the script
**Returns** (string): The content of the script
ID of the script
**Example**
```php
$Content = IPS_GetScriptContent($ScriptID);
```
## IPS_GetScriptEventList
Source: https://www.symcon.de/en/service/documentation/command-reference/management-scripts/ips-getscripteventlist/
`array IPS_GetScriptEventList(int $ScriptID)`
returns all events that are assigned to a script
**Parameters**
- `$ScriptID` (int): ID of the script
**Returns** (array): A list of IDs of events that are assigned to the script
ID of the script
**Example**
```php
$events = IPS_GetScriptEventList($_IPS['SELF']);
print_r($events); // determines all events of the current script
```
## IPS_GetScriptFile
Source: https://www.symcon.de/en/service/documentation/command-reference/management-scripts/ips-getscriptfile/
`string IPS_GetScriptFile(int $ScriptID)`
returns the file name of a script
**Parameters**
- `$ScriptID` (int): ID of the script
**Returns** (string): File name of the script
ID of the script
**Example**
```php
include(IPS_GetScriptFile($ScriptID));
```
## IPS_GetScriptIDByFile
Source: https://www.symcon.de/en/service/documentation/command-reference/management-scripts/ips-getscriptidbyfile/
`int IPS_GetScriptIDByFile(string $FilePath)`
returns the ID of a script by its file
**Parameters**
- `$FilePath` (string): Relative path to the file from the script folder
**Returns** (int): ID of the found script, otherwise FALSE
Relative path to the file from the script folder
**Example**
```php
$ScriptID = @IPS_GetScriptIDByFile("12345.ips.php");
if ($ScriptID === false)
echo "Script file not found!";
else
echo "The ID of the script is: ". $ScriptID;
```
## IPS_GetScriptIDByName
Source: https://www.symcon.de/en/service/documentation/command-reference/management-scripts/ips-getscriptidbyname/
`int IPS_GetScriptIDByName(string $ScriptName, int $ParentID)`
returns the ID of a script by its name
**Parameters**
- `$ScriptName` (string): Name of the script
- `$ParentID` (int): Object whose child objects are searched for the script
**Returns** (int): ID of the found script, otherwise FALSE
Object whose child objects are searched for the script
**Example**
```php
$ScriptID = @IPS_GetScriptIDByName("Rain sensing", $ParentID);
if ($ScriptID === false)
echo "Script not foung!";
else
echo "The Script ID is: ". $ScriptID;
```
## IPS_GetScriptList
Source: https://www.symcon.de/en/service/documentation/command-reference/management-scripts/ips-getscriptlist/
`array IPS_GetScriptList()`
returns a list of all scripts
**Returns** (array): A list of all IDs of scripts
This function determines the IDs of all scripts that are registered within IP-Symcon. The IDs are listed in an array. If no scripts exist, the array is empty.
**Example**
```php
$allScripts = IPS_GetScriptList();
print_r($allScripts);
/* returns, e.g.:
Array
(
[0] => 37659
[1] => 18326
etc. ...
*/
```
## IPS_GetScriptTimer
Source: https://www.symcon.de/en/service/documentation/command-reference/management-scripts/ips-getscripttimer/
`int IPS_GetScriptTimer(int $ScriptID)`
returns the start value of the script timer
**Parameters**
- `$ScriptID` (int): ID of the script
**Returns** (int): Time in seconds that the script is called cyclicly (not the remaining duration)
ID of the script
**Example**
```php
$TimerValue = IPS_GetScriptTimer($ScriptID); // determines the value of the script timer
```
## IPS_ScriptExists
Source: https://www.symcon.de/en/service/documentation/command-reference/management-scripts/ips-scriptexists/
`bool IPS_ScriptExists(int $ScriptID)`
checks if a script exists
**Parameters**
- `$ScriptID` (int): ID of the script
**Returns** (bool): If the command succeeds, it returns __TRUE__, otherwise __FALSE__.
ID of the script
**Example**
```php
if (IPS_ScriptExists(34881))
echo "A script with this ID exists!";
```
## IPS_SetScriptContent
Source: https://www.symcon.de/en/service/documentation/command-reference/management-scripts/ips-setscriptcontent/
`bool IPS_SetScriptContent(int $ScriptID, string $Content)`
_Requires Symcon >= 3.1_
set the content of a script
**Parameters**
- `$ScriptID` (int): ID of the script
- `$Content` (string): Content, including PHP tags ( and ?>)
**Returns** (bool): If the command succeeds, it returns __TRUE__, otherwise __FALSE__.
Content, including PHP tags ( and ?>)
**Example**
```php
$ScriptID = IPS_CreateScript(0);
IPS_SetName($ScriptID, "My Script");
IPS_SetScriptContent($ScriptID, " echo 'Test!'; ?>");
```
## IPS_SetScriptFile
Source: https://www.symcon.de/en/service/documentation/command-reference/management-scripts/ips-setscriptfile/
`bool IPS_SetScriptFile(int $ScriptID, string $FileName)`
sets the file name for a script
**Parameters**
- `$ScriptID` (int): ID of the script
- `$FileName` (string): File name of the PHP file (relative to the "/scripts" folder)
**Returns** (bool): If the command succeeds, it returns __TRUE__, otherwise __FALSE__.
File name of the PHP file (relative to the "/scripts" folder)
**Example**
```php
$ScriptPath = "Example.ips.php"; //script file
$ScriptID = IPS_CreateScript(0);
// Bind
IPS_SetScriptFile($ScriptID, $ScriptPath);
```
## IPS_SetScriptTimer
Source: https://www.symcon.de/en/service/documentation/command-reference/management-scripts/ips-setscripttimer/
`bool IPS_SetScriptTimer(int $ScriptID, int $TimerValue)`
set the start value of a script timer
**Parameters**
- `$ScriptID` (int): ID of the script
- `$TimerValue` (int): Time in seconds in which the script is called cylically
**Returns** (bool): If the command succeeds, it returns __TRUE__, otherwise __FALSE__.
Time in seconds in which the script is called cylically
**Example**
```php
// The script is run every 10 seconds
IPS_SetScriptTimer($ScriptID, 10);
```
---
# Management of Variables
> Symcon documentation · English · generated on 2026-09-26
> Index: https://www.symcon.de/en/llms.txt
Source: https://www.symcon.de/en/service/documentation/command-reference/management-variables/
.
## IPS_CreateVariable
Source: https://www.symcon.de/en/service/documentation/command-reference/management-variables/ips-createvariable/
`int IPS_CreateVariable(int $VariableType)`
creates a new variable
**Parameters**
- `$VariableType` (int)
| Value | Description |
| ----- | -------------------------------------- |
| 0 | creates a variable of type __boolean__ |
| 1 | creates a variable of type __Integer__ |
| 2 | creates a variable of type __float__ |
| 3 | creates a variable of type __string__ |
**Returns** (int): ID of the newly created variable
| Value | Description |
| ----- | -------------------------------------- |
| 0 | creates a variable of type __boolean__ |
| 1 | creates a variable of type __Integer__ |
| 2 | creates a variable of type __float__ |
| 3 | creates a variable of type __string__ |
**Example**
```php
// Create a float variable
$VarID_room temperature = IPS_CreateVariable(2);
```
## IPS_DeleteVariable
Source: https://www.symcon.de/en/service/documentation/command-reference/management-variables/ips-deletevariable/
`bool IPS_DeleteVariable(int $VariableID)`
deletes a variable
**Parameters**
- `$VariableID` (int): ID of the variable
**Returns** (bool): If the command succeeds, it returns __TRUE__, otherwise __FALSE__.
ID of the variable
**Example**
```php
// Delete the variable 47788
IPS_DeleteVariable(47788);
```
## IPS_GetVariable
Source: https://www.symcon.de/en/service/documentation/command-reference/management-variables/ips-getvariable/
`array IPS_GetVariable(int $VariableID)`
retuns extensive information about a variable
**Parameters**
- `$VariableID` (int): ID of the variable
**Returns** (array): The following information is available as key => value pairs:
| Index | Type | Description |
| ------------------------------------------ | ------- | --------------------------------------------------------------------------------------------------------------------------------------------------------------------------------------------------- |
| __VariableAction__ | integer | ID of the instance that is notified about desired changes to the variable. 0 for none or deactivated connection |
| __VariableChanged__ | float | Unix timestamp of the most recent variable change |
| __VariableCustomAction__ | integer | ID of the script that starts on desired changes to the variable from the visualization. If an existing default action is disabled, the non-existent ScriptID 1 is given. (Since version 2.5 # 2300) |
| __VariableCustomPresentation__ (since 8.0) | array | User-defined presentation. Empty array if no presentation is specified. |
| __VariableCustomProfile__ | string | Name of the user defined profile. Empty if no profile is specified |
| __VariableID__ | integer | ID of the variable |
| __VariableIsLocked__ | boolean | Indicates if the variable is above the variable limit and thus cannot be written (Available since Version 2.3) |
| __VariableProfile__ | string | Name of the system profile. Empty if no profile is specified |
| __VariablePresentation__ (since 8.0) | array | System presentation. Empty array if no presentation is specified. |
| __VariableType__ (since 4.0) | integer | Type of the variable (0: Boolean, 1: Integer, 2: Float, 3: String) |
| __VariableUpdated__ | float | Unix timestamp of the most recent variable update |
| __VariableValue__ (until 3.4) | array | see table Variable Value (replaced by VariableType and [GetValue](https://www.symcon.de/en/llms/functions/access-variables.md)) |
_Table: Variable value_
| Index | Type | Description |
| ---------------- | -------- | ------------------------------------------------------------------ |
| __ValueType__ | integer | Type of the variable (0: Boolean, 1: Integer, 2: Float, 3: String) |
| __ValueBoolean__ | boolean | Value of the variable depending on __ValueType__ |
| __ValueInteger__ | integer | Value of the variable depending on __ValueType__ |
| __ValueFloat__ | float | Value of the variable depending on __ValueType__ |
| __ValueString__ | string | Value of the variable depending on __ValueType__ |
ID of the variable
**Example**
```php
// Since version 4.0
print_r(IPS_GetVariable(40770));
/* Examplary output:
Array
(
[VariableChanged] => 1246039629
[VariableCustomAction] => 0
[VariableCustomProfile] => BoolProfile
[VariableID] => 40770
[VariableIsLocked] =>
[VariableProfile] => ~Switch
[VariableType] => 0
[VariableUpdated] => 1246039629
)
*/
print_r(IPS_GetVariableCompatibility(40770));
/* Examplary output:
Array
(
[VariableChanged] => 1246039629
[VariableCustomAction] => 0
[VariableCustomProfile] => BoolProfile
[VariableID] => 40770
[VariableIsLocked] =>
[VariableProfile] => ~Switch
[VariableUpdated] => 1246039629
[VariableValue] => Array
(
[ValueArray] => Array
(
)
[ValueBoolean] => 1
[ValueFloat] => 0
[ValueIndex] => Array
(
[IndexInt] => 0
[IndexStr] =>
[IndexType] => 0
)
[ValueInteger] => 0
[ValueString] =>
[ValueType] => 0
)
)
*/
// Until version 3.4
print_r(IPS_GetVariable(40770));
/* Exemplary output:
Array
(
[VariableChanged] => 1246039629
[VariableCustomAction] => 0
[VariableCustomProfile] => BoolProfile
[VariableID] => 40770
[VariableIsLocked] =>
[VariableProfile] => ~Switch
[VariableUpdated] => 1246039629
[VariableValue] => Array
(
[ValueArray] => Array
(
)
[ValueBoolean] => 1
[ValueFloat] => 0
[ValueIndex] => Array
(
[IndexInt] => 0
[IndexStr] =>
[IndexType] => 0
)
[ValueInteger] => 0
[ValueString] =>
[ValueType] => 0
)
)
*/
```
## IPS_GetVariableEventList
Source: https://www.symcon.de/en/service/documentation/command-reference/management-variables/ips-getvariableeventlist/
`array IPS_GetVariableEventList(int $VariableID)`
returns a list of all events that are associated to a variable
**Parameters**
- `$VariableID` (int): ID of the variable
**Returns** (array): List of IDs of all events associated to the variable
ID of the variable
**Example**
```php
$events = IPS_GetVariableEventList(12345);
print_r($events); // determines all events of the current script
```
## IPS_GetVariableIDByName
Source: https://www.symcon.de/en/service/documentation/command-reference/management-variables/ips-getvariableidbyname/
`int IPS_GetVariableIDByName(string $VariableName, int $ParentID)`
returns the ID of a variable by its name
**Parameters**
- `$VariableName` (string): Name of the variable
- `$ParentID` (int): Object whose children are searched
**Returns** (int): ID of the found variable, otherwise __FALSE__
Object whose children are searched
**Example**
```php
$VarID = @IPS_GetVariableIDByName("Rain fall", $ParentID);
if ($VarID === false)
echo "Variable not found!";
else
echo "The Variable ID is: ". $VarID;
```
## IPS_GetVariableList
Source: https://www.symcon.de/en/service/documentation/command-reference/management-variables/ips-getvariablelist/
`array IPS_GetVariableList()`
returns a list of all existing variables
**Returns** (array): A list of all IDs of the variables
This function determines the IDs of all registered IPS variables in IP Symcon. The IDs are listed in an array. If no variable exists, the array is empty.
**Example**
```php
$allVariables = IPS_GetVariableList();
print_r($allVariables);
/* returns, e.g.:
Array
(
[0] => 37659
[1] => 18326
etc. ...
*/
```
## IPS_GetVariablePresentation
Source: https://www.symcon.de/en/service/documentation/command-reference/management-variables/ips-getvariablepresentation/
`array IPS_GetVariablePresentation(int $VariablenID)`
_Requires Symcon >= 8.1_
Returns all parameters of the currently used presentation
**Parameters**
- `$VariablenID` (int): VariableID of the variable whose representation is to be output
**Returns** (array): An array with all parameters of the current variable presentation
VariableID of the variable whose representation is to be output
**Example**
```text
print_r(IPS_GetVariablePresentation(12345));
/* Example
Array
(
[DIGITS] => 0
[CUSTOM_GRADIENT] => []
[ICON] => temperature-half
[DECIMAL_SEPARATOR] => Client
[GRADIENT_TYPE] => 1
[MAX] => 25
[PRESENTATION] => {6B9CAEEC-5958-C223-30F7-BD36569FC57A}
[INTERVALS] => []
[INTERVALS_ACTIVE] =>
[MIN] => 15
[PERCENTAGE] =>
[PREFIX] =>
[STEP_SIZE] => 1
[SUFFIX] => °C
[THOUSANDS_SEPARATOR] =>
[USAGE_TYPE] => 0
)
*/
```
## IPS_SetVariableCustomAction
Source: https://www.symcon.de/en/service/documentation/command-reference/management-variables/ips-setvariablecustomaction/
`bool IPS_SetVariableCustomAction(int $VariableID, int $ScriptID)`
set a user defined action script for a variable
**Parameters**
- `$VariableID` (int): ID of the variable
- `$ScriptID` (int): ID of the script that should be used as variable action. The nonexistent ScriptID 1 can be given to disable the default action. If a valid ScriptID is specified, it is used instead of the default action
**Returns** (bool): If the command succeeds, it returns __TRUE__, otherwise __FALSE__.
ID of the script that should be used as variable action. The nonexistent ScriptID 1 can be given to disable the default action. If a valid ScriptID is specified, it is used instead of the default action
**Example**
```php
IPS_SetVariableCustomAction(12345, 44431);
```
## IPS_SetVariableCustomPresentation
Source: https://www.symcon.de/en/service/documentation/command-reference/management-variables/ips-setvariablecustompresentation/
`bool IPS_SetVariableCustomPresentation(int $VariableID, array $Presentation)`
_Requires Symcon >= 8.0_
assigns a user-defined presentation to the variable
**Parameters**
- `$VariableID` (int): ID of the variable to which the presentation is to be assigned
- `$Presentation` (array): The configuration of the presentation. Details can be found in the section [Presentations](https://www.symcon.de/en/llms/developer/sdk-tools/sdk-php.md).
**Returns** (bool): If the command could be executed successfully, the result is __TRUE__, otherwise __FALSE__.
The configuration of the presentation. Details can be found in the section [Presentations](https://www.symcon.de/en/llms/developer/sdk-tools/sdk-php.md).
**Example**
```text
// Sets the presentation of a variable to Slider with a minimum, maximum and suffix
IPS_SetVariableCustomPresentation(12345, ['PRESENTATION' => VARIABLE_PRESENTATION_SLIDER, 'MIN' => 0, 'MAX' => 100, 'SUFFIX' => ' %']);
// Sets the presentation of a variable to Enumeration with icons and colors.
IPS_SetVariableCustomPresentation(12345, [
'PRESENTATION' => VARIABLE_PRESENTATION_ENUMERATION,
'DISPLAY' => 1 /* Icon */,
'OPTIONS' => json_encode([
['Value' => 1, 'Caption' => 'Automatic', 'IconActive' => true, 'IconValue' => 'circle-a'],
['Value' => 2, 'Caption' => 'Eco', 'IconActive' => true, 'IconValue' => 'circle-e', 'Color' => 40448],
['Value' => 3, 'Caption' => 'Manual', 'IconActive' => true, 'IconValue' => 'circle-m'],
])
]);
```
## IPS_SetVariableCustomProfile
Source: https://www.symcon.de/en/service/documentation/command-reference/management-variables/ips-setvariablecustomprofile/
`bool IPS_SetVariableCustomProfile(int $VariableID, string $ProfileName)`
_Requires Symcon >= 3.0_
sets a user defined profile for a variable
**Parameters**
- `$VariableID` (int): ID of the variable
- `$ProfileName` (string): Name of the profile. Available profiles can be queried via [IPS_GetVariableProfileList](https://www.symcon.de/en/llms/functions/management-variables.md). If an empty string is used, the custom profile is disabled.
**Returns** (bool): If the command succeeds, it returns __TRUE__, otherwise __FALSE__.
Name of the profile. Available profiles can be queried via [IPS_GetVariableProfileList](https://www.symcon.de/en/llms/functions/management-variables.md). If an empty string is used, the custom profile is disabled.
**Example**
```php
IPS_SetVariableCustomProfile(12345, "~Switch");
```
## IPS_VariableExists
Source: https://www.symcon.de/en/service/documentation/command-reference/management-variables/ips-variableexists/
`bool IPS_VariableExists(int $VariableID)`
checks if a variable exists
**Parameters**
- `$VariableID` (int): ID of the variable
**Returns** (bool): If the variable exists, __TRUE__ is returned, otherwise __FALSE__.
ID of the variable
**Example**
```php
if (IPS_VariableExists(44788))
echo "Variable already exists!";
```
## Variable Presentation
Source: https://www.symcon.de/en/service/documentation/command-reference/management-variables/variable-presentation/
## IPS_GetPresentation
Source: https://www.symcon.de/en/service/documentation/command-reference/management-variables/variable-presentation/ips-getpresentation/
`array IPS_GetPresentation(string $PresentationID)`
_Requires Symcon >= 8.0_
provides comprehensive information about a specific representation
**Parameters**
- `$PresentationID` (string): The ID of the presentation, formatted as GUID
**Returns** (array): The following information is available as __key => value__ pairs:
| Index | Type | Description |
| -------------------------- | ------------ | ------------------------------------------------------------------------------------------------------------------------------------------------------ |
| __caption__ | string | The display name of the presentation. |
| __chart__ | array | An array with parameters for the display of a chart (see chart table) |
| __condition__ | array | A list of conditions that the parameters of the chart must fulfill. |
| __conversions__ | array | A list of statements that are used to adjust parameters for different types of variables |
| __form__ | array/string | The configuration form determines how the parameters can be adjusted in the variables dialog or the template manager. |
| __format__ | array/string | "The formatting of values within this presentation |
| __id__ | string | The ID of the presentation, formatted as GUID |
| __locale__ | array | The localization of the presentation |
| __presentationParameters__ | array | A list describing the default values of the parameters of this presentation |
| __presentationValue__ | string | The default value which is displayed in the presentation preview. Alternatively, can also contain PHP code as a string or array that returns the value |
| __restrictions__ | array | A list of restrictions that defines for which variables this presentation is available |
__chart table__
Each value can either be a number or the name of the parameter whose value is to be used.
| Index | Type | Description |
| ------------ | -------------------- | ------------------------------- |
| __min__ | integer/float/string | Parameter for the minimum value |
| __max__ | integer/float/string | Parameter for the maximum value |
| __stepSize__ | integer/float/string | Parameter for the step size |
The ID of the presentation, formatted as GUID
**Example**
```php
IPS_GetPresentation('{6B9CAEEC-5958-C223-30F7-BD36569FC57A}' /* Slider */);
```
## IPS_GetPresentationForm
Source: https://www.symcon.de/en/service/documentation/command-reference/management-variables/variable-presentation/ips-getpresentationform/
`string IPS_GetPresentationForm(string $PresentationID, int $VariableType, array $Parameters)`
_Requires Symcon >= 8.0_
returns the configuration form of a representation for a variable type
**Parameters**
- `$PresentationID` (string): The ID of the presentation, formatted as GUID
- `$VariableType` (int): The type of variable whose form is to be returned
- `$Parameters` (array): The parameter list to be used for the form
**Returns** (string): The form of the described presentation as a JSON-encoded string.
The parameter list to be used for the form
**Example**
```text
IPS_GetPresentationForm('{6B9CAEEC-5958-C223-30F7-BD36569FC57A}' /* Slider */, 1 /* Integer */, []);
```
## IPS_GetPresentations
Source: https://www.symcon.de/en/service/documentation/command-reference/management-variables/variable-presentation/ips-getpresentations/
`string IPS_GetPresentations()`
_Requires Symcon >= 8.0_
provides all presentations of the system
**Returns** (string): A JSON-encoded list of all available presentations.
The fields of the individual presentations are described in more detail [here](https://www.symcon.de/en/llms/functions/management-variables.md).
Returns a JSON-encoded list of all available presentations.
**Example**
```text
// All presentations as array
$presentations = json_decode(IPS_GetPresentations(), true);
```
## IPS_PresentationExists
Source: https://www.symcon.de/en/service/documentation/command-reference/management-variables/variable-presentation/ips-presentationexists/
`bool IPS_PresentationExists(string $PresentationID)`
_Requires Symcon >= 8.0_
Checks whether a specific presentation exists
**Parameters**
- `$PresentationID` (string): The ID of the presentation to be checked, formatted as GUID
**Returns** (bool): If the presentation exists in the system, **TRUE** is returned, otherwise **FALSE**.
The ID of the presentation to be checked, formatted as GUID
**Example**
```text
if (IPS_PresentationExists('{60AE6B26-B3E2-BDB1-A3A1-BE232940664B}' /* Slider */)) {
echo 'Presentation already exists!';
}
```
## Management of Templates
Source: https://www.symcon.de/en/service/documentation/command-reference/management-variables/variable-presentation/management-of-templates/
## IPS_CreateTemplate
Source: https://www.symcon.de/en/service/documentation/command-reference/management-variables/variable-presentation/management-of-templates/ips-createtemplate/
`string IPS_CreateTemplate(string $PresentationID)`
_Requires Symcon >= 8.0_
creates a new template for a specific display
**Parameters**
- `$PresentationID` (string): The ID of the presentation, formatted as GUID, for which a new template is to be created
**Returns** (string): The ID of the newly created template formatted as GUID
The ID of the presentation, formatted as GUID, for which a new template is to be created
**Example**
```php
$vorlage = IPS_CreateTemplate('{6B9CAEEC-5958-C223-30F7-BD36569FC57A}' /* Slider */);
```
## IPS_DeleteTemplate
Source: https://www.symcon.de/en/service/documentation/command-reference/management-variables/variable-presentation/management-of-templates/ips-deletetemplate/
`bool IPS_DeleteTemplate(string $TemplateID)`
_Requires Symcon >= 8.0_
Deletes a template
**Parameters**
- `$TemplateID` (string): The ID of the template to be deleted, formatted as GUID
**Returns** (bool): If the command could be executed successfully, it returns **TRUE**, otherwise **FALSE**.
The ID of the template to be deleted, formatted as GUID
**Example**
```text
// Deletes the template with the id {8422E41F-00AA-33F7-E8A4-BB516EC0056B}
IPS_DeleteTemplate('{8422E41F-00AA-33F7-E8A4-BB516EC0056B}');
```
## IPS_GetTemplate
Source: https://www.symcon.de/en/service/documentation/command-reference/management-variables/variable-presentation/management-of-templates/ips-gettemplate/
`array IPS_GetTemplate(string $TemplateID)`
_Requires Symcon >= 8.0_
provides comprehensive information about a template
**Parameters**
- `$TemplateID` (string): The ID of the template, formatted as GUID
**Returns** (array): The following information is available as **key=>value** pairs:
| Index | Type | Description |
| -------------- | ------ | --------------------------------------------------------- |
| TemplateID | string | The ID of the template |
| PresentationID | string | The ID of the presentation to which this template belongs |
| DisplayName | string | The display name of the template |
| Values | array | An array with the values of the template |
| ReadOnly | bool | Whether the template can be changed |
The ID of the template, formatted as GUID
**Example**
```text
// Returns information about the room temperature template
print_r(IPS_GetTemplate('{868B087E-A38D-2155-EBE0-157AFBBF9E8C}' /* Raumptemperatur */);
/* Beispielausgabe:
Array
(
[TemplateID] => {868B087E-A38D-2155-EBE0-157AFBBF9E8C}
[PresentationID] => {6B9CAEEC-5958-C223-30F7-BD36569FC57A}
[DisplayName] => Room Temperature
[Values] => Array
(
[MIN] => 15
[DIGITS] => 1
[CUSTOM_GRADIENT] => []
[DECIMAL_SEPARATOR] => Client
[GRADIENT_TYPE] => 1
[MAX] => 25
[INTERVALS] => []
[INTERVALS_ACTIVE] =>
[PERCENTAGE] =>
[PREFIX] =>
[STEP_SIZE] => 0.5
[SUFFIX] => °C
[THOUSANDS_SEPARATOR] =>
[USAGE_TYPE] => 0
)
[IsReadOnly] => 1
)
*/
```
## IPS_GetTemplateList
Source: https://www.symcon.de/en/service/documentation/command-reference/management-variables/variable-presentation/management-of-templates/ips-gettemplatelist/
`array IPS_GetTemplateList()`
_Requires Symcon >= 8.0_
provides all available templates
**Returns** (array): A list of the IDs of all available templates
The function returns the IDs of all available templates in an array. The function [IPS_GetTemplate](https://www.symcon.de/en/llms/functions/management-variables.md) can be used for more information about the individual templates.
**Example**
```text
print_r(IPS_GetTemplateList());
```
## IPS_GetTemplateListByPresentation
Source: https://www.symcon.de/en/service/documentation/command-reference/management-variables/variable-presentation/management-of-templates/ips-gettemplatelistbypresentation/
`array IPS_GetTemplateListByPresentation(string $PresentationID)`
_Requires Symcon >= 8.0_
provides a list of the templates of a representation
**Parameters**
- `$PresentationID` (string): The ID of the presentation whose templates are to be listed
**Returns** (array): An array of the IDs of a presentation
The ID of the presentation whose templates are to be listed
**Example**
```text
print_r(IPS_GetTemplateListByPresentation('{6B9CAEEC-5958-C223-30F7-BD36569FC57A}' /* Slider */));
```
## IPS_SetTemplateName
Source: https://www.symcon.de/en/service/documentation/command-reference/management-variables/variable-presentation/management-of-templates/ips-settemplatename/
`bool IPS_SetTemplateName(string $TemplateID, string $Name)`
_Requires Symcon >= 8.0_
sets the name of a template
**Parameters**
- `$TemplateID` (string): The ID of the template whose name is to be customized
- `$Name` (string): The value to which the name of the template should be set
**Returns** (bool): If the command could be executed successfully, it returns **TRUE** as the result, otherwise **FALSE**.
The value to which the name of the template should be set
**Example**
```text
IPS_SetTemplateName('{3C257416-99FE-0386-D8D3-20437FF62CEB}' , 'New Template');
```
## IPS_SetTemplateValues
Source: https://www.symcon.de/en/service/documentation/command-reference/management-variables/variable-presentation/management-of-templates/ips-settemplatevalues/
`bool IPS_SetTemplateValues(string $TemplateID, array $Values)`
_Requires Symcon >= 8.0_
sets the values of a template
**Parameters**
- `$TemplateID` (string): The ID of the template whose values are to be adjusted
- `$Values` (array): An array to which the values of the template are to be set
**Returns** (bool): If the command could be executed successfully, it returns **TRUE**, otherwise **FALSE**.
An array to which the values of the template are to be set
**Example**
```php
IPS_SetTemplateValues('{E35A875A-E9BC-4C6D-A550-F4DA423BCF18}', ['PROFILE' => '~Intensity.100']);
```
## IPS_TemplateExists
Source: https://www.symcon.de/en/service/documentation/command-reference/management-variables/variable-presentation/management-of-templates/ips-templateexists/
`bool IPS_TemplateExists(string $TemplateID)`
_Requires Symcon >= 8.0_
Checks whether a template exists
**Parameters**
- `$TemplateID` (string): ID of the template to be checked formatted as GUID
**Returns** (bool): If a template with the **TemplateGUID** exists, TRUE is returned, otherwise FALSE.
ID of the template to be checked formatted as GUID
**Example**
```php
if (IPS_TemplateExists('{868B087E-A38D-2155-EBE0-157AFBBF9E8C}' /* room temperature */)) {
echo 'Template already exists!';
}
```
## Variable Profiles
Source: https://www.symcon.de/en/service/documentation/command-reference/management-variables/variable-profiles/
## IPS_CreateVariableProfile
Source: https://www.symcon.de/en/service/documentation/command-reference/management-variables/variable-profiles/ips-createvariableprofile/
`bool IPS_CreateVariableProfile(string $ProfileName, int $VariableType)`
creates a variable profile
**Parameters**
- `$ProfileName` (string): Name of the profile. Legal characters are A-Z, a-z, period (.), comma (,), and underscore (_)
- `$VariableType` (int)
| Value | Description |
| ----- | -------------------------------------------------- |
| 0 | creates a variable profile of the type __Boolean__ |
| 1 | creates a variable profile of the type __Integer__ |
| 2 | creates a variable profile of the type __Float__ |
| 3 | creates a variable profile of the type __String__ |
**Returns** (bool): If the command succeeds, it returns __TRUE__, otherwise __FALSE__.
| Value | Description |
| ----- | -------------------------------------------------- |
| 0 | creates a variable profile of the type __Boolean__ |
| 1 | creates a variable profile of the type __Integer__ |
| 2 | creates a variable profile of the type __Float__ |
| 3 | creates a variable profile of the type __String__ |
**Example**
```php
//Create a profile for Boolean variables
IPS_CreateVariableProfile("Switch", 0);
//... further configuration of the profile is done here
```
## IPS_DeleteVariableProfile
Source: https://www.symcon.de/en/service/documentation/command-reference/management-variables/variable-profiles/ips-deletevariableprofile/
`bool IPS_DeleteVariableProfile(string $ProfileName)`
deletes a variable profile
**Parameters**
- `$ProfileName` (string): Name of profile
**Returns** (bool): If the command succeeds, it returns __TRUE__, otherwise __FALSE__.
Name of profile
**Example**
```php
//Deleting the profile switch
IPS_DeleteVariableProfile("Switch");
```
## IPS_GetVariableProfile
Source: https://www.symcon.de/en/service/documentation/command-reference/management-variables/variable-profiles/ips-getvariableprofile/
`array IPS_GetVariableProfile(string $ProfileName)`
returns extensive information about a variable profile
**Parameters**
- `$ProfileName` (string): Name of the profile
**Returns** (array): The following information is available as key => value pairs:
| Index | Type | Description |
| ---------------- | ------- | ------------------------------------------------------------------------- |
| __Associations__ | array | Array with value, name, icon pairs (see Associations Table) |
| __Icon__ | string | Icon of the variable profile |
| __IsReadOnly__ | boolean | TRUE if the profile is a system created profile, which can not be changed |
| __MaxValue__ | float | The minimum value used for the visualization |
| __MinValue__ | float | The maximum value used for the visualization |
| __StepSize__ | float | Step size for the visualization, 0 when the association table is used |
| __Digits__ | integer | Number of decimal places |
| __Prefix__ | array | Prefix for the visualization |
| __Suffix__ | integer | Suffix for the visualization |
| __ProfileName__ | string | Name of the profile. (~ = System profile) |
| __ProfileType__ | integer | Type of profile (0: Boolean, 1: Integer, 2: Float, 3: String) |
_Associations Table_
| Index | Type | Description |
| --------- | ------- | ------------------------------------------------------------------------------------- |
| __Value__ | float | Value that is associated with the given name, icon, and color |
| __Name__ | string | Name of the specified value |
| __Icon__ | string | Icon of the specified value |
| __Color__ | integer | Color value in HTML format, e.g., 0x0000FF for blue. Special case: -1 for transparent |
Name of the profile
**Example**
```php
print_r( IPS_GetVariableProfile("~WindDirection") );
/* returns e.g.:
Array
(
[Associations] => Array
(
)
[Digits] => 1
[Icon] => WindDirection
[IsReadOnly] => 1
[MaxValue] => 360
[MinValue] => 0
[Prefix] =>
[ProfileName] => ~WindDirection
[ProfileType] => 2
[StepSize] => 60
[Suffix] => °
)
*/
```
## IPS_GetVariableProfileList
Source: https://www.symcon.de/en/service/documentation/command-reference/management-variables/variable-profiles/ips-getvariableprofilelist/
`array IPS_GetVariableProfileList()`
returns a list of all existing variable profiles
**Returns** (array): List of names of all variables profiles
This function lists the name of all existing variable profiles and returns them as an array.
**Example**
```php
$Profile = IPS_GetVariableProfileList();
print_r($Profile);
/* returns e.g.:
Array
(
[0] => ~Temperature
[1] => ~Humidity
[2] => ~AirPressure
etc. ...
*/
```
## IPS_GetVariableProfileListByType
Source: https://www.symcon.de/en/service/documentation/command-reference/management-variables/variable-profiles/ips-getvariableprofilelistbytype/
`array IPS_GetVariableProfileListByType(int $VariablenTyp)`
returns a list of all existing variable profiles of a specific type
**Parameters**
- `$VariablenTyp` (int)
| Value | Description |
| ----- | ------------------------------- |
| 0 | Search for the type __Boolean__ |
| 1 | Search for the type __Integer__ |
| 2 | Search for the type __Float__ |
| 3 | Search for the type __String__ |
**Returns** (array): List of names of all variables profiles
| Value | Description |
| ----- | ------------------------------- |
| 0 | Search for the type __Boolean__ |
| 1 | Search for the type __Integer__ |
| 2 | Search for the type __Float__ |
| 3 | Search for the type __String__ |
**Example**
```php
$Profile = IPS_GetVariableProfileListByType(0);
print_r($Profile);
/* returns e.g.:
Array
(
[0] => ~Switch
[1] => ~Alert
[2] => ~Alert.Reversed
etc. ...
*/
```
## IPS_SetVariableProfileAssociation
Source: https://www.symcon.de/en/service/documentation/command-reference/management-variables/variable-profiles/ips-setvariableprofileassociation/
`bool IPS_SetVariableProfileAssociation(string $ProfileName, mixed $Value, string $Name, string $Icon, int $Color)`
modifies the association table of a variable profile
**Parameters**
- `$ProfileName` (string): Name of the profile. Available profiles can be queried via [IPS_GetVariableProfileList](https://www.symcon.de/en/llms/functions/management-variables.md)
- `$Value` (mixed): The value that should be associated to the name, icon, and color
- `$Name` (string): Name of the specified value
- `$Icon` (string): Icon of the specified value
- `$Color` (int): Color value in HTML format, e.g., 0x0000FF for blue. Special case: -1 for transparent
**Returns** (bool): If the command succeeds, it returns __TRUE__, otherwise __FALSE__.
Color value in HTML format, e.g., 0x0000FF for blue. Special case: -1 for transparent
**Example**
```php
//Creating the value 1 in the white color
IPS_SetVariableProfileAssociation("Temperature", 1, "Value 1", "Speaker", 0xFFFFFF);
//Create Value for "sum" in the yellow color
IPS_SetVariableProfileAssociation("Season", "sum", "Summer", "Sun", 0xFFFF00);
//Delete value 1
IPS_SetVariableProfileAssociation("Temperature", 1, "", "", -1);
```
## IPS_SetVariableProfileDigits
Source: https://www.symcon.de/en/service/documentation/command-reference/management-variables/variable-profiles/ips-setvariableprofiledigits/
`bool IPS_SetVariableProfileDigits(string $ProfileName, int $Digits)`
sets the digits of a variable profile
**Parameters**
- `$ProfileName` (string): Name of the profile. Available profiles can be queried via [IPS_GetVariableProfileList](https://www.symcon.de/en/llms/functions/management-variables.md)
- `$Digits` (int): Number of decimal places displayed in the visualization
**Returns** (bool): If the command succeeds, it returns __TRUE__, otherwise __FALSE__.
Number of decimal places displayed in the visualization
**Example**
```php
IPS_SetVariableProfileDigits("Temperature", 1);
```
## IPS_SetVariableProfileIcon
Source: https://www.symcon.de/en/service/documentation/command-reference/management-variables/variable-profiles/ips-setvariableprofileicon/
`bool IPS_SetVariableProfileIcon(string $ProfileName, string $Icon)`
sets the icon for a variable profile
**Parameters**
- `$ProfileName` (string): Name of the profile. Available profiles can be queried via [IPS_GetVariableProfileList](https://www.symcon.de/en/llms/functions/management-variables.md)
- `$Icon` (string): Icon
**Returns** (bool): If the command succeeds, it returns __TRUE__, otherwise __FALSE__.
Icon
**Example**
```php
IPS_SetVariableProfileIcon("Temperature", "Temperature");
```
## IPS_SetVariableProfileText
Source: https://www.symcon.de/en/service/documentation/command-reference/management-variables/variable-profiles/ips-setvariableprofiletext/
`bool IPS_SetVariableProfileText(string $ProfileName, string $Prefix, string $Suffix)`
sets prefix and suffix for a variable profile
**Parameters**
- `$ProfileName` (string): Name of the profile. Available profiles can be queried via [IPS_GetVariableProfileList](https://www.symcon.de/en/llms/functions/management-variables.md)
- `$Prefix` (string): Prefix of the value
- `$Suffix` (string): Suffix of the value
**Returns** (bool): If the command succeeds, it returns __TRUE__, otherwise __FALSE__.
Suffix of the value
**Example**
```php
IPS_SetVariableProfileText("Switch", "", "%");
```
## IPS_SetVariableProfileValues
Source: https://www.symcon.de/en/service/documentation/command-reference/management-variables/variable-profiles/ips-setvariableprofilevalues/
`bool IPS_SetVariableProfileValues(string $ProfileName, float $MinValue, float $MaxValue, float $StepSize)`
sets the minimal value, maximal value, and stepsize of a variable profile
**Parameters**
- `$ProfileName` (string): Name of the profile. Available profiles can be queried via [IPS_GetVariableProfileList](https://www.symcon.de/en/llms/functions/management-variables.md).
- `$MinValue` (float): Minimum value used for the visualization. This soft limitation does not affect the variable value.
- `$MaxValue` (float): Maximum value used for the visualization. This soft limitation does not affect the variable value.
- `$StepSize` (float): Step size used for the visualization to create the setpoint change bar. A step size of __0__ activates the association list.
**Returns** (bool): If the command succeeds, it returns __TRUE__, otherwise __FALSE__.
Step size used for the visualization to create the setpoint change bar. A step size of __0__ activates the association list.
**Example**
```php
IPS_SetVariableProfileValues("Temperature", -10, 40, 0.5);
```
## IPS_VariableProfileExists
Source: https://www.symcon.de/en/service/documentation/command-reference/management-variables/variable-profiles/ips-variableprofileexists/
`bool IPS_VariableProfileExists(string $ProfileName)`
checks if a variable profile exists
**Parameters**
- `$ProfileName` (string): Name of the variable profile
**Returns** (bool): If the variable profile with the name __ProfileName__ exists, __TRUE__ is returned, otherwise __FALSE__.
Name of the variable profile
**Example**
```php
if (IPS_VariableProfileExists("Temperature"))
echo "Profile already exists!";
```
---
# Accessing Variables
> Symcon documentation · English · generated on 2026-09-26
> Index: https://www.symcon.de/en/llms.txt
Source: https://www.symcon.de/en/service/documentation/command-reference/access-variables/
## GetValue
Source: https://www.symcon.de/en/service/documentation/command-reference/access-variables/getvalue/
`mixed GetValue(int $VariableID)`
returns the value of an IP-Symcon variable, independent of its type
**Parameters**
- `$VariableID` (int): ID of the variable
**Returns** (mixed): Value of the specified variable in the type of the specified variable
ID of the variable
**Example**
```php
$Window_open = GetValue(47788); // Boolean-Variable: true or false
$current_project = GetValue(46250); // String-Variable: e.g. "Rain sensing"
```
## GetValueBoolean
Source: https://www.symcon.de/en/service/documentation/command-reference/access-variables/getvalueboolean/
`bool GetValueBoolean(int $VariableID)`
returns the value of an IP-Symcon variable of the type Boolean
**Parameters**
- `$VariableID` (int): ID of the variable
**Returns** (bool): Value of the specified variable
ID of the variable
**Example**
```php
$Window_open = GetValueBoolean(47788); // Boolean variable: true or false
```
## GetValueFloat
Source: https://www.symcon.de/en/service/documentation/command-reference/access-variables/getvaluefloat/
`float GetValueFloat(int $VariableID)`
returns the value of an IP-Symcon variable of the type Float
**Parameters**
- `$VariableID` (int): ID of the variable
**Returns** (float): Value of the specified variable
ID of the variable
**Example**
```php
$current_Temperature = GetValueFloat(47788);
```
## GetValueFormatted
Source: https://www.symcon.de/en/service/documentation/command-reference/access-variables/getvalueformatted/
`string GetValueFormatted(int $VariableID)`
returns the value of an IP-Symcon variable and formats it according to its profile
**Parameters**
- `$VariableID` (int): ID of the variable
**Returns** (string): Value of the specified variable, formatted accordingly to profile
ID of the variable
**Example**
```php
echo GetValueFormatted(47788); //Profile = ~Switch
//Returns: On or Off
echo GetValueFormatted(46250); //Profile = ~Temperature
//Returns: 17,5°C
```
## GetValueFormattedEx
Source: https://www.symcon.de/en/service/documentation/command-reference/access-variables/getvalueformattedex/
`string GetValueFormattedEx(int $VariableID, mixed $value)`
_Requires Symcon >= 5.5_
returns a value formatted based on the profile of a variable
**Parameters**
- `$VariableID` (int): ID of the variable
- `$value` (mixed): Value to be formatted
**Returns** (string): Value formatted to match the profile of the variable
Value to be formatted
**Example**
```php
echo GetValueFormattedEx(12345, true); //Profil = ~Switch
//Results in: On
echo GetValueFormattedEx(23456, 17.5); //Profile = ~ Temperature
//Results in: 17.5 ° C
```
## GetValueInteger
Source: https://www.symcon.de/en/service/documentation/command-reference/access-variables/getvalueinteger/
`int GetValueInteger(int $VariableID)`
returns the value of an IP-Symcon variable of the type Integer
**Parameters**
- `$VariableID` (int): ID of the variable
**Returns** (int): Value of the specified variable
ID of the variable
**Example**
```php
$Number_persons = GetValueInteger(47788);
```
## GetValueString
Source: https://www.symcon.de/en/service/documentation/command-reference/access-variables/getvaluestring/
`string GetValueString(int $VariableID)`
returns the value of an IP-Symcon variable of the type String
**Parameters**
- `$VariableID` (int): ID of the variable
**Returns** (string): Value of the specified variable
ID of the variable
**Example**
```php
$current_project = GetValueString(47788);
```
## HasAction
Source: https://www.symcon.de/en/service/documentation/command-reference/access-variables/hasaction/
`bool HasAction(int $VariableID)`
_Requires Symcon >= 5.3_
checks whether an action is defined
**Parameters**
- `$VariableID` (int): ID of the variable
**Returns** (bool): __TRUE__, if the the variable has an action, otherwise __FALSE__
ID of the variable
**Example**
```php
// Checks whether the variable with the ID 12356 has an action.
HasAction(12345);
```
## RequestAction
Source: https://www.symcon.de/en/service/documentation/command-reference/access-variables/requestaction/
`bool RequestAction(int $VariableID, mixed $Value)`
_Requires Symcon >= 5.0_
execute the variable action of an IP-Symcon variable
**Parameters**
- `$VariableID` (int): ID of the variable
- `$Value` (mixed): Value for the action
**Returns** (bool): If the command succeeds, it returns __TRUE__, otherwise __FALSE__.
Value for the action
**Example**
```php
// Switch Boolean variable 29117 to "true"
RequestAction(29117, true);
// Switch Integer Variable 46250 to 18
RequestAction(46250, 18);
```
## RequestActionEx
Source: https://www.symcon.de/en/service/documentation/command-reference/access-variables/requestactionex/
`bool RequestActionEx(int $VariableID, mixed $Value, string $Sender)`
_Requires Symcon >= 5.0_
execute the action of an IP-Symcon variable with individual sender
**Parameters**
- `$VariableID` (int): ID of the variable
- `$Value` (mixed): Value for the action
- `$Sender` (string): Name of the sender
**Returns** (bool): If the command succeeds, it returns __TRUE__, otherwise __FALSE__.
Name of the sender
**Example**
```php
// Switch on Boolean variable with Sender AlarmSystem
RequestActionEx(12345, true, "AlarmSystem");
// Set integer variable with Sender TemperatureAirConditioning
RequestActionEx(23456, 18, "TemperatureAirConditioning");
```
## SetValue
Source: https://www.symcon.de/en/service/documentation/command-reference/access-variables/setvalue/
`bool SetValue(int $VariableID, mixed $Value)`
set the value of an IP-Symcon variable independent of its type
**Parameters**
- `$VariableID` (int): ID of the variable
- `$Value` (mixed): New value of the variable
**Returns** (bool): If the command succeeds, it returns __TRUE__, otherwise __FALSE__.
New value of the variable
**Example**
```php
SetValue(29117, true); // Boolean Variable: Set flag for school holidays
SetValue(46250, $current_project); // String Variable: e.g. "Rain sensing"
```
## SetValueBoolean
Source: https://www.symcon.de/en/service/documentation/command-reference/access-variables/setvalueboolean/
`bool SetValueBoolean(int $VariableID, bool $Value)`
set the value of an IP-Symcon Variable with the type Boolean
**Parameters**
- `$VariableID` (int): ID of the variable
- `$Value` (bool): TRUE/FALSE
**Returns** (bool): If the command succeeds, it returns __TRUE__, otherwise __FALSE__.
TRUE/FALSE
**Example**
```php
SetValueBoolean(47788, true); // Switch on alarm system
```
## SetValueFloat
Source: https://www.symcon.de/en/service/documentation/command-reference/access-variables/setvaluefloat/
`bool SetValueFloat(int $VariableID, float $Value)`
set the value of an IP-Symcon variable with the type Float
**Parameters**
- `$VariableID` (int): ID of the variable
- `$Value` (float): 64Bit floating point
**Returns** (bool): If the command succeeds, it returns __TRUE__, otherwise __FALSE__.
64Bit floating point
**Example**
```php
SetValueFloat(47788, $current_Temperature);
```
## SetValueInteger
Source: https://www.symcon.de/en/service/documentation/command-reference/access-variables/setvalueinteger/
`bool SetValueInteger(int $VariableID, int $Value)`
set the value of an IP-Symcon variable with the type Boolean
**Parameters**
- `$VariableID` (int): ID of the variable
- `$Value` (int): -2,147,483,648 .. 2,147,483,647
**Returns** (bool): If the command succeeds, it returns __TRUE__, otherwise __FALSE__.
-2,147,483,648 .. 2,147,483,647
**Example**
```php
SetValueInteger(47788, $Number_persons);
```
## SetValueString
Source: https://www.symcon.de/en/service/documentation/command-reference/access-variables/setvaluestring/
`bool SetValueString(int $VariableID, string $Value)`
set the value of an IP-Symcon variable with the type String
**Parameters**
- `$VariableID` (int): ID of the variable
- `$Value` (string): Text
**Returns** (bool): If the command succeeds, it returns __TRUE__, otherwise __FALSE__.
Text
**Example**
```php
SetValueString(47788, $current_project);
```
---
# Developer Area – Overview
> Symcon documentation · English · generated on 2026-09-26
> Index: https://www.symcon.de/en/llms.txt
Source: https://www.symcon.de/en/service/documentation/developer-area/
### Advanced Functions
| Function | Description |
| ------------------- | ----------------------------------------------------------------------------------------------------------------------------------------------------------------------------------------------------------------------------------------------------------------------------------------------------------------------------------------------------------------------------------------------------------------------------------------------------------------------------------------------------------------------------------------------------------------------------------- |
| System Commands | All commands that are usually only available to module developers are usable to configure IP-Symcon. PHP can access the system completely - The [Command Reference](https://www.symcon.de/en/llms/functions/index.md) lists and explains all possibilities. |
| Module Commands | Every module and every option of modules that can be changed in the management console, can be read and modified by scripts as well. Thus, the complete control over the connected hardware modules is possible. The [Module Reference](https://www.symcon.de/en/llms/modules/index.md) contains a complete list of all action commands. |
| PHP | IP-Symcon offers the full potential of the script language PHP and offers all existing PHP commands. In addition, the individual php.ini can be used to make adjustments or load extensions. This enables extended functions, e.g., extended graphic functions (GD2) or communication with MySQL, MSSQL, or other databases. |
| Client/Server Model | The IP-Symcon service is embedded smoothly into the server operating system. Interactive sessions are not required and thus avoid problems due to unplanned or planned reboots of the system. After the reboot, the system is available again. The management console can always comfortably access the system. Extensions of the system can be done conviniently from the work station. Accessing the server directly or logging in via TeamViewer/AnyDesk/RDP is not needed. Changes in the management console are instantly handled by the server and are immediately available. |
| JSON-RPC Interface | The JSON-RPC interface is available since IP-Symcon 3.0 and allows the access to all functions of the [Command Reference](https://www.symcon.de/en/llms/functions/index.md) and [Module Reference](https://www.symcon.de/en/llms/modules/index.md). Thus, the integration into any application is as easy as writing a PHP script within IP-Symcon. The functions can be used as described in the documentation. Some examples about the integration are found under [Data Exchange](https://www.symcon.de/en/llms/developer/data-exchange.md). |
| WebServer | The integrated WebServer can be operated on multiple ports. One possibility is an SSL description with an individual certificate. A log file that is compatible to Webalizer can be configured for every instance. |
| WebFront | The web interface "WebFront" offers a quick possibility of visualization. As soon as devices are configured within IP-Symcon, they can be accessed from anywhere via LAN/WLAN/Web. It is easy to call the WebFront and operate. Documentation about the possibilities of extending the WebFront are found in the developer area. A modern browser is required for optimal use. |
### SDK/Tools
The [IP-Symcon SDKs](https://www.symcon.de/en/llms/developer/sdk-tools.md) enable the creation of modules for IP-Symcon.
---
# Data Exchange
> Symcon documentation · English · generated on 2026-09-26
> Index: https://www.symcon.de/en/llms.txt
Source: https://www.symcon.de/en/service/documentation/developer-area/data-exchange/
### Reachability
The JSON-RPC API, which has been available since IP-Symcon 3.0, can be accessed via port 3777 by default. Port 3777 is only bound to the local system and does not require any authentication.
The JSON-RPC API is also active on every web server set up in IP-Symcon. This means that the WebFront and the mobile apps can have access to IP-Symcon on every host/port/SSL configuration.
### Password and Features
The JSON-RPC API is authenticated via the license username and the [Remote Access](https://www.symcon.de/en/llms/components/remote-access.md) password. If no password is given, no access will be granted.
A special case are some WFC_* functions that are authenticated using the password of the respective WebFront configurator. In this case "webfront" is used as the username. These functions enable isolated access to the sub-areas of the object tree defined by the configurator. Only the WFC_GetConfigurators function is made available without any authentication. This is necessary to enable the listing of the WebFront configurators for the WebFront and the mobile apps.
In addition, the IP address Autostart Function is thereby implemented. In this function, only the ID/title/icon/position/editability of the respective configurator, whether a password is required and whether this configurator has been activated for the mobile apps is transmitted. By default, the use of mobile apps is deactivated in the configurator in order to avoid a security problem on the basic tree (ID = 0).
### Authentication
The "user" folder, which is shared for user-defined content. The basic authentication offered in the web server applies exclusively to it, provided the web server is used for the WebFront. If the web server is used for another directory, the authentication applies to all content that is located in this directory - but not to the JSON-RPC API, as this is subject to the aforementioned authentication rules.
> **Note:** The normal commands of the [Command Reference](https://www.symcon.de/en/llms/functions/index.md) and [Module Reference](https://www.symcon.de/en/llms/modules/index.md) can be used for the function calls.
> **Warning:** Your license username must be used as username. The password can be set using [Remote Access](https://www.symcon.de/en/llms/components/remote-access.md).
### JSON-RPC interface (via PHP/IP-Symcon)
#### Read Kernel Version
```php
$rpc = new JSONRPC("http://user:password@127.0.0.1:3777/api/");
$result = $rpc->IPS_GetKernelVersion();
echo "KernelVersion: ".$result;
```
#### Start Scripts
```php
$rpc = new JSONRPC("http://user:password@127.0.0.1:3777/api/");
$rpc->IPS_RunScript(34956);
```
#### Read Variables
```php
$rpc = new JSONRPC("http://user:password@127.0.0.1:3777/api/");
echo $rpc->GetValueFormatted(58383);
```
#### Change Variables
```php
$rpc = new JSONRPC("http://user:password@127.0.0.1:3777/api/");
$rpc->SetValue(38809, 18.5);
```
#### Switch HomeMatic Device
```php
$rpc = new JSONRPC("http://user:password@127.0.0.1:3777/api/");
$rpc->HM_WriteValueBoolean(20558, "STATE", false);
```
#### Return value if not available
```php
try {
$rpc = new JSONRPC("http://user:password@127.0.0.1:3777/api/");
$rpc->IPS_GetKernelDir();
} catch (JSONRPCException $ e) {
echo 'RPC Problem: ', $e->getMessage(), "\n";
} catch (Exception $e) {
echo 'Server Problem: ', $e->getMessage(), "\n";
}
```
### WebSocket Interface (via JavaScript)
Changes in the system can be received as quickly as possible via the Websocket interface.
#### Full API
```php
//IP-Symcon 5.1/IP-Symcon 5.2
//Normal
var connection = new WebSocket('ws://127.0.0.1:3777/api/', [btoa('email:remoteaccesspw').replace(/=/g, '')]);
//SSL
var connection = new WebSocket('wss://127.0.0.1:3777/api/', [btoa('email:remoteaccesspw').replace(/=/g, '')]);
//since IP-Symcon 5.3
//Normal
var connection = new WebSocket('ws://127.0.0.1:3777/api/', [encodeURIComponent(btoa('email:remoteaccesspw'))]);
//SSL
var connection = new WebSocket('wss://127.0.0.1:3777/api/', [encodeURIComponent(btoa('email:remoteaccesspw'))]);
```
#### WebFront API
```php
//IP-Symcon 5.1
//Normal
var connection = new WebSocket('ws://127.0.0.1:3777/api/wfc/12345', [btoa('webfront:webfrontpw').replace(/=/g, '')]);
//SSL
var connection = new WebSocket('wss://127.0.0.1:3777/api/wfc/12345', [btoa('webfront:webfrontpw').replace(/=/g, '')]);
//IP-Symcon 5.2
//Normal
var connection = new WebSocket('ws://127.0.0.1:3777/wfc/12345/api/', [btoa('webfront:webfrontpw').replace(/=/g, '')]);
//SSL
var connection = new WebSocket('wss://127.0.0.1:3777/wfc/12345/api/', [btoa('webfront:webfrontpw').replace(/=/g, '')]);
//since IP-Symcon 5.3
//Normal
var connection = new WebSocket('ws://127.0.0.1:3777/wfc/12345/api/', [encodeURIComponent(btoa('webfront:webfrontpw'))]);
//SSL
var connection = new WebSocket('wss://127.0.0.1:3777/wfc/12345/api/', [encodeURIComponent(btoa('webfront:webfrontpw'))]);
```
### JSON-RPC Interface (via cURL)
Invoke via Command Line
#### Change Variables
For the username mail%40provider.de or password @ must not be written. => Instead: %40
Enter username (mail), password and IP without <,>!
> **Note:** To encode and to take special characters into account, the page [https://www.urlencoder.org/](https://www.urlencoder.org/) can be used for username and password.
```php
//SetValue Integer with the parameters ID = 12345 and value = 42
curl -i -X POST -H "Content-Type: application/json" -d "{\"jsonrpc\": \"2.0\", \"id\": \"0\", \"method\": \"SetValue\", \"params\": [12345, 42]}" http://<mail%40provider.de>:@:3777/api/
//SetValue Float with the parameters ID = 12346 and value = 1.23
curl -i -X POST -H "Content-Type: application/json" -d "{\"jsonrpc\": \"2.0\", \"id\": \"0\", \"method\": \"SetValue\", \"params\": [12346, 1.23]}" http://<mail%40provider.de>:@:3777/api/
//SetValue Boolean with the parameters ID = 12347 and value = false
curl -i -X POST -H "Content-Type: application/json" -d "{\"jsonrpc\": \"2.0\", \"id\": \"0\", \"method\": \"SetValue\", \"params\": [12347, false]}" http://<mail%40provider.de>:@:3777/api/
//SetValue string with the parameters ID = 12348 and value = "my string"
curl -i -X POST -H "Content-Type: application/json" -d "{\"jsonrpc\": \"2.0\", \"id\": \"0\", \"method\": \"SetValue\", \"params\": [12348, \"my string\"]}" http://<mail%40provider.de>:@:3777/api/
//Return-value if successful
{"jsonrpc":"2.0","id":"0","result":true}
```
#### Read Variables
```php
//GetValue with the parameters ID = 12345
curl -i -X POST -H "Content-Type: application/json" -d "{\"jsonrpc\": \"2.0\", \"id\": \"0\", \"method\": \"GetValue\", \"params\": [12345]}" http://<mail%40provider.de>:@:3777/api/
//Return-value
{"jsonrpc":"2.0","id":"0","result":42}
```
---
# Download (Archive)
> Symcon documentation · English · generated on 2026-09-26
> Index: https://www.symcon.de/en/llms.txt
Source: https://www.symcon.de/en/service/documentation/developer-area/download-archive/
> **Warning:** It is always recommended to use the latest version of IP-Symcon. For testing purposes, we offer old versions for download for the respective platforms.
### Windows (32-bit)
[4.0](https://download.symcon.de/version/symcon/win/i386?v=4.0), [4.1](https://download.symcon.de/version/symcon/win/i386?v=4.1), [4.2](https://download.symcon.de/version/symcon/win/i386?v=4.2), [4.3](https://download.symcon.de/version/symcon/win/i386?v=4.3), [4.4](https://download.symcon.de/version/symcon/win/i386?v=4.4)
### Windows (64-bit)
[4.2](https://download.symcon.de/version/symcon/win/amd64?v=4.2), [4.3](https://download.symcon.de/version/symcon/win/amd64?v=4.3), [4.4](https://download.symcon.de/version/symcon/win/amd64?v=4.4), [5.0](https://download.symcon.de/version/symcon/win/amd64?v=5.0), [5.1](https://download.symcon.de/version/symcon/win/amd64?v=5.1), [5.2](https://download.symcon.de/version/symcon/win/amd64?v=5.2), [5.3](https://download.symcon.de/version/symcon/win/amd64?v=5.3), [5.4](https://download.symcon.de/version/symcon/win/amd64?v=5.4), [5.5](https://download.symcon.de/version/symcon/win/amd64?v=5.5), [6.0](https://download.symcon.de/version/symcon/win/amd64?v=6.0), [6.1](https://download.symcon.de/version/symcon/win/amd64?v=6.1), [6.2](https://download.symcon.de/version/symcon/win/amd64?v=6.2), [6.3](https://download.symcon.de/version/symcon/win/amd64?v=6.3), [6.4](https://download.symcon.de/version/symcon/win/amd64?v=6.4), [7.0](https://download.symcon.de/version/symcon/win/amd64?v=7.0), [7.1](https://download.symcon.de/version/symcon/win/amd64?v=7.1), [7.2](https://download.symcon.de/version/symcon/win/amd64?v=7.2), [8.0](https://download.symcon.de/version/symcon/win/amd64?v=8.0), [8.1](https://download.symcon.de/version/symcon/win/amd64?v=8.1), [9.0](https://download.symcon.de/version/symcon/win/amd64?v=9.0)
### Raspberry Pi (armhf)
[4.0](https://download.symcon.de/version/symcon/rpi/armhf?v=4.0), [4.1](https://download.symcon.de/version/symcon/rpi/armhf?v=4.1), [4.2](https://download.symcon.de/version/symcon/rpi/armhf?v=4.2), [4.3](https://download.symcon.de/version/symcon/rpi/armhf?v=4.3), [4.4](https://download.symcon.de/version/symcon/rpi/armhf?v=4.4), [5.0](https://download.symcon.de/version/symcon/rpi/armhf?v=5.0), [5.1](https://download.symcon.de/version/symcon/rpi/armhf?v=5.1), [5.2](https://download.symcon.de/version/symcon/rpi/armhf?v=5.2), [5.3](https://download.symcon.de/version/symcon/rpi/armhf?v=5.3), [5.4](https://download.symcon.de/version/symcon/rpi/armhf?v=5.4), [5.5](https://download.symcon.de/version/symcon/rpi/armhf?v=5.5), [6.0](https://download.symcon.de/version/symcon/rpi/armhf?v=6.0), [6.1](https://download.symcon.de/version/symcon/rpi/armhf?v=6.1), [6.2](https://download.symcon.de/version/symcon/rpi/armhf?v=6.2), [6.3](https://download.symcon.de/version/symcon/rpi/armhf?v=6.3), [6.4](https://download.symcon.de/version/symcon/rpi/armhf?v=6.4), [7.0](https://download.symcon.de/version/symcon/rpi/armhf?v=7.0), [7.1](https://download.symcon.de/version/symcon/rpi/armhf?v=7.1), [7.2](https://download.symcon.de/version/symcon/rpi/armhf?v=7.2), [8.0](https://download.symcon.de/version/symcon/rpi/armhf?v=8.0), [8.1](https://download.symcon.de/version/symcon/rpi/armhf?v=8.1), [9.0](https://download.symcon.de/version/symcon/rpi/armhf?v=9.0)
### Raspberry Pi (arm64)
[6.0](https://download.symcon.de/version/symcon/rpi/arm64?v=6.0), [6.1](https://download.symcon.de/version/symcon/rpi/arm64?v=6.1), [6.2](https://download.symcon.de/version/symcon/rpi/arm64?v=6.2), [6.3](https://download.symcon.de/version/symcon/rpi/arm64?v=6.3), [6.4](https://download.symcon.de/version/symcon/rpi/arm64?v=6.4), [7.0](https://download.symcon.de/version/symcon/rpi/arm64?v=7.0), [7.1](https://download.symcon.de/version/symcon/rpi/arm64?v=7.1), [7.2](https://download.symcon.de/version/symcon/rpi/arm64?v=7.2), [8.0](https://download.symcon.de/version/symcon/rpi/arm64?v=8.0), [8.1](https://download.symcon.de/version/symcon/rpi/arm64?v=8.1), [9.0](https://download.symcon.de/version/symcon/rpi/arm64?v=9.0)
### Ubuntu (amd64)
[4.0](https://download.symcon.de/version/symcon/ubuntu/amd64?v=4.0), [4.1](https://download.symcon.de/version/symcon/ubuntu/amd64?v=4.1), [4.2](https://download.symcon.de/version/symcon/ubuntu/amd64?v=4.2), [4.3](https://download.symcon.de/version/symcon/ubuntu/amd64?v=4.3), [4.4](https://download.symcon.de/version/symcon/ubuntu/amd64?v=4.4), [5.0](https://download.symcon.de/version/symcon/ubuntu/amd64?v=5.0), [5.1](https://download.symcon.de/version/symcon/ubuntu/amd64?v=5.1), [5.2](https://download.symcon.de/version/symcon/ubuntu/amd64?v=5.2), [5.3](https://download.symcon.de/version/symcon/ubuntu/amd64?v=5.3), [5.4](https://download.symcon.de/version/symcon/ubuntu/amd64?v=5.4), [5.5](https://download.symcon.de/version/symcon/ubuntu/amd64?v=5.5), [6.0](https://download.symcon.de/version/symcon/ubuntu/amd64?v=6.0), [6.1](https://download.symcon.de/version/symcon/ubuntu/amd64?v=6.1), [6.2](https://download.symcon.de/version/symcon/ubuntu/amd64?v=6.2), [6.3](https://download.symcon.de/version/symcon/ubuntu/amd64?v=6.3), [6.4](https://download.symcon.de/version/symcon/ubuntu/amd64?v=6.4), [7.0](https://download.symcon.de/version/symcon/ubuntu/amd64?v=7.0), [7.1](https://download.symcon.de/version/symcon/ubuntu/amd64?v=7.1), [7.2](https://download.symcon.de/version/symcon/ubuntu/amd64?v=7.2), [8.0](https://download.symcon.de/version/symcon/ubuntu/amd64?v=8.0), [8.1](https://download.symcon.de/version/symcon/ubuntu/amd64?v=8.1), [9.0](https://download.symcon.de/version/symcon/ubuntu/amd64?v=9.0)
### Mac (32-bit)
[4.0](https://download.symcon.de/version/symcon/mac/i386?v=4.0), [4.1](https://download.symcon.de/version/symcon/mac/i386?v=4.1), [4.2](https://download.symcon.de/version/symcon/mac/i386?v=4.2), [4.3](https://download.symcon.de/version/symcon/mac/i386?v=4.3), [4.4](https://download.symcon.de/version/symcon/mac/i386?v=4.4), [5.0](https://download.symcon.de/version/symcon/mac/i386?v=5.0), [5.1](https://download.symcon.de/version/symcon/mac/i386?v=5.1), [5.2](https://download.symcon.de/version/symcon/mac/i386?v=5.2), [5.3](https://download.symcon.de/version/symcon/mac/i386?v=5.3), [5.4](https://download.symcon.de/version/symcon/mac/i386?v=5.4), [5.5](https://download.symcon.de/version/symcon/mac/i386?v=5.5), [6.0](https://download.symcon.de/version/symcon/mac/i386?v=6.0), [6.1](https://download.symcon.de/version/symcon/mac/i386?v=6.1), [6.2](https://download.symcon.de/version/symcon/mac/i386?v=6.2), [6.3](https://download.symcon.de/version/symcon/mac/i386?v=6.3), [6.4](https://download.symcon.de/version/symcon/mac/i386?v=6.4), [7.0](https://download.symcon.de/version/symcon/mac/i386?v=7.0), [7.1](https://download.symcon.de/version/symcon/mac/i386?v=7.1), [7.2](https://download.symcon.de/version/symcon/mac/i386?v=7.2), [8.0](https://download.symcon.de/version/symcon/mac/i386?v=8.0), [8.1](https://download.symcon.de/version/symcon/mac/i386?v=8.1), [9.0](https://download.symcon.de/version/symcon/mac/i386?v=9.0)
### Catan (64-bit)
[9.0](https://download-dev.symcon.de/version/symcon/catan/arm64?v=9.0)
### Legacy IP-Symcon
[3.4](https://data.symcon.de/symcon_3.4-3803_i386.zip)
### Legacy Management Console
[3.4](https://data.symcon.de/console/ips_console-3.4.exe), [4.0](https://data.symcon.de/console/ips_console-4.0.exe), [4.1](https://data.symcon.de/console/ips_console-4.1.exe), [4.2](https://data.symcon.de/console/ips_console-4.2.exe), [4.3](https://data.symcon.de/console/ips_console-4.3.exe), [4.4](https://data.symcon.de/console/ips_console-4.4.exe), [5.0](https://data.symcon.de/console/ips_console-5.0.exe)
---
# Compatibilityfunctions
> Symcon documentation · English · generated on 2026-09-26
> Index: https://www.symcon.de/en/llms.txt
Source: https://www.symcon.de/en/service/documentation/developer-area/compatibility-functions/
Compatibilityfunctions are the deprecated features that should no longer be used and are disabled by default. These were abolished due to performance or replaced by improved replacement functions. For reasons of compatibility with old IP-Symcon installations, these can be activated via the [special switch](https://www.symcon.de/en/llms/developer/special-switches.md) "compatibility functions" if required. However, this requires a lot of resources and is strongly discouraged.
## IPS_GetInstanceChildrenIDs
Source: https://www.symcon.de/en/service/documentation/developer-area/compatibility-functions/ips-getinstancechildrenids/
`array IPS_GetInstanceChildrenIDs(int $InstanceID)`
returns the InstanceIDs of the children (deprecated)
**Parameters**
- `$InstanceID` (int): ID of the instance
**Returns** (array): An array of InstanceIDs from the children instances
ID of the instance
**Example**
```php
print_r(IPS_GetInstanceChildrenIDs(12345));
// Example to replace the deprecated command
// "IPS_GetInstanceChildrenIDs".
// IPS_GetInstance is used
$InstanceIDs = IPS_GetInstanceList();
foreach($InstanceIDs as $IID)
if(IPS_GetInstance($IID)['ConnectionID'] == 12345)
echo $IID . PHP_EOL;
```
## IPS_GetInstanceParentID
Source: https://www.symcon.de/en/service/documentation/developer-area/compatibility-functions/ips-getinstanceparentid/
`int IPS_GetInstanceParentID(int $InstanceID)`
returns the InstanceID of the parent instance (deprecated)
**Parameters**
- `$InstanceID` (int): ID of the instance
**Returns** (int): ID of the parent instance
ID of the instance
**Example**
```php
// Up to Version 2.5
echo IPS_GetInstanceParentID(12345);
// Since Version 2.6
echo IPS_GetInstance(12345)['ConnectionID'];
```
## IPS_GetScriptID
Source: https://www.symcon.de/en/service/documentation/developer-area/compatibility-functions/ips-getscriptid/
`int IPS_GetScriptID(string $ScriptName)`
returns the ID of a script (deprecated)
**Parameters**
- `$ScriptName` (string): ScriptName to search for
**Returns** (int): If the command succeeds, it returns __TRUE__, otherwise __FALSE__.
ScriptName to search for
**Example**
```php
//Suppress error message with @
$ScriptID = @IPS_GetScriptID("Rain Capture");
if ($ScriptID === false)
echo "Script not found!";
else
echo "The script ID is: ". $ScriptID;
```
## IPS_GetStatusVariable
Source: https://www.symcon.de/en/service/documentation/developer-area/compatibility-functions/ips-getstatusvariable/
`array IPS_GetStatusVariable(int $InstanceID, string $VariableIdent)`
returns extensive information about a specific state variable (deprecated)
**Parameters**
- `$InstanceID` (int): ID of the instance
- `$VariableIdent` (string): Status variable identifier. A listing can be found on [IPS_GetStatusVariableIdents](https://www.symcon.de/en/llms/developer/compatibility-functions.md)
**Returns** (array): The following information are available as key => value pairs:
| Index | Type | Description |
| --------------------- | ------- | ------------------------------------------------------------------------------------------- |
| __VariableID__ | integer | Current ID of the associated IP Symcon variable |
| __VariableIdent__ | string | Status variable identifier |
| __VariableName__ | string | Default name of the created variable |
| __VariablePosition__ | integer | Default position of the created variable |
| __VariableProfile__ | string | Default profile name of the created variable |
| __VariableType__ | integer | Compatible variable type ( See: [IPS_GetVariable](https://www.symcon.de/en/llms/functions/management-variables.md) ) |
| __VariableHasAction__ | boolean | Indicates whether an action is internally defined, which was linked to this status variable |
| __VariableUseAction__ | boolean | Specifies the existing action, in which the visualization should be used |
Status variable identifier. A listing can be found on [IPS_GetStatusVariableIdents](https://www.symcon.de/en/llms/developer/compatibility-functions.md)
**Example**
```php
if(IPS_StatusVariableExists(12345, "StatusVariable"))
{
print_r(IPS_GetStatusVariable(12345, "StatusVariable"));
}
```
## IPS_GetStatusVariableID
Source: https://www.symcon.de/en/service/documentation/developer-area/compatibility-functions/ips-getstatusvariableid/
`int IPS_GetStatusVariableID(int $InstanceID, string $VariableIdent)`
returns all status variables for a specific instance (deprecated)
**Parameters**
- `$InstanceID` (int): Instance ID
- `$VariableIdent` (string): Status variable identifier. A listing can be retrieved via [IPS_GetStatusVariableIdents](https://www.symcon.de/en/llms/developer/compatibility-functions.md).
**Returns** (int): Variable ID of the variable associated with the status variable
Status variable identifier. A listing can be retrieved via [IPS_GetStatusVariableIdents](https://www.symcon.de/en/llms/developer/compatibility-functions.md).
**Example**
```php
//Display the status of, for example, an FS20 device without knowing the ID of the "Status" variable
echo GetValue(IPS_GetStatusVariableID(12345, "StatusVariable"));
// since version 2.6 replacement function
$InstanceID = "StatusVariable";
$VariableIdent = 12345;
$migrateIdents = Array(
"F05_StatusVar" => "Status",
"F10_TemperatureVar" => "Temperature",
"F12_Var0" => "Status0",
"F12_Var1" => "Status1",
"F1D_CounterVar1" => "Counter1",
"F1D_CounterVar2" => "Counter2",
"F20_Var0" => "Port0",
"F20_Var1" => "Port1",
"F20_Var2" => "Port2",
"F20_Var3" => "Port3",
"F26_TemperatureVar" => "Temperature",
"F26_VDDVar" => "VDD",
"F26_VADVar" => "VAD",
"F26_XSENSVar" => "XSENS",
"F28_TemperatureVar" => "Temperature",
"F29_Var0" => "Status0",
"F29_LatchVar0" => "Latch0",
"F29_Var1" => "Status1",
"F29_LatchVar1" => "Latch1",
"F29_Var2" => "Status2",
"F29_LatchVar2" => "Latch2",
"F29_Var3" => "Status3",
"F29_LatchVar3" => "Latch3",
"F29_Var4" => "Status4",
"F29_LatchVar4" => "Latch4",
"F29_Var5" => "Status5",
"F29_LatchVar5" => "Latch5",
"F29_Var6" => "Status6",
"F29_LatchVar6" => "Latch6",
"F29_Var7" => "Status7",
"F29_LatchVar7" => "Latch7",
"F2C_PositionVar" => "Position",
"F3A_Var0" => "Status0",
"F3A_Var1" => "Status1"
);
if(isset($migrateIdents[$VariableIdent]))
{
$VariableIdent = $migrateIdents[$VariableIdent];
}
$result = IPS_GetObjectIDByIdent($VariableIdent, $InstanceID);
echo $result;
```
## IPS_GetStatusVariableIdents
Source: https://www.symcon.de/en/service/documentation/developer-area/compatibility-functions/ips-getstatusvariableidents/
`array IPS_GetStatusVariableIdents(int $InstanceID)`
returns the VariableIdents of a status variable (deprecated)
**Parameters**
- `$InstanceID` (int): ID of the instance
**Returns** (array): An array of strings that indicate the status variable identifiers of the instance
ID of the instance
**Example**
```php
print_r(IPS_GetStatusVariableIdents(12345));
```
## IPS_GetUptime
Source: https://www.symcon.de/en/service/documentation/developer-area/compatibility-functions/ips-getuptime/
`int IPS_GetUptime()`
returns the point of time when IP Symcon was started (deprecated)
**Returns** (int): Point of time of the most recent start of IP Symcon
The function returns the date and time of the start time of IP Symcon as Unix Timestamp.
> **Warning:** This function is implemented until version 3.4. Since version 4.0 it is replaced by [IPS_GetKernelStartTime](https://www.symcon.de/en/llms/functions/program-information.md).
**Example**
```php
// returns, e.g., 1204675012
echo IPS_GetUptime();
// returns, e.g., "2008.03.04 23:56:52"
echo gmdate("Y.m.d H:i:s.", IPS_GetUptime());
```
## IPS_GetVariableID
Source: https://www.symcon.de/en/service/documentation/developer-area/compatibility-functions/ips-getvariableid/
`int IPS_GetVariableID(string $VariableName)`
returns the ID of a variable (deprecated)
**Parameters**
- `$VariableName` (string): Name of the variable
**Returns** (int): ID of the found variable, otherwise __FALSE__ and a __Warning__
Name of the variable
**Example**
```php
//Suppress error message with @
$VarID = @IPS_GetVariableID("Rainfall");
if ($VarID === false)
echo "Variable not found!";
else
echo "The Variable ID is: ". $VarID;
```
## IPS_HasInstanceChildren
Source: https://www.symcon.de/en/service/documentation/developer-area/compatibility-functions/ips-hasinstancechildren/
`bool IPS_HasInstanceChildren(bool $InstanceID)`
checks if an instance is connected to child instances (deprecated)
**Parameters**
- `$InstanceID` (bool): ID of the instance
**Returns** (bool): The return value is __TRUE__ if the instance has a child instance, otherwise, __FALSE__.
ID of the instance
**Example**
```php
if(IPS_HasInstanceParent(12345))
{
echo "Has a child instance";
}
```
## IPS_HasInstanceParent
Source: https://www.symcon.de/en/service/documentation/developer-area/compatibility-functions/ips-hasinstanceparent/
`bool IPS_HasInstanceParent(int $InstanceID)`
checks if the instance has a parent instance (deprecated)
**Parameters**
- `$InstanceID` (int): ID of the instance
**Returns** (bool): The return value is __TRUE__ if the instance has a parent instance, otherwise, __FALSE__.
ID of the instance
**Example**
```php
// Up to Version 2.5
if(IPS_HasInstanceParent(12345))
{
echo "Has a parent instance";
}
// Since Version 2.6
if(IPS_GetInstance(12345)['ConnectionID'] > 0)
{
echo "Has a parent instance";
}
```
## IPS_IsPersistent
Source: https://www.symcon.de/en/service/documentation/developer-area/compatibility-functions/ips-ispersistent/
`bool IPS_IsPersistent(int $ObjectID)`
checks if an object is persistent (deprecated)
**Parameters**
- `$ObjectID` (int): The ID of the object
**Returns** (bool): __TRUE__, if the object is saved, __FALSE__ otherwise
The ID of the object
**Example**
```php
if (IPS_IsPersistent(34881))
echo "The object is saved on shut down!";
```
## IPS_SetLinkChildID
Source: https://www.symcon.de/en/service/documentation/developer-area/compatibility-functions/ips-setlinkchildid/
`bool IPS_SetLinkChildID(int $LinkID, int $LinkedObject)`
_Requires Symcon >= 2.1_
set the target for a link (deprecated)
**Parameters**
- `$LinkID` (int): ID of the link
- `$LinkedObject` (int): ID of the target object for the link
**Returns** (bool): If the command succeeds, it returns __TRUE__, otherwise __FALSE__.
ID of the target object for the link
**Example**
```php
IPS_SetLinkChildID($LinkID, 12345); //Refer to object 12345
```
## IPS_SetStatusVariableUseAction
Source: https://www.symcon.de/en/service/documentation/developer-area/compatibility-functions/ips-setstatusvariableuseaction/
`bool IPS_SetStatusVariableUseAction(int $InstanceID, string $VariableIdent, bool $UseAction)`
set if the default action of a status variable should be used (deprecated)
**Parameters**
- `$InstanceID` (int): ID of the instance
- `$VariableIdent` (string): Status variable identifier. A listing can be found on [IPS_GetStatusVariableIdents](https://www.symcon.de/en/llms/developer/compatibility-functions.md)
- `$UseAction` (bool): Indicates whether the action should be used in the visualization
**Returns** (bool): If the command succeeds, it returns __TRUE__, otherwise __FALSE__.
Indicates whether the action should be used in the visualization
**Example**
```php
if(IPS_StatusVariableExists(12345, "StatusVariable"))
{
IPS_SetStatusVariableUseAction(12345, "StatusVariable", false); // Do not make it switchable via WebFront
}
```
## IPS_StatusVariableExists
Source: https://www.symcon.de/en/service/documentation/developer-area/compatibility-functions/ips-statusvariableexists/
`bool IPS_StatusVariableExists(int $InstanceID, string $VariableIdent)`
checks if a specific status variable exists (deprecated)
**Parameters**
- `$InstanceID` (int): ID of the Instance
- `$VariableIdent` (string): Status variable identifier. A listing can be found on [IPS_GetStatusVariableIdents](https://www.symcon.de/en/llms/developer/compatibility-functions.md)
**Returns** (bool): The return value is __TRUE__ if the status variable exists, otherwise __FALSE__
Status variable identifier. A listing can be found on [IPS_GetStatusVariableIdents](https://www.symcon.de/en/llms/developer/compatibility-functions.md)
**Example**
```php
if(IPS_StatusVariableExists(12345, "StatusVariable"))
{
echo IPS_GetStatusVariableID(12345, "StatusVariable");
}
```
---
# Limitations
> Symcon documentation · English · generated on 2026-09-26
> Index: https://www.symcon.de/en/llms.txt
Source: https://www.symcon.de/en/service/documentation/developer-area/limitations/
The restrictions described below are necessary for reasons of performance and security of the system. It is not planned to change these.
| Limitation | Description |
| ------------------------------------------- | ---------------------------------------------------------------------------------------------------------------------------------------------------------------------------------------------------------------------------------------------------------------------------------------------------------------------------------------------------------------------------------------------------------------------------------------- |
| Maximum number of objects | 50000. The address space of 10000-59999 is used. Depending on the license/IP-Symcon version, this value may be lower. |
| Maximum size of a string variable | Over 1024kb an error is generated and the content is not written. For reasons of performance and stability, data over 8kb should be transferred elsewhere. The 1024kb limit simply serves as a hard limit in order to contain catastrophic effects during runtime due to faulty scripts. |
| Maximum size of the RegisterVariable Buffer | For size 8kb and above a warning is written in the log. Only the last 64kb of data is kept in the buffer. Older data will be discarded without further warning. |
| Maximum size of the Cutter Buffer | For size 8kb and above a warning is written in the log. Only the last 64kb of data is kept in the buffer. Older data will be discarded without further warning. |
| Maximum number of PHP-Threads | The default setting of 50 PHP threads is completely sufficient for almost all systems. The minimum is 25 PHP threads. If a value lower than 25 is selected, 25 PHP threads will still be created. If more PHP threads are required, the value can be increased to 100, for example. Much higher values make little sense in most cases and consume an unnecessary amount of RAM. |
| Maximum memory per PHP thread | The default setting is 32MB per PHP thread. This value can be changed to a maximum of 64M per thread in the php.ini file. Consult the PHP documentation for this. |
| Maximum memory per buffer | The buffer has a soft limit of 256kB and a hard limit of 1024kB. This means that IP-Symcon throws a "warning" in the messages if the buffer is larger than 256kB and the maximum size of the buffer is 1024kB. Data larger than 1024kB will be truncated. |
| Query of data via AC_*functions | A maximum of 10000 lines are returned, regardless of whether the limit was selected higher. No warning is given. Queries should be optimized accordingly so that the aggregated data can be accessed. This minimizes the load on the database and thus also minimizes access times for the WebFront visualization of the individual accesses. |
| Maximum associations per variable profile | A maximum of 128 (since 5.0; previously 32) associations are allowed per variable profile. The reasoning to this is that every change to the profile associations must be transferred to all WebFronts, which results in a high overhead if there are a large number of associations. In addition, this feature is not designed for e.g. a playlist selection, as this would negatively influence the design and layout of the WebFront. |
| Maximum number of simultaneous RTSP streams | The hardware of the Symcon server and the resolution of the streams determine how many simultaneous streams are possible. |
---
# Mirroring
> Symcon documentation · English · generated on 2026-09-26
> Index: https://www.symcon.de/en/llms.txt
Source: https://www.symcon.de/en/service/documentation/developer-area/mirroring/
_Requires Symcon >= 7.0_
> **Note:** Mirroring is a paid extension that can be purchased for any existing IP-Symcon license. For a suitable demo version, please contact our [Support](https://www.symcon.de/en/contact-us/#Mirroring%20Extension). The extension can be purchased directly in the [Shop](https://www.symcon.de/en/shop/enterprise/ips-enterprise-mirroring).
A system can be configured as a mirror of another server system. In this case, the mirror is regularly updated by the server and adapts its configuration to that of the server. If the server fails, the mirror can be used and take over the tasks of the server, thereby optimizing the availability of the overall system.
> **Note:** Mirroring contains various parameters which should be configured to suit the use case. In order to optimize the commissioning of this extension, we recommend contacting our [Support](https://www.symcon.de/en/contact-us/#Mirroring%20Support) so that the optimal configuration for the use case can be worked out and implemented together.
To use mirroring, [remote access](https://www.symcon.de/en/llms/components/remote-access.md) must be enabled on the server. The initial settings for mirroring can be configured in the core instance “Replication”. These are then created in the file "replication.json" in the same directory as "settings.json" – see [Installation](https://www.symcon.de/en/llms/getting-started.md) of the corresponding operating system. Changes after the initial activation of replication can only be made in this file, as the rest of the system is a 1:1 mirror of the main system.
### Parameter of replication.json
| Parameters | Type | Description |
| ------------------------------------------------------------ | ------- | -------------------------------------------------------------------------------------------------------------------------------------------------------------------------------------------------------------------------------------------------------------------------------------------------------------------------------------------------------------------------------------------------------------------------------------------------------------------------------------------------------------------------------------------------------------------------------------------------------------------------------------------------------------------------------------------------------------------------------------------------------------------------------------- |
| Active | Boolean | Mirroring is active if the value is set to true, otherwise it is inactive and the system acts normally. |
| Mode | Integer | Operating mode of the mirrored system 0 - Parallel: The system is fully operational and all its connections are active. This means that the system can be used directly if the server fails. However, either a gateway must support the connection of multiple devices or a separate gateway must be available. If the mirrored system is used although the server is still running, these changes will be overwritten during the next mirroring and will therefore expire 1 - Standby: The system is in standby and all its connections are inactive. If the server fails, the mirrored system must therefore be shut down once, the Active parameter set to false and the system restarted. The required connections are then established and the mirrored system can be used. |
| Host | String | The URL under which the server system can be reached |
| Port | Integer | The port under which the server system provides IP-Symcon |
| UseSSL | Boolean | If true, the connection to the client is encrypted via SSL |
| VerifyPeer | Boolean | If true, it is verified that the SSL certificate of the host is correct (only if UseSSL is also true) |
| VerifyHost | Boolean | If true, it is verified that the host URL from the SSL certificate matches the host from the property (only visible if Use SSL is active) |
| Username | String | The user name, i.e. the license address, of the server system |
| Password | String | The password for remote access to the server system |
| Timeout | Integer | The timeout for requests to the server in milliseconds. If a request takes longer, the connection is marked as faulty and no mirroring is performed |
| Synchronization | Object | Detailed settings for not mirroring aspects of the server while retaining your own settings |
### Parameter for Synchronization
| Parameter | Type | Description |
| --------------- | ----- | --------------------------------------------------------------------------------------------------------------------------------------------------------------------------- |
| ExcludeObjects | Array | Objects whose IDs are in this list are not updated during a mirroring and retain the configuration of the mirrored system |
| ExcludeProfiles | Array | [Variable profiles](https://www.symcon.de/en/llms/concepts.md) whose names are in this list are not updated during a mirroring and retain the configuration of the mirrored system |
---
# SDK/Tools
> Symcon documentation · English · generated on 2026-09-26
> Index: https://www.symcon.de/en/llms.txt
Source: https://www.symcon.de/en/service/documentation/developer-area/sdk-tools/
The SDK is used to develop own modules and to be able to integrate them via the "Module Control". The developed modules can be made available to other users.
### SDK
__Version 3.0 and above__
[SDK for Excel](https://www.symcon.de/en/llms/developer/sdk-tools.md)
[SDK for Skins](https://www.symcon.de/en/llms/developer/sdk-tools.md)
__Version 4.0 and above__
[SDK for PHP](https://www.symcon.de/en/llms/developer/sdk-tools/sdk-php.md)
### Tools
[Guid Generator](https://www.symcon.de/en/llms/developer/sdk-tools.md)
[Module Generator](https://www.symcon.de/en/llms/developer/sdk-tools.md)
[Module Validator](https://www.symcon.de/en/llms/developer/sdk-tools.md)
[Network-Configuration-Tool](https://www.symcon.de/en/llms/developer/sdk-tools.md)
[Recoverytool](https://www.symcon.de/en/llms/developer/sdk-tools.md)
[Visual Studio Code](https://www.symcon.de/en/llms/developer/sdk-tools.md)
[AI Agents (llms.txt)](https://www.symcon.de/en/llms/developer/sdk-tools.md)
## AI Agents
Source: https://www.symcon.de/en/service/documentation/developer-area/sdk-tools/ai-agents/
The complete documentation is additionally available as Markdown optimized for AI agents and Large Language Models (LLMs), e.g. Claude, ChatGPT, Cursor or GitHub Copilot. The files are automatically regenerated on every update of the website and are therefore always up to date with this documentation.
In contrast to the HTML page or the PDF, the files contain only the content without any layout. Therefore, they require significantly fewer tokens and can be processed faster by AI agents.
### Structure
The files follow the [llms.txt](https://llmstxt.org) standard:
| File | Description |
| --------------------------------------------------------------- | --------------------------------------------------------------------------------------------------------------------------------------------------------------- |
| [llms.txt](https://www.symcon.de/en/llms.txt) | Index of all files with a short description and approximate size in tokens. The entry point for AI agents. |
| [llms/function-index.md](https://www.symcon.de/en/llms/function-index.md) | All functions (command reference and module functions) with signature and short description, each with a link to the file containing parameters and examples. |
| llms/modules/*.md | One file per module, e.g. [enocean.md](https://www.symcon.de/en/llms/modules/enocean.md) or [knx.md](https://www.symcon.de/en/llms/modules/knx.md), including the module functions. |
| llms/functions/*.md | The command reference, one file per group, e.g. [management-variables.md](https://www.symcon.de/en/llms/functions/management-variables.md). |
| [llms-full.txt](https://www.symcon.de/en/llms-full.txt) | The complete documentation in a single file, e.g. for uploading into a knowledge base. |
The file names are identical in all languages. The German version is available at /de/llms.txt.
### Usage
Most AI agents can fetch the files directly. It is sufficient to tell the agent the address of the index, e.g. in the CLAUDE.md or AGENTS.md file of your module project:
```php
The Symcon documentation for AI agents is available at https://www.symcon.de/en/llms.txt.
For PHP functions, load https://www.symcon.de/en/llms/function-index.md first.
```
Alternatively, the file llms-full.txt can be uploaded as a knowledge base into a project (e.g. Claude Projects or NotebookLM).
### Files
- Start here
- [Function Index](https://www.symcon.de/en/llms/function-index.md)
- [Getting Started](https://www.symcon.de/en/llms/getting-started.md)
- [System Requirements](https://www.symcon.de/en/llms/getting-started/system-requirements.md)
- [Migrationen](https://www.symcon.de/en/llms/getting-started/migrationen.md)
- [Procedures](https://www.symcon.de/en/llms/how-to.md)
- [Basics](https://www.symcon.de/en/llms/concepts.md)
- [Automations](https://www.symcon.de/en/llms/concepts/automations.md)
- Components
- [Components – Overview](https://www.symcon.de/en/llms/components/index.md)
- [Remote Access](https://www.symcon.de/en/llms/components/remote-access.md)
- [Tray](https://www.symcon.de/en/llms/components/tray.md)
- [Service](https://www.symcon.de/en/llms/components/service.md)
- [Management Console](https://www.symcon.de/en/llms/components/management-console.md)
- [Tile Visualization](https://www.symcon.de/en/llms/components/tile-visualization.md)
- [WebFront Visualization](https://www.symcon.de/en/llms/components/webfront-visualization.md)
- [Object Presentation](https://www.symcon.de/en/llms/components/object-presentation.md)
- [Icons](https://www.symcon.de/en/llms/components/icons.md)
- Command Reference
- [Command Reference – Overview](https://www.symcon.de/en/llms/functions/index.md)
- [Process Control](https://www.symcon.de/en/llms/functions/process-control.md)
- [Management of Events](https://www.symcon.de/en/llms/functions/management-events.md)
- [Management of Instances](https://www.symcon.de/en/llms/functions/management-instances.md)
- [Management of Categories](https://www.symcon.de/en/llms/functions/management-categories.md)
- [Management of Links](https://www.symcon.de/en/llms/functions/management-links.md)
- [Management of Media](https://www.symcon.de/en/llms/functions/management-media.md)
- [Management of Modules](https://www.symcon.de/en/llms/functions/management-modules.md)
- [Management of Objects](https://www.symcon.de/en/llms/functions/management-objects.md)
- [Program Information](https://www.symcon.de/en/llms/functions/program-information.md)
- [Management of Scripts](https://www.symcon.de/en/llms/functions/management-scripts.md)
- [Management of Variables](https://www.symcon.de/en/llms/functions/management-variables.md)
- [Accessing Variables](https://www.symcon.de/en/llms/functions/access-variables.md)
- Developer Area
- [Developer Area – Overview](https://www.symcon.de/en/llms/developer/index.md)
- [Data Exchange](https://www.symcon.de/en/llms/developer/data-exchange.md)
- [Download (Archive)](https://www.symcon.de/en/llms/developer/download-archive.md)
- [Compatibilityfunctions](https://www.symcon.de/en/llms/developer/compatibility-functions.md)
- [Limitations](https://www.symcon.de/en/llms/developer/limitations.md)
- [Mirroring](https://www.symcon.de/en/llms/developer/mirroring.md)
- [SDK/Tools](https://www.symcon.de/en/llms/developer/sdk-tools.md)
- [SDK (PHP)](https://www.symcon.de/en/llms/developer/sdk-tools/sdk-php.md)
- [Configuration Forms](https://www.symcon.de/en/llms/developer/sdk-tools/sdk-php/configuration-forms.md)
- [Module](https://www.symcon.de/en/llms/developer/sdk-tools/sdk-php/module.md)
- [Special Switches](https://www.symcon.de/en/llms/developer/special-switches.md)
- Module Reference
- [Module Reference – Overview](https://www.symcon.de/en/llms/modules/index.md)
- Module Reference: Devices
- [1-Wire](https://www.symcon.de/en/llms/modules/1-wire.md)
- [ABL](https://www.symcon.de/en/llms/modules/abl.md)
- [Alfen](https://www.symcon.de/en/llms/modules/alfen.md)
- [ALLNET](https://www.symcon.de/en/llms/modules/allnet.md)
- [BACnet](https://www.symcon.de/en/llms/modules/bacnet.md)
- [Catan](https://www.symcon.de/en/llms/modules/catan.md)
- [digitalSTROM](https://www.symcon.de/en/llms/modules/digitalstrom.md)
- [DMX / ArtNet](https://www.symcon.de/en/llms/modules/dmx-artnet.md)
- [EgiGeoZone](https://www.symcon.de/en/llms/modules/egigeozone.md)
- [ekey](https://www.symcon.de/en/llms/modules/ekey.md)
- [ekey bionyx](https://www.symcon.de/en/llms/modules/ekeybionyx.md)
- [EnOcean](https://www.symcon.de/en/llms/modules/enocean.md)
- [FHZ1X00PC](https://www.symcon.de/en/llms/modules/fhz1x00pc.md)
- [FS10 Weather](https://www.symcon.de/en/llms/modules/fs10-weather.md)
- [GARDENA smart system](https://www.symcon.de/en/llms/modules/gardena-smart-system.md)
- [Geofency](https://www.symcon.de/en/llms/modules/geofency.md)
- [Heating Control](https://www.symcon.de/en/llms/modules/heating-control.md)
- [Home Connect](https://www.symcon.de/en/llms/modules/home-connect.md)
- [HomeMatic](https://www.symcon.de/en/llms/modules/homematic.md)
- [Image Grabber](https://www.symcon.de/en/llms/modules/image-grabber.md)
- [IPS-868](https://www.symcon.de/en/llms/modules/ips-868.md)
- [IR Trans](https://www.symcon.de/en/llms/modules/irtrans.md)
- [KEBA](https://www.symcon.de/en/llms/modules/keba.md)
- [KNX](https://www.symcon.de/en/llms/modules/knx.md)
- [LCN](https://www.symcon.de/en/llms/modules/lcn.md)
- [LJQuick](https://www.symcon.de/en/llms/modules/ljquick.md)
- [Matter](https://www.symcon.de/en/llms/modules/matter.md)
- [M-Bus](https://www.symcon.de/en/llms/modules/mbus.md)
- [Mennekes](https://www.symcon.de/en/llms/modules/mennekes.md)
- [Modbus RTU/TCP](https://www.symcon.de/en/llms/modules/modbus-rtu-tcp.md)
- [Möhlenhoff Alpha 2](https://www.symcon.de/en/llms/modules/moehlenhoff-alpha-2.md)
- [MQTT](https://www.symcon.de/en/llms/modules/mqtt.md)
- [NEA Smart](https://www.symcon.de/en/llms/modules/nea-smart.md)
- [OCPP](https://www.symcon.de/en/llms/modules/ocpp.md)
- [OPC UA](https://www.symcon.de/en/llms/modules/opc-ua.md)
- [SageGlass (BACnet)](https://www.symcon.de/en/llms/modules/sageglass-bacnet.md)
- [Shutter Control](https://www.symcon.de/en/llms/modules/shutter-control.md)
- [Siemens OZW](https://www.symcon.de/en/llms/modules/siemens-ozw.md)
- [SNMP](https://www.symcon.de/en/llms/modules/snmp.md)
- [Snom](https://www.symcon.de/en/llms/modules/snom.md)
- [PLC: Siemens, Vipa, Logo](https://www.symcon.de/en/llms/modules/sps-siemens-vipa-logo.md)
- [PLC: Wago, Beckhoff, ABB](https://www.symcon.de/en/llms/modules/sps-wago-beckhoff-abb.md)
- [Sync Remote](https://www.symcon.de/en/llms/modules/sync-remote.md)
- [Technische Alternative](https://www.symcon.de/en/llms/modules/technische-alternative.md)
- [Door Intercom](https://www.symcon.de/en/llms/modules/door-intercom.md)
- [Voice over IP](https://www.symcon.de/en/llms/modules/voip.md)
- [Weishaupt](https://www.symcon.de/en/llms/modules/weishaupt.md)
- [WinLIRC](https://www.symcon.de/en/llms/modules/winlirc.md)
- [Wireless M-Bus](https://www.symcon.de/en/llms/modules/wireless-m-bus.md)
- [WMRS200](https://www.symcon.de/en/llms/modules/wmrs200.md)
- [W&T](https://www.symcon.de/en/llms/modules/wut.md)
- [XBee](https://www.symcon.de/en/llms/modules/xbee.md)
- [Eaton xComfort](https://www.symcon.de/en/llms/modules/xcomfort.md)
- [Z-Wave](https://www.symcon.de/en/llms/modules/z-wave.md)
- [Zevvy](https://www.symcon.de/en/llms/modules/zevvy.md)
- Module Reference: Logic
- [Active List](https://www.symcon.de/en/llms/modules/active-list.md)
- [Presence Simulation](https://www.symcon.de/en/llms/modules/presence-simulation.md)
- [Image Archive](https://www.symcon.de/en/llms/modules/image-archive.md)
- [Countdown](https://www.symcon.de/en/llms/modules/countdown.md)
- [CSV ZIP Export](https://www.symcon.de/en/llms/modules/csv-zip-export.md)
- [Dummy Module](https://www.symcon.de/en/llms/modules/dummy-module.md)
- [Egg Timer](https://www.symcon.de/en/llms/modules/egg-timer.md)
- [Group Control](https://www.symcon.de/en/llms/modules/group-control.md)
- [JSON Decoder](https://www.symcon.de/en/llms/modules/json-decoder.md)
- [JSON Exporter](https://www.symcon.de/en/llms/modules/json-exporter.md)
- [Logic Gate](https://www.symcon.de/en/llms/modules/logic-gate.md)
- [Computation Module](https://www.symcon.de/en/llms/modules/computation-module.md)
- [RGBMultiplexer](https://www.symcon.de/en/llms/modules/rgbmultiplexer.md)
- [DragPointer](https://www.symcon.de/en/llms/modules/dragpointer.md)
- [Game Collection](https://www.symcon.de/en/llms/modules/game-collection.md)
- [Scene Control](https://www.symcon.de/en/llms/modules/scene-control.md)
- [Dew Point Temperature Calculation](https://www.symcon.de/en/llms/modules/dew-point-temperature-calculation.md)
- [Staircase Light Controls](https://www.symcon.de/en/llms/modules/staircase-light-controls.md)
- [Renamer](https://www.symcon.de/en/llms/modules/renamer.md)
- [Rain Central](https://www.symcon.de/en/llms/modules/rain-central.md)
- [Variable Comparison](https://www.symcon.de/en/llms/modules/variable-comparison.md)
- [Virtuelle Devices](https://www.symcon.de/en/llms/modules/virtuelle-devices.md)
- [Random Lighting](https://www.symcon.de/en/llms/modules/random-lighting.md)
- Module Reference: Energy
- [Work Efficiency](https://www.symcon.de/en/llms/modules/work-efficiency.md)
- [Operating Hours Counter](https://www.symcon.de/en/llms/modules/operating-hours-counter.md)
- [Energy Dashboard](https://www.symcon.de/en/llms/modules/energy-dashboard.md)
- [Energy Manager](https://www.symcon.de/en/llms/modules/energy-manager.md)
- [Energy Distribution](https://www.symcon.de/en/llms/modules/energy-distribution.md)
- [Energy Counter](https://www.symcon.de/en/llms/modules/energy-counter.md)
- [Power Billing Module](https://www.symcon.de/en/llms/modules/power-billing-module.md)
- [Power price](https://www.symcon.de/en/llms/modules/power-price.md)
- [Consumption per Category](https://www.symcon.de/en/llms/modules/consumption-per-category.md)
- [Consumption within Timespan](https://www.symcon.de/en/llms/modules/consumption-within-timespan.md)
- [Consumption Behaviour](https://www.symcon.de/en/llms/modules/consumption-behaviour.md)
- [Calculated Counter](https://www.symcon.de/en/llms/modules/calculated-counter.md)
- [Virtual Counter](https://www.symcon.de/en/llms/modules/virtual-counter.md)
- [Reading (Day)](https://www.symcon.de/en/llms/modules/reading-day.md)
- [Meter Overflow](https://www.symcon.de/en/llms/modules/meter-overflow.md)
- Module Reference: Visualizations
- [Tile Visualization](https://www.symcon.de/en/llms/modules/tile-visualization.md)
- [WebFront Visualization](https://www.symcon.de/en/llms/modules/webfront-visualization.md)
- Module Reference: Voice assistents
- [Amazon Alexa](https://www.symcon.de/en/llms/modules/amazon-alexa.md)
- [Google Assistant](https://www.symcon.de/en/llms/modules/google-assistant.md)
- Module Reference: Notifications
- [Alerting](https://www.symcon.de/en/llms/modules/alerting.md)
- [Notification](https://www.symcon.de/en/llms/modules/notification.md)
- [Announcement](https://www.symcon.de/en/llms/modules/announcement.md)
- [Dynamic Mail](https://www.symcon.de/en/llms/modules/dynamic-mail.md)
- [Done Notifier](https://www.symcon.de/en/llms/modules/done-notifier.md)
- [IMAP](https://www.symcon.de/en/llms/modules/imap.md)
- [MediaPlayer](https://www.symcon.de/en/llms/modules/mediaplayer.md)
- [POP3](https://www.symcon.de/en/llms/modules/pop3.md)
- [Popup Module](https://www.symcon.de/en/llms/modules/popup-module.md)
- [SMS](https://www.symcon.de/en/llms/modules/sms.md)
- [SMTP](https://www.symcon.de/en/llms/modules/smtp.md)
- [Spotify](https://www.symcon.de/en/llms/modules/spotify.md)
- [Fault Manager](https://www.symcon.de/en/llms/modules/fault-manager.md)
- [SymconReport](https://www.symcon.de/en/llms/modules/symconreport.md)
- [Phone Announcement](https://www.symcon.de/en/llms/modules/phone-announcement.md)
- [Phone Chain](https://www.symcon.de/en/llms/modules/phone-chain.md)
- [TelegramBot](https://www.symcon.de/en/llms/modules/telegrambot.md)
- [Text to Speech](https://www.symcon.de/en/llms/modules/text-to-speech.md)
- [TTSAWSPolly](https://www.symcon.de/en/llms/modules/ttsawspolly.md)
- [Consumption Alert](https://www.symcon.de/en/llms/modules/consumption-alert.md)
- [Water Alert](https://www.symcon.de/en/llms/modules/water-alert.md)
- [Watchdog](https://www.symcon.de/en/llms/modules/watchdog.md)
- Module Reference: Core Instances
- [Archive Control](https://www.symcon.de/en/llms/modules/archive-control.md)
- [Permission Control](https://www.symcon.de/en/llms/modules/permission-control.md)
- [Calendar Control](https://www.symcon.de/en/llms/modules/calendar-control.md)
- [Connect Control](https://www.symcon.de/en/llms/modules/connect-control.md)
- [Cutter](https://www.symcon.de/en/llms/modules/cutter.md)
- [DNS-SD Control](https://www.symcon.de/en/llms/modules/dns-sd-control.md)
- [Event Control](https://www.symcon.de/en/llms/modules/event-control.md)
- [Location Control](https://www.symcon.de/en/llms/modules/location-control.md)
- [Module Control](https://www.symcon.de/en/llms/modules/module-control.md)
- [Notification Control](https://www.symcon.de/en/llms/modules/notification-control.md)
- [Presence Control](https://www.symcon.de/en/llms/modules/presence-control.md)
- [RegisterVariable](https://www.symcon.de/en/llms/modules/registervariable.md)
- [Skin Control](https://www.symcon.de/en/llms/modules/skin-control.md)
- [SSDP Control](https://www.symcon.de/en/llms/modules/ssdp-control.md)
- [System Information](https://www.symcon.de/en/llms/modules/system-information.md)
- [Tailscale VPN](https://www.symcon.de/en/llms/modules/tailscale-vpn.md)
- [TextParser](https://www.symcon.de/en/llms/modules/textparser.md)
- [Translation Control](https://www.symcon.de/en/llms/modules/translation-control.md)
- [Util Control](https://www.symcon.de/en/llms/modules/util-control.md)
- [WebHook Control](https://www.symcon.de/en/llms/modules/webhook-control.md)
- [WebServer](https://www.symcon.de/en/llms/modules/webserver.md)
- Module Reference: I/O Instances
- [Client Socket](https://www.symcon.de/en/llms/modules/clientsocket.md)
- [HID](https://www.symcon.de/en/llms/modules/hid.md)
- [HTTP Client](https://www.symcon.de/en/llms/modules/httpclient.md)
- [Multicast Socket](https://www.symcon.de/en/llms/modules/multicastsocket.md)
- [Serial Port](https://www.symcon.de/en/llms/modules/serialport.md)
- [Server Sent Event Client](https://www.symcon.de/en/llms/modules/serversenteventclient.md)
- [Server Socket](https://www.symcon.de/en/llms/modules/serversocket.md)
- [UDP Socket](https://www.symcon.de/en/llms/modules/udpsocket.md)
- [Virtual I/O](https://www.symcon.de/en/llms/modules/virtualio.md)
- [WebSocket Client](https://www.symcon.de/en/llms/modules/websocketclient.md)
- Module Reference: Backups
- [Backup](https://www.symcon.de/en/llms/modules/backup.md)
- Module Reference: Legacy
- [RRDTool](https://www.symcon.de/en/llms/modules/rrdtool.md)
- [Shutter Control (legacy)](https://www.symcon.de/en/llms/modules/shutter-control-legacy.md)
- [USBMapper](https://www.symcon.de/en/llms/modules/usbmapper.md)
- [Web Graph](https://www.symcon.de/en/llms/modules/web-graph.md)
- [Wunderground Weather](https://www.symcon.de/en/llms/modules/wunderground-weather.md)
## SDK (Excel)
Source: https://www.symcon.de/en/service/documentation/developer-area/sdk-tools/sdk-excel/
_Requires Symcon >= 3.0_
### Description
Since IP-Symcon 3.0, IP-Symcon supports the JSON-RPC interface and thus the database can easily be read into Microsoft Excel.
### Requirements
IP-Symcon 3.0 or above
Microsoft Excel or similar with Visual Basic for Applications support
"Visual Basic for Applications" experience (optional)
[Download the prepared Excel file](https://www.symcon.de/assets/files/service/SDK-Excel.zip)
### Setup in Microsoft Excel
The downloaded file must be unzipped and opened in Excel.
#### Opening the file for the first time
When the file is opened for the first time, two warnings appear, which must be clicked through and allowed.
First warning:

If you click on the text of the message, "Enable Editing" must be selected. This is a standard security measure because the file contains scripts.
Then either a popup or a yellow security warning appears, both of which warn of the macros contained. These must be activated to ensure functionality. Either click "Activate macros" in the popup or "Enable Content" in the yellow message.

#### Configure Access
The connection to the IPS database can be tested in the "Configuration" tab.
Make sure that [Remote Access](https://www.symcon.de/en/llms/components/remote-access.md) is activated.

Server, user name and remote access password can be specified in the configuration table.
Complete URLs or IP addresses can be entered for servers.
When using IP addresses, make sure that this is specified in the format "http://192.168.1.1:3777".
The remote access password and user name are only required if the data is not being accessed locally (127.0.0.1).
The connection is established via "Test Connection" and the InstanceID of the archive is read out.
#### Read Raw Data
The raw data of a variable can be read out in the "Raw Data" tab. These are then put out line by line accompanied by date and value.

The VariableID must be entered. The start and end time can be 0 and therefore do not set any limits. Limit sets the maximum number of data records that should be read. Due to the system, however, there is a limit of 10,000 datasets.
The data is read in via "Fetch Data" and entered in the table. The most recent dataset appears first.
#### Read Aggregation
The third tab contains the "Aggregation". The VariableID, start/end time and the limit are required again.
In addition, the aggregation can be selected. With the values 0-6 you can choose from minutely up to annually accurate aggregation.

The data is read in via "Fetch Data" and entered in the table. An average as well as minima and maxima within an aggregation are put out.
### Visual Basic for Applications and the Configuration
In order to manage or change the scripts and macros that enable reading, the developer tools need to be activated in the Quick Bar.
This can easily be selected via "Right-click->File->Customize ribbon". Here, simply the activation of the "Developer" menu is required.

Once activated, you will find the "Visual Basic" button under this menu item, which will take you to the Developer Area.
It looks like this:

Here the required scripts can be adapted and used to further process IP-Symcon’s data.
These scripts also contain the logic for establishing a connection to IP-Symcon, as well as the JSON-RPC interface required for this.
## SDK (Skins) (deprecated)
Source: https://www.symcon.de/en/service/documentation/developer-area/sdk-tools/sdk-skins/
_Requires Symcon >= 3.0_
> **Warning:** Skins are only available for the WebFront. Since version 7.0, there has been the [Tile Visualization](https://www.symcon.de/en/llms/components/tile-visualization.md), whose [design](https://www.symcon.de/en/llms/components/tile-visualization.md) can be changed directly in the visualization for both web and apps.
### Description
Since version 3.0, individual skins can be created.
The creation and change of icons is quick and easy, but if complete changes to the style are to be made, additional knowledge of CSS is required.
> **Note:** This only works for the WebFront. If a skin or adaptation of the mobile apps is desired, this can be implemented via the Enterprise program.
> Further information can be found under [Products for companies](https://www.symcon.de/en/product/corporation/) and an [individual branding](https://www.symcon.de/en/contact-us/#Individual%20branding) can be requested via direct contact.
### Requirements
IP-Symcon 3.0 or above
CSS knowledge (if more than the icons are to be changed)
Download [sample skin](https://codeload.github.com/symcon/SkinTemplate/zip/refs/heads/master) to have a basic structure (recommended)
### Folder structure

```php
Skinname
|
- icons (optional)
| |
| - Aircraft.png
| |
| - Bird.png
|
- img (optional)
| |
| - Background.png
|
- font (optional)
| |
| - WebFont.ttf
|
- skin.json (will be generated)
|
- webfront.css (required, even if empty)
|
- icons.css (will be generated)
|
- README.md (optional)
```
### Icons-Folder
Icons includes all icons. If there are standard icons with the same name, the custom icons will be preferred.
* Contains all icons in PNG format and size 32x32.
* Icon names may only consist of letters, numbers, minus (-) and underscore (_). Spaces, umlauts and special characters are not permitted.
* The icons must all start with capital letters (e.g. Arrow.png, Right.png)
* In the case of word chains, it is recommended that these are also written with a capital letter (e.g. ArrowRight.png). This is for better readability and consistency with the IP-Symcon icons.
* If an icon has the same name as one of the IP-Symcon icons, the custom icon is preferred in the WebFront. The upper and lower case letters are to be observed. (This function is an elegant way of effortlessly equipping a third-party WebFront with a skin.)
### Image-Folder
Img contains additional graphics for e.g. possible backgrounds.
* Contains additional images, e.g. for special backgrounds
### Font-Folder
Contains the fonts required for the skin.
* Contains other WebFonts
* The CSS elements of the WebFont should be added in the webfront.css
### Individual files
Files which are in the main folder.
#### skin.json
* Meta file that is automatically created by the skin builder. The fields Author, Version, URL, GIT and Compatible may be changed after creation. The URL should be the address for the skin topic in the forum. GIT should be the address for the GitHub repository so that the skin control can download updates accordingly. The icon array is created automatically and is used by the WebFront editor as an aid to make the custom icons selectable. Compatible must have the value 1. This is strictly checked so that changes to the WebFront, which make the skins incompatible, can be deactivated.
#### webfront.css
* CSS file containing changes to the WebFront CSS style. Must be present. Can also be empty.
* CSS changes must comply with the above rules.
#### icons.css
* CSS file that contains the links to the custom icons.
* Is generated automatically by the skin builder and should not be changed.
#### README.md
Readme which GitHub automatically displays in the browser in the repository overview. Can be used for documentation.
### Skin Builder
* The skin manager is called with http//host:port/skins/. (Example: http://localhost:3777/skins/)
* As soon as a skin has been selected, the icons currently available in the CSS/meta file are displayed.
* If new icons have been added/removed, a "Build Skin!" must be executed so that the icons.css/skin.json are regenerated accordingly. No action is required when changing the icons themselves or the webfront.css. The browser cache may have to be cleared so that changes can be seen.
> **Note:** Up to version 4.4 the skin manager could be found under http//host:port/user/skins/. (Example: http://localhost:3777/user/skins/)
### Provide skins
* Skins can be uploaded to GitHub.
* The GitHub repository name should match the name of the skin.
* The repository should only contain the necessary files such as icons.css, skin.json, webfront.css and optional folders such as icons, font or img. A README.md and a LICENSE file are also recommended. The files must not be nested in an additional subfolder, otherwise the installer will not work correctly.
* When publishing, the additional size (number in kB/mB) the skin requires when loading must be specified. (This will be displayed after the build process)
### Install skins
This works via [Skin-Control](https://www.symcon.de/en/llms/modules/skin-control.md) and is described there.
### Select skins
In the [WebFront](https://www.symcon.de/en/llms/components/webfront-visualization.md) configurator there is a "Skin" field under the [Presentation](https://www.symcon.de/en/llms/components/webfront-visualization.md) tab, in which the skin can be selected.
## Tools
Source: https://www.symcon.de/en/service/documentation/developer-area/sdk-tools/tools/
### Network-Configuration-Tool
All IPS gateways in the network can be found with the network-configuration-tool.
Instructions for use can be found [HERE](https://www.symcon.de/assets/files/service/NetworkConfigurationTool.pdf) .
[To download](https://support.symcon.de/lan-gct)
### Recoverytool
The recovery tool can write an image to the SymBox.
Instructions for use can be found [HERE](https://www.symcon.de/assets/files/product/symbox-en.pdf) under point "5.2. Recovery using the recovery tool ".
[To download](https://www.symcon.de/en/downloads/#symbox)
### Module development
The following tools are helpful in developing modules for the [Module Store](https://www.symcon.de/en/llms/components/management-console.md) and help to successfully [submit them](https://www.symcon.de/en/llms/developer/sdk-tools/sdk-php.md).
### GUID Generator
The [GUID Generator](https://www.symcon.de/en/llms/developer/sdk-tools.md) generates a GUID in the correct format for the module.
### Module Generator
The [Module Generator](https://www.symcon.de/en/llms/developer/sdk-tools.md) is a wizard which helps to create the basic structure for a module and sets up all the basic facilities for a functioning data flow.
### Module Validator
The [Module Validator](https://www.symcon.de/en/llms/developer/sdk-tools.md) checks the developed files for correct syntax and whether all required information is included.
### External IDEs
External IDEs can insert and display function declarations.
#### Visual Studio Code
Instructions for generating and using in Visual Studio Code can be found [HERE](https://www.symcon.de/en/llms/developer/sdk-tools.md).
## GUID generator
Source: https://www.symcon.de/en/service/documentation/developer-area/sdk-tools/tools/guid-generator/
_Interactive tool, only available on the website: https://www.symcon.de/en/service/documentation/developer-area/sdk-tools/tools/guid-generator/_
## Module Generator
Source: https://www.symcon.de/en/service/documentation/developer-area/sdk-tools/tools/module-generator/
> **Note:** For use in Visual Studio Code, it is recommended to use the Symcon Module Helper extension from pitti instead of this tool. More information can be found [here](https://community.symcon.de/t/symcon-modul-helfer-eine-vs-code-extension-fuer-modul-entwickler-ehem-forminator/141324)
.
_Interactive tool, only available on the website: https://www.symcon.de/en/service/documentation/developer-area/sdk-tools/tools/module-generator/_
## Module Validator
Source: https://www.symcon.de/en/service/documentation/developer-area/sdk-tools/tools/module-validator/
## Visual Studio Code
Source: https://www.symcon.de/en/service/documentation/developer-area/sdk-tools/tools/visual-studio-code/
VisualStudioCode has some useful extensions for module development.
### Install Extension for IP-Symcon
A function list has been created in this extension to display it in the source code.
#### Marketplace
Call up this [Link to Marketplace](https://marketplace.visualstudio.com/items?itemName=symcongmbh.vscode-symcon-stubs) and click on "Install".
#### Extension browser in VSC
* Call up "Extensions"
* Search for "Symcon"
* Select the "Extension for IP-Symcon" and click on "Install" to install it
* In the Extensions area under "Installed" -> "Extension for IP-Symcon" should now appear

### Download PHP
PHP is required for the extensions "CS Fixer" and "PHPUnit".
Here is a [link to download](https://www.php.net/downloads.php) PHP. PHP 8 or higher is recommended.
* Call up "Settings" by clicking on the cogwheel (Manage).
* Select "PHP" under "Extensions".
* There is the item "PHP > Validate: Executable Path" where the "settings.json" can be called.
* The path to php.exe is now specified after "php.validate.executablePath".
The "\" must be escaped with a second "\".
```php
"php.validate.executablePath": "Path\\To\\php.exe"
```
### Install CS Fixer
Needed are:
* The PHAR file, which can be downloaded from [this link](https://github.com/PHP-CS-Fixer/PHP-CS-Fixer) . Version 3 is supported with PHP 8.
* A .style folder. It is recommended to include this [Repository](https://github.com/symcon/StylePHP) as a submodule in the own repository
* The extension to use cs-fixer in Visual Studio Code, which can be downloaded from the [Marketplace](https://marketplace.visualstudio.com/items?itemName=junstyle.php-cs-fixer) or subsequently embed directly into Visual Studio Code
#### Extension browser in VSC
* Call up "Extensions"
* Search for "php cs fixer".
* Select the "php cs fixer" from junstyle and install it by clicking on "Install".
* The extensions area should now appear under "Installed" -> "php cs fixer".
#### Configure CS Fixer
* Call up "Settings" by clicking on the cogwheel (Manage)
* Select "PHP CS Fixer" under "Extensions"
* The item "Allow Risky" is set to true
* Under the item "PHP-cs-fixer: Executable Path" specifies the path to "php-cs-fixer.phar".
Alternatively, these settings can be entered in "settings.json".
```php
"php-cs-fixer.executablePath": "Path\\To\\php-cs-fixer-v3.phar",
"php-cs-fixer.allowRisky": true
```
#### Use CS Fixer
If everything is correctly integrated and set up, the extension can be used. Either by right-clicking in the file to be formatted and selecting Format Document or by pressing the shortcut "Shift+Alt+F".
If the entire project should adopt the style, the following command can be entered via the command line.
```php
php "Path\\To\\php-cs-fixer-v3.phar" fix --config=.style/.php_cs -v --allow-risky=yes
```
### Install PHP Unit
Needed are:
* PHPUnit's PHAR file, which can be downloaded from [this link](https://phpunit.de/getting-started/phpunit-9.html) .
* A test to run
* The extension to use PHPUnit in Visual Studio, which can be downloaded from the [Marketplace](https://marketplace.visualstudio.com/items?itemName=recca0120.vscode-phpunit) or subsequently embed directly into Visual Studio Code
#### Extension browser in VSC
* Call up "Extensions"
* Search for "PHPUnit".
* Select the "PHPUnit Test Explorer" and install it by clicking on "Install".
* The extensions area should now appear under "Installed" -> "PHPUnit Test Explorer" and "Test Explorer UI".
#### Configure PHP Unit
* Call up "Settings" by clicking on the cogwheel (Manage)
* Select "PHPUnit configuration" under "Extensions".
* At the item "Phpunit: Files" is entered "{test,tests}/**/*Test.php".
* Under the point "Phpunit: PHP" the path to PHP.exe is entered.
* At the item "Phpunit: Phpunit" the path to the Phpunit Phar file is entered
* Therefore, under "Phpunit: Args" ["--configuration", "tests/phpunit.xml"] must be entered.
Alternatively, these settings can be entered in "settings.json".
```php
"phpunit.phpunit": "Path\\To\\phpunit-9.5.10.phar",
"phpunit.args": [
"--configuration", "tests/phpunit.xml"
],
"phpunit.php": "Path\\To\\php.exe",
"phpunit.files": "{test,tests}/**/*Test.php",
```
Now PHPUnit can be used. However, errors can still occur. So the following error can appear:
```php
"PHPUnit requires the "mbstring" extension."
```
* Navigate to the folder where "php.exe" is located
* Look for the "php.ini" file in this folder. If it doesn't exist, search for "php.ini-development" and rename it
* Open the "php.ini" file in any text editor
* Search for "mbstring" in the "Dynamic Extensions" section
* Remove the semicolon in front of "extension=mbstring".
* Save file
* Close and reopen Visual Studio Code
Now, another error may occur:
```php
PHP Warning: PHP Startup: Unable to load dynamic library 'mbstring'
(tried: C:\php\ext\mbstring (Das angegebene Modul wurde nicht gefunden.), )
C:\php\ext\php_mbstring.dll (Das angegebene Modul wurde nicht gefunden.) in
Unknown on line 0
```
* Navigate to the folder where "php.exe" is located
* Look for the "php.ini" file in this folder. If it doesn't exist, search for "php.ini-development" and rename it
* Open the "php.ini" file in any text editor
* Look for "extension_dir" in the "Paths and Directories" section
* Remove the semicolon in front of "extension_dir = "ext"" which is under "On windows:".
* Save file
* Close and reopen Visual Studio Code
#### Use PHPUnit
Two buttons should now appear above the function with the test. The test is started by clicking on Run.

---
# SDK (PHP)
> Symcon documentation · English · generated on 2026-09-26
> Index: https://www.symcon.de/en/llms.txt
Source: https://www.symcon.de/en/service/documentation/developer-area/sdk-tools/sdk-php/
_Requires Symcon >= 4.0_
### Description
As of version 4.0, modules can be created using PHP.
### Requirements
PHP knowledge
IP-Symcon 4.0 or above
### Video-Tutorials
For many topics related to the SDK, [video tutorials](https://www.symcon.de/en/llms/getting-started.md) (German) are available on our YouTube channel.
### Integration in IP-Symcon
The data structure can be seen [here](https://www.symcon.de/en/llms/developer/sdk-tools/sdk-php.md) .
The first step would be creating the [library](https://www.symcon.de/en/llms/developer/sdk-tools/sdk-php.md) , as well as setting up all necessary files.
These can also be found in the structure overview.
Then the [Modules](https://www.symcon.de/en/llms/developer/sdk-tools/sdk-php/module.md) can be developed.
> **Note:** In order to reload a module in the local development, a short restart of the service is necessary. For an update via the repository this step is not necessary.
After development has been completed, it is recommended that the library and its module(s) are combined into a repository.
This could, for example, look like this: [Computation Module](https://github.com/symcon/Rechenmodule)
The modules can then be added directly to the [Module Control](https://www.symcon.de/en/llms/modules/module-control.md) via the repository URL. It is also possible to submit this module for the [Module store](https://www.symcon.de/en/llms/developer/sdk-tools/sdk-php.md).

## Actions
Source: https://www.symcon.de/en/service/documentation/developer-area/sdk-tools/sdk-php/actions/
_Requires Symcon >= 6.0_
### Description
It is possible to define your own actions as part of the [Library](https://www.symcon.de/en/llms/developer/sdk-tools/sdk-php.md). After installing the library, these can be used as described under [Actions](https://www.symcon.de/en/llms/concepts/automations.md) .
If actions are saved or configured, this results in three values: The action target, the ActionID and the action parameters. The action target represents the target object, for example the underlying object in the case of an Event. The ActionID uniquely identifies the selected action. The parameters are a set of values which individually belong to the action. This allows a user to further parameterize an action and, for example, specify the value to which a variable should be switched.
### Structure
For each action that should be part of the library, a JSON file must be created in the "actions" subfolder of the library. This JSON file must contain a JSON object that follows the following structure.
| Parameter | Data type | Description |
| ----------------------- | -------------- | --------------------------------------------------------------------------------------------------------------------------------------------------------------------------------------------------------------------------------------------------------------------------------------------------------------------------------------------------------------------------------------------------------------------------------------------------------------------------------------------------------------------------------------------------------------------------------------------------------------------------------------------------------------------------------------------------------------------------------------------------------------------------------------------------------- |
| id | string | Unique GUID for the identification of the action. [GUID Generator](https://www.symcon.de/en/llms/developer/sdk-tools.md) |
| caption | string | Visible name of the action |
| form | array / string | This field can contain an array of configuration elements as in the "elements" or "actions" areas of the [Configuration Forms](https://www.symcon.de/en/llms/developer/sdk-tools/sdk-php/configuration-forms.md). Alternatively, the form can be generated dynamically by a PHP script. In this case, this field contains the corresponding code, which the configuration form returns as an object. The PHP code can be split into multiple strings in an array of strings. If an action that has already been defined is to be processed, for example in an Event, the defined parameters are available as system variables, see [SelectAction](https://www.symcon.de/en/llms/developer/sdk-tools/sdk-php/configuration-forms.md). The settings of the form represent the parameters of the action, with each named configuration element making its value available under its "name". |
| action | array / string | PHP code that defines the execution of the action. If the action is carried out, the PHP code from this field is carried out. In doing so the parameters are available as system variables. |
| priority (optional) | int | Priority of the action, in a selection actions are sorted according to priority |
| category (optional) | string | (__default:__ "other") The short form of the category of the action. Possible categories are listed under [category](https://www.symcon.de/./#category) . |
| restrictions (optional) | array | (__default:__ []) A list of restrictions which limit the conditions under which this action is offered. The possible restrictions are described in the tables [restrictions](https://www.symcon.de/./#restrictions) . |
| locale (optional) | object | (__default:__ []) Here, as in the [Localization of a Module](https://www.symcon.de/en/llms/developer/sdk-tools/sdk-php.md), the action can be localized. This localizes both the form and the caption. |
| format (optional) | string | (__default:__ content of caption) This string represents a short formatting of the action with its parameters, which can be displayed in different places. The formatting is noted in [ICU syntax](https://formatjs.io/docs/core-concepts/icu-syntax/) . There the parameters (name according to the parameter) and the target (name "TARGET") can be used as variables. Some additional [Symcon-specific types](https://www.symcon.de/./#Formatting) are available for formatting. The content of format is translated by the locale. |
| description (optional) | string | (__default:__ "") This text is displayed as a description for the action in the action selection. The content of description is translated by the locale. |
| readable (optional) | array / string | (__default:__ content of action, whereby all status variables of parameters are replaced by the set values) PHP code, which returns the action as readable code. This is used, for example, for "insert commands" in the script editor. In doing so the parameters are available as system variables. |
| deprecated (optional) | array / string | (__default:__ Not deprecated) If this parameter is set, this action is considered as deprecated and the action is not shown in any selections. Whenever a dialog to edit the action is opened, the PHP code in this parameter is executed with the currently set parameters. This action is immediately transformed to the action definition which is returned from the code. |
#### category
| Short form | Name | Description |
| ---------- | ----------------------- | --------------------------------------------------------------- |
| target | Target specific | Actions that belong to a specific target, usually a module |
| math | Mathematical operations | Mathematical operations to modify objects |
| set | Set value | Actions that set the value of a variable |
| switch | Switch value | Actions that switch the value of a variable |
| expert | Expert | Actions that require a deeper understanding of IP-Symcon or PHP |
| other | Other actions | Actions that don't fit into any other category |
#### restrictions
##### Restrictions for all object types
| Parameter | Data type | Description |
| ------------------- | --------- | ------------------------------------------------------------------------------------------------------------------------------------------------------------------------------------------------------------------- |
| objectType | array | The action is only offered for targets of the specified types (0 = category, 1 = instance, 2 = variable, 3 = script, 4 = event, 5 = media, 6 = link) |
| includeEnvironments | array | A list of environments in which the action is offered, see [Environments](https://www.symcon.de/./#Environments) |
| excludeEnvironments | array | A list of environments in which the action is not offered. If it matches "includeEnvironments", the action is not displayed. See [Environments](https://www.symcon.de/./#Environments) |
| writable | bool | If this restriction is set to true, the action is only offered if the target object is not write-protected. If the target is a variable, it must not have a [Variable Action](https://www.symcon.de/en/llms/concepts.md). |
##### Restrictions for Target Objects of the Type Instance
| Parameter | Data type | Description |
| ------------------------ | --------- | ----------------------------------------------------------------------------------------------------------------------------------------------------------------------------------------------------------- |
| hasActionStatusVariables | bool | If this restriction is set to true, the action is only offered if the instance has at least one switchable status variable |
| hasInstanceFunctions | bool | If this restriction is set to true, the action is only offered if the instance has at least one public function that was not inherited from the IPSModule |
| moduleID | array | The action is only offered if the ModuleID of the target instance is included in this list |
| moduleType | array | The action is only offered if the module type of the target instance is included in this list (0: Core, 1: I/O, 2: Splitter, 3: Device, 4: Configurator, 5: Discovery, 6: Visualization) (since Symcon 9.0) |
| hasIdent | array | The action is only offered if the target instance has a child for each entry of the list, that has the corresponding ident (since Symcon 6.1) |
| hasNoIdent | array | The action is only offered if the target instance has NO child that has an ident corresponding to an entry of the list (since Symcon 8.0) |
##### Restrictions for Target Objects of the Variable Type
| Parameter | Data type | Description |
| ------------------- | --------- | ----------------------------------------------------------------------------------------------------------------------------------------------------------------- |
| requestAction | bool | If this restriction is set to true, the action is only offered if the variable has a variable action |
| variableType | array | The action is only offered if the variable type of the target variable is contained in this list (0 = Boolean, 1 = Integer, 2 = Float, 3 = String) |
| profilesInclude | array | The action is only offered if the name of the profile the target variable is currently using is included in this list |
| profilesExclude | array | The action is only offered if the name of the profile the target variable is currently using is NOT in this list |
| profileIsEnum | bool | If this restriction is set to true, the action is only offered if the profile of the variable represents an enumeration (step size = 0, at least one association) |
| profileIsPercentage | bool | If this restriction is set to true, the action is only offered if the profile of the variable represents a percentage value (suffix = "%", max value > min value) |
| presentation | array | The action is only offered if the Id of the used presentation is included in this list |
##### Restrictions for Target Objects of the Type Automation
| Parameter | Data type | Description |
| ---------- | --------- | ------------------------------------------------------------------------------------------------------------------------------------------------------------------- |
| scriptType | array | The action is only offered if the automation type of the automation is included in this list (0 = PHP script, 1 = Flow script, 2 = IPSWorkflow) (since version 6.1) |
##### Restrictions for Target Objects of the Type Event
| Parameter | Data type | Description |
| --------- | --------- | ------------------------------------------------------------------------------------------------------------------------------------------------ |
| eventType | array | The action is only offered if the event type of the event is included in this list (0 = Triggered, 1 = Cyclic, 2 = Schedule) (since version 6.3) |
##### Environments
| Environment | Description |
| ------------------ | ------------------------------------------------------------------------------------------------------------------------------ |
| Default | The default environment in which most actions are defined, many choices are limited to these actions or offer them in addition |
| TestCommands | Action selection in the "Test commands" dialog of an instance, "Default" actions are not offered here |
| EventTrigger | Action selection in a triggered event |
| EventCyclic | Action selection in a cyclical event |
| EventSchedule | Action selection in a weekly plan |
| FlowScript | Action selection in the schedule |
| ScriptEditor | Action selection in the "Add command" dialog of a script editor |
| Other environments | You can define your own environments, for example to offer special actions as part of an instance configuration |
#### System Variables
Both in a possible PHP script for the form and in the script for the execution, the target of the action and the set parameters can be accessed via system variables. The following system variables are available in these scripts:
| System variable | Description |
| --------------------------------------------------------------- | ------------------------------------------------------------------------------------------------------------------------------------------------------------------------------------------------------------------------------------------------------------------------------------------------- |
| $_IPS['TARGET'] | ObjectID of the target of the action |
| $_IPS [(name of the parameter)] (e.g. $ _IPS ['VALUE']) | The set or selected value of the parameter. These fields are not available in a script for the form if the action is initially selected and therefore no parameters have yet been selected. Therefore, the PHP function isset should be used to check whether the system variables are available. |
| Further [system variables](https://www.symcon.de/en/llms/concepts/automations.md) | Additional system variables are available based on the execution of the action. If the parameter names overlap, the parameter values are used and the regular system variables cannot be accessed. |
#### Formatting
All types of the [ICU format](https://formatjs.io/docs/core-concepts/icu-syntax/) can be used in the format field. In addition, Symcon-specific types were introduced. As usual with ICU, these consist of three parts: The parameter designation, the type designation and optional additional parameters.
##### profile
The value is presented based on the profile of the target variable. If the target does not have a profile, the value is displayed directly.
Examples: {VALUE, profile}
##### valueFormatted
The formatted value of the variable with the ObjectID of the value is displayed.
Examples: {VARIABLE, valueFormatted}
##### object
The name of the object with the ObjectID of the value is displayed.
| Parameter | Description |
| ---------------- | ------------------------------------------------------------------------------------------------------------------------------------------------------------------------------------------------------------------------------------------------------------------------------------ |
| ident (optional) | If "ident" is specified as the parameter followed by a parameter name, the name of the child with the ident that corresponds to the parameter is displayed instead. If the value is behind ident in single quotation marks ('), the value in between them is directly used as Ident. |
Examples: {VARIABLE, object}, {TARGET, object, ident IDENT}
##### action
The formatting of the action, which is coded as a JSON string in the value, is shown.
| Parameter | Description |
| ------------------- | -------------------------------------------------------------------------------------------------------------------------------------------------------------------------------------------------------------------------------------------------------------------------------------------------------------------------------------------------------------------------------------------------------------------------------------------------------------------------------- |
| targetID (optional) | If "targetID" is specified as the parameter followed by a parameter name, the TargetID of the formatted action is set to the value of the corresponding parameter. If "ident" is also given immediately afterwards, followed by a parameter name, the target ID is instead displayed on the child's object ID with the ident that corresponds to the parameter. If the value is behind ident in single quotation marks ('), the value in between them is directly used as Ident. |
Beispiele: {ACTION, action}, {ACTION, action, targetID VARIABLE}, {ACTION, action, targetID TARGET ident IDENT}
##### scheduleAction
The names of weekly plan actions of weekly plans are displayed under the specified parent object with the ID of the value.
| Parameter | Description |
| --------- | --------------------------------------------------------------------------------------------------------------------------------------------------------------------------------------------- |
| parent | If "parent" is specified as the parameter followed by a parameter name, the object is used as the parent object with the value as its ID |
| action | If "action" is specified as the parameter, followed by an ActionID in single quotation marks ('), only the names of weekly plan actions that carry out the corresponding action are displayed |
Examples: {SCHEDULE_ACTION, scheduleAction, parent PARENT}, {SCHEDULE_ACTION, scheduleAction, parent PARENT action '{7938A5A2-0981-5FE0-BE6C-8AA610D654EB}'}
##### selectPresentation
Different formattings depending on the presentation used by a variable.
| Parameter | Description |
| -------------------- | ------------------------------------------------------------------------------------------------------------------------------------------------------------- |
| ID of a presentation | If the ID of a presentation is used as a parameter followed by a formatting, the formatting is used if the variable uses the presentation. |
| other | If "other" is used as a parameter followed by a formatting, the formatting is used if the ID of the used presentation was not otherwise found as a parameter. |
Examples: {TARGET, selectPresentation, {6B9CAEEC-5958-C223-30F7-BD36569FC57A}{Slider} {05CC3CC2-A0B2-5837-A4A7-A07EA0B9DDFB}{Color} other{Other presentation}}
### Examples
__switchValueString.json__
```php
{
"id": "{A4D52B67-BE4B-4AD0-964F-B9BA2556AAB0}",
"caption": "Switch to Value",
"form": [
{
"type": "ValidationTextBox",
"name": "VALUE",
"caption": "Value"
}
],
"action": "RequestAction($_IPS['TARGET'], $_IPS['VALUE']);",
"restrictions": {
"objectType": [ 2 ],
"variableType": [ 3 ],
"profileIsEnum": false,
"requestAction": true
},
"priority": 10,
"locale": {
"de": {
"Switch to Value": "Schalte auf Wert",
"Value": "Wert",
"Set to {VALUE, profile}": "Setze auf {VALUE, profile}"
}
},
"format": "Set to {VALUE, profile}"
}
```
__setValueIntegerPreviousReminder.json__
```php
{
"id": "{92971E6F-4AC1-BEF8-B325-9E044D27B3EB}",
"caption": "Set to Value",
"form": [
"$form = [",
" {",
" 'type' => 'SelectColor',",
" 'name' => 'VALUE',",
" 'allowTransparent' => false,",
" 'caption' => 'Value',",
" 'writable' => true",
" }",
"];",
"if (isset($_IPS['VALUE'])) {",
" $form[] = {",
" 'type' => 'Label'",
" 'caption' => 'Previously selected value: ' . $_IPS['VALUE']",
" };",
"}",
"return $form;"
],
"action": "SetValue($_IPS['TARGET'], $_IPS['VALUE']);",
"restrictions": {
"objectType": [ 2 ],
"variableType": [ 1 ],
"profilesExclude": [ "~HexColor" ]
},
"priority": 5,
"locale": {
"de": {
"Set to Value": "Setze auf Wert",
"Value": "Wert",
"Set to {VALUE, profile}": "Setze auf {VALUE, profile}"
}
},
"format": "Set to {VALUE, profile}"
}
```
__switchStatusVariable.json__
```php
{
"id": "{E616C2B2-A827-1712-4AE0-841C57B3DD74}",
"caption": "Switch Status Variable",
"form": [
"$options = [];",
"$firstVariable = false;",
"foreach (IPS_GetChildrenIDs($_IPS['TARGET']) as $childID) {",
" $object = IPS_GetObject($childID);",
" if (($object['ObjectType'] === 2) && ($object['ObjectIdent'] !== '')) {",
" if (!HasAction($childID)) {",
" continue;",
" }",
" if (!$firstVariable) {",
" $firstVariable = $object;",
" }",
" $options[] = [",
" 'caption' => $object['ObjectName'],",
" 'value' => $object['ObjectIdent']",
" ];",
" }",
"}",
"return [",
" [",
" 'type' => 'Select',",
" 'name' => 'IDENT',",
" 'caption' => 'Status Variable',",
" 'options' => $options,",
" 'value' => $firstVariable['ObjectIdent'],",
" 'onChange' => 'IPS_UpdateFormField(\"ACTION\", \"targetID\", IPS_GetObjectIDByIdent($IDENT, ' . $_IPS['TARGET'] . '), $id);'",
" ],",
" [",
" 'type' => 'SelectAction',",
" 'name' => 'ACTION',",
" 'caption' => 'Action',",
" 'targetID' => isset($_IPS['IDENT']) ? IPS_GetObjectIDByIdent($_IPS['IDENT'], $_IPS['TARGET']) : $firstVariable['ObjectID']",
" ]",
"];"
],
"action": [
"$targetVariableID = IPS_GetObjectIDByIdent($_IPS['IDENT'], $_IPS['TARGET']);",
"$action = json_decode($_IPS['ACTION'], true);",
"echo IPS_RunActionWait($action['actionID'], $targetVariableID, $action['parameters']);"
],
"restrictions": {
"objectType": [ 1 ],
"hasActionStatusVariables": true
},
"locale": {
"de": {
"Switch Status Variable": "Schalte Statusvariable",
"Status Variable": "Statusvariable",
"{TARGET, object, ident IDENT}: Switch Variable": "{TARGET, object, ident IDENT}: Schalte Variable"
}
},
"format": "{TARGET, object, ident IDENT}: {ACTION, action, targetID TARGET ident IDENT}",
"readable": [
"$targetVariableID = IPS_GetObjectIDByIdent($_IPS['IDENT'], $_IPS['TARGET']);",
"$action = json_decode($_IPS['ACTION'], true);",
"$action['parameters']['TARGET'] = $targetVariableID;",
"$action['parameters']['ENVIRONMENT'] = $_IPS['ENVIRONMENT'];",
"$action['parameters']['PARENT'] = $_IPS['PARENT'];",
"echo IPS_GetActionReadableCode($action['actionID'], $action['parameters']) . \"\\n\";"
]
}
```
__multiplySetVariable.json (deprecated action)__
```php
{
"id": "{085176EC-BEE5-3732-15E5-8C82875CABD4}",
"caption": "Multiply with Value of other Variable",
"form": [
"$variable = IPS_GetVariable($_IPS['TARGET']);",
"$types = [];",
"if ($variable['VariableType'] === 2) {",
" $types = [1, 2];",
"}",
"else {",
" $types = [ $variable['VariableType'] ];",
"}",
"return [",
" [",
" 'type' => 'SelectVariable',",
" 'name' => 'VARIABLE',",
" 'caption' => 'Variable',",
" 'validVariableTypes' => $types",
" ]",
"];"
],
"action": "SetValue($_IPS['TARGET'], GetValue($_IPS['TARGET']) * GetValue($_IPS['VARIABLE']));",
"restrictions": {
"objectType": [ 2 ],
"variableType": [ 1, 2 ],
"profileIsEnum": false,
"writable": true
},
"locale": {
"de": {
"Multiply with Value of other Variable": "Multipliziere mit Wert einer anderen Variablen",
"Variable": "Variable",
"Multiply by value of {VARIABLE, object}": "Multipliziere mit Wert von {VARIABLE, object}",
"Set the target variable to its current value multiplied with the value of another variable": "Setze die Zielvariable auf ihren aktuellen Wert multipliziert mit dem Wert einer anderen Variablen"
}
},
"format": "Multiply by value of {VARIABLE, object}",
"category": "math",
"description": "Set the target variable to its current value multiplied with the value of another variable",
"deprecated": [
"return [",
" 'actionID' => '{A3153696-013A-41B1-A001-5E8085D95465}',",
" 'parameters' => [",
" 'DYNAMIC' => true,",
" 'FACTOR' => 0,",
" 'VARIABLE' => $_IPS['VARIABLE']",
" ]",
"];"
]
}
```
## Libraries
Source: https://www.symcon.de/en/service/documentation/developer-area/sdk-tools/sdk-php/libraries/
_Requires Symcon >= 4.0_
### Description
The library is the basis for every module development. Several modules can also be combined to form a library. The required directory structure can be viewed under [Structure](https://www.symcon.de/en/llms/developer/sdk-tools/sdk-php.md) .
This can be made available via a repository (we recommend Github or Bitbucket).
### Integration in IP-Symcon
The library.json file must be available, which is located in the main directory.
Based on the directory structure, IP-Symcon can read in the entire library via the "Module Control".
| Parameter | Data type | Description |
| ------------------------- | --------- | ----------------------------------------------------------------------------------------------------------------------------------------------------------------------------------------------------- |
| id | string | Each module has its own GUID for unique identification (see info box below). [GUID generator](https://www.symcon.de/en/llms/developer/sdk-tools.md) |
| author | string | Under what name was the library developed? |
| compatibility (since 4.3) | array | Checks whether the required version is installed. The kernel version and/or date can be checked. (For further description see table) |
| name | string | The name of the entire library. (A-Z, a-z, 0-9, spaces, underscores are allowed characters. However, spaces and underscores may not be at the beginning or the end. An empty name is also not valid.) |
| url | string | URL to the homepage (Must begin with http:// or https://. May alternatively be left empty) |
| version | string | Version number. This is represented as any desired string. We remmomend the form "number.number". E.g: "4.2" |
| build | integer | build number |
| date | integer | Unix timestamp |
> **Note:** The GUID is a UUID and has the format 8-4-4-4-12. The numbers indicate the number of digits. The digits consist of characters between 0-9 and A-F. There must always be hyphens and curly brackets. Only capital letters may be used. (Example: {12345678-90AB-CDEF-1234-567890ABCDEF})
#### Compatibility
| Parameter | Data type | Description |
| ------------------ | --------- | --------------------------------------- |
| version (optional) | string | Minimum version as a string. E.g: "4.2" |
| date (optional) | integer | Date as UnixTimestamp. E.g: 1491343200 |
### Examples
__library.json__
```php
{
"id": "{F96B257F-85E7-47CF-8340-8FE850AACD10}",
"author": "Symcon GmbH",
- name: "Misc Modules",
"url": "https://www.symcon.de",
"compatibility": {
"version": "4.2",
"date": 1491343200
},
"version": "1.0",
"build": 0,
"date": 0
}
```
## Presentations
Source: https://www.symcon.de/en/service/documentation/developer-area/sdk-tools/sdk-php/presentations/
_Requires Symcon >= 8.0_
### Description
A visual overview of all presentations can be found in the [Object Presentation](https://www.symcon.de/en/llms/components/object-presentation.md).
The presentation of a variable can be set using the functions [RegisterVariable](https://www.symcon.de/en/llms/developer/sdk-tools/sdk-php/module.md) and [MaintainVariable](https://www.symcon.de/en/llms/developer/sdk-tools/sdk-php/module.md). The presentation of a variable is determined by an array with the following "Key"->"Value" pairs.
| Key | Description |
| ------------------------- | ---------------------------------------------------------------------------------------------------------------------------------------------------------------- |
| PRESENTATION | The ID of the presentation to be used, formatted as GUID (constants of the [Presentations](https://www.symcon.de/en/llms/developer/sdk-tools/sdk-php.md)) |
| TEMPLATE | (optional) The ID of the template to be used, formatted as a GUID (constants of existing [Templates](https://www.symcon.de/en/llms/developer/sdk-tools/sdk-php.md)) |
| *Presentation Parameters* | (optional) Instead of a template, any number of parameters for a presentation can be set. The parameters are set at the same level as the PRESENTATION parameter |
> **Note:** If a parameter is set directly, the values of the template are ignored
Example:
The presentation of a variable is set to a slider with its own suffix when it is created.
```php
$this->RegisterVariableFloat('Value', 'Value', [
'PRESENTATION' => VARIABLE_PRESENTATION_SLIDER,
'SUFFIX' => ' %'
]);
```
#### Presentations
| presentation |
| -------------------------------------------------------- |
| [Enumeration](https://www.symcon.de/en/llms/developer/sdk-tools/sdk-php.md) |
| [Date/Time](https://www.symcon.de/en/llms/developer/sdk-tools/sdk-php.md) |
| [Duration](https://www.symcon.de/en/llms/developer/sdk-tools/sdk-php.md) |
| [Color](https://www.symcon.de/en/llms/developer/sdk-tools/sdk-php.md) |
| [Shutter](https://www.symcon.de/en/llms/developer/sdk-tools/sdk-php.md) |
| [Switch](https://www.symcon.de/en/llms/developer/sdk-tools/sdk-php.md) |
| [Slider](https://www.symcon.de/en/llms/developer/sdk-tools/sdk-php.md) |
| [Web Content](https://www.symcon.de/en/llms/developer/sdk-tools/sdk-php.md) |
| [Value Presentation](https://www.symcon.de/en/llms/developer/sdk-tools/sdk-php.md) |
| [Value Input](https://www.symcon.de/en/llms/developer/sdk-tools/sdk-php.md) |
## Enumeration
Source: https://www.symcon.de/en/service/documentation/developer-area/sdk-tools/sdk-php/presentations/enumeration/
_Requires Symcon >= 8.0_
### Parameter
Information on the visual properties and meanings of the parameters can be found in the [Object Presentation](https://www.symcon.de/en/llms/components/object-presentation.md).
| Name | Type | Parameter | Description |
| ------------ | ------- | -------------------------- | -------------------------------------------------------------------------------------------------------- |
| PRESENTATION | String | The ID of the presentation | VARIABLE_PRESENTATION_ENUMERATION {52D9E126-D7D2-2CBB-5E62-4CF7BA7C5D82} |
| ICON | String | Default Icon | [Icons](https://www.symcon.de/en/llms/components/icons.md) |
| OPTIONS | String | Options | JSON-encoded list of objects, the exact parameters are described under [Options](https://www.symcon.de/./#Optionen) |
| LAYOUT | Integer | Layout | 0: Column, 1: Row, 2: Grid |
| DISPLAY | Integer | Display... | 0: Caption, 1: Icon, 2: Caption and Icon |
### Optionen
| Name | Type | Parameter | Description |
| ---------- | ---------------------------- | -------------- | ------------------------------------------- |
| Value | Boolean/String/Integer/Float | Value | Depends on the type of the variable |
| Caption | String | Caption | |
| IconActive | Boolean | Overwrite Icon | |
| IconValue | String | Icon | [Icons](https://www.symcon.de/en/llms/components/icons.md) |
| Color | Integer | Color | |
### Beispiele
```php
// When registering a variable for PHP modules
// Only icons are displayed. One option is highlighted in color.
$this->RegisterVariableInteger('Modus', 'Modus', [
'PRESENTATION' => VARIABLE_PRESENTATION_ENUMERATION,
'DISPLAY' => 1 /* Icon */,
'OPTIONS' => json_encode([
['Value' => 1, 'Caption' => 'Automatic', 'IconActive' => true, 'IconValue' => 'circle-a'],
['Value' => 2, 'Caption' => 'Eco', 'IconActive' => true, 'IconValue' => 'circle-e', 'Color' => 40448],
['Value' => 3, 'Caption' => 'Manual', 'IconActive' => true, 'IconValue' => 'circle-m'],
])
]);
// For existing variables via script
// Only icons are displayed. One option is highlighted in color.
IPS_SetVariableCustomPresentation(12345, [
'PRESENTATION' => VARIABLE_PRESENTATION_ENUMERATION,
'DISPLAY' => 1 /* Icon */,
'OPTIONS' => json_encode([
['Value' => 1, 'Caption' => 'Automatic', 'IconActive' => true, 'IconValue' => 'circle-a'],
['Value' => 2, 'Caption' => 'Eco', 'IconActive' => true, 'IconValue' => 'circle-e', 'Color' => 40448],
['Value' => 3, 'Caption' => 'Manual', 'IconActive' => true, 'IconValue' => 'circle-m'],
])
]);
```
## Date/Time
Source: https://www.symcon.de/en/service/documentation/developer-area/sdk-tools/sdk-php/presentations/date-time/
_Requires Symcon >= 8.0_
### Parameter
Information about the visual properties and meanings of the parameters can be found in the [Object Presentation](https://www.symcon.de/en/llms/components/object-presentation.md).
| Name | Type | Parameter | Description |
| --------------- | ------- | ------------------------ | -------------------------------------------------------------------------- |
| PRESENTATION | String | GUID of the Presentation | VARIABLE_PRESENTATION_DATE_TIME{497C4845-27FA-6E4F-AE37-5D951D3BDBF9} |
| DATE | Integer | Date Display | 0: None, 1: Year, Month, and Day, 2: Month and Day, 3: Year and Day |
| MONTH_TEXT | Boolean | Format Month as | false: Number, true: Text |
| DAY_OF_THE_WEEK | Boolean | Show Day of the Week | |
| TIME | Integer | Time Display | 0: None, 1: Hours and Minutes, 2: Hours, Minutes, and Seconds |
### Templates
```php
// Registers a variable with a date template.
$this->RegisterVariableFloat('Date', 'Date', [
'PRESENTATION' => VARIABLE_PRESENTATION_DATE_TIME,
'TEMPLATE' => VARIABLE_TEMPLATE_DATE,
]);
```
| Name | Constant | GUID |
| ------------- | --------------------------- | -------------------------------------- |
| Date | VARIABLE_TEMPLATE_DATE | {B4C70F3E-6613-DA1A-7279-5DEE8DEB1B24} |
| Time | VARIABLE_TEMPLATE_TIME | {362DA268-56A2-E771-5E53-17E38B5D82E6} |
| Date/Time | VARIABLE_TEMPLATE_DATE_TIME | {BB0E9933-0403-BD3A-D1C9-255646934B00} |
### Examples
```php
// When registering a variable for PHP modules
// Only icons are displayed. One option is highlighted in color.
$this->RegisterVariableInteger('Alarm', 'Alarm Time', [
'PRESENTATION' => VARIABLE_PRESENTATION_DATE_TIME,
'DATE' => 0 /* None */,
'TIME' => 2 /* Hours, Minutes, and Seconds */,
]);
// Shows only the time: 05:09:37
$this->RegisterVariableInteger('Alarm', 'Alarm Time', [
'PRESENTATION' => VARIABLE_PRESENTATION_DATE_TIME,
'DATE' => 0 /* None */,
'TIME' => 2 /* Hours, Minutes, and Seconds */,
]);
// For existing variables via script
// Displays a date as follows: Sun, May 3, 2026 05:09
IPS_SetVariableCustomPresentation(12345, [
'PRESENTATION' => VARIABLE_PRESENTATION_DATE_TIME,
'DATE' => 1 /* Year, Month, and Day */,
'DAY_OF_THE_WEEK' => true,
'TIME' => 1 /* Hours and Minutes */,
]);
// Shows only the time: 05:09:37
IPS_SetVariableCustomPresentation(12345, [
'PRESENTATION' => VARIABLE_PRESENTATION_DATE_TIME,
'DATE' => 0 /* None */,
'TIME' => 2 /* Hours, Minutes, and Seconds */,
]);
```
## Duration
Source: https://www.symcon.de/en/service/documentation/developer-area/sdk-tools/sdk-php/presentations/duration/
_Requires Symcon >= 8.0_
### Parameters
Information about the visual properties and meanings of the parameters can be found in the [Object Presentation](https://www.symcon.de/en/llms/components/object-presentation.md).
| Name | Type | Parameter | Description |
| -------------- | ------- | ----------------- | ---------------------------------------------------------------------------------------------- |
| PRESENTATION | String | Presentation GUID | VARIABLE_PRESENTATION_DURATION{08A6AF76-394E-D354-48D5-BFC690488E4E} |
| COUNTDOWN_TYPE | Integer | Display Type | 0: Value in Variable, 1: Duration until Value in Variable, 2: Duration since Value in Variable |
| FORMAT | Integer | Format | 0: Seconds only, 1: Minutes and Seconds, 2: Hours, Minutes, and Seconds, 3: Hours and Minutes |
| MILLISECONDS | Boolean | Show Milliseconds | |
### Examples
```php
// When registering a variable for PHP modules
// Formats the value of the variable as follows: 03:54
$this->RegisterVariableInteger('Countdown', 'Countdown', [
'PRESENTATION' => VARIABLE_PRESENTATION_DURATION,
'COUNTDOWN_TYPE' => 0 /* Value in Variable*/,
'FORMAT' => 1 /* Minutes and Seconds */,
]);
// Formats the duration until the timestamp in the variable as follows: 03:10:08
$this->RegisterVariableInteger('Countdown', 'Countdown', [
'PRESENTATION' => VARIABLE_PRESENTATION_DURATION,
'COUNTDOWN_TYPE' => 1 /* Duration until Value in Variable*/,
'FORMAT' => 2 /* Minutes and Seconds */,
]);
// For existing variables via script
// Formats the value of the variable as follows: 03:54
IPS_SetVariableCustomPresentation(12345, [
'PRESENTATION' => VARIABLE_PRESENTATION_DURATION,
'COUNTDOWN_TYPE' => 0 /* Value in Variable*/,
'FORMAT' => 1 /* Minutes and Seconds */,
]);
// Formats the duration until the timestamp in the variable as follows: 03:10:08
IPS_SetVariableCustomPresentation(12345, [
'PRESENTATION' => VARIABLE_PRESENTATION_DURATION,
'COUNTDOWN_TYPE' => 1 /* Duration until Value in Variable*/,
'FORMAT' => 2 /* Minutes and Seconds */,
]);
```
## Color
Source: https://www.symcon.de/en/service/documentation/developer-area/sdk-tools/sdk-php/presentations/color/
### Parameter
Information about the visual properties and meanings of the parameters can be found in the [Object Presentation](https://www.symcon.de/en/llms/components/object-presentation.md).
| Name | Type | Parameter | Description |
| ------------------ | ------- | -------------------------- | ----------------------------------------------------------------------------------------------------------------------------------- |
| PRESENTATION | String | The ID of the presentation | VARIABLE_PRESENTATION_COLOR {05CC3CC2-A0B2-5837-A4A7-A07EA0B9DDFB} |
| ENCODING | Integer | Encoding | 0: RGB, 1: CMYK, 2: HSV, 3: HSL |
| PRESET_VALUES | String | Default Values | JSON-encoded list of objects, the exact parameters are described under [Colors](https://www.symcon.de/./#Farben) Not available for encoding xy |
| COLOR_SPACE | Integer | Color Space | 0: Custom, 1: sRGB, 2: AdobeRGB, 3: DCI-P3, 4: Rec2020 |
| CUSTOM_COLOR_SPACE | String | Custom color space | JSON-encoded list of objects, the exact parameters are described under [Custom Color Space](https://www.symcon.de/./#Custom_Color_Space) |
| COLOR_CURVE | Integer | Color Curve | 0: None, 1: Custom, 2: Daylight, 3: Daylight (Spring), 4: Daylight (Summer), 5. Daylight (winter) |
| CUSTOM_COLOR_CURVE | String | Custom Color Curve | JSON-encoded list of objects, the exact parameters are described under [Custom Color Curve](https://www.symcon.de/./#Custom_Color_Curve) |
### Colors
| Parameter | Type | Description |
| --------- | ------- | ---------------- |
| Color | Integer | Color as Integer |
### Custom Color Space
A color space is described by 4 objects with the following parameters. The 1st entry is for red, the 2nd for green, the 3rd for blue and the 4th for the white point.
| Parameter | Type | Description |
| --------- | ----- | ------------------------------------------------------------------------ |
| x | Float | X position of the color on the CIE standard color chart in the range 0-1 |
| y | Float | Y position of the color on the CIE standard color chart in the range 0-1 |
Example:
```php
// sRGB
[
{"x":0. 64, "y":0.33},
{"x":0.3, "y":0.6},
{"x":0.15, "y":0.06},
{"x":0.3127, "y":0.329}
]
```
### Custom Color Curve
A color curve consists of any number of colors that represent the color temperature over the course of a day.
| Parameter | Type | Description |
| --------- | ----- | ------------------------------------------------------------------------ |
| x | Float | X position of the color on the CIE standard color chart in the range 0-1 |
| y | Float | Y position of the color on the CIE standard color chart in the range 0-1 |
Example:
```php
// Daylight (Winter)
[
{"x": 0. 477, "y" 0.4137},
{"x": 0.4599, "y" 0.4106},
{"x": 0.433, "y" 0.4027},
{"x": 0.4103, "y" 0.3932},
{"x": 0.3918, "y" 0.3835},
{"x": 0.3761, "y" 0. 374},
{"x": 0.3631, "y" 0.3652},
{"x": 0.352, "y" 0.357},
{"x": 0.3439, "y" 0.3507},
{"x": 0.3367, "y" 0.3447},
{"x": 0.3348, "y" 0.343},
]
```
### Templates
```php
// Registers a variable with shades of green as its default values.
$this->RegisterVariableString('Color', 'Color', [
'PRESENTATION' => VARIABLE_PRESENTATION_COLOR,
'TEMPLATE' => VARIABLE_TEMPLATE_COLOR_FOREST,
]);
```
| Name | Konstante | GUID |
| ---------- | ------------------------------- | -------------------------------------- |
| Rainbow | VARIABLE_TEMPLATE_COLOR_RAINBOW | {0C711895-2F8E-DBFE-1700-84173491D229} |
| Forest | VARIABLE_TEMPLATE_COLOR_FOREST | {A7467E68-5C39-5BD9-C0C8-BCE6004FEEAA} |
### Beispiele
```php
// When registering a variable for PHP modules
// Allows color selection in RGB format, with red, green, and blue as the default values.
$this->RegisterVariableString('ColorRGB', 'Color', [
'PRESENTATION' => VARIABLE_PRESENTATION_COLOR,
'ENCODING' => 0 /* RGB */,
'PRESET_VALUES' => json_encode([['Color' => 16711680], ['Color' => 65280], ['Color' => 255]]),
]);
// Allows color selection in the xy format within a custom color space
$this->RegisterVariableString('ColorXY', 'Color', [
'PRESENTATION' => VARIABLE_PRESENTATION_COLOR,
'ENCODING' => 4 /* xy*/,
'COLOR_SPACE' => 0 /* Custom */,
'SELECTION' => 1 /* CIE Diagram */,
'CUSTOM_COLOR_SPACE' => json_encode([
['x' => 0.692, 'y' => 0.308], // Red
['x' => 0.170, 'y' => 0.700], // Green
['x' => 0.153, 'y' => 0.048], // Blue
['x' => 0.3127,'y' => 0.329] // White point
])
]);
// For existing variables via script
// Allows color selection in RGB format, with red, green, and blue as the default values.
IPS_SetVariableCustomPresentation(12345, [
'PRESENTATION' => VARIABLE_PRESENTATION_COLOR,
'ENCODING' => 0 /* RGB */,
'PRESET_VALUES' => json_encode([['Color' => 16711680], ['Color' => 65280], ['Color' => 255]]),
]);
// Erlaubt die Farbauswahl im Format xy in einem eigenen Farbraum
IPS_SetVariableCustomPresentation(12345, [
'PRESENTATION' => VARIABLE_PRESENTATION_COLOR,
'ENCODING' => 4 /* xy*/,
'COLOR_SPACE' => 0 /* Benutzerdefiniert */,
'SELECTION' => 1 /* CIE Diagramm */,
'CUSTOM_COLOR_SPACE' => json_encode([
['x' => 0.692, 'y' => 0.308], // Red
['x' => 0.170, 'y' => 0.700], // Green
['x' => 0.153, 'y' => 0.048], // Blue
['x' => 0.3127,'y' => 0.329] // White point
])
]);
```
## Shutter
Source: https://www.symcon.de/en/service/documentation/developer-area/sdk-tools/sdk-php/presentations/shutter/
_Requires Symcon >= 8.0_
### Parameter
Information about the visual properties and meanings of the parameters can be found in the [Object Presentation](https://www.symcon.de/en/llms/components/object-presentation.md).
| Name | Type | Parameter | Description |
| -------------------- | ------------- | -------------------------- | ----------------------------------------------------------------------- |
| PRESENTATION | String | The ID of the presentation | VARIABLE_PRESENTATION_SHUTTER {6075FC22-69AF-B110-3749-C24138883082} |
| USAGE_TYPE | Integer | Usage Type | 0: Open, 1: Rotation |
| OPEN_OUTSIDE_VALUE | Integer/Float | Open At / Outside At | |
| CLOSE_INSIDE_VALUE | Integer/Float | Closed At / Inside At | |
| MAX_ROTATION_INSIDE | Integer/Float | Maximum Rotation Inside | |
| MAX_ROTATION_OUTSIDE | Integer/Float | Maximum Rotation Outside | |
| SUN_POSITION | Integer | Sun Position | 0: Left, 1: Right, 2: (None) |
### Templates
```php
// Registers a variable that displays slats rotated to the right.
$this->RegisterVariableFloat('Lamelle', 'Lamelle', [
'PRESENTATION' => VARIABLE_PRESENTATION_SHUTTER,
'TEMPLATE' => VARIABLE_TEMPLATE_SHUTTER_LAMELLA_RIGHT,
]);
```
| Name | Constant | GUID |
| ------------- | ------------------------------------------ | -------------------------------------- |
| Slat right | VARIABLE_TEMPLATE_SHUTTER_LAMELLA_RIGHT | {3BE75DE9-7D84-C082-2E77-9ED3AEE04D63} |
| Slat left | VARIABLE_TEMPLATE_SHUTTER_LAMELLA_LEFT | {22A0DF9C-C200-154A-641B-3A3CB096DB6D} |
### Examples
```php
// When registering a variable for PHP modules
// A variable that represents the opening of the shutter. With a variable value of 150, the presentation is closed - at 0 open.
$this->RegisterVariableInteger('Shutter', 'Shutter', [
'PRESENTATION' => VARIABLE_PRESENTATION_SHUTTER,
'CLOSE_INSIDE_VALUE' => 150,
'USAGE_TYPE' => 0 /* Open */,
'SUN_POSITION' => 2 /* None */,
'OPEN_OUTSIDE_VALUE' => 0,
]);
// A variable that represents the rotation of slats. With a variable value of 100, the presentation is rotated outwards - at 0 inside.
$this->RegisterVariableInteger('Shutter', 'Shutter', [
'PRESENTATION' => VARIABLE_PRESENTATION_SHUTTER,
'CLOSE_INSIDE_VALUE' => 100,
'OPEN_OUTSIDE_VALUE' => 0,
'USAGE_TYPE' => 1 /* Rotation */,
'SUN_POSITION' => 1 /* Right */,
'MAX_ROTATION_INSIDE' => -30,
'MAX_ROTATION_OUTSIDE' => 30,
]);
// For existing variables via script
// A variable that represents the opening of the shutter. With a variable value of 150, the presentation is closed - at 0 open.
IPS_SetVariableCustomPresentation(12345, [
'PRESENTATION' => VARIABLE_PRESENTATION_SHUTTER,
'CLOSE_INSIDE_VALUE' => 150,
'USAGE_TYPE' => 0 /* Open */,
'SUN_POSITION' => 2 /* None */,
'OPEN_OUTSIDE_VALUE' => 0,
]);
// A variable that represents the rotation of slats. With a variable value of 100, the presentation is rotated outwards - at 0 inside.
IPS_SetVariableCustomPresentation(12345, [
'PRESENTATION' => VARIABLE_PRESENTATION_SHUTTER,
'CLOSE_INSIDE_VALUE' => 100,
'OPEN_OUTSIDE_VALUE' => 0,
'USAGE_TYPE' => 1 /* Rotation */,
'SUN_POSITION' => 1 /* Right */,
'MAX_ROTATION_INSIDE' => -30,
'MAX_ROTATION_OUTSIDE' => 30,
]);
```
## Legacy Profile
Source: https://www.symcon.de/en/service/documentation/developer-area/sdk-tools/sdk-php/presentations/legacy-profile/
_Requires Symcon >= 8.0_
### Parameter
Information on the visual properties and meanings of the parameters can be found in the [Object Presentation](https://www.symcon.de/en/llms/components/object-presentation.md).
| Name | Type | Parameter | Description |
| ------------ | ------ | -------------------------- | ---------------------------------------------------------------------- |
| PRESENTATION | String | The ID of the presentation | VARIABLE_PRESENTATION_LEGACY {4153A8D4-5C33-C65F-C1F3-7B61AAF99B1C} |
| PROFILE | String | Profile | [Variable Profiles](https://www.symcon.de/en/llms/concepts.md) |
### Examples
```php
// When registering a variable for PHP modules
$this->RegisterVariableFloat('Temperature', 'Temperature', [
'PRESENTATION' => VARIABLE_PRESENTATION_LEGACY,
'PROFILE' => '~Temperature',
]);
// For existing variables via script
IPS_SetVariableCustomPresentation(12345, [
'PRESENTATION' => VARIABLE_PRESENTATION_LEGACY,
'PROFILE' => '~Temperature',
]);
```
## Switch
Source: https://www.symcon.de/en/service/documentation/developer-area/sdk-tools/sdk-php/presentations/switch/
_Requires Symcon >= 8.0_
### Parameters
Information about the visual properties and meanings of the parameters can be found in the [Object Presentation](https://www.symcon.de/en/llms/components/object-presentation.md).
| Name | Type | Parameter | Description |
| -------------- | ------- | ------------------------------------------------- | ---------------------------------------------------------------------- |
| PRESENTATION | String | The ID of the presentation | VARIABLE_PRESENTATION_SWITCH {60AE6B26-B3E2-BDB1-A3A1-BE232940664B} |
| USE_ICON_FALSE | Boolean | Individual icons based on value | |
| ICON_TRUE | String | Icon for true, also false if USE_ICON_FALSE false | [Icons](https://www.symcon.de/en/llms/components/icons.md) |
| ICON_FALSE | String | Icon for false if USE_ICON_FALSE true | [Icons](https://www.symcon.de/en/llms/components/icons.md) |
| GLOW_COLOR | Integer | Color of glow while active | |
| GLOW_INTENSITY | Integer | Intensity of glow while active | |
| USAGE_TYPE | Integer | Variable Usage | 0: On/Off, 1: Mute Switch, 2: None of these |
### Examples
```php
// When registering a variable for PHP modules
// A switch that glows green.
$this->RegisterVariableInteger('Status', 'Status', [
'PRESENTATION' => VARIABLE_PRESENTATION_SWITCH,
'GLOW_COLOR' => 3210585,
'GLOW_INTENSITY' => 20,
'USAGE_TYPE' => 0 /* On/Off */
]);
// A switch with custom icons to mute
$this->RegisterVariableInteger('Mute', 'Mute', [
'PRESENTATION' => VARIABLE_PRESENTATION_SWITCH,
'USE_ICON_FALSE' => true,
'ICON_FALSE' => 'volume',
'USAGE_TYPE' => 1 /* Mute */,
'ICON_TRUE' => 'volume-xmark',
]);
// For existing variables via script
// A switch that glows green.
IPS_SetVariableCustomPresentation(12345, [
'PRESENTATION' => VARIABLE_PRESENTATION_SWITCH,
'GLOW_COLOR' => 3210585,
'GLOW_INTENSITY' => 20,
'USAGE_TYPE' => 0 /* On/Off */
]);
// A switch with custom icons to mute
IPS_SetVariableCustomPresentation(12345, [
'PRESENTATION' => VARIABLE_PRESENTATION_SWITCH,
'USE_ICON_FALSE' => true,
'ICON_FALSE' => 'volume',
'USAGE_TYPE' => 1 /* Mute */,
'ICON_TRUE' => 'volume-xmark',
]);
```
## Slider
Source: https://www.symcon.de/en/service/documentation/developer-area/sdk-tools/sdk-php/presentations/slider/
_Requires Symcon >= 8.0_
### Parameter
Information about the visual properties and meanings of the parameters can be found in the [Object Presentation](https://www.symcon.de/en/llms/components/object-presentation.md).
| Name | Type | Parameter | Description |
| ------------------- | ------------- | --------------------------------------------- | ------------------------------------------------------------------------------------------------------------------------------------------------------------- |
| PRESENTATION | String | The ID of the presentation | VARIABLE_PRESENTATION_SLIDER {6B9CAEEC-5958-C223-30F7-BD36569FC57A} |
| MIN | Integer/Float | Minimum Value | |
| MAX | Integer/Float | Maximum Value | |
| STEP_SIZE | Integer/Float | Step Size | |
| GRADIENT_TYPE | Integer | Gradient | 0: Default, 1: Temperature, 2: Tuneable White, 3: Custom |
| CUSTOM_GRADIENT | String | Custom Gradient | JSON-encoded list of objects with the parameters 'Value' and 'Color', where Color is encoded analogously to [SelectColor](https://www.symcon.de/en/llms/developer/sdk-tools/sdk-php/configuration-forms.md) |
| USAGE_TYPE | Integer | Variable Usage | 0: Temperature, 1: Tuneable White, 2: Intensity, 3: Volume, 4: Progress, 5: None of these |
| PREFIX | String | Prefix | |
| SUFFIX | String | Suffix | |
| PERCENTAGE | Boolean | Display Type | false: Absolute, true: Percentage |
| THOUSANDS_SEPARATOR | String | Thousands Separator | Client: Default from Client, otherwise directly the value |
| DIGITS | Integer | Digits | |
| DECIMAL_SEPARATOR | String | Decimal Separator | Client: Default from Client, otherwise directly the value |
| ICON | String | Icon | |
| INTERVALS_ACTIVE | Boolean | Use updated parameters for specific intervals | |
| INTERVALS | String | Intervals | JSON-encoded list of objects, the exact parameters are described under [Intervals](https://www.symcon.de/./#Intervals) |
#### Intervals
| Name | Type | Parameter | Description |
| ---------------- | ------------- | ----------------- | -------------------------------------- |
| IntervalMinValue | Integer/Float | Interval Start | |
| IntervalMaxValue | Integer/Float | Interval End | |
| ConstantActive | Boolean | Display | false: Formatted Value, true: Constant |
| ConstantValue | String | Constant | |
| ConversionFactor | Integer/Float | Conversion Factor | |
| PrefixActive | Boolean | Overwrite Prefix | |
| PrefixValue | String | Prefix | |
| SuffixActive | Boolean | Overwrite Suffix | |
| SuffixValue | String | Suffix | |
| DigitsActive | Boolean | Overwrite Digits | |
| DigitsValue | Integer | Digits | |
| IconActive | Boolean | Overwrite Icon | |
| IconValue | String | Icon | |
### Templates
```php
// Registers a variable with a room temperature template.
$this->RegisterVariableFloat('TargetValue', 'Temperature', [
'PRESENTATION' => VARIABLE_PRESENTATION_SLIDER,
'TEMPLATE' => VARIABLE_TEMPLATE_SLIDER_ROOM_TEMPERATURE,
]);
```
| Name | Konstante | GUID |
| ----------------- | -------------------------------------------- | -------------------------------------- |
| Room Temperature | VARIABLE_TEMPLATE_SLIDER_ROOM_TEMPERATURE | {868B087E-A38D-2155-EBE0-157AFBBF9E8C} |
| Color Temperature | VARIABLE_TEMPLATE_SLIDER_COLOR_TEMPERATURE | {66062309-21A9-26C0-213F-775C52E1473B} |
| Energy | VARIABLE_TEMPLATE_SLIDER_ENERGY | {BC799412-0C66-551F-CAEC-7566F5D52BD9} |
| Power | VARIABLE_TEMPLATE_VALUE_PRESENTATION_BATTERY | {8EC19DF0-89FB-A77E-ED7D-047A949CF292} |
### Examples
```php
// When registering a variable for PHP modules
// A slider with a range of 0–2000 W. Values of 1000 W or higher are displayed in kW.
$this->RegisterVariableInteger('Power', 'Power', [
'PRESENTATION' => VARIABLE_PRESENTATION_SLIDER,
'ICON' => 'bolt',
'SUFFIX' => ' W',
'MIN' => 0,
'MAX' => 2000,
'INTERVALS_ACTIVE' => true,
'INTERVALS' => json_encode([
[
'IntervalMinValue' => 1000,
'IntervalMaxValue' => 999999,
'ConversionFactor' => 1000,
'SuffixActive' => true,
'SuffixValue' => ' kW',
'DigitsActive' => true,
'DigitsValue' => 2,
'ConstantActive' => false,
'PrefixActive' => false,
]
])
]);
// For existing variables via script
// A slider with a range of 0–2000 W. Values of 1000 W or higher are displayed in kW.
IPS_SetVariableCustomPresentation(12345, [
'PRESENTATION' => VARIABLE_PRESENTATION_SLIDER,
'ICON' => 'bolt',
'SUFFIX' => ' W',
'MIN' => 0,
'MAX' => 2000,
'INTERVALS_ACTIVE' => true,
'INTERVALS' => json_encode([
[
'IntervalMinValue' => 1000,
'IntervalMaxValue' => 999999,
'ConversionFactor' => 1000,
'SuffixActive' => true,
'SuffixValue' => ' kW',
'DigitsActive' => true,
'DigitsValue' => 2,
'ConstantActive' => false,
'PrefixActive' => false,
]
])
]);
```
## Web Content
Source: https://www.symcon.de/en/service/documentation/developer-area/sdk-tools/sdk-php/presentations/web-content/
_Requires Symcon >= 8.0_
### Parameter
Information about the visual properties and meanings of the parameters can be found in the [Object Presentation](https://www.symcon.de/en/llms/components/object-presentation.md).
| Name | Type | Parameter | Description |
| ------------ | ------- | -------------------------- | --------------------------------------------------------------------------- |
| PRESENTATION | String | The ID of the presentation | VARIABLE_PRESENTATION_WEB_CONTENT {9DE1D610-5106-97FB-714D-1AADEDF8377A} |
| HTML_TYPE | Integer | Display Type | 0: HTML Inhalt, 1: Webseite |
| PADDING | Boolean | Remove Padding | |
### Examples
```php
// When registering a variable for PHP modules
// The variable value is treated as a link. The website is displayed without padding in the tiles.
$this->RegisterVariableString('Website', 'Website', [
'PRESENTATION' => VARIABLE_PRESENTATION_WEB_CONTENT,
'HTML_TYPE' => 1 /* Website*/,
'PADDING' => true,
]);
// For existing variables via script
// The variable value is treated as a link. The website is displayed without padding in the tiles.
IPS_SetVariableCustomPresentation(12345, [
'PRESENTATION' => VARIABLE_PRESENTATION_WEB_CONTENT,
'HTML_TYPE' => 1,
'PADDING' => true,
]);
```
## Value Presentation
Source: https://www.symcon.de/en/service/documentation/developer-area/sdk-tools/sdk-php/presentations/value-presentation/
_Requires Symcon >= 8.0_
### Parameter
Information about the visual properties and meanings of the parameters can be found in the [Object Presentation](https://www.symcon.de/en/llms/components/object-presentation.md).
| Name | Type | Parameter | Description |
| ------------ | ------- | -------------------------- | ---------------------------------------------------------------------------------- |
| PRESENTATION | String | The ID of the presentation | VARIABLE_PRESENTATION_VALUE_PRESENTATION {3319437D-7CDE-699D-750A-3C6A3841FA75} |
| ICON | String | Default Icon | [Icons](https://www.symcon.de/en/llms/components/icons.md) |
| COLOR | Integer | Default Color | |
| PREFIX | String | Prefix | |
| SUFFIX | String | Suffix | |
#### Float and Integer
| Name | Type | Parameter | Description |
| ------------------- | ------------- | --------------------------------------------- | ------------------------------------------------------------------------------------------------------------ |
| USAGE_TYPE | Integer | Variable Usage | 0: None of these, 1: Temperature |
| PERCENTAGE | Boolean | Display Type | true: Percentage, false: Absolute |
| MIN | Integer/Float | Minimum Value | |
| MAX | Integer/Float | Maximum Value | |
| THOUSANDS_SEPARATOR | String | Thousands Separator | Client: Default from Client, otherwise directly the value |
| DIGITS | Integer | Digits | |
| DECIMAL_SEPARATOR | String | Decimal Separator | Client: Default from Client, otherwise directly the value |
| INTERVALS_ACTIVE | Boolean | Use updated parameters for specific intervals | |
| INTERVALS | String | Intervals | JSON-encoded list of objects, the exact parameters are described under [Intervals](https://www.symcon.de/./#Intervalle) |
#### Intervals
| Name | Type | Parameter | Description |
| ---------------- | ------------- | ----------------- | -------------------------------------- |
| IntervalMinValue | Integer/Float | Interval Start | |
| IntervalMaxValue | Integer/Float | Interval End | |
| ConstantActive | Boolean | Display | false: Formatted Value, true: Constant |
| ConstantValue | String | Constant | |
| ConversionFactor | Integer/Float | Conversion Factor | |
| PrefixActive | Boolean | Overwrite Prefix | |
| PrefixValue | String | Prefix | |
| SuffixActive | Boolean | Overwrite Suffix | |
| SuffixValue | String | Suffix | |
| DigitsActive | Boolean | Overwrite Digits | |
| DigitsValue | Integer | Digits | |
| IconActive | Boolean | Overwrite Icon | |
| IconValue | String | Icon | |
| ColorActive | Boolean | Overwrite Color | |
| Color | Integer | Color | |
#### Boolean and String
| Name | Type | Parameter | Description |
| --------- | ------- | --------- | ------------------------------------------------------------------------------------------------------------------ |
| MULTILINE | Boolean | Multiline | |
| OPTIONS | String | Options | JSON-encoded list of objects, the exact parameters are described under [Options](https://www.symcon.de/./#Optionen) described |
### Options
| Name | Type | Parameter | Description |
| ----------- | -------------- | --------------- | ------------------------------------------- |
| Value | Boolean/String | Value | Depends on the type of the variable |
| Caption | String | Caption | |
| IconActive | Boolean | Overwrite Icon | |
| IconValue | String | Icon | [Icons](https://www.symcon.de/en/llms/components/icons.md) |
| ColorActive | Boolean | Overwrite Color | |
| ColorValue | Integer | Color | |
### Templates
```php
// Registers a variable with a temperature template.
$this->RegisterVariableFloat('Temperature', 'Room temperature', [
'PRESENTATION' => VARIABLE_PRESENTATION_VALUE_PRESENTATION,
'TEMPLATE' => VARIABLE_TEMPLATE_VALUE_PRESENTATION_ROOM_TEMPERATURE,
]);
```
| Name | Konstante | GUID |
| ---------------- | ----------------------------------------------------- | -------------------------------------- |
| Room Temperature | VARIABLE_TEMPLATE_VALUE_PRESENTATION_ROOM_TEMPERATURE | {90AF8F8F-183F-BBFD-E078-35FAB6DCFE4F} |
| Power | VARIABLE_TEMPLATE_VALUE_PRESENTATION_POWER | {2FED3D39-073D-6037-901B-2586A1AB5569} |
| Energy | VARIABLE_TEMPLATE_VALUE_PRESENTATION_ENERGY | {C899FCFA-063E-897E-9DA4-28ADD278EED5} |
| Battery | VARIABLE_TEMPLATE_VALUE_PRESENTATION_BATTERY | {7BD38CF5-07F2-5B5B-8F7F-15398B823BFC} |
| Battery (Color) | VARIABLE_TEMPLATE_VALUE_PRESENTATION_BATTERY_COLOR | {C90EF36A-165E-D0B0-032C-F468F483D42B} |
### Examples
```php
// When registering a variable for PHP modules
// An alert variable with an icon and background color
$this->RegisterVariableBoolean('Alarm', 'Alarm', [
'PRESENTATION' => VARIABLE_PRESENTATION_VALUE_PRESENTATION,
'OPTIONS' => json_encode([
['Value' => false, 'Caption' => 'OK', 'IconActive' => true, 'IconValue' => 'siren'],
['Value' => true, 'Caption' => 'Alarm', 'IconActive' => true, 'IconValue' => 'siren-on', 'ColorValue' => 16711680, 'ColorActive' => true],
])
]);
// Power in watts, with values above 1000 displayed in kilowatts
$this->RegisterVariableInteger('Power', 'Power', [
'PRESENTATION' => VARIABLE_PRESENTATION_VALUE_PRESENTATION,
'ICON' => 'bolt',
'SUFFIX' => ' W',
'INTERVALS_ACTIVE' => true,
'INTERVALS' => json_encode([
[
'IntervalMinValue' => 1000,
'IntervalMaxValue' => 999999,
'ConversionFactor' => 1000,
'SuffixActive' => true,
'SuffixValue' => ' kW',
'DigitsActive' => true,
'DigitsValue' => 2,
'ConstantActive' => false,
'PrefixActive' => false,
]
])
]);
// For existing variables via script
// Only icons are displayed. One option is highlighted in color.
IPS_SetVariableCustomPresentation(12345, [
'PRESENTATION' => VARIABLE_PRESENTATION_VALUE_PRESENTATION,
'OPTIONS' => json_encode([
['Value' => false, 'Caption' => 'OK', 'IconActive' => true, 'IconValue' => 'siren'],
['Value' => true, 'Caption' => 'Alarm', 'IconActive' => true, 'IconValue' => 'siren-on', 'ColorValue' => 16711680, 'ColorActive' => true],
])
]);
// Power in watts, with values above 1000 displayed in kilowatts
IPS_SetVariableCustomPresentation(12345, [
'PRESENTATION' => VARIABLE_PRESENTATION_VALUE_PRESENTATION,
'ICON' => 'bolt',
'SUFFIX' => ' W',
'INTERVALS_ACTIVE' => true,
'INTERVALS' => json_encode([
[
'IntervalMinValue' => 1000,
'IntervalMaxValue' => 999999,
'ConversionFactor' => 1000,
'SuffixActive' => true,
'SuffixValue' => ' kW',
'DigitsActive' => true,
'DigitsValue' => 2,
'ConstantActive' => false,
'PrefixActive' => false,
]
])
]);
```
## Value Input
Source: https://www.symcon.de/en/service/documentation/developer-area/sdk-tools/sdk-php/presentations/value-input/
_Requires Symcon >= 8.0_
### Parameter
Information about the visual properties and meanings of the parameters can be found in the [Object Presentation](https://www.symcon.de/en/llms/components/object-presentation.md).
| Name | Type | Parameter | Description |
| ------------ | ------- | -------------------------- | --------------------------------------------------------------------------- |
| PRESENTATION | String | The ID of the presentation | VARIABLE_PRESENTATION_VALUE_INPUT {6F477326-1683-A2FD-D2E7-477F366ECB62} |
| PREFIX | String | Prefix | |
| SUFFIX | String | Suffix | |
| MULTILINE | Boolean | Multiline Input | |
### Examples
```php
// When registering a variable for PHP modules
// Allows numbers to be entered freely.
$this->RegisterVariableFloat('Strompreis', 'Kosten pro kWh', [
'PRESENTATION' => VARIABLE_PRESENTATION_VALUE_INPUT,
'SUFFIX' => ' €',
]);
// Allows free text to be entered over multiple lines.
$this->RegisterVariableString('Einkaufsliste', 'Einkaufsliste', [
'PRESENTATION' => VARIABLE_PRESENTATION_VALUE_INPUT,
'MULLTILINE' => true,
]);
// For existing variables via script
// Allows numbers to be entered freely.
IPS_SetVariableCustomPresentation(12345, [
'PRESENTATION' => VARIABLE_PRESENTATION_VALUE_INPUT,
'SUFFIX' => ' €',
]);
// Allows free text to be entered over multiple lines.
IPS_SetVariableCustomPresentation(12345, [
'PRESENTATION' => VARIABLE_PRESENTATION_VALUE_INPUT,
'MULLTILINE' => true,
]);
```
## Data flow
Source: https://www.symcon.de/en/service/documentation/developer-area/sdk-tools/sdk-php/dataflow/
### Description
The data flow should explain how data is sent between "Device <-> Splitter <-> I / O" in IP-Symcon and what has to be set up for it.
> **Note:** For a simple creation of a module including the data flow, the use of the [module generator](https://www.symcon.de/en/llms/developer/sdk-tools.md) is recommended.
_Typical structure_

### Direction of Data flow
There are 2 directions of data flow.
#### I/O to Device
As can be seen in the figure, this flow direction is from the parent instance via [SendDataToChildren](https://www.symcon.de/en/llms/developer/sdk-tools/sdk-php/module.md) to the children. The incoming data is processed within the children by the overwritable function [ReceiveData](https://www.symcon.de/en/llms/developer/sdk-tools/sdk-php/module.md).
Optionally and if necessary, a splitter can be inserted between I/O and device.
#### Device to I/O
As can be seen in the figure, this flow direction is from the children instance via [SendDataToParent](https://www.symcon.de/en/llms/developer/sdk-tools/sdk-php/module.md) to the parent. The incoming data is processed within the parent by the overwritable function [ForwardData](https://www.symcon.de/en/llms/developer/sdk-tools/sdk-php/module.md).
Optionally and if necessary, a splitter can be inserted between the device and I/O.
### I/O Modules
In the case of self-developed modules, the [GUIDs](https://www.symcon.de/en/llms/concepts.md) for devices and splitters must be specified in the respective [module.json](https://www.symcon.de/en/llms/developer/sdk-tools/sdk-php/module.md) file.
These can be created using the [GUID Generator](https://www.symcon.de/en/llms/developer/sdk-tools.md).
_On the I/O side, the following data packages are available for I/O types:_
| I/O module | Module GUID | Supported data packages |
| --------------------------------------------------------------- | -------------------------------------- | ------------------------------------------------------------------------------------------------------------------------------------------ |
| [Client Socket](https://www.symcon.de/en/llms/modules/clientsocket.md) | {3CFF0FD9-E306-41DB-9B5A-9D06D38576C3} | Simple |
| [HID](https://www.symcon.de/en/llms/modules/hid.md) | {E6D7692A-7F4C-441D-827B-64062CFE1C02} | Extended (event) |
| [HTTP Client](https://www.symcon.de/en/llms/modules/httpclient.md) | {4CB91589-CE01-4700-906F-26320EFCF6C4} | Extended (HTTP Request) |
| [Multicast Socket](https://www.symcon.de/en/llms/modules/multicastsocket.md) | {BAB408E0-0A0F-48C3-B14E-9FB2FA81F66A} | Simple Extended (Socket) |
| [Serial Port](https://www.symcon.de/en/llms/modules/serialport.md) | {6DC3D946-0D31-450F-A8C6-C42DB8D7D4F1} | Simple |
| [Server Sent Event Client](https://www.symcon.de/en/llms/modules/serversenteventclient.md) | {2FADB4B7-FDAB-3C64-3E2C-068A4809849A} | Extended (SSE) |
| [Server Socket](https://www.symcon.de/en/llms/modules/serversocket.md) | {8062CF2B-600E-41D6-AD4B-1BA66C32D6ED} | Simple Extended (Socket) |
| [UDP Socket](https://www.symcon.de/en/llms/modules/udpsocket.md) | {82347F20-F541-41E1-AC5B-A636FD3AE2D8} | Simple Extended (Socket) Erweitert (UDP) |
| [Virtual I/O](https://www.symcon.de/en/llms/modules/virtualio.md) | {6179ED6A-FC31-413C-BB8E-1204150CF376} | Simple Extended (Socket) |
| [WebSocket Client](https://www.symcon.de/en/llms/modules/websocketclient.md) | {D68FD31F-0E90-7019-F16C-1949BD3079EF} | Simple |
#### Data Packages
The data packets are encoded in JSONString.
These contain the [GUID](https://www.symcon.de/en/llms/concepts.md) of the data packet type and the actual data.
Using the GUID as an identifier, the respective module knows what data is in the data packet and how it is formatted.
#### Simple
RX GUID: {018EF6B5-AB94-40C6-AA53-46943E824ACF}
TX GUID: {79827379-F36E-4ADA-8A95-5F8D1DC92FA9}
| Parameter | Data type | Description |
| --------- | --------- | ---------------- |
| Buffer | String | Any data content |
```php
// Example for sending to the parent (TX packet) of the simple type
public function SendData() {
$this->SendDataToParent(json_encode([
'DataID' => "{79827379-F36E-4ADA-8A95-5F8D1DC92FA9}",
'Buffer' => utf8_encode("Hello World String"),
]));
}
// Received data from the parent (RX packet) of the simple type
public function ReceiveData($JSONString) {
$data = json_decode($JSONString);
$data['Buffer'] = utf8_decode($Data['Buffer']);
// Output in the message window for debug purposes
IPS_LogMessage("DATA", print_r($data, true));
}
```
#### Extended (Event)
RX GUID: {FD7FF32C-331E-4F6B-8BA8-F73982EF5AA7}
TX GUID: {4A550680-80C5-4465-971E-BBF83205A02B}
| Parameter | Data type | Description |
| --------- | --------- | ---------------- |
| Buffer | String | Any data content |
| EventID | Integer | ID for the event |
```php
// Example for sending to the parent (TX packet) of the type Extended (Event)
public function SendData() {
$this->SendDataToParent(json_encode([
'DataID' => "{4A550680-80C5-4465-971E-BBF83205A02B}",
'Buffer' => utf8_encode("Hello World String"),
'EventID' => 123
]));
}
// Received data from the parent (RX packet) of the type Extended (Event)
public function ReceiveData($JSONString) {
$data = json_decode($JSONString);
$data['Buffer'] = utf8_decode($Data['Buffer']);
// Output in the message window for debug purposes
IPS_LogMessage("DATA", print_r($data, true));
}
```
#### Extended (Socket)
RX GUID: {7A1272A4-CBDB-46EF-BFC6-DCF4A53D2FC7}
TX GUID: {C8792760-65CF-4C53-B5C7-A30FCC84FEFE}
| Parameter | Data type | description |
| ---------- | --------- | ---------------------------------------------------------- |
| Buffer | String | Any data content |
| Type | Integer | Type of connection (0 = Data, 1 = Connect, 2 = Disconnect) |
| ClientIP | String | Connection IP address |
| ClientPort | Integer | Connection port |
```php
// Example for sending to the parent (TX packet) of the extended type (socket)
public function SendData() {
$this->SendDataToParent(json_encode([
'DataID' => "{C8792760-65CF-4C53-B5C7-A30FCC84FEFE}",
'Buffer' => utf8_encode("Hello World String"),
'Type' => 0,
'ClientIP' => "192.168.0.8",
'ClientPort' => 502
]));
}
// Received data from the parent (RX packet) of the type extended (socket)
public function ReceiveData($JSONString) {
$data = json_decode($JSONString);
$data['Buffer'] = utf8_decode($Data['Buffer']);
// Output in the message window for debug purposes
IPS_LogMessage("DATA", print_r($data, true));
}
```
#### Extended (UDP)
RX GUID: {9082C662-7864-D5CA-863F-53999200D897}
TX GUID: {8E4D9B23-E0F2-1E05-41D8-C21EA53B8706}
| Parameter | Data type | Description |
| ---------- | --------- | ------------------------------------------------------------------------------------------------------------------------------------ |
| Buffer | String | Any data content |
| ClientIP | String | IP address of the connection, if empty then the host address set in the UDP socket is used. (Will be ignored if broadcast is active) |
| ClientPort | Integer | Connection port, if set to 0, the port set in the UDP socket is used |
| Broadcast | Boolean | Broadcast deactivated/activated (False = deactivated, True = activated) |
```php
// Example for sending to the parent (TX packet) of the extended type (UDP)
public function SendData() {
$this->SendDataToParent(json_encode([
'DataID' => "{8E4D9B23-E0F2-1E05-41D8-C21EA53B8706}",
'Buffer' => utf8_encode("Hello World String"),
'ClientIP' => "192.168.0.8",
'ClientPort' => 502
'Broadcast' => false,
]));
}
// Received data from the parent (RX packet) of the extended type (UDP)
public function ReceiveData($JSONString) {
$data = json_decode($JSONString);
$data['Buffer'] = utf8_decode($Data['Buffer']);
// Output in the message window for debug purposes
IPS_LogMessage("DATA", print_r($data, true));
}
```
#### Extended (SSE)
RX GUID: {5A709184-B602-D394-227F-207611A33BDF}
| Parameter | Data type | Description |
| --------- | --------- | ---------------------------------------------- |
| Event | String | Any type of event |
| Data | String | Any data content |
| Retry | String | In milliseconds before another attempt to send |
| ID | String | ID for the event |
TX GUID: {79827379-F36E-4ADA-8A95-5F8D1DC92FA9}
TX is not evaluated but has to be set
```php
// Received data from the parent (RX packet) of the extended type (SSE)
public function ReceiveData($JSONString) {
$data = json_decode($JSONString);
// Output in the message window for debug purposes
IPS_LogMessage("DATA", print_r($data, true));
}
```
Further information is available at [https://www.w3.org/TR/eventsource/](https://html.spec.whatwg.org/multipage/server-sent-events.html#the-eventsource-interface)
#### Extended (HTTP Request)
RX GUID: {018EF6B5-AB94-40C6-AA53-46943E824ACF}
| Parameter RX | Data type | Description |
| ------------ | --------- | ---------------- |
| Buffer | String | Any data content |
TX GUID: {D4C1D08F-CD3B-494B-BE18-B36EF73B8F43}
| Parameter TX | Data type | Description |
| ------------- | --------- | ------------------------------------ |
| RequestMethod | String | GET or POST |
| RequestURL | String | URL of the website to be requested |
| RequestData | String | Which data value should be requested |
| Timeout | Integer | Milliseconds until a timeout occurs |
```php
// Example for sending to the parent (TX packet) of the extended type (HTTP request)
public function SendData() {
$this->SendDataToParent(json_encode([
'DataID' => "{D4C1D08F-CD3B-494B-BE18-B36EF73B8F43}",
'RequestMethod' => utf8_encode("POST"),
'RequestURL' => utf8_encode("https://reqbin.com/echo/post/form"),
'RequestData' => utf8_encode("dummy-post-data"),
'Timeout' => 10000
]));
}
// Received data from the parent (RX packet) of the simple type
public function ReceiveData($JSONString) {
$data = json_decode($JSONString);
$data['Buffer'] = utf8_decode($Data['Buffer']);
// Output in the message window for debug purposes
IPS_LogMessage("DATA", print_r($data, true));
}
```
### Requirements and Setup
The [GUIDs](https://www.symcon.de/en/llms/concepts.md) for the data packet types used are defined in the [module.json](https://www.symcon.de/en/llms/developer/sdk-tools/sdk-php/module.md) .
So that a data flow can be established between two entities, the sender must enter the type of communication used for the appropriate requirement.
The recipient enters the GUID of the communication type under Implemented.
If several GUIDs of different data packet types are entered in the [module.json](https://www.symcon.de/en/llms/developer/sdk-tools/sdk-php/module.md) , a module can also interpret and process several data packet types.
> **Note:** The respective parent of each child must also be set up via [ConnectParent](https://www.symcon.de/en/llms/developer/sdk-tools/sdk-php/module.md), [RequireParent](https://www.symcon.de/en/llms/developer/sdk-tools/sdk-php/module.md) or [ForceParent](https://www.symcon.de/en/llms/developer/sdk-tools/sdk-php/module.md). With the newer IPSModuleStrict, the necessary instances for the data flow are automatically created by the management console. If this automation is not suitable, the respective module can influence the automation of the management console via the function [GetCompatibleParents](https://www.symcon.de/en/llms/developer/sdk-tools/sdk-php/module.md).
### Example
Communication between I/O, splitter and device.
The device has the splitter as a parent and the splitter has the I/O as a parent.
_Excerpt from the respective module.json_
__Example GUIDs of the data packet types:__
IO_TX: {65465465-6546-6546-6546-65465465}
IO_RX: {AE3AE3A-AE3A-AE3A-AE3A-AE3AE3AE}
Device_TX: {78978978-7897-7897-7897-78978978}
Device_RX: {12312312-1231-1231-1231-12312312}
```php
// Inside the I/O (parent of the splitter)
// I/Os usually have no other parents. So the list should normally be empty.
"parentRequirements": [],
// GUID of the data packet type that is used via SendDataToChildren
"childRequirements": ["{AE3AE3A-AE3A-AE3A-AE3A-AE3AE3AE}"],
// List of GUIDs of the data packet types that are obeyed.
// This is processed by the ForwardData function (data come from the child).
"implemented": ["{65465465-6546-6546-6546-65465465}"],
// Within the splitter (parent of the device, child of the I/O)
// GUID of the data packet type which is used via SendDataToParent
"parentRequirements": ["{65465465-6546-6546-6546-65465465}"],
// GUID of the data packet type that is used via SendDataToChildren
"childRequirements": ["{12312312-1231-1231-1231-12312312}"],
// List of GUIDs of the data packet types that are obeyed.
// This is processed either by the ForwardData function (data come from the child) or ReceiveData (data come from the parent).
"implemented": ["{AE3AE3A-AE3A-AE3A-AE3A-AE3AE3AE}", "{78978978-7897-7897-7897-78978978}"],
// Inside the device (child of the splitter)
// GUID of the data packet type which is used via SendDataToParent
"parentRequirements": ["{78978978-7897-7897-7897-78978978}"],
// Devices usually have no other children. So the list should normally be empty.
"childRequirements": [],
// List of GUIDs of the data packet types that are obeyed.
// This is processed by the ReceiveData function (data come from the parent).
"implemented": ["{12312312-1231-1231-1231-12312312}"],
```
## Data management
Source: https://www.symcon.de/en/service/documentation/developer-area/sdk-tools/sdk-php/data-management/
_Requires Symcon >= 4.0_
### Description
A module basically has four different forms of managing data. These are properties, attributes, buffers and status variables. These differ in terms of task, access options and persistence.
Properties
Attributes
Buffer
Status Variables
#### Properties
Properties are persistent data of a module which should/must be configured by the user. This data is only saved when "Apply" is clicked. Properties are, for example, required login data, device ID or interval for calling up sensor values. This is usually done via the configuration page, which is defined via the [form.json](https://www.symcon.de/en/llms/developer/sdk-tools/sdk-php/configuration-forms.md).
| Function name | Brief description |
| -------------------------------------------------------------- | ---------------------------------------- |
| [ReadPropertyBoolean](https://www.symcon.de/en/llms/developer/sdk-tools/sdk-php/module.md) | Returns the value of a boolean property |
| [ReadPropertyFloat](https://www.symcon.de/en/llms/developer/sdk-tools/sdk-php/module.md) | Returns the value of a float property |
| [ReadPropertyInteger](https://www.symcon.de/en/llms/developer/sdk-tools/sdk-php/module.md) | Returns the value of an integer property |
| [ReadPropertyString](https://www.symcon.de/en/llms/developer/sdk-tools/sdk-php/module.md) | Returns the value of a string property |
| [RegisterPropertyBoolean](https://www.symcon.de/en/llms/developer/sdk-tools/sdk-php/module.md) | Creates a boolean property |
| [RegisterPropertyFloat](https://www.symcon.de/en/llms/developer/sdk-tools/sdk-php/module.md) | Creates a float property |
| [RegisterPropertyInteger](https://www.symcon.de/en/llms/developer/sdk-tools/sdk-php/module.md) | Creates an integer property |
| [RegisterPropertyString](https://www.symcon.de/en/llms/developer/sdk-tools/sdk-php/module.md) | Creates a string property |
```php
public function Create() {
//Never delete this line!
parent::Create();
$this->RegisterPropertyBoolean("EmulateStatus", true);
$this->RegisterPropertyFloat("Faktor", 0.5);
$this->RegisterPropertyInteger("DeviceID", 0);
$this->RegisterPropertyString("Text", "");
}
```
#### Attributes
Attributes are persistent data of a module, which are only set by the module itself and saved immediately. These are, for example, tokens for encrypted connections or saved values of a scene control.
| Function name | Brief description |
| --------------------------------------------------------------- | ----------------------------------------- |
| [ReadAttributeBoolean](https://www.symcon.de/en/llms/developer/sdk-tools/sdk-php/module.md) | Returns the value of a boolean attribute |
| [ReadAttributeFloat](https://www.symcon.de/en/llms/developer/sdk-tools/sdk-php/module.md) | Returns the value of a float attribute |
| [ReadAttributeInteger](https://www.symcon.de/en/llms/developer/sdk-tools/sdk-php/module.md) | Returns the value of an integer attribute |
| [ReadAttributeString](https://www.symcon.de/en/llms/developer/sdk-tools/sdk-php/module.md) | Returns the value of a string attribute |
| [RegisterAttributeBoolean](https://www.symcon.de/en/llms/developer/sdk-tools/sdk-php/module.md) | Creates a boolean attribute |
| [RegisterAttributeFloat](https://www.symcon.de/en/llms/developer/sdk-tools/sdk-php/module.md) | Creates a float attribute |
| [RegisterAttributeInteger](https://www.symcon.de/en/llms/developer/sdk-tools/sdk-php/module.md) | Creates an integer attribute |
| [RegisterAttributeString](https://www.symcon.de/en/llms/developer/sdk-tools/sdk-php/module.md) | Creates a string attribute |
| [WriteAttributeBoolean](https://www.symcon.de/en/llms/developer/sdk-tools/sdk-php/module.md) | Writes in a boolean attribute |
| [WriteAttributeFloat](https://www.symcon.de/en/llms/developer/sdk-tools/sdk-php/module.md) | Writes to a float attribute |
| [WriteAttributeInteger](https://www.symcon.de/en/llms/developer/sdk-tools/sdk-php/module.md) | Writes in an integer attribute |
| [WriteAttributeString](https://www.symcon.de/en/llms/developer/sdk-tools/sdk-php/module.md) | Writes to a string attribute |
__Example__
```php
public function Create() {
//Never delete this line!
parent::Create();
$this->RegisterAttributeBoolean("BoolAttr", true);
$this->RegisterAttributeInteger("IntAttr", 5);
$this->RegisterAttributeFloat("FloatAttr", 3.7);
$this->RegisterAttributeString("StrAttr", "lalala");
}
public function BumpAndShow() {
var_dump($this->ReadAttributeBoolean("BoolAttr"));
var_dump($this->ReadAttributeInteger("IntAttr"));
var_dump($this->ReadAttributeFloat("FloatAttr"));
var_dump($this->ReadAttributeString("StrAttr"));
$this->WriteAttributeBoolean("BoolAttr", !$this->ReadAttributeBoolean("BoolAttr"));
$this->WriteAttributeInteger("IntAttr", $this->ReadAttributeInteger("IntAttr")*2);
$this->WriteAttributeFloat("FloatAttr", $this->ReadAttributeFloat("FloatAttr")+0.1);
$this->WriteAttributeString("StrAttr", $this->ReadAttributeString("StrAttr") . "öäü");
}
```
#### Buffer
Buffers are non-persistent data of a module, which should only be managed by the module itself. These are, for example, incoming data records that are not transmitted in one, but arrive gradually and therefore have to be put together. These are only taken from the buffer and processed by the module when the data record is complete.
| Function name | Brief description |
| ---------------------------------------------------- | ------------------------------- |
| [GetBuffer](https://www.symcon.de/en/llms/developer/sdk-tools/sdk-php/module.md) | Returns the content of a buffer |
| [GetBufferList](https://www.symcon.de/en/llms/developer/sdk-tools/sdk-php/module.md) | Returns an array of all buffers |
| [SetBuffer](https://www.symcon.de/en/llms/developer/sdk-tools/sdk-php/module.md) | Creates a buffer |
__Example__
```php
public function ReceiveData($JSONString) {
//Decode JSONString
$data = json_decode($JSONString);
//Parse and write values to our buffer
$this->SetBuffer("Test", utf8_decode($data->Buffer));
//Print buffer
IPS_LogMessage("IOTest", $this->GetBuffer("Test"));
}
```
#### Status Variables
Status variables are persistent data of a module, which can be changed by the module at any time. These are visible in the object tree and are available for further processing and display in the [Visualizations](https://www.symcon.de/en/llms/modules/index.md). Status variables are, for example, sensor values, actuator values to be displayed on the WebFront and status values for further processing.
| Function name | Brief description |
| -------------------------------------------------------------- | ----------------------------------- |
| [DisableAction](https://www.symcon.de/en/llms/developer/sdk-tools/sdk-php/module.md) | Disables the default action |
| [EnableAction](https://www.symcon.de/en/llms/developer/sdk-tools/sdk-php/module.md) | Activates the default action |
| [GetValue](https://www.symcon.de/en/llms/developer/sdk-tools/sdk-php/module.md) | Returns the value of a variable |
| [SetValue](https://www.symcon.de/en/llms/developer/sdk-tools/sdk-php/module.md) | Sets the value of a variable |
| [MaintainAction](https://www.symcon.de/en/llms/developer/sdk-tools/sdk-php/module.md) | Calls DisableAction or EnableAction |
| [MaintainVariable](https://www.symcon.de/en/llms/developer/sdk-tools/sdk-php/module.md) | Configures a status variable |
| [RegisterVariableBoolean](https://www.symcon.de/en/llms/developer/sdk-tools/sdk-php/module.md) | Creates a Boolean status variable |
| [RegisterVariableFloat](https://www.symcon.de/en/llms/developer/sdk-tools/sdk-php/module.md) | Creates a float status variable |
| [RegisterVariableInteger](https://www.symcon.de/en/llms/developer/sdk-tools/sdk-php/module.md) | Creates an integer status variable |
| [RegisterVariableString](https://www.symcon.de/en/llms/developer/sdk-tools/sdk-php/module.md) | Creates a string status variable |
| [RequestAction](https://www.symcon.de/en/llms/developer/sdk-tools/sdk-php/module.md) | Sets the value of a status variable |
| [UnregisterVariable](https://www.symcon.de/en/llms/developer/sdk-tools/sdk-php/module.md) | Deletes a status variable |
__Example__
```php
public function Create() {
//Never delete this line!
parent::Create();
// Variables
$this->RegisterVariableString("TextData", "TextData", "");
IPS_SetHidden($this->GetIDForIdent("TextData"), true);
$this->RegisterVariableString("SimulationView", "SimulationView", "~HTMLBox");
$this->RegisterVariableInteger("SimulationCounter", "SimulationCounter" , "");
$this->RegisterVariableFloat("Factor", "Zoom Factor Wall Display", "Factor.Display");
$this->RegisterVariableBoolean("Active", "Simulation active", "~Switch");
$this->EnableAction("Active");
}
```
## HTML-SDK
Source: https://www.symcon.de/en/service/documentation/developer-area/sdk-tools/sdk-php/html-sdk/
_Requires Symcon >= 7.1_
### Description
The HTML SDK enables PHP modules to use an individual [object presentation](https://www.symcon.de/en/llms/components/object-presentation.md). This presentation allows full flexibility thanks to HTML. Messages between the HTML presentation and the module can be used to update the presentation at runtime or to inform the module about user interaction.
### Use HTML as presentation
If the HTML SDK is to be used, the visualization must be activated with the function [SetVisualizationType](https://www.symcon.de/en/llms/developer/sdk-tools/sdk-php/module.md). If the tile is then to be displayed in the visualization, the function [GetVisualizationTile](https://www.symcon.de/en/llms/developer/sdk-tools/sdk-php/module.md) is used to return the HTML content.
### Translation
Analogous to [configuration forms](https://www.symcon.de/en/llms/developer/sdk-tools/sdk-php/configuration-forms.md), the texts of the HTML elements of the visualization are also [localized](https://www.symcon.de/en/llms/developer/sdk-tools/sdk-php.md) based on the user's language.
### Icons
The [Symcon icons](https://www.symcon.de/en/llms/components/icons.md) can be used within the HTML presentation by loading the icons.js as script:
```php
```
When the script is included, icons can be shown as explained in the [documentation of Font Awesome](https://docs.fontawesome.com/web/add-icons/how-to). All icons that can be used normally in Symcon can be used as well. The Classic icons in the style Light can be used via CSS class fa-light while the Brands icons are used via class fa-brands. The custom icons can be used via class fa-kit.
### messages
The function [GetVisualizationTile](https://www.symcon.de/en/llms/developer/sdk-tools/sdk-php/module.md) is initially called once. If the display is to be adjusted at runtime, this must be done via messages. Alternatively, messages enable a channel from the visualization to the module in order to switch variables or perform other interactions.
> **Note:** It is also possible to realize a comparable communication via a [HTML-Box](https://www.symcon.de/en/llms/components/object-presentation.md). However, on the one hand, this is quite complex and, on the other hand, involves the risk of creating security gaps that could be exploited. In comparison, communication via HTML SDK is secured in both directions with the visualization password.
#### Module to visualization
If a message is to be sent from the module to the visualization, the function [UpdateVisualizationValue](https://www.symcon.de/en/llms/developer/sdk-tools/sdk-php/module.md) must be used in the module. In order to receive and process the content of this message in the display, the function [handleMessage](https://www.symcon.de/en/llms/developer/sdk-tools/sdk-php.md) must be implemented via JavaScript. This function receives the content that the content that was sent with UpdateVisualizationTile exactly as input. The format of this data is absolutely free and should be selected to suit the module.
#### Visualization for module
The visualization can use the function [requestAction](https://www.symcon.de/en/llms/developer/sdk-tools/sdk-php.md) via JavaScript. In return, this function executes the PHP function [RequestAction](https://www.symcon.de/en/llms/developer/sdk-tools/sdk-php/module.md) on the module side, allowing the module to respond to the message.
### Special functions in JavaScript
The HTML SDK offers a range of functions that can be used within the display via JavaScript.
| Function | Description |
| --------------------------------------------------- | ----------------------------------------------------------------- |
| [handleMessage](https://www.symcon.de/en/llms/developer/sdk-tools/sdk-php.md) | This function must be defined to receive messages from the module |
| [requestAction](https://www.symcon.de/en/llms/developer/sdk-tools/sdk-php.md) | This function sends a message to the module |
| [translate](https://www.symcon.de/en/llms/developer/sdk-tools/sdk-php.md) | Translates text based on localization |
| [translateHTML](https://www.symcon.de/en/llms/developer/sdk-tools/sdk-php.md) | Translates the text of HTML elements based on the localization |
### Webinar and examples
At the time of publication, the functionality of the HTML SDK was presented in a webinar on [YouTube](https://www.youtube.com/live/-dIHZRYbqpA?si=7QozwcUIwyK8l4zB).
Some sample implementations can also be viewed and tried out in our test repository:
| Example | Description |
| ---------------------------------------------------------------------------------------------------- | --------------------------------------------------------------------- |
| [Duck counter](https://github.com/symcon/SymconTest/tree/master/HTMLVisuTestDuckCounters) | A small counter with detailed comments |
| [Heat pump](https://github.com/symcon/SymconTest/tree/master/HTMLVisuTestHeatingPump) | A complex and extensive example for the representation of a heat pump |
## handleMessage
Source: https://www.symcon.de/en/service/documentation/developer-area/sdk-tools/sdk-php/html-sdk/handlemessage/
`void handleMessage(mixed Data)`
_Requires Symcon >= 7.1_
This function must be defined to receive messages from the module
**Parameters**
- `Data` (mixed): Any data
**Returns** (void): No return
Any data
**Example**
```text
function handleMessage(data) {
// In this example, data simply contains text that may be translated and displayed
document.getElementById('info').textContent = translate(data);
}
```
## openObject
Source: https://www.symcon.de/en/service/documentation/developer-area/sdk-tools/sdk-php/html-sdk/openobject/
`void openObject(int ObjectID)`
_Requires Symcon >= 8.2_
**Parameters**
- `ObjectID` (int): The ID of the object to be opened.
**Returns** (void): No return
The ID of the object to be opened.
**Example**
```js
// Opens the object with the ID 12345
openObject(12345);
```
## requestAction
Source: https://www.symcon.de/en/service/documentation/developer-area/sdk-tools/sdk-php/html-sdk/requestaction/
`void requestAction(string Ident, mixed Value)`
_Requires Symcon >= 7.1_
**Parameters**
- `Ident` (string): An ident
- `Value` (mixed): A value
**Returns** (void): No return
A value
**Example**
```js
// Set counter to 5
requestAction('Counter', 5);
```
## translate
Source: https://www.symcon.de/en/service/documentation/developer-area/sdk-tools/sdk-php/html-sdk/translate/
`string translate(string Original)`
_Requires Symcon >= 7.1_
Translates text based on localization
**Parameters**
- `Original` (string): The original English text to be translated
**Returns** (string): The translated text
The original English text to be translated
**Example**
```js
// Output the translated text to the console
console.log(translate('Hallo Welt'));
```
## translateHTML
Source: https://www.symcon.de/en/service/documentation/developer-area/sdk-tools/sdk-php/html-sdk/translatehtml/
`void translateHTML(object Node)`
_Requires Symcon >= 7.1_
Translates the text of HTML elements based on the localization
**Parameters**
- `Node` (object): An HTML element
**Returns** (void): No return
An HTML element
**Example**
```js
// Übersetze Inhalt des Textblockes 'info'
translateHTML(document.getElementById('info'));
```
## Constants
Source: https://www.symcon.de/en/service/documentation/developer-area/sdk-tools/sdk-php/constants/
_Requires Symcon >= 5.1_
### Constants
| Define | Description |
| ----------------------------------------------------------------- | -------------------------------------------- |
| EVENTCONDITIONCOMPARISON | Comparison conditions for conditional events |
| EVENTCYCLICDATETYPE | Date type for cyclical event |
| EVENTCYCLICTIMETYPE | Time type of the event |
| EVENTTRIGGERTYPE | Trigger type for triggered event |
| EVENTTYPE | Type of event |
| MEDIATYPE | Type of mediainstance |
| MODULETYPE | Type of module |
| OBJECTTYPE | Type of object |
| SCRIPTTYPE | Type of script |
| VARIABLETYPE | Type of variable |
#### EventConditionComparison
Comparison conditions for conditional events
| Constant | Value | Description |
| --------------------------------------- | ----- | ---------------- |
| EVENTCONDITIONCOMPARISON_EQUAL | 0 | Equal |
| EVENTCONDITIONCOMPARISON_NOTEQUAL | 1 | Not equal |
| EVENTCONDITIONCOMPARISON_GREATER | 2 | Greater |
| EVENTCONDITIONCOMPARISON_GREATEROREQUAL | 3 | Greater or equal |
| EVENTCONDITIONCOMPARISON_SMALLER | 4 | Smaller |
| EVENTCONDITIONCOMPARISON_SMALLEROREQUAL | 5 | Smaller or equal |
#### EventCyclicDateType
Date type for cyclical event
| Constant | Value | Description |
| ------------------------- | ----- | ------------ |
| EVENTCYCLICDATETYPE_NONE | 0 | No date type |
| EVENTCYCLICDATETYPE_ONCE | 1 | Once |
| EVENTCYCLICDATETYPE_DAY | 2 | Daily |
| EVENTCYCLICDATETYPE_WEEK | 3 | Weekly |
| EVENTCYCLICDATETYPE_MONTH | 4 | Monthly |
| EVENTCYCLICDATETYPE_YEAR | 5 | Yearly |
#### EventCyclicTimeType
Time type of the event
| Constant | Value | Description |
| -------------------------- | ----- | ----------- |
| EVENTCYCLICTIMETYPE_ONCE | 0 | Once |
| EVENTCYCLICTIMETYPE_SECOND | 1 | Secondly |
| EVENTCYCLICTIMETYPE_MINUTE | 2 | Minutely |
| EVENTCYCLICTIMETYPE_HOUR | 3 | Hourly |
#### EventTriggerType
Trigger type for triggered event
| Constant | Value | Description |
| ------------------------------ | ----- | ------------------------------ |
| EVENTTRIGGERTYPE_ONUPDATE | 0 | If the variable is updated |
| EVENTTRIGGERTYPE_ONCHANGE | 1 | If the variable is changed |
| EVENTTRIGGERTYPE_ONLIMITEXCEED | 2 | If the limit value is exceeded |
| EVENTTRIGGERTYPE_ONLIMITDROP | 3 | If the limit value is exceeded |
| EVENTTRIGGERTYPE_ONVALUE | 4 | At a certain value |
#### EventType
Type of event
| Constant | Value | Description |
| ------------------ | ----- | --------------- |
| EVENTTYPE_TRIGGER | 0 | Triggered event |
| EVENTTYPE_CYCLIC | 1 | Cyclical event |
| EVENTTYPE_SCHEDULE | 2 | Schedule event |
#### MediaType
Type of mediainstance
| Constant | Value | Description |
| ------------------ | ----- | ----------- |
| MEDIATYPE_IPSVIEW | 0 | IPSView |
| MEDIATYPE_IMAGE | 1 | Image |
| MEDIATYPE_SOUND | 2 | Sound |
| MEDIATYPE_STREAM | 3 | Stream |
| MEDIATYPE_CHART | 4 | Chart |
| MEDIATYPE_DOCUMENT | 5 | Document |
#### ModuleType
Type of module
| Constant | Value | Description |
| ------------------------ | ----- | ------------- |
| MODULETYPE_CORE | 0 | Core |
| MODULETYPE_IO | 1 | I/O |
| MODULETYPE_SPLITTER | 2 | Splitter |
| MODULETYPE_DEVICE | 3 | Device |
| MODULETYPE_CONFIGURATOR | 4 | Configurator |
| MODULETYPE_DISCOVERY | 5 | Discovery |
| MODULETYPE_VISUALIZATION | 6 | Visualization |
#### ObjectType
Type of object
| Constant | Value | Description |
| ------------------- | ----- | ----------- |
| OBJECTTYPE_CATEGORY | 0 | Category |
| OBJECTTYPE_INSTANCE | 1 | Instance |
| OBJECTTYPE_VARIABLE | 2 | Variable |
| OBJECTTYPE_SCRIPT | 3 | Script |
| OBJECTTYPE_EVENT | 4 | Event |
| OBJECTTYPE_MEDIA | 5 | Media |
| OBJECTTYPE_LINK | 6 | Link |
#### ScriptType
Type of script
| Constant | Value | Description |
| ---------------------- | ----- | ----------- |
| SCRIPTTYPE_PHP | 0 | PHP-Script |
| SCRIPTTYPE_FLOW | 1 | Flow Script |
| SCRIPTTYPE_IPSWORKFLOW | 2 | IPSWorkflow |
#### VariableType
Type of variable
| Constant | Value | Description |
| -------------------- | ----- | ----------- |
| VARIABLETYPE_BOOLEAN | 0 | Boolean |
| VARIABLETYPE_INTEGER | 1 | Integer |
| VARIABLETYPE_FLOAT | 2 | Float |
| VARIABLETYPE_STRING | 3 | String |
#### Presentations
| GUID | Konstante | Name |
| -------------------------------------- | ---------------------------------------- | --------------------------------------------------------- |
| {6B9CAEEC-5958-C223-30F7-BD36569FC57A} | VARIABLE_PRESENTATION_SLIDER | [Slider](https://www.symcon.de/en/llms/components/object-presentation.md) |
| {4153A8D4-5C33-C65F-C1F3-7B61AAF99B1C} | VARIABLE_PRESENTATION_LEGACY | [Legacy-Profile](https://www.symcon.de/en/llms/components/object-presentation.md) |
| {3319437D-7CDE-699D-750A-3C6A3841FA75} | VARIABLE_PRESENTATION_VALUE_PRESENTATION | [Value Presentation](https://www.symcon.de/en/llms/components/object-presentation.md) |
| {6F477326-1683-A2FD-D2E7-477F366ECB62} | VARIABLE_PRESENTATION_VALUE_INPUT | [Value Input](https://www.symcon.de/en/llms/components/object-presentation.md) |
| {9DE1D610-5106-97FB-714D-1AADEDF8377A} | VARIABLE_PRESENTATION_WEB_CONTENT | [Web Content](https://www.symcon.de/en/llms/components/object-presentation.md) |
| {05CC3CC2-A0B2-5837-A4A7-A07EA0B9DDFB} | VARIABLE_PRESENTATION_COLOR | [Color](https://www.symcon.de/en/llms/components/object-presentation.md) |
| {497C4845-27FA-6E4F-AE37-5D951D3BDBF9} | VARIABLE_PRESENTATION_DATE_TIME | [Date/Time](https://www.symcon.de/en/llms/components/object-presentation.md) |
| {60AE6B26-B3E2-BDB1-A3A1-BE232940664B} | VARIABLE_PRESENTATION_SWITCH | [Switch](https://www.symcon.de/en/llms/components/object-presentation.md) |
| {6075FC22-69AF-B110-3749-C24138883082} | VARIABLE_PRESENTATION_SHUTTER | [Shuttere](https://www.symcon.de/en/llms/components/object-presentation.md) |
| {52D9E126-D7D2-2CBB-5E62-4CF7BA7C5D82} | VARIABLE_PRESENTATION_ENUMERATION | [Enumeration](https://www.symcon.de/en/llms/components/object-presentation.md) |
| {08A6AF76-394E-D354-48D5-BFC690488E4E} | VARIABLE_PRESENTATION_DURATION | [Duration](https://www.symcon.de/en/llms/components/object-presentation.md) |
#### Templates
| GUID | Konstante | Name |
| -------------------------------------- | ----------------------------------------------------- | -------------------------------------------------------- |
| {B4C70F3E-6613-DA1A-7279-5DEE8DEB1B24} | VARIABLE_TEMPLATE_DATE | [Date](https://www.symcon.de/en/llms/components/object-presentation.md) |
| {362DA268-56A2-E771-5E53-17E38B5D82E6} | VARIABLE_TEMPLATE_TIME | [Time](https://www.symcon.de/en/llms/components/object-presentation.md) |
| {BB0E9933-0403-BD3A-D1C9-255646934B00} | VARIABLE_TEMPLATE_DATE_TIME | [Datum/Uhrzeit](https://www.symcon.de/en/llms/components/object-presentation.md) |
| {868B087E-A38D-2155-EBE0-157AFBBF9E8C} | VARIABLE_TEMPLATE_SLIDER_ROOM_TEMPERATURE | [Room Temperature](https://www.symcon.de/en/llms/components/object-presentation.md) |
| {66062309-21A9-26C0-213F-775C52E1473B} | VARIABLE_TEMPLATE_SLIDER_COLOR_TEMPERATURE | [Color Temperature](https://www.symcon.de/en/llms/components/object-presentation.md) |
| {BC799412-0C66-551F-CAEC-7566F5D52BD9} | VARIABLE_TEMPLATE_SLIDER_ENERGY | [Energy](https://www.symcon.de/en/llms/components/object-presentation.md) |
| {8EC19DF0-89FB-A77E-ED7D-047A949CF292} | VARIABLE_TEMPLATE_SLIDER_POWER | [Power](https://www.symcon.de/en/llms/components/object-presentation.md) |
| {3BE75DE9-7D84-C082-2E77-9ED3AEE04D63} | VARIABLE_TEMPLATE_SHUTTER_LAMELLA_RIGHT | [Lamella right](https://www.symcon.de/en/llms/components/object-presentation.md) |
| {22A0DF9C-C200-154A-641B-3A3CB096DB6D} | VARIABLE_TEMPLATE_SHUTTER_LAMELLA_LEFT | [Lamella left](https://www.symcon.de/en/llms/components/object-presentation.md) |
| {90AF8F8F-183F-BBFD-E078-35FAB6DCFE4F} | VARIABLE_TEMPLATE_VALUE_PRESENTATION_ROOM_TEMPERATURE | [Room Temperature](https://www.symcon.de/en/llms/components/object-presentation.md) |
| {2FED3D39-073D-6037-901B-2586A1AB5569} | VARIABLE_TEMPLATE_VALUE_PRESENTATION_POWER | [Power](https://www.symcon.de/en/llms/components/object-presentation.md) |
| {C899FCFA-063E-897E-9DA4-28ADD278EED5} | VARIABLE_TEMPLATE_VALUE_PRESENTATION_ENERGY | [Energy](https://www.symcon.de/en/llms/components/object-presentation.md) |
| {7BD38CF5-07F2-5B5B-8F7F-15398B823BFC} | VARIABLE_TEMPLATE_VALUE_PRESENTATION_BATTERY | [Battery](https://www.symcon.de/en/llms/components/object-presentation.md) |
| {C90EF36A-165E-D0B0-032C-F468F483D42B} | VARIABLE_TEMPLATE_VALUE_PRESENTATION_BATTERY_COLOR | [Battery (Color)](https://www.symcon.de/en/llms/components/object-presentation.md) |
| {0C711895-2F8E-DBFE-1700-84173491D229} | VARIABLE_TEMPLATE_COLOR_RAINBOW | [Rainbow](https://www.symcon.de/en/llms/components/object-presentation.md) |
| {A7467E68-5C39-5BD9-C0C8-BCE6004FEEAA} | VARIABLE_TEMPLATE_COLOR_FOREST | [Forest](https://www.symcon.de/en/llms/components/object-presentation.md) |
#### InstanceStatus
The status of an instance
| Constant | Value | Description |
| ------------- | ----- | ------------------------- |
| IS_CREATING | 101 | Instance is being created |
| IS_ACTIVE | 102 | Instance is active |
| IS_DELETING | 103 | Instance is being deleted |
| IS_INACTIVE | 104 | Instance is inactive |
| IS_NOTCREATED | 105 | Instance was not created |
| IS_STANDBY | 106 | Instance is in standby |
#### Visualization Types
since 9.1
| Constant | Value | Description |
| ------------------------------------------- | ----- | ------------------------------------------------------------------------- |
| INSTANCE_VISUALIZATION_TYPE_NONE | 0 | The instance does not use its own visualization |
| INSTANCE_VISUALIZATION_TYPE_HTML | 1 | The instance uses an HTML visualization |
| INSTANCE_VISUALIZATION_TYPE_HTML_FULLSCREEN | 2 | The instance uses an HTML visualization for normal and opened tile |
## Localizations
Source: https://www.symcon.de/en/service/documentation/developer-area/sdk-tools/sdk-php/localizations/
_Requires Symcon >= 4.1_
The JSON file "locale.json" contains the translations for "label" and "caption" of the configuration page. Graduated language abbreviations are also possible here. For example, "de_DE" or "de_AT" can also be used.
### Examples
__Basic structure of the JSON file__
The language abbreviations indicate into which language the translation is to be carried out
```php
{
"translations": {
"de": {
"Word to be translated 1": "Translation into German - Word 1",
"Word to be translated 2": "Translation into German - Word 2"
},
"de_DE": {
"Word to be translated 1": "Translation into German - Word 1",
"Word to be translated 2": "Translation into German - Word 2"
},
"de_CH": {
"Word to be translated 1": "Translation into Swiss German - word 1",
"Word to be translated 2": "Translation into Swiss German - word 2"
}
}
}
```
__Complete example using an SMS module (see example [configuration forms](https://www.symcon.de/en/llms/developer/sdk-tools/sdk-php/configuration-forms.md) )__
```php
{
"translations": {
"de": {
"Username": "Benutzername",
"Password": "Passwort",
"Sender": "Absender",
"Type": "Typ",
"Combi-SMS": "Kombi-SMS",
"Number": "Nummer",
"Message": "Nachricht",
"Send Message": "Sende Nachricht",
"Read Balance": "Frage Guthaben ab",
"Login information valid": "Logindaten sind gültig",
"Authentication failed": "Authentifizierung ist fehlgeschlagen",
"No credits left": "Kein Guthaben vorhanden"
}
}
}
```
## Messages
Source: https://www.symcon.de/en/service/documentation/developer-area/sdk-tools/sdk-php/messages/
_Requires Symcon >= 4.1_
### Description
All messages have their own ID, which describes the type of message.
This is a five-digit number and is made up as follows:
Base + category + type = total value
> **Note:** With version 5.0 and above the values are available as constants automatically
### Overview of all MessageIDs
### Message base
Messages from IP-Symcon have the value base 10000, those from module instances (still undocumented) have the value base 20000.
| Define | Value | Description |
| ------------- | ----- | ------------------------- |
| IPS_BASE | 10000 | Value base for the kernel |
| IPS_MODULBASE | 20000 | Value base for modules |
### Message Categories
| Define | Value | Description |
| -------------------------------------------------------- | ----- | ---------------- |
| [IPS_BASE](https://www.symcon.de/./#IPS_BASE) | 0 | Service messages |
| [IPS_KERNELMESSAGE](https://www.symcon.de/./#IPS_KERNELMESSAGE) | 100 | Kernel Manager |
| [IPS_LOGMESSAGE](https://www.symcon.de/./#IPS_LOGMESSAGE) | 200 | Message Manager |
| [IPS_MODULEMESSAGE](https://www.symcon.de/./#IPS_MODULEMESSAGE) | 300 | Module Manager |
| [IPS_OBJECTMESSAGE](https://www.symcon.de/./#IPS_OBJECTMESSAGE) | 400 | Object Manager |
| [IPS_INSTANCEMESSAGE](https://www.symcon.de/./#IPS_INSTANCEMESSAGE) | 500 | Instance Manager |
| [IPS_SEARCHMESSAGE](https://www.symcon.de/./#IPS_SEARCHMESSAGE) | 510 | Search Manager |
| [IPS_VARIABLEMESSAGE](https://www.symcon.de/./#IPS_VARIABLEMESSAGE) | 600 | Variable Manager |
| [IPS_SCRIPTMESSAGE](https://www.symcon.de/./#IPS_SCRIPTMESSAGE) | 700 | Script Manager |
| [IPS_EVENTMESSAGE](https://www.symcon.de/./#IPS_EVENTMESSAGE) | 800 | Event Manager |
| [IPS_MEDIAMESSAGE](https://www.symcon.de/./#IPS_MEDIAMESSAGE) | 900 | Media Manager |
| [IPS_LINKMESSAGE](https://www.symcon.de/./#IPS_LINKMESSAGE) | 1000 | Link Manager |
| [IPS_FLOWMESSAGE](https://www.symcon.de/./#IPS_FLOWMESSAGE) | 1100 | Flow Manager |
| [IPS_ENGINEMESSAGE](https://www.symcon.de/./#IPS_ENGINEMESSAGE) | 1200 | Script Engine |
| [IPS_PROFILEMESSAGE](https://www.symcon.de/./#IPS_PROFILEMESSAGE) | 1300 | Profile Pool |
| [IPS_TIMERMESSAGE](https://www.symcon.de/./#IPS_TIMERMESSAGE) | 1400 | Timer Pool |
| [IPS_ACTIONMESSAGE](https://www.symcon.de/./#IPS_ACTIONMESSAGE) | 1500 | Action Pool |
| [IPS_LICENSEMESSAGE](https://www.symcon.de/./#IPS_LICENSEMESSAGE) | 1600 | License Pool |
### Message types
#### IPS_BASE
Value base 0
| Define | Value | Total value | Description |
| --------------------------- | ----- | ----------- | ---------------------------------------------------- |
| IPS_KERNELSTARTED (ab 4.2) | 1 | 10001 | Is sent after KR_READY and processed synchronously |
| IPS_KERNELSHUTDOWN (ab 4.2) | 2 | 10002 | Is sent before KR_UNINIT and processed synchronously |
#### IPS_KERNELMESSAGE
Value base 100
| Define | Value | Total value | Description |
| ----------- | ----- | ----------- | --------------------------------------------------------------------------- |
| KR_CREATE | 1 | 10101 | Kernel was created |
| KR_INIT | 2 | 10102 | Kernel components are initialized, modules are loaded and settings are read |
| KR_READY | 3 | 10103 | Kernel is ready and running |
| KR_UNINIT | 4 | 10104 | "Shutdown"-command received, finalize everything loaded |
| KR_SHUTDOWN | 5 | 10105 | Finalization complete, remove kernel |
#### IPS_LOGMESSAGE
Value base 200
| Define | Value | Total value | Description |
| ---------- | ----- | ----------- | ------------------- |
| KL_MESSAGE | 1 | 10201 | Normal message |
| KL_SUCCESS | 2 | 10202 | Success |
| KL_NOTIFY | 3 | 10203 | Change Notification |
| KL_WARNING | 4 | 10204 | Warning |
| KL_ERROR | 5 | 10205 | Error Message |
| KL_DEBUG | 6 | 10206 | Debug Information |
| KL_CUSTOM | 7 | 10207 | Other Messages |
#### IPS_MODULEMESSAGE
Value base 300
| Define | Value | Total value | Description |
| --------- | ----- | ----------- | --------------- |
| ML_LOAD | 1 | 10301 | Module loaded |
| ML_UNLOAD | 2 | 10302 | Module unloaded |
#### IPS_OBJECTMESSAGE
Value base 400
| Define | Value | Total value | Description |
| ----------------- | ----- | ----------- | ------------------------------ |
| OM_REGISTER | 1 | 10401 | Object created |
| OM_UNREGISTER | 2 | 10402 | Object removed |
| OM_CHANGEPARENT | 3 | 10403 | Parent object has changed |
| OM_CHANGENAME | 4 | 10404 | Name has changed |
| OM_CHANGEINFO | 5 | 10405 | Description has changed |
| OM_CHANGETYPE | 6 | 10406 | Type has changed |
| OM_CHANGESUMMARY | 7 | 10407 | Short information has changed |
| OM_CHANGEPOSITION | 8 | 10408 | Type has changed |
| OM_CHANGEREADONLY | 9 | 10409 | "Read-only" status has changed |
| OM_CHANGEHIDDEN | 10 | 10410 | Visibility has changed |
| OM_CHANGEICON | 11 | 10411 | Icon has changed |
| OM_CHILDADDED | 12 | 10412 | Child added |
| OM_CHILDREMOVED | 13 | 10413 | Child removed |
| OM_CHANGEIDENT | 14 | 10414 | Ident has changed |
| OM_CHANGEDISABLED | 15 | 10415 | Usability has changed |
| OM_CHANGELOCKED | 16 | 10416 | Locked was Changed |
#### IPS_INSTANCEMESSAGE
Value base 500
| Define | Value | Total value | Description |
| ------------------ | ----- | ----------- | -------------------------------------- |
| IM_CREATE | 1 | 10501 | Instance created |
| IM_DELETE | 2 | 10502 | Instance removed |
| IM_CONNECT | 3 | 10503 | Instance interface available |
| IM_DISCONNECT | 4 | 10504 | Instance interface no longer available |
| IM_CHANGESTATUS | 5 | 10505 | Status has changed |
| IM_CHANGESETTINGS | 6 | 10506 | Settings have changed |
| IM_CHANGEATTRIBUTE | 7 | 10507 | Attribute has changed |
| IM_ADDATTRIBUTE | 8 | 10508 | Attribute added |
| IM_REMOVEATTRIBUTE | 9 | 10509 | Attribute removed |
#### IPS_SEARCHMESSAGE
Value base 510
| Define | Value | Total value | Description |
| --------------- | ----- | ----------- | ---------------------- |
| IM_SEARCHSTART | 1 | 10511 | Search started |
| IM_SEARCHSTOP | 2 | 10512 | Search stopped |
| IM_SEARCHUPDATE | 3 | 10513 | Search has new results |
#### IPS_FORMMESSAGE
Value base 520
| Define | Value | Total value | Description |
| ------------------ | ----- | ----------- | ---------------------------- |
| IM_FORMFIELDCREATE | 1 | 10521 | Create new form field |
| IM_FORMFIELDDELETE | 2 | 10522 | Delete existing form field |
| IM_FORMFIELDUPDATE | 3 | 10523 | Updating existing form field |
| IM_FORMRELOAD | 4 | 10524 | Reload form |
#### IPS_VARIABLEMESSAGE
Value base 600
| Define | Value | Total value | Description |
| ---------------------- | ----- | ----------- | -------------------------------------- |
| VM_CREATE | 1 | 10601 | Variable was created |
| VM_DELETE | 2 | 10602 | Variable was removed |
| VM_UPDATE | 3 | 10603 | Variable was updated |
| VM_CHANGEPROFILENAME | 4 | 10604 | Variable profile name has been changed |
| VM_CHANGEPROFILEACTION | 5 | 10605 | Variable profile action was changed |
| VM_CHANGEDLOCKED | 6 | 10606 | Locked was Changed |
#### IPS_SCRIPTMESSAGE
Value base 700
| Define | Value | Total value | Description |
| ------------- | ----- | ----------- | ------------------------------- |
| SM_CREATE | 1 | 10701 | Script was created |
| SM_DELETE | 2 | 10702 | Script was removed |
| SM_CHANGEFILE | 3 | 10703 | Script was attached to file |
| SM_BROKEN | 4 | 10704 | Script error status has changed |
| SM_UPDATE | 5 | 10704 | Script was updated |
#### IPS_EVENTMESSAGE
Value base 800
| Define | Value | Total value | Description |
| ---------------------------------- | ----- | ----------- | ---------------------------------------------------------- |
| EM_CREATE | 1 | 10801 | Event was created |
| EM_DELETE | 2 | 10802 | Event was removed |
| EM_UPDATE | 3 | 10803 | Event was updated |
| EM_CHANGEACTIVE | 4 | 10804 | Event activation has changed |
| EM_CHANGELIMIT | 5 | 10805 | Event call limit has changed |
| EM_CHANGESCRIPT | 6 | 10806 | Event script content has changed |
| EM_CHANGETRIGGER | 7 | 10807 | Event trigger has changed |
| EM_CHANGETRIGGERVALUE | 8 | 10808 | Event limit has changed |
| EM_CHANGETRIGGEREXECUTION | 9 | 10809 | Event limit triggering has changed |
| EM_CHANGECYCLIC | 10 | 10810 | Cyclic event has changed |
| EM_CHANGECYCLICDATEFROM | 11 | 10811 | Start date has changed |
| EM_CHANGECYCLICDATETO | 12 | 10812 | End date has changed |
| EM_CHANGECYCLICTIMEFROM | 13 | 10813 | Start time has changed |
| EM_CHANGECYCLICTIMETO | 14 | 10814 | End time has changed |
| EM_ADDSCHEDULEACTION | 15 | 10815 | Entry in the action table of the schedule has been added |
| EM_REMOVESCHEDULEACTION | 16 | 10816 | Entry in the action table of the schedule has been removed |
| EM_CHANGESCHEDULEACTION | 17 | 10817 | Entry in the action table of the schedule has changed |
| EM_ADDSCHEDULEGROUP | 18 | 10818 | Group of the schedule days was added |
| EM_REMOVESCHEDULEGROUP | 19 | 10819 | Group of the schedule days has been removed |
| EM_CHANGESCHEDULEGROUP | 20 | 10820 | Group of the schedule days has changed |
| EM_ADDSCHEDULEGROUPPOINT | 21 | 10821 | Switching point of a group has been added |
| EM_REMOVESCHEDULEGROUPPOINT | 22 | 10822 | Switching point of a group has been removed |
| EM_CHANGESCHEDULEGROUPPOINT | 23 | 10823 | The switching point of a group has changed |
| EM_ADDCONDITION | 24 | 10824 | Condition was added |
| EM_REMOVECONDITION | 25 | 10825 | Condition was removed |
| EM_CHANGECONDITION | 26 | 10826 | Condition has changed |
| EM_ADDCONDITIONVARIABLERULE | 27 | 10827 | Condition variable rule has been added |
| EM_REMOVECONDITIONVARIABLERULE | 28 | 10828 | Variable rule of the condition has been removed |
| EM_CHANGECONDITIONVARIABLERULE | 29 | 10829 | Variable rule of the condition has changed |
| EM_ADDCONDITIONDATERULE | 30 | 10830 | Date rule of condition was added |
| EM_REMOVECONDITIONDATERULE | 31 | 10831 | Date rule of condition was added |
| EM_CHANGECONDITIONDATERULE | 32 | 10832 | Condition date rule has changed |
| EM_ADDCONDITIONTIMERULE | 33 | 10833 | Condition time rule was added |
| EM_REMOVECONDITIONTIMERULE | 34 | 10834 | Time rule of the condition has been removed |
| EM_CHANGECONDITIONTIMERULE | 35 | 10835 | Time rule of the condition has changed |
| EM_ADDCONDITIONDAYOFTHEWEEKRULE | 36 | 10836 | Day of the week rule was added |
| EM_REMOVECONDITIONDAYOFTHEWEEKRULE | 37 | 10837 | Day of the week rule of the condition has been removed |
| EM_CHANGECONDITIONDAYOFTHEWEEKRULE | 38 | 10838 | Day of the week rule of the condition has changed |
#### IPS_MEDIAMESSAGE
Value base 900
| Define | Value | Total value | Description |
| --------------- | ----- | ----------- | ----------------------------------------------- |
| MM_CREATE | 1 | 10901 | Media object was created |
| MM_DELETE | 2 | 10902 | Media object has been removed |
| MM_CHANGEFILE | 3 | 10903 | Media asset file has changed |
| MM_AVAILABLE | 4 | 10904 | The availability of the media asset has changed |
| MM_UPDATE | 5 | 10905 | Media asset has been updated |
| MM_CHANGECACHED | 6 | 10906 | Media object cache option has changed |
#### IPS_LINKMESSAGE
Value base 1000
| Define | Value | Total value | Description |
| --------------- | ----- | ----------- | --------------------------------------- |
| LM_CREATE | 1 | 11001 | Link was created |
| LM_DELETE | 2 | 11002 | Link was removed |
| LM_CHANGETARGET | 3 | 11003 | The destination of the link has changed |
#### IPS_FLOWMESSAGE
Value base 1100
| Define | Value | Total value | Description |
| --------------- | ----- | ----------- | ----------------------------------------------- |
| FM_CONNECT | 1 | 11101 | Instance has been connected |
| FM_DISCONNECT | 2 | 11102 | Instance was disconnected |
| FM_CHILDADDED | 3 | 11103 | Child instance was connected to this instance |
| FM_CHILDREMOVED | 4 | 11104 | Child instance was separated from this instance |
#### IPS_ENGINEMESSAGE
Value base 1200
| Define | Value | Total value | Description |
| ------------- | ----- | ----------- | --------------------------------------------------------------- |
| SE_UPDATE | 1 | 11201 | Script engine was reloaded |
| SE_EXECUTE | 2 | 11202 | Script was executed |
| SE_RUNNING | 3 | 11203 | Script is running |
| SE_FLOWSCRIPT | 4 | 11204 | On FlowScript Status (either all steps finished or was aborted) |
#### IPS_PROFILEMESSAGE
Value base 1300
| Define | Value | Total value | Description |
| --------------------- | ----- | ----------- | ------------------------------------------ |
| PM_CREATE | 1 | 11301 | Profile was created |
| PM_DELETE | 2 | 11302 | Profile has been removed |
| PM_CHANGETEXT | 3 | 11303 | Profile prefix/ profile suffix has changed |
| PM_CHANGEVALUES | 4 | 11304 | Profile values have changed |
| PM_CHANGEDIGITS | 5 | 11305 | Profile decimal places have changed |
| PM_CHANGEICON | 6 | 11306 | Profile icon has changed |
| PM_ASSOCIATIONADDED | 7 | 11307 | Profile association was added |
| PM_ASSOCIATIONREMOVED | 8 | 11308 | Profile association was removed |
| PM_ASSOCIATIONCHANGED | 9 | 11309 | Profile association has changed |
#### IPS_TIMERMESSAGE
Value base 1400
| Define | Value | Total value | Description |
| ----------------- | ----- | ----------- | -------------------------- |
| TM_REGISTER | 1 | 11401 | Timer was created |
| TM_UNREGISTER | 2 | 11402 | Timer has been removed |
| TM_CHANGEINTERVAL | 3 | 11403 | Timer interval has changed |
#### IPS_ACTIONMESSAGE
Value base 1500
| Define | Value | Total value | Description |
| ------------------ | ----- | ----------- | ---------------------------- |
| AM_FORMFIELDCREATE | 1 | 11501 | Currently unused |
| AM_FORMFIELDDELETE | 2 | 11502 | Currently unused |
| AM_FORMFIELDUPDATE | 3 | 11503 | Form element needs an update |
| AM_FORMRELOAD | 4 | 11504 | Reload configuration form |
#### IPS_LICENSEMESSAGE
Value base 1600
| Define | Value | Total value | Description |
| --------------------- | ----- | ----------- | ---------------------- |
| LP_UPDATELICENSE | 1 | 11601 | On license update |
| LP_UPDATESUBSCRIPTION | 2 | 11602 | On subscription update |
### Message parameters
Values of various message parameters
#### Search Handling
| Define | Value | Total value | Description |
| -------------- | ----- | ----------- | --------------------------------------------------------------------------- |
| IF_UNKNOWN | 0 | 0 | Unknown value |
| IF_NEW | 1 | 1 | Device is created but not configured |
| IF_OLD | 2 | 2 | Device is configured and should have an InstanceID |
| IF_CURRENT | 3 | 3 | The device is configured and the InstanceID belongs to the searching device |
| IF_UNSUPPORTED | 4 | 4 | Device is not supported by the module |
#### Status Codes
| Define | Value | Total value | Description |
| ------------- | ----- | ----------- | --------------------------- |
| IS_SBASE | 100 | 100 | Value base for status codes |
| IS_CREATING | 1 | 101 | Instance is creating |
| IS_ACTIVE | 2 | 102 | Instance is active |
| IS_DELETING | 3 | 103 | Instance is deleting |
| IS_INACTIVE | 4 | 104 | Instance is inactive |
| IS_NOTCREATED | 5 | 105 | Instance was not created |
#### Error Codes
| Define | Value | Total value | Description |
| -------- | ----- | ----------- | ------------- |
| IS_EBASE | 200 | 200 | General error |
## References
Source: https://www.symcon.de/en/service/documentation/developer-area/sdk-tools/sdk-php/references/
_Requires Symcon >= 5.1_
### Description
References indicate which objects require oneself to function properly. For example, during a reference search for a variable, a triggered event is listed which is triggered when the variable changes. Without the variable, the event cannot function properly.
The references are called up by default via the [context menu](https://www.symcon.de/en/llms/concepts.md) in the object tree. One can then jump to the objects in the displayed list.

### Manage references
References can be added and removed in the module.
| Function | Description |
| ---------------------------------------------------------- | ------------------------------------------------------------------------------------------------------------ |
| [GetReferenceList](https://www.symcon.de/en/llms/developer/sdk-tools/sdk-php/module.md) | This function returns an array with all references. |
| [RegisterReference](https://www.symcon.de/en/llms/developer/sdk-tools/sdk-php/module.md) | This function registers a reference using the TargetobjectID, which is then found during a reference search. |
| [UnregisterReference](https://www.symcon.de/en/llms/developer/sdk-tools/sdk-php/module.md) | This function removes a reference for the module. |
## Store
Source: https://www.symcon.de/en/service/documentation/developer-area/sdk-tools/sdk-php/store/
Since version 5.1 there is a module store in IP-Symcon in which developed modules can be offered. This is based on a library which can be found and installed conveniently.
> **Note:** General information about the Module Store can be found here: [Module Store](https://www.symcon.de/en/llms/components/management-console.md)
Up to three different channels can be offered for each library: Stable, Beta and Testing
* __Stable__ is the channel for the stable productive version of the library. Publications on this channel are checked by the Symcon team.
* __Beta__ is the open test channel. Every user has access to it and can install the beta version.
* __Testing__ describes an internal test channel. For this purpose, users must be invited explicitly, granting them access to the channel. If one is not invited, no insight into this version is possible.
## Submit
Source: https://www.symcon.de/en/service/documentation/developer-area/sdk-tools/sdk-php/store/submit/
### Description
If a developed library is to be offered in the Module Store, this must be submitted via the developer area on the [account page](https://account.symcon.de) .
### Developer area
The developer area can be accessed on the [account page](https://account.symcon.de) under "developer area".

All previous submissions are listed here. The number of downloads as well as the state of the individual channels is displayed here. With the "Edit" button a module can be adjusted. The button "Check up to date" automatically checks which modules are currently at the state of the newest commit of its main branch. This function is only supported for GitHub repositories. For a bigger number of modules correspondingly many requests are made towards the GitHub API, which could become exhausted if the account from the personal area is not connected with a GitHub account. If the account is [connected to GitHub](https://www.symcon.de/./#Connect_with_GitHub), the limit is significantly increased. New modules can be prepared for submission using the "Add module" button. If your own account has been granted access to other accounts, the submissions of these accounts can be checked and edited by selecting "Account".
### Add module
After clicking on "Add module", a dialog appears in which a Bundle ID and an initial channel can be selected.

The Bundle ID is a unique ID, which remains the same for new versions, and consists of lowercase letters and dots. It is recommended to use the reverse domain notation, e.g. de.symcon.alexa. The initial channel is the channel for the first submission. Additional channels can easily be added later.
### Submit module
Under "Edit module" one can check the current status according to channels and prepare the next submission.

The address of the Git repository under which the current library can be found is entered under GIT-URL. To use private repositories, the account of the personal area needs to be [connected to a GitHub account](https://www.symcon.de/./#Connect_with_GitHub) that has access to that private repository.
> **Note:** Currently private repositories are only supported on GitHub.
After the URL, the commit that is to be published is selected. To do this, one can click on the gear in the "GIT-Commit" line, click on the desired commit and confirm via "Select". The dialog offers the commits divided according to branches. If the desired commit is not displayed, more commits of a branch can be loaded with "Load more". Alternatively, the ID of the commit can also be entered manually. If the repository is not on GitHub, the dialog is limited and can only select a branch. The newest commit from that branch is automatically selected.

Localization provides names and descriptions of the module in one language. Multiple localizations for multiple languages can be added, but at least one is required. The module must be usable in all localized languages. Once a module has been published with a localization, this language must also be offered in future publications.
Clicking on "Add localization" opens a dialog in which the language of the new localization can be selected.

After the selection has been confirmed with "OK", a new empty localization of the selected language appears. A localization can be expanded with a click on the arrow on the right.

The following fields must be filled in for localization:
| Field | Description |
| --------------------- | ---------------------------------------------------------------------------------------------------------------------- |
| Name | The displayed name of the module |
| Description | A description of the module |
| Version information | Information on what's new about this version |
| Link to documentation | A link to explain the module. This can be, for example, a readme in the repository or an explanatory post in the forum |
A localization can be removed by clicking on the X next to the language.
Finally, suitable categories are selected for the submission. Via "Add Category" a dialog appears in which a new category can be selected and confirmed with "Select".

Categories can be removed by clicking on the associated X. At least one category is required for a submission, selecting multiple categories is also possible.
Below "Submission" further settings are possible.
| Setting | Description |
| ------------------------------------------------------ | ------------------------------------------------------------------------------------------------------------------------------------------------------------------------------------------------------------------------------------------------------------------------------------------------------------------------------------------- |
| Update includes no functional changes | This setting can be activated, if the current submission does not include any programaticcal changes that are relevant for the user, e.g., only the style was updated. The new version is not offered to users. The submission of non-functional changes can be helpful, to properly recognize the module as up to date |
| Close beta and testing channels after succesful review | If this setting is activated, all lower channels are closed after a succesful publication. Closed channels are not available in the Module Store any more. Users that are on a closed channel now, are forwarded towards the next highest channel for updates. This setting is not available if there are no publications on lower channels |
Finally, the current template offers three buttons. "Discard" will delete the template. If only the template exists for the module, the entire bundle will be deleted. "Save" saves the current status of the template. Not all elements are required to be filled in for this. A module without localizations and categories can therefore be saved, but not submitted. "Submit" is used to submit the module for deployment in the Module Store. The module is offered directly in the module store on the testing and beta channels. When submitting to Stable, the module goes through a review process by the Symcon-Team before it is published. If the module is accepted, it will be published in the Module Store. If it is rejected, one will be informed why the submission was rejected, both in the developer area and via e-mail.
### Review
When reviewing a module, various points are checked on the basis of our [Best Practices](https://gist.github.com/paresy/236bfbfcb26e6936eaae919b3cfdfc4f) . These are the following points in particular:
1. Does the module access local files and could read and manipulate them?
* Access to local files is permitted in exceptional cases, especially within the IP-Symcon folder. However, a more detailed check is carried out here in order to prevent misuse.
2. Is there a corresponding translation for each localization of the module?
3. Can the instances of the module be created without errors, even if not all requirements may have been met?
* Under all circumstances it must be possible to create a module as an instance. The module must therefore independently check whether the requirements are met. If the requirements are not met, this should be shown appropriately in the instance configuration.
4. Does any communication via splitter/IO run as intended via the data flow via [SendDataToChildren](https://www.symcon.de/en/llms/developer/sdk-tools/sdk-php/module.md)/[SendDataToParent](https://www.symcon.de/en/llms/developer/sdk-tools/sdk-php/module.md)/[ReceiveData](https://www.symcon.de/en/llms/developer/sdk-tools/sdk-php/module.md)/[ForwardData](https://www.symcon.de/en/llms/developer/sdk-tools/sdk-php/module.md)?
5. Does a module only access its own objects or ones that have been assigned to it?
* Own objects are below the instance.
* Using SelectVariable and similar elements, further objects can be assigned to a module, which may be used within the expected framework.
* External objects that have not been assigned to the module must not be manipulated.
6. New objects may only be created outside of the instance if this has been explicitly confirmed by the user. A conforming example of this is the use of the "Configurator" configuration element.
* This also prohibits the creation of events to switch internal functions. For this purpose [RegisterTimer](https://www.symcon.de/en/llms/developer/sdk-tools/sdk-php/module.md) or [MessageSink](https://www.symcon.de/en/llms/developer/sdk-tools/sdk-php/module.md) and the associated functions are to be used.
7. Deviations are possible with prior agreement. However, this should be discussed in a suitable place when submitting, for example by e-mail or as a comment at the relevant point in the code.
8. Code quality or absence of errors are not checked during the review.
9. "IPSymcon", "IPS" or similar may not be part of a name chosen in a localization.
10. Modules that require more than the current stable version as a condition, e.g. ones that only work with the current beta, may not be submitted to the stable channel.
11. Some object properties are in the sovereignty of the user even in the case of module-specific objects. These may initially be specified, but cannot be further manipulated without explicit confirmation from the user. These properties are:
* The name
* All visual settings: Show object, object active and icon
* The description
* The position
* All event-specific properties
* User-defined profile, user-defined action and logging of variables must never be set without explicit confirmation, not even initially! Action or profile can of course be defined using a standard action or profile.
12. PHP files cannot use the short PHP-tag (<?) And should use the long PHP-tag (<?php) instead.
13. After the initial creation of an instance, the user is in the sovereignty of the properties.
* If the module wants to change something here, other values can be specified via the dynamic function [UpdateFormField](https://www.symcon.de/en/llms/developer/sdk-tools/sdk-php/module.md) and subsequently be confirmed by the user.
* Thus the functions [IPS_SetProperty](https://www.symcon.de/en/llms/functions/management-instances.md) and [IPS_ApplyChanges](https://www.symcon.de/en/llms/functions/management-instances.md) should never be used.
* If the parameter loadValuesFromConfiguration is set to false in a [List](https://www.symcon.de/en/llms/developer/sdk-tools/sdk-php/configuration-forms.md) or a [Tree](https://www.symcon.de/en/llms/developer/sdk-tools/sdk-php/configuration-forms.md), the property still has to be filled in the interests of the user when loading. The parameter should only make it possible to adjust, for example, the order or to add new values in the middle.
14. A submission requires a descriptive name, a suitable description and version information as well as a documentation that explains the configuration and use of the module.
15. If configurators are connected to a splitter or I/O, they may only manage devices that are also connected to this splitter or I/O
* Instances, that are connected to the same splitter or I/O as the configurator, should be listed in the configurator regardless of whether they still exist physically
* Instances, that are connected to another splitter or I/O, must not be listed in a configurator with a splitter or I/O
16. If a module offers a discovery instance, it must work without configuration
17. Since logging can smoothly be implemented via $this->LogMessage and these messages are correctly linked to the sending instance, IPS_LogMessage may no longer be used for logging
### Edit module
If there is no current template on a channel under "Edit module", a new template can be created by clicking on "Prepare new version". In the dialog one can choose whether one wants to create a completely new template or use a current publication as a template.

Alternatively, when publishing there is an option to move these to a higher channel. If a submission has been rejected, it can also be used as a new template to compensate for any deficiencies without having to configure everything from scratch again.

If a module, which is currently being reviewed, is to be withdrawn, this can be done by clicking on "Withdraw". If a module is in the module store, it can no longer be withdrawn.
### Connect with GitHub
The account of the personal area can be connected to GitHub. This enables the use of private repositories as well as a significantly higher number of requests towards the GitHub API. This can be especially relevant for checking if published modules are up to date. The connection can be done in the [Settings of the Personal Area](https://account.symcon.de/account/settings). This is done by clicking "Connect" in the area "(Developer) GitHub OAuth Connection".

If no GitHub user is currently logged in within the browser, this is done within the next step. Here, the email as well as the password of the GitHub account need to be entered. If an account is already logged in, this step is skipped.

Finally, the access via Symcon needs to be authorized. This is done by clicking "Authorize symcon".

Now, the account from the personal area is connected with the GitHub account. The connection can be undone by clicking "Disconnect".
## Structure
Source: https://www.symcon.de/en/service/documentation/developer-area/sdk-tools/sdk-php/structure/
### Description
The required structure is necessary for correct functioning within IP-Symcon. Integration via [Module Control](https://www.symcon.de/en/llms/modules/module-control.md) only works if the structure is adhered to.
* The "library.json" is the core of every module development.
* The "module.php" and "module.json" together form the actual module.
* Form.json can be used to set up the configuration page.
* Locale.json is used for possible translations.
* The module folder name (here: Module1, Module2) should have the same name as the class name in module.php.
Folders that do not contain any module.json are marked as faulty.
Exceptions are the folders:
* libs/ (since version 4.2)
* docs/ (since version 4.2)
* imgs/ (since version 4.2)
* tests/ (since version 4.4)
* actions/ (since version 6.0)
> **Note:** Point-folders (e.g. .github, .style) are also ignored and are not necessary for the module to function correctly. These are important, for example, for the correct functioning of the repository.
These folders are not integrated as a module and offer the possibility of making external libraries, documents, images and tests available.
### Directory structure
```php
Library
|
- Module1
| |
| - module.php
| |
| - module.json
| |
| - form.json (optional)
| |
| - locale.json (optional)
|
- Module2
| |
| - module.php
| |
| - module.json
| |
| - form.json (optional)
| |
| - locale.json (optional)
|
- actions (optional)
| |
| - Definitions of actions
|
- libs (optional)
| |
| - any libraries
|
- docs (optional)
| |
| - any documents
|
- imgs (optional)
| |
| - any media files
|
- tests (optional)
| |
| - any test files
|
- library.json
|
- README.txt (optional)
```
---
# Configuration Forms
> Symcon documentation · English · generated on 2026-09-26
> Index: https://www.symcon.de/en/llms.txt
Source: https://www.symcon.de/en/service/documentation/developer-area/sdk-tools/sdk-php/configuration-forms/
_Requires Symcon >= 4.0_
The configuration forms are JSON files that are used to configure the properties of IP-Symcon instances.
These are usually loaded from the Management Console and displayed accordingly.
The JSON file describing the configuration form has up to two areas which can, independently of one another, be individually described.
A translation of the "caption" and "label" can be added via the [Localizations](https://www.symcon.de/en/llms/developer/sdk-tools/sdk-php.md) via the locale.json.
### Form areas

__elements__
Form fields defined in the "elements" area can set the properties of an instance. The name of a form field, if available, corresponds to the name of the property which is set via [IPS_SetProperty](https://www.symcon.de/en/llms/functions/management-instances.md). If the "elements" area is not to be visible, it must not be defined.
__actions__
The "actions" area is a so-called test environment. The form fields defined here cannot change the properties of the respective instance. If the "actions" area is not to be visible, it must not be defined.
The general rule: The test environment can only be used if changes have been accepted in the elements area. This prevents settings that have not been accepted from being tested.
__status__
The "status" area defines possible status messages. No form fields are allowed in the "status" area, only status messages which are explained under [Status Message](https://www.symcon.de/en/llms/developer/sdk-tools/sdk-php/configuration-forms.md). If the module is not to display any status messages, this area does not have to be defined.
### Overview of the insertable form fields
| Form field / Type | since IP-Symcon | Description |
| -------------------------------------------------------- | --------------- | ------------------------------------------------------------------------------- |
| [Button](https://www.symcon.de/en/llms/developer/sdk-tools/sdk-php/configuration-forms.md) | 4.0 | Button |
| [CheckBox](https://www.symcon.de/en/llms/developer/sdk-tools/sdk-php/configuration-forms.md) | 4.0 | Checkbox |
| [Configurator](https://www.symcon.de/en/llms/developer/sdk-tools/sdk-php/configuration-forms.md) | 5.0 | Describes a configurator |
| [ExpansionPanel](https://www.symcon.de/en/llms/developer/sdk-tools/sdk-php/configuration-forms.md) | 5.0 | Form fields that can be opened and closed |
| [HorizontalSlider](https://www.symcon.de/en/llms/developer/sdk-tools/sdk-php/configuration-forms.md) | 4.0 | A horizontal slider |
| [Image](https://www.symcon.de/en/llms/developer/sdk-tools/sdk-php/configuration-forms.md) | 5.0 | Creates an image on the module page |
| [IntervalBox](https://www.symcon.de/en/llms/developer/sdk-tools/sdk-php/configuration-forms.md) | 4.0 | Specification of numbers with text description / unit (outdated) |
| [Label](https://www.symcon.de/en/llms/developer/sdk-tools/sdk-php/configuration-forms.md) | 4.0 | A label |
| [List](https://www.symcon.de/en/llms/developer/sdk-tools/sdk-php/configuration-forms.md) | 4.2 | An editable list |
| [NumberSpinner](https://www.symcon.de/en/llms/developer/sdk-tools/sdk-php/configuration-forms.md) | 4.0 | Input field in which only numbers are allowed. (optionally with decimal places) |
| [PasswordTextBox](https://www.symcon.de/en/llms/developer/sdk-tools/sdk-php/configuration-forms.md) | 4.0 | Input field for passwords |
| [PopupAlert](https://www.symcon.de/en/llms/developer/sdk-tools/sdk-php/configuration-forms.md) | 5.0 | Alarm, which opens a popup immediately |
| [PopupButton](https://www.symcon.de/en/llms/developer/sdk-tools/sdk-php/configuration-forms.md) | 5.0 | Button that opens a popup |
| [RowLayout](https://www.symcon.de/en/llms/developer/sdk-tools/sdk-php/configuration-forms.md) | 5.0 | Row view of multiple form fields |
| [Select](https://www.symcon.de/en/llms/developer/sdk-tools/sdk-php/configuration-forms.md) | 4.0 | Drop-down menu |
| [SelectCategory](https://www.symcon.de/en/llms/developer/sdk-tools/sdk-php/configuration-forms.md) | 4.0 | Selection dialog for a category |
| [SelectColor](https://www.symcon.de/en/llms/developer/sdk-tools/sdk-php/configuration-forms.md) | 4.2 | Selection dialog for a color |
| [SelectDate](https://www.symcon.de/en/llms/developer/sdk-tools/sdk-php/configuration-forms.md) | 5.0 | Selection dialog for a date |
| [SelectDateTime](https://www.symcon.de/en/llms/developer/sdk-tools/sdk-php/configuration-forms.md) | 5.0 | Selection dialog for a date and time |
| [SelectEvent](https://www.symcon.de/en/llms/developer/sdk-tools/sdk-php/configuration-forms.md) | 4.0 | Selection dialog for an event |
| [SelectFile](https://www.symcon.de/en/llms/developer/sdk-tools/sdk-php/configuration-forms.md) | 4.2 | Selection dialog for a file |
| [SelectInstance](https://www.symcon.de/en/llms/developer/sdk-tools/sdk-php/configuration-forms.md) | 4.0 | Selection dialog for an instance |
| [SelectLink](https://www.symcon.de/en/llms/developer/sdk-tools/sdk-php/configuration-forms.md) | 4.0 | Selection dialog for a link |
| [SelectMedia](https://www.symcon.de/en/llms/developer/sdk-tools/sdk-php/configuration-forms.md) | 4.0 | Selection dialog for a media file |
| [SelectObject](https://www.symcon.de/en/llms/developer/sdk-tools/sdk-php/configuration-forms.md) | 4.0 | Selection dialog for an object |
| [SelectScript](https://www.symcon.de/en/llms/developer/sdk-tools/sdk-php/configuration-forms.md) | 4.0 | Selection dialog for a script |
| [SelectTime](https://www.symcon.de/en/llms/developer/sdk-tools/sdk-php/configuration-forms.md) | 5.0 | Selection dialog for a time |
| [SelectVariable](https://www.symcon.de/en/llms/developer/sdk-tools/sdk-php/configuration-forms.md) | 4.0 | Selection dialog for a variable |
| [Tree](https://www.symcon.de/en/llms/developer/sdk-tools/sdk-php/configuration-forms.md) | 5.0 | Creates a tree |
| [ValidationTextBox](https://www.symcon.de/en/llms/developer/sdk-tools/sdk-php/configuration-forms.md) | 4.0 | Input field for text |
### Examples
__Basic structure of the JSON file__
```php
{
"elements":
[
... // Insert form fields here
],
"actions":
[
... // Insert form fields here
],
"status":
[
... // Insert status messages here
]
}
```
__Complete example using an SMS module__
```php
{
"elements":
[
{ "type": "ValidationTextBox", "name": "Username", "caption": "Username" },
{ "type": "ValidationTextBox", "name": "Password", "caption": "Password" },
{ "type": "NumberSpinner", "name": "APIID", "caption": "APIID" },
{ "type": "ValidationTextBox", "name": "Sender", "caption": "Sender" },
{ "type": "Select", "name": "SMSType", "caption": "Type",
"options": [
{ "caption": "SMS", "value": 0 },
{ "caption": "Combi-SMS", "value": 1 },
{ "caption": "MMS", "value": 2 }
]}
],
"actions":
[
{ "type": "ValidationTextBox", "name": "Number", "caption": "Number" },
{ "type": "ValidationTextBox", "name": "Message", "caption": "Message" },
{ "type": "Button", "caption": "Send Message", "onClick": "SMS_Send($id, $Number, $Message);" },
{ "type": "Button", "caption": "Read Balance", "onClick": "echo 'Balance: '.sprintf('%.2f', SMS_RequestBalance($id)).' credits';" }
],
"status":
[
{ "code": 102, "icon": "active", "caption": "Login information valid" },
{ "code": 201, "icon": "error", "caption": "Authentication failed" },
{ "code": 202, "icon": "error", "caption": "No credits left" }
]
}
```
## Button
Source: https://www.symcon.de/en/service/documentation/developer-area/sdk-tools/sdk-php/configuration-forms/button/
A button that executes an action when pressed.

### Parameters
| Parameter | Description |
| ------------------- | ------------------------------------------------------------------------------------------------------------------------------------------------------------------------------------------------------------------------------------------------------------------------------------------------------------------------------------------ |
| caption | Visible caption of the button |
| confirm (optional) | (__default:__ "") If this parameter does not contain an empty string, the text is displayed in a yes/no dialog when the button is pressed. The onClick action is only carried out if the dialog is confirmed with "Yes". If the parameter is empty, the action is carried out directly. (since IP-Symcon 5.0) |
| download (optional) | (__default:__ "") If this parameter is not an empty string and the output of the onClick script is a [Data-URL](https://developer.mozilla.org/en-US/docs/Web/HTTP/Basics_of_HTTP/Data_URLs), the output is downloaded as a text file with the name of the download parameter. (since IP-Symcon 7.0) |
| enabled (optional) | (__default:__ true) If true, the button can be used, otherwise it is displayed as deactivated (since IP-Symcon 5.2) |
| label | Name and visible caption of the button _(deprecated, cannot be changed)_ |
| link (optional) | If this parameter is true, the output of the onClick script is opened as a link. If it is false, the output is displayed as a dialog in the configuration form. If the parameter is not set, a decision whether it is opened as a link or displayed in the dialog is made on the basis of the output (see info box). (since IP-Symcon 5.1) |
| name (optional) | Name of the button |
| onClick | Script that is executed when the button is clicked. If the script consists of several lines, the individual lines can also be defined as an array (arrays are supported since version 6.0). No PHP-tags are required. There are a few other variables available, which are discussed in the information field below. |
| type | Button |
| visible (optional) | (__default:__ true) If true, the button is visible, otherwise it is invisible (since IP-Symcon 5.2) |
| width (optional) | Fixed width of the button in pixels or % as a string, e.g. "40%" or "250px". If the value is not set or "", the width is automatically selected based on the caption (since IP-Symcon 5.2) |
> **Note:** The variable $id is available in all areas. In addition, variables are created for all form fields if a name has been assigned. The variable can then be used accordingly as $Name. The $Name variable is only available within the same scope (e.g. actions or elements).
> **Note:** If the parameter onClick contains an "echo" in combination with 'http'/'https', the browser is opened and the URL is called. If there is an "echo" in combination with a 'mailto:', the default mail program is opened with all the parameters set. If an "echo" is present in combination with a 'link:', 'link:' is filtered out and the remaining content is opened in the browser. This makes relative links possible. (available since IP-Symcon 4.1)
### Example
```php
//The example returns the instance ID.
{ "type": "Button", "caption": "On", "onClick": "echo $id;" }
// Special example:
// The example opens the browser with the specified address when "clicked": 'https://www.symcon.de'
{
"type": "Button",
"caption": "Symcon",
"onClick": "echo 'https://www.symcon.de';"
}
// The example asks whether the value of a variable should actually be set to 0
{
"type": "Button",
"caption": "Reset",
"onClick": "SetValue(12345, 0);",
"confirm": "This sets the variable back to 0. Important data can be lost in the process. Are you sure?"
}
// The example runs a multi-line script
{
"type": "Button",
"caption": "Reset",
"onClick": [
"SetValue(12345, 0);",
"echo 'value was reset';"
]
}
```
## CheckBox
Source: https://www.symcon.de/en/service/documentation/developer-area/sdk-tools/sdk-php/configuration-forms/checkbox/
Creates a checkbox.
If created in the "elements" area, the checkbox sets a property to __True__ or __False__ when accepted.
The parameter __"name"__ defines which property is set.

### Parameters
| Parameter | Description |
| ------------------------ | -------------------------------------------------------------------------------------------------------------------------------------------------------------------------------------------------------------------------------------------------------------------------------------------------------------------------------------------- |
| caption | visible caption |
| download (optional) | (__default:__ "") If this parameter is not an empty string and the output of the onChange script is a [Data-URL](https://developer.mozilla.org/en-US/docs/Web/HTTP/Basics_of_HTTP/Data_URLs), the output is downloaded as a text file with the name of the download parameter. (since Symcon 7.0) |
| enabled (optional) | (__default:__ true) If true, the CheckBox can be used, otherwise it is displayed as deactivated (since Symcon 5.2) |
| items (optional) | (__default:__ []) List of configuration elements which are only displayed while the CheckBox is activated. The values of the elements are retained if it is deactivated again (cannot be changed) (since Symcon 9.1) |
| itemsPosition (optional) | (__default:__ 0) The position of the configuration elements defined by "items" (since Symcon 9.1) 0: The elements are displayed below the CheckBox 1: The elements are displayed to the right of the CheckBox |
| link (optional) | (__default:__ false) If this parameter is true, the output of the onChange script is opened as a link. If it is false, the output is displayed as a dialog in the configuration form. (since Symcon 6.0) |
| name (optional) | Name of the checkbox/the property to be set |
| onChange (optional) | (__default:__ "") Script, which is executed with a click when the checkbox is changed. If the script consists of several lines, the individual lines can also be defined as an array (arrays are supported since version 6.0). It has the same properties as onClick of the [Button](https://www.symcon.de/en/llms/developer/sdk-tools/sdk-php/configuration-forms.md) (since Symcon 5.2) |
| type | CheckBox |
| value (optional) | (__default:__ false) The value of the CheckBox - If there is an associated property, this parameter is overwritten by the property in the elements area (since Symcon 5.2) |
| visible (optional) | (__default:__ true) If true, the CheckBox is visible, otherwise it is invisible (since Symcon 5.2) |
| width (optional) | Fixed width of the checkbox in pixels or % as a string, e.g. "40%" or "250px". If the value is not set or "", the width is automatically selected based on the caption (since Symcon 5.3) |
### Example
```php
{ "type": "CheckBox", "name": "status", "caption": "emulate Status" }
//Configuration elements which are only displayed while the CheckBox is activated
{ "type": "CheckBox", "name": "UseProxy", "caption": "Use proxy",
"itemsPosition": 1,
"items": [
{ "type": "ValidationTextBox", "name": "ProxyHost", "caption": "Host" },
{ "type": "NumberSpinner", "name": "ProxyPort", "caption": "Port" }
]
}
```
## ColumnLayout
Source: https://www.symcon.de/en/service/documentation/developer-area/sdk-tools/sdk-php/configuration-forms/columnlayout/
_Requires Symcon >= 6.0_
Creates a column in which form fields are displayed one below one another. This is particularly useful for dynamically adapting the content.

> **Warning:** This item is not supported by the Legacy Console. If a module with this element is opened in the legacy console, all the elements contained are displayed one below the other in the form.
### Parameters
| Parameter | Description |
| ------------------ | ---------------------------------------------------------------------------- |
| items | List of configuration items within the column |
| name (optional) | Name of the column |
| type | ColumnLayout |
| visible (optional) | (__default:__true) If true, the column is visible, otherwise it is invisible |
### Example
```php
// column layout
{
"type": "ColumnLayout",
"items": [
{
"type": "SelectLocation",
"name": "Location",
"caption": "My Location"
},{
"type": "Button",
"caption": "Test",
"onClick": "TM_Update($id);"
},{
"type": "Button",
"caption": "Test2",
"onClick": "TM_Update2($id);"
}
]
}
```
## Configurator
Source: https://www.symcon.de/en/service/documentation/developer-area/sdk-tools/sdk-php/configuration-forms/configurator/
_Requires Symcon >= 5.0_
Describes the appearance and functionality of a configurator.

> **Warning:** This item is not supported by the Legacy Console. If a module with this element is opened in the legacy console, an error message appears.
### General Parameters
| Parameter | Description |
| ---------------------------------------------------------- | ------------------------------------------------------------------------------------------------------------------------------------------------------------------------------------------------------------------------------------------------------------------------------------------------------------------------------------------------------------------------------------------------------------------------------------------------------------------------------------------------------------------------------------------------------------------------------ |
| caption (optional) | visible caption of the configuration list |
| columns (optional) | (__default:__ columns for address ("address") and name ("name")) Columns of the configuration list |
| delete (optional) | (__default:__ false) If true, a button is displayed behind each entry with InstanceID, which deletes the corresponding instance and updates the line in the configurator |
| discoveryInterval (optional) | (__default:__ 0) If the console requests the including configuration form for [Device Search](https://www.symcon.de/en/llms/components/management-console.md), this parameter defines how many seconds need to pass before another request is allowed to be executed; If multiple elements of the type Configurator are included within the configuration form, the maximum is used (since IP-Symcon 6.3) |
| onExpand (optional) | (__default:__ "") Script which is executed after expanding an entry of the configurator. If the script consists of several lines, the individual lines can also be defined as an array. In this version, the tree does not offer the currently selected entry as the variable value, but the expanded entry, see [Selected Line as a Variable in in on-Actions](https://www.symcon.de/en/llms/developer/sdk-tools/sdk-php/configuration-forms.md). Otherwise it has the same properties as onClick of the [Button](https://www.symcon.de/en/llms/developer/sdk-tools/sdk-php/configuration-forms.md) (since IP-Symcon 6.4) |
| name (optional) | Name of the configuration list |
| rowCount (optional) | (__default:__ 0) visible number of lines; If there are more lines in the list, a scroll bar is shown - if the value is 0, the configuration list fills the remaining space in the instance editor. Only one configuration item can get all of the remaining space. |
| sort(optional) | Sorting of the table. If this is not set, the list remains unsorted |
| type | Configurator |
| values (optional) | Entries of the form |
| visible (optional) | (__default:__ true) If true, the configurator is visible, otherwise it is invisible (since IP-Symcon 5.2) |
> **Note:** If the parameters columns, sort or values are to be changed via [UpdateFormField](https://www.symcon.de/en/llms/developer/sdk-tools/sdk-php/module.md), the new values must be coded as JSON.
### Parameters for Columns
| Parameter | Description |
| ---------------------- | ------------------------------------------------------------------------------------------------------------------------------------------------------------------------------------------------------------------------------------------------------------------------------------------------------------- |
| caption | visible caption of a column |
| label | visible caption of a column _(deprecated)_ |
| name | unique name of a column to refer to; the name cannot be "id", "parent", "create", "expanded" or "InstanceID" |
| quickFilter (optional) | (__default:__ true) If true, the text of this column is considered during the search via quick filter. Should the value be false for all columns, the quick filter is hidden. (since IP-Symcon 7.2) |
| visible (optional) | (__default:__ true) If false, the column is not displayed |
| width | Width of the column in pixels, as a CSS string (e.g. "100px"); a single column may have the value "auto", which means that the width of this column uses the remaining available space. In the case of a tree, the value "auto" must be set for a column. The expansion symbols are displayed in this column. |
### Parameters for sort
| Parameter | Description |
| --------- | ----------------------------------------------------------------------------------------------------- |
| column | Name of the column by which the list is sorted |
| direction | The direction of the sort; "ascending" for an ascending order and "descending" for a descending order |
### Parameters for values
| Parameter | Description |
| --------------------- | ----------------------------------------------------------------------------------------------------------------------------------------------------------------------------------------------------------------------------------------------------------------- |
| address (optional) | (__default__ : "") If the default columns were used, this value is used for the address column. |
| create (optional) | (__default__ : error) Specification of the configuration of the created instance (More information) |
| expanded (optional) | (__default__ : false) If this value is true, the entry is expanded directly when the configuration form is loaded |
| instanceID (optional) | (__default__ : 0) InstanceID of the device in the object tree, 0 if the device has not yet been created |
| id (optional) | An identifier with which the entry for a tree display can be addressed as a parent node, id must be greater than 0 |
| name (optional) | (__default__ : "") If the default columns were used, this value is used for the name column. This value additionally defines the name of the instance to be created. If the instance already exists, the name column shows the name of the instance and not the content of this parameter. |
| parent (optional) | (__default__ : 0) The id of a value can be set in this field, which becomes the parent node of this value in the tree display. For this, the parent value must come before of the child in the array. If "parent" is 0, the element is inserted at the top level. |
### Parameter for Create
There are various options for defining the instances to be created and their initial configuration.
#### Variant 1: Configuration of a Single Instance
In the first variant, a single instance and its configuration is defined. In this case create is an object that contains information about the ModuleID used and the initial configuration:
_Parameters for configuration_
| Parameter | Description |
| -------------------------- | ------------------------------------------------------------------------------------------------------------------------------------------------------------------------------------------------------------------------------------------------------------------------------------------------------------------------------------------------------------------------------------------------------------------------------------------------------------------------------------------------------------------------------------------------------------------------------------------------------------------- |
| moduleID | The module ID of the instance required or to be created |
| configuration | The required configuration of the instance, see [IPS_SetConfiguration](https://www.symcon.de/en/llms/functions/management-instances.md), not coded as a JSON string |
| location (optional) | (__default:__ []) The list of strings indicates the initial position in the object tree. If the list is empty, the instance is created in the main category. Otherwise, the categories with the respective name are used hierarchically and created if necessary. |
| info (optional) | (__default:__ "") The initial description of the newly created instance; if an existing instance is used, the description is not overwritten. |
| position (optional) | (__default:__ 0) The initial position of the newly created instance; if an existing instance is used, the position is not overwritten. |
| name (optional) | (__default:__ module name or value of the "name" column) The initial name of the newly created instance; if an existing instance is used, the name is not overwritten. (since IP-Symcon 5.5) |
| noDiscovery (optional) | (__default:__ false) If this parameter is set to true, this entry is not displayed as a device in the [Device Search](https://www.symcon.de/en/llms/components/management-console.md) and cannot be marked as read. In the case of a configuration as a chain (variant 2 ), the value of the first entry in the chain is used. If there are several possible configurations (variant 3 ), each configuration must have this parameter set to true so that the selection does not appear in the Device Search. (since IP-Symcon 5.4) |
| statusVariables (optional) | (__default:__ {}) This object specifies an initial configuration of the status variables. For each parameter of this status variable object, the variable with the ident of the parameter name is configured. The associated parameter is another object that defines the configuration of the variables. The variable configuration is used after the instance configuration has been adopted. Variables that are created later cannot be configured here. (since IP-Symcon 5.3) |
_Parameters for status variables_
| Parameter | Description |
| --------------- | ------------------------------------------------------------------------------------------------------------------------------------------------------------------- |
| name (optional) | (__default:__ specification by created instance) The status variable is renamed to this value. The name is translated through the localization of the configurator. |
If an instance is created, it is created with the ModuleID and configuration specified by the configuration. As is usual with the creation of an instance, the new instance is linked to a valid physical parent instance, if possible. The physical parent instance of the configurator is preferably used here.
#### Variant 2: Configuration of a Chain
Alternatively, a chain of configurations can be used. This defines the entire physical chain for the newly created instance, usually the device, splitter and I/O. In this variant, data.create represents a list, the elements of which define the instances of the physical chain as in variant 1. The list begins with the device to be created and then continues with the next parent instance.
When creating a chain, existing parent instances are preferably reused, provided that these and their parent instances meet the requirements of the chain. However, the device itself will always be newly created.
#### Variant 3: Several possible Configurations
Finally, several configurations can be made available for selection. Here create is configured as an object with key/value pairs, whereby each value corresponds to a configuration as described in variant 1 or variant 2. If an instance is to be created in this representation, the user is given a selection of the designations. The instance is created with the settings of the selected item. The keys "moduleID" and "configuration" cannot be used here.
### Colors in the Configuration List
What the individual colors mean in messages and in the configurator can be read under the color codes for [messages](https://www.symcon.de/en/llms/developer/sdk-tools/sdk-php.md) and [configurators](https://www.symcon.de/en/llms/concepts.md). The element presents this information as follows:
| Color | Condition |
| ----- | ----------------------------------------------------------------------------------------------------------------------------------------------------------------------------------------------------------------------- |
| green | InstanceID is 0, create is defined |
| red | InstanceID is not 0, create is not defined or the defined InstanceID does not exist |
| gray | The instance with the ID InstanceID is not configured as specified by create. If create represents a chain, the line is also displayed in gray if a physical parent is configured differently than defined in the chain |
| white | InstanceID is 0, create is not defined (category) |
| white | The instance with the ID instanceID is configured as specified by create. If create represents a chain, the line is only displayed in white if all physical parents are configured as defined in the chain |
### Use the Configurator Form Field in the Device Search
The console offers [Instances](https://www.symcon.de/en/llms/concepts.md) that can be created centrally via the [Device Search](https://www.symcon.de/en/llms/components/management-console.md). This is done by regularly calling [GetConfigurationForm](https://www.symcon.de/en/llms/developer/sdk-tools/sdk-php/module.md) for [Instances](https://www.symcon.de/en/llms/concepts.md) of the type Configurator and Discovery and evaluating the parameter values for configurator fields. Only configurator and discovery instances that contain at least one configurator field are displayed in the Device Search. In this, values can also be empty. If the own instance is to be seen in the [Device Search](https://www.symcon.de/en/llms/components/management-console.md), the following conditions must therefore be met:
* The instance must be of the type Configurator or Discovery
* The search for devices must be started automatically when executing [GetConfigurationForm](https://www.symcon.de/en/llms/developer/sdk-tools/sdk-php/module.md). If the search takes longer, values should be left empty in an initial return, but after the search has been completed, the devices that can be created must be included in the return of [GetConfigurationForm](https://www.symcon.de/en/llms/developer/sdk-tools/sdk-php/module.md)
* The search should not be restarted when [GetConfigurationForm](https://www.symcon.de/en/llms/developer/sdk-tools/sdk-php/module.md) is called repeatedly if it is currently running
* An example implementation can be found here: [SymconTest](https://github.com/symcon/SymconTest/blob/master/BelatedDiscoveryTest/module.php)
### Selected Line as a Variable in on-Actions
The use of the values of the configurator in scripts is analogous to [Lists](https://www.symcon.de/en/llms/developer/sdk-tools/sdk-php/configuration-forms.md). All values are available there, including expanded, instanceID and create. However, the configurator does not save any values in a property.
### Example
```php
// Basic example
{
"type": "Configurator",
"name": "Configuration",
"caption": "Configuration",
"delete": true,
"values": [
{
"id": 1,
"name": "Category",
"address": ""
},{
"parent": 1,
"name": "Calculation module - minimum",
"address": "2",
"create": {
"moduleID": "{A7B0B43B-BEB0-4452-B55E-CD8A9A56B052}",
"configuration": {
"Calculation": 2,
"Variables": "[]"
}
}
},{
"parent": 1,
"name": "Computing module in the living room",
"address": "2",
"create": {
"moduleID": "{A7B0B43B-BEB0-4452-B55E-CD8A9A56B052}",
"configuration": {
"Calculation": 2,
"Variables": "[]"
},
"location": [
"Ground floor",
"Living room"
]
}
},{
"parent": 1,
"instanceID": 53398,
"name": "Incorrect instance",
"address": "4"
},{
"parent": 1,
"name": "Calculation module - selection",
"address": "2",
"create": {
"Maximum": {
"moduleID": "{A7B0B43B-BEB0-4452-B55E-CD8A9A56B052}",
"configuration": {
"Calculation": 3,
"Variables": "[]"
}
},
"Average": {
"moduleID": "{A7B0B43B-BEB0-4452-B55E-CD8A9A56B052}",
"configuration": {
"Calculation": 4,
"Variables": "[]"
}
}
}
}, {
"parent": 1,
"name": "OZW772 IP-Interface",
"address": "00:A0:03:FD:14:BB",
"create": [
{
"moduleID": "{33765ABB-CFA5-40AA-89C0-A7CEA89CFE7A}",
"configuration": {}
},
{
"moduleID": "{1C902193-B044-43B8-9433-419F09C641B8}",
"configuration": {
"GatewayMode":1
}
},
{
"moduleID": "{82347F20-F541-41E1-AC5B-A636FD3AE2D8}",
"configuration": {
"Host":"172.17.31.95",
"Port":3671,
"Open":true
}
}
]
}
]
}
// Example with renaming of status variables
{
"type": "Configurator",
"values": [{
"name": "Calculation module (renamed status variables)",
"address": "Address",
"create": {
"moduleID": "{A7B0B43B-BEB0-4452-B55E-CD8A9A56B052}",
"configuration": {},
"statusVariables": {
"Minimum": {
"name": "Alternative name for minimum"
},
"Maximum": {
"name": "Alternative name for maximum"
}
}
}
}]
}
```
## ExpansionPanel
Source: https://www.symcon.de/en/service/documentation/developer-area/sdk-tools/sdk-php/configuration-forms/expansionpanel/
_Requires Symcon >= 5.0_
Creates an Expansion Panel, which contains further form fields and can be opened and closed in order to display the content in a space-saving manner.

> **Warning:** This item is not supported by the Legacy Console. If a module with this element is opened in the legacy console, all elements contained are displayed directly in the form.
### Parameters
| Parameter | Description |
| ------------------- | ---------------------------------------------------------------------------------------------------------------------------------------------------------------------------------------------------------------------------------------------------------------------------------------------------------------------------------------- |
| caption | Expansion panel caption |
| download (optional) | (__default:__ "") If this parameter is not an empty string and the output of the onClick script is a [Data-URL](https://developer.mozilla.org/en-US/docs/Web/HTTP/Basics_of_HTTP/Data_URLs), the output is downloaded as a text file with the name of the download parameter. (since IP-Symcon 7.0) |
| expanded (optional) | (__default:__ false) If true, the expansion panel is expanded, otherwise it is collapsed (since IP-Symcon 5.2) |
| items | List of form fields within the expansion panel (cannot be changed) |
| link (optional) | (__default:__ false) If this parameter is true, the output of the onClick script is opened as a link. If it is false, the output is displayed as a dialog in the configuration form. (since IP-Symcon 6.0) |
| name (optional) | Name of the button |
| onClick (optional) | (__default:__ "") Script that is executed when you click on the drop-down icon. If the script consists of several lines, the individual lines can also be defined as an array (arrays are supported since version 6.0). It has the same properties as onClick of the [Button](https://www.symcon.de/en/llms/developer/sdk-tools/sdk-php/configuration-forms.md) (since IP-Symcon 5.3) |
| type | ExpansionPanel |
| visible (optional) | (__default:__ true) If true, the expansion panel is visible, otherwise it is invisible (since IP-Symcon 5.2) |
| width (optional) | Fixed width of the expansion panel in pixels or % as a string, e.g. "40%" or "250px". If the value is not set or "", the full width is used automatically (since IP-Symcon 5.3) |
### Example
```php
// Set up an Expansion Panel
{
"type": "ExpansionPanel",
"caption": "My Expansion Panel",
"items": [
{
"type": "SelectFile",
"name": "File",
"caption": "File"
},
{
"type": "Select",
"name": "Calculation",
"caption": "Calculation",
"options": [
{ "caption": "Everything", "value": 0 },
{ "caption": "Sum", "value": 1 },
{ "caption": "Minimum", "value": 2 },
{ "caption": "Maximum", "value": 3 },
{ "caption": "Average", "value": 4 },
{ "caption": "Count", "value": 5 }
]
}
]
}
```
## HorizontalSlider
Source: https://www.symcon.de/en/service/documentation/developer-area/sdk-tools/sdk-php/configuration-forms/horizontalslider/
Creates a horizontal slider that can be moved between the values of __"minimum"__ and __"maximum"__.

### Parameters
| Parameter | Description |
| ---------------------------------------- | --------------------------------------------------------------------------------------------------------------------------------------------------------------------------------------------------------------------------------------------------------------------------------------------------------------- |
| caption | Caption of the slider |
| displayValue (optional) | (__default:__ false) On true, the value of the slider is displayed right of the slider. (since IP-Symcon 8.1) |
| download (optional) | (__default:__ "") If this parameter is not an empty string and the output of the onChange script is a [Data-URL](https://developer.mozilla.org/en-US/docs/Web/HTTP/Basics_of_HTTP/Data_URLs), the output is downloaded as a text file with the name of the download parameter. (since IP-Symcon 7.0) |
| enabled (optional) | (__default:__ true) If true, the slider can be used, otherwise it is displayed as deactivated (since IP-Symcon 5.2) |
| link (optional) | (__default:__ false) If this parameter is true, the output of the onChange script is opened as a link. If it is false, the output is displayed as a dialog in the configuration form. (since IP-Symcon 6.0) |
| maximum (optional, since IP-Symcon 5.3) | (__default:__ 100) Maximum value that can be set in the slider |
| minimum (optional, since IP-Symcon 5.3) | (__default:__ 0) Minimum value that can be set in the slider |
| name (optional) | Name of the slider |
| onChange (optional, since IP-Symcon 5.3) | (__default:__ "") Script which is executed when the controller is moved. If the script consists of several lines, the individual lines can also be defined as an array (arrays are supported since version 6.0). It has the same properties as onClick of the [Button](https://www.symcon.de/en/llms/developer/sdk-tools/sdk-php/configuration-forms.md) |
| prefix (optional) | (__default:__ "") Visible caption / unit before the value display (since IP-Symcon 8.1) |
| stepSize (optional) | (__default:__ 1) Step size in which the slider can be adjusted (since IP-Symcon 5.3) |
| suffix (optional) | (__default:__ "") Visible caption / unit after the value display (since IP-Symcon 8.1) |
| type | Horizontal slider |
| value (optional) | (__default:__ minimum) The value of the slider - If there is an associated property, the parameter in the elements area is overwritten by the property (since IP-Symcon 5.2) |
| visible (optional) | (__default:__ true) If true, the slider is visible, otherwise it is invisible (since IP-Symcon 5.2) |
| width (optional) | (__default:__ 300px) Fixed width of the slider in pixels or % as a string, e.g. "40%" or "250px" (since IP-Symcon 5.3) |
### Example
```php
// The example returns the InstanceID.
{ "type": "HorizontalSlider", "name": "Slider", "caption": "ID-slider", "minimum": 0, "maximum": 16, "onChange": "echo $id;" }
```
## Image
Source: https://www.symcon.de/en/service/documentation/developer-area/sdk-tools/sdk-php/configuration-forms/image/
_Requires Symcon >= 5.0_
Creates an image that is displayed on the module page. The image can be specified directly or loaded from a media object.
> **Warning:** This item is not supported by the Legacy Console. If a module with this element is opened in the legacy console, an error message appears.
### Parameters
| Parameter | Description |
| ------------------- | ------------------------------------------------------------------------------------------------------------------------------------------------------------------------------------------------------------------------------------------------------------------------------------------------------------------------------------------ |
| download (optional) | (__default:__ "") If this parameter is not an empty string and the output of the onChange script is a [Data-URL](https://developer.mozilla.org/en-US/docs/Web/HTTP/Basics_of_HTTP/Data_URLs), the output is downloaded as a text file with the name of the download parameter. (since IP-Symcon 7.0) |
| image (optional) | Content of the image as a Data-URI ([More info](https://wiki.selfhtml.org/wiki/Grafik/Grafiken_mit_Data-URI), cannot be combined with __mediaID__, either __image__ or __mediaID__ must be set) |
| link (optional) | If this parameter is true, the output of the onClick script is opened as a link. If it is false, the output is displayed as a dialog in the configuration form. If the parameter is not set, a decision is made on the basis of the output whether it is opened as a link or displayed in the dialog (see info box). (since IP-Symcon 6.0) |
| mediaID (optional) | MediaID of the displayed image or stream (since IP-Symcon 5.5) (cannot be combined with __image__, either __image__ or __mediaID__ must be set) |
| name (optional) | Name of the image |
| type | Image |
| visible (optional) | (__default:__ true) If true, the image is visible, otherwise it is invisible (since IP-Symcon 5.2) |
| center (optional) | (__default:__ false) If __center__ is set, the image is centered horizontally within the displayed area, otherwise it is left-justified. This setting has no function within a [RowLayout](https://www.symcon.de/en/llms/developer/sdk-tools/sdk-php/configuration-forms.md). |
| width (optional) | Fixed width of the image in pixels or % as a string, e.g. "40%" or "250px". If the value is not set or "", the width is automatically selected based on the image (since IP-Symcon 6.0) |
| onClick | Script that is executed when the image is clicked. If the script consists of several lines, the individual lines can also be defined as an array. It has the same properties as onClick of the [Button](https://www.symcon.de/en/llms/developer/sdk-tools/sdk-php/configuration-forms.md). (since IP-Symcon 6.0) |
> **Note:** If the parameter onClick contains an "echo" in combination with 'http'/'https', the browser is opened and the URL is called. If there is an "echo" in combination with a 'mailto:', the default mail program is opened with all the parameters set (since IP-Symcon 6.0)
### Example
```php
// Display the image base64-coded
{
"type": "Image",
"image": "data:image/png;base64, iVBORw0KGgoAAAANSUhEUgAAAAUAAAAFCAYAAACNbyblAAAAHElEQVQI12P4//8/w38GIAXDIBKE0DHxgljNBAAO9TXL0Y4OHwAAAABJRU5ErkJggg=="
}
// Display image from media
{
"type": "Image",
"mediaID": 12345
}
```
## IntervalBox (deprecated)
Source: https://www.symcon.de/en/service/documentation/developer-area/sdk-tools/sdk-php/configuration-forms/intervalbox/
> **Warning:** As of 5.0 the IntervalBox is deprecated and will be removed at a future date. The [NumberSpinner](https://www.symcon.de/en/llms/developer/sdk-tools/sdk-php/configuration-forms.md) supports the
> parameter __suffix__ and thus offers all functions of the IntervalBox. Therefore the parameters of the IntervalBox cannot be changed.
Creates an IntervalBox which has a number input field, which has a label/unit behind the input field.
If created in the "elements" area, the IntervalBox sets a property to the entered numerical value when adopted.
The parameter __"name"__ defines which property is set.

### Parameters
| Parameter | Description |
| --------------- | ----------------------------------------------- |
| caption | Visible label/unit behind the input field |
| type | IntervalBox |
| name (optional) | Name of the interval box/the property to be set |
### Example
```php
{"type": "IntervalBox", "name": "CacheInterval", "caption": "Seconds" }
```
## Label
Source: https://www.symcon.de/en/service/documentation/developer-area/sdk-tools/sdk-php/configuration-forms/label/
Creates a label that provides an overview.

### Parameters
| Parameter | Description |
| ------------------ | ----------------------------------------------------------------------------------------------------------------------------------------------------------------------------------------- |
| caption | visible caption |
| label | visible caption _(outdated, cannot be changed)_ |
| link (optional) | (__default:__ true) If this parameter is set, URLs within the label that begin with "http://" or "https://" are displayed as links (since IP-Symcon 5.3) |
| name (optional) | Name of the label |
| type | Label |
| visible (optional) | (__default:__ true) If true, the label is visible, otherwise it is invisible (since IP-Symcon 5.2) |
| width (optional) | Fixed width of the label in pixels or % as a string, e.g. "40%" or "250px". If the value is not set or "", the width is automatically selected based on the caption (since IP-Symcon 5.3) |
### Example
```php
{ "type": "Label", "caption": "Press learn after you have put the device into learn mode" }
```
## List
Source: https://www.symcon.de/en/service/documentation/developer-area/sdk-tools/sdk-php/configuration-forms/list/
_Requires Symcon >= 4.2_
Creates a list with the heading __caption__.
The displayed columns are defined in __columns__.
Initial entries in the list can be specified via __values__.

### General Parameters
| Parameter | Description |
| ------------------------------------------------------- | ------------------------------------------------------------------------------------------------------------------------------------------------------------------------------------------------------------------------------------------------------------------------------------------------------------------------------------------------------------------------------------------------------------------------------------------------------------------------------------------------------------------------------------------------------------------------------------------------------------------------------------------------------------------------------ |
| add (optional) | (__default:__ false) If true, an "Add" button is displayed below the table, which adds a new element with standard values to the table |
| caption (optional) | Visible caption of the list |
| columns | Columns of the list |
| delete (optional) | (__default:__ false) If true, a button is displayed behind each entry in the list, which deletes the corresponding element |
| download (optional) | (__default:__ "") If this parameter is not an empty string and the output of the onAdd, onChangeOrder, onDelete or onEdit script is a [Data-URL](https://developer.mozilla.org/en-US/docs/Web/HTTP/Basics_of_HTTP/Data_URLs), the output is downloaded as a text file with the name of the download parameter. (since Symcon 7.0) |
| form (optional) | (__default:__ based on the "edit" parameters of column) An individual form for editing or adding rows. The definition of the form is done analogously to the definition of the form for [Actions](https://www.symcon.de/en/llms/developer/sdk-tools/sdk-php.md) either static or via PHP code. How the form is evaluated and filled is explained in the section Individual Forms for Editing (since Symcon 7.0) |
| link (optional) | (__default:__ false) If this parameter is true, the output of the onAdd, onChangeOrder, onDelete or onEdit script is opened as a link. If it is false, the output is displayed as a dialog in the configuration form. (since Symcon 6.0) |
| multiAdd (optional) | (__default:__ false, if onAdd is set, otherwise true) If this parameter is true, form is not set and the list has only a single editable column of the type [SelectObject](https://www.symcon.de/en/llms/developer/sdk-tools/sdk-php/configuration-forms.md), [SelectCategory](https://www.symcon.de/en/llms/developer/sdk-tools/sdk-php/configuration-forms.md), [SelectInstance](https://www.symcon.de/en/llms/developer/sdk-tools/sdk-php/configuration-forms.md), [SelectVariable](https://www.symcon.de/en/llms/developer/sdk-tools/sdk-php/configuration-forms.md), [SelectScript](https://www.symcon.de/en/llms/developer/sdk-tools/sdk-php/configuration-forms.md), [SelectMedia](https://www.symcon.de/en/llms/developer/sdk-tools/sdk-php/configuration-forms.md) or [SelectLink](https://www.symcon.de/en/llms/developer/sdk-tools/sdk-php/configuration-forms.md), multiple objects can be added at once. When adding multiple objects, onAdd is still executed only once. (since Symcon 9.1) |
| name (optional) | Name of the list / the property to be set |
| onAdd (optional) | (__default:__ "") Script which is executed after adding an entry to the list. If the script consists of several lines, the individual lines can also be defined as an array (arrays are supported since version 6.0). In this version, the list does not offer the currently selected entry as the variable value but the added entry instead, see [Selected line as variable in on-Actions](https://www.symcon.de/en/llms/developer/sdk-tools/sdk-php/configuration-forms.md). Otherwise it has the same properties as onClick of the [Button](https://www.symcon.de/en/llms/developer/sdk-tools/sdk-php/configuration-forms.md) (since Symcon 5.3) |
| onChangeOrder (optional) | (__default:__ "") Script which is executed after moving an entry within the list. If the script consists of several lines, the individual lines can also be defined as an array. In this version, the list does not offer the currently selected entry as the variable value but the moved entry instead, see [Selected line as variable in on-Actions](https://www.symcon.de/en/llms/developer/sdk-tools/sdk-php/configuration-forms.md). Otherwise it has the same properties as onClick of the [Button](https://www.symcon.de/en/llms/developer/sdk-tools/sdk-php/configuration-forms.md) (since Symcon 6.3) |
| onDelete (optional) | (__default:__ "") Script which is executed after deleting an entry in the list. If the script consists of several lines, the individual lines can also be defined as an array (arrays are supported since version 6.0). In this version, the list does not offer the currently selected entry as a variable value but the deleted entry instead, see [Selected line as variable in on-Actions](https://www.symcon.de/en/llms/developer/sdk-tools/sdk-php/configuration-forms.md). Otherwise it has the same properties as onClick of the [Button](https://www.symcon.de/en/llms/developer/sdk-tools/sdk-php/configuration-forms.md) (since Symcon 5.3) |
| onEdit (optional) | (__default:__ "") Script which is executed after editing an entry in the list. If the script consists of several lines, the individual lines can also be defined as an array (arrays are supported since version 6.0). In this version, the list does not offer the currently selected entry as a variable value but the edited entry instead, see [Selected line as variable in on-Actions](https://www.symcon.de/en/llms/developer/sdk-tools/sdk-php/configuration-forms.md). Otherwise it has the same properties as onClick of the [Button](https://www.symcon.de/en/llms/developer/sdk-tools/sdk-php/configuration-forms.md) (since Symcon 5.3) |
| rowCount (optional) | (__default:__ 0) visible number of lines; If there are more lines in the list, a scroll bar is displayed - if the value is 0, the list fills the remaining space available in the instance editor. Only one configuration item can get all of the remaining space. |
| sort (optional) | Sort the table. If this is not set, the list remains unsorted |
| type | List |
| values (optional) | Initial entries in the list |
| visible (optional) | (__default:__ true) If true, the list is visible, otherwise it is invisible (since Symcon 5.2) |
| enabled (optional) | (__default:__ true) If true, the list can be used, otherwise it is displayed deactivated (since Symcon 6.0) |
| changeOrder (optional) | (__default:__ false) If true, the order of the entries can be changed using drag & drop. The sorting of the list according to columns, however, is not possible in that case. (since Symcon 6.0) |
| loadValuesFromConfiguration (optional) | (__default:__ true) This parameter specifies whether the list should be filled with the values of the property, see [Saving and loading lists](https://www.symcon.de/en/llms/developer/sdk-tools/sdk-php/configuration-forms.md) . If the value is set to false, it is necessary for a successful review in the Module Store to fill the list in the interests of the user, see [Review guidelines](https://www.symcon.de/en/llms/developer/sdk-tools/sdk-php.md) Point 13 (since Symcon 6.0) |
### Parameters for Columns
| Parameter | Description |
| --------------------------------------------------- | ----------------------------------------------------------------------------------------------------------------------------------------------------------------------------------------------------------------------------------------------------------------------------------------------------------------------------- |
| add (optional) | Initial value in this column for a newly added entry, necessary if __add__ is set to true in the list. Alternatively, an object can be provided which generates the value automatically, see Parameters for add (since Symcon 9.1) |
| align (optional) | (__default:__ "left") Alignment of the column (since Symcon 5.2) "left": Content is displayed left-aligned "center": Content is displayed centered "right": Content is displayed right-aligned |
| caption | Visible caption of a column |
| confirm (optional) | (__default:__ "") Query text before an onClick action is performed. The action is only carried out if the query is confirmed with "Yes". If no query text is defined, the action is carried out directly (since Symcon 5.2) |
| download (optional) | (__default:__ "") If this parameter is not an empty string and the output of the onClick script of this column is a [Data-URL](https://developer.mozilla.org/en-US/docs/Web/HTTP/Basics_of_HTTP/Data_URLs), the output is downloaded as a text file with the name of the download parameter. (since Symcon 7.1) |
| edit (optional) | Description of an editable element |
| label | Visible caption of a column _(deprecated)_ |
| link (optional) | (__default:__ false) If this parameter is true, the output of the onClick script of this column is opened as a link. If it is false, the output is displayed as a dialog in the configuration form. (since Symcon 7.1) |
| name | Unique name of a column to refer to; the name must not be "rowColor", "editable" or "deletable", since these values are used for other functions, see [Parameters for values](https://www.symcon.de/en/llms/developer/sdk-tools/sdk-php/configuration-forms.md) |
| onClick (optional) | (__default:__ "") Script which is executed when a field in this column is clicked. It has the same properties as onClick of the [Button](https://www.symcon.de/en/llms/developer/sdk-tools/sdk-php/configuration-forms.md). The script is only executed if this field is not empty, i.e. 0, false or "" (since Symcon 5.2) |
| quickFilter (optional) | (__default:__ false) If true, the text of this column is considered during the search via quick filter. Should the value be false for all columns, the quick filter is hidden. (since Symcon 7.2) |
| sortColumn (optional) | If sortColumn is set and sorted according to this column, the values of the column are compared with the name of this parameter instead of the values of this column |
| save (optional) | (__default:__ true, if the element can be edited or __add__ is an object for automatic generation, otherwise false) If true, the values of this column should be saved as module properties, see [Save and load lists](https://www.symcon.de/en/llms/developer/sdk-tools/sdk-php/configuration-forms.md) |
| visible (optional) | (__default:__ true) If false, the column is not displayed |
| width | Width of the column in pixels, as a CSS string (e.g. "100px"); a single column may have the value "auto", which means that the width of this column uses the remaining available space |
### Parameters for edit
| Parameter | Description |
| ------------------ | ----------------------------------------------------------------------------------------------------------------------------------------------------------------------------------------------------------------------------------------------------------------------------------------------------------------------------------------------------------------------------------------------------------------------------------------------------------------------------------------------------------------------------------------------------------------------------------------------------------------------------------------------------------------------------------------------------------------------------------------------------------------------------------------------------------------------------------------------------------------------------------------------------------------------------------------------------------------------------------------------------------------------------------- |
| type | Type of representation, according to the possible entries: [CheckBox](https://www.symcon.de/en/llms/developer/sdk-tools/sdk-php/configuration-forms.md), [IntervalBox](https://www.symcon.de/en/llms/developer/sdk-tools/sdk-php/configuration-forms.md), [NumberSpinner](https://www.symcon.de/en/llms/developer/sdk-tools/sdk-php/configuration-forms.md), [PasswordTextBox](https://www.symcon.de/en/llms/developer/sdk-tools/sdk-php/configuration-forms.md), [Select](https://www.symcon.de/en/llms/developer/sdk-tools/sdk-php/configuration-forms.md), [SelectCategory](https://www.symcon.de/en/llms/developer/sdk-tools/sdk-php/configuration-forms.md), [SelectColor](https://www.symcon.de/en/llms/developer/sdk-tools/sdk-php/configuration-forms.md), [SelectEvent](https://www.symcon.de/en/llms/developer/sdk-tools/sdk-php/configuration-forms.md), [SelectFile](https://www.symcon.de/en/llms/developer/sdk-tools/sdk-php/configuration-forms.md), [SelectInstance](https://www.symcon.de/en/llms/developer/sdk-tools/sdk-php/configuration-forms.md), [SelectLink](https://www.symcon.de/en/llms/developer/sdk-tools/sdk-php/configuration-forms.md), [SelectMedia](https://www.symcon.de/en/llms/developer/sdk-tools/sdk-php/configuration-forms.md), [SelectObject](https://www.symcon.de/en/llms/developer/sdk-tools/sdk-php/configuration-forms.md), [SelectScript](https://www.symcon.de/en/llms/developer/sdk-tools/sdk-php/configuration-forms.md), [SelectVariable](https://www.symcon.de/en/llms/developer/sdk-tools/sdk-php/configuration-forms.md), [ValidationTextBox](https://www.symcon.de/en/llms/developer/sdk-tools/sdk-php/configuration-forms.md), [List](https://www.symcon.de/en/llms/developer/sdk-tools/sdk-php/configuration-forms.md), [Tree](https://www.symcon.de/en/llms/developer/sdk-tools/sdk-php/configuration-forms.md) |
| Further parameters | The other parameters depend on the type selected; the parameters "name" and "caption" of the type are ignored |
> **Note:** If the "type" List or Tree is used, the value of this column is not JSON-coded again. It is only necessary to parse the value of the higher-level list once. Each sub-list or subtree is then directly available as an object. Similarly, the values in "values" do not have to be coded twice.
> **Note:** The "add" parameter of the column is translated according to the localization, provided the "type" of "edit" is ValidationTextBox or PasswordTextBox or "edit" is not set at all
> **Note:** It is possibly to update only specific parts of columns or values with the function [UpdateFormField](https://www.symcon.de/en/llms/developer/sdk-tools/sdk-php/module.md) by using a dot notation. In this case, the target is provided as columns.x.y or values.x.y. x refers to the index of the affected column or value and y refers to the name of the updated field. It is also possible to update a single column or value completely by using columns.x or values.x as target. For example, updating the width of the second column can be done via $this->UpdateFormField('list', 'columns.1.width', '200px');.
### Parameters for add
Instead of a fixed value, the parameter __add__ of a column can also be an object which describes the strategy by which the value of a newly added entry is generated automatically (since Symcon 9.1). The value is generated when the entry is added and is treated like a regular value afterwards. The generated value is unique within the column: If a random value matches the value of an existing entry, a new value is generated. Generated values are not translated.
| Parameter | Description |
| ----------------- | --------------------------------------------------------------------------------------------------------------------------------------------------------------------------------------------------------------------------------------------------------------------------------------------------------------------------------------------------------------------------------------------------------------------------------------------------------------------------------------------- |
| strategy | Strategy of the generation: "increment": The highest numeric value of this column across all entries of the list is increased by __step__. Non-numeric values are ignored. If there is no numeric value yet, __step__ is used "random-string": A random string of the characters a-z, A-Z and 0-9 with the length __length__ "random-integer": A random integer between __min__ and __max__ "guid": A random GUID (UUID version 4), e.g. "{3F2504E0-4F89-4D3A-9A0C-0305E82C3301}" |
| step (optional) | (__default:__ 1) Step by which the highest value is increased, only for the strategy "increment"; must be a number other than 0 |
| length (optional) | (__default:__ 32) Number of characters of the generated string, only for the strategy "random-string" |
| min (optional) | (__default:__ 0) Lower bound (inclusive) of the random integer, only for the strategy "random-integer"; must be less than __max__ |
| max (optional) | (__default:__ 2147483647) Upper bound (inclusive) of the random integer, only for the strategy "random-integer"; must be greater than __min__ |
> **Note:** To keep generated values, columns with such an add value are saved by default, i.e. the parameter "save" is true by default for these columns. If a loaded entry is missing the value of such a column, e.g. because the column was added later, the value is generated by the same strategy when loading. The default value that on-actions receive when no entry is selected is generated by the strategy as well. If no unique value can be generated because all possible values are already in use, e.g. with "random-integer" and a small range between min and max, adding the entry fails with an error message.
```php
// Columns with automatically generated values
{
"caption": "ID",
"name": "ID",
"width": "50px",
"add": { "strategy": "increment", "step": 10 }
}, {
"caption": "Token",
"name": "Token",
"width": "auto",
"add": { "strategy": "random-string", "length": 16 },
"edit": { "type": "ValidationTextBox" }
}, {
"caption": "Random number",
"name": "Number",
"width": "100px",
"add": { "strategy": "random-integer", "min": 1, "max": 100 },
"edit": { "type": "NumberSpinner" }
}, {
"caption": "GUID",
"name": "GUID",
"width": "300px",
"add": { "strategy": "guid" }
}
```
### Parameters for sort
| Parameter | Description |
| --------- | ----------------------------------------------------------------------------------------------------- |
| column | Name of the column by which the list is sorted |
| direction | The direction of the sort; "ascending" for an ascending order and "descending" for a descending order |
### Parameters for values
| Parameter | Description |
| ----------------------------- | --------------------------------------------------------------------------------------------------------------------------------------------------------------------------------------------------------------------------------------------------------------------------------------------- |
| deletable (optional) | (__default:__ true) If false, the line cannot be deleted (since Symcon 5.4) |
| editable (optional) | (__default:__ true) If false, the line cannot be edited, although the list itself has editable columns (since Symcon 5.4) |
| rowColor (optional) | (__default:__ transparent) Background color of the line as hex code (default colors see below), empty string for transparency |
| icons (optional) | (__default:__ {}) An object that contains the used icons for each column. Within the object, the key defines the name of the column and the value the name of the used icon. If there is no entry for a column, no icon is shown for that column. (since Symcon 9.0) |
| Further parameters (optional) | (__default:__ "") For each initial entry in the list, the values for all columns are defined here. For this purpose, a parameter with the name of the column is entered for each column. The assignment of the parameter corresponds to the value of this column for the corresponding entry. |
| Color | Hex code |
| ----------- | -------- |
| Light green | #C0FFC0 |
| Purple | #C0C0FF |
| Yellow | #FFFFC0 |
| Gray | #DFDFDF |
| Red | #FFC0C0 |
What the individual colors mean in messages and in the configurator can be read under the color codes for [messages](https://www.symcon.de/en/llms/components/management-console.md) and [configurators](https://www.symcon.de/en/llms/concepts.md).
All icons supported by iron-icon are usable: [Iron Icons Demo](https://kevingleason.me/Polymer-Todo/bower_components/iron-icons/demo/index.html)
In addition, the following Symcon specific icons can be used:

### Saving and loading lists
When the list is saved, all list elements that can be edited or that have set the __save__ parameter are saved as module properties.
If the list is reloaded and the parameter __loadValuesFromConfiguration__ is not set to false, the values that were saved as module properties are entered first. If __loadValuesFromConfiguration__ is set to false, values are not loaded from the property and only as described in the next steps. If values from the property should be used as basis anyway, they must be provided within the __values__. The other elements, including the color, are filled with the initial values from __values__.
If there are more lines than elements in __values__, elements of the superfluous lines that were not saved as module properties are filled with the initial value __add__ of the corresponding column.
### Selected Line as a Variable in on-Actions
In the definition of the configuration form, the values of the table can be used as the variable __$Name__. The object can be accessed like an array. If the corresponding object is accessed with a string index, the corresponding value is returned as defined in [values](https://www.symcon.de/en/llms/developer/sdk-tools/sdk-php/configuration-forms.md) of the selected line. If a numeric index is accessed or the object is iterated, the corresponding line is returned, the individual parameters of which can in turn be referenced by a string index.
Example:
```php
// Output the name of the currently selected row in the devices table
{ "type": "Button", "caption": "Output", "onClick": "print_r($devices['name']);" }
// Output the name of the first line of the devices table
{ "type": "Button", "caption": "Output", "onClick": "print_r($devices[0]['name']);" }
```
### Individual Forms for Editing
By default, when editing or adding a new row, a form based on the edit parameters of the individual columns is used. However, if the parameter "form" is set, a form that is described by that parameter is used instead.
If a row is edited, the value of each form field is set depending on the value with the same name of the edited row, if available. During adding, the initial values of the form fields are instead defined by the "add" value of the column with the same name if such a column exists. When the dialog is confirmed, all values of the dialog are saved for the row. If afterwards columns exist, whose name are not contained within the form, their values are set by their "add" value.
When applying the configuration, all values that correspond to a column are saved as usual depending on the "save" parameter. If a value does not fit any column, it is saved in any case.
Parts of an individual form can be updated via [UpdateFormField](https://www.symcon.de/en/llms/developer/sdk-tools/sdk-php/module.md) just like within the regular form.
Example for the use of the "form" parameter can be found within the [Test Repository](https://github.com/symcon/SymconTest/tree/master/ListDynamicEditFormTest).
### Register and read out values from the table in PHP
If the table was defined in the configuration form in the __elements__ area, the table can be registered with the [RegisterPropertyString](https://www.symcon.de/en/llms/developer/sdk-tools/sdk-php/module.md) function. The table is then saved as a JSON-encoded string.
The [ReadPropertyString](https://www.symcon.de/en/llms/developer/sdk-tools/sdk-php/module.md) function can be used to read out the stored string. In a next step the function **json_decode** should be used to convert the read string into an array.
Example:
```php
$arrString = $this->ReadPropertyString("devices");
$arr = json_decode($arrString);
```
### Example
```php
// Simple editable list of instances and associated values
// The list initially contains an entry
{
"type": "List",
"name": "Devices",
"caption": "Devices",
"rowCount": 5,
"add": true,
"delete": true,
"sort": {
"column": "Name",
"direction": "ascending"
},
"columns": [{
"caption": "InstanceID",
"name": "InstanceID",
"width": "75px",
"add": 0,
"edit": {
"type": "SelectInstance"
}
}, {
"caption": "Name",
"name": "Name",
"width": "auto",
"add": ""
}, {
"caption": "State",
"name": "State",
"width": "40px",
"add": "New!"
}, {
"caption": "Temperature",
"name": "Temperature",
"width": "75px",
"add": 20.0,
"edit": {
"type": "NumberSpinner",
"digits": 2
}
}],
"values": [{
"InstanceID": 12435,
"Name": "ABCD",
"State": "OK!",
"Temperature": 23.31,
"rowColor": "#ff0000" //rot
}]
}
```
If the value __InstanceID__ of the first entry in the example table is changed to 54321 and __Temperature__ to 37.0 and the table is saved, the new values for __InstanceID__ and __Temperature__ are persistently saved as module properties. Since the other elements, i.e. __name__, __state__ and the color of the line __rowColor__, cannot be edited, they are not saved either.
If the table is now reloaded, the saved values for __InstanceID__ and __Temperature__ are loaded first. The non-editable fields __name__ and __state__ are then assigned the values from __values__ i.e., "ABCD" and "OK!" filled. The color is also loaded from __values__, which gives the line a red background.
If one has also added another line to the table and set the values __InstanceID__ and __Temperature__ to 314 and -5.3, respectively, then these would also be loaded from the module properties. Since there is only one element in __values__, the non-editable fields are filled according to the standard values from __add__. The __name__ field of the second line would remain empty and __state__ would be set to "OK!". Since no color is defined, the background of this line would be transparent.
```php
// List with alternative sorting
{
"type": "List",
"name": "sortList",
"rowCount": 5,
"add": false,
"columns": [
{
"caption": "Text",
"name": "Text",
"width": "auto",
"sortColumn": "Number"
},
{
"caption": "Number",
"name": "Number",
"width": "200px",
"visible": false
}
],
"values": [
{
"Text": "One",
"Number": "1"
},
{
"Text": "Two",
"Number": "2"
},
{
"Text": "Three",
"Number": "3"
}
]
}
```
## NumberSpinner
Source: https://www.symcon.de/en/service/documentation/developer-area/sdk-tools/sdk-php/configuration-forms/numberspinner/
Creates an input field for numbers with the heading __caption__.
If created in the "Elements" area, the NumberSpinner sets a property to the entered numerical value when accepted.
The parameter __"Name"__ defines which property is set.
> **Note:** The digits parameter is used to determine whether the entered number is interpreted as an integer or a float (floating point number).

### Parameters
| Parameter | Description |
| --------------------- | ----------------------------------------------------------------------------------------------------------------------------------------------------------------------------------------------------------------------------------------------------------------------------------------------- |
| caption | Visible caption of the NumberSpinner |
| digits (optional) | (__default:__ 0) Indicates the number of decimal places. (Cannot be combined with hex) |
| enabled (optional) | (__default:__ true) If true, the NumberSpinner can be used, otherwise it is displayed as deactivated (since IP-Symcon 5.2) |
| hex (optional) | (__default:__ false) If true, then a hexadecimal input {1..9, A..F} is allowed. (Cannot be combined with digits) |
| minimum (optional) | (__default:__ no minimum value) Defines a minimum value - If the entered value is less than the minimum value, an error is displayed and changes cannot be accepted (since IP-Symcon 5.3) |
| maximum (optional) | (__default:__ no maximum value) Defines a maximum value - If the entered value is greater than the maximum value, an error is displayed and changes cannot be accepted (since IP-Symcon 5.3) |
| moreDigits (optional) | (__default:__ false) If false, the NumberSpinner is limited to the specified number of decimal places. If this is exceeded, an error is displayed and changes cannot be accepted. If true, any number of decimal places can be specified (cannot be combined with hex; since IP-Symcon 6.0) |
| name (optional) | Name of the NumberSpinner / the property to be set |
| onChange (optional) | (__default:__ "") Script which is executed when the NumberSpinner value is changed. If the script consists of several lines, the individual lines can also be defined as an array. It has the same properties as onClick of the [Button](https://www.symcon.de/en/llms/developer/sdk-tools/sdk-php/configuration-forms.md). (since IP-Symcon 8.1) |
| suffix (optional) | (__default:__ "") Visible caption / unit behind the input field |
| type | NumberSpinner |
| value (optional) | (__default:__ 0) The value of the NumberSpinner - If there is an associated property, this parameter is overwritten by the property in the elements area (since IP-Symcon 5.2) |
| visible (optional) | (__default:__ true) If true, the NumberSpinner is visible, otherwise it is invisible (since IP-Symcon 5.2) |
| width (optional) | (__default:__ 300px) Fixed width of the input field in pixels or % as a string, e.g. "40%" or "250px" (since IP-Symcon 5.3) |
### Example
```php
// without digits/hex parameters
{ "type": "NumberSpinner", "Name": "Port", "caption": "Port" }
// with digits parameter
{ "type": "NumberSpinner", "Name": "Latitude", "caption": "Latitude (N)", "digits": 2}
// with hex parameters
{ "type": "NumberSpinner", "Name": "Value", "caption": "Hexvalue", "hex": true}
// with suffix
{ "type": "NumberSpinner", "Name": "Seconds", "caption": "Seconds", "suffix": "seconds"}
```
## OpenObjectButton
Source: https://www.symcon.de/en/service/documentation/developer-area/sdk-tools/sdk-php/configuration-forms/openobjectbutton/
_Requires Symcon >= 5.3_
A button that opens an object when pressed. The instance configurator is opened for an instance and the script editor for a script. For all other object types, the edit dialog is opened in the object tree.

### Parameters
| Parameters | Description |
| ------------------ | -------------------------------------------------------------------------------------------------------------------------------------------------------------------- |
| caption | Visible caption of the button |
| enabled (optional) | (__default:__ true) If true, the button can be used, otherwise it is displayed as deactivated |
| name (optional) | Name of the button |
| objectID | ID of the object to be opened |
| type | OpenObjectButton |
| visible (optional) | (__default:__ true) If true, the button is visible, otherwise it is invisible |
| width (optional) | Fixed width of the button in pixels or % as a string, e.g. "40%" or "250px". If the value is not set or "", the width is automatically selected based on the caption |
### Example
```php
{ "type": "OpenObjectButton", "caption": "To the Connect Control", "objectID": 42563 }
```
## PasswordTextBox
Source: https://www.symcon.de/en/service/documentation/developer-area/sdk-tools/sdk-php/configuration-forms/passwordtextbox/
Creates an input field for passwords with the heading __caption__.
If created in the "Elements" area, the PasswordTextBox sets a property to the entered String when accepted.
The parameter __"Name"__ defines which property is set.

### Parameter
| Parameters | Description |
| ------------------- | ----------------------------------------------------------------------------------------------------------------------------------------------------------------------------------------------------------------------------------------------------------------------------------------------- |
| caption | Visible caption of the password input field |
| enabled (optional) | (__default:__ true) If true, the PasswordTextBox can be used, otherwise it is displayed as deactivated (since IP-Symcon 5.2) |
| name (optional) | Name of the password input field/the property to be set |
| onChange (optional) | (__default:__ "") Script which is executed when the PasswordTextBox value is changed. If the script consists of several lines, the individual lines can also be defined as an array. It has the same properties as onClick of the [Button](https://www.symcon.de/en/llms/developer/sdk-tools/sdk-php/configuration-forms.md). (since IP-Symcon 8.1) |
| type | PasswordTextBox |
| validate (optional) | (__default:__ "") If the value does not meet the regular expression specified here, an error is displayed and changes cannot be accepted (since IP-Symcon 5.3) |
| value (optional) | (__default:__ "") The value of the PasswordTextBox - If there is an associated property, this parameter is overwritten by the property in the elements area (since IP-Symcon 5.2) |
| visible (optional) | (__default:__ true) If true, the image is visible, otherwise it is invisible (since IP-Symcon 5.2) |
| width (optional) | (__default:__ 300px) Fixed width of the input field in pixels or % as a string, e.g. "40%" or "250px" (since IP-Symcon 5.3) |
### Example
```php
{ "type": "PasswordTextBox", "name": "Password", "caption": "Passwort" }
```
## PopupAlert
Source: https://www.symcon.de/en/service/documentation/developer-area/sdk-tools/sdk-php/configuration-forms/popupalert/
_Requires Symcon >= 5.0_
If the configuration form contains this element, it will be opened when the configuration page is loaded. After the popup has been closed, it is also possible to open it again using dynamics (visible to true).

### General Parameters
| Parameters | Description |
| ------------------ | ------------------------------------------------------------------------------------------------------------------------------------------------------------------------------------------------------------------------------------------------------------------------ |
| name (optional) | Name of the PopupAlert |
| popup | Definition of the popup to be opened (parameters can be changed since Symcon 6.1 by linking the parameter names, e.g. popup.closeCaption) |
| type | PopupAlert |
| visible (optional) | (__default:__ true) If visible is initially true, the popup is opened when the instance configuration is opened, otherwise nothing happens. By changing to true, the popup can be opened afterwards. A change to false closes a currently open popup. (since Symcon 5.2) |
### Parameters for popup
| Parameters | Description |
| ------------------------------------------------------ | ----------------------------------------------------------------------------------------------------------------------------------------------------------------------------------------------------------------------------------------------------------------------------------------------------------------------------------------------------------------------------------------------------------------------------------------------------------------------------------------------------------------------------------------------------------------------------------------------------------------------------------------------------------------------------------------------- |
| buttons (optional) | (__default:__ []) A list of buttons which is shown in the popup at the bottom right. The close button is always displayed first, followed by the buttons described here in sequence (since Symcon 6.1) |
| caption (optional) | (__default:__ "") Visible title of the popup (since Symcon 8.2) |
| closeCaption (optional) | (__default:__ "OK") The caption of the close button in the lower right corner of the popup |
| initialPage (optional) | (__default:__ 0) A reference to the page from [pages](https://www.symcon.de/./#Parameters_for_pages) that is shown when the popup is opened. This can be a number corresponding to the index within the pages list, a string corresponding to the name of the page, or a script returning the page as a number or string. If the script consists of several lines, the individual lines can also be defined as an array. No PHP-tags are required. It has the same properties as onClick of the [Button](https://www.symcon.de/en/llms/developer/sdk-tools/sdk-php/configuration-forms.md). If the defined page does not exist, the first page is shown. A change to initialPage only takes effect the next time the popup is opened. (since Symcon 9.1) |
| items | List of form fields in the popup (cannot be changed) |
| [pages](https://www.symcon.de/./#Parameters_for_pages) (optional) | (__default:__ []) A list of pages of the popup that can be linked together to enable the functionality of a wizard. If the list is empty, the regularly defined content is displayed. (since Symcon 9.1) |
| width (optional) | (__default:__ "") Initial width of the popup in pixels or % as a string, e.g. "40%" or "250px". Percentages refer to the width of the browser window. If the value is not set or "", the default width is used (since Symcon 9.0) |
### Parameters for pages
The pages field contains a list of objects, each describing a page. If a popup has multiple pages, the buttons on the far right show "Back" and "Next" or "OK", which can be used to switch between pages. "Back" is active if a previous page exists and either no script for "onConfirm" has been defined for it, or both "onConfirm" and "onUndo" are defined. If only "onConfirm" is defined, "Back" is deactivated. For the second button, "Next" is displayed if a next page is defined, otherwise "OK". Each of these objects can use the following parameters:
| Parameter | Description |
| ----------------------------- | -------------------------------------------------------------------------------------------------------------------------------------------------------------------------------------------------------------------------------------------------------------------------------------------------------------------------------------------------------------------------------------------------------------------------------------------------------------------------------------------------------------------------------------------------------------- |
| name (optional) | A name for referencing, typically for nextPage |
| nextPage (optional) | (__default:__ next page) A reference to the page to be shown when "Next" is clicked. This can be a number corresponding to the index within the pages list, a string corresponding to the name of the page, or a script returning the next page as a number or string. If the script consists of several lines, the individual lines can also be defined as an array. No PHP-tags are required. It has the same properties as onClick of the [Button](https://www.symcon.de/en/llms/developer/sdk-tools/sdk-php/configuration-forms.md). If the defined page does not exist, clicking "OK" closes the popup. |
| onConfirm (optional) | (__default:__ "") Script that is executed when "Next" or "OK" is pressed. If the script consists of several lines, the individual lines can also be defined as an array. No PHP-tags are required. It has the same properties as onClick of the [Button](https://www.symcon.de/en/llms/developer/sdk-tools/sdk-php/configuration-forms.md). If the page change is prevented by validate, onConfirm is not executed. |
| onUndo (optional) | (__default:__ "") Script that is executed when returning to this page via "Back". If the script consists of several lines, the individual lines can also be defined as an array. No PHP-tags are required. It has the same properties as onClick of the [Button](https://www.symcon.de/en/llms/developer/sdk-tools/sdk-php/configuration-forms.md). |
| validate (optional) | (__default:__ "") Script that is executed when "Next" or "OK" is pressed. If the script consists of several lines, the individual lines can also be defined as an array. No PHP-tags are required. It has the same properties as onClick of the [Button](https://www.symcon.de/en/llms/developer/sdk-tools/sdk-php/configuration-forms.md). If the script returns a non-empty string, it is displayed as an error, no page change takes place and onConfirm is not executed. |
| Further parameters (optional) | All parameters from [popup](https://www.symcon.de/./#Parameters_for_popup), i.e. buttons, caption, closeCaption and items can also be defined for a page. In that case the parameter defined for the page is used. Only if this is not set, the default from popup is used. |
### Parameters for buttons
| Parameters | Description |
| ------------------ | -------------------------------------------------------------------------------------------------------------------------------------------------------------------------------------------------------------------------------------------------------------------------------------------------------------------------------------------------------------------------------------------------------------------------------------------------------------------------------------------------------------------------------------------------------------------------------------------------------------------------------------------- |
| caption | Visible caption of the button |
| onClick | Script that is executed when the button is clicked. If the script consists of several lines, the individual lines can also be defined as an array. No PHP-tags are required. It has the same properties as onClick of the [Button](https://www.symcon.de/en/llms/developer/sdk-tools/sdk-php/configuration-forms.md). If the script does not produce any output, the popup is closed after the script has been processed. Otherwise the output is shown as a red error message at the bottom of the popup. There is an exception here if the return begins with the prefix "MESSAGE:". In this case the popup is closed and the return is displayed after the prefix in a message dialog. |
| enabled (optional) | (__default:__ true) If true, the button can be used, otherwise it is displayed as deactivated |
### Example
```php
{
"type": "PopupAlert",
"popup": {
"closeCaption": "I understand",
"items": [
{
"type": "Label",
"caption": "Be careful when configuring this instance. Even small changes can have significant impact!"
}
]
}
},
{
"type": "PopupAlert",
"popup": {
"items": [
{
"type": "SelectVariable",
"name": "VariableActionTest",
"caption": "Some Action Variable"
}
]
}
},
{
"type": "PopupAlert",
"popup": {
"caption": "A title that is never seen since every page overrides it",
"closeCaption": "Close dialog",
"items": [
{
"type": "Label",
"caption": "This element is never seen since every page has its own items"
}
],
"pages": [
{
"caption": "Start",
"items": [
{
"type": "Label",
"caption": "Next page: Selection"
}
],
"nextPage": 2
},
{
"caption": "Never visible",
"items": [
{
"type": "Label",
"caption": "This page is never shown since the start page jumps directly to the page at index 2, the selection"
}
]
},
{
"caption": "Selection",
"items": [
{
"type": "Select",
"name": "NextPage",
"options": [
{"value": "page1", "caption": "Go to page 1"},
{"value": "page2", "caption": "Go to page 2"},
{"value": "close", "caption": "Done, close"}
],
"caption": "Choose next page"
}
],
"nextPage": "return $NextPage;"
},
{
"name": "page1",
"caption": "Page 1",
"items": [
{
"type": "Label",
"caption": "This is page 1 with 'Undo'"
}
],
"onUndo": "echo 'Undo page 1';",
"onConfirm": "echo 'Confirm page 1';"
},
{
"name": "page2",
"caption": "Page 2",
"items": [
{
"type": "Label",
"caption": "This is page 2, there is no 'Undo'. This is also the last page of the wizard."
}
],
"onConfirm": "echo 'Confirm page 2';"
}
]
}
}
```
## PopupButton
Source: https://www.symcon.de/en/service/documentation/developer-area/sdk-tools/sdk-php/configuration-forms/popupbutton/
_Requires Symcon >= 5.0_
Creates a button which, when clicked, opens a popup containing additional form fields.

### General Parameters
| Parameter | Description |
| ------------------- | ----------------------------------------------------------------------------------------------------------------------------------------------------------------------------------------------------------------------------------------------------------------------------------------------------------- |
| caption | Visible caption of the button |
| download (optional) | (__default:__ "") If this parameter is not an empty string and the output of the onClick script is a [Data-URL](https://developer.mozilla.org/en-US/docs/Web/HTTP/Basics_of_HTTP/Data_URLs), the output is downloaded as a text file with the name of the download parameter. (since Symcon 7.0) |
| enabled (optional) | (__default:__ true) If true, the button can be used, otherwise it is displayed as deactivated This parameter has no effect on a possibly opened popup (since Symcon 5.2) |
| link (optional) | (__default:__ false) If this parameter is true, the output of the onClick script is opened as a link. If it is false, the output is displayed as a dialog in the configuration form. (since Symcon 6.0) |
| name (optional) | Name of the PopupButton |
| onClick | Script that is executed when the button is clicked. If the script consists of several lines, the individual lines can also be defined as an array (arrays are supported since version 6.0). It has the same properties as onClick of the [Button](https://www.symcon.de/en/llms/developer/sdk-tools/sdk-php/configuration-forms.md) (since Symcon 5.3) |
| popup | Definition of the popup to be opened (parameters can be changed since Symcon 6.1 by linking the parameter names, e.g. popup.closeCaption) |
| type | PopupButton |
| visible (optional) | (__default:__ true) If true, the button is visible, otherwise it is invisible This parameter has no effect on a possibly opened popup (since Symcon 5.2) |
| width (optional) | Fixed width of the button in pixels or % as a string, e.g. "40%" or "250px". If the value is not set or "", the width is automatically selected based on the caption (since Symcon 5.2) |
### Parameters for popup
| Parameters | Description |
| ------------------------------------------------------ | ----------------------------------------------------------------------------------------------------------------------------------------------------------------------------------------------------------------------------------------------------------------------------------------------------------------------------------------------------------------------------------------------------------------------------------------------------------------------------------------------------------------------------------------------------------------------------------------------------------------------------------------------------------------------------------------------- |
| buttons (optional) | (__default:__ []) A list of buttons which is shown in the popup at the bottom right. The close button is always displayed first, followed by the buttons described here in sequence (since Symcon 6.1) |
| caption (optional) | (__default:__ "") Visible title of the popup |
| closeCaption (optional) | (__default:__ "Close") The caption of the close button at the bottom right in the popup (since version 6.1) |
| initialPage (optional) | (__default:__ 0) A reference to the page from [pages](https://www.symcon.de/./#Parameters_for_pages) that is shown when the popup is opened. This can be a number corresponding to the index within the pages list, a string corresponding to the name of the page, or a script returning the page as a number or string. If the script consists of several lines, the individual lines can also be defined as an array. No PHP-tags are required. It has the same properties as onClick of the [Button](https://www.symcon.de/en/llms/developer/sdk-tools/sdk-php/configuration-forms.md). If the defined page does not exist, the first page is shown. A change to initialPage only takes effect the next time the popup is opened. (since Symcon 9.1) |
| items | List of form fields in the popup (cannot be changed) |
| [pages](https://www.symcon.de/./#Parameters_for_pages) (optional) | (__default:__ []) A list of pages of the popup that can be linked together to enable the functionality of a wizard. If the list is empty, the regularly defined content is displayed. (since Symcon 9.1) |
| width (optional) | (__default:__ "") Initial width of the popup in pixels or % as a string, e.g. "40%" or "250px". Percentages refer to the width of the browser window. If the value is not set or "", the default width is used (since Symcon 9.0) |
### Parameters for pages
The pages field contains a list of objects, each describing a page. If a popup has multiple pages, the buttons on the far right show "Back" and "Next" or "OK", which can be used to switch between pages. "Back" is active if a previous page exists and either no script for "onConfirm" has been defined for it, or both "onConfirm" and "onUndo" are defined. If only "onConfirm" is defined, "Back" is deactivated. For the second button, "Next" is displayed if a next page is defined, otherwise "OK". Each of these objects can use the following parameters:
| Parameter | Description |
| ----------------------------- | -------------------------------------------------------------------------------------------------------------------------------------------------------------------------------------------------------------------------------------------------------------------------------------------------------------------------------------------------------------------------------------------------------------------------------------------------------------------------------------------------------------------------------------------------------------- |
| name (optional) | A name for referencing, typically for nextPage |
| nextPage (optional) | (__default:__ next page) A reference to the page to be shown when "Next" is clicked. This can be a number corresponding to the index within the pages list, a string corresponding to the name of the page, or a script returning the next page as a number or string. If the script consists of several lines, the individual lines can also be defined as an array. No PHP-tags are required. It has the same properties as onClick of the [Button](https://www.symcon.de/en/llms/developer/sdk-tools/sdk-php/configuration-forms.md). If the defined page does not exist, clicking "OK" closes the popup. |
| onConfirm (optional) | (__default:__ "") Script that is executed when "Next" or "OK" is pressed. If the script consists of several lines, the individual lines can also be defined as an array. No PHP-tags are required. It has the same properties as onClick of the [Button](https://www.symcon.de/en/llms/developer/sdk-tools/sdk-php/configuration-forms.md). If the page change is prevented by validate, onConfirm is not executed. |
| onUndo (optional) | (__default:__ "") Script that is executed when returning to this page via "Back". If the script consists of several lines, the individual lines can also be defined as an array. No PHP-tags are required. It has the same properties as onClick of the [Button](https://www.symcon.de/en/llms/developer/sdk-tools/sdk-php/configuration-forms.md). |
| validate (optional) | (__default:__ "") Script that is executed when "Next" or "OK" is pressed. If the script consists of several lines, the individual lines can also be defined as an array. No PHP-tags are required. It has the same properties as onClick of the [Button](https://www.symcon.de/en/llms/developer/sdk-tools/sdk-php/configuration-forms.md). If the script returns a non-empty string, it is displayed as an error, no page change takes place and onConfirm is not executed. |
| Further parameters (optional) | All parameters from [popup](https://www.symcon.de/./#Parameters_for_popup), i.e. buttons, caption, closeCaption and items can also be defined for a page. In that case the parameter defined for the page is used. Only if this is not set, the default from popup is used. |
### Parameters for buttons
| Parameters | Description |
| ------------------ | -------------------------------------------------------------------------------------------------------------------------------------------------------------------------------------------------------------------------------------------------------------------------------------------------------------------------------------------------------------------------------------------------------------------------------------------------------------------------------------------------------------------------------------------------------------------------------------------------------------------------------------------- |
| caption | Visible caption of the button |
| onClick | Script that is executed when the button is clicked. If the script consists of several lines, the individual lines can also be defined as an array. No PHP-tags are required. It has the same properties as onClick of the [Button](https://www.symcon.de/en/llms/developer/sdk-tools/sdk-php/configuration-forms.md). If the script does not produce any output, the popup is closed after the script has been processed. Otherwise the output is shown as a red error message at the bottom of the popup. There is an exception here if the return begins with the prefix "MESSAGE:". In this case the popup is closed and the return is displayed after the prefix in a message dialog. |
| enabled (optional) | (__default:__ true) If true, the button can be used, otherwise it is displayed as deactivated |
### Example
```php
{
"type": "PopupButton",
"caption": "Open Popup",
"popup": {
"caption": "My Element Popup",
"items": [
{
"type": "SelectVariable",
"name": "VariableTest",
"caption": "Some Variable"
}
]
}
},
{
"type": "PopupButton",
"caption": "Start Wizard",
"popup": {
"caption": "A title that is never seen since every page overrides it",
"closeCaption": "Close dialog",
"items": [
{
"type": "Label",
"caption": "This element is never seen since every page has its own items"
}
],
"pages": [
{
"caption": "Start",
"items": [
{
"type": "Label",
"caption": "Next page: Selection"
}
],
"nextPage": 2
},
{
"caption": "Never visible",
"items": [
{
"type": "Label",
"caption": "This page is never shown since the start page jumps directly to the page at index 2, the selection"
}
]
},
{
"caption": "Selection",
"items": [
{
"type": "Select",
"name": "NextPage",
"options": [
{"value": "page1", "caption": "Go to page 1"},
{"value": "page2", "caption": "Go to page 2"},
{"value": "close", "caption": "Done, close"}
],
"caption": "Choose next page"
}
],
"nextPage": "return $NextPage;"
},
{
"name": "page1",
"caption": "Page 1",
"items": [
{
"type": "Label",
"caption": "This is page 1 with 'Undo'"
}
],
"onUndo": "echo 'Undo page 1';",
"onConfirm": "echo 'Confirm page 1';"
},
{
"name": "page2",
"caption": "Page 2",
"items": [
{
"type": "Label",
"caption": "This is page 2, there is no 'Undo'. This is also the last page of the wizard."
}
],
"onConfirm": "echo 'Confirm page 2';"
}
]
}
}
```
## ProgressBar
Source: https://www.symcon.de/en/service/documentation/developer-area/sdk-tools/sdk-php/configuration-forms/progressbar/
_Requires Symcon >= 5.2_
Creates a progress bar.
The progress bar is helpful to inform a user about a possibly longer process by using [UpdateFormField](https://www.symcon.de/en/llms/developer/sdk-tools/sdk-php/module.md).
It is possible to display either a progressive bar or an indefinite bar that shows a loading animation.

### Parameters
| Parameter | Description |
| ------------------------ | --------------------------------------------------------------------------------------------------------------------------------------------------------------------------------------------------------------------------------------------------------------------------------------------------------------------------------------- |
| caption (optional) | Visible caption of the progress bar |
| current (optional) | (__default:__ 0) The current value of the progress bar - If the bar is displayed progressively, it is unfilled if the current value corresponds to the minimum value of the progress bar, completely filled if the current value corresponds to the maximum value of the progress bar and otherwise accordingly proportionately filled. |
| indeterminate (optional) | (__default:__ false) If true, the progress bar is indeterminate and shows an animation, otherwise the bar is displayed progressively on the basis of current, minimum and maximum |
| maximum (optional) | (__default:__ 100) The maximum value of the progress bar |
| minimum (optional) | (__default:__ 0) The minimum value of the progress bar |
| name (optional) | Name of the progress bar |
| type | ProgressBar |
| visible (optional) | (__default:__ true) If true, the button is visible, otherwise it is invisible |
| width (optional) | (__default:__ 300px) Fixed width of the input field in pixels or % as a string, e.g. "40%" or "250px" (since IP-Symcon 5.3) |
### Example
```php
{
"type": "ProgressBar",
"name": "IndeterminateProgress",
"indeterminate": true,
"caption": "loading..."
},
{
"type": "ProgressBar",
"name": "DeterminateProgress",
"minimum": 0,
"maximum": 50,
"current": 20,
"caption": "20 / 50"
}
```
## QrCode
Source: https://www.symcon.de/en/service/documentation/developer-area/sdk-tools/sdk-php/configuration-forms/qrcode/
_Requires Symcon >= 7.0_
Creates a QR Code.

### parameter
| parameter | description |
| ------------------ | ------------------------------------------------------------------------------------------- |
| caption (optional) | (__default:__ "") visible caption |
| center (optional) | (__default:__ false) If true the QR Code is displayed in the middle, otherwise left-aligned |
| description | (__default:__ true) If true, the text contained in the QR Code will be displayed below it |
| name (optional) | name of the QR Code/property to set |
| source | The string encoded in the QR Code |
| type | QrCode |
| visible (optional) | (__default:__ true) If true the QR Code is visible, otherwise it is invisible |
### example
```php
{ "type": "QrCode", "name": "Example", "caption": "Example text", "source": "An example text" }
```
## RadioButtonGroup
Source: https://www.symcon.de/en/service/documentation/developer-area/sdk-tools/sdk-php/configuration-forms/radiobuttongroup/
_Requires Symcon >= 9.1_
Creates a group of radio buttons with the heading __caption__.
If created in the "elements" area, the radio buttons set a property to the selected value __value__ when accepted.
The parameter __"name"__ defines which property is set.
> **Note:** With MultiSelect it is important to ensure that all value arrays contain the same names
> **Warning:** If RadioButtonGroup is used within lists, there is no MultiSelect.

### Parameter
| Parameter | Description |
| ------------------------ | ----------------------------------------------------------------------------------------------------------------------------------------------------------------------------------------------------------------------------------------------------------------------------------------- |
| caption | Visible caption of the group of radio buttons |
| download (optional) | (__default:__ "") If this parameter is not an empty string and the output of the onChange script is a [Data-URL](https://developer.mozilla.org/en-US/docs/Web/HTTP/Basics_of_HTTP/Data_URLs), the output is downloaded as a text file with the name of the download parameter. |
| enabled (optional) | (__default:__ true) If true, the group can be used, otherwise it is displayed as deactivated |
| itemsPosition (optional) | (__default:__ 0) The position of the configuration elements defined by "items" of the options 0: The elements are displayed below the respective radio button 1: The elements are displayed to the right of the respective radio button |
| link (optional) | (__default:__ false) If this parameter is true, the output of the onChange script is opened as a link. If it is false, the output is displayed as a dialog in the configuration form. |
| name (optional) | Name of the group/the property to be set |
| options | Array containing all options |
| onChange (optional) | (__default:__ "") Script which is executed when a radio button is selected. If the script consists of several lines, the individual lines can also be defined as an array. It has the same properties as onClick of the [Button](https://www.symcon.de/en/llms/developer/sdk-tools/sdk-php/configuration-forms.md) |
| type | RadioButtonGroup |
| value (optional) | (__default:__ first defined option) The value of the selected radio button - If there is an associated property, this parameter is overwritten by the property in the elements area |
| visible (optional) | (__default:__ true) If true, the group is visible, otherwise it is invisible |
| width (optional) | (__default:__ 300px) Fixed width of the group in pixels or % as a string, e.g. "40%" or "250px" |
### Parameters for options
| Parameter | Description |
| ------------------ | --------------------------------------------------------------------------------------------------------------------------------------------------------------------------------- |
| caption | Caption of a radio button |
| enabled (optional) | (__default:__ true) If true, the radio button is active and can be selected, otherwise it is shown as inactive and cannot be selected |
| items (optional) | (__default:__ []) List of configuration elements which are only displayed while this radio button is selected. The values of the elements of the other radio buttons are retained |
| value | Value that is transferred when selected. Can also contain another array, which transfers the values to several properties. |
### Example
```php
//Simple value transfer
//The "DeviceType" property is set to 0..3
//The group has 4 radio buttons
{ "type": "RadioButtonGroup", "name": "DeviceType", "caption": "Unit",
"options": [
{ "caption": "Bit (1Bit)", "value": 0 },
{ "caption": "Bits (2Bit)", "value": 1 },
{ "caption": "Bits (4Bit)", "value": 2 },
{ "caption": "Byte (8Bit)", "value": 3 }
]
}
//Multiple value transfer (MultiSelect)
//"name" of the RadioButtonGroup (here: "OutputDevice") must be set, but is not used to set the values.
//Properties "DeviceName", "DeviceChannels" and "DeviceNum" are set.
{ "type": "RadioButtonGroup", "name": "OutputDevice", "caption": "Output device",
"options": [
{"caption" : "No sound",
"value": [
{"name": "DeviceName", "value": "No sound"},
{"name": "DeviceChannels", "value": 0},
{"name": "DeviceNum", "value": 0}
]
},
{"caption" : "Headphones",
"value": [
{"name": "DeviceName", "value": "Headphones"},
{"name": "DeviceChannels", "value": 2},
{"name": "DeviceNum", "value": 1}
]
},
{"caption" : "Speaker",
"value": [
{"name": "DeviceName", "value": "Stereo speakers"},
{"name": "DeviceChannels", "value": 2},
{"name": "DeviceNum", "value": 2}
]
}
]
}
//Configuration elements of individual radio buttons
//The elements of the radio button "Network" are only displayed while it is selected
{ "type": "RadioButtonGroup", "name": "ConnectionType", "caption": "Connection",
"options": [
{ "caption": "USB", "value": 0 },
{ "caption": "Network", "value": 1,
"items": [
{ "type": "ValidationTextBox", "name": "Host", "caption": "Host" },
{ "type": "NumberSpinner", "name": "Port", "caption": "Port" }
]
}
]
}
```
## RowLayout
Source: https://www.symcon.de/en/service/documentation/developer-area/sdk-tools/sdk-php/configuration-forms/rowlayout/
_Requires Symcon >= 5.0_
Creates a row in which form fields are displayed side by side.

### Parameter
| Parameter | Description |
| ------------------ | ------------------------------------------------------------------------------------------------ |
| items | List with configuration elements within the row (can be changed since IP-Symcon 6.0) |
| name (optional) | Name of the row |
| type | RowLayout |
| visible (optional) | (__default:__ true) If true, the row is visible, otherwise it is invisible (since IP-Symcon 5.2) |
### Example
```php
// row layout
{
"type": "RowLayout",
"items": [
{
"type": "SelectLocation",
"name": "Location",
"caption": "My Location"
},{
"type": "Button",
"caption": "Test",
"onClick": "TM_Update($id);"
},{
"type": "Button",
"caption": "Test2",
"onClick": "TM_Update2($id);"
}
]
}
```
## ScriptEditor
Source: https://www.symcon.de/en/service/documentation/developer-area/sdk-tools/sdk-php/configuration-forms/scripteditor/
_Requires Symcon >= 6.0_
Creates a script editor with the heading __caption__.
If created in the "elements" area, the ScriptEditor sets a property on transfer to the entered string.
The parameter __"name"__ defines which property is set.

### Parameters
| Parameter | Description |
| ------------------- | ------------------------------------------------------------------------------------------------------------------------------------------------------------------------------------ |
| caption (optional) | (__default:__ "") Visible caption of the input field |
| enabled (optional) | (__default:__ true) If true, the button can be used, otherwise it is displayed as deactivated |
| name (optional) | Name of the input field/the property to be set |
| type | ScriptEditor |
| value (optional) | (__default:__ Placeholder script with PHP tag) The value of the input field - If there is an associated property, this parameter is overwritten by the property in the elements area |
| visible (optional) | (__default:__ true) If true, the input field is visible, otherwise it is invisible |
| width (optional) | (__default:__ 100%) Fixed width of the input field in pixels or % as a string, e.g. "40%" or "250px", |
| rowCount (optional) | (__default:__ 5) Number of lines displayed in the editor. If the script itself contains more lines, a scroll bar is displayed |
### Example
```php
{ "type": "ScriptEditor", "name": "Script" }
```
## Select
Source: https://www.symcon.de/en/service/documentation/developer-area/sdk-tools/sdk-php/configuration-forms/select/
Creates a drop-down menu with the heading __caption__.
If created in the "elements" area, the drop-down menu sets a property to the selected value __value__ when accepted.
The parameter __"name"__ defines which property is set.
> **Note:** With MultiSelect it is important to ensure that all value arrays contain the same names
> **Warning:** If Select is used within lists, there is no MultiSelect.

### Parameter
| Parameter | Description |
| ------------------------ | ------------------------------------------------------------------------------------------------------------------------------------------------------------------------------------------------------------------------------------------------------------------------------------------------------------------------------------ |
| caption | Visible caption of the drop-down menu |
| download (optional) | (__default:__ "") If this parameter is not an empty string and the output of the onChange script is a [Data-URL](https://developer.mozilla.org/en-US/docs/Web/HTTP/Basics_of_HTTP/Data_URLs), the output is downloaded as a text file with the name of the download parameter. (since Symcon 7.0) |
| enabled (optional) | (__default:__ true) If true, the drop-down menu can be used, otherwise it is displayed as deactivated (since Symcon 5.2) |
| itemsPosition (optional) | (__default:__ 0) The position of the configuration elements defined by "items" of the options (since Symcon 9.1) 0: The elements are displayed below the drop-down menu 1: The elements are displayed to the right of the drop-down menu |
| link (optional) | (__default:__ false) If this parameter is true, the output of the onChange script is opened as a link. If it is false, the output is displayed as a dialog in the configuration form. (since Symcon 6.0) |
| name (optional) | Name of the drop-down menu/the property to be set |
| options | Array containing all options |
| onChange (optional) | (__default:__ "") Script which is executed when the dropdown value is changed. If the script consists of several lines, the individual lines can also be defined as an array (arrays are supported from version 6.0). It has the same properties as onClick of the [Button](https://www.symcon.de/en/llms/developer/sdk-tools/sdk-php/configuration-forms.md). (since Symcon 5.2) |
| type | Select |
| value (optional) | (__default:__ first defined option) The value of the drop-down menu - If there is an associated property, this parameter is overwritten by the property in the elements area (since Symcon 5.2) |
| visible (optional) | (__default:__ true) If true, the drop-down menu is visible, otherwise it is invisible (since Symcon 5.2) |
| width (optional) | (__default:__ 300px) Fixed width of the input field in pixels or % as a string, e.g. "40%" or "250px" (since Symcon 5.3) |
### Parameters for options
| Parameter | Description |
| ------------------ | ---------------------------------------------------------------------------------------------------------------------------------------------------------------------------------------- |
| caption | Caption of an option |
| enabled (optional) | (__default:__ true) If true, the option is active and can be selected, otherwise it is shown as inactive and cannot be selected (since Symcon 9.1) |
| items (optional) | (__default:__ []) List of configuration elements which are only displayed while this option is selected. The values of the elements of the other options are retained (since Symcon 9.1) |
| label | Caption of an option _(deprecated)_ |
| value | Value that is transferred when selected. Can also contain another array, which transfers the values to several properties. |
### Example
```php
//Simple value transfer
//The "DeviceType" property is set to 0..3
//The drop-down menu has 4 entries
{ "type": "Select", "name": "DeviceType", "caption": "Unit",
"options": [
{ "caption": "Bit (1Bit)", "value": 0 },
{ "caption": "Bits (2Bit)", "value": 1 },
{ "caption": "Bits (4Bit)", "value": 2 },
{ "caption": "Byte (8Bit)", "value": 3 }
]
}
//Multiple value transfer (MultiSelect)
//"name" of the Select (here: "OutputDevice") must be set, but is not used to set the values.
//Properties "DeviceName", "DeviceChannels" and "DeviceNum" are set.
{ "type": "Select", "name": "OutputDevice", "caption": "Output device",
"options": [
{"caption" : "No sound",
"value": [
{"name": "DeviceName", "value": "No sound"},
{"name": "DeviceChannels", "value": 0},
{"name": "DeviceNum", "value": 0}
]
},
{"caption" : "Headphones",
"value": [
{"name": "DeviceName", "value": "Headphones"},
{"name": "DeviceChannels", "value": 2},
{"name": "DeviceNum", "value": 1}
]
},
{"caption" : "Speaker",
"value": [
{"name": "DeviceName", "value": "Stereo speakers"},
{"name": "DeviceChannels", "value": 2},
{"name": "DeviceNum", "value": 2}
]
}
]
}
//Configuration elements of individual options
//The elements of the option "Network" are only displayed while it is selected
{ "type": "Select", "name": "ConnectionType", "caption": "Connection",
"options": [
{ "caption": "USB", "value": 0 },
{ "caption": "Network", "value": 1,
"items": [
{ "type": "ValidationTextBox", "name": "Host", "caption": "Host" },
{ "type": "NumberSpinner", "name": "Port", "caption": "Port" }
]
}
]
}
```
## SelectAction
Source: https://www.symcon.de/en/service/documentation/developer-area/sdk-tools/sdk-php/configuration-forms/selectaction/
_Requires Symcon >= 6.0_
Creates an input for an [action](https://www.symcon.de/en/llms/developer/sdk-tools/sdk-php.md) .

If created in the "elements" area, the property __name__ is set to a JSON-coded object, which contains the following parameters:
| Parameter | Description |
| ---------- | ----------------- |
| actionID | Action ID |
| parameters | Action parameters |
### Parameters
| Parameter | Description |
| ------------------------------------ | -------------------------------------------------------------------------------------------------------------------------------------------------------------------------------------------------------------- |
| caption (optional) | (__default:__ "") Visible caption (since IP-Symcon 7.1) |
| enabled (optional) | (__default:__ true) If true, the selection can be used, otherwise it is displayed as deactivated |
| environment (optional) | (__default:__ "Default") Defines the environment of the action selection, here it can be determined which types of actions are available for selection, see also [Actions](https://www.symcon.de/en/llms/developer/sdk-tools/sdk-php.md) |
| highestPriorityOnly (optional) | (__default:__ false) If false, the element has a selection of all suitable actions, otherwise the action with the highest priority is automatically selected |
| includeDefaultEnvironment (optional) | (__default:__ true) If false, only actions that support the environment _environment_ are offered for selection; if true, all actions of the "Default" environment are also offered |
| name (optional) | Name of the selection/the property to be set |
| targetID (optional) | (__default:__ -2) With -2 the element has a target selection, otherwise the target with this ID is set as the target, where -1 stands for general actions |
| type | SelectAction |
| value (optional) | (__default:__ no action selected) The value of the selection - If there is an associated property, this parameter will be overwritten by the property in the elements area |
| visible (optional) | (__default:__ true) If true, the selection is visible, otherwise it is invisible |
| width (optional) | (__default:__ 300px) Fixed width of the input field in pixels or % as a string, e.g. "40%" or "250px" |
| saveTarget (optional) | (__default:__ true) If true, the target is saved as TARGET as part of the parameters |
| saveEnvironment (optional) | (__default:__ true) If true, the environment is saved as ENVIRONMENT as part of the parameters |
| saveParent (optional) | (__default:__ true) If true, the InstanceID is saved as PARENT as part of the parameters |
### Example 1: Target, Environment and InstanceID are constantly saved as part of the property
By default, all required parameters are saved as a return from SelectAction. This is the easiest way to perform the action.
```php
{ "type": "SelectAction", "name": "PropertyAction", "targetID": 12345 }
// PHP code in the module
$action = json_decode($this->ReadPropertyString('PropertyAction'), true);
IPS_RunAction($action['actionID'], $action['parameters']);
```
### Example 2: Target, environment and InstanceID are set dynamically
If the additional parameters are not saved as a return, they have to be added manually. In this way, for example, actions can be exchanged between entities and no redundant data is stored.
```php
{ "type": "SelectAction", "name": "PropertyAction", "targetID": 12345, "saveTarget": false, "saveEnvironment": false, "saveParent": false }
// PHP code in the module
$action = json_decode($this->ReadPropertyString('PropertyAction'), true);
$parameters = $action['parameters'];
$parameters['TARGET'] = 12345;
$parameters['ENVIRONMENT'] = 'Default';
$parameters['PARENT'] = $this->InstanceID;
IPS_RunAction($action['actionID'], $parameters);
```
## SelectCategory
Source: https://www.symcon.de/en/service/documentation/developer-area/sdk-tools/sdk-php/configuration-forms/selectcategory/
Creates a selection dialog with the caption __caption__.
If created in the "elements" area, the property __name__ is set to the ID of the selected category when accepted.

### Parameter
| Parameter | Description |
| ------------------- | --------------------------------------------------------------------------------------------------------------------------------------------------------------------------------------------------------------------------------------------------------------------------------------------------------------------------------------------------------- |
| caption | Visible caption |
| download (optional) | (__default:__ "") If this parameter is not an empty string and the output of the onChange script is a [Data-URL](https://developer.mozilla.org/en-US/docs/Web/HTTP/Basics_of_HTTP/Data_URLs), the output is downloaded as a text file with the name of the download parameter. (since IP-Symcon 7.0) |
| enabled (optional) | (__default:__ true) If true, the category selection can be used, otherwise it is shown deactivated (since IP-Symcon 5.2) |
| link (optional) | (__default:__ false) If this parameter is true, the output of the onChange script is opened as a link. If it is false, the output is displayed as a dialog in the configuration form. (since IP-Symcon 6.0) |
| name (optional) | Name of the category selection/the property to be set |
| onChange (optional) | (__default:__ "") Script which is executed when the value of the category selection is changed. If the script consists of several lines, the individual lines can also be defined as an array (arrays are supported since version 6.0). It has the same properties as onClick of the [Button](https://www.symcon.de/en/llms/developer/sdk-tools/sdk-php/configuration-forms.md). (since IP-Symcon 5.2) |
| type | SelectCategory |
| value (optional) | (__default:__ 1) The value of the category selection - If there is an associated property, this parameter is overwritten by the property in the elements area (since IP-Symcon 5.2) |
| visible (optional) | (__default:__ true) If true, the selection is visible, otherwise it is invisible (since IP-Symcon 5.2) |
| width (optional) | (__default:__ 300px) Fixed width of the category selection in pixels or % as a string, e.g. "40%" or "250px" (since IP-Symcon 5.3) |
### Example
```php
{ "type": "SelectCategory", "name": "PropertyCategoryID", "caption": "Target" }
```
## SelectColor
Source: https://www.symcon.de/en/service/documentation/developer-area/sdk-tools/sdk-php/configuration-forms/selectcolor/
_Requires Symcon >= 4.2_
Creates a selection dialog with the caption __caption__.
If created in the "elements" area, the property __name__ is set to the value as hex string of the selected color when accepted.
If the value is deleted, it is set to transparent(value = -1).

### Parameters
| Parameter | Description |
| --------------------------- | ---------------------------------------------------------------------------------------------------------------------------------------------------------------------------------------------------------------------------------------------------------------------------------------------------------------------------- |
| allowTransparent (optional) | (__default:__ true) If set, the selection can be deleted and thereby set to "transparent". Otherwise the value cannot be deleted and therefore cannot be set to "transparent". |
| caption | Visible caption |
| download (optional) | (__default:__ "") If this parameter is not an empty string and the output of the onChange script is a [Data-URL](https://developer.mozilla.org/en-US/docs/Web/HTTP/Basics_of_HTTP/Data_URLs), the output is downloaded as a text file with the name of the download parameter. (since Symcon 7.0) |
| enabled (optional) | (__default:__ true) If true, the selection can be used, otherwise it is displayed as deactivated (since Symcon 5.2) |
| link (optional) | (__default:__ false) If this parameter is true, the output of the onChange script is opened as a link. If it is false, the output is displayed as a dialog in the configuration form. (since Symcon 6.0) |
| name (optional) | Name of the selection/the property to be set |
| onChange (optional) | (__default:__ "") Script which is executed when the color is changed. If the script consists of several lines, the individual lines can also be defined as an array (arrays are supported since version 6.0). It has the same properties as onClick of the [Button](https://www.symcon.de/en/llms/developer/sdk-tools/sdk-php/configuration-forms.md). (since Symcon 5.2) |
| transparentCaption | (__default:__ "Transparent") Caption that is shown when the selection is set to "transparent", i.e., -1 (since Symcon 8.2) |
| type | SelectColor |
| value (optional) | (__default:__ -1 if allowTransparent, otherwise 0) The value of the selection - If there is an associated property, this parameter is overwritten by the property in the elements area (since Symcon 5.2) |
| visible (optional) | (__default:__ true) If true, the selection is visible, otherwise it is invisible (since Symcon 5.2) |
| width (optional) | (__default:__ 300px) Fixed width of the color selection in pixels or % as a string, e.g. "40%" or "250px" (since Symcon 5.3) |
### Example
```php
{ "type": "SelectColor", "name": "HexColorProperty", "caption": "Color" }
```
## SelectCondition
Source: https://www.symcon.de/en/service/documentation/developer-area/sdk-tools/sdk-php/configuration-forms/selectcondition/
_Requires Symcon >= 6.1_
Creates an input for conditions.

If created in the "elements" area, the property __name__ is set to a JSON-coded list when accepted, whereby each element represents an object with the following parameters:
| Parameter | Description |
| --------------------------- | ----------------------------------------------------------------------------------------------------------------------- |
| id | Condition ID |
| parentID | Parent condition ID |
| operation | Operation for linking the individual rules (0: AND, 1: OR, 2: NAND (not yet implemented), 3: NOR (not yet implemented)) |
| rules | Object that describes the rules of the condition |
#### rules
| Parameter | Description |
| ------------ | -------------------------- |
| variable | List of the variable rules |
| date | List of date rules |
| time | List of time rules |
| dayOfTheWeek | List of weekday rules |
#### Representation of a rule
| Parameter | Description |
| ------------------------------------- | ------------------------------------------------------------------------------------------------------------------------------------------------------------------------------------------------------------------------------------------------------------------------------------------------------------------------------------------------------------------------------------------------------------------------------------------------------------------------------------------------------------------------------------------------------------------------------------------------------------------------------------------------------------------------------------------------------------------------------------------------------------------------------------------------- |
| id | Unique ID of the rule within the rule list |
| comparison | Comparison operator with which the current value is compared with the comparison value (0: =, 1: ≠, 2: >, 3: ≥, 4: <, 5: ≤) |
| value | The comparison value, the type depends on the type of rule _Variable_: If "type" = 0, this is the absolute comparison value that matches the type of the variable; if "type" = 1, this is a variable ID whose value is used for comparison _Date_: The value is saved as an object with the fields "year", "month" and "day", analogous to the representation of [IPS_SetEventConditionDateRule](https://www.symcon.de/en/llms/functions/management-events.md) _Time_: The value is saved as an object with the fields "hour", "minute" and "second", analogous to the representation of [IPS_SetEventConditionTimeRule](https://www.symcon.de/en/llms/functions/management-events.md) _Weekday_: The comparison day is saved as a number (1: Monday, 2: Tuesday, 3: Wednesday, 4: Thursday, 5: Friday, 6: Saturday, 7: Sunday) |
| variableID (only with variable rules) | The ID of the variable that contains the current value |
| type (only with variable rules) | If 0 the variable is compared with an absolute value, if 1 it is compared with the value of another variable |
> **Note:** Instead of evaluating a configured condition independently, the [IPS_IsConditionPassing](https://www.symcon.de/en/llms/functions/management-events.md) function should be used. There the value of the SelectCondition can be used directly as a parameter.
> **Note:** If the saved condition contains nested conditions or "multi" is set to false and the condition contains several rules, the rule is displayed as "complex" and cannot be edited.
### Parameters
| Parameter | Description |
| ------------------ | -------------------------------------------------------------------------------------------------------------------------------------------------------------------- |
| caption (optional) | (__default:__ "") Visible caption (since IP-Symcon 7.1) |
| enabled (optional) | (__default:__ true) If true, the selection can be used, otherwise it is displayed as deactivated |
| multi (optional) | (__default:__ false) If false, an individual rule is defined by the element, if true an entire condition with any number of rules |
| name (optional) | Name of the selection/the property to be set |
| type | SelectCondition |
| value (optional) | (__default:__ no condition) The value of the selection - If there is an associated property, this parameter will be overwritten by the property in the elements area |
| visible (optional) | (__default:__ true) If true, the selection is visible, otherwise it is invisible |
| width (optional) | (__default:__ 300px, if multi = false, otherwise 100%) Fixed width of the input field in pixels or % as a string, e.g. "40%" or "250px" |
### Example
```php
{ "type": "SelectCondition", "name": "PropertyCondition", "multi": true }
```
## SelectDate
Source: https://www.symcon.de/en/service/documentation/developer-area/sdk-tools/sdk-php/configuration-forms/selectdate/
_Requires Symcon >= 5.0_
Creates an input for a date with the caption __caption__.

If created in the "elements" area, the property __name__ is set to a JSON-coded object, which contains the following parameters:
| Parameter | Description |
| --------- | ----------------- |
| day | Day of the date |
| month | Month of the date |
| year | Year of the date |
If no time was selected, all parameters are set to 0.
### Parameters
| Parameter | Description |
| ------------------ | ---------------------------------------------------------------------------------------------------------------------------------------------------------------------------------------------- |
| caption | Visible caption |
| enabled (optional) | (__default:__ true) If true, the selection can be used, otherwise it is displayed as deactivated (since IP-Symcon 5.2) |
| name (optional) | Name of the selection/the property to be set |
| type | SelectDate |
| value (optional) | (__default:__ no time selected) The value of the selection - If there is an associated property, this parameter will be overwritten by the property in the elements area (since IP-Symcon 5.2) |
| visible (optional) | (__default:__ true) If true, the selection is visible, otherwise it is invisible (since IP-Symcon 5.2) |
| width (optional) | (__default:__ 300px) Fixed width of the input field in pixels or % as a string, e.g. "40%" or "250px" (since IP-Symcon 5.3) |
### Example
```php
{ "type": "SelectDate", "name": "PropertyDate", "caption": "date" }
```
## SelectDateTime
Source: https://www.symcon.de/en/service/documentation/developer-area/sdk-tools/sdk-php/configuration-forms/selectdatetime/
_Requires Symcon >= 5.0_
Creates an input for a date and time with the caption __caption__.

If created in the "elements" area, the property __name__ is set to a JSON-coded object, which contains the following parameters:
| Parameter | Description |
| --------- | ----------------- |
| day | Day of the date |
| hour | Hours of time |
| minute | Minutes of time |
| month | Month of the date |
| second | Seconds of time |
| year | Year of the date |
If no time was selected, all parameters are set to 0.
### Parameters
| Parameter | Description |
| ------------------ | ---------------------------------------------------------------------------------------------------------------------------------------------------------------------------------------------- |
| caption | Visible caption |
| enabled (optional) | (__default:__ true) If true, the selection can be used, otherwise it is displayed as deactivated (since IP-Symcon 5.2) |
| name (optional) | Name of the selection/the property to be set |
| type | SelectDateTime |
| value (optional) | (__default:__ no time selected) The value of the selection - If there is an associated property, this parameter will be overwritten by the property in the elements area (since IP-Symcon 5.2) |
| visible (optional) | (__default:__ true) If true, the selection is visible, otherwise it is invisible (since IP-Symcon 5.2) |
| width (optional) | (__default:__ 300px) Fixed width of the input field in pixels or % as a string, e.g. "40%" or "250px" (since IP-Symcon 5.3) |
### Example
```php
{ "type": "SelectDateTime", "name": "PropertyDateTime", "caption": "Date + Time" }
```
## SelectEvent
Source: https://www.symcon.de/en/service/documentation/developer-area/sdk-tools/sdk-php/configuration-forms/selectevent/
Creates a selection dialog with the caption __caption__.
If created in the "elements" area, the property __name__ is set to the ID of the selected event when it is accepted.

### Parameter
| Parameter | Description |
| ------------------- | ----------------------------------------------------------------------------------------------------------------------------------------------------------------------------------------------------------------------------------------------------------------------------------------------------------------------------------------------------- |
| caption | Visible caption |
| download (optional) | (__default:__ "") If this parameter is not an empty string and the output of the onChange script is a [Data-URL](https://developer.mozilla.org/en-US/docs/Web/HTTP/Basics_of_HTTP/Data_URLs), the output is downloaded as a text file with the name of the download parameter. (since IP-Symcon 7.0) |
| enabled (optional) | (__default:__ true) If true, the selection can be used, otherwise it is displayed as deactivated (since IP-Symcon 5.2) |
| link (optional) | (__default:__ false) If this parameter is true, the output of the onChange script is opened as a link. If it is false, the output is displayed as a dialog in the configuration form. (since IP-Symcon 6.0) |
| name (optional) | Name of the event selection/the property to be set |
| onChange (optional) | (__default:__ "") Script which is executed when the value of the event selection is changed. If the script consists of several lines, the individual lines can also be defined as an array (arrays are supported since version 6.0). It has the same properties as onClick of the [Button](https://www.symcon.de/en/llms/developer/sdk-tools/sdk-php/configuration-forms.md) (since IP-Symcon 5.2) |
| type | SelectEvent |
| value (optional) | (__default:__ 0) The value of the event selection - If there is an associated property, this parameter is overwritten by the property in the elements area (since IP-Symcon 5.2) |
| visible (optional) | (__default:__ true) If true, the event selection is visible, otherwise it is invisible (since IP-Symcon 5.2) |
| width (optional) | (__default:__ 300px) Fixed width of the event selection in pixels or % as a string, e.g. "40%" or "250px" (since IP-Symcon 5.3) |
### Example
```php
{ "type": "SelectEvent", "name": "PropertyEventID", "caption": "Target" }
```
## SelectFile
Source: https://www.symcon.de/en/service/documentation/developer-area/sdk-tools/sdk-php/configuration-forms/selectfile/
_Requires Symcon >= 4.2_
Creates a selection dialog with the caption __caption__.
If created in the "elements" area, the property __name__ is set to the value of the selected file when accepted. This means that the content of the selected file is saved as a Base64 encoded string.

### Parameters
| Parameter | Description |
| --------------------- | ---------------------------------------------------------------------------------------------------------------------------------------------------------------------------------------------------------------------------------------------------------------------------------------------------------------------------------------------------- |
| caption | Visible caption |
| download (optional) | (__default:__ "") If this parameter is not an empty string and the output of the onChange script is a [Data-URL](https://developer.mozilla.org/en-US/docs/Web/HTTP/Basics_of_HTTP/Data_URLs), the output is downloaded as a text file with the name of the download parameter. (since IP-Symcon 7.0) |
| enabled (optional) | (__default:__ true) If true, the file selection can be used, otherwise it is displayed as deactivated (since IP-Symcon 5.2) |
| extensions (optional) | Allowed file extensions. Separated by a comma and introduced with a period Example: .jpg,.gif,.txt |
| link (optional) | (__default:__ false) If this parameter is true, the output of the onChange script is opened as a link. If it is false, the output is displayed as a dialog in the configuration form. (since IP-Symcon 6.0) |
| name (optional) | Name of the file selection/the string property to be set |
| onChange (optional) | (__default:__ "") Script which is executed when the value of the file selection is changed. If the script consists of several lines, the individual lines can also be defined as an array (arrays are supported since version 6.0). It has the same properties as onClick of the [Button](https://www.symcon.de/en/llms/developer/sdk-tools/sdk-php/configuration-forms.md) (since IP-Symcon 5.2) |
| type | SelectFile |
| value (optional) | (__default:__ 0) The value of the file selection - If there is an associated property, this parameter is overwritten by the property in the elements area (since IP-Symcon 5.2) |
| visible (optional) | (__default:__ true) If true, the file selection is visible, otherwise it is invisible (since IP-Symcon 5.2) |
| width (optional) | (__default__ 300px) Fixed width of the file selection in pixels or % as a string, e.g. "40%" or "250px" (since IP-Symcon 5.3) |
### Example
```php
{ "type": "SelectFile", "name": "PropertyStringFile", "caption": "Target", "extensions": ".jpg,.gif,.txt" }
```
## SelectIcon
Source: https://www.symcon.de/en/service/documentation/developer-area/sdk-tools/sdk-php/configuration-forms/selecticon/
Creates a selection dialog with the caption __caption__.
If created in the "elements" area, the property __name__ is set to the name of the selected icon when accepted.
If the value is deleted, it is set to an empty string.

### Parameters
| Parameter | Description |
| ------------------- | ------------------------------------------------------------------------------------------------------------------------------------------------------------------------------------------------------------------------------------------------------------------------------------------------------------------------------ |
| caption | Visible caption |
| download (optional) | (__default:__ "") If this parameter is not an empty string and the output of the onChange script is a [Data-URL](https://developer.mozilla.org/en-US/docs/Web/HTTP/Basics_of_HTTP/Data_URLs), the output is downloaded as a text file with the name of the download parameter. (since IP-Symcon 7.0) |
| enabled (optional) | (__default:__ true) If true, the selection can be used, otherwise it is displayed as deactivated (since IP-Symcon 5.2) |
| link (optional) | (__default:__ false) If this parameter is true, the output of the onChange script is opened as a link. If it is false, the output is displayed as a dialog in the configuration form. (since IP-Symcon 6.0) |
| name (optional) | Name of the selection/the property to be set |
| onChange (optional) | (__default:__ "") Script which is executed when the icon is changed. If the script consists of several lines, the individual lines can also be defined as an array (arrays are supported since version 6.0). It has the same properties as onClick of the [Button](https://www.symcon.de/en/llms/developer/sdk-tools/sdk-php/configuration-forms.md). (since IP-Symcon 5.2) |
| type | SelectIcon |
| value (optional) | (__default:__ "") The value of the selection - If there is an associated property, this parameter is overwritten by the property in the elements area (since IP-Symcon 5.2) |
| visible (optional) | (__default:__ true) If true, the selection is visible, otherwise it is invisible (since IP-Symcon 5.2) |
| width (optional) | (__default:__ 300px) Fixed width of the color selection in pixels or % as a string, e.g. "40%" or "250px" (since IP-Symcon 5.3) |
### Example
```php
{ "type": "SelectIcon", "name": "IconProperty", "caption": "Icon" }
```
## SelectInstance
Source: https://www.symcon.de/en/service/documentation/developer-area/sdk-tools/sdk-php/configuration-forms/selectinstance/
Creates a selection dialog with the caption __caption__.
If created in the "elements" area, the property __name__ is set to the ID of the selected instance when accepted.

### Parameters
| Parameter | Description |
| ----------------------- | -------------------------------------------------------------------------------------------------------------------------------------------------------------------------------------------------------------------------------------------------------------------------------------------------------------------------------------------------------- |
| caption | Visible caption |
| download (optional) | (__default:__ "") If this parameter is not an empty string and the output of the onChange script is a [Data-URL](https://developer.mozilla.org/en-US/docs/Web/HTTP/Basics_of_HTTP/Data_URLs), the output is downloaded as a text file with the name of the download parameter. (since IP-Symcon 7.0) |
| enabled (optional) | (__default:__ true) If true, the instance selection can be used, otherwise it is displayed as deactivated (since IP-Symcon 5.2) |
| link (optional) | (__default:__ false) If this parameter is true, the output of the onChange script is opened as a link. If it is false, the output is displayed as a dialog in the configuration form. (since IP-Symcon 6.0) |
| name (optional) | Name of the instance selection/the property to be set |
| onChange (optional) | (__default:__ "") Script which is executed when the value of the instance selection is changed. If the script consists of several lines, the individual lines can also be defined as an array (arrays are supported since version 6.0). It has the same properties as onClick of the [Button](https://www.symcon.de/en/llms/developer/sdk-tools/sdk-php/configuration-forms.md) (since IP-Symcon 5.2) |
| type | SelectInstance |
| validModules (optional) | (__default:__ []) The selection is restricted to instances that have one of the defined moduleIDs. If the list is empty, all instances are allowed. If the selected instance does not correspond to any of the moduleIDs, an error is displayed and changes cannot be accepted. (since IP-Symcon 5.5) |
| value (optional) | (__default:__ 1) The value of the instance selection - If there is an associated property, this parameter is overwritten by the property in the elements area (since IP-Symcon 5.2) |
| visible (optional) | (__default:__ true) If true, the instance selection is visible, otherwise it is invisible (since IP-Symcon 5.2) |
| width (optional) | (__default:__ 300px) Fixed width of the instance selection in pixels or % as a string, e.g. "40%" or "250px" (since IP-Symcon 5.3) |
### Example
```php
{ "type": "SelectInstance", "name": "PropertyInstanceID", "caption": "Target" }
```
## SelectLink
Source: https://www.symcon.de/en/service/documentation/developer-area/sdk-tools/sdk-php/configuration-forms/selectlink/
Creates a selection dialog with the caption __caption__.
If created in the "elements" area, the property __name__ is set to the ID of the selected link when accepted.

### Parameter
| Parameter | Description |
| ------------------- | ---------------------------------------------------------------------------------------------------------------------------------------------------------------------------------------------------------------------------------------------------------------------------------------------------------------------------------------------------- |
| caption | Visible caption |
| download (optional) | (__default:__ "") If this parameter is not an empty string and the output of the onChange script is a [Data-URL](https://developer.mozilla.org/en-US/docs/Web/HTTP/Basics_of_HTTP/Data_URLs), the output is downloaded as a text file with the name of the download parameter. (since IP-Symcon 7.0) |
| enabled (optional) | (__default:__ true) If true, the link selection can be used, otherwise it is displayed as deactivated (since IP-Symcon 5.2) |
| link (optional) | (__default:__ false) If this parameter is true, the output of the onChange script is opened as a link. If it is false, the output is displayed as a dialog in the configuration form. (since IP-Symcon 6.0) |
| name (optional) | Name of the selection/the property to be set |
| onChange (optional) | (__default:__ "") Script which is executed when the value of the link selection is changed. If the script consists of several lines, the individual lines can also be defined as an array (arrays are supported since version 6.0). It has the same properties as onClick of the [Button](https://www.symcon.de/en/llms/developer/sdk-tools/sdk-php/configuration-forms.md) (since IP-Symcon 5.2) |
| type | SelectLink |
| value (optional) | (__default:__ 1) The value of the link selection - If there is an associated property, this parameter is overwritten by the property in the elements area (since IP-Symcon 5.2) |
| visible (optional) | (__default:__ true) If true, the link selection is visible, otherwise it is invisible (since IP-Symcon 5.2) |
| width (optional) | (__default:__ 300px) Fixed width of the color selection in pixels or % as a string, e.g. "40%" or "250px" (since IP-Symcon 5.3) |
### Example
```php
{ "type": "SelectLink", "name": "PropertyLinkID", "caption": "Target" }
```
## SelectLocation
Source: https://www.symcon.de/en/service/documentation/developer-area/sdk-tools/sdk-php/configuration-forms/selectlocation/
_Requires Symcon >= 5.0_
Creates an input for a position with the caption __caption__. Here, the position can be selected via map if internet access is available. Alternatively, the longitude and latitude can also be entered manually.


If created in the "elements" area, the property __name__ is set to a JSON-coded object, which contains the following parameters:
| Parameter | Description |
| --------- | ------------------------- |
| latitude | Latitude of the position |
| longitude | Longitude of the position |
If no position was selected, all parameters are set to 0.
### Parameters
| Parameter | Description |
| ------------------ | -------------------------------------------------------------------------------------------------------------------------------------------------------------------------------------------------- |
| caption | Visible caption |
| enabled (optional) | (__default:__ true) If true, the selection can be used, otherwise it is displayed as deactivated (since IP-Symcon 5.2) |
| name (optional) | Name of the selection/the property to be set |
| type | SelectLocation |
| value (optional) | (__default:__ no position selected) The value of the selection - If there is an associated property, this parameter will be overwritten by the property in the elements area (since IP-Symcon 5.2) |
| visible (optional) | (__default:__ true) If true, the selection is visible, otherwise it is invisible (since IP-Symcon 5.2) |
| width (optional) | (__default:__ 300px) Fixed width of the input field in pixels or % as a string, e.g. "40%" or "250px" (since IP-Symcon 5.3) |
### Example
```php
{ "type": "SelectLocation", "name": "Location", "caption": "Home" }
```
## SelectMedia
Source: https://www.symcon.de/en/service/documentation/developer-area/sdk-tools/sdk-php/configuration-forms/selectmedia/
Creates a selection dialog with the caption __caption__.
If created in the "elements" area, the property __name__ is set to the ID of the selected medium when accepted.

### Parameters
| Parameter | Description |
| ------------------- | -------------------------------------------------------------------------------------------------------------------------------------------------------------------------------------------------------------------------------------------------------------------------------------------------------------------------------------------------------- |
| caption | Visible caption |
| download (optional) | (__default:__ "") If this parameter is not an empty string and the output of the onChange script is a [Data-URL](https://developer.mozilla.org/en-US/docs/Web/HTTP/Basics_of_HTTP/Data_URLs), the output is downloaded as a text file with the name of the download parameter. (since IP-Symcon 7.0) |
| enabled (optional) | (__default:__ true) If true, the media selection can be used, otherwise it is displayed as deactivated (since IP-Symcon 5.2) |
| link (optional) | (__default:__ false) If this parameter is true, the output of the onChange script is opened as a link. If it is false, the output is displayed as a dialog in the configuration form. (since IP-Symcon 6.0) |
| name (optional) | Name of the media selection/the property to be set |
| onChange (optional) | (__default:__ "") Script which is executed when the value of the category selection is changed. If the script consists of several lines, the individual lines can also be defined as an array (arrays are supported since version 6.0). It has the same properties as onClick of the [Button](https://www.symcon.de/en/llms/developer/sdk-tools/sdk-php/configuration-forms.md) (since IP-Symcon 5.2) |
| type | SelectMedia |
| value (optional) | (__default:__ 1) The value of the media selection - If there is an associated property, this parameter is overwritten by the property in the elements area (since IP-Symcon 5.2) |
| visible (optional) | (__default:__ true) If true, the media selection is visible, otherwise it is invisible (since IP-Symcon 5.2) |
| width (optional) | (__default:__ 300px) Fixed width of the media selection in pixels or % as a string, e.g. "40%" or "250px" (since IP-Symcon 5.3) |
### Example
```php
{ "type": "SelectMedia", "name": "PropertyMediaID", "caption": "Target" }
```
## SelectModule
Source: https://www.symcon.de/en/service/documentation/developer-area/sdk-tools/sdk-php/configuration-forms/selectmodule/
_Requires Symcon >= 5.5_
Creates a selection dialog with the caption __caption__.
If created in the "elements" area, the property __name__ is set to the ID of the selected instance when accepted.

### Parameters
| Parameter | Description |
| ------------------- | ---------------------------------------------------------------------------------------------------------------------------------------------------------------------------------------------------------------------------------------------------------------------------------------------------------------------------------- |
| caption | Visible caption |
| download (optional) | (__default:__ "") If this parameter is not an empty string and the output of the onChange script is a [Data-URL](https://developer.mozilla.org/en-US/docs/Web/HTTP/Basics_of_HTTP/Data_URLs), the output is downloaded as a text file with the name of the download parameter. (since IP-Symcon 7.0) |
| enabled (optional) | (__default:__ true) If true, the module selection can be used, otherwise it is displayed as deactivated |
| link (optional) | (__default:__ false) If this parameter is true, the output of the onChange script is opened as a link. If it is false, the output is displayed as a dialog in the configuration form. (since IP-Symcon 6.0) |
| moduleID | The ID of the module whose instances are to be offered for selection |
| name (optional) | Name of the module slection/the property to be set |
| onChange (optional) | (__default:__ "") Script which is executed when the value of the category selection is changed. If the script consists of several lines, the individual lines can also be defined as an array (arrays are supported since version 6.0). It has the same properties as onClick of the [Button](https://www.symcon.de/en/llms/developer/sdk-tools/sdk-php/configuration-forms.md) |
| type | SelectModule |
| value (optional) | (__default:__ 1) The value of the module selection - If there is an associated property, this parameter is overwritten by the property in the elements area |
| visible (optional) | (__default:__ true) If true, the module selection is visible, otherwise it is invisible |
| width (optional) | (__default:__ 300px) Fixed width of the module selection in pixels or % as a string, e.g. "40%" or "250px" |
### Example
```php
{ "type": "SelectModule", "name": "PropertyModuleInstanceID", "caption": "VoIP Module" , "moduleID": "{A4224A63-49EA-445F-8422-22EF99D8F624}"}
```
## SelectObject
Source: https://www.symcon.de/en/service/documentation/developer-area/sdk-tools/sdk-php/configuration-forms/selectobject/
Creates a selection dialog with the caption __caption__.
If created in the "elements" area, the property __name__ is set to the ID of the selected object when accepted.

### Parameter
| Parameter | Description |
| ------------------- | ------------------------------------------------------------------------------------------------------------------------------------------------------------------------------------------------------------------------------------------------------------------------------------------------------------------------------------------------------ |
| caption | Visible caption |
| download (optional) | (__default:__ "") If this parameter is not an empty string and the output of the onChange script is a [Data-URL](https://developer.mozilla.org/en-US/docs/Web/HTTP/Basics_of_HTTP/Data_URLs), the output is downloaded as a text file with the name of the download parameter. (since IP-Symcon 7.0) |
| enabled (optional) | (__default:__ true) If true, the object selection can be used, otherwise it is displayed as deactivated (since IP-Symcon 5.2) |
| link (optional) | (__default:__ false) If this parameter is true, the output of the onChange script is opened as a link. If it is false, the output is displayed as a dialog in the configuration form. (since IP-Symcon 6.0) |
| name (optional) | Name of the selection/the property to be set |
| onChange (optional) | (__default:__ "") Script which is executed when the value of the object selection is changed. If the script consists of several lines, the individual lines can also be defined as an array (arrays are supported since version 6.0). It has the same properties as onClick of the [Button](https://www.symcon.de/en/llms/developer/sdk-tools/sdk-php/configuration-forms.md) (since IP-Symcon 5.2) |
| type | SelectObject |
| value (optional) | (__default:__ 1) The value of the object selection - If there is an associated property, this parameter is overwritten by the property in the elements area (since IP-Symcon 5.2) |
| visible (optional) | (__default:__ true) If true, the object selection is visible, otherwise it is invisible (since IP-Symcon 5.2) |
| width (optional) | (__default:__ 300px) Fixed width of object selection in pixels or % as a string, e.g. "40%" or "250px" (since IP-Symcon 5.3) |
### Example
```php
{ "type": "SelectObject", "name": "ObjectID", "caption": "Target" }
```
## SelectProfile
Source: https://www.symcon.de/en/service/documentation/developer-area/sdk-tools/sdk-php/configuration-forms/selectprofile/
_Requires Symcon >= 5.5_
Creates a selection dialog with the caption __caption__.
If created in the "elements" area, the property __name__ is set to the name of the selected profile when accepted.

### Parameters
| Parameter | Description |
| ---------------------- | --------------------------------------------------------------------------------------------------------------------------------------------------------------------------------------------------------------------------------------------------------------------------------------------------------------------------------- |
| caption | Visible caption |
| download (optional) | (__default:__ "") If this parameter is not an empty string and the output of the onChange script is a [Data-URL](https://developer.mozilla.org/en-US/docs/Web/HTTP/Basics_of_HTTP/Data_URLs), the output is downloaded as a text file with the name of the download parameter. (since IP-Symcon 7.0) |
| enabled (optional) | (__default:__ true) If true, the profile selection can be used, otherwise it is displayed as deactivated |
| link (optional) | (__default:__ false) If this parameter is true, the output of the onChange script is opened as a link. If it is false, the output is displayed as a dialog in the configuration form. (since IP-Symcon 6.0) |
| name (optional) | Name of the selection/the property to be set |
| onChange (optional) | (__default:__ "") Script which is executed when the value of the profile selection is changed. If the script consists of several lines, the individual lines can also be defined as an array (arrays are supported since version 6.0). It has the same properties as onClick of the [Button](https://www.symcon.de/en/llms/developer/sdk-tools/sdk-php/configuration-forms.md) |
| profileType (optional) | (__default:__ -1) The type of profile which can be selected (-1: All, 0: Boolean, 1: Integer, 2: Float, 3: String) |
| type | SelectProfile |
| value (optional) | (__default:__ "") The value of the profile selection - If there is an associated property, this parameter is overwritten by the property in the elements area |
| visible (optional) | (__default:__ true) If true, the profile selection is visible, otherwise it is invisible |
| width (optional) | (__default:__ 300px) Fixed width of the profile selection in pixels or % as a string, e.g. "40%" or "250px" |
### Example
```php
{ "type": "SelectProfile", "name": "PropertyProfileName", "caption": "Profil - Integer" , "profileType": 1}
```
## SelectScript
Source: https://www.symcon.de/en/service/documentation/developer-area/sdk-tools/sdk-php/configuration-forms/selectscript/
Creates a selection dialog with the caption __caption__.
If created in the "elements" area, the property __name__ is set to the ID of the selected script when accepted.

### Parameter
| Parameter | Description |
| ------------------- | ------------------------------------------------------------------------------------------------------------------------------------------------------------------------------------------------------------------------------------------------------------------------------------------------------------------------------------------------------ |
| caption | Visible caption |
| download (optional) | (__default:__ "") If this parameter is not an empty string and the output of the onChange script is a [Data-URL](https://developer.mozilla.org/en-US/docs/Web/HTTP/Basics_of_HTTP/Data_URLs), the output is downloaded as a text file with the name of the download parameter. (since IP-Symcon 7.0) |
| enabled (optional) | (__default:__ true) If true, the script selection can be used, otherwise it is displayed as deactivated (since IP-Symcon 5.2) |
| link (optional) | (__default:__ false) If this parameter is true, the output of the onChange script is opened as a link. If it is false, the output is displayed as a dialog in the configuration form. (since IP-Symcon 6.0) |
| name (optional) | Name of the script selection/the property to be set |
| onChange (optional) | (__default:__ "") Script which is executed when the value of the script selection is changed. If the script consists of several lines, the individual lines can also be defined as an array (arrays are supported since version 6.0). It has the same properties as onClick of the [Button](https://www.symcon.de/en/llms/developer/sdk-tools/sdk-php/configuration-forms.md) (since IP-Symcon 5.2) |
| type | SelectScript |
| value (optional) | (__default:__ 1) The value of the script selection - If there is an associated property, this parameter is overwritten by the property in the elements area (since IP-Symcon 5.2) |
| visible (optional) | (__default:__ true) If true, the script selection is visible, otherwise it is invisible (since IP-Symcon 5.2) |
| width (optional) | (__default:__ 300px) Fixed width of the script selection in pixels or % as a string, e.g. "40%" or "250px" (since IP-Symcon 5.3) |
### Example
```php
{ "type": "SelectScript", "name": "RXObjectID", "caption": "Target" }
```
## SelectTime
Source: https://www.symcon.de/en/service/documentation/developer-area/sdk-tools/sdk-php/configuration-forms/selecttime/
_Requires Symcon >= 5.0_
Creates an input for a time with the caption __caption__.

If created in the "elements" area, the property __name__ is set to a JSON-coded object, which contains the following parameters:
| Parameter | Description |
| --------- | --------------- |
| hour | Hours of time |
| minute | Minutes of time |
| second | Seconds of time |
If no time was selected, all parameters are set to 0.
### Parameters
| Parameter | Description |
| ------------------ | ---------------------------------------------------------------------------------------------------------------------------------------------------------------------------------------------- |
| caption | Visible caption |
| enabled (optional) | (__default:__ true) If true, the selection can be used, otherwise it is displayed as deactivated (since IP-Symcon 5.2) |
| name (optional) | Name of the selection/the property to be set |
| type | SelectTime |
| value (optional) | (__default:__ no time selected) The value of the selection - If there is an associated property, this parameter will be overwritten by the property in the elements area (since IP-Symcon 5.2) |
| visible (optional) | (__default:__ true) If true, the selection is visible, otherwise it is invisible (since IP-Symcon 5.2) |
| width (optional) | (__default:__ 300px) Fixed width of the input field in pixels or % as a string, e.g. "40%" or "250px" (since IP-Symcon 5.3) |
### Example
```php
{ "type": "SelectTime", "name": "PropertyTime", "caption": "Time" }
```
## SelectValue
Source: https://www.symcon.de/en/service/documentation/developer-area/sdk-tools/sdk-php/configuration-forms/selectvalue/
_Requires Symcon >= 6.3_
Creates a selection dialog that displays a suitable form field based on the type and profile of the selected __variableID__.
If created in the "elements" area, the property __name__ is set to the currently selected value when it is accepted.

### Parameters
| Parameter | Description |
| ------------------- | --------------------------------------------------------------------------------------------------------------------------------------------------------------------------------------- |
| caption | Visible caption |
| enabled (optional) | (__default:__ true) If true, the value selection can be used, otherwise it is displayed as deactivated (since IP-Symcon 5.2) |
| name (optional) | Name of the value selection/the property to be set |
| onChange (optional) | (__default:__ "") Script which is executed when the value of the valve selection is changed. It has the same properties as onClick of the [Button](https://www.symcon.de/en/llms/developer/sdk-tools/sdk-php/configuration-forms.md) |
| type | SelectValue |
| value (optional) | (__default:__ null) The JSON encoded value of the choice. If there is an associated property, this parameter is overwritten by the property in the elements area |
| visible (optional) | (__default:__ true) If true, the value selection is visible, otherwise it is invisible |
| variableID | (__default:__ 1) The variable that is used to select the element |
| width (optional) | (__default:__ 300px) Fixed width of the color selection in pixels or % as a string, e.g. "40%" or "250px" |
> **Note:** The value __value__ is saved as a JSON encoded string.
### Example
```php
{
"type": "SelectValue",
"name": "Value",
"caption": "Value",
"variableID": 12345
}
```
## SelectVariable
Source: https://www.symcon.de/en/service/documentation/developer-area/sdk-tools/sdk-php/configuration-forms/selectvariable/
Creates a selection dialog with the caption __caption__.
If created in the "elements" area, the property __name__ is set to the ID of the selected variable when accepted.

### Parameters
| Parameter | Description |
| ----------------------------- | ------------------------------------------------------------------------------------------------------------------------------------------------------------------------------------------------------------------------------------------------------------------------------------------------------------------------- |
| caption | Visible caption |
| download (optional) | (__default:__ "") If this parameter is not an empty string and the output of the onChange script is a [Data-URL](https://developer.mozilla.org/en-US/docs/Web/HTTP/Basics_of_HTTP/Data_URLs), the output is downloaded as a text file with the name of the download parameter. (since IP-Symcon 7.0) |
| enabled (optional) | (__default:__ true) If true, the variable selection can be used, otherwise it is displayed as deactivated (since IP-Symcon 5.2) |
| link (optional) | (__default:__ false) If this parameter is true, the output of the onChange script is opened as a link. If it is false, the output is displayed as a dialog in the configuration form. (since IP-Symcon 6.0) |
| name (optional) | Name of the variable selection/the property to be set |
| onChange (optional) | (__default:__ "") Script which is executed when the value of the variable selection is changed. It has the same properties as onClick of the [Button](https://www.symcon.de/en/llms/developer/sdk-tools/sdk-php/configuration-forms.md) (since IP-Symcon 5.2) |
| requiredAction (optional) | (__default:__ 0) Indicates whether the variable must have an action (since IP-Symcon 6.0) 0: It doesn't matter whether the variable has an action or not 1: The variable must have an action 2: The variable must not have any action |
| requiredLogging (optional) | (__default:__ 0) The way in which the variable may be logged (since IP-Symcon 6.0) 0: It doesn't matter whether the variable is logged or not 1: The variable must be logged 2: The variable must not be logged 3: The variable must be logged as standard 4: The variable must be logged as a counter |
| type | SelectVariable |
| validVariableTypes (optional) | (__default:__ []) The types of variables that can be selected. With an empty array, all variable types are permitted (0: Boolean, 1: Integer, 2: Float, 3: String) (since IP-Symcon 6.0) |
| value (optional) | (__default:__ 1) The value of the variable selection - If there is an associated property, this parameter is overwritten by the property in the elements area (since IP-Symcon 5.2) |
| visible (optional) | (__default:__ true) If true, the variable selection is visible, otherwise it is invisible (since IP-Symcon 5.2) |
| width (optional) | (__default:__ 300px) Fixed width of the variable selection in pixels or % as a string, e.g. "40%" or "250px" (since IP-Symcon 5.3) |
> **Note:** If the variable does not correspond to the requirements defined by the parameters validVariableTypes, requiredAction or requiredLogging, an error is displayed and changes cannot be accepted
### Example
```php
// Any variable can be selected
{
"type": "SelectVariable",
"name": "PropertyVariableID",
"caption": "Target"
}
// The selected variable must be an integer or float,
// and be logged and have an action
{
"type": "SelectVariable",
"name": "PropertyVariableID",
"caption": "Target",
"validVariableTypes": [1, 2],
"requiredAction": 1,
"requiredLogging": 1
}
```
## Status message
Source: https://www.symcon.de/en/service/documentation/developer-area/sdk-tools/sdk-php/configuration-forms/statusmessage/
Creates a status message.
> **Warning:** Status messages can only be used in the "status" area. No other form field types can be used in the "status" area.
### Parameters
| Parameter | Description |
| --------- | ------------------------- |
| caption | Visible caption |
| code | Status code (see table) |
| icon | Symbol which is displayed |
### Overview of the status codes
| code | Description |
| ----- | ------------------------ |
| 101 | Instance is creating |
| 102 | Instance is active |
| 103 | Instance is deleting |
| 104 | Instance is inactive |
| 105 | Instance was not created |
| >=200 | Instance is faulty |
> **Note:** Codes >= 200 must be defined by oneself.
### Overview of the possible icons
active

error

inactive

### Example
```php
// Active icon
{ "code": 102, "icon": "active", "caption": "Logged in!" }
// Error icon
{ "code": 200, "icon": "error", "caption": "Error!" }
// Inactive icon
{ "code": 104, "icon": "inactive", "caption": "Logged out!" }
```
## TestCenter
Source: https://www.symcon.de/en/service/documentation/developer-area/sdk-tools/sdk-php/configuration-forms/testcenter/
_Requires Symcon >= 5.0_
Generates a Test Center in which all switchable status variables of the instance can be switched. The operating elements are based on the type and profile of the variables and are based on the switching elements of the WebFront.
> **Warning:** This item is not supported by the Legacy Console. If a module with this element is opened in the legacy console, the TestCenter is not displayed.

### Parameter
| Parameter | Description |
| ------------------ | ------------------------------------------------------------------------------------------------------------------------ |
| caption (optional) | (__default:__ "") Visible caption (since IP-Symcon 7.2) |
| enabled (optional) | (__default:__ true) If true, the Test Center can be used, otherwise it is displayed as deactivated (since IP-Symcon 5.2) |
| name (optional) | Name of the Test Center |
| type | TestCenter |
| visible (optional) | (__default:__ true) If true, the Test Center is visible, otherwise it is invisible (since IP-Symcon 5.2) |
### Example
```php
{
"type": "TestCenter"
}
```
## Tree
Source: https://www.symcon.de/en/service/documentation/developer-area/sdk-tools/sdk-php/configuration-forms/tree/
_Requires Symcon >= 5.0_
Creates a tree with the caption __caption__.
The displayed columns are defined in __columns__.
Initial entries in the tree can be specified via __values__.

> **Warning:** This item is not supported by the Legacy Console. If a module with this element is opened in the legacy console, an error message appears.
### General Parameters
| Parameter | Description |
| ------------------------------------------------------- | ------------------------------------------------------------------------------------------------------------------------------------------------------------------------------------------------------------------------------------------------------------------------------------------------------------------------------------------------------------------------------------------------------------------------------------------------------------------------------------------------------------------------------------------------------------------------------------------------------------------------------------------------------------------------------ |
| add (optional) | (__default:__ false) If true, an "Add" button is displayed below the table, which adds a new element to the tree under the selected node |
| caption (optional) | Visible caption of the tree |
| columns | Columns of the tree |
| delete (optional) | (__default:__ false) If true, a button is displayed behind each entry of the tree, which deletes the corresponding element |
| download (optional) | (__default:__ "") If this parameter is not an empty string and the output of the onAdd, onDelete, onEdit or onExpand script is a [Data-URL](https://developer.mozilla.org/en-US/docs/Web/HTTP/Basics_of_HTTP/Data_URLs), the output is downloaded as a text file with the name of the download parameter. (since Symcon 7.0) |
| form (optional) | (__default:__ based on the "edit" parameters of column) An individual form for editing or adding rows. The definition of the form is done analogously to the definition of the form for [Actions](https://www.symcon.de/en/llms/developer/sdk-tools/sdk-php.md) either static or via PHP code. The usage of the form is done analogously to the same parameter of the [List](https://www.symcon.de/en/llms/developer/sdk-tools/sdk-php/configuration-forms.md) (since Symcon 7.0) |
| link (optional) | (__default:__ false) If this parameter is true, the output of the onAdd, onDelete, onEdit and onExpand script is opened as a link. If it is false, the output is displayed as a dialog in the configuration form. (since Symcon 6.0) |
| multiAdd (optional) | (__default:__ false, if onAdd is set, otherwise true) If this parameter is true, form is not set and the tree has only a single editable column of the type [SelectObject](https://www.symcon.de/en/llms/developer/sdk-tools/sdk-php/configuration-forms.md), [SelectCategory](https://www.symcon.de/en/llms/developer/sdk-tools/sdk-php/configuration-forms.md), [SelectInstance](https://www.symcon.de/en/llms/developer/sdk-tools/sdk-php/configuration-forms.md), [SelectVariable](https://www.symcon.de/en/llms/developer/sdk-tools/sdk-php/configuration-forms.md), [SelectScript](https://www.symcon.de/en/llms/developer/sdk-tools/sdk-php/configuration-forms.md), [SelectMedia](https://www.symcon.de/en/llms/developer/sdk-tools/sdk-php/configuration-forms.md) or [SelectLink](https://www.symcon.de/en/llms/developer/sdk-tools/sdk-php/configuration-forms.md), multiple objects can be added at once. When adding multiple objects, onAdd is still executed only once. (since Symcon 9.1) |
| name (optional) | Name of the tree |
| onAdd (optional) | (__default:__ "") Script which is executed after adding an entry to the tree. If the script consists of several lines, the individual lines can also be defined as an array (arrays are supported from version 6.0). In this version, the tree does not offer the currently selected entry as the variable value but the added entry, see [Use of the tree content in on-actions](https://www.symcon.de/en/llms/developer/sdk-tools/sdk-php/configuration-forms.md). Otherwise it has the same properties as onClick of the [Button](https://www.symcon.de/en/llms/developer/sdk-tools/sdk-php/configuration-forms.md) (since Symcon 5.3) |
| onDelete (optional) | (__default:__ "") Script which is executed after deleting an entry of the tree. If the script consists of several lines, the individual lines can also be defined as an array (arrays are supported from version 6.0). In this version, the tree does not offer the currently selected entry as the variable value but the deleted entry, see [Use of the tree content in on-actions](https://www.symcon.de/en/llms/developer/sdk-tools/sdk-php/configuration-forms.md). Otherwise it has the same properties as onClick of the [Button](https://www.symcon.de/en/llms/developer/sdk-tools/sdk-php/configuration-forms.md) (since Symcon 5.3) |
| onEdit (optional) | (__default:__ "") Script which is executed after editing an entry of the tree. If the script consists of several lines, the individual lines can also be defined as an array (arrays are supported from version 6.0). In this version, the tree does not offer the currently selected entry as the variable value, but the edited entry, see [Use of the tree content in on-actions](https://www.symcon.de/en/llms/developer/sdk-tools/sdk-php/configuration-forms.md). Otherwise it has the same properties as onClick of the [Button](https://www.symcon.de/en/llms/developer/sdk-tools/sdk-php/configuration-forms.md) (since Symcon 5.3) |
| onExpand (optional) | (__default:__ "") Script which is executed after expanding an entry of the tree. If the script consists of several lines, the individual lines can also be defined as an array. In this version, the tree does not offer the currently selected entry as the variable value, but the expanded entry, see [Use of the tree content in on-actions](https://www.symcon.de/en/llms/developer/sdk-tools/sdk-php/configuration-forms.md). Otherwise it has the same properties as onClick of the [Button](https://www.symcon.de/en/llms/developer/sdk-tools/sdk-php/configuration-forms.md) (since Symcon 6.4) |
| rowCount (optional) | (__default:__ 0) visible number of lines; If there are more lines in the tree, a scroll bar is displayed - if the value is 0, the tree fills the remaining space available in the instance editor. Only one configuration item can get all of the remaining space. |
| sort (optional) | Sorting of the tree. If this is not set, the tree is sorted according to the identifiers of the nodes |
| type | Tree |
| values (optional) | Initial entries in the tree |
| visible (optional) | (__default:__ true) If true, the tree is visible, otherwise it is invisible (from Symcon 5.2) |
| enabled (optional) | (__default:__ true) If true, the tree can be used, otherwise it is displayed as deactivated (from Symcon 6.0) |
| changeOrder (optional) | (__default:__ false) If true, the order of the entries can be changed using drag & drop. The sorting of the list according to columns, however, is not possible in that case. (since Symcon 6.0) |
| loadValuesFromConfiguration (optional) | (__default:__ true) This parameter specifies whether to populate the tree with the property's values, see [Saving and loading trees](https://www.symcon.de/en/llms/developer/sdk-tools/sdk-php/configuration-forms.md). If the value is set to true, it is necessary to fill the tree in the interest of the user for a successful review in the Module Store, see [Review guidelines](https://www.symcon.de/en/llms/developer/sdk-tools/sdk-php.md) Point 13 (since Symcon 6.0) |
### Parameters for Columns
| Parameter | Description |
| --------------------------------------------------- | ----------------------------------------------------------------------------------------------------------------------------------------------------------------------------------------------------------------------------------------------------------------------------------------------------------------------------- |
| add (optional) | Initial value in this column for a newly added entry, necessary if __add__ is set to true on the tree. Alternatively, an object can be provided which generates the value automatically, see Parameters for add (since Symcon 9.1) |
| caption | Visible caption of a column |
| confirm (optional) | (__default:__ "") Query text before an onClick action is performed. The action is only carried out if the query is confirmed with "Yes". If no query text is defined, the action is carried out directly (since Symcon 5.2) |
| download (optional) | (__default:__ "") If this parameter is not an empty string and the output of the onClick script of this column is a [Data-URL](https://developer.mozilla.org/en-US/docs/Web/HTTP/Basics_of_HTTP/Data_URLs), the output is downloaded as a text file with the name of the download parameter. (since Symcon 7.1) |
| edit (optional) | Description of an editable element |
| label | Visible caption of a column _(deprecated)_ |
| link (optional) | (__default:__ false) If this parameter is true, the output of the onClick script of this column is opened as a link. If it is false, the output is displayed as a dialog in the configuration form. (since Symcon 7.1) |
| name | Unique name of a column to refer to; the name must not be "id", "parent", "expanded", "rowColor", "editable" or "deletable", since these values are used for other functions, see [parameters for values](https://www.symcon.de/en/llms/developer/sdk-tools/sdk-php/configuration-forms.md) |
| onClick (optional) | (__default:__ "") Script which is executed when a field in this column is clicked. It has the same properties as onClick of the [Button](https://www.symcon.de/en/llms/developer/sdk-tools/sdk-php/configuration-forms.md). The script is only executed if this field is not empty, i.e. 0, false or "" (since Symcon 5.2) |
| quickFilter (optional) | (__default:__ false) If true, the text of this column is considered during the search via quick filter. Should the value be false for all columns, the quick filter is hidden. (since Symcon 7.2) |
| save (optional) | (__default:__ true, if the element is editable or __add__ is an object for automatic generation, otherwise false) If true, the values of this column should be saved as module properties, see [Saving and loading trees](https://www.symcon.de/en/llms/developer/sdk-tools/sdk-php/configuration-forms.md) |
| visible (optional) | (__default:__ true) If false, the column is not displayed |
| width | Width of the column in pixels, as a CSS string (e.g. “100px”); exactly one column must have the value “auto”, which means that the width of that column uses the rest of the available space. In addition, the expansion symbols of the tree are displayed in this column. |
### Parameters for edit
| Parameter | Description |
| ------------------ | ----------------------------------------------------------------------------------------------------------------------------------------------------------------------------------------------------------------------------------------------------------------------------------------------------------------------------------------------------------------------------------------------------------------------------------------------------------------------------------------------------------------------------------------------------------------------------------------------------------------------------------------------------------------------------------------------------------------------------------------------------------------------------------------------------------------------------------------------------------------------------------------------------------------------------------------------------------------------------------------------------------------------------------- |
| type | Type of representation, according to the possible entries: [CheckBox](https://www.symcon.de/en/llms/developer/sdk-tools/sdk-php/configuration-forms.md), [IntervalBox](https://www.symcon.de/en/llms/developer/sdk-tools/sdk-php/configuration-forms.md), [NumberSpinner](https://www.symcon.de/en/llms/developer/sdk-tools/sdk-php/configuration-forms.md), [PasswordTextBox](https://www.symcon.de/en/llms/developer/sdk-tools/sdk-php/configuration-forms.md), [Select](https://www.symcon.de/en/llms/developer/sdk-tools/sdk-php/configuration-forms.md), [SelectCategory](https://www.symcon.de/en/llms/developer/sdk-tools/sdk-php/configuration-forms.md), [SelectColor](https://www.symcon.de/en/llms/developer/sdk-tools/sdk-php/configuration-forms.md), [SelectEvent](https://www.symcon.de/en/llms/developer/sdk-tools/sdk-php/configuration-forms.md), [SelectFile](https://www.symcon.de/en/llms/developer/sdk-tools/sdk-php/configuration-forms.md), [SelectInstance](https://www.symcon.de/en/llms/developer/sdk-tools/sdk-php/configuration-forms.md), [SelectLink](https://www.symcon.de/en/llms/developer/sdk-tools/sdk-php/configuration-forms.md), [SelectMedia](https://www.symcon.de/en/llms/developer/sdk-tools/sdk-php/configuration-forms.md), [SelectObject](https://www.symcon.de/en/llms/developer/sdk-tools/sdk-php/configuration-forms.md), [SelectScript](https://www.symcon.de/en/llms/developer/sdk-tools/sdk-php/configuration-forms.md), [SelectVariable](https://www.symcon.de/en/llms/developer/sdk-tools/sdk-php/configuration-forms.md), [ValidationTextBox](https://www.symcon.de/en/llms/developer/sdk-tools/sdk-php/configuration-forms.md), [List](https://www.symcon.de/en/llms/developer/sdk-tools/sdk-php/configuration-forms.md), [Tree](https://www.symcon.de/en/llms/developer/sdk-tools/sdk-php/configuration-forms.md) |
| Further parameters | The other parameters depend on the type selected; the parameters "name" and "caption" of the type are ignored |
> **Note:** If the "type" List or Tree is used, the value of this column is not JSON-coded again. It is only necessary to parse the value of the parent tree once. Each sub-list or subtree is then directly available as an object. Similarly, the values in "values" do not have to be coded twice.
> **Note:** The "add" parameter of the column is translated according to the localization, provided the "type" of "edit" is ValidationTextBox or PasswordTextBox or "edit" is not set at all
### Parameters for add
Instead of a fixed value, the parameter __add__ of a column can also be an object which describes the strategy by which the value of a newly added entry is generated automatically (since Symcon 9.1). The value is generated when the entry is added and is treated like a regular value afterwards. The generated value is unique within the column: If a random value matches the value of an existing entry, a new value is generated. Generated values are not translated.
| Parameter | Description |
| ----------------- | --------------------------------------------------------------------------------------------------------------------------------------------------------------------------------------------------------------------------------------------------------------------------------------------------------------------------------------------------------------------------------------------------------------------------------------------------------------------------------------------- |
| strategy | Strategy of the generation: "increment": The highest numeric value of this column across all entries of the tree is increased by __step__. Non-numeric values are ignored. If there is no numeric value yet, __step__ is used "random-string": A random string of the characters a-z, A-Z and 0-9 with the length __length__ "random-integer": A random integer between __min__ and __max__ "guid": A random GUID (UUID version 4), e.g. "{3F2504E0-4F89-4D3A-9A0C-0305E82C3301}" |
| step (optional) | (__default:__ 1) Step by which the highest value is increased, only for the strategy "increment"; must be a number other than 0 |
| length (optional) | (__default:__ 32) Number of characters of the generated string, only for the strategy "random-string" |
| min (optional) | (__default:__ 0) Lower bound (inclusive) of the random integer, only for the strategy "random-integer"; must be less than __max__ |
| max (optional) | (__default:__ 2147483647) Upper bound (inclusive) of the random integer, only for the strategy "random-integer"; must be greater than __min__ |
> **Note:** To keep generated values, columns with such an add value are saved by default, i.e. the parameter "save" is true by default for these columns. If a loaded entry is missing the value of such a column, e.g. because the column was added later, the value is generated by the same strategy when loading. The default value that on-actions receive when no entry is selected is generated by the strategy as well. If no unique value can be generated because all possible values are already in use, e.g. with "random-integer" and a small range between min and max, adding the entry fails with an error message.
```php
// Columns with automatically generated values
{
"caption": "ID",
"name": "ID",
"width": "50px",
"add": { "strategy": "increment", "step": 10 }
}, {
"caption": "Token",
"name": "Token",
"width": "auto",
"add": { "strategy": "random-string", "length": 16 },
"edit": { "type": "ValidationTextBox" }
}, {
"caption": "Random number",
"name": "Number",
"width": "100px",
"add": { "strategy": "random-integer", "min": 1, "max": 100 },
"edit": { "type": "NumberSpinner" }
}, {
"caption": "GUID",
"name": "GUID",
"width": "300px",
"add": { "strategy": "guid" }
}
```
### Parameters for sort
| Parameter | Description |
| --------- | ----------------------------------------------------------------------------------------------------- |
| column | Name of the column according to which the tree is sorted |
| direction | The direction of the sort; "ascending" for an ascending order and "descending" for a descending order |
### Parameters for values
| Parameter | Description |
| ----------------------------- | --------------------------------------------------------------------------------------------------------------------------------------------------------------------------------------------------------------------------------------------------------------------------------------------- |
| deletable (optional) | (__default:__ true) If false, the line cannot be deleted (since Symcon 5.4) |
| editable (optional) | (__default:__ true) If false, the line cannot be edited, even if the tree itself has editable columns (since Symcon 5.4) |
| expanded (optional) | (__default:__ false) If this value is true, the entry is expanded directly when the configuration form is loaded |
| id | An identifier with which the entry in the tree view can be addressed as a parent node, id must be greater than 0 |
| parent (optional) | (__default:__ 0) The id of a value can be set in this field, which becomes the parent node of this value in the tree display. For this, the parent value must come before of the child in the array. If "parent" is 0, the element is inserted at the top level. |
| rowColor (optional) | (__default:__ transparent) Background color of the line as hex code (e.g. red: "#ff0000"), empty string for transparency |
| icons (optional) | (__default:__ {}) Icons can be defined in the same way as for [List](https://www.symcon.de/en/llms/developer/sdk-tools/sdk-php/configuration-forms.md). (since Symcon 9.0) |
| Further parameters (optional) | (__default:__ "") For each initial entry in the tree, the values for all columns are defined here. For this purpose, a parameter with the name of the column is entered for each column. The assignment of the parameter corresponds to the value of this column for the corresponding entry. |
### Saving and loading trees
The saving and loading of trees is done almost analogously to [Lists](https://www.symcon.de/en/llms/developer/sdk-tools/sdk-php/configuration-forms.md).
The values for __id__ and __parent__ are also saved in the property.
When loading, it should be noted that when using values, the identifier of the node must always be specified so that these can be assigned to the appropriate node from the property.
### Use of the tree content in on-actions
The use of the values of the tress in scripts is analogous to [Lists](https://www.symcon.de/en/llms/developer/sdk-tools/sdk-php/configuration-forms.md). In addition, each entry contains the value "expanded", which defines whether the entry is expanded (true) or collapsed (false).
### Example
```php
{
"type": "Tree",
"name": "Devices",
"caption": "Devices",
"rowCount": 5,
"add": true,
"delete": true,
"sort": {
"column": "Name",
"direction": "ascending"
},
"columns": [{
"caption": "InstanceID",
"name": "InstanceID",
"width": "75px",
"add": 0,
"edit": {
"type": "SelectInstance"
}
}, {
"caption": "Name",
"name": "Name",
"width": "auto",
"add": ""
}, {
"caption": "State",
"name": "State",
"width": "40px",
"add": "New!"
}, {
"caption": "Temperature",
"name": "Temperature",
"width": "75px",
"add": 20.0,
"edit": {
"type": "NumberSpinner",
"digits": 2
}
}],
"values": [{
"id": 1,
"InstanceID": 0,
"Name": "Category",
"State": "",
"Temperature": 0
},{
"id": 2,
"parent": 1,
"InstanceID": 12435,
"Name": "ABCD",
"State": "OK!",
"Temperature": 23.31,
"rowColor": "#ff0000"
}]
}
```
## ValidationTextBox
Source: https://www.symcon.de/en/service/documentation/developer-area/sdk-tools/sdk-php/configuration-forms/validationtextbox/
Creates an input field for text with the heading __caption__.
If created in the “elements” area, the ValidationTextBox sets a property to the entered string when accepted.
The parameter __"name"__ defines which property is set.

### Parameters
| Parameter | Description |
| -------------------- | ----------------------------------------------------------------------------------------------------------------------------------------------------------------------------------------------------------------------------------------------------------------------------------------------- |
| caption | Visible caption of the input field |
| enabled (optional) | (__default:__ true) If true, the input field can be used, otherwise it is displayed as deactivated (since IP-Symcon 5.2) |
| multiline (optional) | (__default:__ false) If true, the input field is expanded to several lines if necessary. This can happen through deliberately set line breaks, e.g. by pressing Enter, as well as in the event of an overflow. If false, the input field always remains in one line (since IP-Symcon 5.4) |
| name (optional) | Name of the input field/the property to be set |
| onChange (optional) | (__default:__ "") Script which is executed when the ValidationTextBox value is changed. If the script consists of several lines, the individual lines can also be defined as an array. It has the same properties as onClick of the [Button](https://www.symcon.de/en/llms/developer/sdk-tools/sdk-php/configuration-forms.md). (since IP-Symcon 8.1) |
| type | ValidationTextBox |
| validate (optional) | (__default:__ "") If the value does not meet the regular expression specified here, an error is displayed and changes cannot be adopted (since IP-Symcon 5.3) |
| value (optional) | (__default:__ "") The value of the input field - If there is an associated property, this parameter is overwritten by the property in the elements area (since IP-Symcon 5.2) |
| visible (optional) | (__default:__ true) If true, the input field is visible, otherwise it is invisible (since IP-Symcon 5.2) |
| width (optional) | (__default:__ 300px) Fixed width of the input field in pixels or % as a string, e.g. "40%" or "250px" (since IP-Symcon 5.3) |
### Example
```php
{ "type": "ValidationTextBox", "name": "IPAddress", "caption": "Host" }
```
---
# Module
> Symcon documentation · English · generated on 2026-09-26
> Index: https://www.symcon.de/en/llms.txt
Source: https://www.symcon.de/en/service/documentation/developer-area/sdk-tools/sdk-php/module/
_Requires Symcon >= 4.0_
### Description
A module basically consists of 2 files. The module.php and module.json.
A configuration page (form.json) can optionally be provided.
### form.json
Further information on the configuration page is available under [Configuration Forms](https://www.symcon.de/en/llms/developer/sdk-tools/sdk-php/configuration-forms.md).
### locale.json
Further information on the translation of the configuration page is available under [Localizations](https://www.symcon.de/en/llms/developer/sdk-tools/sdk-php.md).
### module.json
This file contains frame information essential for identification and correct integration of the module.
| Parameter | Data type | Description |
| ------------------ | -------------- | -------------------------------------------------------------------------------------------------------------------------------------------------------------------------------------------------------------------------- |
| id | string | Unique [GUID](https://www.symcon.de/en/llms/concepts.md) for unique identification. [GUID Generator](https://www.symcon.de/en/llms/developer/sdk-tools.md) |
| name | string | Module name. (A-Z, a-z, 0-9, spaces, underscores are allowed characters. However, spaces and underscores may not be at the beginning or the end. An empty name is also not valid.) |
| type | integer | Module type (0: Core, 1: I/O, 2: Splitter, 3: Device, 4: Configurator, 5: Discovery) |
| vendor | string | Manufacturer name and the name of the menu item under which the device can be found in "Add instance". If nothing is specified, the device is entered under "(Other)". |
| aliases | array [string] | Additional device names/ variants |
| url | string | URL to the documentation page of the module (Must start with http:// or https://. May alternatively be left "" (empty) |
| parentRequirements | array [string] | Data flow [GUIDs](https://www.symcon.de/en/llms/concepts.md), whereby compatible parent instances are determined. The parent instance must have implemented at least one of these data flow GUIDs in order to be compatible |
| childRequirements | array [string] | Data flow [GUIDs](https://www.symcon.de/en/llms/concepts.md), which determines compatible child instances. The child instance must have implemented at least one of these data flow GUIDs in order to be compatible |
| implemented | array [string] | Supported data flow GUIDs must be correctly evaluated and supported in the respective ReceiveData/ ForwardData functions, provided they are listed here |
| prefix | string | Prefix, which is assigned to the functions. Can only contain numbers and letters. |
```php
{
"id": "{E5AA629B-75BD-45C0-9BCB-845C102B0411}",
"name": "ModulnameXYZ",
"type": 3,
"vendor": "",
"aliases":
[
"Name1SupportedDevice",
"Name2SupportedDevice"
],
"url": "https://www.symcon.de",
"parentRequirements": [],
"childRequirements": [],
"implemented": [],
"prefix": "ABC"
}
```
### module.php
This is the actual class file, which contains the functions that process and forward data afterwards.
> **Note:** The class name must be identical to the "name" parameter, which was defined in module.json. The only allowed difference are spaces. These must be removed from the class name within module.php.
> **Warning:** Function names may only consist of the following characters: "a..z", "A..Z", "0..9". Furthermore, "$InstanceID" must not be used as a parameter name.
Since IP-Symcon 8.1, the improved base class IPSModuleStrict is available.
IPSModule remains supported but should no longer be used for new modules.
The following table highlights the differences:
| Feature | IPSModule | IPSModuleStrict |
| ------------------------------------------------- | ------------------------------------------------------------------------------------------------------------------------------- | ---------------------------------------------------------------------------------------------------------------------------------------------------------------------------------------- |
| Type hints | Optional for public functions | Always required |
| Errors for missing type hints in public functions | Only warnings | Treated as errors |
| Support for outdated types | Integer/Boolean allowed | Use int/bool instead |
| Return value of `RegisterVariable*` | Current variable ID as int | Boolean indicating whether the variable was created (e.g., to set an initial value) |
| Write access to created variables | Always possible, also via SetValue from outside | Only via $this->SetValue (variables are protected as read-only) |
| Data flow connections | Manual via ConnectParent/RequireParent/ForceParent | Automatic via compatibility and [GetCompatibleParents()](page://lJzvF8VHHoPHhcnn) |
| Data flow encoding | UTF-8 (utf8_encode/utf8_decode), problematic with PHP 9.0 | HEX-encoded (bin2hex/hex2bin), easier to detect when encoding is needed |
| Hook/WebHook | Workaround via [WebHookModule](https://github.com/symcon/SymconTest/blob/master/libs/WebHookModule.php) base class | Native support via [RegisterHook](https://www.symcon.de/en/llms/developer/sdk-tools/sdk-php/module.md), [ProcessHookData](https://www.symcon.de/en/llms/developer/sdk-tools/sdk-php/module.md) and [UnregisterHook](https://www.symcon.de/en/llms/developer/sdk-tools/sdk-php/module.md) |
| OAuth | Workaround via [WebOAuthModule](https://github.com/symcon/SymconTest/blob/master/libs/WebOAuthModule.php) base class | Native support via [RegisterOAuth](https://www.symcon.de/en/llms/developer/sdk-tools/sdk-php/module.md), [ProcessOAuthData](https://www.symcon.de/en/llms/developer/sdk-tools/sdk-php/module.md) and [UnregisterOAuth](https://www.symcon.de/en/llms/developer/sdk-tools/sdk-php/module.md) |
#### Template minimal
```php
// class definition
class ModulnameXYZ extends IPSModuleStrict {
/**
* The following functions are automatically available if the module has been inserted via the "Module Control".
* The functions are, with the prefix set up by oneself, made available in PHP and JSON-RPC as follows:
*
* ABC_MyFirstOwnFunction($id);
*
*/
public function MyFirstOwnFunction(): void {
echo $this->InstanceID;
}
}
```
#### Template classic
```php
// class definition
class ModulnameXYZ extends IPSModuleStrict {
// Overrides the internal IPS_Create($id) function
public function Create(): void {
// Don't delete this line
parent::Create();
}
// Overwrites the internal IPS_ApplyChanges($id) function
public function ApplyChanges(): void {
// Don't delete this line
parent::ApplyChanges();
}
/**
* The following functions are automatically available if the module has been inserted via the "Module Control".
* The functions are, with the prefix set up by oneself, made available in PHP and JSON-RPC as follows:
*
* ABC_MyFirstOwnFunction($id);
*
*/
public function MyFirstOwnFunction(): void {
// Self-created code
}
}
```
## __construct
Source: https://www.symcon.de/en/service/documentation/developer-area/sdk-tools/sdk-php/module/construct/
`void __construct(string $InstanceID)`
_Requires Symcon >= 4.0_
Function that is called with every request to the module
**Parameters**
- `$InstanceID` (string): ID of this instance
**Returns** (void): No Return
ID of this instance
**Example**
```php
// Normally, this function does not need to be overwritten.
```
## ApplyChanges
Source: https://www.symcon.de/en/service/documentation/developer-area/sdk-tools/sdk-php/module/applychanges/
`void ApplyChanges()`
_Requires Symcon >= 4.0_
Function which is executed when the configuration is applied
**Returns** (void): No Return
Is executed when "Apply" is pressed on the configuration page and immediately after the instance has been created.
> **Note:** The ApplyChanges function is called by IP-Symcon. It must therefore be overwritten by the base class in order to add custom extensions
**Example**
```php
// IPSModuleStrict
public function ApplyChanges(): void {
// Do not delete this line
parent::ApplyChanges();
// ConnectParent/RequireParent/ForceParent is not available - but can be replaced by the new function 'GetCompatibleParents()'.
}
// IPSModule
public function ApplyChanges() {
// Do not delete this line
parent::ApplyChanges();
// If there is no parent instance, create a new own VirtualIO instance
$this->RequireParent("{6179ED6A-FC31-413C-BB8E-1204150CF376}");
}
```
## ConnectParent
Source: https://www.symcon.de/en/service/documentation/developer-area/sdk-tools/sdk-php/module/connectparent/
`bool ConnectParent(string $ParentGUID)`
_Requires Symcon >= 4.0_
Connects an instance to a parent instance
**Parameters**
- `$ParentGUID` (string): [GUID](https://www.symcon.de/en/llms/concepts.md)
**Returns** (bool): If the command succeeds, it returns __TRUE__, otherwise __FALSE__.
[GUID](https://www.symcon.de/en/llms/concepts.md)
**Example**
```php
// IPSModuleStrict
ConnectParent/RequireParent/ForceParent is not available,
but can be replaced by the new function "GetCompatibleParents()"
// IPSModule
public function Create() {
// Never remove the line!
parent::Create();
// Connect to an existing splitter or create a new one if necessary
$this->ConnectParent("{46C969BF-3465-4E3E-B2A5-E404FB969735}");
}
```
## Create
Source: https://www.symcon.de/en/service/documentation/developer-area/sdk-tools/sdk-php/module/create/
`void Create()`
_Requires Symcon >= 4.0_
Function that is called once when the instance is created
**Returns** (void): No Return
In contrast to [Construct](https://www.symcon.de/en/llms/developer/sdk-tools/sdk-php/module.md), this function is called only once when creating the instance and starting IP-Symcon. Therefore, status variables and module properties which the module requires permanently should be created here.
Frequently used functions:
[RegisterPropertyString](https://www.symcon.de/en/llms/developer/sdk-tools/sdk-php/module.md)
[RegisterPropertyInteger](https://www.symcon.de/en/llms/developer/sdk-tools/sdk-php/module.md)
[RegisterPropertyFloat](https://www.symcon.de/en/llms/developer/sdk-tools/sdk-php/module.md)
[RegisterPropertyBoolean](https://www.symcon.de/en/llms/developer/sdk-tools/sdk-php/module.md)
> **Note:** The Create function is called by IP-Symcon. It must therefore be overwritten by the base class in order to add custom extensions
**Example**
```php
// IPSModuleStrict
public function Create(): void {
// Do not remove this line
parent::Create();
// Module property creation
$this->RegisterPropertyString("Username", "MaxMustermann");
$this->RegisterPropertyInteger("Number", 123);
$this->RegisterPropertyFloat("Factor", 0.5);
$this->RegisterPropertyBoolean("Open", true);
}
// IPSModule
public function Create() {
// Example is identical. Please note the changed function signature.
}
```
## Destroy
Source: https://www.symcon.de/en/service/documentation/developer-area/sdk-tools/sdk-php/module/destroy/
`void Destroy()`
_Requires Symcon >= 4.1_
Function that is called when the instance is deleted or the module is updated
**Returns** (void): No Return
This function is called when deleting the instance during operation and when updating via "Module Control". The function is not called when exiting IP-Symcon.
> **Note:** The Destroy function is called by IP-Symcon. It must therefore be overwritten by the base class in order to add individual extensions.
**Example**
```php
// IPSModuleStrict
public function Destroy(): void {
// Do not remove this line
parent::Destroy();
}
// IPSModule
public function Destroy() {
// Example is identical. Please note the changed function signature.
}
```
## DisableAction
Source: https://www.symcon.de/en/service/documentation/developer-area/sdk-tools/sdk-php/module/disableaction/
`bool DisableAction(string $Ident)`
_Requires Symcon >= 4.0_
**Parameters**
- `$Ident` (string): Ident of the variable
**Returns** (bool): If the command succeeds, it returns __TRUE__, otherwise __FALSE__.
Ident of the variable
**Example**
```php
// Deactivates the default action of the status variable
$this->DisableAction("Status");
```
## EnableAction
Source: https://www.symcon.de/en/service/documentation/developer-area/sdk-tools/sdk-php/module/enableaction/
`bool EnableAction(string $Ident)`
_Requires Symcon >= 4.0_
**Parameters**
- `$Ident` (string): Ident of the variable
**Returns** (bool): If the command succeeds, it returns __TRUE__, otherwise __FALSE__.
Ident of the variable
**Example**
```php
// Activates the default action of the status variable
$this->EnableAction("Status");
```
## ForceParent
Source: https://www.symcon.de/en/service/documentation/developer-area/sdk-tools/sdk-php/module/forceparent/
`bool ForceParent(string $ModuleID)`
_Requires Symcon >= 4.0_
Connects an instance to a parent instance
**Parameters**
- `$ModuleID` (string): [GUID](https://www.symcon.de/en/llms/concepts.md)
**Returns** (bool): If the command succeeds, it returns __TRUE__, otherwise __FALSE__.
[GUID](https://www.symcon.de/en/llms/concepts.md)
**Example**
```php
// IPSModuleStrict
ConnectParent/RequireParent/ForceParent is not available,
but can be replaced by the new function "GetCompatibleParents()"
// IPSModule
public function ApplyChanges() {
// Never remove the line!
parent::ApplyChanges();
// Create different I/O instances depending on the configuration
switch($this->ReadPropertyInteger("GatewayMode")) {
case 0: //Create ClientSocket in mode 0
$this->ForceParent("{3CFF0FD9-E306-41DB-9B5A-9D06D38576C3}");
break;
case 1: //Create SerialPort in mode 1
$this->ForceParent("{6DC3D946-0D31-450F-A8C6-C42DB8D7D4F1}");
break;
}
}
```
## ForwardData
Source: https://www.symcon.de/en/service/documentation/developer-area/sdk-tools/sdk-php/module/forwarddata/
`string ForwardData(string $JSONString)`
_Requires Symcon >= 4.0_
Function which is called when receiving data from a child instance (e.g. device)
**Parameters**
- `$JSONString` (string): Data packet in JSON format
**Returns** (string): Result of the function, which is returned to the calling child instance
Data packet in JSON format
**Example**
```php
// IPSModuleStrict
public function ForwardData(string $JSONString): string {
// Example within a gateway/splitter instance
// Received data from the device instance
$data = json_decode($JSONString);
IPS_LogMessage("ForwardData", utf8_decode($data->Buffer));
// The buffer would normally be processed here
// e.g., check CRC, partition into individual parts
// Forward to the I/O instance
$resultat = $this->SendDataToParent(json_encode(Array("DataID" => "{79827379-F36E-4ADA-8A95-5F8D1DC92FA9}", "Buffer" => $data->Buffer)));
// Processing and passing on
return $resultat;
}
// IPSModule
public function ForwardData($JSONString) {
// Example is identical. Please note the changed function signature.
}
```
## GetBuffer
Source: https://www.symcon.de/en/service/documentation/developer-area/sdk-tools/sdk-php/module/getbuffer/
`string GetBuffer(string $Name)`
_Requires Symcon >= 4.1_
Returns the content of a buffer
**Parameters**
- `$Name` (string): The name of the buffer
**Returns** (string): The content of the buffer
The name of the buffer
**Example**
```php
// Returns the content of the "Databuffer" buffer
$Bufferdata = $this->GetBuffer("DataBuffer");
```
## GetBufferList
Source: https://www.symcon.de/en/service/documentation/developer-area/sdk-tools/sdk-php/module/getbufferlist/
`array GetBufferList()`
_Requires Symcon >= 5.0_
Returns an array with the names of all buffers
**Returns** (array): List of names of all buffers
This function returns an array with the names of all buffers.
**Example**
```php
// Returns the array of buffer names
$BufferList = $this->GetBufferList();
```
## GetCompatibleParents
Source: https://www.symcon.de/en/service/documentation/developer-area/sdk-tools/sdk-php/module/getcompatibleparents/
`string GetCompatibleParents()`
_Requires Symcon >= 8.2_
Overwritable function that describes the compatible physically higher-level instances
**Returns** (string): Required connection type and description of compatible instances
The function returns a JSON-encoded object that describes compatible physical parent instances. The management console uses this information to suggest the appropriate parent instances when creating or adapting the instance.
If the function is not implemented, all modules that are compatible according to the data flow are returned. For the module type Splitter, Discovery and Configurators, a new instance or an instance without connections is required (type = require); for the module type Device, existing instances with other connections are also suggested (type = connect). All other module types do not require any further connection. In most cases, this heuristic is sufficient. However, if it is not sufficient, the function can be overwritten.
### Parameter
| Name | Description |
| --------- | --------------------------------------------------------------------------------------------------------------------------------------------------------------------------------------------------------------------- |
| type | If "require", only newly created instances and instances without other physically child instances are offered. If "connect" is selected, newly created instances and all existing compatible instances are suggested. |
| moduleIDs | A list of moduleIDs of compatible parent instances. If moduleIDs is used, no extended parameters can be used. Either moduleIDs or modules must be set, but not both. |
| modules | A description of possible compatible parent instances. For the possible parameters, see modules. Either moduleIDs or modules must be set, but not both. |
#### modules
| Name | Description |
| ------------------------ | --------------------------------------------------------------------------------------------------------------------------------------------------------------------------------------------------------------------------------------------------------------------------------------------------------------------------------------------------------------------------------------------------------------------------------------- |
| moduleID | The moduleID of instances that are compatible |
| configuration (optional) | (**default**: {}) An object that describes the required configuration of the instance. Existing instances that do not have the specified configuration are not displayed as compatible. If a new instance is created, this configuration is enforced and cannot be changed by the user. |
| initial (optional) | (**default**: {}) An object that contains suggested configuration parameters. If a new instance is created, these parameters are initially filled in, but can be adjusted by the user. The object has no effect on existing instances. |
| formOverride (optional) | (**default**: {}) An object that describes adjustments to the configuration form of the new instance, which are applied in a similar way to [UpdateFormField](https://www.symcon.de/en/llms/developer/sdk-tools/sdk-php/module.md). The keys of the object are the names of the configuration elements. The values are in turn objects that contain the names of the fields as keys and the updated parameter as values. The object has no effect on existing instances. |
**Example**
```php
// Require a new instance, a serial port
public function GetCompatibleParents() {
return '{"type": "require", "moduleIDs": ["{6DC3D946-0D31-450F-A8C6-C42DB8D7D4F1}"]}';
}
// Require an MQTT Client with a specific Client ID
// When creating a new gateway, the initial value for the keep alive interval is 10 seconds, different from the usual default value. However, it can be adjusted
public function GetCompatibleParents() {
return '{"type": "connect", "modules": [{
"moduleID": "{F7A0DD2E-7684-95C0-64C2-D2A9DC47577B}",
"configuration": {
"ClientID": "b10c75459d64cafb5d78"
},
"initial": {
"KeepAliveInterval": 10
}
}]}';
}
// Require a new instance, a serial port with Baud Rate 2400 or 9600
public function GetCompatibleParents() {
return '{"type": "require", "modules": [{
"moduleID": "{6DC3D946-0D31-450F-A8C6-C42DB8D7D4F1}",
"formOverride": {
"Baudrate": {
"options": [
{
"value": "2400",
"caption": "2400"
},
{
"value": "9600",
"caption": "9600"
}
]
}
}
}]}';
}
```
## GetConfigurationForm
Source: https://www.symcon.de/en/service/documentation/developer-area/sdk-tools/sdk-php/module/getconfigurationform/
`string GetConfigurationForm()`
_Requires Symcon >= 4.1_
Extendable function that supplies the content of the configuration page
**Returns** (string): Content of the configuration page
The content can be overwritten in order to transfer a self-created configuration page. This way, content can be generated dynamically. In this case, the "form.json" on the file system is completely ignored.
> **Note:** If this function is not defined in a module, the content of form.json is passed on by default.
**Example**
```php
// IPSModuleStrict
public function GetConfigurationForm() {
return '{ "actions": [ { "type": "Label", "label": "The current time is '.date("d.m.y H:i").'" } ] }';
}
// IPSModule
public function GetConfigurationForm() {
// xxx
}
```
## GetConfigurationForParent
Source: https://www.symcon.de/en/service/documentation/developer-area/sdk-tools/sdk-php/module/getconfigurationforparent/
`string GetConfigurationForParent()`
_Requires Symcon >= 4.2_
Extendable function which partially or completely sets the configuration of the parent instance
**Returns** (string): Content of the configuration of the parent instance
The configuration string is transferred to the parent instance. The instance reads the string and sets the entered values. Values read in via this function can no longer be changed via the configuration page.
> **Note:** If this function is not defined in its own module, nothing is changed by default and the parent instance remains freely configurable.
**Example**
```php
// IPSModuleStrict
public function GetConfigurationForParent() {
// Parent instance is a "SerialPort"
return "{\"BaudRate\": \"57600\", \"StopBits\": \"1\", \"DataBits\": \"8\", \"Parity\": \"None\"}";
}
// IPSModule
public function GetConfigurationForParent() {
// xxxx
}
```
## GetIDForIdent
Source: https://www.symcon.de/en/service/documentation/developer-area/sdk-tools/sdk-php/module/getidforident/
`mixed GetIDForIdent(string $Ident)`
_Requires Symcon >= 4.0_
Searches for the object ID for an object via the object identifier
**Parameters**
- `$Ident` (string): Ident of the object to be searched for.
**Returns** (mixed): ID of the found object, otherwise FALSE
Ident of the object to be searched for.
**Example**
```php
// Output the path of the status variable with the Ident "Status"
echo IPS_GetLocation($this->GetIDForIdent("Status"));
```
## GetMessageList
Source: https://www.symcon.de/en/service/documentation/developer-area/sdk-tools/sdk-php/module/getmessagelist/
`array GetMessageList()`
_Requires Symcon >= 5.0_
Returns an array of all registered messages
**Returns** (array): Array of all active messages
This function returns an array with all active messages that were registered via [RegisterMessage](https://www.symcon.de/en/llms/developer/sdk-tools/sdk-php/module.md).
A list of message IDs is available here: [Messages](https://www.symcon.de/en/llms/developer/sdk-tools/sdk-php.md)
> **Note:** To cancel a registration, [UnregisterMessage](https://www.symcon.de/en/llms/developer/sdk-tools/sdk-php/module.md) can be used.
**Example**
```php
// Returns an array of the active registered messages
print_r($this->GetMessageList());
// Sample output:
array(1) {
[12345]=> //ID of the Instance
array(1) {
[0]=>
int(10505) //MessageID => IM_CHANGESTATUS
}
}
```
## GetReferenceList
Source: https://www.symcon.de/en/service/documentation/developer-area/sdk-tools/sdk-php/module/getreferencelist/
`array GetReferenceList()`
_Requires Symcon >= 5.1_
Returns an array with the IDs of all references
**Returns** (array): Array with integer values of the IDs of all references
This function returns an array with the IDs of all references.
**Example**
```php
$ReferenceList = $this->GetReferenceList();
```
## GetStatus
Source: https://www.symcon.de/en/service/documentation/developer-area/sdk-tools/sdk-php/module/getstatus/
`int GetStatus()`
_Requires Symcon >= 5.1_
Returns the current status of the instance
**Returns** (int): Current status
This function returns the current status of the instance.
_Table: Instance status_
| Value | #status |
| ----- | ------------------------ |
| 101 | Instance is creating |
| 102 | Instance is active |
| 103 | Instance is deleting |
| 104 | Instance is inactive |
| 105 | Instance was not created |
| 106 | Instance is in standby |
| >=200 | Instance is faulty |
For more information on status codes, see [Messages](https://www.symcon.de/en/llms/developer/sdk-tools/sdk-php.md).
**Example**
```php
// Queries the current status of the instance
$currentStatus = $this->GetStatus();
```
## GetTimerInterval
Source: https://www.symcon.de/en/service/documentation/developer-area/sdk-tools/sdk-php/module/gettimerinterval/
`int GetTimerInterval(string $Name)`
_Requires Symcon >= 5.2_
Queries the interval of a timer
**Parameters**
- `$Name` (string): The name of the timer whose interval is to be queried.
**Returns** (int): Currently set interval in milliseconds
The name of the timer whose interval is to be queried.
**Example**
```php
// Queries the interval of the "Update" timer
echo $this->GetTimerInterval("Update");
```
## GetValue
Source: https://www.symcon.de/en/service/documentation/developer-area/sdk-tools/sdk-php/module/getvalue/
`mixed GetValue(string $Ident)`
_Requires Symcon >= 5.0_
Returns the value of a status variable
**Parameters**
- `$Ident` (string): Ident of the status variable
**Returns** (mixed): The content of the status variable
Ident of the status variable
**Example**
```php
// Returns the value of the status variable "Statusvariable1"
$StatusvariableValue = $this->GetValue("Statusvariable1");
```
## GetVisualizationTile
Source: https://www.symcon.de/en/service/documentation/developer-area/sdk-tools/sdk-php/module/getvisualizationtile/
`string GetVisualizationTile()`
_Requires Symcon >= 7.1_
Returns the individual display via HTML SDK
**Returns** (string): Initial display of a presentation via HTML SDK
If the [HTML-SDK](https://www.symcon.de/en/llms/developer/sdk-tools/sdk-php.md) is to be used, this function must be overwritten in order to return the HTML content.
> **Note:** For easier processing, it is usually worth defining the constant part of the display in an HTML file instead of writing it out completely in this function
**Example**
```r
// IPSModuleStrict
public function GetVisualizationTile(): string {
// Directly return the contents of the module.html in the same directory
return file_get_contents('./module.html');
}
// IPSModule
public function GetVisualizationTile() {
// xxxx
}
```
## HasActiveParent
Source: https://www.symcon.de/en/service/documentation/developer-area/sdk-tools/sdk-php/module/hasactiveparent/
`bool HasActiveParent()`
_Requires Symcon >= 5.1_
Checks whether all physical parent instances are active
**Returns** (bool): __TRUE__, if all physical parent instances are active, otherwise __FALSE__
This function checks whether all physical parent instances are active. If at least one instance in the chain is not active, the function returns __FALSE__. If all instances are active, the function returns __TRUE__.
> **Note:** If there is no parent, the function also returns __FALSE__.
**Example**
```php
// Abort with an error message if the splitter or I/O are not ready
if (!$this->HasActiveParent()) {
echo "error: Parent instances are not active ";
return;
}
// ...
```
## LogMessage
Source: https://www.symcon.de/en/service/documentation/developer-area/sdk-tools/sdk-php/module/logmessage/
`bool LogMessage(string $Message, int $Type)`
_Requires Symcon >= 5.0_
Sends a message with type coding
**Parameters**
- `$Message` (string): Content of the message
- `$Type` (int)
| Type | Value | Description |
| ---------- | ----- | ------------------ |
| KL_DEBUG | 10206 | A debug message |
| KL_ERROR | 10205 | An error message |
| KL_MESSAGE | 10201 | A standard message |
| KL_NOTIFY | 10203 | A notification |
| KL_WARNING | 10204 | A warning message |
**Returns** (bool): If the command succeeds, it returns __TRUE__, otherwise __FALSE__.
| Type | Value | Description |
| ---------- | ----- | ------------------ |
| KL_DEBUG | 10206 | A debug message |
| KL_ERROR | 10205 | An error message |
| KL_MESSAGE | 10201 | A standard message |
| KL_NOTIFY | 10203 | A notification |
| KL_WARNING | 10204 | A warning message |
**Example**
```php
// Send a warning message in the message window
$this->LogMessage("This is a warning", KL_WARNING);
```
## MaintainAction
Source: https://www.symcon.de/en/service/documentation/developer-area/sdk-tools/sdk-php/module/maintainaction/
`bool MaintainAction(string $Ident, bool $ActivateAction)`
_Requires Symcon >= 4.0_
Activates/deactivates the default action depending on the parameter
**Parameters**
- `$Ident` (string): Ident of the variable
- `$ActivateAction` (bool): Enable if __True__, Disable if __False__
**Returns** (bool): If the command succeeds, it returns __TRUE__, otherwise __FALSE__.
Enable if __True__, Disable if __False__
**Example**
```php
// We only have an action if the device type == 5
$this->MaintainAction("SpecialData", $this->ReadPropertyInteger("DeviceType") == 5);
```
## MaintainVariable
Source: https://www.symcon.de/en/service/documentation/developer-area/sdk-tools/sdk-php/module/maintainvariable/
`mixed MaintainVariable(string $Ident, string $Name, int $Type, string $ProfileOrPresentation, int $Position, bool $Retain)`
_Requires Symcon >= 4.0_
Creates/deletes the status variable depending on the parameter
**Parameters**
- `$Ident` (string): Ident of the status variable
- `$Name` (string): Name of the status variable
- `$Type` (int): Type of status variable
- `$ProfileOrPresentation` (string): Name of the variable profile or configuration of the [Presentation](https://www.symcon.de/en/llms/developer/sdk-tools/sdk-php.md) to be used
- `$Position` (int): Position in the object tree and therefore also in the WebFront
- `$Retain` (bool): Register if __True__, Unregister if __False__
**Returns** (mixed): | Class | Type | Description |
| --------------- | ------- | ------------------------------------------------------------------------------------------------------------- |
| IPSModuleStrict | boolean | Returns whether the variable was created. The return value can be used, for example, to set an initial value. |
| IPSModule | integer | Variable ID of the created status variable. |
Register if __True__, Unregister if __False__
**Example**
```php
// We only have this status variable if the device type is == 5
// IPSModuleStrict
$created = $this->MaintainVariable("Status", "Status of Device", 3, "Myvariablesprofileforstatus", 0, $this->ReadPropertyInteger("DeviceType") == 5);
if ($created) {
// Initial value should be true
$this-SetValue("Status", true);
}
// IPSModule
$variableID = $this->MaintainVariable("Status", "Status of Device", 3, "Myvariablesprofileforstatus", 0, $this->ReadPropertyInteger("DeviceType") == 5);
```
## MessageSink
Source: https://www.symcon.de/en/service/documentation/developer-area/sdk-tools/sdk-php/module/messagesink/
`void MessageSink(int $TimeStamp, int $SenderID, int $MessageID, array $Data)`
_Requires Symcon >= 4.1_
Extendable function which processes registered messages
**Parameters**
- `$TimeStamp` (int): Continuous counter timestamp
- `$SenderID` (int): Sender ID
- `$MessageID` (int): ID of the message
- `$Data` (array): Data of the message
**Returns** (void): No Return
Data of the message
**Example**
```php
// IPSModuleStrict
public function MessageSink(int $TimeStamp, int $SenderID, int $Message, array $Data) {
IPS_LogMessage("MessageSink", "Message from SenderID ".$SenderID." with Message ".$Message."\r\n Data: ".print_r($Data, true));
}
// IPSModule
public function MessageSink($TimeStamp, $SenderID, $Message, $Data) {
// xxx
}
```
## Migrate
Source: https://www.symcon.de/en/service/documentation/developer-area/sdk-tools/sdk-php/module/migrate/
`string Migrate(string $JSONData)`
_Requires Symcon >= 7.0_
Function that is called once after the creation of the instance
**Parameters**
- `$JSONData` (string): Persistenz (Konfiguration, Attribute) der Instanz
**Returns** (string): JSON encoded object with the new configuration/attributes.
Empty string unless changes are needed.
Persistenz (Konfiguration, Attribute) der Instanz
**Example**
```php
// IPSModuleStrict
public function Migrate(string $JSONData): string {
// Don't remove this line
parent::Migrate($JSONData);
// Example data for JSONData
/*
{
"attributes": {
"MyAttribute": "MyValue"
},
"configuration": {
"MyConfiguration": "MyValue"
}
}
*/
// Migrate Configuration/Attributes
$j = json_decode($JSONString);
$j->attributes->NewAttribut = $j->attributes->MyAttribute;
$j->configuration->NewConfiguration = $j->configuration->MyConfiguration;
return json_encode($j);
}
// IPSModule
public function Migrate($JSONData) {
// xxx
}
```
## ProcessHookData
Source: https://www.symcon.de/en/service/documentation/developer-area/sdk-tools/sdk-php/module/processhookdata/
`void ProcessHookData()`
_Requires Symcon >= 4.0_
Function that is called when the previously registered webhook is called
**Returns** (void): No return
If the WebHook registered by the function [RegisterHook](https://www.symcon.de/en/llms/developer/sdk-tools/sdk-php/module.md) in the [WebHook Control](https://www.symcon.de/en/llms/modules/webhook-control.md) is called from outside, this function is executed. The output of this function (e.g. through echo) is returned to the caller. The header of the response can also be adapted using corresponding PHP functions.
**Example**
```php
// IPSModuleStrict
protected function ProcessHookData(): void {
// Received data
$data = json_decode(file_get_contents('php://input'), true);
$this->LogMessage('Remote Method', utf8_decode($data['method']), KL_MESSAGE);
if ($data['method'] == 'get_version') {
header('Content-Type: application/json');
echo json_encode([
'result' => IPS_GetKernelVersion(),
'jsonrpc' => '2.0',
'id' => $request['id']
]);
}
}
// IPSModule
protected function ProcessHookData($JSONString) {
// Example is identical. Please note the changed function signature.
}
```
## ProcessOAuthData
Source: https://www.symcon.de/en/service/documentation/developer-area/sdk-tools/sdk-php/module/processoauthdata/
`void ProcessOAuthData()`
_Requires Symcon >= 4.1_
Function that is called when the OAuth process is completed
**Returns** (void): No return
If the OAuth handler registered by the function [RegisterOAuth](https://www.symcon.de/en/llms/developer/sdk-tools/sdk-php/module.md) is called, this function is executed. The received OAuth credentials can be read, for example, via the corresponding PHP input streams.
**Example**
```php
// IPSModuleStrict
protected function ProcessOAuthData(): void {
// OAuth credentials from the request
$token = file_get_contents('php://input');
$this->LogMessage('OAuth token received', KL_MESSAGE);
// Save token
$this->WriteAttributeString('OAuthToken', $token);
}
// IPSModule
protected function ProcessOAuthData($Token) {
// Example is identical. Please note the changed function signature.
}
```
## ReadAttributeBoolean
Source: https://www.symcon.de/en/service/documentation/developer-area/sdk-tools/sdk-php/module/readattributeboolean/
`bool ReadAttributeBoolean(string $Name)`
_Requires Symcon >= 5.1_
Reads an attribute of type boolean
**Parameters**
- `$Name` (string): Name of the attribute
**Returns** (bool): The value of the attribute
Name of the attribute
**Example**
```php
$this->ReadAttributeBoolean("CurrentState");
```
## ReadAttributeFloat
Source: https://www.symcon.de/en/service/documentation/developer-area/sdk-tools/sdk-php/module/readattributefloat/
`float ReadAttributeFloat(string $Name)`
_Requires Symcon >= 5.1_
Reads an attribute of type float
**Parameters**
- `$Name` (string): Name of the attribute
**Returns** (float): The value of the attribute
Name of the attribute
**Example**
```php
$this->ReadAttributeFloat("Median");
```
## ReadAttributeInteger
Source: https://www.symcon.de/en/service/documentation/developer-area/sdk-tools/sdk-php/module/readattributeinteger/
`int ReadAttributeInteger(string $Name)`
_Requires Symcon >= 5.1_
Reads an attribute of type integer
**Parameters**
- `$Name` (string): Name of the attribute
**Returns** (int): The value of the attribute
Name of the attribute
**Example**
```php
$this->ReadAttributeInteger("SequenceCounter")
```
## ReadAttributeString
Source: https://www.symcon.de/en/service/documentation/developer-area/sdk-tools/sdk-php/module/readattributestring/
`string ReadAttributeString(string $Name)`
_Requires Symcon >= 5.1_
Reads an attribute of type string
**Parameters**
- `$Name` (string): Name of the attribute
**Returns** (string): The value of the attribute
Name of the attribute
**Example**
```php
$this->ReadAttributeString("Token");
```
## ReadPropertyBoolean
Source: https://www.symcon.de/en/service/documentation/developer-area/sdk-tools/sdk-php/module/readpropertyboolean/
`bool ReadPropertyBoolean(string $Name)`
_Requires Symcon >= 4.0_
Reads a property of type boolean
**Parameters**
- `$Name` (string): Name of the property
**Returns** (bool): The value of the property
Name of the property
**Example**
```php
$this->ReadPropertyBoolean("EmulateStatus");
```
## ReadPropertyFloat
Source: https://www.symcon.de/en/service/documentation/developer-area/sdk-tools/sdk-php/module/readpropertyfloat/
`float ReadPropertyFloat(string $Name)`
_Requires Symcon >= 4.0_
Reads a property of type float
**Parameters**
- `$Name` (string): Name of the property
**Returns** (float): The value of the property
Name of the property
**Example**
```php
$this->ReadPropertyFloat("Factor");
```
## ReadPropertyInteger
Source: https://www.symcon.de/en/service/documentation/developer-area/sdk-tools/sdk-php/module/readpropertyinteger/
`int ReadPropertyInteger(string $Name)`
_Requires Symcon >= 4.0_
Reads a property of type integer
**Parameters**
- `$Name` (string): Name of the property
**Returns** (int): The value of the property
Name of the property
**Example**
```php
$this->ReadPropertyInteger("GatewayMode");
```
## ReadPropertyString
Source: https://www.symcon.de/en/service/documentation/developer-area/sdk-tools/sdk-php/module/readpropertystring/
`string ReadPropertyString(string $Name)`
_Requires Symcon >= 4.0_
Reads a property of type string
**Parameters**
- `$Name` (string): Name of the property
**Returns** (string): The value of the property
Name of the property
**Example**
```php
$this->ReadPropertyString("Username");
```
## ReceiveData
Source: https://www.symcon.de/en/service/documentation/developer-area/sdk-tools/sdk-php/module/receivedata/
`string ReceiveData(string $JSONString)`
_Requires Symcon >= 4.0_
Function that is called when data is received from a parent entity (e.g. I/O, splitter)
**Parameters**
- `$JSONString` (string): Data package in JSON format
**Returns** (string): Optional response to the parent instance
Data package in JSON format
**Example**
```php
// IPSModuleStrict
public function ReceiveData(string $JSONString): string {
// Example within a gateway/splitter instance
// Received data from I/O
$data = json_decode($JSONString);
IPS_LogMessage("ReceiveData", utf8_decode($data->Buffer));
// This is where the data is processed
// Forwarding to all device-/device-instances
$results = $this->SendDataToChildren(json_encode(Array("DataID" => "{66164EB8-3439-4599-B937-A365D7A68567}", "Buffer" => $data->Buffer)));
// If a child instance delivers a result, this can be used.
foreach($results as $result) {
IPS_LogMessage("IOSplitter RECV-RES", $result);
}
}
// Example within a device-/device-instance
public function ReceiveData(string $JSONString): string {
// Received data from the gateway/splitter
$data = json_decode($JSONString);
IPS_LogMessage("ReceiveData", utf8_decode($data->Buffer));
// Data processing and writing of the values in the status variables
SetValue($this->GetIDForIdent("Value"), $data->Buffer);
// Send result back to the gateway/splitter
return "OK from " . $this->InstanceID;
}
// IPSModule
public function ReceiveData($JSONString) {
// xxxx
}
```
## RegisterAttributeBoolean
Source: https://www.symcon.de/en/service/documentation/developer-area/sdk-tools/sdk-php/module/registerattributeboolean/
`bool RegisterAttributeBoolean(string $Name, bool $DefaultValue)`
_Requires Symcon >= 5.1_
Creates an attribute of type boolean
**Parameters**
- `$Name` (string): Name of the attribute
- `$DefaultValue` (bool): Default value of the attribute
**Returns** (bool): If the command succeeds, it returns __TRUE__, otherwise __FALSE__.
Default value of the attribute
**Example**
```php
public function Create() {
// Don't delete or change this line.
parent::Create();
$this->RegisterAttributeBoolean("CurrentState", true);
}
```
## RegisterAttributeFloat
Source: https://www.symcon.de/en/service/documentation/developer-area/sdk-tools/sdk-php/module/registerattributefloat/
`bool RegisterAttributeFloat(string $Name, float $DefaultValue)`
_Requires Symcon >= 5.1_
Creates an attribute of type float
**Parameters**
- `$Name` (string): Name of the attribute
- `$DefaultValue` (float): Default value of the attribute
**Returns** (bool): If the command succeeds, it returns __TRUE__, otherwise __FALSE__.
Default value of the attribute
**Example**
```php
public function Create() {
// Don't delete or change this line.
parent::Create();
$this->RegisterAttributeFloat("Median", 0.5);
}
```
## RegisterAttributeInteger
Source: https://www.symcon.de/en/service/documentation/developer-area/sdk-tools/sdk-php/module/registerattributeinteger/
`bool RegisterAttributeInteger(string $Name, int $DefaultValue)`
_Requires Symcon >= 5.1_
Creates an attribute of type integer
**Parameters**
- `$Name` (string): Name of the attribute
- `$DefaultValue` (int): Default value of the attribute
**Returns** (bool): If the command succeeds, it returns __TRUE__, otherwise __FALSE__.
Default value of the attribute
**Example**
```php
public function Create() {
// Don't delete or change this line.
parent::Create();
$this->RegisterAttributeInteger("SequenceCounter", 0);
}
```
## RegisterAttributeString
Source: https://www.symcon.de/en/service/documentation/developer-area/sdk-tools/sdk-php/module/registerattributestring/
`bool RegisterAttributeString(string $Name, string $DefaultValue)`
_Requires Symcon >= 5.1_
Creates an attribute of type string
**Parameters**
- `$Name` (string): Name of the attribute
- `$DefaultValue` (string): Default value of the attribute
**Returns** (bool): If the command succeeds, it returns __TRUE__, otherwise __FALSE__.
Default value of the attribute
**Example**
```php
public function Create() {
// Don't delete or change this line.
parent::Create();
$this->RegisterAttributeString("Token", "");
}
```
## RegisterHook
Source: https://www.symcon.de/en/service/documentation/developer-area/sdk-tools/sdk-php/module/registerhook/
`bool RegisterHook(string $Address)`
_Requires Symcon >= 8.1_
Registers a WebHook with the specified address
**Parameters**
- `$Address` (string): Address of the hook
**Returns** (bool): If the command could be executed successfully, the result is __TRUE__, otherwise __FALSE__.
Address of the hook
**Example**
```php
// IPSModuleStrict
public function Create(): void {
// Do not remove this line
parent::Create();
$this->RegisterHook('my-module');
}
// IPSModule
// This function can only be used natively for IPSModuleStrict
// Using the base class WebHookModule enables a comparable use in IPSModule
```
## RegisterMessage
Source: https://www.symcon.de/en/service/documentation/developer-area/sdk-tools/sdk-php/module/registermessage/
`bool RegisterMessage(int $SenderID, int $MessageID)`
_Requires Symcon >= 4.1_
Registers a message for a SenderID
**Parameters**
- `$SenderID` (int): ID of the Sender
- `$MessageID` (int): ID of the message
**Returns** (bool): If the command succeeds, it returns __TRUE__, otherwise __FALSE__.
ID of the message
**Example**
```php
$this->RegisterMessage(12345 /* InstanzID */, 10505 /* IM_CHANGESTATUS */);
```
## RegisterOAuth
Source: https://www.symcon.de/en/service/documentation/developer-area/sdk-tools/sdk-php/module/registeroauth/
`bool RegisterOAuth(string $Identifier)`
_Requires Symcon >= 8.1_
Registers an OAuth handler with the specified identifier
**Parameters**
- `$Identifier` (string): Identifier of the OAuth handler
**Returns** (bool): If the command could be executed successfully, the result is __TRUE__, otherwise __FALSE__.
Identifier of the OAuth handler
**Example**
```php
// IPSModuleStrict
public function Create(): void {
// Do not remove this line
parent::Create();
$this->RegisterOAuth('my-module');
}
// IPSModule
// This function can only be used natively for IPSModuleStrict
// Using the base class WebOAuthModule enables a comparable use in IPSModule
```
## RegisterOnceTimer
Source: https://www.symcon.de/en/service/documentation/developer-area/sdk-tools/sdk-php/module/registeroncetimer/
`bool RegisterOnceTimer(string $Name, string $ScriptContent)`
_Requires Symcon >= 5.5_
Creates a one-time timer
**Parameters**
- `$Name` (string): Name of the timer
- `$ScriptContent` (string): PHP script without PHP tags (<?php ... )
**Returns** (bool): If the command succeeds, it returns __TRUE__, otherwise __FALSE__.
PHP script without PHP tags (<?php ... )
**Example**
```php
// Creates a timer called "Update".
$this->RegisterOnceTimer("Update", "echo 'Hallo World';");
```
## RegisterPropertyBoolean
Source: https://www.symcon.de/en/service/documentation/developer-area/sdk-tools/sdk-php/module/registerpropertyboolean/
`bool RegisterPropertyBoolean(string $Name, bool $DefaultValue)`
_Requires Symcon >= 4.0_
Creates a property of type Boolean
**Parameters**
- `$Name` (string): Name of the property
- `$DefaultValue` (bool): Default value of the property
**Returns** (bool): If the command succeeds, it returns __TRUE__, otherwise __FALSE__.
Default value of the property
**Example**
```php
public function Create(): void {
// Don't delete or change this line.
parent::Create();
$this->RegisterPropertyBoolean("EmulateStatus", true);
}
```
## RegisterPropertyFloat
Source: https://www.symcon.de/en/service/documentation/developer-area/sdk-tools/sdk-php/module/registerpropertyfloat/
`bool RegisterPropertyFloat(string $Name, float $DefaultValue)`
_Requires Symcon >= 4.0_
Creates a property of type float
**Parameters**
- `$Name` (string): Name of the property
- `$DefaultValue` (float): Default value of the property
**Returns** (bool): If the command succeeds, it returns __TRUE__, otherwise __FALSE__.
Default value of the property
**Example**
```php
public function Create(): void {
//Don't delete or change this line.
parent::Create();
$this->RegisterPropertyFloat("Factor", 0.5);
}
```
## RegisterPropertyInteger
Source: https://www.symcon.de/en/service/documentation/developer-area/sdk-tools/sdk-php/module/registerpropertyinteger/
`bool RegisterPropertyInteger(string $Name, int $DefaultValue)`
_Requires Symcon >= 4.0_
Creates a property of type Integer
**Parameters**
- `$Name` (string): Name of the property
- `$DefaultValue` (int): Default value of the property
**Returns** (bool): If the command succeeds, it returns __TRUE__, otherwise __FALSE__.
Default value of the property
**Example**
```php
public function Create(): void {
// Don't delete or change this line.
parent::Create();
$this->RegisterPropertyInteger("GatewayMode", 0);
}
```
## RegisterPropertyString
Source: https://www.symcon.de/en/service/documentation/developer-area/sdk-tools/sdk-php/module/registerpropertystring/
`bool RegisterPropertyString(string $Name, string $DefaultValue)`
_Requires Symcon >= 4.0_
Creates a property of type String
**Parameters**
- `$Name` (string): Name of the property
- `$DefaultValue` (string): Default value of the property
**Returns** (bool): If the command succeeds, it returns __TRUE__, otherwise __FALSE__.
Default value of the property
**Example**
```php
public function Create(): void {
// Don't delete or change this line.
parent::Create();
$this->RegisterPropertyString("Username", "MaxMustermann");
}
```
## RegisterReference
Source: https://www.symcon.de/en/service/documentation/developer-area/sdk-tools/sdk-php/module/registerreference/
`bool RegisterReference(int $ID)`
_Requires Symcon >= 5.1_
Registers an ID as referenced
**Parameters**
- `$ID` (int): ID of the object
**Returns** (bool): If the command succeeds, it returns __TRUE__, otherwise __FALSE__.
ID of the object
**Example**
```php
$this->RegisterReference(10505 /* ObjectID */);
```
## RegisterScript
Source: https://www.symcon.de/en/service/documentation/developer-area/sdk-tools/sdk-php/module/registerscript/
`mixed RegisterScript(string $Ident, string $Name, string $Contents, int $Position)`
_Requires Symcon >= 4.0_
Creates a script if it does not already exist
**Parameters**
- `$Ident` (string): Ident of the script
- `$Name` (string): Name of the script
- `$Contents` (string)
Content to be entered in the script. __Default__ == "<?php
//Autogenerated script"
- `$Position` (int): Position in the object tree and thus also in the visualization. __Default__ == 0
**Returns** (mixed): | Class | Type | Description |
| --------------- | ------- | --------------------------------------------------------------------------------------------------------------------- |
| IPSModule | integer | Returns the object ID of the created or existing script. |
| IPSModuleStrict | boolean | Returns whether the script was created. The return value can be used, for example, to perform initial configurations. |
Position in the object tree and thus also in the visualization. __Default__ == 0
**Example**
```php
// IPSModuleStrict
$created = $this->RegisterScript("TestScript", "My TestScript");
if ($created) {
// Do things, after initially creating the script
}
// IPSModule
$scriptID = $this->RegisterScript("TestScript", "My TestScript");
```
## RegisterTimer
Source: https://www.symcon.de/en/service/documentation/developer-area/sdk-tools/sdk-php/module/registertimer/
`bool RegisterTimer(string $Name, int $Interval, string $ScriptContent)`
_Requires Symcon >= 4.0_
Creates a timer
**Parameters**
- `$Name` (string): Name of the timer
- `$Interval` (int): Interval in milliseconds with which the timer should be created. 0 = never
- `$ScriptContent` (string): PHP script without PHP tags (<?php ... )
**Returns** (bool): If the command succeeds, it returns __TRUE__, otherwise __FALSE__.
PHP script without PHP tags (<?php ... )
**Example**
```php
// Creates a timer named "Update" with an interval of 5 seconds.
$this->RegisterTimer("Update", 5000, "echo 'Hello World';");
```
## RegisterVariableBoolean
Source: https://www.symcon.de/en/service/documentation/developer-area/sdk-tools/sdk-php/module/registervariableboolean/
`mixed RegisterVariableBoolean(string $Ident, string $Name, array $Presentation, int $Position)`
_Requires Symcon >= 4.0_
Creates a status variable of type Boolean
**Parameters**
- `$Ident` (string): Ident of the status variable
- `$Name` (string): Name of the status variable
- `$Presentation` (array): The configuration of the presentation as an array. A profile can be set via the [Legacy profile](https://www.symcon.de/en/llms/developer/sdk-tools/sdk-php.md). __Default__ == ""
- `$Position` (int): Position in the object tree and therefore also in the visualization. __Default__ == 0
**Returns** (mixed): | Class | Type | Description |
| --------------- | ------- | ------------------------------------------------------------------------------------------------------------- |
| IPSModuleStrict | boolean | Returns whether the variable was created. The return value can be used, for example, to set an initial value. |
| IPSModule | integer | Variable ID of the created status variable. |
Position in the object tree and therefore also in the visualization. __Default__ == 0
**Example**
```php
// IPSModuleStrict
$created = $this->RegisterVariableBoolean("Switch", "Light Switch", ["PRESENTATION" => VARIABLE_PRESENTATION_SWITCH]);
if ($created) {
// Set initial value
$this->SetValue("Switch", true);
}
// IPSModule
$variableID = $this->RegisterVariableBoolean("Switch", "Light Switch", ["PRESENTATION" => VARIABLE_PRESENTATION_SWITCH]);
```
## RegisterVariableFloat
Source: https://www.symcon.de/en/service/documentation/developer-area/sdk-tools/sdk-php/module/registervariablefloat/
`mixed RegisterVariableFloat(string $Ident, string $Name, array $Presentation, int $Position)`
_Requires Symcon >= 4.0_
Creates a status variable of type Float
**Parameters**
- `$Ident` (string): Ident of the status variable
- `$Name` (string): Name of the status variable
- `$Presentation` (array): The configuration of the display as an array. A profile can be set via the [Legacy profile](https://www.symcon.de/en/llms/developer/sdk-tools/sdk-php.md). __Default__ == ""
- `$Position` (int): Position in the object tree and therefore also in the visualization. __Default__ == 0
**Returns** (mixed): | Class | Type | Description |
| --------------- | ------- | ------------------------------------------------------------------------------------------------------------- |
| IPSModuleStrict | boolean | Returns whether the variable was created. The return value can be used, for example, to set an initial value. |
| IPSModule | integer | Variable ID of the created status variable. |
Position in the object tree and therefore also in the visualization. __Default__ == 0
**Example**
```php
// IPSModuleStrict
$created = $this->RegisterVariableFloat("Factor", "Zoom Factor", ["PRESENTATION"=> VARIABLE_PRESENTATION_SLIDER, 'SUFFIX' => ' %']);
if ($created) {
// Set initial value
$this->SetValue("Factor", 5.8);
}
// IPSModule
$variableID = $this->RegisterVariableFloat("Factor", "Zoom Factor", ["PRESENTATION"=> VARIABLE_PRESENTATION_SLIDER, 'SUFFIX' => ' %']);
```
## RegisterVariableInteger
Source: https://www.symcon.de/en/service/documentation/developer-area/sdk-tools/sdk-php/module/registervariableinteger/
`mixed RegisterVariableInteger(string $Ident, string $Name, array $Presentation, int $Position)`
_Requires Symcon >= 4.0_
Creates a status variable of type integer
**Parameters**
- `$Ident` (string): Ident of the status variable
- `$Name` (string): Name of the status variable
- `$Presentation` (array): The configuration of the display as an array. A profile can be set via the [Legacy profile](https://www.symcon.de/en/llms/developer/sdk-tools/sdk-php.md). __Default__ == ""
- `$Position` (int): Position in the object tree and therefore also in the visualization. __Default__ == 0
**Returns** (mixed): | Class | Type | Description |
| --------------- | ------- | ------------------------------------------------------------------------------------------------------------- |
| IPSModuleStrict | boolean | Returns whether the variable was created. The return value can be used, for example, to set an initial value. |
| IPSModule | integer | Variable ID of the created status variable. |
Position in the object tree and therefore also in the visualization. __Default__ == 0
**Example**
```php
// IPSModuleStrict
$created = $this->RegisterVariableInteger("Brightness", "Lamp Brightness", ["PRESENTATION"=> VARIABLE_PRESENTATION_SLIDER, 'SUFFIX' => ' lx']);
if ($created) {
// Set initial value
$this->SetValue("Brightness", 50);
}
// IPSModule
$variablenID = $this->RegisterVariableInteger("Brightness", "Lamp Brightness", ["PRESENTATION"=> VARIABLE_PRESENTATION_SLIDER, 'SUFFIX' => ' lx']);
```
## RegisterVariableString
Source: https://www.symcon.de/en/service/documentation/developer-area/sdk-tools/sdk-php/module/registervariablestring/
`mixed RegisterVariableString(string $Ident, string $Name, array $Presentation, int $Position)`
_Requires Symcon >= 4.0_
Creates a status variable of type String
**Parameters**
- `$Ident` (string): Ident of the status variable
- `$Name` (string): Name of the status variable
- `$Presentation` (array): The configuration of the display as an array. A profile can be set via the [Legacy profile](https://www.symcon.de/en/llms/developer/sdk-tools/sdk-php.md). __Default__ == ""
- `$Position` (int): Position in the object tree and therefore also in the visualization. __Default__ == 0
**Returns** (mixed): | Class | Type | Description |
| --------------- | ------- | ------------------------------------------------------------------------------------------------------------- |
| IPSModuleStrict | boolean | Returns whether the variable was created. The return value can be used, for example, to set an initial value. |
| IPSModule | integer | Variable ID of the created status variable. |
Position in the object tree and therefore also in the visualization. __Default__ == 0
**Example**
```php
// IPSModuleStrict
$created = $this->RegisterVariableString("Name", "My Name", ["PRESENTATION"=> VARIABLE_PRESENTATION_VALUE_INPUT]);
if ($created) {
// Set initial value
$this->SetValue("Name", "Peter");
}
// IPSModule
$variablenID = $this->RegisterVariableString("Name", "My Name", ["PRESENTATION"=> VARIABLE_PRESENTATION_VALUE_INPUT]);
```
## ReloadForm
Source: https://www.symcon.de/en/service/documentation/developer-area/sdk-tools/sdk-php/module/reloadform/
`bool ReloadForm()`
_Requires Symcon >= 5.2_
Reload the instance configuration
**Returns** (bool): If the command succeeds, it returns __TRUE__, otherwise __FALSE__.
This function reloads the instance configuration form in each open instance configuration. Current entries will get lost.
**Example**
```php
// Reload the form
$this->ReloadForm();
```
## RequestAction
Source: https://www.symcon.de/en/service/documentation/developer-area/sdk-tools/sdk-php/module/requestaction/
`void RequestAction(string $Ident, mixed $Value)`
Function that is called when the visualization requests a value change.
**Parameters**
- `$Ident` (string): Ident of the variable
- `$Value` (mixed): The value to be set
**Returns** (void): No Return
The value to be set
**Example**
```php
// IPSModuleStrict
public function RequestAction(string $Ident, mixed $Value): void {
switch($Ident) {
case "TestVariable":
// An action, e.g. switching, would normally be carried out here
// Outputs via 'echo' are returned to the visualization
// Write new value to the status variable
SetValue($this->GetIDForIdent($Ident), $Value);
break;
default:
throw new Exception("Invalid Ident");
}
}
// IPSModule
public function RequestAction($Ident, $Value) {
// xxxxx
}
```
## RequireParent
Source: https://www.symcon.de/en/service/documentation/developer-area/sdk-tools/sdk-php/module/requireparent/
`bool RequireParent(string $ParentGUID)`
_Requires Symcon >= 4.0_
Connects an instance to a parent instance
**Parameters**
- `$ParentGUID` (string): [GUID](https://www.symcon.de/en/service/documentation/basics/instances#GUID)
**Returns** (bool): If the command succeeds, it returns __TRUE__, otherwise __FALSE__.
[GUID](https://www.symcon.de/en/service/documentation/basics/instances#GUID)
**Example**
```php
// IPSModuleStrict
ConnectParent/RequireParent/ForceParent is not available,
but can be replaced by the new function “GetCompatibleParents()”.
// IPSModule
public function Create() {
// Never remove the line!
parent::Create();
// Connect to the newly created splitter if there is no connection yet
$this->RequireParent("{46C969BF-3465-4E3E-B2A5-E404FB969735}");
}
```
## SendDataToChildren
Source: https://www.symcon.de/en/service/documentation/developer-area/sdk-tools/sdk-php/module/senddatatochildren/
`array SendDataToChildren(string $Data)`
_Requires Symcon >= 4.0_
Sends data to all subordinate instances
**Parameters**
- `$Data` (string): JSON encoded string
**Returns** (array): Results which [ReceiveData](https://www.symcon.de/en/llms/developer/sdk-tools/sdk-php/module.md) delivers from the parent instances
JSON encoded string
**Example**
```php
// The example can be found at ReceiveData
```
## SendDataToParent
Source: https://www.symcon.de/en/service/documentation/developer-area/sdk-tools/sdk-php/module/senddatatoparent/
`string SendDataToParent(string $Data)`
_Requires Symcon >= 4.0_
Sends data to a higher-level instance
**Parameters**
- `$Data` (string): JSON encoded string
**Returns** (string): Result which [ForwardData](https://www.symcon.de/en/llms/developer/sdk-tools/sdk-php/module.md) delivers from the parent instance
JSON encoded string
**Example**
```php
// Example can be found at ForwardData
```
## SendDebug
Source: https://www.symcon.de/en/service/documentation/developer-area/sdk-tools/sdk-php/module/senddebug/
`bool SendDebug(string $MessageName, string $Data, int $Format)`
_Requires Symcon >= 4.0_
Sends a message to the debug output
**Parameters**
- `$MessageName` (string): Name/title of the debug output
- `$Data` (string): Content of the debug message
- `$Format` (int): Presetting for automatic formation selection (0 = text, 1 = hex)
**Returns** (bool): If the command succeeds, it returns __TRUE__, otherwise __FALSE__.
Presetting for automatic formation selection (0 = text, 1 = hex)
**Example**
```php
// Example from the presence simulation
$this->SendDebug("Fetch", "Fetched day -".$day." with ".sizeof($data['Data'])." valid device(s)", 0);
// Sample output automatically configured as text output in the debug window
"Fetch" - "Fetched day -28 with 2 valid device(s)"
```
## SetBuffer
Source: https://www.symcon.de/en/service/documentation/developer-area/sdk-tools/sdk-php/module/setbuffer/
`bool SetBuffer(string $Name, string $Data)`
_Requires Symcon >= 4.1_
Sets the content of a buffer
**Parameters**
- `$Name` (string): Name of the buffer
- `$Data` (string): Data which should be packed into the buffer.
**Returns** (bool): If the command succeeds, it returns __TRUE__, otherwise __FALSE__.
Data which should be packed into the buffer.
**Example**
```php
// Writes "Hello World" to the "Databuffer" buffer
$this->SetBuffer("DataBuffer", "Hello World");
```
## SetForwardDataFilter
Source: https://www.symcon.de/en/service/documentation/developer-area/sdk-tools/sdk-php/module/setforwarddatafilter/
`bool SetForwardDataFilter(string $RequiredRegexRule)`
_Requires Symcon >= 4.1_
Sets a “Regular Expression” filter for the ForwardData function
**Parameters**
- `$RequiredRegexRule` (string): RegexRule which should be used as a filter
**Returns** (bool): If the command succeeds, it returns __TRUE__, otherwise __FALSE__.
RegexRule which should be used as a filter
**Example**
```php
// Add filter for ForwardData
public function ApplyChanges(): void {
[...]
$this->SetForwardDataFilter(".*Hello.*");
[...]
}
// Only called if “Hello” is found in the $JSONString
public function ForwardData(string $JSONString): string {
return "OK";
}
```
## SetReceiveDataFilter
Source: https://www.symcon.de/en/service/documentation/developer-area/sdk-tools/sdk-php/module/setreceivedatafilter/
`bool SetReceiveDataFilter(string $RequiredRegexRule)`
_Requires Symcon >= 4.1_
Sets a "Regular Expression"-Filter for the RecieveData function
**Parameters**
- `$RequiredRegexRule` (string): Regexrule which should be used as a filter
**Returns** (bool): If the command succeeds, it returns __TRUE__, otherwise __FALSE__.
Regexrule which should be used as a filter
**Example**
```php
// Add filters for ReceiveData
public function ApplyChanges(): void {
[...]
$this->SetReceiveDataFilter(".*Hello.*");
[...]
}
// Only called if “Hello” is found in the $JSONString
public function ReceiveData(string $JSONString): string {
return "";
}
```
## SetStatus
Source: https://www.symcon.de/en/service/documentation/developer-area/sdk-tools/sdk-php/module/setstatus/
`bool SetStatus(int $StatusValue)`
_Requires Symcon >= 4.0_
**Parameters**
- `$StatusValue` (int): The status value to which the instance should be set.
**Returns** (bool): If the command succeeds, it returns __TRUE__, otherwise __FALSE__.
The status value to which the instance should be set.
**Example**
```php
// sets the status to "inactive"
$this->SetStatus(104);
```
## SetSummary
Source: https://www.symcon.de/en/service/documentation/developer-area/sdk-tools/sdk-php/module/setsummary/
`bool SetSummary(string $ShortInfo)`
_Requires Symcon >= 4.1_
Sets the short info of an object
**Parameters**
- `$ShortInfo` (string): Content to be set
**Returns** (bool): If the command succeeds, it returns __TRUE__, otherwise __FALSE__.
Content to be set
**Example**
```php
// puts a possible IP address in the short description to ensure quick recognition.
$this->SetSummary($this->ReadPropertyString("IPAddress"));
```
## SetTimerInterval
Source: https://www.symcon.de/en/service/documentation/developer-area/sdk-tools/sdk-php/module/settimerinterval/
`bool SetTimerInterval(string $Name, int $Interval)`
_Requires Symcon >= 4.0_
Sets the interval of a timer
**Parameters**
- `$Name` (string): The name of the timer whose interval is to be set.
- `$Interval` (int): The interval, at which the timer should be set, in milliseconds.
**Returns** (bool): If the command succeeds, it returns __TRUE__, otherwise __FALSE__.
The interval, at which the timer should be set, in milliseconds.
**Example**
```php
// Sets the interval of the "Update" timer to 5 seconds
$this->SetTimerInterval("Update", 5000);
```
## SetValue
Source: https://www.symcon.de/en/service/documentation/developer-area/sdk-tools/sdk-php/module/setvalue/
`bool SetValue(string $Ident, mixed $Value)`
_Requires Symcon >= 5.0_
Sets the value of a status variable
**Parameters**
- `$Ident` (string): Ident of the status variable
- `$Value` (mixed): Value to be written into the status variable.
**Returns** (bool): If the command succeeds, it returns __TRUE__, otherwise __FALSE__.
Value to be written into the status variable.
**Example**
```php
// Writes 123 into the status variable "Statusvariable1"
$this->SetValue("Statusvariable1", 123);
```
## SetVisualizationType
Source: https://www.symcon.de/en/service/documentation/developer-area/sdk-tools/sdk-php/module/setvisualizationtype/
`SetVisualizationType(int $VisualisierungsTyp)`
_Requires Symcon >= 7.1_
Sets the visualization type for the instance
**Parameters**
- `$VisualisierungsTyp` (int): Visualization type for individual visualization __0__: no individual visualization __1__: visualization via HTML SDK __2__: Visualization via HTML SDK in normal tile view and full-screen mode (since 9.1) [Constants](https://www.symcon.de/en/llms/developer/sdk-tools/sdk-php.md)
**Returns** (): If the command succeeds, it returns __TRUE__, otherwise __FALSE__.
Visualization type for individual visualization __0__: no individual visualization __1__: visualization via HTML SDK __2__: Visualization via HTML SDK in normal tile view and full-screen mode (since 9.1) [Constants](https://www.symcon.de/en/llms/developer/sdk-tools/sdk-php.md)
**Example**
```text
// Acivate HTML-SDK
$this->SetVisualizationType(INSTANCE_VISUALIZATION_TYPE_HTML);
```
## Translate
Source: https://www.symcon.de/en/service/documentation/developer-area/sdk-tools/sdk-php/module/translate/
`string Translate(string $Text)`
_Requires Symcon >= 4.3_
Translates a section of text
**Parameters**
- `$Text` (string): Text to be translated
**Returns** (string): Translated text
Text to be translated
**Example**
```php
// module.php
$label = sprintf($this->Translate("The current time is %s"), date("d.m.y H:i"));
// locale.json
{
"translations": {
"de": {
"The current time is %s": "Die aktuelle Zeit ist %s"
}
}
}
```
## UnregisterHook
Source: https://www.symcon.de/en/service/documentation/developer-area/sdk-tools/sdk-php/module/unregisterhook/
`bool UnregisterHook(string $Address)`
_Requires Symcon >= 8.2_
Unregisters a WebHook with the specified address
**Parameters**
- `$Address` (string): Address of the hook
**Returns** (bool): If the command could be executed successfully, the result is __TRUE__, otherwise __FALSE__.
Address of the hook
**Example**
```php
// IPSModuleStrict
public function ApplyChanges(): void {
...
$this->UnregisterHook('my-module');
...
}
```
## UnregisterMessage
Source: https://www.symcon.de/en/service/documentation/developer-area/sdk-tools/sdk-php/module/unregistermessage/
`bool UnregisterMessage(int $SenderID, int $MessageID)`
_Requires Symcon >= 4.1_
Deactivates a message for a SenderID
**Parameters**
- `$SenderID` (int): ID of the sender
- `$MessageID` (int): ID of the message
**Returns** (bool): If the command succeeds, it returns __TRUE__, otherwise __FALSE__.
ID of the message
**Example**
```php
// The module no longer "listens" for messages from instance 12345 with MessageID 10505
$this->UnregisterMessage(12345 /* InstanceID */, 10505 /* IM_CHANGESTATUS */);
// All messages from the module should be deleted
foreach ($this->GetMessageList() as $senderID => $messages) {
foreach ($messages as $message) {
$this->UnregisterMessage($senderID, $message);
}
}
```
## UnregisterOAuth
Source: https://www.symcon.de/en/service/documentation/developer-area/sdk-tools/sdk-php/module/unregisteroauth/
`bool UnregisterOAuth(string $Identifier)`
_Requires Symcon >= 8.2_
Unregisters an OAuth handler with the specified identifier
**Parameters**
- `$Identifier` (string): Identifier of the OAuth handler
**Returns** (bool): If the command could be executed successfully, the result is __TRUE__, otherwise __FALSE__.
Identifier of the OAuth handler
**Example**
```php
// IPSModuleStrict
public function ApplyChanges(): void {
...
$this->UnregisterOAuth('my-module');
...
}
```
## UnregisterReference
Source: https://www.symcon.de/en/service/documentation/developer-area/sdk-tools/sdk-php/module/unregisterreference/
`bool UnregisterReference(int $ID)`
_Requires Symcon >= 5.1_
Removes an ID as referenced
**Parameters**
- `$ID` (int): ID of the object
**Returns** (bool): If the command succeeds, it returns __TRUE__, otherwise __FALSE__.
ID of the object
**Example**
```php
$this->UnregisterReference(10505 /* ObjectID */);
```
## UnregisterVariable
Source: https://www.symcon.de/en/service/documentation/developer-area/sdk-tools/sdk-php/module/unregistervariable/
`bool UnregisterVariable(string $Ident)`
_Requires Symcon >= 4.0_
Deletes a status variable
**Parameters**
- `$Ident` (string): Ident of the status variable
**Returns** (bool): | Class | Type | Description |
| --------------- | ------- | ------------------------------------------------------------------------------------------------------------------- |
| IPSModuleStrict | boolean | Returns whether the variable has been removed. The return value can be used, for example, to clean up other things. |
| IPSModule | boolean | If the command succeeds, it returns **TRUE**, otherwise **FALSE**. |
Ident of the status variable
**Example**
```php
$this->UnregisterVariable("Temperature");
```
## UpdateFormField
Source: https://www.symcon.de/en/service/documentation/developer-area/sdk-tools/sdk-php/module/updateformfield/
`bool UpdateFormField(string $Field, string $Parameters, mixed $Value)`
_Requires Symcon >= 5.2_
Changes the parameter of a form field
**Parameters**
- `$Field` (string): Name of the form field to be changed
- `$Parameters` (string): Name of the parameter to be changed
- `$Value` (mixed): New value of the parameter
**Returns** (bool): If the command succeeds, it returns __TRUE__, otherwise __FALSE__.
New value of the parameter
**Example**
```php
// hide the button
$this->UpdateFormField("MyButton", "visible", false);
```
## UpdateVisualizationValue
Source: https://www.symcon.de/en/service/documentation/developer-area/sdk-tools/sdk-php/module/updatevisualizationvalue/
`bool UpdateVisualizationValue(mixed $Data)`
_Requires Symcon >= 7.1_
Sends a message to the visualization when using the HTML SDK
**Parameters**
- `$Data` (mixed): Any data that is sent to the visualization
**Returns** (bool): If the command succeeds, it returns __TRUE__, otherwise __FALSE__.
Any data that is sent to the visualization
**Example**
```text
// In this example, a simple number is passed as the count
$this->UpdateVisualizationValue(5);
```
## WriteAttributeBoolean
Source: https://www.symcon.de/en/service/documentation/developer-area/sdk-tools/sdk-php/module/writeattributeboolean/
`bool WriteAttributeBoolean(string $Name, bool $Value)`
_Requires Symcon >= 5.1_
Writes an attribute of the Boolean type
**Parameters**
- `$Name` (string): Name of the attribute
- `$Value` (bool): Value of the attribute
**Returns** (bool): If the command succeeds, it returns __TRUE__, otherwise __FALSE__.
Value of the attribute
**Example**
```php
$this->WriteAttributeBoolean("CurrentState", false);
```
## WriteAttributeFloat
Source: https://www.symcon.de/en/service/documentation/developer-area/sdk-tools/sdk-php/module/writeattributefloat/
`bool WriteAttributeFloat(string $Name, float $Value)`
_Requires Symcon >= 5.1_
Writes an attribute of the Float type
**Parameters**
- `$Name` (string): Name of the attribute
- `$Value` (float): Value of the attribute
**Returns** (bool): If the command succeeds, it returns __TRUE__, otherwise __FALSE__.
Value of the attribute
**Example**
```php
$this->WriteAttributeFloat("Median", 5.5);
```
## WriteAttributeInteger
Source: https://www.symcon.de/en/service/documentation/developer-area/sdk-tools/sdk-php/module/writeattributeinteger/
`bool WriteAttributeInteger(string $Name, int $Value)`
_Requires Symcon >= 5.1_
Writes an attribute of the integer type
**Parameters**
- `$Name` (string): Name of the attribute
- `$Value` (int): Value of the attribute
**Returns** (bool): If the command succeeds, it returns __TRUE__, otherwise __FALSE__.
Value of the attribute
**Example**
```php
$this->WriteAttributeInteger("SequenceCounter", 4);
```
## WriteAttributeString
Source: https://www.symcon.de/en/service/documentation/developer-area/sdk-tools/sdk-php/module/writeattributestring/
`bool WriteAttributeString(string $Name, string $Value)`
_Requires Symcon >= 5.1_
Writes an attribute of the string type
**Parameters**
- `$Name` (string): Name of the attribute
- `$Value` (string): Value of the attribute
**Returns** (bool): If the command succeeds, it returns __TRUE__, otherwise __FALSE__.
Value of the attribute
**Example**
```php
$this->WriteAttributeString("Token", "08da50bd109c7fb1bec49d15ae86e55f");
```
---
# Special Switches
> Symcon documentation · English · generated on 2026-09-26
> Index: https://www.symcon.de/en/llms.txt
Source: https://www.symcon.de/en/service/documentation/developer-area/special-switches/
_Requires Symcon >= 2.6_
In order to be able to better control some functions of IP-Symcon, it is possible to change some switches within the Management Console.
> **Warning:** Please note that any changes will only take effect as soon as IP-Symcon has been restarted.

The following switches are available:
| Option-name | Special switch function | Description |
| ------------------------------------------------ | -------------------------------------------------- | ---------------------------------------------------------------------------------------------------------------------------------------------------------------------------------------------------------------------------------------------------------------------------------------------------------------------------------------------------------------------------------------------------------------------- |
| ArchiveCommitInterval (since 5.0) | Archive time interval | __Default = 60__. Second value after which the logged values are written to the hard disk. |
| ArchiveRecordLimit (since 4.3) | Number of data points used in the archive | __Default = 10000__. Maximum value for the limit parameters of the archive functions. This correlates directly with the maximum data sets used for rendering and aggregating graphs. Attention: Higher number slows down graph rendering. Only suitable for high-performance systems. |
| ArchiveRecordLimitBool (since 5.0) | Number of raw data points used in the archive | __Default = 500__. Maximum value for the limit parameters of the archive functions. This correlates directly with the maximum raw data sets used for rendering and aggregating graphs. Attention: Higher number slows down graph rendering. Only suitable for high-performance systems. |
| BackupCount | Number of backups | __Default = 25__. Number of Backup Settings that are archived in the 'backup' folder. A Backup Settings is created at every start and shortly after midnight. The number in the file name is a UnixTimeStamp of the creation time. If the value zero (0) is specified, an unlimited number of backups will be created. (Attention, storage consumption!) |
| CompatibilityRequired (since 4.0) | Compatibility Features | __Default = Disabled (Windows: Enabled)__. If __activated__, the compatibility functions for deprecated functions since 2.x / 3.x are available under IP-Symcon 4.0. Activating this special switch increases the runtime of every PHP script and should remain deactivated if possible. This feature is enabled by default on Windows due to backwards compatibility. |
| ConnectCheck | Check interval from the Connect service | __Default = 30 (in minutes)__. Interval in minutes at which the connection is actively checked by the Connect service. |
| ConnectLimit (since 5.4) | Connection attempt limit | __Default = 25__ (maximum 100). Specifies the maximum number of connection attempts within 24 hours of the Connect-Control. All inquiries beyond this are aborted with an error message and written to the logfile. The limit is reset every 24 hours. |
| ConnectWatch (since 4.0) | Log Connect service | __Default = Disabled__. If __activated__, extended outputs from processed "Connect Service" requests are written to the logfile. |
| DefaultVisualization (since 7.0) | Specify which visualization is on the front page | __Default = 1__. If __1__, the Tile-Visualization is shown, If __0__ the WebFront-Visualization is show. For systems upgrading to 7.0 the default value is 0. |
| DiscoveryWatch (since 4.3) | Enable extended protocol for SSDP | __Default = Disabled__. If __activated__, extended messages related to the SSDP service are written to the log file. The SSDP service is, for example, responsible for the automatic detection of IP-Symcon for the management console and mobile apps. |
| LogfileCount | Number of logfiles | __Default = 25__. Number of log files that are archived in the 'logs' folder. A log file is created at each start and shortly after midnight. The number in the file name is a UnixTimeStamp of the creation time. If the value zero (0) is specified, an unlimited number of backups will be created. (Attention, storage consumption!) |
| LogfileFilter | RegEx for logfile messages | __Default = ""__. RegEx to filter certain logfile messages. If not empty and the filter rule applies, the message will not be displayed in the logfile nor in the message window. The text to which the filter is applied can be found in the logfile, excluding the time. |
| LogfileVerbose | Activate extended protocol | __Default = Enabled__. If __activated__, all messages are written to the logfile. If __deactivated__, all messages except KL_DEBUG are written to the logfile. |
| LogMessageCount | Number of messages per message type | __Default = 25__. Number of messages per message type that are saved for the status widget. |
| MaxLoginAttemptsBeforeLockdown (since 5.1) | Login attempts until blocked | __Default = 15__. Number of incorrect logins before the IP address is completely blocked for further logins. |
| MaxLoginAttemptsBeforeSlowdown (since 5.1) | Login attempts until delay | __Default = 5__. Number of incorrect logins before further logins from this IP address are slowed down (slowing down is defined by MaxLoginAttemptsSlowdownWaitTime) |
| MaxLoginAttemptsLockdownDuration (since 5.1) | Duration of the login lock | __Default = 900 (in seconds)__. Delay until the login block for the affected IP address is removed. |
| MaxLoginAttemptsSlowdownDuration (since 5.1) | Duration of the login delay | __Default = 300 (in seconds)__. Delay until the slowdown is removed for the affected IP address. |
| MaxLoginAttemptsSlowdownWaitTime (since 5.1) | Time of delay | __Default = 5000 (in milliseconds)__. Delay time in milliseconds for slowed down logins. |
| MessageRingBufferSize | Number of buffer messages | __Default = 8192__. Indicates the number of messages that are buffered. If the maximum number is reached, the first (oldest) messages are overwritten. |
| MessageQueueWatch | Log processing queue | __Default = Disabled__. If __activated__, the delay times of the internal processing queue are recorded in the logfile. If __deactivated__, these are not logged. |
| NATPublicIP | Set NAT Public IP | __Default = ""__. If NATSupport is active, this public IP is automatically used everywhere. If this setting is empty, the public IP can be set manually in the respective instances. |
| NATSupport | Activate NAT extensions | __Default = Disabled__. If __activated__, extended functions are activated, e.g. in the KNX gateway and HomeMatic Socket, in order to specify the correct IP address behind the NAT. This is particularly relevant for operation in Docker containers, which are created in bridge mode by default. |
| NotificationLimit (since 5.4) | Limit of push notifications | __Default = 250__(maximum 1000). Specifies the maximum number of push notifications within 24 hours. All inquiries beyond this are aborted with an error message and written to the logfile. The limit is reset every 24 hours, given the limit has not been reached. If the limit has been reached, the cause must be corrected and the service restarted before further push messages can be sent. |
| OAuthWatch (since 5.0) | Enable OAuth endpoint protocol | __Default = Disabled__. If activated, all requests are logged via the OAuth endpoint |
| OPcacheSupport (since 5.0) | Activate PHP's OPcache | __Default = activated (up to 5.4 deactivated)__. If __activated__, PHP scripts are saved in memory. This avoids loading and parsing the scripts each time it is executed. |
| ProxyConnectLimitFrameRate (since 5.5) | Number of frames in the stream via Connect service | __Default = 2__. Specifies whether the number of frames per second via the Connect service should be reduced in order to conserve the data volume, 0 = no limit) |
| ProxyConnectReduceQuality (since 5.5) | Reduce the quality of the stream | __Default = Enabled__. If __activated__, the quality of the stream via the Connect service is reduced in order to conserve the data volume. |
| ProxyConnectReduceResolution (since 5.5) | Limit the resolution of the stream | __Default = Enabled__. If __activated__, the resolution is reduced to a maximum of 720p. |
| ProxyInterface (since 7.0) | Setting the IP address for Proxy/VoIP | __Default = ""__. IP address of the network card that is to be used for the Proxy/VoIP connection. Only has to be set if the automatic detection does not work correctly. |
| ProxyLimitFrameRate (since 5.5) | Number of frames in the local stream | __Default = 0__. Specifies whether the number of frames per second for local connections should be reduced in order to conserve the data volume, 0 = no limit. |
| ProxyRTSPBuffer (since 5.5) | Size of the RTSP buffer | __Default = 524288__. Specifies the size of the buffer for RTSP streams. The larger the buffer, the more latency the stream has, the smaller the jittery the picture can be with bad connections. |
| ProxyUseHWAccel (since 5.5) | Hardware acceleration index for RTSP | __Default = -1 (automatic)__. Specifies whether an available hardware acceleration should be used for decoding. 0 = never, 1..x = index of the available acceleration. |
| ProxyWatch (since 5.1) | Log RTSP/MJPEG streams | __Default = Disabled__. If __activated__, further debugging information about called RTSP/MJPEG streams is logged. |
| SaveInterval | StorageInterval | __Default = 10 (in minutes)__. This special switch indicates the cycle in which the settings are automatically saved to the hard disk. When exiting IP-Symcon, the settings are written regardless of this option. If the value zero (0) is specified, the settings are only written on exit (not recommended). |
| ScriptOutputBufferLimit (since 5.2) | Define script output length | __Default = 1048576 (in bytes)__. Maximum length that a script output can have. If the output is longer, the script is immediately aborted with the error message "Output-Buffer exceeds Limit". |
| ScriptWatch | Log script executions | __Default = Enabled__. If __activated__, script executions are logged in the logfile. If __deactivated__, no script executions are logged. Errors and outputs (e.g. via echo) are always logged. |
| ServerHardQueueBytesLimit (since 5.3) | Byte limit of the queue | __Default = 33554432__. When the limit of bytes of all messages in the queue is reached, the connection is terminated immediately. |
| ServerHardQueueSizeLimit (since 5.3) | Message limit of the queue | __Default = 65536__. When the limit for messages in the queue is reached, the connection is terminated immediately. |
| ServerHardQueueTransferTimeout (since 5.3) | Queue timeout | __Default = 300__. Limit in seconds after which an inactive connection is immediately terminated. |
| ServerLogging (since 5.0) | Activate server logging | __Default = Disabled__. If __activated__, logging of accesses to the web server (port = 3777) is activated. This setting only affects the server on port 3777. On own web servers the setting in the respective instance is taken into account. The log file is called “access.log” and is, depending on the operating system, located in the logfiles folder. See [Installation](https://www.symcon.de/en/llms/getting-started.md) |
| ServerLoggingFilter (since 5.0) | Activate filter for server logging | __Default = Enabled__. If __activated__, API calls (IPS_GetSnapshotChanges/WFC_GetSnapshotChanges) are not written to the "access.log" logfile if ServerLogging is active . If __deactivated__, all entries are written to the logfile. |
| ServerMaxPostSize (since 5.1) | Maximum bytes for POST | __Default = 25165824 (in bytes)__. Maximum number of bytes that can be sent to the server via POST. |
| ServerSecurity (since 5.0) | Activate CORS protection | __Default = Enabled__. If __activated__, all CORS protection of the web server is activated. |
| ServerSoftQueueBytesLimit (since 5.3) | Bytes soft limit of the queue | __Default = 8388608__. When the limit of bytes of all messages in the queue is reached, the connection is disconnected if the ServerSoftQueueTranferTimeout limit is also exceeded |
| ServerSoftQueueSizeLimit (since 5.3) | Message soft limit of the queue | __Default = 32768__. When the limit of messages in the queue is reached, the connection is disconnected if the ServerSoftQueueTranferTimeout limit is also exceeded |
| ServerSoftQueueTranferTimeout (since 5.3) | Queue time soft limit | __Default = 10__. Limit in seconds after which the soft limits apply to the size and number of messages |
| ServerUserFolderPassword (since 5.1) | Basic authentication password | __Default = ""__. Password for the basic authentication of the web server to secure the "user"-folder. |
| ServerUserFolderUsername (since 5.1) | Basic authentication username | __Default = ""__. Username for the basic authentication of the web server to secure the "user"-folder. |
| SettingsWatch (since 4.0) | Log saving of settings | __Default = Disabled__. If __activated__, a message is written to the logfile as soon as the settings have been saved in the SaveInterval. |
| SOAPEnabled (up to 3.4) | Activate SOAP | __Default = Disabled__. If __activated__, the SOAP interface can be reached via port 3773. |
| ThreadCount | Number of threads | __Default = 50__. Minimum = 25. Indicates the number of PHP threads that are available in IP-Symcon. Each thread consumes a few megabytes of RAM and a small percentage of the CPU load to manage. The maximum value can be determined from the information under Limitations. |
| ThreadQueueLimit (since 4.0) | Thread queue limit | __Default = 50__. Specifies the maximum number of PHP requests that are waiting in the internal queue for execution. Any further inquiries will be canceled with an error message. By default, this special switch should not be changed, but instead it should be ensured that scripts have a short runtime. |
| VariableWatch | Activate extended variable log | __Default = Enabled__. If __activated__, value changes/updates of all variables are written to the logfile. If __deactivated__, these are not written to the logfile. |
| VoIPInterface (since 5.2, up to 6.4) | Setting the IP address for VoIP | __Default = ""__. IP address of the network card that is to be used for the VoIP connection. Only has to be set if the automatic detection does not work correctly. Superseded by the new ProxyInterface special switch that is available since IP-Symcon 7.0. |
| VoIPLogLevel (since 5.2, up to 6.4) | Set debug output level for VoIP | __Default = 0 (disabled)__. The level can be set between 0 and 3 (Recommended: 2). Where 0 is deactivated and 3 means the highest level of detail. The VoIPLogLevel determines the level of detail of the debug messages in the message log. Superseded by the ProxyWatch special switch that includes this information starting with IP-Symcon 7.0. |
| WebSocketWatch (since 5.0) | Activate extended WebSocket protocol | __Default = Disabled__. If activated, further debugging information is output on the WebSocket return channel, such as Open, Close, Error or if timeouts or limits have been exceeded. |
---
# Module Reference – Overview
> Symcon documentation · English · generated on 2026-09-26
> Index: https://www.symcon.de/en/llms.txt
## Module Reference
Source: https://www.symcon.de/en/service/documentation/module-reference/
> **Note:** The [Product Page](https://www.symcon.de/en/product/) describes what IP-Symcon is.
> A table with all supported systems is listed at [Interfaces](https://www.symcon.de/en/llms/components/service.md).
In the Module Reference, natively supported modules are shown. In the corresponding module references, tutorials, examples, and Tips & Tricks for the respective system.
Furthermore, the module specific commands are listed.
> **Note:** __For a list of IP Symcon specific commands, see the [Command Reference](https://www.symcon.de/en/llms/functions/index.md).__
## Devices
Source: https://www.symcon.de/en/service/documentation/module-reference/devices/
## Logic
Source: https://www.symcon.de/en/service/documentation/module-reference/logic/
## Energy
Source: https://www.symcon.de/en/service/documentation/module-reference/energy/
## Visualizations
Source: https://www.symcon.de/en/service/documentation/module-reference/visualizations/
## Voice assistents
Source: https://www.symcon.de/en/service/documentation/module-reference/voice-assistents/
## Notifications
Source: https://www.symcon.de/en/service/documentation/module-reference/notifications/
## Core Instances
Source: https://www.symcon.de/en/service/documentation/module-reference/core-instances/
## I/O Instances
Source: https://www.symcon.de/en/service/documentation/module-reference/i-o-instances/
I/O Instances deliver data from devices or sources outside of IP Symcon and make it available. These often form the first interface to the physical device.
### Integration in IP-Symcon
When creating a device instance, which requires an I/O instance as a parent instance, the appropriate instance is often created and set up automatically.
Only the settings need to be checked.
An I/O instance can also be inserted if required. This is often used in combination with a [RegisterVariable](https://www.symcon.de/en/llms/modules/registervariable.md), which has additional values available via [System Variables](https://www.symcon.de/en/llms/concepts/automations.md).
I/O instances are also used in [PHP Module Development](https://www.symcon.de/en/llms/developer/sdk-tools/sdk-php.md). Similar to native modules, I/O instances are inserted there as an interface.
## Backups
Source: https://www.symcon.de/en/service/documentation/module-reference/backups/
## Legacy
Source: https://www.symcon.de/en/service/documentation/module-reference/legacy/
---
# 1-Wire
> Symcon documentation · English · generated on 2026-09-26
> Index: https://www.symcon.de/en/llms.txt
Source: https://www.symcon.de/en/service/documentation/module-reference/devices/1-wire/
The 1-Wire bus system is similar to I2C. In a simple way different sensors can be connected to a normal 3-wire cable (ground, data, and +5 V). For connection to a PC, a USB adapter (DS9490R) or serial interface (DS9097U-S09) are available.
> **Note:** The following devices are supported by IP-Symcon:
>
> [Supported Devices](https://www.symcon.de/en/llms/modules/1-wire.md)
> **Warning:** Since version 4.0 __no__ TMEX driver is required for usage, except for DS2490/DS9490R
> **Warning:** IP-Symcon does not support the __parasitic__ mode.
> A __+5V__ power supply is essential!
### Video Tutorial for configuration (German)
[Video](https://www.youtube.com/embed/JbIdm5x0uxY?rel=0&cc_load_policy=1)
### Integration into IP-Symcon
When using the LAN gateway, it can be integrated via the [Device Search](https://www.symcon.de/en/llms/components/management-console.md). As a system, "OneWire Discovery" must be selected. The Discovery instance offers the creation of a OneWire [Configurator](https://www.symcon.de/en/llms/concepts.md). After the configurator is created, it can be used to create the individual devices as instances via "Create".
The building blocks that are connected to the 1-Wire bus do not send their values automatically - they must be requested. The __Interval__ in the respective instance configuration defines how often the request is done.

> **Warning:** Every request takes time and occupies the bus. For this reason, the "Interval" should be used sparingly. In practice, for example, a request cycle of 60 seconds to read a room temperature is more than sufficient. Smaller values under one second cannot be configured for that reason.
Furthermore, it should be considered that the bus workload rises with more devices connected to an adapter. In our model home, 30 devices are working without issue on one adapter. Wie recommend an individual power supply and multiple adapters for bigger installations.
### Tips & Tricks
* The serial adapter has a different pinout than the USB adapter and does not provide +5 V bus voltage.
* For power supply a regulated 5V power supply with current limitation is recommended.
* For smaller systems, we recommend using a modular cable with RJ12 or RJ45 plug for creating cable itself and distributing a 3 Series modular socket. The system is then wired 1:1 (star-shaped junctions).
__Further links:__
Wikipedia: [https://en.wikipedia.org/wiki/1-Wire](https://en.wikipedia.org/wiki/1-Wire)
Manufacturer: [https://www.maximintegrated.com/en/pl_list.cfm/filter/21]
__Read the COM Port of a USB Device in Windows (German)__[Video](https://www.youtube.com/embed/0w6weaMF8tg?rel=0&cc_load_policy=1)
## DS2405
Source: https://www.symcon.de/en/service/documentation/module-reference/devices/1-wire/ds2405/
The DS2413 is a 1-port switch (4mA) & input (PIO) module.
Unfortunately it is no longer manufactured. As a replacement, we recommend the type [DS2413](https://www.symcon.de/en/llms/modules/1-wire.md).
Alternatively, you can set each of the eight channels as "Digital Output" or "Digital Input".
Additionally you can "invert the status" (see DS2413).
For testing purposes, you have the ability to switch the output "ON" and "OFF".

## OW_SwitchMode
Source: https://www.symcon.de/en/service/documentation/module-reference/devices/1-wire/ds2405/ow-switchmode/
`bool OW_SwitchMode(int $InstanceID, bool $Status)`
**Parameters**
- `$InstanceID` (int): ID of the device to be switched
- `$Status` (bool): __TRUE__ for On, __FALSE__ for Off
**Returns** (bool): If the command succeeds, it returns __TRUE__, otherwise __FALSE__.
__TRUE__ for On, __FALSE__ for Off
**Example**
```php
OW_SwitchMode(12345, true); //Turn on device
```
## OW_ToggleMode
Source: https://www.symcon.de/en/service/documentation/module-reference/devices/1-wire/ds2405/ow-togglemode/
`bool OW_ToggleMode(int $InstanceID)`
Changes the state of the device with the ID __InstanceID__. The current value can be queried in the state variable after the operation.
-
**Parameters**
- `$InstanceID` (int): ID of the device to be switched
**Returns** (bool): If the command succeeds, it returns __TRUE__, otherwise __FALSE__.
ID of the device to be switched
**Example**
```php
OW_ToggleMode(12345); //Toggle device
```
## DS2406
Source: https://www.symcon.de/en/service/documentation/module-reference/devices/1-wire/ds2406/
The DS2406 is a 2-way switch (50 / 8mA), input (PIO) module & 1Kb memory module.
## OW_SetPin
Source: https://www.symcon.de/en/service/documentation/module-reference/devices/1-wire/ds2406/ow-setpin/
`bool OW_SetPin(int $InstanceID, int $Pin, bool $Status)`
**Parameters**
- `$InstanceID` (int): ID of the device to be switched
- `$Pin` (int): Pin of the module (0..1)
- `$Status` (bool): __TRUE__ for On, __FALSE__ for Off
**Returns** (bool): If the command succeeds, it returns __TRUE__, otherwise __FALSE__.
__TRUE__ for On, __FALSE__ for Off
**Example**
```php
OW_SetPin(12345, 0, true); //Turn on device
```
## DS2408
Source: https://www.symcon.de/en/service/documentation/module-reference/devices/1-wire/ds2408/
The DS2408 and DS2408+ is a 8-port switch & input (PIO) module.
Alternatively, you can set each of the eight channels as "Digital Output" or "Digital Input".
Additionally you can "invert the status" (see [DS2413](https://www.symcon.de/en/llms/modules/1-wire.md)).
For testing purposes, you have the ability to switch the output "ON" and "OFF".

## OW_SetPin
Source: https://www.symcon.de/en/service/documentation/module-reference/devices/1-wire/ds2408/ow-setpin/
`bool OW_SetPin(int $InstanceID, int $Pin, bool $Status)`
sets a pin from the DS2408 to on/ off
**Parameters**
- `$InstanceID` (int): ID of the device to be switched
- `$Pin` (int): 0-7
- `$Status` (bool): __TRUE__ for on, __FALSE__ for off
**Returns** (bool): If the command succeeds, it returns __TRUE__, otherwise __FALSE__.
__TRUE__ for on, __FALSE__ for off
**Example**
```php
OW_SetPin(12345, 2, true); //Turn on pin 2 of the device
```
## OW_SetPort
Source: https://www.symcon.de/en/service/documentation/module-reference/devices/1-wire/ds2408/ow-setport/
`bool OW_SetPort(int $InstanceID, int $Bitmaske)`
**Parameters**
- `$InstanceID` (int): ID of the device to be switched
- `$Bitmaske` (int): 0-255 (Bit0 = Pin0 … Bit7 = Pin7)
**Returns** (bool): If the command succeeds, it returns __TRUE__, otherwise __FALSE__.
0-255 (Bit0 = Pin0 … Bit7 = Pin7)
**Example**
```php
OW_SetPort(12345, 0); //Turn everything off
```
## OW_SetStrobe
Source: https://www.symcon.de/en/service/documentation/module-reference/devices/1-wire/ds2408/ow-setstrobe/
`bool OW_SetStrobe(int $InstanceID, bool $Status)`
**Parameters**
- `$InstanceID` (int): ID of the device to be switched
- `$Status` (bool): __TRUE__ for On, __FALSE__ for Off
**Returns** (bool): If the command succeeds, it returns __TRUE__, otherwise __FALSE__.
__TRUE__ for On, __FALSE__ for Off
**Example**
```php
OW_SetStrobe(12345, true); //Turn on strobe
```
## OW_WriteBytes
Source: https://www.symcon.de/en/service/documentation/module-reference/devices/1-wire/ds2408/ow-writebytes/
`bool OW_WriteBytes(int $InstanceID, string $Data)`
**Parameters**
- `$InstanceID` (int): ID of the device to be switched
- `$Data` (string): Sequence of bytes to be sent
**Returns** (bool): If the command succeeds, it returns __TRUE__, otherwise __FALSE__.
Sequence of bytes to be sent
**Example**
```php
OW_WriteBytes(12345, Chr(0).Chr(1)); //Send sequence
```
## OW_WriteBytesMasked
Source: https://www.symcon.de/en/service/documentation/module-reference/devices/1-wire/ds2408/ow-writebytesmasked/
`bool OW_WriteBytesMasked(int $InstanceID, string $Data, int $Mask)`
**Parameters**
- `$InstanceID` (int): ID of the device to be switched
- `$Data` (string): Sequence of bytes to be sent
- `$Mask` (int): Bitmask of the bit to be set
**Returns** (bool): If the command succeeds, it returns __TRUE__, otherwise __FALSE__.
Bitmask of the bit to be set
**Example**
```php
OW_WriteBytesMasked(12345, Chr(255), Chr(1)); //Set only Bit 0
```
## DS2413
Source: https://www.symcon.de/en/service/documentation/module-reference/devices/1-wire/ds2413/
The DS2413 is a 2-port switch & input (PIO) module.
Its outputs can deliver 20mA. For further details check out the data sheet.
> **Note:** Definition of “Status pins”:
> A logic low level at the output is rated as "Off"/ "False" (the internal transistor is active).
If e.g. an LED is connected with a common anode, it lights at this "Status pin = Off".
In this case "Invert status" should be activated.
2

If a pin is used as a "digital input", make sure that the DS205 has no latch. Thus, no switching pulses are stored.
> **Note:** To e.g. evaluate a PIRI (PIR), the timer should be set for ten seconds. Additionally provide at the input a 1M resistor and a capacitor 10uF. Both are commonly connected to 0V. A switching pulse pulls the input short to +5 V. The capacitor buffers the voltage, until the next polling cycle recognizes the pin as HI.
## OW_SetPin
Source: https://www.symcon.de/en/service/documentation/module-reference/devices/1-wire/ds2413/ow-setpin/
`bool OW_SetPin(int $InstanceID, int $Pin, bool $Status)`
**Parameters**
- `$InstanceID` (int): ID of the device to be switched
- `$Pin` (int): 0-1
- `$Status` (bool): __TRUE__ for On, __FALSE__ for Off
**Returns** (bool): If the command succeeds, it returns __TRUE__, otherwise __FALSE__.
__TRUE__ for On, __FALSE__ for Off
**Example**
```php
OW_SetPin(12345, 0, true); //Turn on Pin 0
```
## DS2438
Source: https://www.symcon.de/en/service/documentation/module-reference/devices/1-wire/ds2438/
The DS2438 is originally a "Smart Battery Monitor".
For use in the home automation, he has four interesting features:
* A voltmeter, this provides the bus voltage - ideal for monitoring (VDD)
* A thermometer - can always be useful (Temperature)
* An AD converter (VAD) - can be used for measuring the moisture or brightness
* A current input (Xsens) - at leisure

Practical example: moisture measurement
The humidity sensor __HIH-4000__ from HONEYWELL has an accuracy of 3.5%, ranging from 0 to 100% RH.
Because of its linear output the DS2438 can be read out directly. A temperature compensation can be taken into account because the DS2438 has an internal temperature sensor.
As it goes, illustrates the following script:
```php
$Vad = GetValue(44045);
$Vdd = GetValue(14570);
$temp = GetValue(18691);
$Srh = ($Vad - 0.958062) * 30.680;
$Srh = $Srh / ((1.0305 + (0.000044 * $temp) - (0.0000011 * pow($temp,2))));
echo "Humidity: $Srh %rh Temp.Comp.\n";
SetValue(49935 /*[Humidity %rh]*/, $Srh);
```
## DS2450
Source: https://www.symcon.de/en/service/documentation/module-reference/devices/1-wire/ds2450/
The DS2450 is an A/D converter module with a resolution of up to 16-bit.
Additionally, the four channels can also be used as an output (4 mA).
Further details check out on the data sheet.
### Configuration
Alternatively, you can select any of the four channels as a "Digital Output" and "Analog Input".
In addition, two voltage ranges are available: 2.55 V and 5.1 V.
Furthermore, the resolution between 1-bit and 16-bit is adjustable:

## OW_SetPin
Source: https://www.symcon.de/en/service/documentation/module-reference/devices/1-wire/ds2450/ow-setpin/
`bool OW_SetPin(int $InstanceID, int $Pin, bool $Status)`
**Parameters**
- `$InstanceID` (int): ID of the device to be switched
- `$Pin` (int): 0-3 (A-D)
- `$Status` (bool): __TRUE__ for On, __FALSE__ for Off
**Returns** (bool): If the command succeeds, it returns __TRUE__, otherwise __FALSE__.
__TRUE__ for On, __FALSE__ for Off
**Example**
```php
OW_SetPin(12345, 2, true); //Turn on Pin C of the device
```
## DS2890
Source: https://www.symcon.de/en/service/documentation/module-reference/devices/1-wire/ds2890/
The DS2890 is a digital potentiometer with 8-bit resolution.
Unfortunately he is no longer manufactured. No replacement type exists.

"CHARGE PUMP CONSIDERATIONS" should be used on the 1-Wire Center 0 to 10V output. To do this, enable "Use CPC."
For a test the slider can be changed and the "SET" button can be pushed.
## OW_SetPosition
Source: https://www.symcon.de/en/service/documentation/module-reference/devices/1-wire/ds2890/ow-setposition/
`bool OW_SetPosition(int $InstanceID, int $Value)`
**Parameters**
- `$InstanceID` (int): ID of the device to be switched
- `$Value` (int): 0-255
**Returns** (bool): If the command succeeds, it returns __TRUE__, otherwise __FALSE__.
0-255
**Example**
```php
OW_SetPosition(12345, 123); //Set the device on value 123
```
## Device List
Source: https://www.symcon.de/en/service/documentation/module-reference/devices/1-wire/device-list/
### Supported Gateways
| Gateway | Description |
| ---------------------------------------------------------------------------------------------------------------------------------------------------------------------- | ---------------- |
| Symcon 1-Wire LAN Gateway [Product information](https://www.symcon.de/assets/files/product/1-wire-lan-gateway.pdf) | [Order now](https://www.symcon.de/en/shop/gateways/lan-1-wire/) | IP Gateway |
| DS2480B | serial interface |
| DS2490 (Windows only) | USB adapter |
| DS9097U | serial interface |
| DS9490R (Windows only) | USB adapter |
| Link45 | serial interface |
| LinkUSB | USB adapter |
### Supported Components
| Product | Description |
| --------------------------------------------- | -------------------------------------------------------- |
| DS1820 | Thermometer -55°C to +125°C, 0.5 exact at -10°C to +85°C |
| DS18B20 | Thermometer -55°C to +125°C, 0.5 exact at -10°C to +85°C |
| DS18S20 | Thermometer -55°C to +125°C, 0.5 exact at -10°C to +85°C |
| DS1920 | Thermometer -55°C to +100°C, 0.5 |
| [DS2405](https://www.symcon.de/en/llms/modules/1-wire.md) | 1-way: Switch & Input (PIO) |
| [DS2406](https://www.symcon.de/en/llms/modules/1-wire.md) | 2-way: Switch & Input (PIO) |
| DS2407 | 2-way: Switch & Input (PIO) |
| [DS2408](https://www.symcon.de/en/llms/modules/1-wire.md) | 8-way: Switch & Input (PIO) |
| [DS2408+](https://www.symcon.de/en/llms/modules/1-wire.md) | 8-way: Switch & Input (PIO) |
| [DS2413](https://www.symcon.de/en/llms/modules/1-wire.md) | 2-way: Switch & Input (PIO) |
| DS2423P | 4KB counter |
| [DS2438](https://www.symcon.de/en/llms/modules/1-wire.md) | Current and voltage measurement |
| [DS2450](https://www.symcon.de/en/llms/modules/1-wire.md) | A/D converter |
| [DS2890](https://www.symcon.de/en/llms/modules/1-wire.md) | Digital potentiometer |
## OW_RequestStatus
Source: https://www.symcon.de/en/service/documentation/module-reference/devices/1-wire/ow-requeststatus/
`bool OW_RequestStatus(int $InstanceID)`
**Parameters**
- `$InstanceID` (int): ID of the device to be switched
**Returns** (bool): If the command succeeds, it returns __TRUE__, otherwise __FALSE__.
ID of the device to be switched
**Example**
```php
OW_RequestStatus(12345); //Read out the device
```
---
# ABL
> Symcon documentation · English · generated on 2026-09-26
> Index: https://www.symcon.de/en/llms.txt
Source: https://www.symcon.de/en/service/documentation/module-reference/devices/abl/
_Requires Symcon >= 7.0_
ABL offers various wallboxes/charging stations. These can be read out via ModBus TCP. A connection with IP-Symcon is possible via a LAN-IP gateway.
> **Note:** The following devices are supported by IP-Symcon:
>
> [Supported components](https://www.symcon.de/en/llms/modules/abl.md)
### installation
To use ABL wallboxes/charging stations in IP-Symcon, a connection via Ethernet must be available. Inside the wallbox/charging station only the Ethernet RJ45 plug has to be plugged in according to the instructions.
### integration IP-Symcon
First a "ModBus Device" instance must be added within the object tree of IP-Symcon. In the following dialog the IP address of the wallbox has to be entered. The port is 502 by default. Both information can be viewed on the web interface of the wallbox/charging station.


Afterwards the ModBus template for ABL wallboxes/charging stations can be downloaded. This contains the whole configuration of the ModBus device. After downloading, the "ABLmodbusX_vx.json" can be loaded via "Import". Afterwards all ModBus addresses of the common ABL wallboxes/charging stations are set up.
> **Note:** ModBus template for ABL wallboxes/charging columns:
> [Download eMH1](https://www.symcon.de/media/pages/service/dokumentation/modulreferenz/geraete/abl/98e89f4429-1790424938/ablmodbusemh1_v1.json)
> [Download eM4](https://www.symcon.de/media/pages/service/dokumentation/modulreferenz/geraete/abl/ab98749223-1790424938/ablmodbusem4_v1.json)
> This includes the outlet/counter 1.
> If more are needed the [Support](https://www.symcon.de/en/contact-us/#Modbus-Template) can be contacted
> **Note:** eMH2 and eMH3 can be used via [OCPP](https://www.symcon.de/en/llms/modules/ocpp.md).

### Add addresses
If further addresses are to be added, this can be realized via "Add".
Depending on the design of the wallbox, individual addresses may have to be de-/activated. This can be controlled via the Active column.
## Device-List
Source: https://www.symcon.de/en/service/documentation/module-reference/devices/abl/device-list/
_Requires Symcon >= 7.0_
### Supported components
| System | Description |
| ------------ | ------------------------- |
| Wallbox eMH1 | Supported in all versions |
| Wallbox eMH2 | Supported in all versions |
| Wallbox eMH3 | Supported in all versions |
| Wallbox eM4 | Supported in all versions |
| Wallbox eMC | Supported in all versions |
---
# Alfen
> Symcon documentation · English · generated on 2026-09-26
> Index: https://www.symcon.de/en/llms.txt
Source: https://www.symcon.de/en/service/documentation/module-reference/devices/alfen/
_Requires Symcon >= 7.0_
Alfen offers various wallboxes/charging stations. These can be read out via ModBus TCP. A connection with IP-Symcon is possible via a LAN-IP gateway.
> **Note:** The following devices are supported by IP-Symcon:
>
> [Supported components](https://www.symcon.de/en/llms/modules/alfen.md)
### installation
To use Alfen wallboxes/charging columns in IP-Symcon, a connection via Ethernet to the wallbox must be available. A LAN connection is integrated within the wallbox/charging station.

Within the ACE Service Software, as visible in the image, Active Load Balancing must be activated and "Energy Managment System" must be selected. This will also activate the ModBus TCP.
### integration IP-Symcon
First a "ModBus Device" instance must be added within the object tree of IP-Symcon. In the following dialog the IP address of the wallbox has to be entered. The port is 502 by default. Both information can be seen in the app or ACE service software of the wallbox/charging station.


Afterwards you can download the ModBus template ("AlfenModBusX_vx.json") for Alfen wallboxes/charging stations. This download contains the standard or the SCN configuration of the ModBus device. Via "Import" the desired template can be loaded. Afterwards, all ModBus addresses of the common Alfen wallboxes/charging columns are set up.
> **Note:** ModBus template for Alfen wallboxes/charging columns:
> [Download Standard](https://www.symcon.de/media/pages/service/dokumentation/modulreferenz/geraete/alfen/c9bf09a94d-1790424938/alfenmodbusstandard_v1.json)
> [Download SCN](https://www.symcon.de/media/pages/service/dokumentation/modulreferenz/geraete/alfen/316c1a74fd-1790424938/alfenmodbusscn_v1.json)


### Add addresses
If more addresses are to be added, this can be done via "Add".
Depending on the design of the wallbox, individual addresses may have to be de-/activated. This can be controlled via the Active column.
### use standard or SCN
In the ACE Service Software you can choose between a standard load management (socket) or SCN operation, as shown in the picture. SCN maps several wallboxes, whereas Socket supports only one wallbox.

### protocol description
> **Note:** protocol description for Alfen wallboxes/charging stations: [download](https://www.symcon.de/media/pages/service/dokumentation/modulreferenz/geraete/alfen/d3575a4655-1790424938/alfen_modbus_tcpip_register_mapping.pdf)
## Device List
Source: https://www.symcon.de/en/service/documentation/module-reference/devices/alfen/device-list/
_Requires Symcon >= 7.0_
### Supported components
| System | Description |
| ---------------------- | ------------------------- |
| Eve Single S-line | Supported in all versions |
| Eve Single Pro-line | Supported in all versions |
| Eve Single Pro-line DE | Supported in all versions |
| Eve Double Pro-line | Supported in all versions |
| Eve Double Pro-line DE | Supported in all versions |
| Eve Double PG-line DE | Supported in all versions |
| Eve Twin 4/5XL | Supported in all versions |
---
# ALLNET
> Symcon documentation · English · generated on 2026-09-26
> Index: https://www.symcon.de/en/llms.txt
Source: https://www.symcon.de/en/service/documentation/module-reference/devices/allnet/
IP-Symcon supports the "tax and measuring computer ALL4000" - for it, numerous sensors and actuators are available. The ALL4000 is connected to the network via its 100Mbit Ethernet interface, and provides a web server on which are displayed the measurements graphically and numerically.
All products have their own web server for configuration.
Manufacturers and other product information as PDF: [https://www.allnet.de](https://www.allnet.de)
_List of supported devices:_
* ALL5000
* ALL4500
* ALL4000
* ALL4001
* ALL3000
* ALL3075 > Network socket for switching over LAN
* ALL3076 > Network socket for dimming over LAN
* ALL3270 > Narrowband Powerline Master Ethernet Bridge/ requirement for:
* ALL3275 > Narrowband Powerline slave socket for switching over Powerline
* ALL3090 / All 3096 > 8 Port Reset Switch
* ALL4100 > 8 Port Power Switch 19″ with 8 Heating appliance
* ALL3000RF MK2 > Control unit for Intertechno radio sockets
* ALL3690 > PowerMeter (3 Phases)
* ALL3691 > PowerMeter (2*3 Phases, 2*S0, 2*D0)
## ALL_SetAnalog
Source: https://www.symcon.de/en/service/documentation/module-reference/devices/allnet/all-setanalog/
`bool ALL_SetAnalog(int $InstanceID, int $ChannelID, float $Value)`
_Requires Symcon >= 5.0_
sets the analog value of a channel
**Parameters**
- `$InstanceID` (int): ID of the device to be switched
- `$ChannelID` (int): ID of the channel to be switched
- `$Value` (float): Value to which the channel should be set
**Returns** (bool): If the command succeeds, it returns __TRUE__, otherwise __FALSE__.
Value to which the channel should be set
**Example**
```php
// Sets channel 3 of device 12345 to 20.4
ALL_SetAnalog(12345, 3, 20.4); //Turn device on
```
## ALL_SwitchActor
Source: https://www.symcon.de/en/service/documentation/module-reference/devices/allnet/all-switchactor/
`bool ALL_SwitchActor(int $InstanceID, int $ChannelID, bool $Status)`
switches an ALLNET actuator on/off
**Parameters**
- `$InstanceID` (int): ID of the device to be switched
- `$ChannelID` (int): ID of the channel to be switched
- `$Status` (bool): __TRUE__ for on, __FALSE__ for off
**Returns** (bool): If the command succeeds, it returns __TRUE__, otherwise __FALSE__.
__TRUE__ for on, __FALSE__ for off
**Example**
```php
ALL_SwitchActor(12345, 1, true); //Switch on the actuator of device 12345 on channel 1
```
## ALL_SwitchMode
Source: https://www.symcon.de/en/service/documentation/module-reference/devices/allnet/all-switchmode/
`bool ALL_SwitchMode(int $InstanceID, bool $Status)`
**Parameters**
- `$InstanceID` (int): ID of the device to be switched
- `$Status` (bool): __TRUE__ for On, __FALSE__ for Off
**Returns** (bool): If the command succeeds, it returns __TRUE__, otherwise __FALSE__.
__TRUE__ for On, __FALSE__ for Off
**Example**
```php
ALL_SwitchMode(12345, true); //Turn on device
```
## ALL_UpdateValues
Source: https://www.symcon.de/en/service/documentation/module-reference/devices/allnet/all-updatevalues/
`bool ALL_UpdateValues(int $InstanceID)`
**Parameters**
- `$InstanceID` (int): ID of the device to be updated
**Returns** (bool): If the command succeeds, it returns __TRUE__, otherwise __FALSE__.
ID of the device to be updated
**Example**
```php
//Update Device with the ID "12345"
ALL_UpdateValues(12345);
```
## Device list
Source: https://www.symcon.de/en/service/documentation/module-reference/devices/allnet/device-list/
### Supported Components
An excerpt of supported components.
On [request](https://www.symcon.de/en/contact-us/) we will be happy to check other devices that are not listed for their compatibility.
#### ALLNET devices with firmware 3.x
| Product name | Description |
| ------------ | ------------------------------------------------------------------------ |
| ALL3040 | WiFi Basic Sensor Central |
| ALL3072 | Network socket for switching via LAN/W-LAN |
| ALL3073WLAN | Network socket for switching via LAN/W-LAN |
| ALL3075 V2 | Network socket for switching via LAN (including consumption measurement) |
| ALL3075 V3 | Network socket for switching via LAN (including consumption measurement) |
| ALL3418 V2 | IP Triometer |
| ALL3419 | IP Thermometer/sensor center |
| ALL3500 | IP Homeautomation Appliance |
| ALL3505 | IP Homeautomation Appliance |
| ALL3653 | Remote Control |
| ALL3690 | PM1 PowerMeter (3 phases) |
| ALL3691 | PM2 PowerMeter (2x3 phases, 2xS0, 2xD0) |
| ALL3692 | PM3 PowerMeter (4xD0, 2xI2C) |
| ALL3696 | IP PowerMeter |
| ALL3697-32A | PM4 PowerMeter (HUT Powermeter, 3 phases) |
| ALL4075 | 4-way Network relay (LAN/WLAN) |
| ALL4076 | 6-way IP socket strip |
| ALL4175 | 4-way Network relay |
| ALL4176 | 6-way IP socket strip |
| ALL4500 | Sensoric Appliance |
| ALL4550 | POE information display |
| ALL5000 | IP Facility Control Server |
#### ALLNET devices with firmware 2.x
| Product name | Description |
| ----------------- | ------------------------------------------------------------- |
| ALL3000 | Internet Thermometer |
| ALL3000RF MK2 | Control unit for Intertechno radio-controlled sockets |
| ALL3075 | Network socket for switching via LAN |
| ALL3076 | Network socket for dimming via LAN |
| ALL3090 / ALL3096 | 8 Port Reset Switch |
| ALL3100 | Ethernet Power Switch |
| ALL3270 | Narrowband Powerline Master Ethernet Bridge |
| ALL3275 | Narrowband Powerline slave socket for switching via Powerline |
| ALL3418 | IP Triometer |
| ALL3421 | IP Triometer |
| ALL4000 | Ethernet sensor meter |
| ALL4001 | HUT Ethernet sensor meter for top hat rail |
| ALL4100 | 8 Port Power Switch 19 ″ with 8 IEC sockets |
---
# BACnet
> Symcon documentation · English · generated on 2026-09-26
> Index: https://www.symcon.de/en/llms.txt
Source: https://www.symcon.de/en/service/documentation/module-reference/devices/bacnet/
_Requires Symcon >= 6.3_
> **Note:** The BACnet module is a paid extension that can be purchased for any existing Symcon license in the [Shop](https://www.symcon.de/en/shop/enterprise/bundle-ips-enterprise-bacnet). Up to 3 BACnet objects can be created free of charge for each Symcon license.
The BACnet (client) connection allows the comfortable setup of BACnet devices within Symcon. Thereby all BACnet devices available in the local network are searched via a discovery instance and created accordingly. In the next step each created device is queried and the data points available on the device are displayed. Any data points can be created or in the simplest case all data points can be imported into Symcon. The data points show the "Present Value", which is updated automatically via COV, provided the device supports this. Alternatively, the value can also be queried cyclically. The value can also be changed via visualization, script and flowchart.
The BACnet (server) allows to bring any variables from Symcon to BACnet via a configurator. The available data points can be read out automatically by the client and COV is also supported by the server accordingly. Symcon can also be automatically recognized as BACnet devices in the network.
### Video tutorial for setup
[Video](https://www.youtube.com/embed/T6NsoRShn2o?rel=0&cc_load_policy=1)
#### Supported Protocol
* BACnet/IP
#### Supported BIBBs (Client)
* DM-DDB-A (Dynamic Device Binding)
* DS-RP-A (Read Property)
* DS-RPM-A (Read Property Multiple)
* DS-WP-A (Write Property)
* DS-COV-A (Change of Value Notification)
* DS-COVP-A (Change Of Value Property)
#### Supported BIBBs (Server)
* DM-DDB-B (Dynamic Device Binding)
* DS-RP-B (Read Property)
* DS-RPM-B (Read Property Multiple)
* DS-WP-B (Write Property)
* DS-COV-B (Change of Value Notification)
* DS-COVP-B (Change Of Value Property)
#### Unterstützte BIBBs (Other)
* NM-FDR-A (Foreign Device Registration)
#### Supported Standard Object Types
* Analog Input
* Analog Output
* Analog Value
* Binary Input
* Binary Output
* Binary Value
* MultiState Input
* MultiState Output
* MultiState Value
* Accumulator
#### Supported Segmentation
* Receive: Yes (>64 segments, Max 1476 bytes per segment).
* Transmit: No (not required so far)
#### Example of a Wrapper Module for non-standard devices
[Integrates the SageGlass SIM II (BACnet) with Symcon](https://www.symcon.de/en/llms/modules/sageglass-bacnet.md)
## BAC_RelinquishPresetValue
Source: https://www.symcon.de/en/service/documentation/module-reference/devices/bacnet/bac-relinquishpresetvalue/
`bool BAC_RelinquishPresetValue(int $InstanceID)`
Resetting the preset value
**Parameters**
- `$InstanceID` (int): ID of the instance
**Returns** (bool): If the command succeeds, it returns __TRUE__, otherwise __FALSE__.
ID of the instance
**Example**
```php
BAC_RelinquishPresetValue(12345);
```
---
# Catan
> Symcon documentation · English · generated on 2026-09-26
> Index: https://www.symcon.de/en/llms.txt
Source: https://www.symcon.de/en/service/documentation/module-reference/devices/catan/
_Requires Symcon >= 9.0_
### Integration in Symcon
The Catan interfaces can be integrated via the [Device search](https://www.symcon.de/en/llms/components/management-console.md). To do this, "Catan Discovery" must be selected as the system. The Discovery instance then offers the creation of a Catan Configurator [Configurator](https://www.symcon.de/en/llms/concepts.md) for each interface.

All channels of a device are displayed in the configurator and can be created and configured. Different channel types are available depending on the device: DOI UOI UI and DOR. A type can be assigned to each of these channels in the instance configuration. A variable is created below each channel instance that corresponds to the value of the channel. The name as well as the display and action are specified by the channel type.
**UI**
- Unconfigured
- Digital output
- Counter
- Analog input (voltage 0-10V)
- Analog input (current 0-20mA)
- Analog input (current 4-20mA)
- Analog input (resistance 0-10kΩ)
- Analog input (temperature, PT1000, DIN)
- Analog input (temperature, NI1000, DIN)
- Analog input (temperature, NI1000, LG)
- Analog input (temperature, NTC 10k)
- Analog input (temperature, NTC 10k, PRE)
- Analog input (temperature, NTC 20k)
**UOI**
- Unconfigured
- Digital output
- Digital input
- Counter
- Analog output (voltage 0-10V)
**DOI**
- Unconfigured
- Digital output
- Digital input
### configuration
Which of the following setting options are available depends on the channel type.
#### Configuration of the display
| Name | Description |
| ----------------------------------- | ----------------------------------------------------------------------------------------------------------------------------------------------------------------------------------------------------------------------------------------------------- |
| Allow override on display | If active, the value can be changed via the control panel |
| Override on display can be canceled | If active, the override can be canceled via the "Cancel override" button in the instance configuration. Alternatively, the PHP function CATAN_CancelOverride can also be used. If the override is canceled, the value is reset to the previous value. |
| Name source | The name of the channel that is displayed in the Control Panel. From instance name: Name of the instance. From text field: Freely selectable. |
| Unit | The text that is displayed after the value on the control panel. |
#### Configuration of the value change
| Name | Description |
| ---------------------- | ------------------------------------------------------------ |
| Minimum send interval | The interval in milliseconds at which value changes are sent |
| Value change increment | The threshold value at which the change to a value is sent |
#### configuration of the default value
| Name | Description |
| ---------------------------- | -------------------------------------------------------------------------------------------- |
| Default value | The default value |
| Use default value at start | If active, the default value is set when Catan is started. |
| Use default value on failure | If active, the default value is set in the event of an error or if the supply voltage fails. |
#### configuration of the counter
| Name | Description |
| ------------------------- | ------------------------------------------------------------------------------------------------ |
| Scaling factor | The factor by which the counter value is multiplied before it is written to the counter variable |
| Show raw value of counter | If active, an additional variable is created with the raw value of the counter. |
#### Additional configuration
| Name | Description |
| ---------------------- | ---------------------------------------------------------------------------------------------------------------- |
| Display channel status | If active, a variable is created that displays the channel status. (States: OK, Error, Overwritten, Deactivated) |
| Display error status | If active, a variable is created that displays the current error code. |
##### Error codes
| Value | Description |
| ----- | ---------------------------------------------- |
| 0 | No error |
| 5 | Peripheral error |
| 10 | Resistance too high |
| 11 | Temperature too high |
| 12 | Input voltage too high |
| 13 | Input current or shunt resistance too high |
| 14 | Output voltage too high |
| 15 | Upper warning limit exceeded |
| 20 | Temperature too low |
| 21 | Negative input voltage |
| 22 | Input current too low |
| 23 | Negative input current |
| 24 | Negative input current or sensor not connected |
| 25 | Output voltage too low |
| 26 | Lower warning limit not reached |
| 30 | Sensor not connected |
| 31 | Load resistance too high for valid voltage |
| 40 | Output overload |
| 50 | Virtual zero |
| 51 | Virtual alarm |
| 52 | Virtual obsolete |
| 53 | Virtual crash |
| 54 | Virtual error |
| 55 | Virtual Disabled |
Catan also supports other systems
- [KNX](https://www.symcon.de/en/llms/modules/knx.md)
- [ModBus](https://www.symcon.de/en/llms/modules/modbus-rtu-tcp.md)
- [DMX](https://www.symcon.de/en/llms/modules/dmx-artnet.md)
## CATAN_CancelOverride
Source: https://www.symcon.de/en/service/documentation/module-reference/devices/catan/catan-canceloverride/
`bool CATAN_CancelOverride(int $InstanzID)`
_Requires Symcon >= 9.0_
**Parameters**
- `$InstanzID` (int): The ID of the Catan channel instance whose overwriting is to be canceled.
**Returns** (bool): If the command could be executed successfully, it returns **TRUE**, otherwise **FALSE**.
The ID of the Catan channel instance whose overwriting is to be canceled.
**Example**
```text
CATAN_CancelOverride(12345); // Bricht die Überschreibung des Kanals ab
```
## CATAN_ResetCounter
Source: https://www.symcon.de/en/service/documentation/module-reference/devices/catan/catan-resetcounter/
`bool CATAN_ResetCounter(int $InstanzID)`
_Requires Symcon >= 9.0_
Resets the counter reading
**Parameters**
- `$InstanzID` (int): The ID of the Catan channel instance whose counter is to be reset.
**Returns** (bool): If the command could be executed successfully, it returns **TRUE** as the result, otherwise **FALSE**.
The ID of the Catan channel instance whose counter is to be reset.
**Example**
```text
CATAN_ResetCounter(12345); // Setzt den Zähler des Kanals ab
```
## Device List
Source: https://www.symcon.de/en/service/documentation/module-reference/devices/catan/device-list/
### Supported devices
| Device | Description |
| ------------------- | ------------------- |
| Catan C1 | Control |
| Catan DOR6 UI8 | Relay module |
| Catan DOI8 UOI8 UI8 | input/output module |
---
# digitalSTROM
> Symcon documentation · English · generated on 2026-09-26
> Index: https://www.symcon.de/en/llms.txt
Source: https://www.symcon.de/en/service/documentation/module-reference/devices/digitalstrom/
DigitalSTROM is a system that uses power grid wiring. A connection with IP-Symcon is established via LAN(IP) with the digitalSTROM server.
Furthermore, a digitalSTROM terminal block is installed in the device to be operated, or the conventional luster terminal is replaced.
All electrical devices that are compatible with the digitalSTROM server via digitalSTROM terminal block are also compatible with IP-Symcon and can be integrated.
### Setup video-tutorial
[Video](https://www.youtube.com/embed/mnR2ab6IMlQ?rel=0&cc_load_policy=1)
### Connection
Before the digitalSTROM Server is connected to the PC, all electrical devices to be controlled, which are to be operated with the PC, should be correctly connected to the PC via digitalSTROM terminal block. Then the digitalSTROM Server must be connected to the network with a network cable.
### Installation
If the digitalSTROM Server is correctly connected and a DHCP server is used, the digitalSTROM Server is now connected to the local network.
(The DHCP server automatically assigns addresses for the network participants.)
The digitalSTROM Server appears in the network environment under “Other devices” as “dSS”.
By "double-clicking" on "dSS", a window appears in the lower area of which the IP address of the digitalSTROM Server is located. After it has been copied and pasted into any browser, the digitalSTROM configuration webpage opens. A security warning may appear, which must be confirmed with "I know the risk".
The following applies to the first login: __"Name" = "dssadmin" and "Password" = "dssadmin"__.
The password should be changed after the first login. Note that it is case-sensitive.
Some pre-settings can be made on the configuration webpage.
It is also possible to assign the IP address manually.
### Integration in IP-Symcon
A "dS configurator" can be created within the [Management Console](https://www.symcon.de/en/llms/components/management-console.md) via "Welcome page -> Manage configurators". The "dS Splitter" can be configured using the gear wheel in the lower window area.

The configuration of the "dS Splitter" opens. The IP address of the digitalSTROM server must be entered for "IP address". The setting is saved with "Apply". After clicking on “Request Token”, the name (username) and password (password) of the configuration webpage must be entered. If the entry is correct, a lot of numbers and small letters will appear next to tokens. The "dS Splitter" configuration can now be closed. The search can now be started in the digitalSTROM Configurator via “Search”. Then all devices connected to the digitalSTROM server via digitalSTROM terminals appear.

The ID on the left is the identification number that can be found on the back of the respective digitalSTROM terminal block. In the case of a large number of installed devices, this ensures problem-free assignment and configuration. The ID on the right is the InstanceID assigned by IP-Symcon. This is unique and unchangeable.
Each device can be created individually as an instance. To do this, it must be selected and the "Create" button clicked. The created devices can now be operated.
After selecting a digitalSTROM device and clicking on “Configure”, the function of each individual device can be tested.

The configuration page can also be called up via a "double click" within the object tree. (These devices can be found in the object tree under splitter instances.)
## DS_CallScene
Source: https://www.symcon.de/en/service/documentation/module-reference/devices/digitalstrom/ds-callscene/
`bool DS_CallScene(int $InstanceID, int $Scene)`
calls up a scene
**Parameters**
- `$InstanceID` (int): ID of the device to be switched
- `$Scene` (int): Scenes from 0 to 127
**Returns** (bool): If the command succeeds, it returns __TRUE__, otherwise __FALSE__.
Scenes from 0 to 127
**Example**
```php
DS_CallScene(12345, 42);
```
## DS_DimSet
Source: https://www.symcon.de/en/service/documentation/module-reference/devices/digitalstrom/ds-dimset/
`bool DS_DimSet(int $InstanceID, int $Intensity)`
dims a digitalSTROM terminal to a specific value
**Parameters**
- `$InstanceID` (int): ID of the device to be switched
- `$Intensity` (int): Value of 0-255
**Returns** (bool): If the command succeeds, it returns __TRUE__, otherwise __FALSE__.
Value of 0-255
**Example**
```php
DS_DimSet(12345, 128); //Dim to 50%
```
## DS_MakeRequest
Source: https://www.symcon.de/en/service/documentation/module-reference/devices/digitalstrom/ds-makerequest/
`string DS_MakeRequest(int $InstanceID, string $Request, string $Data)`
sends a digitalSTROM command directly to the dSS
**Parameters**
- `$InstanceID` (int): ID of the device to be switched
- `$Request` (string): Request which should be called
- `$Data` (string): Parameters for request
**Returns** (string): JSON encoded string
Parameters for request
**Example**
```php
// Request for system version
// Sends the "system/version" request to the instance with ID 12345
DS_MakeRequest(12345, "system/version", "");
// Recalls scene 0
// Sends the request "apartment/callScene" with the data "sceneNumber = 0" to the instance with the ID 12345
DS_MakeRequest(12345, "apartment/callScene", "sceneNumber=0");
```
## DS_RequestStatus
Source: https://www.symcon.de/en/service/documentation/module-reference/devices/digitalstrom/ds-requeststatus/
`bool DS_RequestStatus(int $InstanceID)`
_Requires Symcon >= 4.0_
retrieves the status
**Parameters**
- `$InstanceID` (int): Device ID
**Returns** (bool): If the command succeeds, it returns __TRUE__, otherwise __FALSE__.
Device ID
**Example**
```php
DS_RequestStatus(12345);
```
## DS_ShutterMove
Source: https://www.symcon.de/en/service/documentation/module-reference/devices/digitalstrom/ds-shuttermove/
`bool DS_ShutterMove(int $InstanceID, int $Position)`
moves the roller shutter to a desired position/stop
**Parameters**
- `$InstanceID` (int): ID of the device to be switched
- `$Position` (int): Position from 0-255
**Returns** (bool): If the command succeeds, it returns __TRUE__, otherwise __FALSE__.
Position from 0-255
**Example**
```php
DS_ShutterMove(12345, 128); //Set to 50%
```
## DS_ShutterMoveDown
Source: https://www.symcon.de/en/service/documentation/module-reference/devices/digitalstrom/ds-shuttermovedown/
`bool DS_ShutterMoveDown(int $InstanceID)`
moves the roller shutter down to the end position/stop
**Parameters**
- `$InstanceID` (int): ID of the device to be switched
**Returns** (bool): If the command succeeds, it returns __TRUE__, otherwise __FALSE__.
ID of the device to be switched
**Example**
```php
DS_ShutterMoveDown(12345); //Move down
```
## DS_ShutterMoveUp
Source: https://www.symcon.de/en/service/documentation/module-reference/devices/digitalstrom/ds-shuttermoveup/
`bool DS_ShutterMoveUp(int $InstanceID)`
moves the roller shutter up to the end position/stop
**Parameters**
- `$InstanceID` (int): ID of the device to be switched
**Returns** (bool): If the command succeeds, it returns __TRUE__, otherwise __FALSE__.
ID of the device to be switched
**Example**
```php
DS_ShutterMoveUp(12345); //Move up
```
## DS_ShutterStop
Source: https://www.symcon.de/en/service/documentation/module-reference/devices/digitalstrom/ds-shutterstop/
`bool DS_ShutterStop(int $InstanceID)`
stops a motion
**Parameters**
- `$InstanceID` (int): ID of the device to be switched
**Returns** (bool): If the command succeeds, it returns __TRUE__, otherwise __FALSE__.
ID of the device to be switched
**Example**
```php
DS_ShutterStop(12345); //Stop
```
## DS_SwitchMode
Source: https://www.symcon.de/en/service/documentation/module-reference/devices/digitalstrom/ds-switchmode/
`bool DS_SwitchMode(int $InstanceID, bool $Status)`
switches a digitalSTROM terminal on/off
**Parameters**
- `$InstanceID` (int): ID of the device to be switched
- `$Status` (bool): __TRUE__ for on, __FALSE__ for off
**Returns** (bool): If the command succeeds, it returns __TRUE__, otherwise __FALSE__.
__TRUE__ for on, __FALSE__ for off
**Example**
```php
DS_SwitchMode(12345, true); //Turn device on
```
## Device list
Source: https://www.symcon.de/en/service/documentation/module-reference/devices/digitalstrom/device-list/
### Supported Gateways
| Gateway | Description |
| ------- | ------------------- |
| dSS11 | digitalSTROM Server |
| dSS20 | digitalSTROM Server |
### Supported Components
#### Light (yellow)
| Manufacturer designation | Connection type | Description |
| ------------------------ | -------------------- | ----------------------------------- |
| GE-KL200 | Relay terminal | Switching 1400 W |
| GE-KM200 | Luster terminal | Switching/dimming 150 W |
| GE-KM220 | Luster terminal | Save 150 W |
| GE-SDM200 | Cord dimmer | Dimming 150 W |
| GE-SDS200 | Cord dimmer | Dimming 150 W |
| GE-SDS210 | Cord dimmer | Save 150 W |
| GE-TKM210 | Push button terminal | with output control + dimming 150 W |
| GE-TKM220 | Push button terminal | Operate 1-way |
| GE-TKM230 | Push button terminal | Operate 2-way |
| GE-TUP200 | Button | Operate 1-way |
| GE-TUP210 | Button | Operate 2-way |
| GE-TUP220 | Button+ | Operate 1-way plus |
| GE-UMV200 | Screw terminals | 1-10V universal module |
| GE-ZWS210 | Adapter plug | Switching 2300 W |
| GE-ZWS200 | Adapter plug | Switching 2300 W |
#### Shadow (gray)
| Manufacturer designation | Connection type | Description |
| ------------------------ | -------------------- | --------------------- |
| GR-HKL230 | Relay terminal | Blind switch actuator |
| GR-KL200 | Relay terminal | 700 VA roller shutter |
| GR-KL210 | Relay terminal | Awning 700 VA |
| GR-KL220 | Relay terminal | Blind 700 VA |
| GR-TKM200 | Push button terminal | Operate 1-way |
| GR-TKM210 | Push button terminal | Operate 2-way |
| GR-TUP200 | Button | Operate 1-way |
| GR-TUP210 | Button | Operate 2-way |
| GR-TUP220 | Button | Operate 1-way plus |
#### Heating/air conditioning (blue)
| Manufacturer designation | Connection type | Description |
| ------------------------ | ------------------ | --------------------- |
| BL-KL200 | Relay terminal | Switching 700 W |
| BL-KM200 | Luster terminal | Switch 150 W |
| BL-SDS2001 | Sensor with output | Switch 150 W + sensor |
| BL-TUP2001 | Sensor | Climate sensor |
#### Joker (black)
| Manufacturer designation | Connection type | Description |
| ------------------------ | -------------------- | ---------------------------------------- |
| dS-iSens200 | Luster terminal | Room sensor for temperature and humidity |
| dS-Alarm400 | Push button terminal | 4 sensors can be connected |
| SW-AKM200 | Push button terminal | 4 sensors can be connected |
| SW-AKM210 | Push button terminal | 2 sensors can be connected |
| SW-SSL200 | Cord dimmer | 1-way switch |
| SW-TKM200 | Push button terminal | 4-way universal operation |
| SW-TKM210 | Push button terminal | 2-way universal operation |
| SW-TUP200 | Button | 1-way universal operation |
| SW-UMR200 | Screw terminals | Relay universal module |
| SW-ZWS200 | Adapter plug | Switching 2300 W. |
| SW-ZWS210 | Adapter plug | Switching 2300 W. |
#### Access (green)
No separate control required.
#### Security (red)
No separate control required.
#### Audio (light blue)
No separate control required.
---
# DMX / ArtNet
> Symcon documentation · English · generated on 2026-09-26
> Index: https://www.symcon.de/en/llms.txt
Source: https://www.symcon.de/en/service/documentation/module-reference/devices/dmx-artnet/
DMX or DMX512 is a protocol for controlling lighting technology components. The connection to IP-Symcon is established, for example, via a DMX USB interface (serial) or DMX LAN interface. The IP protocol ArtNet is also supported via the LAN interface.
> **Note:** The following devices are supported by IP-Symcon:
>
> [Supported components](https://www.symcon.de/en/llms/modules/dmx-artnet.md)
### Description
DMX (lighting technology) or also called DMX512 is a digital control protocol that is used in stage and event technology. It is used to control dimmers, spotlights and effect devices on stages or in discos. The abbreviation DMX stands for Digital Multiplex, it is a standard that was standardized by DIN 56930-2. The connection to IP-Symcon takes place via a DMX USB interface/DMX LAN interface. ArtNet has also been supported since IP-Symcon 3.0. It is an IP based protocol for transferring large amounts of DMX information over LAN. The specification was created by the company "Artistic License" and is freely available. IP-Symcon supports all ArtNet-compatible DMX interfaces.
### Setup video-tutorial
### Integration in IP-Symcon
A prerequisite for operation in connection with IP-Symcon is properly installed hardware and knowledge of the COM port interface used or the IP address.
A DMX instance must be added in IP-Symcon and the DMX or ArtNet mode for the connected hardware must be selected in the parent instance. With ArtNet the "Universe" is usually 0 and with DMX the entry is irrelevant.

When using ArtNet, the following settings must be made in the parent instance:
'Send Host' is the IP address of the ArtNet interface and the 'Send Port': 6454 - the default port of the ArtNet protocol.
'Receive Host' is the IP address of the network card to which the interface is connected. It is usually the address of the PC on which the IP-Symcon server is running.
> **Note:** If several ArtNet interfaces are created, the receiving port (default: 53000) must be increased by 1 for each each UDP Socket. (i.e. the second interface has e.g. port 53001)

With a DMX interface that is connected via USB, a virtual COM port is installed in the Windows device manager. This is to be entered here. The other baud rate settings: 38400,8,1,N must not be changed.
Once all the settings have been made, the port or socket must be opened and "Apply" pressed.

In the 'DMX output' instance the functionality can be checked in the test environment.

> **Note:** Several channels of the DMX device can be addressed with one instance. This is useful, for example, to be able to display complete DMX-RGB spotlights as a coherent device in the visualization. All channels assigned to the instance can be switched on or off using the "All On" and "All Off" buttons.
> **Warning:** In the case of a DMX RGB instance with channel(type) = 16bit, it should be noted that not only the set channel is used, but also the next higher one. DMX channels are 8 bit. To control 16 bit, 2 channels are used. Example: Channel(Red) = 40 means that channels 40 and 41 are used.
## DMX_FadeChannel
Source: https://www.symcon.de/en/service/documentation/module-reference/devices/dmx-artnet/dmx-fadechannel/
`bool DMX_FadeChannel(int $InstanceID, int $Channel, int $Value, float $FadeTime)`
**Parameters**
- `$InstanceID` (int): ID of the device to be switched
- `$Channel` (int): 0 = all module channels, 1 – 512 depending on configuration
- `$Value` (int): 0-255
- `$FadeTime` (float): Time in seconds
**Returns** (bool): If the command succeeds, it returns __TRUE__, otherwise __FALSE__.
Time in seconds
**Example**
```php
DMX_FadeChannel(12345, 0, 255, 2.5); //Dim all channels of the module to 255 in 2,5 sec
```
## DMX_FadeChannelDelayed
Source: https://www.symcon.de/en/service/documentation/module-reference/devices/dmx-artnet/dmx-fadechanneldelayed/
`bool DMX_FadeChannelDelayed(int $InstanceID, int $Channel, int $Value, float $FadeTime, float $DelyTime)`
**Parameters**
- `$InstanceID` (int): ID of the device to be switched
- `$Channel` (int): 0 = all module channels, 1 – 512 depending on configuration
- `$Value` (int): 0-255
- `$FadeTime` (float): Time in seconds
- `$DelyTime` (float): Time in seconds
**Returns** (bool): If the command succeeds, it returns __TRUE__, otherwise __FALSE__.
Time in seconds
**Example**
```php
//Dims a module completely down and back up.
DMX_FadeChannel(12345, 0, 255, 5.0); //Dim all channels of the module to 255 in 2,5 sec
DMX_FadeChannelDelayed(12345, 0, 0, 2.5, 5); //Dim all channels of the module to 0 in 2,5sec., after a delay of 5sec.
```
## DMX_FadeRGB
Source: https://www.symcon.de/en/service/documentation/module-reference/devices/dmx-artnet/dmx-fadergb/
`bool DMX_FadeRGB(int $InstanceID, int $R, int $G, int $B, float $FadeTime)`
dims the RGB channel with a fade time
**Parameters**
- `$InstanceID` (int): ID of the device to be switched
- `$R` (int): Brightness value 0 (off) to 255/65535 (8/16 bit) (on, maximum brightness)
- `$G` (int): Brightness value 0 (off) to 255/65535 (8/16 bit) (on, maximum brightness)
- `$B` (int): Brightness value 0 (off) to 255/65535 (8/16 bit) (on, maximum brightness)
- `$FadeTime` (float): Time in seconds
**Returns** (bool): If the command succeeds, it returns __TRUE__, otherwise __FALSE__.
Time in seconds
**Example**
```php
// Fade color to yellow in 5 seconds
// 8bit instance
DMX_FadeRGB(12345, 255, 255, 0, 5.0);
// 16bit instance
DMX_FadeRGB(12345, 65535, 65535, 0, 5.0);
```
## DMX_FadeRGBDelayed
Source: https://www.symcon.de/en/service/documentation/module-reference/devices/dmx-artnet/dmx-fadergbdelayed/
`bool DMX_FadeRGBDelayed(int $InstanceID, int $R, int $G, int $B, float $FadeTime, float $DelayTime)`
dims the RGB channel with a fade time
**Parameters**
- `$InstanceID` (int): ID of the device to be switched
- `$R` (int): Brightness value 0 (off) to 255/65535 (8/16 bit) (on, maximum brightness)
- `$G` (int): Brightness value 0 (off) to 255/65535 (8/16 bit) (on, maximum brightness)
- `$B` (int): Brightness value 0 (off) to 255/65535 (8/16 bit) (on, maximum brightness)
- `$FadeTime` (float): Time in seconds
- `$DelayTime` (float): Time in seconds
**Returns** (bool): If the command succeeds, it returns __TRUE__, otherwise __FALSE__.
Time in seconds
**Example**
```php
//Dims a module completely up and down to yellow.
//8bit
//Dim the instance to yellow within 5 seconds
DMX_FadeRGB(12345, 255, 255, 0, 5.0);
//Dim the instance to yellow within 2.5 seconds, after a delay of 5 seconds
DMX_FadeRGBDelayed(12345, 255, 255, 0, 2.5, 5);
//16 bit
//Dim the instance to yellow within 5 seconds
DMX_FadeRGB(12345, 65535, 65535, 0, 5.0);
//Dim the instance to yellow within 2.5 seconds, after a delay of 5 seconds
DMX_FadeRGBDelayed(12345, 65535, 65535, 0, 2.5, 5);
```
## DMX_RequestInfo
Source: https://www.symcon.de/en/service/documentation/module-reference/devices/dmx-artnet/dmx-requestinfo/
`bool DMX_RequestInfo(int $InstanceID)`
Queries the information of a DMX instance
**Parameters**
- `$InstanceID` (int): ID of the DMX splitter instance
**Returns** (bool): If the command succeeds, it returns __TRUE__, otherwise __FALSE__.
ID of the DMX splitter instance
**Example**
```php
// Request information from instance 12345.
DMX_RequestInfo(12345);
```
## DMX_ResetInterface
Source: https://www.symcon.de/en/service/documentation/module-reference/devices/dmx-artnet/dmx-resetinterface/
`bool DMX_ResetInterface(int $InstanceID)`
Sets the DMX interface back with the ID __InstanceID__. It is recommended that in case of problems, create a script with this command and declare it as startup script.
-
**Parameters**
- `$InstanceID` (int): ID of DMX I/O Instance
**Returns** (bool): If the command succeeds, it returns __TRUE__, otherwise __FALSE__.
ID of DMX I/O Instance
**Example**
```php
//Reset interface
DMXI_ResetInterface(12345);
```
## DMX_SetBlackout
Source: https://www.symcon.de/en/service/documentation/module-reference/devices/dmx-artnet/dmx-setblackout/
`bool DMX_SetBlackOut(int $InstanceID, bool $Status)`
**Parameters**
- `$InstanceID` (int): ID of the device to be switched
- `$Status` (bool): __TRUE__ for old value, __FALSE__ for 0
**Returns** (bool): If the command succeeds, it returns __TRUE__, otherwise __FALSE__.
__TRUE__ for old value, __FALSE__ for 0
**Example**
```php
//Deactivate all channels
DMXI_SetBlackout(12345, true);
//Reactivate all channels
DMXI_SetBlackout(12345, false);
```
## DMX_SetChannel
Source: https://www.symcon.de/en/service/documentation/module-reference/devices/dmx-artnet/dmx-setchannel/
`bool DMX_SetChannel(int $InstanceID, int $Channel, int $Value)`
**Parameters**
- `$InstanceID` (int): ID of the device to be switched
- `$Channel` (int): 0 = all module channels, 1 – 512 depending on configuration
- `$Value` (int): 0-255
**Returns** (bool): If the command succeeds, it returns __TRUE__, otherwise __FALSE__.
0-255
**Example**
```php
DMX_SetChannel(12345, 0, 255); //Switch channel 0 to 255
```
## DMX_SetRGB
Source: https://www.symcon.de/en/service/documentation/module-reference/devices/dmx-artnet/dmx-setrgb/
`bool DMX_SetRGB(int $InstanceID, int $R, int $G, int $B)`
sets the RGB channel to a certain value
**Parameters**
- `$InstanceID` (int): ID of the device to be switched
- `$R` (int): Brightness value 0 (off) to 255/65535 (8/16 bit) (on, maximum brightness)
- `$G` (int): Brightness value 0 (off) to 255/65535 (8/16 bit) (on, maximum brightness)
- `$B` (int): Brightness value 0 (off) to 255/65535 (8/16 bit) (on, maximum brightness)
**Returns** (bool): If the command succeeds, it returns __TRUE__, otherwise __FALSE__.
Brightness value 0 (off) to 255/65535 (8/16 bit) (on, maximum brightness)
**Example**
```php
// set color to yellow
// 8bit instance
DMX_SetRGB(12345, 255, 255, 0);
// 16bit instance
DMX_SetRGB(12345, 65535, 65535, 0);
```
## Device list
Source: https://www.symcon.de/en/service/documentation/module-reference/devices/dmx-artnet/device-list/
### Supported Interfaces
* DMX4ALL Mini-USB-DMX-Interface
* DMX4ALL NanoDMX USB Interface
* DMX4ALL USB-DMX STAGE-PROFI MK2
* DMX4ALL USB-DMX STAGE-PROFI MK3
* LAN-DMX STAGE-PROFI
* AVR Art Net Node
* Art Net Box (Quad Art Net Box)
* All ArtNet interfaces are supported
### Supported Devices
#### Up to version 4.0
All devices that use the interfaces listed above and a maximum of 8 bit (256 steps) resolution.
#### Version 4.1 and above
All devices that use the interfaces listed above.
The 16bit (65535 steps) resolution is also supported.
---
# EgiGeoZone
> Symcon documentation · English · generated on 2026-09-26
> Index: https://www.symcon.de/en/llms.txt
Source: https://www.symcon.de/en/service/documentation/module-reference/devices/egigeozone/
_Requires Symcon >= 4.2_
The module is used to receive EgiGeoZone data.
### function scope
- Separate location list for each device
- Username and password identification within IP-Symcon.
- Automatically sets up the webhook "/hook/egigeozone".
- It is recommended to use this in combination with the Connect module.

### prerequisites
- EgiGeoZone App for Google Android
### Software installation
- Via the [Module Store](https://www.symcon.de/de/service/dokumentation/komponenten/verwaltungskonsole/module-store/) install the module EgiGeoZone.
### Instance setup in IP-Symcon
- Under "Add Instance" the 'EgiGeoZone' module can be found using the quick search.
- More information about adding instances in the [Instances documentation](https://www.symcon.de/service/dokumentation/konzepte/instanzen/#Instanz_hinzuf%C3%BCgen)
#### Configuration Page:
| Name | Description |
| -------- | ------------------------------------------------------------------------------ |
| Username | Username which must be specified in the EgiGeoZone App to send IP-Symcon data. |
| Password | Password which must be specified in the EgiGeoZone App. |
*If this data is left empty, anyone can send data to IP-Symcon via the hook
### status variables
The status variables/categories are created automatically. Deleting individual ones can lead to malfunctions.
#### Status variables
The variables are created automatically based on the device ID and when sending within the EgiGeoZone module for the first time. Multiple devices can run through one hook. Each device is set up under its own "category".
| Name | Type | Description |
| ----------------------------- | ---------------- | ----------------------------------------------------------------------------------------------------------------------------------------- |
| Device Name | Instance (Dummy) | Serves as a "category" in which all monitored locations, as well as the timestamp and longitude/latitude are located. Created per device. |
| Latitude | Float | Latitude of the last activity. |
| Longitude | Float | Longitude of the last activity. |
| Timestamp | Integer | UnixTimestamp of the last activity. |
| Sample Location (GeoZoneTest) | Boolean | Present or Absent. Information supplied by Gefency. |
Example:

### Visualization
There is no native display via Visualization or in the mobile apps. Devices and variables that should be displayed can be displayed via link.
---
# ekey
> Symcon documentation · English · generated on 2026-09-26
> Index: https://www.symcon.de/en/llms.txt
Source: https://www.symcon.de/en/service/documentation/module-reference/devices/ekey/
The company ekey manufactures various finger scanners. These can be integrated into IP-Symcon using a gateway. IP-Symcon receives the activities of the finger scanner and makes them available via variable.
> **Note:** The following devices are supported by IP-Symcon:
>
> __[Supported devices](https://www.symcon.de/en/llms/modules/ekey.md) __
>
> To integrate ekey bionyx, please go to the following page [ekey bionyx](https://www.symcon.de/en/llms/modules/ekeybionyx.md)
### Installation
In order to grant IP-Symcon access to the Home/Multi/Net system, the appropriate CV LAN module (gateway) must be integrated into the network.
The IP address for the UDP socket can be set using the eKey home CV LAN tool.
> **Note:** The CV LAN Tool is available in different versions for [Home](https://www.ekey.net/downloadcenter/) , Multi and Net.
After setting up the CV LAN, the specified IP addresses must be configured in IP-Symcon.
The protocol and separator must be set in the eKey instance.
The sending and receiving host and port must be entered via "Configure gateway".
The IP from the IP-Symcon server must be entered as the recipient IP.

## Device list
Source: https://www.symcon.de/en/service/documentation/module-reference/devices/ekey/device-list/
### Supported Gateways
| Gateway | Description |
| ------------------------------------------------- | ----------------- |
| ekey Home Converter LAN RS-485 | Home/Multi System |
| ekey Net CV LAN RS-485 | Net System |
| [ekey bionyx](https://www.symcon.de/en/llms/modules/ekeybionyx.md) | Cloud System |
### Supported Components
IP-Symcon supports all devices that can be connected to ekey Home/Multi/Net.
---
# ekey bionyx
> Symcon documentation · English · generated on 2026-09-26
> Index: https://www.symcon.de/en/llms.txt
Source: https://www.symcon.de/en/service/documentation/module-reference/devices/ekeybionyx/
_Requires Symcon >= 7.0_
The company ekey manufactures various finger scanners and these can be integrated into IP-Symcon using a gateway. IP-Symcon receives the activities of the finger scanner via webhooks.
### range of functions
- Set up one or more ekey bionyx systems
- Storing actions for webhooks
### Setting up the instances in IP-Symcon
Under 'Add instance', the 'ekey bionyx configurator' module can be found using the quick filter.
- Further information on adding instances can be found in the [Instance documentation](https://www.symcon.de/service/dokumentation/konzepte/instanzen/#Instanz_hinzufügen)
The interface can be configured when creating the instance.
__Configuration page of the cloud__:
| Name | Description |
| ---------- | ---------------------------------------------------------------------------------------------------------------------------------------------------------------------------------------------------------------------------------- |
| Connection | __Local__: If the ekey controller and IP-Symcon are in the same network, this option is used. __Connect__: If the ekey controller and IP-Symcon are not in the same network, communication takes place via the Connect service |
| IP address | The IP address of the IP-Symcon server |
The instance is then created. The message "A higher-level instance is inactive" appears in the configurator. The ekey Cloud instance is called up. To complete the setup of the ekey Cloud instance, click on the Register button. A new tab opens in the browser with the ekey login screen.

After entering the login data, the following dialog is displayed if successful.

You can now return to IP-Symcon. A token should now be available in the ekey bionyx Cloud instance.
In the ekey bionyx configurator, you can now click on Update to display the existing systems that are linked to the account. These can now be created and configured.
__Configuration page of the configurator__:
| Name | Description |
| ----------- | -------------------------------------------------------------------------- |
| iD | ID |
| Name | Name of the ekey Account Admin |
| Information | Information on how many webhooks are available and present for this system |
5 webhooks are allowed per account.
configuration page of the system__:
Functions Webhooks:
| Name | Description |
| -------- | ------------------------------------------------------- |
| ID | ID of the webhook |
| Function | Function name that is displayed in the ekey bionyx app |
| Location | Location name which is displayed in the ekey bionyx app |
| Action | Action that is executed when the webhook is triggered |
---
# EnOcean
> Symcon documentation · English · generated on 2026-09-26
> Index: https://www.symcon.de/en/llms.txt
Source: https://www.symcon.de/en/service/documentation/module-reference/devices/enocean/
EnOcean is a wireless system that is supported by multiple manufacturers. For a connection to IP-Symcon a USB or LAN interface is required.
> **Note:** The following devices are supported by IP-Symcon:
>
> __[Supported Devices (incl. gateways)](https://www.symcon.de/en/llms/modules/enocean.md)__ and __[EEP List](https://www.symcon.de/en/llms/modules/enocean.md) __
### Installation
The __USB Gateway__ is connected to the server and is accessible via Serial Port.
The __Symcon LAN Gateway__ is connected to the server via LAN. For the configuration, the IP-Symcon "Network Configuration Tool" is required. It is available for [Download](https://support.symcon.de/lan-gct) . A simple [Description for Configuration of the Gateway (German)](https://www.symcon.de/assets/files/service/NetworkConfigurationTool.pdf) is available. Afterwards, the gateway can be accessed at the corresponding IP address and Port (default: 5000).
> **Note:** If no IP-Symcon house is printed on the front of the LAN gateway, it is an older model of the gateway. The installation manual for that model can be downloaded [here (German)](https://www.symcon.de/assets/files/service/EnOceanLAN-Gatewayrev.vor2015.pdf) .
The __Eltako FGW14__ is connected to a SymBox with over RS232. The SymBox must have the RS232 module fitted. The FGW14 is in turn connected to the __Eltako FAM14__ via the "Eltako Bus14" pluggable jumper bridges. The following connectivity configuration is to be observed:
**FAM14:**
- **Rotary Mode Selector (BA):**
Set According to manual. Select mode 2 for bi-directional communication.
Select mode 1 for address assignment.
- **Terminal Pins "N" and "L":**
Connect with 230V mains power. Either by attaching a suitable mains plug or connect directly to live and neutral rail inside a control cabinet or fuse box.
- **Terminal Pin "Hold":**
Connect with terminal pin "Hold" on FGW14.
- **Terminal Pin "GND":**
Connect with ground pin (⊖) of the RS232 interface of the SymBox.
**FGW14:**
- **Rotary Mode Selector (BA):**
Select mode 6: "Bus14 ↔ RS232 58k Baud".
- **Terminal Pin "Hold":**
Connect with terminal pin "Hold" on FAM14.
- **Terminal Pin "Tx":**
Connect with terminal pin ↓ of the RS232 interface of the SymBox.
- **Terminal Pin "Tx":**
Connect with terminal pin ↑ of the RS232 interface of the SymBox.
### Integration into IP-Symcon
When using the LAN gateway it can be integrated via [Device Search](https://www.symcon.de/en/llms/components/management-console.md). This is realized by selecting the system "EnOcean Discovery". The Discovery instance offers the creation of an EnOcean [Configurator](https://www.symcon.de/en/llms/concepts.md). After the configurator was created, individual devices can be integrated as described below.
The USB gateway is directly created as configurator as it cannot be found via [Device Search](https://www.symcon.de/en/llms/components/management-console.md). This is done by creating an "EnOcean Configurator" in the [Object Tree](https://www.symcon.de/en/llms/components/management-console.md). During the configuration of the interface, the according ESP2 or ESP3 mode must be selected and finally the according port selected and opened.
> **Note:** How the I/O instance (parent instance of the gateway) is selected and eventually replaced, can be found here: [Replace I/O Instance](https://www.symcon.de/en/llms/how-to.md)
### Configuration
Depending on the device type, the configuration differs. There are four different device types. Each has its one different approach during configuration. (see below in the corresponding section)
> **Warning:** To use an EnOcean device, it must be taught in explicitely into IP-Symcon.
> **Warning:** Every Device ID (0-127) may only be given once.
> **Note:** Before starting a search, the parent instance needs to be configured. The correct serial ports need to be entered and the configuration applied. The setting of Baud rate etc. is not required and is done automatically by the system.
A general tutorial for creating devices/instances in IP-Symcon can be found here: [Integrate Devices](https://www.symcon.de/en/llms/how-to.md)
#### Configurator
The configurator can create any EnOcean device as instance. This is done by selecting "New device", clicking "Create", and selecting the according device from the list.

After the configurator has created the instance and the configuration button was pressed, the configuration for the device instance opens. Here, the Device ID can be searched and selected by pressing the "Search" button and multiple confirmations on the EnOcean device.


New instances are created in the main category in the Object Tree. These created instances can be renamed and positioned at another location. It is also possible to open the corresponding instance configurations via "Configure" in the configurator.
#### Actor
- Enter Device ID and confirm with "Apply"
- Put device into teach in mode (see manufacturer manual)
- Click "Teach In"
- Eventually test functionality with On/Off in the test environment
| ID | Description |
| --------- | ----------------------------------------------------- |
| Device ID | Provided by the user. 0-127 in whole numbers possible |
#### Actor (Eltako)
* Assign an ID to the devices via login at the FAM14 (see manufacturer manual)
* Enter Device ID and confirm with "Apply"
* It can be seen easiest via the PCT14
* Put device into teach in mode (see manufacturer manual)
* Click "Teach In" in the IP-Symcon instance
* Eventually test functionality with On/Off in the test environment
* Click "Search". The device should switch On/Off five times
* Select found ID and confirm with "OK"
__Special handling for certain devices__
* __FUD14:__ In PCT14, in the configuration area, the options "Confirmation Telegram with Dim Value" and "Confirmation Telegram with Button Telegram" must be set to "On". If not inserted by the teach in, the function 32 "Dim Value from GFVS / Rotary Switch" must be configured in function group 3 of the tab "ID - Allocation Area" of the device.
* __FSR14-xR:__ Must be teached in as directional button or universal button, depending on whether the button should switch On/Off or switch with two buttons.
* __FSB14:__ If not inserted by the teach in, the function 32 "Drive Time with predefined time value FVS" must be configured in the function group of the tab "ID - Allocation Area" of the PCT14.
> **Warning:** While the connection between FAM14 and PCT14 is active via USB, wireless telegrams cannot be sent.
> **Note:** For Eltako devices, the switch actor must be taught in in directional button mode. The dim actor must be taught in in the mode P,L,C (also PCT). This is realized by the especially available instance and the Teach In button. (since IP-Symcon 2.5)
> **Note:** The device Eltako FSB14 can only be taught in in RV 180/200 (Motor 1/2).
| ID | Description |
| --------- | ----------------------------------------------------- |
| Device ID | Provided by the user. 0-127 in whole numbers possible |
| Report ID | Sent by the device. Used for device allocation |
#### Actor (OPUS)
1. The OPUS Config Tool is required in a current version, so a generic "Gateway" can be added.
2. In the gateway, the EURID of the used EnOcean gateway needs to be entered. (It is found below the EnOcean Gateway Splitter instance) [For older TCM310 it is eventually required to enter the BaseID]
3. "Connect" device in gateway [It is highlighted in blue then] and let the device program
3. Add devices manually via "Add Instance" in IP-Symcon and enter the known Device ID in the instance
4. Switching and receiving should be possible effortlessly

| ID | Description |
| --------- | --------------------------------------------- |
| Device ID | 8 digit EnOcean ID. It is found on the device |
#### Actor (Actuator)
- Enter Device ID and confirm with "Apply"
- Click "Search"
- Put device into teach in mode (see manufacturer manual)
- Device confirms teach in (see manufacturer manual)
- Select found ID, confirm with "OK" and "Apply"
| ID | Description |
| --------- | ----------------------------------------------------- |
| Device ID | Provided by the user. 0-127 in whole numbers possible |
| Report ID | Sent by the device. Used for device allocation |
#### Sensor
- Click "Search"
- Wait for data receival (evntually press button)
- Select found ID and confirm with "OK"
The search dialog display a device only after it has received data. For a button, it can be pressed to call a sending process. For temperature sensors, waiting for the next interval or entering the ID manually is required.
| ID | Description |
| --------- | ---------------------------------------------- |
| Device ID | Sent by the device. Used for device allocation |
### Tips & Tricks
* To eliminate reception problems or to bridge large distances, maximum two repeater of type "TCM 120" can be used.
* The manual for changing the Base ID (not to be confused with the Device ID) can be found [here (German)](https://www.symcon.de/assets/files/service/EnOceanBaseIDTool.pdf).
Additional information about the used technology and sources of supply are available on online presence of EnOcean.
Link: [https://www.enocean.com/en/](https://www.enocean.com/en/)
## ENO_DimSet
Source: https://www.symcon.de/en/service/documentation/module-reference/devices/enocean/eno-dimset/
`bool ENO_DimSet(int $InstanceID, int $Intensity)`
**Parameters**
- `$InstanceID` (int): ID of the device to be switched
- `$Intensity` (int): 1..100
**Returns** (bool): If the command succeeds, it returns __TRUE__, otherwise __FALSE__.
1..100
**Example**
```php
ENO_DimSet(12345, 10); //Device dimmed to 10%
```
## ENO_SetActiveMessage
Source: https://www.symcon.de/en/service/documentation/module-reference/devices/enocean/eno-setactivemessage/
`bool ENO_SetActiveMessage(int $InstanceID, int $Message)`
activates a certain message
**Parameters**
- `$InstanceID` (int): ID of the instance of the device to be switched
- `$Message` (int): 0..8
**Returns** (bool): If the command succeeds, it returns __TRUE__, otherwise __FALSE__.
0..8
**Example**
```php
ENO_SetActiveMessage(12345, 2);
```
## ENO_SetFanStage
Source: https://www.symcon.de/en/service/documentation/module-reference/devices/enocean/eno-setfanstage/
`bool ENO_SetFanStage(int $InstanceID, int $FanStage)`
sets the FanStage to a certain value
**Parameters**
- `$InstanceID` (int): ID of the Instance of the device to be switched
- `$FanStage` (int): 0..4
**Returns** (bool): If the command succeeds, it returns __TRUE__, otherwise __FALSE__.
0..4
**Example**
```php
ENO_SetFanStage(12345, 4); //Device is set to automatic
```
## ENO_SetIntensity
Source: https://www.symcon.de/en/service/documentation/module-reference/devices/enocean/eno-setintensity/
`bool ENO_SetIntensity(int $InstanceID, bool $Status, int $Intensity)`
**Parameters**
- `$InstanceID` (int): ID of the device to be switched
- `$Status` (bool): __TRUE__ for On, __FALSE__ for Off
- `$Intensity` (int): 1..20, 1 = 5%, 20 = 100%
**Returns** (bool): If the command succeeds, it returns __TRUE__, otherwise __FALSE__.
1..20, 1 = 5%, 20 = 100%
**Example**
```php
ENO_SetIntensity(12345, true, 10); //Device dimmed to about 50%
```
## ENO_SetLockFanStage
Source: https://www.symcon.de/en/service/documentation/module-reference/devices/enocean/eno-setlockfanstage/
`bool ENO_SetLockFanStage(int $InstanceID, bool $Locked)`
**Parameters**
- `$InstanceID` (int): ID of the Instance of the device to be switched
- `$Locked` (bool): __TRUE__ for on, __FALSE__ for off
**Returns** (bool): If the command succeeds, it returns __TRUE__, otherwise __FALSE__.
__TRUE__ for on, __FALSE__ for off
**Example**
```php
ENO_SetLockFanStage(12345, true);
```
## ENO_SetLockRoomOccupancy
Source: https://www.symcon.de/en/service/documentation/module-reference/devices/enocean/eno-setlockroomoccupancy/
`bool ENO_SetLockRoomOccupancy(int $InstanceID, bool $Locked)`
**Parameters**
- `$InstanceID` (int): ID of the Instance of the device to be switched
- `$Locked` (bool): __TRUE__ for on, __FALSE__ for off
**Returns** (bool): If the command succeeds, it returns __TRUE__, otherwise __FALSE__.
__TRUE__ for on, __FALSE__ for off
**Example**
```php
ENO_SetLockRoomOccupancy(12345, true);
```
## ENO_SetMode
Source: https://www.symcon.de/en/service/documentation/module-reference/devices/enocean/eno-setmode/
`bool ENO_SetMode(int $InstanceID, int $Value)`
sets the actuator in a certain mode
**Parameters**
- `$InstanceID` (int): ID of the Instance of the device to be switched
- `$Value` (int): 0..5
**Returns** (bool): If the command succeeds, it returns __TRUE__, otherwise __FALSE__.
0..5
**Example**
```php
ENO_SetMode(12345, 1); //Actuator is set to summer mode
```
## ENO_SetPosition
Source: https://www.symcon.de/en/service/documentation/module-reference/devices/enocean/eno-setposition/
`bool ENO_SetPosition(int $InstanceID, int $Value)`
**Parameters**
- `$InstanceID` (int): ID of the Instance of the device to be switched
- `$Value` (int): 1..100
**Returns** (bool): If the command succeeds, it returns __TRUE__, otherwise __FALSE__.
1..100
**Example**
```php
ENO_SetPosition(12345, 10);
```
## ENO_SetRoomOccupancy
Source: https://www.symcon.de/en/service/documentation/module-reference/devices/enocean/eno-setroomoccupancy/
`bool ENO_SetRoomOccupancy(int $InstanceID, bool $Occupied)`
sets the occupancy to true/false
**Parameters**
- `$InstanceID` (int): ID of the Instance of the device to be switched
- `$Occupied` (bool): __TRUE__ for on, __FALSE__ for off
**Returns** (bool): If the command succeeds, it returns __TRUE__, otherwise __FALSE__.
__TRUE__ for on, __FALSE__ for off
**Example**
```php
ENO_SetRoomOccupancy(12345, true);
```
## ENO_SetTemperature
Source: https://www.symcon.de/en/service/documentation/module-reference/devices/enocean/eno-settemperature/
`bool ENO_SetTemperature(int $InstanceID, float $Value)`
sets the actuator to a certain target temperature
**Parameters**
- `$InstanceID` (int): ID of the Instance of the device to be switched
- `$Value` (float): 1...100
**Returns** (bool): If the command succeeds, it returns __TRUE__, otherwise __FALSE__.
1...100
**Example**
```php
ENO_SetTemperature(12345, 22.7);
```
## ENO_SetTemperature1
Source: https://www.symcon.de/en/service/documentation/module-reference/devices/enocean/eno-settemperature1/
`bool ENO_SetTemperature1(int $InstanceID, float $Temperature)`
sets the device to a certain temperature
**Parameters**
- `$InstanceID` (int): ID of the Instance of the device to be switched
- `$Temperature` (float): 1..100
**Returns** (bool): If the command succeeds, it returns __TRUE__, otherwise __FALSE__.
1..100
**Example**
```php
ENO_SetTemperature1(12345, 10);
```
## ENO_ShutterMoveDown
Source: https://www.symcon.de/en/service/documentation/module-reference/devices/enocean/eno-shuttermovedown/
`bool ENO_ShutterMoveDown(int $InstanceID)`
moves the roller shutter down to the end position/stop
**Parameters**
- `$InstanceID` (int): ID of the Instance of the device to be switched
**Returns** (bool): If the command succeeds, it returns __TRUE__, otherwise __FALSE__.
ID of the Instance of the device to be switched
**Example**
```php
ENO_ShutterMoveDown(12345);
```
## ENO_ShutterMoveDownEx
Source: https://www.symcon.de/en/service/documentation/module-reference/devices/enocean/eno-shuttermovedownex/
`bool ENO_ShutterMoveDownEx(int $InstanceID, float $Runtime)`
_Requires Symcon >= 4.2_
moves the roller shutter for a certain time
**Parameters**
- `$InstanceID` (int): ID of the Instance of the device to be switched
- `$Runtime` (float): How long the roller shutter should run for in seconds. (0 - 6535.5)
**Returns** (bool): If the command succeeds, it returns __TRUE__, otherwise __FALSE__.
How long the roller shutter should run for in seconds. (0 - 6535.5)
**Example**
```php
//Move the roller shutter down for 10.5 seconds
ENO_ShutterMoveDownEx(12345, 10.5);
```
## ENO_ShutterMoveUp
Source: https://www.symcon.de/en/service/documentation/module-reference/devices/enocean/eno-shuttermoveup/
`bool ENO_ShutterMoveUp(int $InstanceID)`
moves the roller shutter up to the end position/stop
**Parameters**
- `$InstanceID` (int): ID of the Instance of the device to be switched
**Returns** (bool): If the command succeeds, it returns __TRUE__, otherwise __FALSE__.
ID of the Instance of the device to be switched
**Example**
```php
ENO_ShutterMoveUp(12345);
```
## ENO_ShutterMoveUpEx
Source: https://www.symcon.de/en/service/documentation/module-reference/devices/enocean/eno-shuttermoveupex/
`bool ENO_ShutterMoveUpEx(int $InstanceID, float $Runtime)`
_Requires Symcon >= 4.2_
moves the roller shutter for a certain time
**Parameters**
- `$InstanceID` (int): ID of the Instance of the device to be switched
- `$Runtime` (float): How long the roller shutter should run for in seconds.
**Returns** (bool): If the command succeeds, it returns __TRUE__, otherwise __FALSE__.
How long the roller shutter should run for in seconds.
**Example**
```php
//Move the roller shutter up for 10.5 seconds
ENO_ShutterMoveUpEx(12345, 10.5);
```
## ENO_ShutterStop
Source: https://www.symcon.de/en/service/documentation/module-reference/devices/enocean/eno-shutterstop/
`bool ENO_ShutterStop(int $InstanceID)`
stops a motion
**Parameters**
- `$InstanceID` (int): ID of the Instance of the device to be switched
**Returns** (bool): If the command succeeds, it returns __TRUE__, otherwise __FALSE__.
ID of the Instance of the device to be switched
**Example**
```php
ENO_ShutterStop(12345);
```
## ENO_SwitchMode
Source: https://www.symcon.de/en/service/documentation/module-reference/devices/enocean/eno-switchmode/
`bool ENO_SwitchMode(int $InstanceID, bool $Status)`
**Parameters**
- `$InstanceID` (int): ID of the device to be switched
- `$Status` (bool): __TRUE__ for On, __FALSE__ for Off
**Returns** (bool): If the command succeeds, it returns __TRUE__, otherwise __FALSE__.
__TRUE__ for On, __FALSE__ for Off
**Example**
```php
ENO_SwitchMode(12345, true); //Turn on device
```
## ENO_SwitchModeEx
Source: https://www.symcon.de/en/service/documentation/module-reference/devices/enocean/eno-switchmodeex/
`bool ENO_SwitchModeEx(int $InstanceID, bool $Status, int $SendMode)`
**Parameters**
- `$InstanceID` (int): ID of the device to be switched
- `$Status` (bool): __TRUE__ for On, __FALSE__ for Off
- `$SendMode` (int): 0 = NMessage, 1 = UMessage, 2 = Both (Like [ENO_SwitchMode](https://www.symcon.de/en/llms/modules/enocean.md))
**Returns** (bool): If the command succeeds, it returns __TRUE__, otherwise __FALSE__.
0 = NMessage, 1 = UMessage, 2 = Both (Like [ENO_SwitchMode](https://www.symcon.de/en/llms/modules/enocean.md))
**Example**
```php
ENO_SwitchModeEx(12345, true, 0); //Send NMessage
IPS_Sleep(500); //Warten
ENO_SwitchModeEx(12345, true, 1); //Send UMessage
```
## Device list
Source: https://www.symcon.de/en/service/documentation/module-reference/devices/enocean/device-list/
#### Supported Gateways
| Product | Description |
| ----------------------------------------------------------------------------------------------------------------------------------- | -------------------------------------------------------------------------------------- |
| EnOcean LAN Gateway (TCM310/TCM515 LAN Gateway) [Product information](https://www.symcon.de/assets/files/product/enocean-lan-gateway.pdf) | IP Gateway |
| BSC-BOR | USB Gateway |
| EnOcean USB300 | USB Gateway |
| EnOcean Pi | Raspberry Pi plug-in board |
| EnOcean FGW14 (with FAM14) | USB/serial Gateway (operating mode 6) and Radio extension FAM14 (operating mode 2) |
| FAM USB | USB Gateway (must be entered as TCM 130) |
| TCM130 | All devices that support the ESP2 protocol |
| TCM310 | All devices that support the ESP3 protocol (Dolphin) |
| TCM515 | All devices that support the ESP3 protocol (Dolphin) |
| Thermokon STC-Ethernet | IP Gateway |
#### Supported Devices
The following devices have been examined for their compatibility with IP-Symcon.
On [request](https://www.symcon.de/en/contact-us/) we will be happy to check other devices that are not listed.
##### General
| Product | Description |
| ------- | ------------------------------ |
| PTM 200 | Button/Expert |
| PTM 200 | Switch |
| RCM 1xx | Switching actuator (universal) |
| STM100 | Sensor |
| STM250 | Sensor |
##### alphaEOS
| Product | Description |
| ---------- | ------------------------------------------------ |
| Drive B2 | Radio actuator |
| SENSE TF-H | Indoor climate sensor (temperature and humidity) |
##### Eltako
| Product | Description | EEP number (See EEP list below) |
| -------------- | --------------------------------------------------------------------------- | -------------------------------------------------- |
| DSZ14DRS | Wireless single-phase energy meter transmitter module | EEP: A5-12-01 |
| DSZ14WDRS | Wireless single-phase energy meter transmitter module | EEP: A5-12-01 |
| F2L14 | RS485 bus actuator 2-stage ventilation relay | stand-alone module |
| F3Z14D | RS485 bus electricity meter collector | EEP: A5-12-01 |
| F4HK14 | 4-channel heating-cooling relay | stand-alone module |
| F4T65 | Wireless sensors without batteries or wires | EEP: F6-02-01 |
| FABH65S | Outdoor motion/brightness sensor | stand-alone module |
| FADS60-230V | Wireless actuator for outdoor twilight sensor | stand-alone module |
| FAE14LPR | Individual room control heating/cooling for 2 zones | stand-alone module |
| FAE14SSR | Individual room control heating/cooling for 2 zones with solid-state relays | stand-alone module |
| FAFT60 | Outdoor humidity temperature sensor | stand-alone module |
| FAH60 | Outdoor brightness sensor | stand-alone module |
| FAH60B | Outdoor brightness sensor | stand-alone module, EEP: A5-06-01 |
| FAH63 | Outdoor brightness sensor | stand-alone module |
| FAH65S | Outdoor brightness sensor | stand-alone module |
| FASM60 | Wireless outdoor transmitter module | EEP: F6-02-01 |
| FBH65B | Motion/brightness sensor | stand-alone module |
| FBH65S | Motion/brightness sensor | stand-alone module |
| FBH65TFB | Motion/brightness sensor | stand-alone module |
| FCO2TF65 | CO2 sensor | EEP: A5-09-04 |
| FD62NP-230V | Wireless universal dimming actuator without N-connection | stand-alone module |
| FD62NPN-230V | Wireless universal dimming actuator | stand-alone module |
| FFR14 | RS485 bus actuator field release switch | stand-alone module |
| FFR61-230V | Field release switch | stand-alone module |
| FHF | Wireless sensor window handle | EEP: F6-10-00 |
| FHK14 | Wireless actuator for heating/cooling relays | stand-alone module |
| FHK61SSR-230V | Wireless actuator for heating/cooling relays | stand-alone module |
| FHK61U-230V | Wireless actuator for heating relay | stand-alone module |
| FIFT65S | Indoor humidity temperature sensor | stand-alone module |
| FIH65S | Outdoor brightness sensor | stand-alone module |
| FIH65Bv | Indoor brightness sensor | EEP: A5-06-02 |
| FIUS65 | Indoor wireless flush-mounted signal generator | stand-alone module |
| FJ62/12-36V DC | Wireless blind and roller shutter actuator | stand-alone module |
| FJ62NP-230V | Wireless blind and roller shutter actuator | stand-alone module |
| FKC | Wireless card switch | stand-alone module |
| FKF | Wireless card switch | stand-alone module |
| FL62-230V | Wireless light actuator 10A/250V AC | stand-alone module |
| FL62NP-230V | Wireless light actuator 10A/250V AC | stand-alone module |
| FLC61-230V | Wireless light controller | stand-alone module |
| FMS14 | RS485 bus actuator multifunction impulse switching relay | stand-alone module |
| FMS61NP-230V | Wireless actuator multifunction impulse switch | stand-alone module |
| FMZ14 | RS485 bus actuator multifunction time relay | stand-alone module |
| FMZ61-230V | Wireless actuator multifunction time relay | stand-alone module |
| FR62-230V | Wireless relay actuator 10 A/250 V AC | stand-alone module |
| FR62NP-230V | Wireless relay actuator 10 A/250 V AC | stand-alone module |
| FRGBW71L | Dimming actuator | stand-alone module |
| FRW | Wireless sensor smoke alarm device | stand-alone module |
| FSB14 | Actuator for shading elements and roller shutters | stand-alone module |
| FSB61 | Wireless actuator for shading elements and roller shutters | stand-alone module |
| FSB71 | Wireless actuator for shading elements and roller shutters | stand-alone module |
| FSDG14 | Wireless single-phase energy meter transmitter module | EEP: A5-12-01 |
| FSG14/1-10V | Dimming actuator | stand-alone module |
| FSG71/1-10V | Dimming actuator | stand-alone module |
| FSM14 | Radio transmitter module | EEP: F6-02-01 |
| FSM60B | 4-channel input | EEP: A5-30-03 |
| FSM61 | Wireless 2-way transmitter module | EEP: F6-01-01 |
| FSR14SSR | RS485 bus actuator 2-channel impulse switching relay noiseless | stand-alone module |
| FSR14-2x | RS485 bus actuator 2-channel impulse switching relay | stand-alone module |
| FSR14-4x | RS485 bus actuator 4-channel impulse switching relay | stand-alone module |
| FSR61-230V | Wireless actuator for impulse switching relays | stand-alone module |
| FSR61/8-24V | Wireless actuator for impulse switching relays | stand-alone module |
| FSR61LN-230V | Wireless actuator for impulse switching relays | stand-alone module |
| FSR61NP-230V | Wireless actuator for impulse switching relays | stand-alone module |
| FSR61VA | Wireless single-phase energy meter transmitter module | EEP: A5-12-01 |
| FSR61VA-10A | Wireless actuator for 10A impulse switching relays | stand-alone module |
| FSR71 | Wireless actuator for 2-channel impulse switching relays | stand-alone module |
| FSS12 | Wireless electricity meter transmitter module | EEP: A5-12-01 |
| FSSA-230V | Wireless actuator socket switch actuator | stand-alone module |
| FSU14 | RS485 bus display timer | EEP: A5-13-04 |
| FSU65D | Wireless sensor timer with display | EEP: F6-01-01 |
| FSUD-230V | Dimming actuator | stand-alone module |
| FSVA-230V | Wireless single-phase energy meter transmitter module | EEP: A5-12-01 |
| FT-FTSB | Tip wireless humidity/temperature sensor | EEP: A5-04-02 |
| FT4F | Wireless sensor surface wireless pushbutton | EEP: F6-02-01 |
| FT55 | Wireless sensor surface wireless pushbutton | EEP: F6-02-01 |
| FTF65S | Temperature sensor | EEP: A5-02-05 |
| FTK | Wireless window/door contact | EEP: D5-00-01 |
| FTKB | Wireless window/door contact | EEP: D5-00-01 |
| FTKE | Wireless window/door contact | EEP: F6-10-00 |
| FTN14 | RS485 bus actuator staircase lighting overrun switch | stand-alone module |
| FTN61NP-230V | Wireless actuator for staircase lighting overrun switch | stand-alone module |
| FTR65DS | Wireless sensor temperature controller | stand-alone module |
| FTR65HS | Wireless sensor temperature controller | stand-alone module |
| FTR78S | Wireless temperature controller with rotary knob | EEP: A5-10-03 |
| FUD14 | Dimming actuator | stand-alone module |
| FUD14-800W | Dimming actuator | stand-alone module |
| FUD61NP | Dimming actuator | stand-alone module |
| FUD61NPN | Dimming actuator | stand-alone module |
| FUD70S-230V | Dimming actuator | stand-alone module |
| FUD71 | Dimming actuator | stand-alone module |
| FUTH55D | Wireless sensor clock thermo-hygrostat | stand-alone module |
| FUTH65D | Wireless sensor clock thermo-hygrostat | stand-alone module |
| FWS61 | Wireless weather data transmitter module | EEP: A5-13-01, A5-13-02 |
| FWWKW71L | PWM Dimming actuator for LED | stand-alone module |
| FWZ12 | Wireless single-phase energy meter transmitter module | EEP: A5-12-01 |
| FWZ14 | Wireless single-phase energy meter transmitter module | EEP: A5-12-01 |
| FWZ61 | Wireless single-phase energy meter transmitter module | EEP: A5-12-01 |
| FZK14 | RS485 bus actuator time relay for card switches/smoke alarm devices | stand-alone module |
| FZK61NP-230V | Wireless actuator for time relays with card switch/smoke alarm device | stand-alone module |
| FZS | Wireless sensor pull switch | stand-alone module |
| FMMS44SB | Wireless mini multisensor | EEP: D2-14-41 |
##### Hoppe
| Product | Description | EEP number (See EEP list below) |
| ----------- | --------------------------------------------- | -------------------------------------------------- |
| FHF | Window handle | F6-10-00 |
| SecuSignal | eWindow handle Amsterdam E0400/FR-408 F69 | F6-10-00 |
| SecuSignal | eWindow handle Atlanta 0530S/FR-408 100 Nm F9 | F6-10-00 |
| SecuSignal | eWindow handle Toulon E0400/FR-408 F69 | F6-10-00 |
| ConnectHome | eWindow handle Tokyo | F6-10-00 |
| ConnectHome | eWindow handle New York | F6-10-00 |
##### HORA
| Product | Description |
| ------------- | ----------- |
| SmartDrive MX | Actuator |
##### Kieback & Peter
| Product | Description |
| ------- | -------------- |
| MD15 | Small actuator |
##### Maco
| Product | Description | EEP number (See EEP list below) |
| -------------------------- | ------------------ | -------------------------------------------------- |
| Smart Ready Sensor eTRONIC | Door/window sensor | EEP: A5-14-01 |
##### NodOn
| Product | Description | EEP number (See EEP list below) |
| ----------- | ---------------------------------------------- | -------------------------------------------------- |
| ASP-2-1-00 | Smart Plug | EEP: D2-01-0A |
| ASP-2-1-01 | Smart Plug Metering | EEP: D2-01-0B |
| ASP-2-1-10 | Smart Plug | EEP: D2-01-0A |
| ASP-2-1-11 | Smart Plug Metering | EEP: D2-01-0B |
| SIN-2-1-01 | In-wall Multifunction Relay Switch 1-Channel | EEP: D2-01-0F |
| SIN-2-2-01 | In-wall ON/OFF Lighting Relay Switch 2-Channel | EEP: D2-01-0B |
| SIN-2-RS-01 | Roller Shutter Relay Switch | EEP: D2-05-00 |
##### OPUS
| Product | Description | EEP number (See EEP list below) |
| ------------ | --------------------------------------------------------------- | -------------------------------------------------- |
| 514.441 | 55 Wall transmitter module standard | EEP: F6-02-01 |
| 561.150.9052 | Temperature sensor (2 buttons) | EEP: A5-10-12 |
| 561.150.9069 | Temperature sensor (4 buttons) | EEP: A5-10-22 |
| 563.010-C* | Bridge 1 channel | EEP: D2-01-01 |
| 563.014-C* | Bridge 1 channel, 16A | EEP: D2-01-01 |
| 563.020-C* | Bridge 2 channel | EEP: D2-01-11 |
| 563.031-C* | Bridge roller shutter/ blind | EEP: D2-05-02 |
| 563.035-C* | Bridge dimmer | EEP: D2-01-03 |
| 563.051-C | Smart Motion Sensor (light) | EEP: F6-02-01 |
| 563.052-C | Smart motion sensor multifunction | EEP: F6-02-01 |
| 563.053 | Smart Motion Sensor Ambient Assisted Living - Inability to move | EEP: A5-07-03 |
| 563.055-C | Smart Motion Sensor (presence) | EEP: A5-07-03 |
| 563.067-C | Water alarm (instant alarm) | EEP: F6-05-01 |
| 563.068-C | Water alarms (source disks) | EEP: A5-30-03 |
| 563.069-C | Smoke alarm device | EEP: F6-05-02 |
*Requires setup via Opus Config Tool (563.040)
##### PEHA
| Product | Description |
| ------- | ----------------------------------------------- |
| Various | All devices that support EEP |
##### Thermokon
| Product | Description |
| ------- | -------------------- |
| SR04 | Temperature/humidity |
| SAB02 | Actuator |
| Thanos | Room control unit |
### EEP
All devices that use the following EEPs are supported by IP-Symcon.
##### Actuators
| New | since version | Old | Description |
| -------- | ------------- | -------- | ---------------------------- |
| A5-20-12 | 4.0 | 07-20-12 | Temperature Controller Input |
##### Bi-Directional
| New | since version | Old | Description |
| -------- | ------------- | -------- | ----------------------------------------------------------------------------------- |
| A5-20-01 | 4.0 | 07-20-01 | Battery Powered Actuator |
| D2-01-00 | 4.3 | | Electronic switches and dimmer with Energy Measurement and Local Content |
| D2-01-01 | 4.3 | | Electronic switches and dimmer with Energy Measurement and Local Content |
| D2-01-02 | 4.3 | | Electronic switches and dimmer with Energy Measurement and Local Content |
| D2-01-03 | 4.3 | | Electronic switches and dimmer with Energy Measurement and Local Content |
| D2-01-04 | 4.3 | | Electronic switches and dimmer with Energy Measurement and Local Content |
| D2-01-05 | 4.3 | | Electronic switches and dimmer with Energy Measurement and Local Content |
| D2-01-06 | 4.3 | | Electronic switches and dimmer with Energy Measurement and Local Content |
| D2-01-07 | 4.3 | | Electronic switches and dimmer with Energy Measurement and Local Content |
| D2-01-08 | 4.3 | | Electronic switches and dimmer with Energy Measurement and Local Content |
| D2-01-09 | 4.3 | | Electronic switches and dimmer with Energy Measurement and Local Content |
| D2-01-0A | 4.3 | | Electronic switches and dimmer with Energy Measurement and Local Content |
| D2-01-0B | 4.3 | | Electronic switches and dimmer with Energy Measurement and Local Content |
| D2-01-0C | 4.3 | | Electronic switches and dimmer with Energy Measurement and Local Content |
| D2-01-0D | 4.3 | | Electronic switches and dimmer with Energy Measurement and Local Content |
| D2-01-0E | 4.3 | | Electronic switches and dimmer with Energy Measurement and Local Content |
| D2-01-0F | 4.3 | | Electronic switches and dimmer with Energy Measurement and Local Content |
| D2-01-10 | 4.3 | | Electronic switches and dimmer with Energy Measurement and Local Content |
| D2-01-11 | 4.3 | | Electronic switches and dimmer with Energy Measurement and Local Content |
| D2-01-12 | 4.3 | | Electronic switches and dimmer with Energy Measurement and Local Content |
| D2-01-13 | 4.3 | | Electronic switches and dimmer with Energy Measurement and Local Content |
| D2-01-14 | 4.3 | | Electronic switches and dimmer with Energy Measurement and Local Content |
| D2-03-00 | 5.5 | | Light, Switching + Blind Control Type 0x00 |
| D2-03-0A | 5.5 | | Push Button – Single Button |
| D2-03-10 | 5.5 | | Mechanical Handle |
| D2-05-00 | 5.3 | | Blinds Control for Position/Angle Type 0x00 |
| D2-05-01 | 5.3 | | Blinds Control for Position/Angle Type 0x01 |
| D2-05-02 | 5.3 | | Blinds Control for Position/Angle Type 0x02 |
| D2-06-01 | 4.3 | | Multisensor Window Handle - Alarm, Position Sensor, Vacation Mode, Optional Sensors |
| D2-07-00 | 5.5 | | Locking Systems Control - Mortise lock |
| D2-11-01 | 5.3 | | Room Operating Panel (BI-DIR) Type 0x01 |
| D2-11-02 | 5.3 | | Room Operating Panel (BI-DIR) Type 0x02 |
| D2-11-03 | 5.3 | | Room Operating Panel (BI-DIR) Type 0x03 |
| D2-11-04 | 5.3 | | Room Operating Panel (BI-DIR) Type 0x04 |
| D2-11-05 | 5.3 | | Room Operating Panel (BI-DIR) Type 0x05 |
| D2-11-06 | 5.3 | | Room Operating Panel (BI-DIR) Type 0x06 |
| D2-11-07 | 5.3 | | Room Operating Panel (BI-DIR) Type 0x07 |
| D2-11-08 | 5.3 | | Room Operating Panel (BI-DIR) Type 0x08 |
| D2-15-00 | 5.5 | | People Activity Counter |
| D2-A0-01 | 5.5 | | Valve Control (BI-DIR) |
##### Sensors
| New | since version | Old | Description |
| -------- | ------------- | -------- | --------------------------------------------------------------------------------------- |
| A5-02-01 | 4.0 | 07-02-01 | Temperature Sensor Range -40°C to 0°C |
| A5-02-02 | 4.0 | 07-02-02 | Temperature Sensor Range -30°C to +10°C |
| A5-02-03 | 4.0 | 07-02-03 | Temperature Sensor Range -20°C to +20°C |
| A5-02-04 | 4.0 | 07-02-04 | Temperature Sensor Range -10°C to +30°C |
| A5-02-05 | 4.0 | 07-02-05 | Temperature Sensor Range 0°C to +40°C |
| A5-02-06 | 4.0 | 07-02-06 | Temperature Sensor Range +10°C to +50°C |
| A5-02-07 | 4.0 | 07-02-07 | Temperature Sensor Range +20°C to +60°C |
| A5-02-08 | 4.0 | 07-02-08 | Temperature Sensor Range +30°C to +70°C |
| A5-02-09 | 4.0 | 07-02-09 | Temperature Sensor Range +40°C to +80°C |
| A5-02-0A | 4.0 | 07-02-0A | Temperature Sensor Range +50°C to +90°C |
| A5-02-0B | 4.0 | 07-02-0B | Temperature Sensor Range +60°C to +100°C |
| A5-02-10 | 4.0 | 07-02-10 | Temperature Sensor Range -60°C to +20°C |
| A5-02-11 | 4.0 | 07-02-11 | Temperature Sensor Range -50°C to +30°C |
| A5-02-12 | 4.0 | 07-02-12 | Temperature Sensor Range -40°C to +40°C |
| A5-02-13 | 4.0 | 07-02-13 | Temperature Sensor Range -30°C to +50°C |
| A5-02-14 | 4.0 | 07-02-14 | Temperature Sensor Range -20°C to +60°C |
| A5-02-15 | 4.0 | 07-02-15 | Temperature Sensor Range -10°C to +70°C |
| A5-02-16 | 4.0 | 07-02-16 | Temperature Sensor Range 0°C to +80°C |
| A5-02-17 | 4.0 | 07-02-17 | Temperature Sensor Range +10°C to +90°C |
| A5-02-18 | 4.0 | 07-02-18 | Temperature Sensor Range +20°C to +100°C |
| A5-02-19 | 4.0 | 07-02-19 | Temperature Sensor Range +30°C to +110°C |
| A5-02-1A | 4.0 | 07-02-1A | Temperature Sensor Range +40°C to +120°C |
| A5-02-1B | 4.0 | 07-02-1B | Temperature Sensor Range +50°C to +130°C |
| A5-02-20 | 4.0 | 07-02-20 | 10 Bit Temperature Sensor Range -10°C to +41.2°C |
| A5-02-30 | 4.0 | 07-02-30 | 10 Bit Temperature Sensor Range -40°C to +62.3°C |
| A5-04-01 | 4.0 | 07-04-01 | Range 0°C to +40°C and 0% to 100% |
| A5-04-02 | 4.1 | 07-04-02 | Range -20°C to +60°C and 0% to 100% |
| A5-04-03 | 4.1 | 07-04-03 | Range -20°C to +60°C 10bit-measurement and 0% to 100% |
| A5-04-03 | 5.3 | 07-04-03 | Temperature and Humidity Sensor |
| A5-06-01 | 4.0 | 07-06-01 | Range 300lx to 60.000lx |
| A5-06-02 | 4.0 | 07-06-02 | Range 0lx to 1.020lx |
| A5-06-03 | 4.0 | 07-06-03 | 10-bit measurement (1-Lux resolution) with range 0lx to 1000lx |
| A5-07-01 | 4.0 | 07-07-01 | Occupancy with Supply voltage monitor |
| A5-07-01 | 5.3 | 07-07-01 | gN-Deckenbewegungsmelder 360° |
| A5-07-01 | 5.3 | 07-07-01 | Desk Occupancy |
| A5-07-02 | 4.0 | 07-07-02 | Occupancy with Supply voltage monitor |
| A5-07-03 | 4.0 | 07-07-03 | Occupancy with Supply voltage monitor and 10-bit illumination measurement |
| A5-08-01 | 4.0 | 07-08-01 | Range 0lx to 510lx |
| A5-08-01 | 4.0 | 07-08-01 | 0°C to +51°C and Occupancy Button |
| A5-08-02 | 4.0 | 07-08-02 | Range 0lx to 1020lx |
| A5-08-02 | 4.0 | 07-08-02 | 0°C to +51°C and Occupancy Button |
| A5-08-03 | 4.0 | 07-08-03 | Range 0lx to 1530lx |
| A5-08-03 | 4.0 | 07-08-03 | -30°C to +50°C and Occupancy Button |
| A5-09-01 | 4.0 | 07-09-01 | CO Sensor (not in use) |
| A5-09-02 | 4.0 | 07-09-02 | CO-Sensor 0 ppm to 1020 ppm |
| A5-09-04 | 4.0 | 07-09-04 | CO2 Sensor |
| A5-09-04 | 5.3 | 07-09-04 | CO2, Temperature and Humidity Sensor |
| A5-09-05 | 4.0 | 07-09-05 | VOC Sensor |
| A5-09-06 | 4.0 | 07-09-06 | Radon |
| A5-09-07 | 4.0 | 07-09-07 | Particles |
| A5-09-08 | 4.0 | 07-09-08 | Pure CO2 Sensor |
| A5-10-01 | 4.0 | 07-10-01 | Temperature Sensor |
| A5-10-01 | 4.0 | 07-10-01 | Set Point |
| A5-10-01 | 4.0 | 07-10-01 | Fan Speed and Occupancy Control |
| A5-10-02 | 4.0 | 07-10-02 | Temperature Sensor |
| A5-10-02 | 4.0 | 07-10-02 | Set Point |
| A5-10-02 | 4.0 | 07-10-02 | Fan Speed and Day/Night Control |
| A5-10-03 | 4.0 | 07-10-03 | Temperature Sensor |
| A5-10-03 | 4.0 | 07-10-03 | Set Point Control |
| A5-10-04 | 4.0 | 07-10-04 | Temperature Sensor |
| A5-10-04 | 4.0 | 07-10-04 | Set Point and Fan Speed Control |
| A5-10-05 | 4.0 | 07-10-05 | Temperature Sensor |
| A5-10-05 | 4.0 | 07-10-05 | Set Point and Occupancy Control |
| A5-10-06 | 4.0 | 07-10-06 | Temperature Sensor |
| A5-10-06 | 4.0 | 07-10-06 | Set Point and Day/Night Control |
| A5-10-07 | 4.0 | 07-10-07 | Temperature Sensor |
| A5-10-07 | 4.0 | 07-10-07 | Fan Speed Control |
| A5-10-08 | 4.0 | 07-10-08 | Temperature Sensor |
| A5-10-08 | 4.0 | 07-10-08 | Fan Speed and Occupancy Control |
| A5-10-09 | 4.0 | 07-10-09 | Temperature Sensor |
| A5-10-09 | 4.0 | 07-10-09 | Fan Speed and Day/Night Control |
| A5-10-0A | 4.0 | 07-10-0A | Temperature Sensor |
| A5-10-0A | 4.0 | 07-10-0A | Set Point Adjust and Single Input Contact |
| A5-10-0B | 4.0 | 07-10-0B | Temperature Sensor and Single Input Contact |
| A5-10-0C | 4.0 | 07-10-0C | Temperature Sensor and Occupancy Control |
| A5-10-0D | 4.0 | 07-10-0D | Temperature Sensor and Day/Night Control |
| A5-10-10 | 4.0 | 07-10-10 | Temperature and Humidity Sensor |
| A5-10-10 | 4.0 | 07-10-10 | Set Point and Occupancy Control |
| A5-10-11 | 4.0 | 07-10-11 | Temperature and Humidity Sensor |
| A5-10-11 | 4.0 | 07-10-11 | Set Point and Day/Night Control |
| A5-10-12 | 4.0 | 07-10-12 | Temperature and Humidity Sensor and Set Point |
| A5-10-13 | 4.0 | 07-10-13 | Temperature and Humidity Sensor |
| A5-10-13 | 4.0 | 07-10-13 | Occupancy Control |
| A5-10-14 | 4.0 | 07-10-14 | Temperature and Humidity Sensor |
| A5-10-14 | 4.0 | 07-10-14 | Day/Night Control |
| A5-10-15 | 4.0 | 07-10-15 | 10 Bit Temperature Sensor |
| A5-10-15 | 4.0 | 07-10-15 | 6 bit Set Point Control |
| A5-10-16 | 4.0 | 07-10-16 | 10 Bit Temperature Sensor |
| A5-10-16 | 4.0 | 07-10-16 | 6 bit Set Point Control;Occupancy Control |
| A5-10-17 | 4.0 | 07-10-17 | 10 Bit Temperature Sensor |
| A5-10-17 | 4.0 | 07-10-17 | Occupancy Control |
| A5-10-18 | 4.0 | 07-10-18 | Illumination |
| A5-10-18 | 4.0 | 07-10-18 | Temperature Set Point |
| A5-10-18 | 4.0 | 07-10-18 | Temperature Sensor |
| A5-10-18 | 4.0 | 07-10-18 | Fan Speed and Occupancy Control |
| A5-10-19 | 4.0 | 07-10-19 | Humidity |
| A5-10-19 | 4.0 | 07-10-19 | Temperature Set Point |
| A5-10-19 | 4.0 | 07-10-19 | Temperature Sensor |
| A5-10-19 | 4.0 | 07-10-19 | Fan Speed and Occupancy Control |
| A5-10-1A | 4.0 | 07-10-1A | Supply voltage monitor |
| A5-10-1A | 4.0 | 07-10-1A | Temperature Set Point |
| A5-10-1A | 4.0 | 07-10-1A | Temperature Sensor |
| A5-10-1A | 4.0 | 07-10-1A | Fan Speed and Occupancy Control |
| A5-10-1B | 4.0 | 07-10-1B | Supply Voltage Monitor |
| A5-10-1B | 4.0 | 07-10-1B | Illumination |
| A5-10-1B | 4.0 | 07-10-1B | Temperature Sensor |
| A5-10-1B | 4.0 | 07-10-1B | Fan Speed and Occupancy Control |
| A5-10-1C | 4.0 | 07-10-1C | Illumination |
| A5-10-1C | 4.0 | 07-10-1C | Illumination Set Point |
| A5-10-1C | 4.0 | 07-10-1C | Temperature Sensor |
| A5-10-1C | 4.0 | 07-10-1C | Fan Speed and Occupancy Control |
| A5-10-1D | 4.0 | 07-10-1D | Humidity |
| A5-10-1D | 4.0 | 07-10-1D | Humidity Set Point |
| A5-10-1D | 4.0 | 07-10-1D | Temperature Sensor |
| A5-10-1D | 4.0 | 07-10-1D | Fan Speed and Occupancy Control |
| A5-10-1E | 5.5 | 07-10-1E | Temperature Sensor, Supply Voltage, Light, Fan Speed, and Occupancy Control |
| A5-10-1F | 4.0 | 07-10-1F | Temperature Sensor |
| A5-10-1F | 4.0 | 07-10-1F | Set Point |
| A5-10-1F | 4.0 | 07-10-1F | Fan Speed |
| A5-10-1F | 4.0 | 07-10-1F | Occupancy and Unoccupancy Control |
| A5-10-20 | 4.0 | 07-10-20 | Temperature and Set Point with Special Heating States |
| A5-10-21 | 4.0 | 07-10-21 | Temperature |
| A5-10-21 | 4.0 | 07-10-21 | Humidity and Set Point with Special Heating States |
| A5-10-22 | 5.5 | 07-10-22 | Temperature Sensor, Set Point, Humidity, and Fan Speed |
| A5-10-23 | 5.5 | 07-10-23 | Temperature Sensor, Set Point, Humidity, Fan Speed, and Occupancy Control |
| A5-11-01 | 4.0 | 07-11-01 | Lighting Controller |
| A5-11-02 | 4.0 | 07-11-02 | Temperature Controller Output |
| A5-11-03 | 4.0 | 07-11-03 | Blind Status |
| A5-11-04 | 4.0 | 07-11-04 | Extended Lighting Status |
| A5-12-00 | 4.0 | 07-12-00 | Counter |
| A5-12-00 | 5.3 | 07-12-00 | Operations Counting |
| A5-12-01 | 4.0 | 07-12-01 | Electricity |
| A5-12-02 | 4.0 | 07-12-02 | Gas |
| A5-12-03 | 4.0 | 07-12-03 | Water |
| A5-13-01 | 4.0 | 07-13-01 | Weather Station |
| A5-13-02 | 4.0 | 07-13-02 | Sun Intensity |
| A5-13-03 | 4.0 | 07-13-03 | Date Exchange |
| A5-13-04 | 4.0 | 07-13-04 | Time and Day Exchange |
| A5-13-05 | 4.0 | 07-13-05 | Direction Exchange |
| A5-14-01 | 4.0 | 07-14-01 | Single Input Contact (Window/Door) |
| A5-14-01 | 4.0 | 07-14-01 | Supply voltage monitor |
| A5-14-02 | 4.0 | 07-14-02 | Single Input Contact (Window/Door) |
| A5-14-02 | 4.0 | 07-14-02 | Supply voltage monitor and Illumination |
| A5-14-03 | 4.0 | 07-14-03 | Single Input Contact (Window/Door) |
| A5-14-03 | 4.0 | 07-14-03 | Supply voltage monitor and Vibration |
| A5-14-04 | 4.0 | 07-14-04 | Single Input Contact (Window/Door) |
| A5-14-04 | 4.0 | 07-14-04 | Supply voltage monitor |
| A5-14-04 | 4.0 | 07-14-04 | Vibration and Illumination |
| A5-14-05 | 4.0 | 07-14-05 | Vibration/Tilt |
| A5-14-05 | 4.0 | 07-14-05 | Supply voltage monitor |
| A5-14-05 | 5.3 | 07-14-05 | Chair Occupancy Solar Sensor |
| A5-14-06 | 4.0 | 07-14-06 | Vibration/Tilt |
| A5-14-06 | 4.0 | 07-14-06 | Illumination and Supply voltage monitor |
| A5-14-07 | 5.0 | 07-14-07 | Dual door contact with States (Open/Closed/Locked/Unlocked) |
| A5-14-07 | 5.0 | 07-14-07 | Supply voltage monitor |
| A5-14-08 | 5.0 | 07-14-08 | Dual door contact with States (Open/Closed/Locked/Unlocked) |
| A5-14-08 | 5.0 | 07-14-08 | Supply voltage monitor and Vibration detection |
| A5-14-09 | 5.0 | 07-14-09 | Window/Door Sensor with States (Open/Closed/Tilt) |
| A5-14-09 | 5.0 | 07-14-09 | Supply voltage monitor |
| A5-14-0A | 5.0 | 07-14-0A | Window/Door Sensor with States (Open/Closed/Tilt) |
| A5-14-0A | 5.0 | 07-14-0A | Supply voltage monitor and Vibration detection |
| A5-20-01 | 5.3 | 07-14-01 | Heating Valve Controller |
| A5-20-06 | 5.5 | 07-20-06 | Heating Valve Controller |
| A5-30-01 | 4.0 | 07-30-01 | Single Input Contact |
| A5-30-01 | 4.0 | 07-30-01 | Battery Monitor |
| A5-30-02 | 4.0 | 07-30-02 | Single Input Contact |
| A5-30-03 | 4.0 | 07-30-03 | 4 Digital Inputs |
| A5-30-03 | 4.0 | 07-30-03 | Wake and Temperature |
| A5-30-04 | 4.0 | 07-30-04 | 3 Digital Inputs |
| A5-30-04 | 4.0 | 07-30-04 | 1 Digital Input 8 Bits |
| A5-37-01 | 4.0 | 07-37-01 | Demand Response |
| A5-38-08 | 4.0 | 07-38-08 | Gateway |
| A5-38-09 | 4.0 | 07-38-09 | Extended Lighting-Control |
| D2-14-30 | 6.0 | | Sensor for Smoke, Air quality, Hygrothermal comfort, Temperature and Humidity |
| D2-14-41 | 6.4 | | Sensor for Humidity, Illumination, Temperature, Dissolved oxegen, Contact, Acceleration |
| D2-15-00 | 5.4 | | People Activity Counter |
| D2-32-00 | 4.3 | | A.C. Current Clamp |
| D2-32-00 | 5.3 | | Single Channel CT Clamp |
| D2-32-01 | 4.3 | | A.C. Current Clamp |
| D2-32-02 | 4.3 | | A.C. Current Clamp |
| D5-00-01 | 4.0 | 06-00-01 | Single Input Contact |
| D5-00-01 | 5.3 | 06-00-01 | Magnet Contact |
| F6-01-01 | 5.5 | 05-01-01 | Push Button |
| F6-02-01 | 4.0 | 05-02-01 | Light and Blind Control - Application Style 1 |
| F6-02-02 | 4.0 | 05-02-02 | Light and Blind Control - Application Style 2 |
| F6-02-03 | 4.0 | 05-02-03 | Light Control - Application Style 1 |
| F6-02-04 | 4.0 | 05-02-04 | Light and blind control ERP2 |
| F6-03-01 | 4.0 | 05-03-01 | Light and Blind Control - Application Style 1 |
| F6-03-02 | 4.0 | 05-03-02 | Light and Blind Control - Application Style 2 |
| F6-04-01 | 4.0 | 05-04-01 | Key Card Activated Switch |
| F6-04-02 | 4.0 | 05-04-02 | Key Card Activated Switch ERP2 |
| F6-05-00 | 5.0 | 05-05-00 | Wind Speed Threshold Detector |
| F6-05-01 | 4.0 | 05-05-01 | Liquid Leakage Sensor (mechanic harvester) |
| F6-05-02 | 5.0 | 05-05-02 | Smoke Detector |
| F6-10-00 | 4.1 | 05-10-00 | Window Contact Sensor |
| F6-10-01 | 5.5 | 05-10-01 | Window Handle ERP2 |
---
# FHZ1X00PC
> Symcon documentation · English · generated on 2026-09-26
> Index: https://www.symcon.de/en/llms.txt
Source: https://www.symcon.de/en/service/documentation/module-reference/devices/fhz1x00pc/
The FHZ1X00PC (WLAN) is an interface developed by Contronics and sold by ELV that allows the end user to communicate with FS20, HMS and FHT components via PC. From the FHZ1300PC also the combined weather sensor KS300 is supported. The FHZ1350PC is only on Contronics available and provides the ability to access the dialer of the ELV. This feature is not supported by IP-Symcon.
The FS20 system provides an affordable entry into the building technology and automation. Parts of it are also sold under other labels (e.g. Conrad) - but are 100 percent compatible.
### List of supported devices
__FS20 sender and receiver__
All FS20 sender and receiver
__HMS sensors and actuators__
All HMS alarm sensors and actuators
__FHT components__
FHT80B/FHT80B2 (FHT8 is not compatible!)
### Installation
* Once you have connected the device to your PC, you must install the drivers. If you have installed this, you can download it on our website: [Download Drivers](https://www.symcon.de/en/downloads/)
### Tips & Tricks
* The FHZ is compatible with all USB-> LAN converters. (e.g. Silex, Lantronix)
* Information to the change to LAN or to extend the range, see in the forum.
* The FHZ1300PC WLAN is not officially supported in IP-Symcon. In order to use it in IP-Symcon, the encryption algorithm must be disabled.
The necessary steps you can read here:
[http://www.thinkwiki.org/wiki/User:Akw/FHZ](http://www.thinkwiki.org/wiki/User:Akw/FHZ)
### Problem solving
The configuration says: "A parent configuration seems to be broken"
* Click on the messages and activate the correct driver.
No data is being transmitted/ received
* Verify that the FHZ is connected to your system. (Hardware Manager)
* Verify that by sending/ receiving the red LED flashes on the FHZ.
* If not, the FHZ has no power or has not been configured in the system. Check whether the FTDI driver has been activated properly. (see above)
Devices are connected only sporadically (FS20)
* Is the unit too far away?
* Try to place the FHZ somewhere else or expand your system by another FHZ.
* Is there jammer nearby?
## FHT
Source: https://www.symcon.de/en/service/documentation/module-reference/devices/fhz1x00pc/fht/
The radio heating system FHT is ideally suited to save energy through intelligent control of the heating valves and to create a comfortable indoor climate at different times.
> **Note:** Only FHT8b/FHT80b can be connected to the FHZ1000PC Professional, FHZ1300PC or FHZ1300PC WLAN. The much cheaper FHT8R are only suitable for single-mode and can not be connected to the FHZ.
> **Warning:** Weekly and daily programs can/ are not be transferred to the FHT with IP Symcon. This feature has been requested many a time, but it will definitely __not__ given.
> Link: [Feature-Request](https://community.symcon.de/c/funktionswuensche/45)
### Configuration
* Register FHT at FHZ:
* Press the key "PROG" until "Sond" is displayed.
* Turn the wheel until "Code" appears, then press the "Function" button.
* Now you have the opportunity to select a code from a pair of numbers (00-99).
* Confirm by pressing the "PROG" button.
* Press the "PROG" button again.
* Set FHT in IPSymcon:
* Create FHT instance. See integrate devices
* Enter the code in the property page and click the "Apply" button.
__If the room controller was probably already registered to a central station, this application must be deleted.__
* Press the key "PROG" until "Sond" is displayed.
* Turn the wheel until "Cent" appears, then press the "PROG" button.
* Turn the wheel until "nA" appears und press “PROG”.
* Wait about 15 minutes for safety until the logout process has been completed.
* Perform the described registration process.
> **Note:** With the option "Emulate status" the value of the target variable is updated immediately after sending the command without waiting for the actual feedback from the FHT.
> **Warning:** __After the registration process must be at least one command (e.g. set target temperature) be sent to the FHT to start the communication.__
### Available status variables
| Status | Description |
| ---------------------------- | ------------------------------------------------------------------------------------------------------------------------------------------------------------ |
| LowBattery | Indicates whether the FHT displays a low battery warning. If the value is TRUE, you should change the battery and then manually reset the value to FALSE. |
| Window Open | Indicates whether the window contact which is connected to the FHT reports an open window. TRUE = window open, FALSE = window closed |
| Position | Value of the control valve from 0 to 100% |
| Temperature | Actual temperature received from the FHT |
| Target Mode | Received mode from the FHT |
| Beim Auslesen | The integer variable uses the following values: 0: Automatic, 1: Manual; 2: Vacation; 3: Party |
| Target Mode (Pending) | The mode sent to the FHT. Once the radio command could be discontinued, "Target Mode" and "Target Mode (Pending)" are identical. |
| Target Temperature | Target temperature received from the FHT |
| Target Temperature (Pending) | The target temperature sent to the FHT. Once the radio command could be discontinued, are "Target Temperature" and "Target Temperature (Pending)" identical. |
## FHT_SetMode
Source: https://www.symcon.de/en/service/documentation/module-reference/devices/fhz1x00pc/fht/fht-setmode/
`bool FHT_SetMode(int $InstanceID, float $Mode)`
**Parameters**
- `$InstanceID` (int): ID of the device to be switched
- `$Mode` (float): __0__ = Automatic, __1__ = Manual
**Returns** (bool): If the command succeeds, it returns __TRUE__, otherwise __FALSE__.
__0__ = Automatic, __1__ = Manual
**Example**
```php
FHT_SetMode(12345, 1); //Switch to manual mode
```
## FHT_SetTemperature
Source: https://www.symcon.de/en/service/documentation/module-reference/devices/fhz1x00pc/fht/fht-settemperature/
`bool FHT_SetTemperature(int $InstanceID, float $Temperature)`
**Parameters**
- `$InstanceID` (int): ID of the device to be switched
- `$Temperature` (float): Temperature value in 0.5 ° C increments
**Returns** (bool): If the command succeeds, it returns __TRUE__, otherwise __FALSE__.
Temperature value in 0.5 ° C increments
**Example**
```php
FHT_SetTemperature(12345, 22.5); //Set to 22.5 ° C
```
## FS20
Source: https://www.symcon.de/en/service/documentation/module-reference/devices/fhz1x00pc/fs20/
When creating the instance you have three choices for the FS20 system:
| InstanceName | Purpose |
| ------------------- | ------------------------------------------------------- |
| FS20 Receiver | Sockets, dimmers, canopy control, … |
| FS20 Sender | Motion sensor, … |
| FS20 Remote control | Multi-channel remote controls, push-button, transmitter |
If you have not set up your device, please follow the steps on this page: [embed devices](https://www.symcon.de/en/llms/concepts.md)
### FS20 receiver / configurate sender

1. You can enter and take over the house code manually. Possible characters: 1-4
2. You can receive the house code from another transmitter (e.g. a remote control).
3. You can check if the address is already in use by another instance.
4. When activated, the instance receives data from FS20 transmitters and updated accordingly, the state variable.
5. When activated, the instance receives data from FS20 transmitters, evaluates the timer data and emulates the state of the timer (e.g. ON for 30sec).
6. Once the new settings have been applied, you can test it by sending on / off telegrams. When transmitting the value in the duration field is rounded to the nearest possible time that can evaluate the FS20 system.
7. Once the new settings have been applied, you can teach one FS20 receiver (eg switch socket). You must put this in the "learning mode" and program it within the next 15 seconds by pressing the teach button.
### FS20 configurate remote control

1. You must enter the house code by hand before you can continue the configuration. Possible characters: 1-4
2. The list shows already learned buttons of the remote control.
3. If you know the address, you can enter it manually. Possible characters: 1-4
4. If you do not know the address, you can receive it from your remote control. Please note that you must have entered the house code and that it must be saved via the "Apply" button.
### Available status variables
| Variable | Function |
| ------------------ | ------------------------------------------------------------------------------------------------------------------------------------------------------------------------------------------------ |
| Status Variable | Displays the status of the device |
| Intensity Variable | Shows the dim value of the device in %. Note that the values 0-16 are used internal, if you load in the variable in your scripts. |
| Timer Variable | The time, in seconds, the timer runs. Point 5 must be enabled in the configuration, so this variable is evaluated by IP Symcon. (It appears the total received time - not the time to maturity.) |
| Data Variable | Displays the internal received status code. |
__Available status codes:__
```php
0-16 => 0% – 100%
17 => on, old value (corresponds to value 11 at PIRI)
18 => swap
19 => dim up (Simple channel number)
20 => dim down (Simple channel number)
21 => dim up/down (Double number of channels)
24 => PIRI; off for the ON duration, afterwards on
25 => PIRI; on, 100% for the ON duration, afterwards off
26 => PIRI; on, old value for the ON duration, afterwards off
30 => PIRI; on, 100% for the ON duration, afterwards old state
31 => PIRI; on, afterwards old state for the ON duration
```
## FS20_DimDown
Source: https://www.symcon.de/en/service/documentation/module-reference/devices/fhz1x00pc/fs20/fs20-dimdown/
`bool FS20_DimDown(int $InstanceID)`
**Parameters**
- `$InstanceID` (int): ID of the device to be switched
**Returns** (bool): If the command succeeds, it returns __TRUE__, otherwise __FALSE__.
ID of the device to be switched
**Example**
```php
FS20_DimDown(12345); //Dimming the device down
```
## FS20_DimUp
Source: https://www.symcon.de/en/service/documentation/module-reference/devices/fhz1x00pc/fs20/fs20-dimup/
`bool FS20_DimUp(int $InstanceID)`
**Parameters**
- `$InstanceID` (int): ID of the device to be switched
**Returns** (bool): If the command succeeds, it returns __TRUE__, otherwise __FALSE__.
ID of the device to be switched
**Example**
```php
FS20_DimUp(12345); //Dimming the device up
```
## FS20_SetIntensity
Source: https://www.symcon.de/en/service/documentation/module-reference/devices/fhz1x00pc/fs20/fs20-setintensity/
`bool FS20_SetIntensity(int $InstanceID, int $Intensity, int $Duration)`
**Parameters**
- `$InstanceID` (int): ID of the device to be switched
- `$Intensity` (int): 0-16 (0=0%, 16=100%)
- `$Duration` (int): Duration of the dimming
**Returns** (bool): If the command succeeds, it returns __TRUE__, otherwise __FALSE__.
Duration of the dimming
**Example**
```php
FS20_SetIntensity(12345, 16, 5); //Dimming device to 100% in 5 seconds
```
## FS20_SwitchDuration
Source: https://www.symcon.de/en/service/documentation/module-reference/devices/fhz1x00pc/fs20/fs20-switchduration/
`bool FS20_SwitchDuration(int $InstanceID, bool $Status, int $Duration)`
**Parameters**
- `$InstanceID` (int): ID of the device to be switched
- `$Status` (bool): __TRUE__ for On, __FALSE__ for Off
- `$Duration` (int): On/ Off duration in seconds
**Returns** (bool): If the command succeeds, it returns __TRUE__, otherwise __FALSE__.
On/ Off duration in seconds
**Example**
```php
FS20_SwitchDuration(12345, true, 60); //Turn on device for 60 seconds
```
## FS20_SwitchMode
Source: https://www.symcon.de/en/service/documentation/module-reference/devices/fhz1x00pc/fs20/fs20-switchmode/
`bool FS20_SwitchMode(int $InstanceID, bool $Status)`
**Parameters**
- `$InstanceID` (int): ID of the device to be switched
- `$Status` (bool): __TRUE__ for On, __FALSE__ for Off
**Returns** (bool): If the command succeeds, it returns __TRUE__, otherwise __FALSE__.
__TRUE__ for On, __FALSE__ for Off
**Example**
```php
FS20_SwitchMode(12345, true); //Turn on device
```
## Device list
Source: https://www.symcon.de/en/service/documentation/module-reference/devices/fhz1x00pc/device-list/
### List of supported devices
__FS20 transmitter and receiver__
All FS20 transmitters and receivers
__HMS sensors and actuators__
All HMS-Alaram sensors and actuators
__FHT components__
FHT80B/FHT80B2 (FHT8 is not compatible!)
## HMS
Source: https://www.symcon.de/en/service/documentation/module-reference/devices/fhz1x00pc/hms/
### Setup in IP-Symcon
An HMS instance must be added ([Integrate devices](https://www.symcon.de/en/llms/concepts.md)). The type can still be changed later on the configuration page.

After "Searching" the device must be selected. A device instance with the appropriate variables is automatically created.
Here using the example of an HMS100 TF.

## HMS_ReleaseFI
Source: https://www.symcon.de/en/service/documentation/module-reference/devices/fhz1x00pc/hms/hms-releasefi/
`bool HMS_ReleaseFI(int $InstanceID, int $TriggerDelay)`
**Parameters**
- `$InstanceID` (int): ID of the device to be switched
- `$TriggerDelay` (int): Delay in seconds
**Returns** (bool): If the command succeeds, it returns __TRUE__, otherwise __FALSE__.
Delay in seconds
**Example**
```php
FS20_ReleaseFI(12345, 0); //Trigger FI immediatly
```
## KS300
Source: https://www.symcon.de/en/service/documentation/module-reference/devices/fhz1x00pc/ks300/
### Installation
If you have not set up your device, please follow the steps on this page: [Integrate devices](https://www.symcon.de/en/service/documentation/basics/instances/)
### Tips & Tricks
It is known that the FHZ1300PC from KS300 receives only irregularly.
A discussion can be traced in the forum. [Link](https://community.symcon.de/t/regenerfassung-mit-ks300/15552)
---
# FS10 Weather
> Symcon documentation · English · generated on 2026-09-26
> Index: https://www.symcon.de/en/llms.txt
Source: https://www.symcon.de/en/service/documentation/module-reference/devices/fs10-weather/
The __FS10 radio system__ is the predecessor system of the FS20 and operates in the 433 MHz range.
All devices are no longer available in the free trade.
The internal coding allows up to 392 code combinations. To evaluate the components of the FS10 weather WS2000er series with IP-Symcon, the PC weather sensor from ELV is needed. This is simply connected to the serial port and therefore can existing weather components be integrated easily in the building management system. To increase the quality of reception, the installation of Superhet receiver is recommended.
### Installation
For the weather receiver no special installation is required. Only a connection to the serial port is necessary.
### Configuration
> **Note:** Before you start searching, you still need to configure the parent instance by specifying the correct com port and apply the configuration. The Setting of the baud rate ect. is not necessary, because it is being made by the system automatically.
> **Warning:** The search dialog shows a device only when data has been received. With a remote control, you can press the button to display a broadcast transmission. With a temperature sensor, you should wait for the next interval or specify the ID manually.
Once you specify an ID, you must apply the configuration. Thus also the corresponding state variables are created automatically.
---
# GARDENA smart system
> Symcon documentation · English · generated on 2026-09-26
> Index: https://www.symcon.de/en/llms.txt
Source: https://www.symcon.de/en/service/documentation/module-reference/devices/gardena-smart-system/
_Requires Symcon >= 6.0_
### Description
The GARDENA module enables supported devices from GARDENA smart system to be integrated into IP-Symcon.
### Integration in IP-Symcon
> **Note:** The use of the GARDENA module requires an activated connection to the [Connect service](https://www.symcon.de/en/llms/modules/connect-control.md) which, in turn, requires an active subscription.
#### Create GARDENA Configurator Instance
In order for the GARDENA module to be used, it must first be installed via the [Module Store](https://www.symcon.de/en/llms/components/management-console.md). The [Module Store](https://www.symcon.de/en/llms/components/management-console.md) must be opened for this. It is located in the upper right area. The Gardena smart system module can be found via the search field by entering "Gardena smart system". When opening the found module, the installation of the module can be initiated in the following dialog via the "Install" button.


The add dialog for creating a Gardena configurator instance then opens.
If the instance is to be added manually, an [Instance](https://www.symcon.de/en/llms/concepts.md) must be created by the Gardena configurator. To do this, the object tree must first be opened. Here, the "+" button at the bottom right must be pressed and [Instance](https://www.symcon.de/en/llms/concepts.md) selected.

The "Gardena Configurator" from the manufacturer "Gardena" can be found using the quick search. The location should not be changed, the name can be chosen freely. Finally, confirm with "OK".

After the configurator instance has been created, it automatically opens and can be set up.
#### Set up GARDENA configurator-instance
Before devices can be created, they must be registered by clicking on Register in order to connect IP-Symcon to the Husqvarna Group account.

One has to log in with the Husqvarna Group account in order to grant IP-Symcon the necessary authorizations.


The "Configure Interface" dialog can then be confirmed with Next. Now the created WebSocket Client has to be activated.

Now the configurator opens and all recognized devices can be created with a click on "Create".

### Troubleshooting
#### Variables are no longer updated
The connection to the Husqvarna service can be re-established in the Gardena Cloud instance by clicking on 'Reset WebSocket'.
### Supported Devices
* [smart Irrigation Control](https://www.symcon.de/en/llms/modules/gardena-smart-system.md)
* [smart Water Control](https://www.symcon.de/en/llms/modules/gardena-smart-system.md)
* [smart Pump](https://www.symcon.de/en/llms/modules/gardena-smart-system.md)
* [smart Sensor](https://www.symcon.de/en/llms/modules/gardena-smart-system.md)
* [smart Mower](https://www.symcon.de/en/llms/modules/gardena-smart-system.md)
* [smart Power Socket](https://www.symcon.de/en/llms/modules/gardena-smart-system.md)
## smart Irrigation Control
Source: https://www.symcon.de/en/service/documentation/module-reference/devices/gardena-smart-system/smart-irrigation-control/
_Requires Symcon >= 6.0_
> **Note:** Since the Gardena API does not transmit the schedules created in the app, irrigation plans can be implemented using the [weekly schedule](https://www.symcon.de/en/llms/concepts.md) and the actions provided.
### Description
The smart irrigation control device offers various services in IP-Symcon which, for example, make it possible to identify the status of the device or switch the various valves.
### Services
An instance can be created for each service using the configurator.
In the instance configuration, the 'Show last transmitted' switch can be activated to create a variable for each value, if available, that contains the time of the last data transfer.
| Service | Description |
| ------------------------------------- | -------------------------------------------------------- |
| General | Contains general information about the device |
| Valve | Represents one of the 6 valves of the irrigation control |
| Main valve | The main valve with which all valves can be closed |
#### General
The following state variables are created for this instance
| Variable | Type | Description |
| -------------- | ------- | ------------------------------------------------------------------------ |
| Battery status | String | The status of the device's battery (This device does not have a battery) |
| RF Link Level | Integer | The quality of the wireless connection in percent |
| RF Link Status | String | The status of the device's wireless connection |
#### Valve
The following state variables are created for this instance
| Variable | Type | Description |
| ------------- | ------- | --------------------------------------------------------------------- |
| Activity | String | The current activity of the device |
| Remaining | Integer | The time remaining in seconds until the valve is closed |
| Error code | String | The last error transmitted |
| Status | String | The current state of the device |
| Open duration | Integer | The duration for which the valve is to be opened manually |
| Action | String | Allows the valve to be opened or closed for a specific opening period |
The following actions are available for this instance
| Action | Parameters | Description |
| ----------- | ------------------ | ---------------------------------------------------------- |
| Open valve | Duration (minutes) | Allows the valve to be opened for a certain period of time |
| Close valve | (none) | Allows the valve to close |
#### Main Valve
The following state variables are created for this instance
| Name | Type | Description |
| ---------- | ------ | ------------------------------- |
| Error code | String | The last error transmitted |
| Status | String | The current state of the device |
| Action | String | Closes all valves |
The following actions are available for this instance
| Action | Parameters | Description |
| ---------------- | ---------- | ------------------------------ |
| Close main valve | (none) | Allows the main valve to close |
## smart SILENO Mower
Source: https://www.symcon.de/en/service/documentation/module-reference/devices/gardena-smart-system/smart-mower/
_Requires Symcon >= 6.0_
### Description
The smart SILENO Mower offers various services in IP-Symcon, which make it possible, for example, to recognize the current activity of the device or to start or stop the mowing process.
### Services
For each service, an instance can be created with the configurator.
In the instance configuration, the 'Show last transmitted' switch can be activated to create a variable for each value, if available, that contains the time of the last data transfer.
| Service | Description |
| ------------------------------- | --------------------------------------------- |
| General | Contains general information about the device |
| Mower | Represents the SILENO mower |
#### General
The following status variables are created for this instance
| Variable | Type | Description |
| -------------- | ------- | --------------------------------------------------- |
| Battery status | String | The status of the device's battery |
| RF Link Level | Integer | The quality of the wireless connection in percent |
| RF Link Status | String | The status of the wireless connection of the device |
#### Mower
The following status variables are created for this instance
| Variable | Type | Description |
| ---------------- | ------- | ----------------------------------------------------------------------------- |
| Activity | String | The current activity of the device |
| Operating hours | Integer | The time the mower has been active for, in hours |
| Error code | String | The last error transmitted |
| Status | String | The current state of the device |
| Cutting duration | Integer | The time in minutes for manual mowing |
| Mowing | String | Allows the mower to mow for a specific mowing time or according to a schedule |
| Parking | String | Allows the mower to drive to the charging station |
The following actions are available for this instance
| Action | Parameters | Description |
| ------------------------------- | ------------------ | ------------------------------------------------------------------------ |
| Automatic mowing | (none) | Makes the mower mow on schedule |
| Manual mowing | Duration (minutes) | Makes the mower mow for the specified time |
| Park until the next task | (none) | Makes the mower drive to the charging station and wait for the next task |
| Parking and ignore the schedule | (none) | Makes the mower drive to the charging station and ignore the schedule |
## smart Power Socket
Source: https://www.symcon.de/en/service/documentation/module-reference/devices/gardena-smart-system/smart-power-socket/
_Requires Symcon >= 6.0_
### Description
The smart Power Socket offers various services in IP-Symcon, which make it possible, for example, to recognize the status of the device or to switch the adapter.
### Services
For each service an instance can be created with the configurator.
In the instance configuration, the 'Show last transmitted' switch can be activated to create a variable for each value, if available, that contains the time of the last data transfer.
| Service | Description |
| ----------------------------------------- | ------------------------------------------------ |
| General | Contains general information about the device |
| Power socket | Represents the power socket that can be switched |
#### General
The following status variables are created for this instance
| Variable | Type | Description |
| -------------- | ------- | ------------------------------------------------------------------------ |
| Battery status | String | The status of the device's battery (This device does not have a battery) |
| RF Link Level | Integer | The quality of the wireless connection in percent |
| RF Link Status | String | The status of the wireless connection of the device |
#### Power Socket
The following status variables are created for this instance
| Variable | Type | Description |
| ----------------- | ------- | --------------------------------------------------------------- |
| Activity | String | The current activity of the device |
| Remaining | Integer | The remaining time in seconds until the socket is switched off |
| Error code | String | The last error transmitted |
| Status | String | The current state of the device |
| Activity duration | Integer | The duration for which the socket is to be switched on manually |
| Action | String | The action which should be carried out |
The following actions are available for this instance
| Action | Parameters | Description |
| -------------------------------------- | ------------------ | --------------------------------------------------------------- |
| Switch on the socket | Duration (minutes) | Enables the power socket to be switched on for a defined period |
| Switch on the power socket permanently | (none) | Allows the socket to be switched on permanently |
| Switch off the socket | (none) | Allows the socket to be switched off |
## smart Pressure Pump
Source: https://www.symcon.de/en/service/documentation/module-reference/devices/gardena-smart-system/smart-pump/
_Requires Symcon >= 6.0_
### Description
The smart Pump offers various services in IP-Symcon which, for example, enable the status of the device to be recognized or the valve to be switched.
### Services
An instance can be created for each service with the configurator.
In the instance configuration, the 'Show last transmitted' switch can be activated to create a variable for each value, if available, that contains the time of the last data transfer.
| Service | Description |
| ------------------------------------- | -------------------------------------------------- |
| General | Contains general information about the device |
| Valve | Represents the valve of the pump |
| Main valve | The main valve with which all valves can be closed |
#### General
The following status variables are created for this instance
| Variable | Type | Description |
| -------------- | ------- | ------------------------------------------------- |
| Battery status | String | The status of the device's battery |
| RF Link Level | Integer | The quality of the wireless connection in percent |
| RF Link Status | String | The status of the device's wireless connection |
#### Valve
The following status variables are created for this instance
| Variable | Type | Description |
| ------------- | ------- | --------------------------------------------------------------------- |
| Activity | String | The current activity of the device |
| Remaining | Integer | The time remaining in seconds until the valve is closed |
| Error code | String | The last error transmitted |
| Status | String | The current state of the device |
| Open duration | Integer | The duration for which the valve is to be opened manually |
| Action | String | Allows the valve to be opened or closed for a specific opening period |
The following actions are available for this instance
| Action | Parameters | Description |
| ----------- | ------------------ | ---------------------------------------------------------- |
| Open valve | Duration (minutes) | Allows the valve to be opened for a certain period of time |
| Close valve | (none) | Allows the valve to close |
#### Main Valve
The following status variables are created for this instance
| Name | Type | Description |
| ---------- | ------ | ------------------------------- |
| Error code | String | The last error transmitted |
| Status | String | The current state of the device |
| Action | String | Closes all valves |
The following actions are available for this instance
| Action | Parameters | Description |
| ---------------- | ---------- | ------------------------------ |
| Close main valve | (none) | Allows the main valve to close |
## smart Sensor
Source: https://www.symcon.de/en/service/documentation/module-reference/devices/gardena-smart-system/smart-sensor/
_Requires Symcon >= 6.0_
### Description
The smart sensor offers various services in IP-Symcon which, for example, make it possible to read out the different values of the sensors, such as soil moisture or light intensity.
### Services
An instance can be created for each service with the configurator.
In the instance configuration, the 'Show last transmitted' switch can be activated to create a variable for each value, if available, that contains the time of the last data transfer.
| Service | Description |
| ------------------------------- | --------------------------------------------- |
| General | Contains general information about the device |
| Sensor | Represents the values of the sensor |
#### General
The following status variables are created for this instance
| Variable | Type | Description |
| -------------- | ------- | --------------------------------------------------- |
| Battery status | String | The status of the device's battery |
| RF Link Level | Integer | The quality of the wireless connection in percent |
| RF Link Status | String | The status of the wireless connection of the device |
#### Sensor
The following status variables are created for this instance
| Variable | Type | Description |
| ------------------- | ------- | ---------------------------------------------------- |
| Soil humidity | Integer | The soil moisture measured by the sensor in percent |
| Soil temperature | Float | The soil temperature measured by the sensor in °C |
| Light intensity | Float | The illuminance measured by the sensor in lux |
| Ambient temperature | Float | The ambient temperature measured by the sensor in °C |
## smart Water Control
Source: https://www.symcon.de/en/service/documentation/module-reference/devices/gardena-smart-system/smart-water-control/
_Requires Symcon >= 6.0_
### Description
The smart Water Control offers various services in IP-Symcon, which make it possible, for example, to recognize the status of the device or to switch the valve.
### Services
An instance can be created for each service with the configurator.
In the instance configuration, the 'Show last transmitted' switch can be activated to create a variable for each value, if available, that contains the time of the last data transfer.
| Service | Description |
| ------------------------------------- | -------------------------------------------------- |
| General | Contains general information about the device |
| Valve | Represents the valve of the irrigation control |
| Main valve | The main valve with which all valves can be closed |
#### General
The following status variables are created for this instance
| Variable | Type | Description |
| -------------- | ------- | ------------------------------------------------- |
| Battery status | String | The status of the device's battery |
| RF Link Level | Integer | The quality of the wireless connection in percent |
| RF Link Status | String | The status of the device's wireless connection |
#### Valve
The following status variables are created for this instance
| Variable | Type | Description |
| ------------- | ------- | --------------------------------------------------------------------- |
| Activity | String | The current activity of the device |
| Remaining | Integer | The time remaining in seconds until the valve is closed |
| Error code | String | The last error transmitted |
| Status | String | The current state of the device |
| Open duration | Integer | The duration for which the valve is to be opened manually |
| Action | String | Allows the valve to be opened or closed for a specific opening period |
The following actions are available for this instance
| Action | Parameters | Description |
| ----------- | ------------------ | ---------------------------------------------------------- |
| Open valve | Duration (minutes) | Allows the valve to be opened for a certain period of time |
| Close valve | (none) | Allows the valve to close |
#### Main Valve
The following status variables are created for this instance
| Name | Type | Description |
| ---------- | ------ | ------------------------------- |
| Error code | String | The last error transmitted |
| Status | String | The current state of the device |
| Action | String | Closes all valves |
The following actions are available for this instance
| Action | Parameters | Description |
| ---------------- | ---------- | ------------------------------ |
| Close main valve | (none) | Allows the main valve to close |
---
# Geofency
> Symcon documentation · English · generated on 2026-09-26
> Index: https://www.symcon.de/en/llms.txt
Source: https://www.symcon.de/en/service/documentation/module-reference/devices/geofency/
_Requires Symcon >= 4.2_
The module is used to receive Geofency data.
### functional scope
- Each device has its own location list
- Username and password identification within IP-Symcon.
- Automatically sets up the webhook "/hook/geofency".
- It is recommended to use this in combination with the Connect module.
- Optionally, the current location of Geofency can be transmitted
### requirements
- Geofency App for Apple iOS
### software installation
Via the [Module Store](https://www.symcon.de/en/service/documentation/components/management-console/module-store/) install the Geofency module.
### Geofency Configuration
In the Geofency app, use + to add a new location. Then click on the 3 dots on the right to open the menu. Here you have to select Webhook.
#### Event

The URL is the domain where IP-Symcon can be reached followed by /hook/geofency
The easiest way is to enter the IP-Symcon Connect address followed by /hook/geofency
Optionally you can activate Send current position.
#### POST Format
Setting remains on default, JSON-encoded is disabled and not selected
#### authentication
| Name | HTTP Basic Authentication |
| -------- | ------------------------------------------------------ |
| Username | The Webhook username which will be stored in IP-Symcon |
| Password | The Webhook password which will be stored in IP-Symcon |
### setting up the instances in IP-Symcon
- Under "Add Instance" the 'Geofency' module can be found using the quick filter.
- More information about adding instances in the [Instances documentation](https://www.symcon.de/en/service/documentation/basics/instances/)
#### Configuration Page:
| Name | Description |
| -------- | ------------------------------------------------------------------------------- |
| Username | Username which must be specified in the Geofency App to send data to IP-Symcon. |
| Password | Password, which must be specified in the Geofency App. |
if this data is left empty, anyone can send data to IP-Symcon via the hook
### statusvariables
The status variables/categories are created automatically. Deleting individual ones can lead to malfunctions.
#### Statusvariables
The variables are created automatically based on the device ID and when they are sent for the first time within the Geofency module. Multiple devices can run through one hook. Each device is set up under its own "category".
| Name | Type | Description |
| ------------------------- | ---------------- | ------------------------------------------------------------------------------------------------------------------------------------------------------------------------------------- |
| Device Name | Instance (Dummy) | Serves as a "category" containing all monitored locations, as well as the timestamp and longitude/latitude. Created per device. |
| Latitude | Float | Latitude (center of geofences) of the last activity |
| Longitude | Float | Longitude (center of geofences) of the last activity |
| CurrentLatitude | Float | Proximity coordinates, i.e. the current coordinates at entry or exit (outer perimeter of the geofences), if "Send current position" was selected in the app at the webhook |
| CurrentLongitude | Float | Proximity coordinates, i.e. the current coordinates at entry or exit (outer perimeter of the geofence) if "Send current position" was selected in the app at the webhook |
| Direction | Integer | Azimuth angle (direction in degrees) of the current entry/exit point relative to the center of the geofence circle, if "Send current position" was selected in the app at the webhook |
| Distance | Float | Distance (in meters) of the current entry/exit point relative to the center of the geofence circle, if "Send current position" was selected in the app at the webhook |
| Orientation | Float | Cardinal direction (as name) of the current entry/exit point relative to the center of the geofence circle, if "Send current position" was selected in the app during the webhook |
| Timestamp | Integer | UnixTimestamp of the last activity. |
| Example Location (Office) | Boolean | Present or Absent. Information is supplied by Gefency. |
| current Longitude | Float | current Latitude |
| current Latitude | Float | current Longitude |
| Motion | Integer | current motion state like walking, driving etc. |
| WifiBSSD | String | BSSID of the connected WLAN |
| WifiSSID | String | SSID of the connected WLAN |
Example:

---
# Heating Control
> Symcon documentation · English · generated on 2026-09-26
> Index: https://www.symcon.de/en/llms.txt
Source: https://www.symcon.de/en/service/documentation/module-reference/devices/heating-control/
### Description
The heating module is used to control temperatures in living spaces.
It is based on a simple but effective 2-point controller.
This compares the target value with the actual value and switches an actuator on or off.
For each exceeding or falling below of the set temperature, a single switching command is sent.
### Requirement
The actual value is obtained via respective temperature sensors. The value must be known of IP-Symcon as a variable in. Furthermore, the heat source must be switchable via an actuator. Examples: Radiator with a thermal actuator or a heater and a radio socket.
### Configuration
Add the "Heating Control" module (manufacturer: None) and specify optionally a name such as 'Heating module living room':

| Variable | Description |
| ------------------------- | --------------------------------------------------------------------------------------------------------------------------------------------------------------------------------------------------------------------------------------------------------------------------------------------------------------------------- |
| Source Variable: | Here you can select the variable that contains the actual value. |
| Hysteresis: | Temperature difference between the switch-on and switch-off, for example: T-Target = 20.0 degrees and hysteresis = 0.4, the actuator is switched on when dropping below 19.8 degrees and stopped when exceeding 20.2 degrees. A hysteresis of 0 causes a "toggling" of the actuator at each update of the actual variables. |
| Reduction: | Temperature in °C, by which is to be lowered, if one or more of the 'lowering variables' are TRUE. |
| Retransmission Instances: | Here the switching actuators should be entered. Thermal actuators, which are open at electroless, "Invert" must be activated. |
| Priority Variables: | Can be e.g. Status variables of window contacts. When true, the output of the regulator will remain off. |
| Retransmission Interval: | If a (radio) command is not handled correctly, it can be repeatedly cycled (no more frequently than 15 minutes). |
| Lowering Variables: | Can be e.g. Presence variables of movement and presence detectors. If no person is staying in a room, energy can be saved by a temperature decrease. |
| Expert Settings: | For special cases, a custom script can be selected. It is called for each switching operation of the controller. All necessary data is deposited in the 'System Variables'. |
| Test Center: | To check the function of the controller, a desired temperature can be entered. The actuator must then turn on or off as desired. |
| Status Variables | |
| Target Value: | Contains the target temperature |
| Override: | If True at least one priority variable is also true (OR operation), and the actuator is switched off. |
| Heating: | Reflects the output of the controller. Inverting the Retransmission instances has no effect on this variable. |
### Tips & Tricks
Use the lower function in order to save energy in unoccupied rooms.
Practical example:
A motion detector installed in the room provides for a few seconds in IP-Symcon a variable change to TRUE. The following script will be extended to this impulse for example for 15 minutes and writes the status in the variable 'presence' (please create it before!). If within the desired time no movement is detected in the room, the variable is set to FALSE.
It can now be added under the 'lowering variables'. However, also 'Invert' must be activated, because we want to lower the temperature in NOT-Presence. This must now be entered only under 'reduction': for example 2 °C.
An open window with his 'priority variable' also has precedence here and turns the heating off completely.
```php
$id_prae = 12345 /*[Präsenz]*/; // set!
if($_IPS['SENDER'] == "Variable"){
if($_IPS['VALUE'] == True){ //Start Timer
IPS_SetScriptTimer($_IPS['SELF'], 15 * 60);
$prae = GetValue($id_prae );
if($prae == False){
SetValue($id_prae, True);
}
}
}
if($_IPS['SENDER'] == "TimerEvent"){
IPS_SetScriptTimer($_IPS['SELF'], 0);
SetValue($id_prae , False);
}
```
### Further Links
Two-point controller: [https://de.wikipedia.org/wiki/Zweipunktregler](https://de.wikipedia.org/wiki/Zweipunktregler)
Hysteresis: [https://de.wikipedia.org/wiki/Hysterese](https://de.wikipedia.org/wiki/Hysterese)
> **Warning:** Since at any time the PC (control) can fail, in addition a temperature limit/ safety shutdown must be installed to prevent injury or damage.
## HC_TargetValue
Source: https://www.symcon.de/en/service/documentation/module-reference/devices/heating-control/hc-targetvalue/
`bool HC_TargetValue(int $InstanceID, float $TagetValue)`
**Parameters**
- `$InstanceID` (int): ID of the device to be switched
- `$TagetValue` (float): New target value
**Returns** (bool): If the command succeeds, it returns __TRUE__, otherwise __FALSE__.
New target value
**Example**
```php
HC_TargetValue(12345, 22.5); //At 22.5°C
```
---
# Home Connect
> Symcon documentation · English · generated on 2026-09-26
> Index: https://www.symcon.de/en/llms.txt
Source: https://www.symcon.de/en/service/documentation/module-reference/devices/home-connect/
_Requires Symcon >= 6.0_
### Description
The Home Connect module allows devices from Bosch, Siemens, Gaggenau and Neff, which support the Home Connect service, to be integrated into IP-Symcon.
### Integration in IP-Symcon
> **Note:** The use of the Home Connect-Module requires an activated connection to the [Connect service](https://www.symcon.de/en/llms/modules/connect-control.md), which in turn requires an active subscription.
#### Home Connect Configurator Create Instance
In order for the Home Connect module to be used, it must first be installed via the [Module Store](https://www.symcon.de/en/llms/components/management-console.md). To do this, the [Module Store](https://www.symcon.de/en/llms/components/management-console.md) must be opened. It is located in the upper right area. The Home Connect module can be found via the search field via “Home Connect”. When opening the found module, the installation of the module can be initiated in the following dialog via the "Install" button.


The add dialog for creating a Home Connect configurator instance then opens.
If the instance is to be added manually, an [Instance](https://www.symcon.de/en/llms/concepts.md) must be created by the Home Connect configurator. To do this, the object tree must first be opened. In this the "+" button at the bottom right must be pressed and [Instance](https://www.symcon.de/en/llms/concepts.md) selected.

With the help of the quick search, the “Home Connect Configurator” can be found by the manufacturer “(configurator)”. The location should not be changed, the name can be chosen freely. Finally, confirm with "OK".

After the configurator instance has been created, it automatically opens and can be set up.
#### Home Connect Setup Configurator Instance
Before devices can be created, one must register with a click on Register in order to connect IP-Symcon to the Home Connect account.
In the 'Language' field, one can select in which language the information about the devices is processed. The language you select here is not related to the language used in IP-Symcon.

One must log in with the Home Connect account to grant IP-Symcon the necessary permissions.


The “Configure Interface” dialog can then be confirmed with Next. The SSE client that was created must now be activated.

Now the configurator opens and all recognized devices can be created with a click on "Create".

## Device list
Source: https://www.symcon.de/en/service/documentation/module-reference/devices/home-connect/device-list/
### Supported Devices
The Home Connect service is provided by devices from Bosch, Siemens, Gaggenau and Neff.
| Device type |
| --------------- |
| Coffee machine |
| Oven |
| Dryer |
| Washing Machine |
| Dishwasher |
| Refrigerator |
| Freezer |
If a device is not in the list above, it can still be added to IP-Symcon. If problems arise during setup, our support team will be happy to help.
## Home Connect Device
Source: https://www.symcon.de/en/service/documentation/module-reference/devices/home-connect/home-connect-device/
_Requires Symcon >= 6.0_
### Description
When a device is created by the Home Connect configurator, a Home Connect device instance is created which has various status variables depending on the device type.
### Control by IP-Symcon
In order to be able to use the devices to the full extent, the remote start and/or remote control must be activated directly on the device. If only the remote control is active, programs and options can be changed, but the program cannot be started. While the device is being operated locally, it cannot be controlled by IP-Symcon.
### Status variables
Each device can have 4 different types of variables.
#### Status
Status type variables are variables that cannot be switched by IP-Symcon.
__Examples:__ Operating status, Local operation active
#### Setting
Variables of the setting type can usually be switched and are used to change various settings of the device.
__Examples:__ Temperature (refrigerator), Energy status
#### Program
Each device has only one variable of the type program. This variable can be used to determine which program is to be executed by the device.
> **Note:** If a program, that is available in the Home Connect app, is not displayed in IP-Symcon, then it is not supported by the API. If such a program is selected manually via the app or the device, then all setting options are grayed out
#### Options
When a program is selected, corresponding option variables are created that change the details for the selected program.
__Examples:__ Capacity (coffee machine), Duration (oven)
When a program has been selected and the available options have been set, the program can be started using the Control variable.
As soon as a program has been started, depending on the device, variables are created that provide information on the progress.
__Examples:__ Program progress, Remaining runtime
### Particularities
* When creating a device, it should be online and therefore switched on
* The refrigerator has no programs
### Troubleshooting
#### A device instance is not created correctly
All data of a device can be requested again in the device instance by clicking on the 'Initialize device' button.
#### Variables are not updated
Click on 'Register server events' to re-establish the connection to the Home Connect service.
---
# HomeMatic
> Symcon documentation · English · generated on 2026-09-26
> Index: https://www.symcon.de/en/llms.txt
Source: https://www.symcon.de/en/service/documentation/module-reference/devices/homematic/
Symcon supports integration via the HCU and via the CCU.
- [HomeMatic CCU](https://www.symcon.de/en/llms/modules/homematic.md)
- [HomeMatic HCU (Beta)](https://www.symcon.de/en/llms/modules/homematic.md)
## Device list
Source: https://www.symcon.de/en/service/documentation/module-reference/devices/homematic/device-list/
### Supported Gateways
| Gateway | Description |
| --------------------------- | ---------------------------------------------------- |
| CCU1 | Central for HomeMatic radio and wired components |
| CCU2 | Central for HomeMatic radio, wired and IP components |
| CCU3 | Central for HomeMatic radio, wired and IP components |
| HM-LAN (via BidCos service) | HomeMatic LAN adapter |
| HM-USB (via BidCos service) | HomeMatic USB adapter |
| HCU | Central for HomeMatic IP components |
### Supported Components
IP-Symcon supports all wired and wireless components.
## HomeMatic CCU
Source: https://www.symcon.de/en/service/documentation/module-reference/devices/homematic/homematic-ccu/
_Requires Symcon >= 4.1_
HomeMatic is a primarily radio-based system. A connection to IP-Symcon is established via LAN through the Central Control Unit (CCU). Alternatively, this also works with a "LAN configuration adapter".
> **Note:** The following devices are supported by IP-Symcon:
>
> [Supported devices](https://www.symcon.de/en/llms/modules/homematic.md)
### Installation
The HomeMatic devices are connected to IP-Symcon via CCU (LAN) or [BidCoS Service](https://www.symcon.de/en/llms/modules/homematic.md).
The instructions for setting up via BidCoS Service are located [here](https://www.symcon.de/en/llms/modules/homematic.md).
> **Note:** Advantages of the CCU:
>
> * HomeMatic Wired RS485 components are supported.
>
> * Programs can be executed in the CCU.
>
> * Status of the actuators can be queried via script.
#### HomeMatic Wired
HomeMatic Wired is a wired version of HomeMatic. Separate switching and dimming actuators as well as input and output modules are available for this purpose.
However, "HomeMatic Wired" is controlled by IP-Symcon in the same way as the radio-based components.
This can be enabled on the configuration page of the gateway.
#### HomeMatic IP
HomeMatic IP is the successor to HomeMatic and offers wireless and wired devices. HomeMatic IP is controlled by IP-Symcon in the same way as the original HomeMatic components. Parallel operation of HomeMatic and HomeMatic IP components is possible without any problems.
### Setup Video-Tutorial
[Video](https://www.youtube.com/embed/uDd-jdKm0CE?rel=0&cc_load_policy=1)
### Connection
The CCU is connected to the network by a network cable.
> **Warning:** The antenna of the CCU is used only for radio communication with the individual actuators. However, a WIFI connection with a PC is not possible.
> **Note:** If no LAN network is available, a connection via USB is also possible. This requires extra USB drivers, which can be found on the included CD.
### Installation
If the CCU is connected correctly and a DHCP server is used, the CCU automatically receives an IP address and is connected to the network.
If no DHCP server is available, an IP address can also be entered manually via the menu of the CCU, under the menu item "Network".
The subnet mask and the default gateway must also be assigned here. If the setup is correct, the device "HomeMatic Central" can now be found in the network overview.
> **Note:** If the CCU does not appear in the network, disconnecting the power supply of the CCU for 30 seconds may be helpful. After booting up the CCU and updating the network environment, it is now accessible.
A double click on "HomeMatic Central" opens a window in the lower area of which the IP address of the CCU can be found. (Optionally, this can also be found in the menu of the CCU.) By copying this address into a browser, the HomeMatic WebUI opens.
### Adding secondary devices
In the HomeMatic WebUI, the secondary HomeMatic devices (e.g. temperature sensors, intermediate plugs, handheld transmitters, etc.) can now be connected to the CCU. To do this, "Teach devices" (top right) must be clicked on and the further instructions followed.

### Integration in IP-Symcon
The CCU can be integrated via the [Device Search](https://www.symcon.de/en/llms/components/management-console.md). For this, "Homematic Discovery" must be selected as the system. The Discovery instance then offers to create a Homematic [Configurator](https://www.symcon.de/en/llms/concepts.md). After the configurator has been created, the individual devices can be integrated via it as described below.
Within the configurator, the configuration page of the "HomeMatic Socket" can be opened via "Configure gateway". To activate the socket, the checkbox "Open socket" must be set. The options displayed tell whether HomeMatic radio/wired/IP is to be used. If authentication is enabled, the user name and password can be entered here.

Various devices are now visible in the window that appears in the center. After selecting a device, a device instance can be created with "Create" and then the configuration page can be called up via "Configure".

To test if e.g. a dimmer is working, the proper function can be checked, e.g. in the Visualization.
> **Warning:** In certain circumstances, the return channel may not work. This is noticeable by the fact that IP-Symcon does not visualize if e.g. a lamp was switched via a light switch.
> This problem is often due to the Windows Firewall. This can be configured in Windows under "Control Panel" -> "System and Security" -> "Windows Firewall".
> In the menu "Allow a program or feature through Windows Firewall" -> "Change settings" -> "Allow other program..." there is a button "Browse".
> By selecting the IP-Symcon (IP-Symcon Service) file and then "open", the return channel also works!
> Another way to ensure the functionality of the return channel is to make sure that under the firewall settings in the CCU "HomeMatic XML-RPC API" and "Remote HomeMatic-Script API" full access is selected or the IP address of the IP-Symcon PC is entered.
### Device Configuration
It is recommended to use the HomeMatic Configurator to set up the individual devices.
The following settings are possible on the configuration page of the device instance.

| Option | Description |
| -------------- | ---------------------------------------------------------------------------------------------------------------------------------------------------------------------------------------------------------------------------------------------------------------------- |
| System | Select whether the device is controlled via radio, wired or IP. |
| Address | HomeMatic Address of the device. This can also be searched for via the "Search" dialog in the upper bar of the configuration bar. |
| Emulate status | If enabled, the status of the device is updated when a command is successfully sent to the CCU. If switched off, the actual response of the device to be switched is waited for. This can lead to delays. For example, with devices that wake up only every x minutes. |
### Firewall-, Authentication- and Port Settings
Authentication is possible with a CCU3 or RaspberryMatic in combination with IP-Symcon 5.1 or above.
This can be set in the web interface of the CCU. Authentication can be activated under "Settings" -> "Control Panel" -> "Security". This then uses the users that are set in the user administration.

Furthermore, the firewall can be set up under "Settings" -> "Control Panel" -> "Configure Firewall". Further information can be found in the CCU manual.

[Video](https://www.youtube.com/embed/sahJdNXUZZs?rel=0&cc_load_policy=1)
### Replacement of Defective Equipment
General information on how an exchange works in IP-Symcon can be found [here](https://www.symcon.de/en/llms/how-to.md)
For replacement, the configuration of the defective device must be opened in IP-Symcon and the address of the old device must be replaced for that of the new one. The address is either on the device itself or can be selected via "Search".

The address in the highlighted area must be replaced and saved with "Apply".
### HomeMatic with QNAP, Synology or Docker
If HomeMatic is to be used with QNAP, Synology or Docker, NAT support must be set up to receive responses from the system. This process is explained [here](https://www.symcon.de/en/llms/getting-started.md).
### Tips & Tricks
* [Documentation Homematic Data Points](https://www.eq-3.de/Downloads/eq3/download%20bereich/hm_web_ui_doku/HM-Script_4-Datenpunkte.pdf)
* [Documentation HomematicIP Data Points](https://www.eq-3.de/Downloads/eq3/download%20bereich/hm_web_ui_doku/HmIP_Device_Documentation.pdf)
* [HomeMatic Homepage](https://www.eq-3.com/products/homematic.html)
* [It is possible to change the display of the 19 button remote control](https://community.symcon.de/t/display-der-19-tasten-fernbedienung-ansteuern/17472)
* [To query the status of all actuators and sensors (only possible with the CCU!)](https://community.symcon.de/t/homematic-geraet-status-abfragen/22519)
* The duty cycle for an actuator can be specified with "ON_TIME" and for a dimmer additionally a ramp can be specified.
Here is an example script for three dimmers creating a light scene:
```php
$id_bar = 54392 /*[EG\Table Bar]*/;
$id_ecken = 24601 /*[EG\Corner Spots]*/;
$id_tisch = 38758 /*[EG\TableLamp]*/;
$ramp = 2;
HM_WriteValueFloat($id_bar, "ON_TIME", 60*10); // x Minuten ON
HM_WriteValueFloat($id_bar, "RAMP_TIME", $ramp); // X seconds ramp
HM_WriteValueFloat($id_bar , "LEVEL" , .4); // and run on X%
HM_WriteValueFloat($id_corner , "RAMP_TIME", $ramp); // X seconds ramp
HM_WriteValueFloat($id_corner , "LEVEL" , .4); // and run on X%
HM_WriteValueFloat($id_table , "RAMP_TIME", $ramp); // X seconds ramp
HM_WriteValueFloat($id_table , "LEVEL" , .4); // and run on x%
```
Example script WinMatic 60 minutes aeration:
```php
$id_actuator = 49712 /*[OG\Bedroom\HM WinMatic]*/;
HM_WriteValueFloat($id_actuator, "SPEED" , 1.0); // Maximum Speed ;
HM_WriteValueFloat($id_actuator, "RELOCK_DELAY" , 60*60); // Close window again after XX minutes
HM_WriteValueFloat($id_actuator, "LEVEL" , 0.7); // Open window
```
Example script open KeyMatic:
```php
HM_WriteValueBoolean($id, "OPEN", true);
```
Example script to get a feedback if an actuator has executed the switching command correctly:
```php
$id_actuator = 12345;
$err = HM_WriteValueBoolean($id_actuator, "STATE" , False);
//echo "Err: " .(int) $err . "\n";
if ($err === False){
echo "error: Switch actuator - Command was not executed";
SetValue($id_done, False);
} else {
SetValue($id_done, True);
echo "OK: Switch actuator - Command was executed\n";
}
```
Example script to toggle (turn on and off) an actuator (lamp):
```php
$id_actuator = 25404 /*[yard garden\lamp]*/;
$id_state = 55194 /*[yard garden\lamp\STATE]*/;
HM_WriteValueBoolean($id_actuator, "STATE" , !GetValue($id_state));
```
## BidCos Service
Source: https://www.symcon.de/en/service/documentation/module-reference/devices/homematic/homematic-ccu/bidcos-service/
The BidCos service is an alternative to the CCU-supported control of [HomeMatic](https://www.symcon.de/en/llms/modules/homematic.md) devices.
### Configuration of the LAN-adapter
First of all, the latest user software must be installed from the HomeMatic site.
We recommend assigning a fixed IP-address (DHCP: Off):

After successful installation a new directory was created: "x:\ProgramData\Bidcos-Service\"
The serial number (see label) and the IP address of the adapter must be adjusted in the 'bidcos.conf' file.
__Example:__
```php
[Interface 0]
Type = Lan Interface
Serial Number = GEQ0123456
# Key is on the back of the interface.
# The function can also be deactivated via the LAN tool.
# Then the field can be left blank
Encryption Key =
Description = First Lan Interface
# IP address of the LAN interface
IP Address = 192.168.2.61
```
> **Note:** Further settings in bidcos.conf are not required.
> It is essential that the following entry remains unchanged:
>
>
> ```php
> # TCP Port for XmlRpc connections
> Listen Port = 2001
> ```
### Testing the adapter
A successful configuration can now be checked with the "Test-Run BidCos-Service" program. The last line in the DOS window then reads: "… Connected to Lan Interface…".
> **Warning:** A flashing power LED indicates that the BidCos service is not connected.
If necessary, the start options can be adjusted (Control Panel > Administration > Services) or the service can be started manually:

### Configure HomeMatic-Components
In the "HomeMatic Configurator" program, the connection "Remote BidCoS Service" must be selected under "File > Settings". Then the IP address (localhost) and the port (2001) have to be entered.
Finally, the HomeMatic components can now be added one after the other in the "Teach-in devices" menu.
### Client Socket in IP-Symcon
The HomeMatic Socket (in the I/O instances) must be configured. "LAN Mode" must be selected as the mode. If the BidCoS service is running on another PC, its IP address must be entered as the host. Otherwise "localhost" must remain specified as the address. If there are several network adapters, the IP address of the network-adapter, which the LAN-adapter is connected to, must be selected in the event-server. The port (5544) does not have to be changed, it only has to be enabled in an existing firewall.

## HM_ReadServiceMessages
Source: https://www.symcon.de/en/service/documentation/module-reference/devices/homematic/homematic-ccu/hm-readservicemessages/
`array HM_ReadServiceMessages(int $InstanceID)`
**Parameters**
- `$InstanceID` (int): ID of the HomeMatic Socket Instance
**Returns** (array): The following information are available as __key => value__ pairs:
| Index | Type | Description |
| ----------- | ------- | ------------------------------------------------------------------------------------------------------------------------------------------- |
| __Address__ | string | Address of the relevant device |
| __Message__ | string | Cryptic description of the error message. Text can be found partially in the stringtable_de.txt from the Home Automatic configuration tool. |
| __Value__ | variant | Value of the error message |
ID of the HomeMatic Socket Instance
**Example**
```php
//Creates a variable that displays all service messages in the Visualization. Copy in a script and run.
//From here change anything
$object = IPS_GetObject($_IPS['SELF']);
$parentID = $object['ParentID'];
//Installer
if ($_IPS['SENDER'] == "Execute")
{
IPS_SetHidden($_IPS['SELF'], true);
IPS_SetName($_IPS['SELF'], "Script");
$parentObject = IPS_GetObject($parentID);
if ($parentObject['ObjectType'] !== 1)
{
$instanceID = IPS_CreateInstance("{485D0419-BE97-4548-AA9C-C083EB82E61E}");
IPS_SetParent($instanceID, $parentID);
$parentID = $instanceID;
IPS_SetParent($_IPS['SELF'], $parentID);
IPS_SetName($instanceID, "Servic messages");
}
IPS_SetScriptTimer($_IPS['SELF'], 300);
}
$texte = Array(
"CONFIG_PENDING" => "Configuration data are due for transfer",
"LOWBAT" => "Low battery condition",
"STICKY_UNREACH" => "Device communication was disrupted",
"UNREACH" => "Disrupted communication devices currently"
);
$str = "
"; // Adjust color or remove style
$str .= "
Gerätname
GeräteID
Meldung
";
$ids = IPS_GetInstanceListByModuleID("{A151ECE9-D733-4FB9-AA15-7F7DD10C58AF}");
if(sizeof($ids) == 0)
die("No HomeMatic Socket instance found!");
$msgs = HM_ReadServiceMessages($ids[0]);
if($msgs === false)
die("Connect to the CCU failed");
if(sizeof($msgs) == 0)
$str .= "
No service messages!
";
foreach($msgs as $msg)
{
if(array_key_exists($msg['Message'], $texte)) {
$text = $texte[$msg['Message']];
} else {
$text = $msg['Message'];
}
$id = GetInstanceIDFromHMID($msg['Address']);
if(IPS_InstanceExists($id)) {
$name = IPS_GetLocation($id);
} else {
$name = "Device is not set up in IP Symcon";
}
$str .= "
".$name."
".$msg['Address']."
".$text."
";
}
$str .= "
";
$vid = CreateVariableByName($parentID, "Content", 3);
IPS_SetIcon($vid, "Information");
IPS_SetVariableCustomProfile($vid, "~HTMLBox");
SetValue($vid, $str);
function GetInstanceIDFromHMID($sid)
{
$ids = IPS_GetInstanceListByModuleID("{EE4A81C6-5C90-4DB7-AD2F-F6BBD521412E}");
foreach($ids as $id)
{
$a = explode(":", HM_GetAddress($id));
$b = explode(":", $sid);
if($a[0] == $b[0])
{
return $id;
}
}
return 0;
}
function CreateVariableByName($id, $name, $type)
{
$vid = @IPS_GetVariableIDByName($name, $id);
if($vid === false)
{
$vid = IPS_CreateVariable($type);
IPS_SetParent($vid, $id);
IPS_SetName($vid, $name);
IPS_SetInfo($vid, "this variable was created by script #".$_IPS['SELF']);
}
return $vid;
}
```
## HM_RequestStatus
Source: https://www.symcon.de/en/service/documentation/module-reference/devices/homematic/homematic-ccu/hm-requeststatus/
`bool HM_RequestStatus(int $InstanceID, string $Parameter)`
**Parameters**
- `$InstanceID` (int): ID of the device to be switched
- `$Parameter` (string)
| Value | Description |
| ----- | ------------------------------------------------------------------------------------------------------------------------------------------------------------------------------------------------- |
| STATE | Status of an actuator |
| LEVEL | Dim value |
| ... | An overview for all requestable "readable" parameters can be taken from the documentation of the [Homematic Datapoints](https://www.symcon.de/en/llms/modules/homematic.md) under Tipps & Tricks. |
**Returns** (bool): If the command succeeds, it returns __TRUE__, otherwise __FALSE__.
| Value | Description |
| ----- | ------------------------------------------------------------------------------------------------------------------------------------------------------------------------------------------------- |
| STATE | Status of an actuator |
| LEVEL | Dim value |
| ... | An overview for all requestable "readable" parameters can be taken from the documentation of the [Homematic Datapoints](https://www.symcon.de/en/llms/modules/homematic.md) under Tipps & Tricks. |
**Example**
```php
// This requests an update of all parameters for all Homemeatic instances.
// This strains the wireless communication extremely and is not recommanded as general update.
$ids = IPS_GetInstanceListByModuleID("{EE4A81C6-5C90-4DB7-AD2F-F6BBD521412E}");
echo "Geräte: ".sizeof($ids)."\n";
foreach($ids as $id)
{
$svs=IPS_GetStatusVariableIdents($id);
if(sizeof($svs) > 0) {
if(@HM_RequestStatus($id, $svs[0]) === false) {
echo "Fehler: ".IPS_GetLocation($id)."\n";
}
}
}
```
## HM_WriteValueBoolean
Source: https://www.symcon.de/en/service/documentation/module-reference/devices/homematic/homematic-ccu/hm-writevalueboolean/
`bool HM_WriteValueBoolean(int $InstanceID, string $Parameter, bool $Value)`
**Parameters**
- `$InstanceID` (int): ID of the device to be switched
- `$Parameter` (string): Parameter that should be set. The name of the parameter can be taken from the data point list or as "Ident" in the tab "Status Variables" in IP-Symcon.
- `$Value` (bool): true or false
**Returns** (bool): If the command succeeds, it returns __TRUE__, otherwise __FALSE__.
true or false
**Example**
```php
// Switch device on
HM_WriteValueBoolean(12345, "STATE", true);
// Lock device
HM_WriteValueBoolean(12345, "INHIBIT", true);
// Switch on display light
HM_WriteValueBoolean(12345, "BACKLIGHT", true);
```
## HM_WriteValueFloat
Source: https://www.symcon.de/en/service/documentation/module-reference/devices/homematic/homematic-ccu/hm-writevaluefloat/
`bool HM_WriteValueFloat(int $InstanceID, string $Parameter, float $Value)`
**Parameters**
- `$InstanceID` (int): ID of the device to be switched
- `$Parameter` (string): Parameter that should be set. The name of the parameter can be taken from the data point list or as "Ident" in the tab "Status Variables" in IP-Symcon.
- `$Value` (float): floating point number that should be set
**Returns** (bool): If the command succeeds, it returns __TRUE__, otherwise __FALSE__.
floating point number that should be set
**Example**
```php
// Dim device to 25%. Values allowed between 0.0 and 1.0
HM_WriteValueFloat(12345, "LEVEL", 0.25);
// Set the activation duration to 1 hour. Values allowed between 0 and 85825945.6 in seconds
HM_WriteValueFloat(12345, "ON_TIME", 3600);
```
## HM_WriteValueInteger
Source: https://www.symcon.de/en/service/documentation/module-reference/devices/homematic/homematic-ccu/hm-writevalueinteger/
`bool HM_WriteValueInteger(int $InstanceID, string $Parameter, int $Value)`
**Parameters**
- `$InstanceID` (int): ID of the device to be switched
- `$Parameter` (string): Parameter that should be set. The name of the parameter can be taken from the data point list or as "Ident" in the tab "Status Variables" in IP-Symcon.
- `$Value` (int): Whole number that should be set
**Returns** (bool): If the command succeeds, it returns __TRUE__, otherwise __FALSE__.
Whole number that should be set
**Example**
```php
// Set the number of alarms to the value 25. Values allowed between 0 and 255.
HM_WriteValueInteger(12345, ALARM_COUNT, 25);
// Set the number of service to the value 78. Values allowed between 0 and 255.
HM_WriteValueInteger(12345, SERVICE_COUNT, 78);
```
## HM_WriteValueString
Source: https://www.symcon.de/en/service/documentation/module-reference/devices/homematic/homematic-ccu/hm-writevaluestring/
`bool HM_WriteValueString(int $InstanceID, string $Parameter, string $Value)`
**Parameters**
- `$InstanceID` (int): ID of the device to be switched
- `$Parameter` (string): Parameter that should be set. The name of the parameter can be taken from the data point list or as "Ident" in the tab "Status Variables" in IP-Symcon.
- `$Value` (string): string that should be set
**Returns** (bool): If the command succeeds, it returns __TRUE__, otherwise __FALSE__.
string that should be set
**Example**
```php
// Transfers the value "Hello World". Any string allowed.
HM_WriteValueString(12345, SUBMIT, "Hello World");
```
## HomeMatic HCU (Beta)
Source: https://www.symcon.de/en/service/documentation/module-reference/devices/homematic/homematic-hcu/
_Requires Symcon >= 8.1_
> **Note:** This module is currently still in the beta phase. To use it, developer mode must be activated via HCUWeb. Once this mode is activated, eQ-3 can no longer provide technical support. More information: [Connect API FAQ](https://homematic-ip.com/de/home-control-unit-mit-plugin-support-und-connect-api)
> **Note:** Due to a limitation in the HCU Connect API, some button channel assignments do not match those displayed in the Homematic IP app.
### Integration in IP-Symcon
The HCU can be integrated via [Device search](https://www.symcon.de/en/llms/components/management-console.md). To do this, "Homematic HCU Discovery" must be selected as the system. The Discovery instance then offers the creation of a Homematic HCU [Configurator](https://www.symcon.de/en/llms/concepts.md). Once the configurator has been created, the individual devices and groups can be integrated as described below.

Within the configurator the configuration page of the "HomeMatic HCU Gateway" can be opened in via "Configure". The activation key from the HCUWeb must be entered here. To do this, developer mode must be activated in the HCUWeb and the WebSocket must be enabled. Once the key has been generated and entered in the gateway, the process can be completed by clicking "Apply changes".

If the HCU needs to be registered again at a later date, a new activation key can be generated and entered in the corresponding field. To complete the process, click the 'Register Again' button in the gateway's expert options.
Various devices are now visible in the configurator and divided into rooms. The groups are summarized under a separate item. After selecting a device or a group, an instance can be created with "Create" and then the configuration page can be called up via "Configure".
### Device configuration

On the configuration page, the connection type is displayed in addition to the device ID. Currently there is only the connection via the HCU. The "Advanced settings" allow you to influence the creation of a device's data points. The option "Create only selected" is active by default. If the device is not known to Symcon, all data points are created.
| Option | Description |
| ---------------------------------------- | ------------------------------------------------------------------------------------------------------------------------------------ |
| Create only selected | If the Symcon device is known, the data points created can be limited to those that are most relevant for the function of the device.|
| Create only selected and from whitelist | In addition to the data points selected by Symcon, further data points can be selected from a list of all data points. |
| Create only from whitelist | Each data point to be created can be selected individually. |
| Create all | All available data points are created. This option is selected if the Symcon device is not known |
All switchable values of the device are displayed at the bottom of the action area.
> **Note:** The configuration of groups is structured identically
---
# Image Grabber
> Symcon documentation · English · generated on 2026-09-26
> Index: https://www.symcon.de/en/llms.txt
Source: https://www.symcon.de/en/service/documentation/module-reference/devices/image-grabber/
The Image Grabber saves webcam images from a specific address. These are automatically added as media objects and are therefore also available to the Visualization.
> **Warning:** As of IP-Symcon 4.0, the media created by the Image Grabber are only written to the hard disk after closing IP-Symcon. The intelligent caching protects the hard disk/ flash memory and the content is only stored in the working memory. The current content can be accessed at runtime via [IPS_GetMediaContent](https://www.symcon.de/en/llms/functions/management-media.md).
### Integration in IP-Symcon
Set up a new instance via "Add object" -> "Add instance" -> Manufacturer: "(Other)".
The following settings can be made in the configuration tab.
> **Note:** With a [MJPG stream](https://www.symcon.de/en/llms/concepts.md) it is possible to display a webcam with moving images.
> **Note:** In contrast to most other instances, this module does not need a parent instance
### Settings
| Option | Description |
| ------------------ | -------------------------------------------------------------------------------------------------------------------------------------------------------------------- |
| Address | The address of the webcam and the path/URL to the image. See list below |
| Type | In which format the image should be saved. If the file extension in the address is not ".jpg", ".gif", ".bmp", ".png", the file format must be specified explicitly. |
| Interval | In which cycle in seconds the image should be queried |
| Use authentication | Whether authentication should be used: Yes/No |
| Username | Username for authentication |
| Password | Password for authentication |
### Addresses
All common manufacturers/models are listed under the link listed here. The standard stream addresses can also be seen under the respective model, which may have to be integrated via a [Stream](https://www.symcon.de/en/llms/concepts.md).
[List of manufacturers](https://www.ispyconnect.com/cameras)
### Example

## IG_UpdateImage
Source: https://www.symcon.de/en/service/documentation/module-reference/devices/image-grabber/ig-updateimage/
`bool IG_UpdateImage(int $InstanceID)`
updates the image of the instance
**Parameters**
- `$InstanceID` (int): ID of the Instance of the device to be switched
**Returns** (bool): If the command succeeds, it returns __TRUE__, otherwise __FALSE__.
ID of the Instance of the device to be switched
**Example**
```php
// The picture of instance 12345 is updated
IG_UpdateImage(12345);
```
---
# IPS-868
> Symcon documentation · English · generated on 2026-09-26
> Index: https://www.symcon.de/en/llms.txt
Source: https://www.symcon.de/en/service/documentation/module-reference/devices/ips-868/
With its bidirectional radio components, the IP-Symcon radio system 868 supplements areas of application that are often not satisfactorily covered by other systems. This includes consumption recording via the S0 input, presence control via the PresenceControlModule including a tracker, analysis of the room air via an air quality sensor, and the control of LED strips.
> **Note:** The following devices are supported by IP-Symcon:
>
> [supported devices](https://www.symcon.de/en/llms/modules/ips-868.md)
### Installation
The __USB Gateway__ is connected to the PC via USB. The necessary drivers are available from SiLabs for [download](https://www.silabs.com/developers/usb-to-uart-bridge-vcp-drivers) . After its installation, the gateway is ready for use.
The __LAN Gateway__ is connected to the PC via LAN. By default, DHCP and port 5000 are set up. If an individual IP address is required, the IP-Symcon "Network Configuration Tool" is required. This is available for [download](https://support.symcon.de/lan-gct) . A simple [description of how to configure the gateway](https://www.symcon.de/assets/files/service/NetworkConfigurationTool.pdf) is available. The gateway can then be reached via the corresponding IP address and port.
> **Note:** If no IP-Symcon house is printed on the front of the LAN gateway, it is an older model of the gateway. The installation instructions for this model can be found [here](https://www.symcon.de/assets/files/service/IPS868LAN-Gatewayrev.vor2015.pdf) .
### Integration in IP-Symcon
When using the LAN gateway, this can be integrated via the [Device Search](https://www.symcon.de/en/llms/components/management-console.md). To do this, "IPS-868 Discovery" must be selected as the system. The discovery instance then offers to create an IPS-868 [Configurator](https://www.symcon.de/en/llms/concepts.md). After the configurator has been created, the individual devices can be integrated there as described below.
The USB gateway is created directly as a configurator because it cannot be found via the [Device search](https://www.symcon.de/en/llms/components/management-console.md). For this purpose, an "IPS-868 Configurator" is created in the [Object Tree](https://www.symcon.de/en/llms/components/management-console.md). When configuring the interface, the "IPS-868 USB Gateway" mode must be selected and then the appropriate port selected and opened.
### Configurator
All IPS-868 devices can be created as [Instance](https://www.symcon.de/en/llms/concepts.md) using the IPS-868 configurator. To do this, "New device" must be selected from the list and "Create" clicked on.

New [Instances](https://www.symcon.de/en/llms/concepts.md) are created in the [Object Tree](https://www.symcon.de/en/llms/components/management-console.md) in the main category. These created instances can then be renamed accordingly and sorted elsewhere. A newly added device can be configured via "Configure".
Here, on the one hand, the device ID must be entered here and, depending on the device, other device-specific properties may have to be defined. The exact procedure and the device ID can be found in the documentation of the respective device. ([device list](https://www.symcon.de/en/llms/modules/ips-868.md) )

### Configuration
Various properties can be set on the configuration page of the device.
These can be found in more detail in the respective device documentation.
| Device Instance | Device description |
| ---------------------------- | -------------------------------------------------------- |
| ACC-868 | -------------------------------------------------------- |
| AKM-868 (Tracker) | [AKM-868](https://www.symcon.de/en/llms/modules/ips-868.md) |
| ANA-868 (Analog-Output) | [ANA-868](https://www.symcon.de/en/llms/modules/ips-868.md) |
| ANA-868 (Analog-Input) | [ANA-868](https://www.symcon.de/en/llms/modules/ips-868.md) |
| DATA-868 | -------------------------------------------------------- |
| EKM-868 (Counter) | [EKM-868](https://www.symcon.de/en/llms/modules/ips-868.md) |
| FD-868 (Display Input) | [FD-868](https://www.symcon.de/en/llms/modules/ips-868.md) |
| FD-868 (Display Output) | [FD-868](https://www.symcon.de/en/llms/modules/ips-868.md) |
| FD-868 (Display) | [FD-868](https://www.symcon.de/en/llms/modules/ips-868.md) |
| JKM-868 (LevelJET) | [JKM-868-LevelJET](https://www.symcon.de/en/llms/modules/ips-868.md) |
| JKM-868 (ThermoJET) | [JKM-868-ThermoJET](https://www.symcon.de/en/llms/modules/ips-868.md) |
| LGS-868 (Air Quality Sensor) | [LGS-868](https://www.symcon.de/en/llms/modules/ips-868.md) |
| RGBW-868 (Stripe) | [RGBW-868](https://www.symcon.de/en/llms/modules/ips-868.md) |
| RGBW-868 (Stripe Input) | [RGBW-868](https://www.symcon.de/en/llms/modules/ips-868.md) |
| SERVO-868 | [SERVO-868](https://www.symcon.de/en/llms/modules/ips-868.md) |
| SERVO-868 (Input) | [SERVO-868](https://www.symcon.de/en/llms/modules/ips-868.md) |
| TFK-868 (Input) | -------------------------------------------------------- |
| WDT-868 (WatchDog) | [WDT-868](https://www.symcon.de/en/llms/modules/ips-868.md) |
## AKM-868
Source: https://www.symcon.de/en/service/documentation/module-reference/devices/ips-868/akm-868/
### Description
The presence control module AKM 868 consists of a small remote control in keychain format in an oval housing (size: 55 * 44 * 15 mm) and a repeater. The remote has a button with a dual function: short and long press. This enables two devices (e.g. light and a garage door) to be switched on or off. The special feature of this handset is that it sends a 'ping' approximately every 40 seconds. It consists of a unique ID, which is analyzed by IP Symcon. If the tracker is no longer within range, a corresponding variable is set to FALSE after five minutes. In this way, certain scenarios can be started when leaving or entering the apartment.
The battery lasts at least six months - according to current knowledge even more than a year (pure ping operation). Data is transmitted via the 868 MHz frequency band.
### Installation
In order to be able to receive data, an 868 Gateway (LAN or USB) must first be connected and set up. "AKM-868 (Tracker)" must be added in IP-Symcon. The parent instances (e.g. the gateway) are created automatically.
### Configuration
To use the device in IP Symcon, add a new AKM-868 instance (manufacturer: IP Symcon/ ProJet):
* __DeviceID:__
As standard 0 is specified. This means that of all the repeaters data can be received. To specifically select a device, e.g. the 160 can be selected.
Jumper assignment (view in the device, antenna above, bottom 2 jumpers pairs):
160: both open
161: right closed
162: left closed
163: both closed
* __TrackerID:__
To change the ID, the button must be held down while inserting the battery.
The ID is automatically generated by the tracker. This is retained even after a battery change.
Most of the time the TrackerID is: 8191 (Default)
If a 'ping' is received, 'Available' is automatically set to TRUE, and in addition, the time stamp in 'Update' updated. If no 'Ping' signals are received for more than five minutes (fixed, unchangeable), 'Available' is set to FALSE. Additionally, the key shots are evaluated. (For 'Special' both buttons are pressed simultaneously - old version: with two keys.)
> **Note:** Note that the key variables always remain TRUE and only the timestamp changes.

### Tips & Tricks
* The receiver sensitivity of the repeater can be set to "HI / LO". To do this, the jumper next to the ATMEL processor must be bridged (low reception sensitivity).
If the transmission power is low (LO), the approximate position of the remote control can be determined with a second or third AKM. Of course, this is highly dependent on the respective local conditions. However, a distinction - such as basement, garden or upper floor - should be possible.
* In order to significantly increase the range of the remote control, the SMD antenna can be replaced by a wire antenna (_Lambda district: 87mm_). This is available from us on request.
###Troubleshooting
* If the tracker is not recognized despite a new battery, the TrackerID must be reassigned (see above) and then re-taught in the tracker module with "Search".
## ANA-868
Source: https://www.symcon.de/en/service/documentation/module-reference/devices/ips-868/ana-868/
The analogue-digital/ digital-analogue converter module has 2 analogue inputs (10V, input impedance 10kOhm) and 2 analogue outputs (10V/10mA).
### Installation
In order to read in the data from measured voltages or to be able to set voltages at the outputs, an 868 Gateway must first be connected and set up. An "ANA-868 (analog input/ analog output)" module must be added in IP-Symcon. The parent instances (e.g. the gateway) are created/connected automatically.
### Configuration
| Value | Description |
| --------------- | --------------------------------------------------------------------------------------------------------------------------------------------------------------------------- |
| Device Address | The ID:184 is specified by default. If there are more controllers in a system, a new ID must be assigned. The jumper assignment can be found in the operating instructions. |
| Channel Address | (1-4) Indicates which of the two output/input channels should be used. |
## PJ_RequestStatus
Source: https://www.symcon.de/en/service/documentation/module-reference/devices/ips-868/ana-868/pj-requeststatus/
`bool PJ_RequestStatus(int $InstanceID)`
Query the status of variables and set them
**Parameters**
- `$InstanceID` (int): Device ID
**Returns** (bool): If the command succeeds, it returns __TRUE__, otherwise __FALSE__.
Device ID
**Example**
```php
//Queries the current values of instance 12345.
PJ_RequestStatus(12345);
```
## PJ_SetVoltage
Source: https://www.symcon.de/en/service/documentation/module-reference/devices/ips-868/ana-868/pj-setvoltage/
`bool PJ_SetVoltage(int $InstanceID, float $Volt)`
Sets the output to a specific voltage
**Parameters**
- `$InstanceID` (int): Device ID
- `$Volt` (float): Voltage to which the output is to be set
**Returns** (bool): If the command succeeds, it returns __TRUE__, otherwise __FALSE__.
Voltage to which the output is to be set
**Example**
```php
//Sets the output voltage to 5.30 volts
PJ_SetVoltage(12345, 5.30);
```
## EKM-868
Source: https://www.symcon.de/en/service/documentation/module-reference/devices/ips-868/ekm-868/
### Description
The power control module EKM 868 is a 4-channel module with 32-bit counter, which counts of four inputs and records their duration. The bidirectional data transmission takes place via a USB radio transceiver operating in the 868 MHz frequency band. It is used to visualize and projection of consumption costs in conjunction with IP Symcon. The count remains valid as long a power supply consists (9V = power adapter). A clear (reset) of the count by a power outage is detected by IP Symcon, a battery backup is therefore not required. The running PC you only need to provide a single value with a timestamp and to generate graphics. A special feature of the EKM 868 is that in addition the current power (consumption) is recorded.
### Installation
To query counter data, first the virtual Comport driver on Windows must be installed and the USB radio transceiver must be connected.
### Configuration
Now add a new EKM 868 (manufacturer: IP Symcon/ ProJet):

| Value | Description |
| -------------------- | ---------------------------------------------------------------------------------------------------------------------------------------------------------------------------------------------------------------------------------------------------------------------------------------------------------------------------------- |
| DeviceID | Default 128 is predetermined. When two EKM 868 are present in a system, in the device a jumpers can be set: the two lower pins (direction Header, upper PIN: NC). The new ID is then 129. ATTENTION: If red LEDs are installed (1 to 4), the ID is 129 by open Jumper! Devices with the ID 130/131, etc. are available on request. |
| CounterID | The ID corresponds to the respective inputs (channels): 1,2,3,4 |
| Modus: Read counter | It is read out the count (Variable: Counter) and the time interval in 1/100 seconds between two impulses (Current). |
| Modus: Read on-time | The duty cycle (closed contact) is returned in 1/10 seconds (at 32 bits this results in a period of more than 13 years!) |
| Modus: Read off-time | The off-time (contact open) is returned in 1/10 seconds |
| Impulse | At electricity meters the impulses are entered per kWh. The unit of the variable "Current" is then also kWh. At 0 is the unit 1/100 second - ideal for e.g. to determine the volumetric flow of gas or water meter. |
| Timer activated | With a set tick values are queried in the specified time interval. This is limited to a minimum of 60 sec. |
| Test Center | A command for output values will be sent to the EMK. When properly installed, the variables in the object tree are updated accordingly. |
> **Warning:** Attention:
> The inputs are not galvanically isolated - they must not exceed 5V. At plan view, the common ground of the four inputs is the right connection. At every entrance, an RC element was installed: 1K to as pull-up and 100nF mass. A switching e.g. with a reed contact to ground causes a count. The power supply must not exceed = 12V. Higher voltages or reversed polarity lead to destruction of the device. Then, an external protective circuit (Z-diode, resistor) is to provide.
### Tips & Tricks
* The internal timing (Current) has a resolution of 16-bit and 1/100 overclocking.
This means it can be detected pulse sequences of a maximum length of 655 seconds (almost 11 minutes). In case of an overflow, an -0- is returned.
* Internally, the following formula is used to convert the current power in watt:
P = (3600 * 1000) / (Current / 100 * Impulses) [Watt]
Where "Current", is the time between two pulses in 1/100 seconds
* To display the current energy consumption (energy-light), in practice intervals of 20 minutes revealed to be optimal.
* Power supply: Please be sure to use the supplied = 9V power supply - no "bell transformer"
Internally, a low drop 3.3 V voltage transformer is installed.
The input voltage ranges from 5.0 V = to = 10.0 V. The inner contact of the DC socket is the positive pole.
* If the counter e.g. is erased by a power failure, so this is not relevant because IP Symcon detects it automatically and takes it into account when generating the graphics
> **Note:** Problem: LED lights permanently
> Solution: If necessary, swap the wires of the respective counter input (electronically)
> or wait until the counter continues to rotate and releases the reed contact (mechanical).
### Technical data
* Dimensions (without antenna): 70 * 70 * 25 mm
* Weight: 100g
* Power supply: 9V bis 12V DC / 100 mA / Connector: DC socket for hollow plug 2,1mm
* 4 * S0 Inputs / 4 * 32-Bit counter (TTL – 5V)
* maximum count frequency: 100 Hz
* minimum pulse length: 20 msec (debounced internally for mechanical contacts)
* Protection class: IP 20
* Radio module: 868MHz (PC radio interface: USB-T 868 is not included)
## PJ_RequestStatus
Source: https://www.symcon.de/en/service/documentation/module-reference/devices/ips-868/ekm-868/pj-requeststatus/
`bool PJ_RequestStatus(int $InstanceID)`
Queries the current values for the device with the ID __InstanceID__ and writes it to the appropriate state variables.
[
**Parameters**
- `$InstanceID` (int): ID of the device
**Returns** (bool): If the command succeeds, it returns __TRUE__, otherwise __FALSE__.
ID of the device
**Example**
```php
PJ_RequestStatus(12345); //Query values
```
## FD-868
Source: https://www.symcon.de/en/service/documentation/module-reference/devices/ips-868/fd-868/
### Function
The radio display 868 is used to display text messages on a 2 x 16-character LC display.
In addition, three LEDs and a buzzer can be switched.
Optional is an IO box (relay board) with two outputs (10A/250V) and two inputs (TTL +5V) available.
The bidirectional data transmission takes place via an USB radio transceiver operating in the 868 MHz frequency band.
### Installation
The radio display 868 is used to display text messages on a 2 x 16-character LC display.
In addition, three LEDs and a buzzer can be switched.
Optional is an IO box (relay board) with two outputs (10A/250V) and two inputs (TTL +5V) available.
The bidirectional data transmission takes place via an USB radio transceiver operating in the 868 MHz frequency band.
### Configuration
The following properties can be changed as follows (not by command): hold left button on the display and switch the device on. Follow the further instructions on the screen.
| Value | Description |
| ----------------- | ----------------------------------------------------------------------------------------------------------------------------- |
| Device-Address | By default, the ID: 1 is set. If more displays are available in a system, a new ID will be awarded. |
| Group-Address | Here all displays e.g. of the ground floor will be addressed together. This feature is not available in the first generation. |
| Broadcast-Address | Fixed: 255 - all displays will be addressed together |
| Key click | On/ Off |
> **Warning:** Only one device with the same ID may be present in a radio network.
> **Note:** Optional is an IO box (relay board) with two outputs (10A/250V) and two inputs (TTL +5V) available. RJ-11 socket assignment (Display):
> 1 – Input 1 / TTL
> 2 – GND
> 3 – Output 1 / Open Collector
> 4 – Output 2 / Open Collector
> 5 – VCC /+5V
> 6 – Input 2 / TTL
> IO-BOX socket on the terminal of ‘Output 1′
### Tips & Tricks
Scripts for a menu control are available in our forums:
[Link to the forum post](https://community.symcon.de/t/ips-funksystem-868/21115)
> **Warning:** You can not turn off the key-click in the first generation.
> It signaled to the operator that the command from the USB radio transceiver has been adopted (Acknowledgment).
## PJ_Backlight
Source: https://www.symcon.de/en/service/documentation/module-reference/devices/ips-868/fd-868/pj-backlight/
`bool PJ_Backlight(int $InstanceID, bool $Status)`
turns the display backlight on or off
**Parameters**
- `$InstanceID` (int): ID of the device to be switched
- `$Status` (bool): __TRUE__ for on, __FALSE__ for off
**Returns** (bool): If the command succeeds, it returns __TRUE__, otherwise __FALSE__.
__TRUE__ for on, __FALSE__ for off
**Example**
```php
PJ_Backlight(12345, true);
```
## PJ_Beep
Source: https://www.symcon.de/en/service/documentation/module-reference/devices/ips-868/fd-868/pj-beep/
`bool PJ_Beep(int $InstanceID, int $TenthsOfSeconds)`
outputs an audio signal
**Parameters**
- `$InstanceID` (int): ID of the device to be switched
- `$TenthsOfSeconds` (int): Length of the tone in 1/10 seconds
**Returns** (bool): default
Length of the tone in 1/10 seconds
**Example**
```php
PJ_Beep($id_lcd, 50); // Beep for 0,5 seconds
```
## PJ_LCDText
Source: https://www.symcon.de/en/service/documentation/module-reference/devices/ips-868/fd-868/pj-lcdtext/
`bool PJ_LCDText(int $InstanceID, int $Line, string $Text)`
sends a text to the display
**Parameters**
- `$InstanceID` (int): ID of the device to be switched
- `$Line` (int): Line number of the display (1 or 2)
- `$Text` (string): Lines of text, 16 characters maximum - the rest is cut off
**Returns** (bool): If the command succeeds, it returns __TRUE__, otherwise __FALSE__.
Lines of text, 16 characters maximum - the rest is cut off
**Example**
```php
PJ_LCDText($id_lcd, 1, "ALARM - Meldung"); // Return text in line 1
```
## PJ_SwitchLED
Source: https://www.symcon.de/en/service/documentation/module-reference/devices/ips-868/fd-868/pj-switchled/
`bool PJ_SwitchLED(int $InstanceID, int $LED, bool $Status)`
switches an LED of the display
**Parameters**
- `$InstanceID` (int): ID of the device to be switched
- `$LED` (int): 1
- `$Status` (bool): True = On / False = Off
**Returns** (bool): If the command succeeds, it returns __TRUE__, otherwise __FALSE__.
True = On / False = Off
**Example**
```php
PJ_SwitchLED($id_lcd,1,False); // Red
PJ_SwitchLED($id_lcd,3,True); // Green
```
## PJ_SwitchMode
Source: https://www.symcon.de/en/service/documentation/module-reference/devices/ips-868/fd-868/pj-switchmode/
`bool PJ_SwitchMode(int $InstanceID, bool $Status)`
switches an FS20 device on/off
**Parameters**
- `$InstanceID` (int): ID of the Relay to be switched
- `$Status` (bool): __TRUE__ for On, __FALSE__ for Off
**Returns** (bool): If the command succeeds, it returns __TRUE__, otherwise __FALSE__.
__TRUE__ for On, __FALSE__ for Off
**Example**
```php
PJ_SwitchMode($id_lcd, True); //Turn on Relay
```
## Device list
Source: https://www.symcon.de/en/service/documentation/module-reference/devices/ips-868/device-list/
### Supported Gateways
| Gateway | | Description |
| ---------------- | ------------------------------------------------------------------------------ | ------------------------------ |
| Symcon LAN-T 868 | [Product Information](https://www.symcon.de/assets/files/product/ips-868-lan-gateway.pdf) | IP gateway with LAN connection |
| Symcon USB-T 868 | | USB gateway with USB port |
### Supported Components
| Components | | Description |
| -------------------------------------------------------- | ----------------------------------------------------------------------- | ---------------------------------------------- |
| [AKM-868](https://www.symcon.de/en/llms/modules/ips-868.md) | [Product Information](https://www.symcon.de/assets/files/product/ips-868-akm.pdf) | AttendanceControlModule |
| [EKM-868](https://www.symcon.de/en/llms/modules/ips-868.md) | [Product Information](https://www.symcon.de/assets/files/product/ips-868-ekm.pdf) | EnergyControlModule (4-channel meter module) |
| [FD-868](https://www.symcon.de/en/llms/modules/ips-868.md) | | Wireless display |
| [JKM-868 LevelJet](https://www.symcon.de/en/llms/modules/ips-868.md) | | LevelJET |
| [JKM-868 ThermoJET](https://www.symcon.de/en/llms/modules/ips-868.md) | | ThermoJET |
| [LGS-868](https://www.symcon.de/en/llms/modules/ips-868.md) | [Product Information](https://www.symcon.de/assets/files/product/ips-868-lgs.pdf) | AirQualitySensor |
| [RGBW-868](https://www.symcon.de/en/llms/modules/ips-868.md) | [Product Information](https://www.symcon.de/assets/files/product/ips-868-rgbw.pdf) | LED stripe controller (12V/24V) |
| [SERVO-868](https://www.symcon.de/en/llms/modules/ips-868.md) | | 4-way servo controller |
| Tracker 868 | [Product Information](https://www.symcon.de/assets/files/product/ips-868-akm.pdf) | Key fob (used in combination with the AKM-868) |
| [WDT-868](https://www.symcon.de/en/llms/modules/ips-868.md) | | Watch-Dog-Timer |
## JKM-868 LevelJET
Source: https://www.symcon.de/en/service/documentation/module-reference/devices/ips-868/jkm-868-leveljet/
### Description
The JKM-868 with connected LevelJET is used to read out the individual values of the LevelJET level indicator.
### Installation
In order to be able to receive data, the virtual COM port driver from Silicon Labs (CP210x) must first be installed on Windows and the USB-T 868 radio transceiver must be connected. In IP-Symcon, “JKM-868 (LevelJET)” must be added. The parent instances (e.g. the gateway) are created automatically.
Alternatively, the 868 LAN gateway can also be used. A client socket with the appropriate settings must be selected as the “parent instance”.
### Configuration
The DeviceID defaults to 166 and must be added to the address of the respective device. Example: the LevelJET has the address 12 - so 178 must be entered here. The address is parameterized in LevelJET according to the manufacturer's instructions.
| Variable | Description |
| ---------- | ---------------------- |
| Distance | Distance in cm |
| Output (1) | State of the 1st Relay |
| Output (2) | State of the 2nd Relay |

> **Warning:** The distance value (input) is queried cyclically in the set “interval”. The status of both outputs cannot be actively queried. It is sent automatically after the distance thresholds set in the LevelJET have been exceeded or undershot.
### Tips & Tricks
In order to calculate the volume in liters, own PHP scripts must be created.
## PJ_RequestStatus
Source: https://www.symcon.de/en/service/documentation/module-reference/devices/ips-868/jkm-868-leveljet/pj-requeststatus/
`bool PJ_RequestStatus(int $InstanceID)`
Query the status of variables and set them
**Parameters**
- `$InstanceID` (int): Device ID
**Returns** (bool): If the command succeeds, it returns __TRUE__, otherwise __FALSE__.
Device ID
**Example**
```php
//Queries the current values of instance 12345.
PJ_RequestStatus(12345);
```
## JKM-868 ThermoJET
Source: https://www.symcon.de/en/service/documentation/module-reference/devices/ips-868/jkm-868-thermojet/
### Description
The JKM-868 with attached ThermoJET is used to read out the individual values of the ThermoJET temperature controller.
### Installation
In order to be able to receive data, the virtual COM port driver from Silicon Labs (CP210x) must first be installed on Windows and the USB-T 868 radio transceiver must be connected. In IP-Symcon, “JKM-868 (ThermoJET)” must be added. The parent instances (e.g. the gateway) are created automatically.
Alternatively, the 868 LAN gateway can also be used. A “client socket” with the appropriate settings must be selected as the “parent instance”.
### Configuration
The DeviceID defaults to 166 and must be added to the address of the respective device. Example: The ThermoJET has the address 17 - so 183 must be entered here. The ThermoJET has 8 inputs - if more than 4 temperature guides are connected, every second JKM instance with the mode setting: “Input (5-8)” must be added to IP-Symcon.
| Variable | Description |
| ------------------ | ----------------------- |
| Output (1) | State of the 1st Relay |
| Output (2) | State of the 2nd Relay |
| Temperature (1..4) | Temperature value in °C |
> **Warning:** Note: If no sensor is connected, the output is -99.9°C
> **Note:** If a second instance is created for input 5-8, the new variables are still called temperature 1-4. These can be renamed if required. The variables for outputs 1+2 are the same in both modes.

> **Warning:** The four temperature channels (inputs) are queried cyclically in the set “interval”. The status of both outputs cannot be actively queried. This is sent automatically after the temperature thresholds set in the ThermoJET have been exceeded or undershot.
## PJ_RequestStatus
Source: https://www.symcon.de/en/service/documentation/module-reference/devices/ips-868/jkm-868-thermojet/pj-requeststatus/
`bool PJ_RequestStatus(int $InstanceID)`
Query the status of variables and set them
**Parameters**
- `$InstanceID` (int): Device ID
**Returns** (bool): If the command succeeds, it returns __TRUE__, otherwise __FALSE__.
Device ID
**Example**
```php
//Queries the current values of instance 12345.
PJ_RequestStatus(12345);
```
## LGS-868
Source: https://www.symcon.de/en/service/documentation/module-reference/devices/ips-868/lgs-868/
The air quality sensor (LGS-868) analyses room air and summarizes the concentration of mixed gases in the air into a usable value (ppm - parts per million).
> **Note:** Technical information and advice on proper ventilation can be found in the following brochure: [Download](https://www.symcon.de/assets/files/product/IPS-868-lgs-ds.pdf)
### Installation
In order to receive data, an IPS-868 gateway (LAN or USB) must first be connected and set up. The parent instances (e.g. the gateway) are created automatically.
### Configuration
To use the device in IP-Symcon, a new LGS-868 instance (manufacturer: IP-SymCon/ ProJet) must be added.
If parent instances do not yet exist, they are created automatically.
| Value | Description |
| -------------- | ----------------------------------------------------------------------------------------------------------------------------------------------------------------------------- |
| Device address | The ID:176 is specified by default. If several controllers exist in a system, a new ID must be assigned. The jumper configuration can be found in the operating instructions. |
> **Warning:** Only one device with the same ID may be present in one wireless network at a time.
### Application
The device returns an integer value that returns the measured ppm (parts per million/ millionth share). The official limits can be found in the table below.
The LGS-868 has 3 LEDs (green/yellow/red), which are automatically switched at the IP-Symcon limit values (450-1000/ 1001-1500/ 1501-2100). The automatic can be switched off by setting “Limit (yellow)” and “Limit (red)” to 0 in the configuration page.
| ppm | Air quality |
| ------------ | ---------------------------------------------------------- |
| >2100 | Very bad (heavily polluted room air; ventilation required) |
| 2100... 1501 | Bad (heavily polluted room air; ventilation required) |
| 1500... 1001 | Medium (polluted room air; ventilation recommended) |
| 1000... 801 | Satisfactory |
| 800... 601 | Good |
| 600... 450 | Excellent |
> **Note:** Extremely high values above 2100 ppm are rare and are based, for example, on possible alcohols in cleaning products or typical odors in a restroom.
## PJ_RequestStatus
Source: https://www.symcon.de/en/service/documentation/module-reference/devices/ips-868/lgs-868/pj-requeststatus/
`bool PJ_RequestStatus(int $InstanceID)`
Query the status of variables and set them
**Parameters**
- `$InstanceID` (int): Device ID
**Returns** (bool): If the command succeeds, it returns __TRUE__, otherwise __FALSE__.
Device ID
**Example**
```php
//Queries the current values of instance 12345.
PJ_RequestStatus(12345);
```
## PJ_SetLEDs
Source: https://www.symcon.de/en/service/documentation/module-reference/devices/ips-868/lgs-868/pj-setleds/
`bool PJ_SetLEDs(int $InstanceID, bool $Green, bool $Yellow, bool $Red)`
switches LEDs on the AirQualitySensor
**Parameters**
- `$InstanceID` (int): ID of the device to be switched
- `$Green` (bool): Turns off the green LED
- `$Yellow` (bool): Turns off the yellow LED
- `$Red` (bool): Turns off the red LED
**Returns** (bool): If the command succeeds, it returns __TRUE__, otherwise __FALSE__.
Turns off the red LED
**Example**
```php
//Turns the green and yellow LED on and the red LED off.
PJ_SetLEDs(12345,true,true,false);
```
## RGBW-868
Source: https://www.symcon.de/en/service/documentation/module-reference/devices/ips-868/rgbw-868/
> **Note:** [Manual as a PDF](http://projet.de/Datasheets/RGBW868_24V.pdf)
### Description
The LED stripe controller is used to control LED stripes to allow different lighting scenarios and moods in a residential environment.
### Installation
To communicate with the controller, you must first install the virtual comport driver and connect the USB radio transceiver. In IP Symcon 'RGBW(Stripe)' must be added. The parent instances (e.g. the gateway) are automatically created. Please check if the right COM-Port was selected.
### Configuration
| Value | Description |
| ----------------- | ----------------------------------------------------------------------------------------------------------------------------------------------------------------------------------------------------------------------------------------------------- |
| Device-Address | By default, the ID: 144 is given. If more controllers are present in a system, a new ID will be awarded. Please check the jumper assignment in the instruction manual. Note: If necessary, the addresses: 149,150 and 151 are occupied by the system |
| Broadcast-Address | Fixed: 254 - all controller will be addressed together |
> **Warning:** Only one device with the same ID may be present in a radio network.
### A first test
For a quick check of basic functionality click the right mouse button on the 'RGBW(Stripe)' module, then 'Open Object' (or double-click) and choose a color, or, if connected, a brightness value for white-channel. Then click 'Insert'. The LED will light stripe in the desired color.

### Check in case of problems
* When switching on the 12V supply the LED stripe flashes briefly.
* The red LED on the board is also lit up brightly and then flashes further (very) slightly.
* All jumpers open means address 144.
* If commands are received, the LED lights as well.
* If commands are sent, the Rx/Tx LED lights on the USB-T
* The splitter 'ProJet Gateway' must be connected to the correct COM-Port
### Tips & Tricks
In addition to the lighting scenes also for example flashing warning or flashing notes can be dislayed. These can be acknowledged by both of the controller pushbutton inputs as positive (as YES) or negative (as NO) since the used radio system is bidirectional. In IP Symcon the 'FD(Stripe) Input' module has to be added.
## PJ_DimRGBW
Source: https://www.symcon.de/en/service/documentation/module-reference/devices/ips-868/rgbw-868/pj-dimrgbw/
`bool PJ_DimRGBW(int $InstanceID, int $R, int $RTime, int $G, int $GZeit, int $B, int $BZeit, int $W, int $WZeit)`
**Parameters**
- `$InstanceID` (int): ID of the device to be switched
- `$R` (int): Brightness value 0 (off) to 255 (on, maximum brightness)
- `$RTime` (int): In seconds in which the desired brightness level is to be achieved
- `$G` (int): Brightness value 0 (off) to 255 (on, maximum brightness)
- `$GZeit` (int): In seconds in which the desired brightness level is to be achieved
- `$B` (int): Brightness value 0 (off) to 255 (on, maximum brightness)
- `$BZeit` (int): In seconds in which the desired brightness level is to be achieved
- `$W` (int): Brightness value 0 (off) to 255 (on, maximum brightness)
- `$WZeit` (int): In seconds in which the desired brightness level is to be achieved
**Returns** (bool): If the command succeeds, it returns __TRUE__, otherwise __FALSE__.
In seconds in which the desired brightness level is to be achieved
**Example**
```php
//dim in 2 seconds on yellow
PJ_DimRGBW(12345,255,2,255,2,0,0,0,0);
```
## PJ_RunProgram
Source: https://www.symcon.de/en/service/documentation/module-reference/devices/ips-868/rgbw-868/pj-runprogram/
`bool PJ_RunProgram(int $InstanceID, int $Program)`
**Parameters**
- `$InstanceID` (int): ID of the device to be switched
- `$Program` (int): 0 – all RGBW off; 1 – all RGBW at the last brightness value; 2- blink slowly; 3- blink rapidly; 4- flash slowly ; 5- flash rapidly; 6- fade slowly
**Returns** (bool): If the command succeeds, it returns __TRUE__, otherwise __FALSE__.
0 – all RGBW off; 1 – all RGBW at the last brightness value; 2- blink slowly; 3- blink rapidly; 4- flash slowly ; 5- flash rapidly; 6- fade slowly
**Example**
```php
//let LEDs blink rapidly
PJ_RunProgram(12345, 3);
```
## PJ_SetRGBW
Source: https://www.symcon.de/en/service/documentation/module-reference/devices/ips-868/rgbw-868/pj-setrgbw/
`bool PJ_SetRGBW(int $InstanceID, int $R, int $G, int $B, int $W)`
sets a color value
**Parameters**
- `$InstanceID` (int): ID of the device to be switched
- `$R` (int): Brightness value 0 (off) to 255 (on, maximum brightness)
- `$G` (int): Brightness value 0 (off) to 255 (on, maximum brightness)
- `$B` (int): Brightness value 0 (off) to 255 (on, maximum brightness)
- `$W` (int): Overall brightness value 0 (off) to 255 (on, maximum brightness)
**Returns** (bool): If the command succeeds, it returns __TRUE__, otherwise __FALSE__.
Overall brightness value 0 (off) to 255 (on, maximum brightness)
**Example**
```php
// Switch to yellow at full brightness
PJ_SetRGBW(12345,255,255,0,255);
```
## SERVO-868
Source: https://www.symcon.de/en/service/documentation/module-reference/devices/ips-868/servo-868/
### Description
The 4-way servo controller is used to control commercially available model-making servos with the RJ connector system. As a second function, up to four buttons can be connected as control inputs.
### Installation
In order to communicate with the controller, the USBT-868 or LAN-T-868 gateway must have been installed beforehand. The instance "Servo-868" must be added in IP-Symcon. The parent instances such as the "ProJetGateway" are created automatically. It must be checked whether the correct virtual COM port was selected by the USB gateway. With the LAN-T-868 Gateway, the correct IP address and port must be specified in the "Client Socket".
### Configuration
The default device address is ID:160. If there are more controllers in a system, a new ID must be assigned. The jumper configuration can be found in the operating instructions.
### A first test
For a quick first function test, the device must be connected to a suitable power source. It is important to pay attention to the correct polarity. A servo is then connected to the servo output with a flat cable and a plug with a contact spacing of 2.54 mm. As a rule, the brown wire is "minus", red is "plus" and orange is the "PWM" signal. In IP-Symcon, the configuration page can be opened by right-clicking (or double-clicking) on the "Servo-868" instance and then on "Open object". A value between 0 and 255 can be entered in the respective "Channel" in the 'Test Environment'. After "Set Channel n" the servo moves to a new position.
### Tipps & Tricks
[https://en.wikipedia.org/wiki/Servo_(radio_control)](https://en.wikipedia.org/wiki/Servo_(radio_control))
[https://www.mikrocontroller.net/articles/Modellbauservo_Ansteuerung](https://www.mikrocontroller.net/articles/Modellbauservo_Ansteuerung)
[http://www.electronicsplanet.ch/Roboter/Servo/intern/intern.htm](http://www.electronicsplanet.ch/Roboter/Servo/intern/intern.htm)
## PJ_DimServo
Source: https://www.symcon.de/en/service/documentation/module-reference/devices/ips-868/servo-868/pj-dimservo/
`bool PJ_DimServo(int $InstanceID, int $Channel, int $Value, int $Steps)`
incrementally sets a servo value
**Parameters**
- `$InstanceID` (int): ID of the device to be switched
- `$Channel` (int): Servo channel 1..4
- `$Value` (int): Value from 0..255
- `$Steps` (int): Steps from 0 (instant) through 1 (slow) to 255 (fast)
**Returns** (bool): If the command succeeds, it returns __TRUE__, otherwise __FALSE__.
Steps from 0 (instant) through 1 (slow) to 255 (fast)
**Example**
```php
// Immediately sets servo channel 1 to the value 255
PJ_DimServo(12345, 1, 255, 0);
```
## PJ_SetServo
Source: https://www.symcon.de/en/service/documentation/module-reference/devices/ips-868/servo-868/pj-setservo/
`bool PJ_SetServo(int $InstanceID, int $Channel, int $Value)`
**Parameters**
- `$InstanceID` (int): ID of the device to be switched
- `$Channel` (int): Servo channel 1..4
- `$Value` (int): Value from 0..255
**Returns** (bool): If the command succeeds, it returns __TRUE__, otherwise __FALSE__.
Value from 0..255
**Example**
```php
PJ_SetServo(12345, 1, 255);
```
## WDT-868
Source: https://www.symcon.de/en/service/documentation/module-reference/devices/ips-868/wdt-868/
### Description
The watchdog timer is used to monitor computer systems and individual programs. A "sign of life" is sent cyclic from the PC to the WDT. If this is not received correctly, can via a potential free contact e.g. a siren ca be activated or a hardware reset can be executed.
Additionally, the UM-relay (5A/230V) can be turned on and off, or to be addressed by a timer (65,535 sec). The unit also has a pushbutton input at leisure. The status is shown as a variable in IP Symcon.
### Installation
To receive data, previously on Windows must be the [virtual comport driver from Silicon Labs (CP210x)] installed[1] and the T-USB 868 radio transceiver connected. In IP Symcon 'WDT-868' must be added. The parent instances (e.g. the gateway) are automatically created.
### Configuration
In the DeviceID 165 will be set (Position 0). This can be changed by turning the coding switch to 174 (Position 9).

| Variable | Description |
| -------- | --------------------------------------------------- |
| Input | False: Button is open / True: Button is pressed |
| Status | False: Relay de-energized / True: Relay energized |
| Timer | Time in seconds, after the relay changes its status |
After the timer expires, the WDT sends the new state of the relay. The state variable is updated accordingly (no simulation). By an active timer the LED blinks every second.
A brief flash signals a radio commands in IP Symcon-868 radio system[/i]
> **Warning:** Only one device with the same ID may be present in a radio network.
### Tipps & Tricks
To the two contacts of the switch e.g. an external switch (doorbell, motion sensors, photocells, etc.) can be connected.
## PJ_SwitchDuration
Source: https://www.symcon.de/en/service/documentation/module-reference/devices/ips-868/wdt-868/pj-switchduration/
`bool PJ_SwitchDuration(int $InstanceID, bool $Status, int $Dauer)`
**Parameters**
- `$InstanceID` (int): ID of the device to be switched
- `$Status` (bool): __TRUE__ for On, __FALSE__ for Off
- `$Dauer` (int): On or off times in seconds
**Returns** (bool): If the command succeeds, it returns __TRUE__, otherwise __FALSE__.
On or off times in seconds
**Example**
```php
//The following command turns on the relay for 60 seconds:
PJ_SwitchDuration(12345, True, 60);
```
## PJ_SwitchMode
Source: https://www.symcon.de/en/service/documentation/module-reference/devices/ips-868/wdt-868/pj-switchmode/
`bool PJ_SwitchMode(int $InstanceID, bool $Status)`
**Parameters**
- `$InstanceID` (int): ID of the device to be switched
- `$Status` (bool): __TRUE__ for On, __FALSE__ for Off
**Returns** (bool): If the command succeeds, it returns __TRUE__, otherwise __FALSE__.
__TRUE__ for On, __FALSE__ for Off
**Example**
```php
PJ_SwitchMode(12345, True);
```
---
# IR Trans
> Symcon documentation · English · generated on 2026-09-26
> Index: https://www.symcon.de/en/llms.txt
Source: https://www.symcon.de/en/service/documentation/module-reference/devices/irtrans/
Using infrared signals allows an inexpensive and easy integration of existing audio and video equipment into home automation. Moreover, e.g. light scenarios using the infrared remote control can be activated or blinds can be lowered. For this, in principle, only one transmitter and receiver diode is necessary - as you want as a finished device or for crafting ...
Manufacturer: IRTrans: “… turns your PC into a programmable remote control”
[http://www.irtrans.de/de/index.php](http://www.irtrans.de/de/index.php)
### Installation
To send/receive IR signals over IRTrans, a IRTrans compatible device, such as USB, LAN or WLAN variant is needed. Once the devices operate within the IRTrans Tray software, you can begin the installation within IP-Symcon. [www.irtrans.de/download/setup.exe](http://www.irtrans.de/download/setup.exe)
With the IRTrans Tray Icon (right click -> Diagnostics), the IDs of the devices can be queried, that were found by the IRTrans server application, which can then be controlled via IP-Symcon. The following figure shows an IRTrans LAN device that has the ID 0.

### Programming the remote control
The manufacturer recommends the learning of the commands via the "IRTrans GUI Client". First, you must enter the name of the remote control (e.g. "sat") and the appropriate key (e.g. "power"). A teaching about IP-Symcon is not possible.

In the configuration of the IRTrans instance the device ID must be specified, which can be removed from the upper diagnosis window. Each instance can control a single device. Any number of IRTrans instances can be created. If you want to send to multiple devices, multiple PHP commands can simply be sent to multiple instances in a row. The function can be checked in the Test Center.

The IRTrans module provides two variables in the object tree. With these variables it can reacted on the currently depressed remote control and button. For that, a triggered event must be created that responds to the update of the "key" variable.

## Device list
Source: https://www.symcon.de/en/service/documentation/module-reference/devices/irtrans/device-list/
### Supported Gateways
| Gateway | Description |
| ----------------------- | ------------------------- |
| IRTrans Ethernet Module | IR-Trans LAN adapter |
| IRTrans USB Module | IR-Trans USB adapter |
| IRTrans WiFi Module | IR-Trans wireless adapter |
### Supported Components
The list of supported infrared devices can be found on the homepage [HERE](http://www.irtrans.de/en/technicalinfo/ir.php) .
> **Warning:** The SymBox only supports IR-Trans devices with IR database.
## IRT_SendOnce
Source: https://www.symcon.de/en/service/documentation/module-reference/devices/irtrans/irt-sendonce/
`bool IRT_SendOnce(int $InstanceID, string $RemoteControl, string $Button)`
sends an IR command
**Parameters**
- `$InstanceID` (int): ID of the device to be switched
- `$RemoteControl` (string): Name of the remote control, which is/ was registered in the remote database.
- `$Button` (string): Name of the remote control, which is/ was registered in the remote database.
**Returns** (bool): If the command succeeds, it returns __TRUE__, otherwise __FALSE__.
Name of the remote control, which is/ was registered in the remote database.
**Example**
```php
IRT_SendOnce(37279,"ccf", "v+");
```
---
# KEBA
> Symcon documentation · English · generated on 2026-09-26
> Index: https://www.symcon.de/en/llms.txt
Source: https://www.symcon.de/en/service/documentation/module-reference/devices/keba/
KEBA offers various wallboxes/charging stations. These can be read out via ModBus RTU/TCP. A connection with IP-Symcon is possible via LAN or RS485, depending on the version.
> **Note:** The following devices are supported by IP-Symcon:
>
> [Supported components](https://www.symcon.de/en/llms/modules/keba.md)
### Installation
In order to be able to use KEBA wallboxes/charging stations in IP-Symcon, a connection via Ethernet or RS485 to the wallbox must be available.
### IP-Symcon integration
First, a "ModBus Device" instance must be added within the IP-Symcon object tree. The DeviceID must be set to 255 and the IP address of the wallbox must be entered in the following dialog. The port is 502 by default. Both pieces of information can be viewed on the web interface/app of the WallBox/charging pole.


The ModBus template for KEBA wallboxes/charging stations can then be downloaded. This contains the entire configuration of the ModBus device. After downloading, the "KebaModBus_vx.json" can be loaded via "Import". All ModBus addresses of the common KEBA wallboxes/charging stations are then set up.
> **Note:** ModBus template for KEBA wallboxes/charging stations: [Download](https://www.symcon.de/media/pages/service/dokumentation/modulreferenz/geraete/keba/95f894dbf9-1790424938/kebamodbus_v1.json)

### Add addresses
If further addresses are to be added, this can be done via "Add".
Depending on the wallbox version, individual addresses may need to be deactivated/activated. This can be controlled via the Active column.
### protocol description
> **Note:** Protocol description for KEBA wallboxes/charging stations:
> * KEBA KeContact P30: [Download](https://www.symcon.de/media/pages/service/dokumentation/modulreferenz/geraete/keba/dafc7da7e7-1790424938/keba-p30-wallbox-modbus.pdf)
> * KEBA KeContact P40: [Download](https://www.symcon.de/media/pages/service/dokumentation/modulreferenz/geraete/keba/8ad234ed8e-1790424938/keba-p40-wallbox-modbus.pdf)
## Device List
Source: https://www.symcon.de/en/service/documentation/module-reference/devices/keba/device-list/
_Requires Symcon >= 7.0_
### Supported components
| System | Model | Description |
| ------------------ | --------------------- | ------------------------- |
| KEBA KeContact P30 | All, without a-series | Supported in all versions |
| KEBA KeContact P40 | All | Supported in all versions |
---
# KNX
> Symcon documentation · English · generated on 2026-09-26
> Index: https://www.symcon.de/en/llms.txt
Source: https://www.symcon.de/en/service/documentation/module-reference/devices/knx/
KNX is a wired as well as radio based system. A connection with IP-Symcon is possible via a serial or KNX IP interface. For the configuration of the system an engineering tool software (short "ETS") is needed.
> **Note:** The following devices are supported by IP-Symcon:
>
> [Supported components (excerpt)](https://www.symcon.de/en/llms/modules/knx.md)
>
> KNX Data Secure and KNX IP Secure are supported!
### Summary
- Introduction
- Installation
- XML Export in ETS
- Integration IP-Symcon
- Integration without KNX Data Secure
- Integration with KNX Data Secure
- Set up single actuators
- Automatic detection of feedback address
- Examples
- Example: Send temperature values to the bus
- Better roller shutter control with KNX Shutter
- Tips and Tricks
- Conversion of group addresses
- KNX with QNAP, Synology or Docker
- Read out states
- Output of group addresses
- Legacy
- OPC Export in ETS
- Assignment EIS type / DPT
### Introduction
KNX is a network of home and building control systems according to EN 50090 and ISO/IEC 14543. It controls, for example, heating, lighting, blinds, ventilation and security systems across different trades. The system usually uses cables (designation e.g. J-Y (St) Y 2x2x0.8 EIB or YCYM 2x2x0.8) with two wire pairs (red-black and white-yellow). The KNX system is supplied by a power supply with 30 V nominal voltage [DC voltage]. This voltage supplies the bus couplers via which each KNX device communicates with the other networked KNX devices. The data exchange between the KNX devices takes place via telegrams.
The programming of the participants and the assignment of the group addresses is done with the Engineering Tool Software (ETS). The ETS is provided by the umbrella organization Konnex and ensures the trouble-free cooperation of components from different manufacturers.
The connection to IP-Symcon is done via a serial or IP gateway.
As a rule, all serial gateways "PEI type 10″ with FT1.2 protocol (interfaces of type PEI 16 do not work) are supported and all KNX/IP gateways that offer the tunneling protocol. If a KNX gateway meets these requirements and does not work, Symcon support should be contacted. The problem will be solved as soon as possible.
Since IP-Symcon 6.4, KNX Data Secure and KNX IP Secure are also fully supported. In addition, all KNX IP Secure Interfaces also support the new KNX/IP over TCP, which is much more robust than the older KNX/IP over UDP.
### Installation
When all KNX devices are correctly set up and connected, they must be configured with the ETS. The three-stage address assignment is used for this purpose.
> **Warning:** Currently only three-level addresses (e.g. 10/2/5) are supported. Two-level or free addresses are not supported by IP-Symcon at the moment. About the Conversion any two-level address can be controlled via the translated three-level address
If the installation was done by an electrician, he should include the OPC/XML export explained below and the associated file of type XML.
To use KNX in IP-Symcon, either a serial FT1.2 gateway or a compatible KNX/IP gateway is required. The setup of the different gateways differs slightly. A KNX instance can be created directly in IP-Symcon and the gateway can be configured from there. Alternatively, the XML export from the ETS can be used.

Using the XML export with the IP-Symcon configurator allows a fast integration of all KNX components.
> **Note:** From IP-Symcon 5.3 the export as XML is recommended, because it supports the new KNX DPT instances
#### XML Export to ETS
An XML export can be saved within the ETS in the opened project via right click on the group addresses.

Video tutorial for export:
From version 6.0.0
[Video](https://www.youtube.com/embed/-hdo5nrTr3Y?rel=0&cc_load_policy=1)
From version 5.6.5
[Video](https://www.youtube.com/embed/DeGCLestF_I?rel=0&cc_load_policy=1)
#### Integration in IP-Symcon
The KNX interface can be integrated via the [device-search](https://www.symcon.de/en/llms/components/management-console.md). For this, "KNX Discovery" must be selected as the system. The Discovery instance then offers the creation of a KNX [Configurator](https://www.symcon.de/en/llms/concepts.md). After the configurator has been created, the individual devices can be added via this as described below.

Before the import of the group addresses can be started, the interface must be correctly selected and configured. To do this, click on the "cogwheel" in the upper part of the configuration. The following dialog should open.

> **Note:** If KNX Data Secure should be used, you can read more in the chapter KNX Data Secure
#### Integration without KNX Data Secure
Under Mode the type of gateway has to be selected. For all common IP gateways the mode "KNX/IP (UDP)" may be selected. For the KNX IP interfaces with secure support, you can also choose the more reliable mode “KNX/IP (TCP)” or the appropriate secure equivalent. Changes are saved with the "Apply" button. To be able to enter the address for the interface, the "Gearwheel" in the upper area must be clicked again. Depending on the mode, either the IP address or the serial port belonging to the interface must be entered. In case of doubt, the IP address can also be found out with the help of the ETS. Further settings are not necessary. The changes are confirmed with "Apply". In the configuration of the gateway, the parameters of the gateway can now be read out via "Reload information". If these have been read out correctly, the configuration is complete.
Video tutorial:
[Video](https://www.youtube.com/embed/hgz7nv0SC-Q?rel=0&cc_load_policy=1)
#### Integration in IP-Symcon with KNX IP Secure / KNX Data Secure
To use KNX Data Secure and/or KNX IP Secure in IP-Symcon, a backup of a keychain is needed in addition to the XML file.
Video tutorial to export the keychain:
[Video](https://www.youtube.com/embed/R8BTUxpIDUc?rel=0&cc_load_policy=1)
In the KNX Gateway the mode "KNX/IP Secure (TCP)" must be selected. In the field "Select keychain" the keychain file is imported and the password is entered in the field "Keychain password". Changes will be saved with the button "Apply". Now the field "Secure tunnel" appears over which the configured tunnel of the interface can be selected. To be able to enter the address for the interface, the "Gearwheel" in the upper area must be clicked again. Here the IP address must be entered belongs. In case of doubt, the IP address can also be found out with the help of the ETS. Further settings are not necessary. The changes are confirmed with "Apply". In the configuration of the gateway, the gateway parameters can now be read out via "Reload information". If these have been read out correctly, the configuration is complete.
Video tutorial for KNX Data Secure with KNX IP Secure Interface:
[Video](https://www.youtube.com/embed/AZo_TwAyn-U?rel=0&cc_load_policy=1)
Video tutorial for KNX Data Secure with SymBox with KNX extension:
[Video](https://www.youtube.com/embed/aA8mcKEyHOY?rel=0&cc_load_policy=1)
##### find IP address
[Video](https://www.youtube.com/embed/0nEpt1Y_2nc?rel=0&cc_load_policy=1)
#### Single Actuators Setup
In the KNX Configurator after uploading the XML file all previously configured KNX actuators can be integrated and visualized in IP-Symcon.
For this purpose devices have to be created by pressing "Create". The devices are now operable.
The ID that appears on the right side is the instance ID assigned by IP-Symcon. This is unique and unchangeable.
After clicking on a selected KNX device and then clicking on "Configure", the functionality of each individual device can be tested.
The devices can be found again in the object tree.
The created devices can now be switched via the "Visualization".
#### Automatic detection of feedback addresses
If a device has a feedback address set up, this can be automatically detected and set as a feedback address. To do this, click on the button "Detect feedback GA automatically" in the KNX Configurator and activate this via the item "Activate detection".
Then you must select the levels via which the group addresses are to be linked. If the feedback address and the device are in the same middle group, the item "Link on the same level (1/1/x)" is selected. If the feedback address and the device are in different middle groups, the item "Link over two levels (1/x/x)" is selected. If the addresses are in different main groups, the item "Link on all levels (x/x/x)" is selected.
The linking of the group addresses is done by the specified keywords. If the name of a feedback address is identical with the name of a group address after removing the keyword, they will be linked. The upper/lower case is ignored. The feedback address is then set as the feedback address of the group address.
Video about the setup with automatic feedback addresses:
[Video](https://www.youtube.com/embed/hDwXGSwMjvc?rel=0&cc_load_policy=1)
### Examples
### Sending temperature values to the KNX bus
In order to be able to send values such as the temperature to the KNX bus, an action script is required. This forms the link between the visualization and the actuators. A script with the following content must be created:
```php
EIB_Value(IPS_GetParent($_IPS['VARIABLE']), $_IPS['VALUE']);
```
For each desired device that should be changeable, the corresponding variable must be linked to this action script. This must be done in the configuration of the respective variable. To do this, the variable must be double-clicked. The selection of the action script is located in the "Profile settings" area. Here, the script just created must be selected. In addition, a suitable profile (e.g. ~temperature) should be selected via "Own profile".

> **Note:** The last step can be repeated as often as needed. It is only necessary to create the script once with the above mentioned content
### Better Shutter Control with KNX Shutter
Due to the many setting options and linked addresses, shutters cannot be added via the configurator.

#### Move
Here the address for the up and down movement of the shutter must be entered. In the area "More?" further addresses can be entered on which the instance for moving up/down should listen.
#### Stop
Here the address for stopping the shutter must be entered. In the "More?" area, further addresses can be entered to which the instance is to listen for stopping.
#### Activate_steps/Slat
This address can be enabled and controls the stepwise movement of the shutter. This is used to adjust the slats of the shutter. In the "More?" area, further addresses can be entered to which the instance for step control should listen.
#### Activate percentage positioning
These two addresses can be enabled and control either the percentage positioning of the shutter or the slats.
#### Test Center
In the Test Center basic functions can be tested adhoc.
### Tips and Tricks
* [Is the ETS mandatory?](/forum/f18/ets-mandatory-7102/)
* [Synchronize time with KNX](/forum/f53/date-time-knx-synchronize-send-12064/)
#### Conversion of group addresses
##### Convert from two-level group addresses to three-level group addresses
If a two-level representation of the group addresses has been selected in the ETS, the addresses can be converted with the help of this tool. If the OPC export is used, the ETS takes over this process automatically.
##### Convert free group addresses to three level group addresses
If you have selected the free representation of the group addresses in the ETS, unfortunately an OPC export is not possible. With the help of this tool the addresses can be converted.
#### KNX with QNAP, Synology or Docker
If KNX is to be used with QNAP, Synology or Docker, NATSupport must be set up to receive responses from the system. This process is explained [here](https://www.symcon.de/en/llms/getting-started.md).
#### Script to read states from the bus
Since only variable changes are perceived by IP-Symcon, it is necessary to query IP-Symcon when restarting to see if there have been any status changes in order to ensure a consistent display.
For this a start script can be added in the [Event-Control](https://www.symcon.de/en/llms/modules/event-control.md) .
```php
$gatewayIDs = IPS_GetInstanceListByModuleID("{1C902193-B044-43B8-9433-419F09C641B8}");
$instanceIDs = IPS_GetInstanceList();
foreach($gatewayIDs as $gatewayID) {
foreach($instanceIDs as $instanceID) {
$i = IPS_GetInstance($instanceID);
if($i['ConnectionID'] == $gatewayID) {
switch($i['ModuleInfo']['ModuleID']) {
case "{24A9D68D-7B98-4D74-9BAE-3645D435A9EF}": //Shutter
case "81F54858-72B1-4C2C-8CE3-7E00A3168378": //RGB (Legacy until IP-Symcon 5.0)
case "{81F54858-72B1-4C2C-8CE3-7E00A3168378}": //RGB (IP-Symcon 5.1+)
case "4D7F7548-0979-4ABD-9BB3-81F9477C0903": //RGBW (Legacy until IP-Symcon 5.0)
case "{4D7F7548-0979-4ABD-9BB3-81F9477C0903}": //RGBW (IP-Symcon 5.1+)
EIB_RequestStatus($instanceID);
break;
case "{D62B95D3-0C5E-406E-B1D9-8D102E50F64B}": //Group
if(IPS_GetProperty($instanceID, "GroupCapabilityRead")) {
EIB_RequestStatus($instanceID);
}
break;
case "{FB223058-3084-C5D0-C7A2-3B8D2E73FE8A}": //Device
KNX_RequestStatus($instanceID);
break;
default:
//DPTs
if(strpos($i['ModuleInfo']['ModuleName'], "DPT") !== false) {
if(IPS_GetProperty($instanceID, "CapabilityRead")) {
KNX_RequestStatus($instanceID);
}
}
break;
}
}
}
}
```
#### Script to output the group addresses
The following script can be used to output the group addresses including id, name and location.
```php
echo "ID,Name,Location,GA,MoreGA" . PHP_EOL;
$gatewayIDs = IPS_GetInstanceListByModuleID("{1C902193-B044-43B8-9433-419F09C641B8}");
$instanceIDs = IPS_GetInstanceList();
foreach($gatewayIDs as $gatewayID) {
foreach($instanceIDs as $instanceID) {
$i = IPS_GetInstance($instanceID);
if($i['ConnectionID'] == $gatewayID) {
switch($i['ModuleInfo']['ModuleID']) {
case "{24A9D68D-7B98-4D74-9BAE-3645D435A9EF}": //Shutter
printGA($instanceID, "GroupMove");
if (IPS_GetProperty($instanceID, "EnableStep")) {
printGA($instanceID, "GroupStep");
}
printGA($instanceID, "GroupStop");
if (IPS_GetProperty($instanceID, "EnablePosition")) {
printGA($instanceID, "GroupPosition");
}
if (IPS_GetProperty($instanceID, "EnableBladePosition")) {
printGA($instanceID, "GroupBladePosition");
}
break;
case "81F54858-72B1-4C2C-8CE3-7E00A3168378": //RGB (Legacy until IP-Symcon 5.0)
case "{81F54858-72B1-4C2C-8CE3-7E00A3168378}": //RGB (IP-Symcon 5.1+)
case "4D7F7548-0979-4ABD-9BB3-81F9477C0903": //RGBW (Legacy until IP-Symcon 5.0)
case "{4D7F7548-0979-4ABD-9BB3-81F9477C0903}": //RGBW (IP-Symcon 5.1+)
case "{D62B95D3-0C5E-406E-B1D9-8D102E50F64B}": //Group
printGA($instanceID, "Group");
break;
case "{FB223058-3084-C5D0-C7A2-3B8D2E73FE8A}": //Device
printGAs($instanceID);
break;
default:
//DPTs
if(strpos($i['ModuleInfo']['ModuleName'], "DPT") !== false) {
printGA($instanceID, "");
}
break;
}
}
}
}
function printGA($id, $prefix) {
$c = json_decode(IPS_GetConfiguration($id), true);
echo sprintf("%d,%s,%s,", $id, IPS_GetName($id), IPS_GetLocation($id));
echo sprintf("%d/%d/%d", $c[$prefix . "Address1"], $c[$prefix . "Address2"], $c[$prefix . "Address3"]);
foreach (json_decode($c[$prefix . "Mapping"], true) as $a) {
echo "," . sprintf("%d/%d/%d", $a[$prefix . "Address1"], $a[$prefix . "Address2"], $a[$prefix . "Address3"]);
}
echo PHP_EOL;
}
function printGAs($id) {
$c = json_decode(IPS_GetConfiguration($id), true);
foreach(json_decode($c['GroupAddresses'], true) as $ga) {
echo sprintf("%d,%s,%s,", $id, IPS_GetName($id), IPS_GetLocation($id));
echo sprintf("%d/%d/%d", $ga["Address1"], $ga["Address2"], $ga["Address3"]);
foreach ($ga["Mapping"] as $a) {
echo "," . sprintf("%d/%d/%d", $a["Address1"], $a["Address2"], $a["Address3"]);
}
echo PHP_EOL;
}
}
```
### Legacy
##### OPC Export in ETS

Video tutorial for export:[Video](https://www.youtube.com/embed/WnJ3qRI0qVE?rel=0&cc_load_policy=1)
##### Setup with OPC[Video](https://www.youtube.com/embed/kfv0HSX9PVM?rel=0&cc_load_policy=1)
### Assignment of individual functions to EIS type/DPT
| function | EIS type | DPT |
| ------------------------------------------------------------ | -------- | ------------ |
| [EIB_Char](https://www.symcon.de/en/llms/modules/knx.md) | EIS13 | DPT4 |
| [EIB_Counter8bit](https://www.symcon.de/en/llms/modules/knx.md) | EIS14 | DPT5, DPT6 |
| [EIB_Counter16bit](https://www.symcon.de/en/llms/modules/knx.md) | EIS10 | DPT7, DPT8 |
| [EIB_Counter32bit](https://www.symcon.de/en/llms/modules/knx.md) | EIS11 | DPT12, DPT13 |
| [EIB_Date](https://www.symcon.de/en/llms/modules/knx.md) | EIS4 | DPT11 |
| [EIB_DimControl](https://www.symcon.de/en/llms/modules/knx.md) | EIS2 | DPT3 |
| [EIB_DimValue](https://www.symcon.de/en/llms/modules/knx.md) | EIS6 | DPT5 |
| [EIB_DriveBladeValue](https://www.symcon.de/en/llms/modules/knx.md) | EIS6 | DPT5 |
| [EIB_DriveMove](https://www.symcon.de/en/llms/modules/knx.md) | EIS7 | DPT1 |
| [EIB_DriveShutterValue](https://www.symcon.de/en/llms/modules/knx.md) | EIS6 | DPT5 |
| [EIB_DriveStep](https://www.symcon.de/en/llms/modules/knx.md) | EIS7 | DPT1 |
| [EIB_FloatValue](https://www.symcon.de/en/llms/modules/knx.md) | EIS9 | DPT14 |
| [EIB_Move](https://www.symcon.de/en/llms/modules/knx.md) | EIS7 | DPT1 |
| [EIB_Position](https://www.symcon.de/en/llms/modules/knx.md) | EIS6 | DPT5 |
| [EIB_PriorityControl](https://www.symcon.de/en/llms/modules/knx.md) | EIS8 | DPT2 |
| [EIB_PriorityPosition](https://www.symcon.de/en/llms/modules/knx.md) | EIS1 | DPT1 |
| [EIB_Scale](https://www.symcon.de/en/llms/modules/knx.md) | EIS6 | DPT5 |
| [EIB_Str](https://www.symcon.de/en/llms/modules/knx.md) | EIS15 | DPT16 |
| [EIB_Switch](https://www.symcon.de/en/llms/modules/knx.md) | EIS1 | DPT1 |
| [EIB_Time](https://www.symcon.de/en/llms/modules/knx.md) | EIS3 | DPT10 |
| [EIB_Value](https://www.symcon.de/en/llms/modules/knx.md) | EIS5 | DPT9 |
| N/A | EIS12 | DPT15 |
## EIB_Char
Source: https://www.symcon.de/en/service/documentation/module-reference/devices/knx/eib-char/
`bool EIB_Char(int $InstanceID, string $Letter)`
**Parameters**
- `$InstanceID` (int): ID of the device to be switched
- `$Letter` (string): Single letter
**Returns** (bool): If the command succeeds, it returns __TRUE__, otherwise __FALSE__.
Single letter
**Example**
```php
EIB_Char(12345, "A"); //Sends the letter A onto the bus
```
## EIB_Counter8Bit
Source: https://www.symcon.de/en/service/documentation/module-reference/devices/knx/eib-counter8bit/
`bool EIB_Counter8Bit(int $InstanceID, float $Value)`
sends an 8-bit counter value
**Parameters**
- `$InstanceID` (int): ID of the device to be switched
- `$Value` (float): Default = 0..255; Signed = -127..127
**Returns** (bool): If the command succeeds, it returns __TRUE__, otherwise __FALSE__.
Default = 0..255; Signed = -127..127
**Example**
```php
EIB_Counter8Bit(12345, 10); //Sends the value 10 on the bus
```
## EIB_Counter16Bit
Source: https://www.symcon.de/en/service/documentation/module-reference/devices/knx/eib-counter16bit/
`bool EIB_Counter16Bit(int $InstanceID, float $Value)`
sends a 16bit counter value
**Parameters**
- `$InstanceID` (int): ID of the device to be switched
- `$Value` (float): Standard = 0..65535; Signed = -32768..32767
**Returns** (bool): If the command succeeds, it returns __TRUE__, otherwise __FALSE__.
Standard = 0..65535; Signed = -32768..32767
**Example**
```php
EIB_Counter16Bit(12345, 10); //Sends the value 10 on the bus
```
## EIB_Counter32bit
Source: https://www.symcon.de/en/service/documentation/module-reference/devices/knx/eib-counter32bit/
`bool EIB_Counter32Bit(int $InstanceID, float $Value)`
sends a 32bit counter value
**Parameters**
- `$InstanceID` (int): ID of the device to be switched
- `$Value` (float): Standard = -2147483648..2147483647
**Returns** (bool): If the command succeeds, it returns __TRUE__, otherwise __FALSE__.
Standard = -2147483648..2147483647
**Example**
```php
EIB_Counter32bit (12345, 10);//Sends the value 10 to the bus
```
## EIB_Date
Source: https://www.symcon.de/en/service/documentation/module-reference/devices/knx/eib-date/
`bool EIB_Date(int $InstanceID, string $Date)`
**Parameters**
- `$InstanceID` (int): ID of the device to be switched
- `$Date` (string): Default = yyyymmdd
**Returns** (bool): If the command succeeds, it returns __TRUE__, otherwise __FALSE__.
Default = yyyymmdd
**Example**
```php
EIB_Date(12345, date("Ymd")); //Sends the current date on the bus
```
## EIB_DimControl
Source: https://www.symcon.de/en/service/documentation/module-reference/devices/knx/eib-dimcontrol/
`bool EIB_DimControl(int $InstanceID, int $Value)`
**Parameters**
- `$InstanceID` (int): ID of the device to be switched
- `$Value` (int): Dim value date between 0..15 or -7..7
**Returns** (bool): If the command succeeds, it returns __TRUE__, otherwise __FALSE__.
Dim value date between 0..15 or -7..7
**Example**
```php
EIB_DimControl(12345, 0);
```
## EIB_DimValue
Source: https://www.symcon.de/en/service/documentation/module-reference/devices/knx/eib-dimvalue/
`bool EIB_DimValue(int $InstanceID, int $Value)`
**Parameters**
- `$InstanceID` (int): ID of the device to be switched
- `$Value` (int): Value 0..255, 0..100%
**Returns** (bool): If the command succeeds, it returns __TRUE__, otherwise __FALSE__.
Value 0..255, 0..100%
**Example**
```php
EIB_DimValue(12345, 100); //Dimming to 100%
```
## EIB_DriveBladeValue
Source: https://www.symcon.de/en/service/documentation/module-reference/devices/knx/eib-drivebladevalue/
`bool EIB_DriveBladeValue(int $InstanceID, int $Value)`
**Parameters**
- `$InstanceID` (int): ID of the device to be switched
- `$Value` (int): Value 0..255, 0..100%
**Returns** (bool): If the command succeeds, it returns __TRUE__, otherwise __FALSE__.
Value 0..255, 0..100%
**Example**
```php
EIB_DriveBladeValue(12345, 100); //Go to 100%
```
## EIB_DriveMove
Source: https://www.symcon.de/en/service/documentation/module-reference/devices/knx/eib-drivemove/
`bool EIB_DriveMove(int $InstanceID, bool $Direction)`
Moving the device with ID __InstanceID__ in a particular __Direction__. Depending on configuration the movement direction can be inverted.
-
**Parameters**
- `$InstanceID` (int): ID of the device to be switched
- `$Direction` (bool): Standard
**Returns** (bool): If the command succeeds, it returns __TRUE__, otherwise __FALSE__.
Standard
**Example**
```php
```
## EIB_DriveShutterValue
Source: https://www.symcon.de/en/service/documentation/module-reference/devices/knx/eib-driveshuttervalue/
`bool EIB_DriveShutterValue(int $InstanceID, int $Value)`
**Parameters**
- `$InstanceID` (int): ID of the device to be switched
- `$Value` (int): Value 0..255, 0..100%
**Returns** (bool): If the command succeeds, it returns __TRUE__, otherwise __FALSE__.
Value 0..255, 0..100%
**Example**
```php
EIB_DriveShutterValue(12345, 100); //Go to 100%
```
## EIB_DriveStep
Source: https://www.symcon.de/en/service/documentation/module-reference/devices/knx/eib-drivestep/
`bool EIB_DriveStep(int $InstanceID, bool $StepTowards)`
**Parameters**
- `$InstanceID` (int): ID of the device to be switched
- `$StepTowards` (bool): Standard
**Returns** (bool): If the command succeeds, it returns __TRUE__, otherwise __FALSE__.
Standard
**Example**
```php
EIB_DriveStep(12345, true); //Shutters move stepwise
```
## EIB_FloatValue
Source: https://www.symcon.de/en/service/documentation/module-reference/devices/knx/eib-floatvalue/
`bool EIB_FloatValue(int $InstanceID, float $Value)`
sends a float value
**Parameters**
- `$InstanceID` (int): ID of the device to be switched
- `$Value` (float): Floating point value
**Returns** (bool): If the command succeeds, it returns __TRUE__, otherwise __FALSE__.
Floating point value
**Example**
```php
EIB_FloatValue(12345, 22.1); //Sends 22.1°C to the controller
```
## EIB_Move
Source: https://www.symcon.de/en/service/documentation/module-reference/devices/knx/eib-move/
`bool EIB_Move(int $InstanceID, int $Direction)`
moves a roller shutter
**Parameters**
- `$InstanceID` (int): ID of the KNX shutter instance
- `$Direction` (int): 0 = up, 1 = step (up), 2 = stop, 3 = step (down), 4 = down
**Returns** (bool): If the command succeeds, it returns __TRUE__, otherwise __FALSE__.
0 = up, 1 = step (up), 2 = stop, 3 = step (down), 4 = down
**Example**
```php
EIB_move (12345, 3); //Stop shutters
```
## EIB_Position
Source: https://www.symcon.de/en/service/documentation/module-reference/devices/knx/eib-position/
`bool EIB_Position(int $InstanceID, int $Position)`
moves a roller shutter to a position
**Parameters**
- `$InstanceID` (int): ID of the KNX shutter instance
- `$Position` (int): 0-100%
**Returns** (bool): If the command succeeds, it returns __TRUE__, otherwise __FALSE__.
0-100%
**Example**
```php
EIB_Position(12345, 50); //Move roller shutters to 50%
```
## EIB_PriorityControl
Source: https://www.symcon.de/en/service/documentation/module-reference/devices/knx/eib-prioritycontrol/
`bool EIB_PriorityControl(int $InstanceID, int $State)`
sets a device state
**Parameters**
- `$InstanceID` (int): ID of the device to be switched
- `$State` (int): Default
**Returns** (bool): If the command succeeds, it returns __TRUE__, otherwise __FALSE__.
Default
**Example**
```php
EIB_PriorityControl(12345, 0);
```
## EIB_PriorityPosition
Source: https://www.symcon.de/en/service/documentation/module-reference/devices/knx/eib-priorityposition/
`bool EIB_PriorityPosition(int $InstanceID, bool $Direction)`
**Parameters**
- `$InstanceID` (int): ID of the device to be switched
- `$Direction` (bool): Standard
**Returns** (bool): If the command succeeds, it returns __TRUE__, otherwise __FALSE__.
Standard
**Example**
```php
EIB_PriorityPosition(12345, true); //Move shutters
```
## EIB_RequestStatus
Source: https://www.symcon.de/en/service/documentation/module-reference/devices/knx/eib-requeststatus/
`bool EIB_RequestStatus(int $InstanceID)`
sends a read request for EIB instances to the bus
**Parameters**
- `$InstanceID` (int): Device ID
**Returns** (bool): If the command succeeds, it returns __TRUE__, otherwise __FALSE__.
Device ID
**Example**
```php
EIB_RequestStatus(12345); //Send read request
```
## EIB_Scale
Source: https://www.symcon.de/en/service/documentation/module-reference/devices/knx/eib-scale/
`bool EIB_Scale(int $InstanceID, int $Value)`
**Parameters**
- `$InstanceID` (int): ID of the device to be switched
- `$Value` (int): Value 0..255, 0..100, 0..360
**Returns** (bool): If the command succeeds, it returns __TRUE__, otherwise __FALSE__.
Value 0..255, 0..100, 0..360
**Example**
```php
EIB_Scale(12345, 360);
```
## EIB_SetRGB
Source: https://www.symcon.de/en/service/documentation/module-reference/devices/knx/eib-setrgb/
`bool EIB_SetRGB(int $InstanceID, int $Red, int $Green, int $Blue)`
sets an RGB stripe to a specific color
**Parameters**
- `$InstanceID` (int): ID of the device to be switched
- `$Red` (int): 0 .. 255 (0 = off, 255 = bright)
- `$Green` (int): 0 .. 255 (0 = off, 255 = bright)
- `$Blue` (int): 0 .. 255 (0 = off, 255 = bright)
**Returns** (bool): If the command succeeds, it returns __TRUE__, otherwise __FALSE__.
0 .. 255 (0 = off, 255 = bright)
**Example**
```php
EIB_SetRGB(12345, 255, 0, 0); //Sets the RGB stripe to red
```
## EIB_SetRGBW
Source: https://www.symcon.de/en/service/documentation/module-reference/devices/knx/eib-setrgbw/
`bool EIB_SetRGBW(int $InstanceID, int $Red, int $Green, int $Blue, int $White)`
sets an RGBW stripe to a specific color
**Parameters**
- `$InstanceID` (int): ID of the device to be switched
- `$Red` (int): 0 .. 255 (0 = off, 255 = bright)
- `$Green` (int): 0 .. 255 (0 = off, 255 = bright)
- `$Blue` (int): 0 .. 255 (0 = off, 255 = bright)
- `$White` (int): 0 .. 255 (0 = off, 255 = bright)
**Returns** (bool): If the command succeeds, it returns __TRUE__, otherwise __FALSE__.
0 .. 255 (0 = off, 255 = bright)
**Example**
```php
EIB_SetRGBW(12345, 255, 0, 0, 0); //Sets the RGB stripe to red
```
## EIB_Str
Source: https://www.symcon.de/en/service/documentation/module-reference/devices/knx/eib-str/
`bool EIB_Str(int $InstanceID, string $String)`
**Parameters**
- `$InstanceID` (int): ID of the device to be switched
- `$String` (string): Text to send (14 characters maximum)
**Returns** (bool): If the command succeeds, it returns __TRUE__, otherwise __FALSE__.
Text to send (14 characters maximum)
**Example**
```php
EIB_Str(12345, “It rings! “); //Send the string to the bus
```
## EIB_Switch
Source: https://www.symcon.de/en/service/documentation/module-reference/devices/knx/eib-switch/
`bool EIB_Switch(int $InstanceID, bool $Status)`
**Parameters**
- `$InstanceID` (int): ID of the device to be switched
- `$Status` (bool): __TRUE__ for On, __FALSE__ for Off
**Returns** (bool): If the command succeeds, it returns __TRUE__, otherwise __FALSE__.
__TRUE__ for On, __FALSE__ for Off
**Example**
```php
EIB_Switch(12345, true); //Turns on the device
```
## EIB_Time
Source: https://www.symcon.de/en/service/documentation/module-reference/devices/knx/eib-time/
`bool EIB_Time(int $InstanceID, string $Time)`
sends a time value
**Parameters**
- `$InstanceID` (int): ID of the device to be switched
- `$Time` (string): Standard = dhhmmss; TimeOnly = hhmmss
**Returns** (bool): If the command succeeds, it returns __TRUE__, otherwise __FALSE__.
Standard = dhhmmss; TimeOnly = hhmmss
**Example**
```php
EIB_Time(12345, date("NHis")); //Sends the current time on the bus (Standard)
EIB_Time(12345, date("His")); //Sends the current time on the bus (TimeOnly)
```
## EIB_Value
Source: https://www.symcon.de/en/service/documentation/module-reference/devices/knx/eib-value/
`bool EIB_Value(int $InstanceID, float $Value)`
**Parameters**
- `$InstanceID` (int): ID of the device to be switched
- `$Value` (float): -671088,64 .. 670760,96
**Returns** (bool): If the command succeeds, it returns __TRUE__, otherwise __FALSE__.
-671088,64 .. 670760,96
**Example**
```php
EIB_Value(12345, 22.1); //Sends 22.1 ° C to the controller
```
## Device list
Source: https://www.symcon.de/en/service/documentation/module-reference/devices/knx/device-list/
### Supported Gateways
All serial gateways with FT1.2 protocol (and cEMI messages) and all KNX/IP gateways, that offer the tunneling protocol, are supported. For KNX gateways that meet these requirements but do not work, please contact our support. We will solve the problem as quickly as possible.
Since IP-Symcon 6.4 we also support KNX Data Secure and KNX IP Secure.
| Component | Manufacturer | Connection type | Description |
| ----------------------------- | -------------------------- | --------------- | ------------------------------------------------- |
| SymBox with KNX extension | Symcon GmbH | Serial | Integrated module from Weinzierl Engineering GmbH |
| 1a EIB KNX IP interface PoE | EIBMARKT | IP | EIB KNX IP interface PoE (ArtNr. N000401) |
| i-bus® KNX/IP interface | ABB | IP | REG IPS/S 2.1, 2CDG 110 098 R0011 |
| MDT SCN-IP000.02 | MDT | IP | |
| MDT SCN-IP000.03 | MDT | IP (Secure) | |
| 1168 KNX IP Secure Interface | Enertex | IP (Secure) | |
| KNX BAOS Module 838 kBerry | Weinzierl Engineering GmbH | IP (Secure) | |
| KNX BAOS Module 838 kBerry | Weinzierl Engineering GmbH | Seriell | |
| KNX IP Interface 730 | Weinzierl Engineering GmbH | IP | |
| KNX IP Interface 731 | Weinzierl Engineering GmbH | IP | |
| KNX IP Interface 732 Secure | Weinzierl Engineering GmbH | IP (Secure) | |
| KNX IP Interface 740 wireless | Weinzierl Engineering GmbH | IP | |
| KNX Router Weinzierl 750 | Weinzierl Engineering GmbH | IP | |
| N146 | Siemens | IP | |
| N148 | Siemens | IP | |
### Supported DPT
#### Since Version 5.0
| DPT-Type | Version |
| --------------------------------------------------------- | --------- |
| DPT 001.x | since 5.0 |
| DPT 002.x | since 5.0 |
| DPT 003.x | since 5.0 |
| DPT 004.x | since 5.0 |
| DPT 005.x | since 5.0 |
| DPT 006.x | since 5.0 |
| DPT 007.x | since 5.0 |
| DPT 008.x | since 5.0 |
| DPT 009.x | since 5.0 |
| DPT 010.x | since 5.0 |
| DPT 011.x | since 5.0 |
| DPT 012.x | since 5.0 |
| DPT 013.x | since 5.0 |
| DPT 014.x | since 5.0 |
| DPT 015.x | since 5.0 |
| DPT 016.x | since 5.0 |
| DPT 017.x | since 5.0 |
| DPT 018.x | since 5.0 |
| DPT 019.x | since 5.0 |
| DPT 020.x | since 5.0 |
| DPT 021.x | since 5.0 |
| DPT 022.x | since 5.0 |
| DPT 023.x | since 5.0 |
| DPT 024.x | since 5.0 |
| DPT 025.x | since 5.0 |
| DPT 026.x | since 5.0 |
| DPT 027.x | since 5.0 |
| DPT 028.x | since 5.0 |
| DPT 029.x | since 5.0 |
| DPT 030.x | since 5.0 |
| DPT 031.x | since 5.0 |
| DPT 200.x | since 5.0 |
| DPT 201.x | since 5.0 |
| DPT 202.x | since 5.0 |
| DPT 203.x | since 5.0 |
| DPT 204.x | since 5.0 |
| DPT 205.x | since 5.0 |
| DPT 206.x | since 5.0 |
| DPT 207.x | since 5.0 |
| DPT 209.x | since 5.0 |
| DPT 210.x | since 5.0 |
| DPT 211.x | since 5.0 |
| DPT 212.x | since 5.0 |
| DPT 213.x | since 5.0 |
| DPT 214.x | since 5.0 |
| DPT 215.x | since 5.0 |
| DPT 216.x | since 5.0 |
| DPT 217.x | since 5.0 |
| DPT 218.x | since 5.0 |
| DPT 219.x | since 5.0 |
| DPT 220.x | since 5.0 |
| DPT 221.x | since 5.0 |
| DPT 222.x | since 5.0 |
| DPT 223.x | since 5.0 |
| DPT 224.x | since 5.0 |
| DPT 225.x | since 5.0 |
| DPT 229.x | since 5.0 |
| DPT 230.x | since 5.0 |
| DPT 231.x | since 5.0 |
| DPT 232.x | since 5.0 |
| DPT 234.x | since 5.0 |
| DPT 235.x | since 5.0 |
| DPT 236.x | since 5.0 |
| DPT 237.x | since 5.0 |
| DPT 238.x | since 5.0 |
| DPT 239.x | since 5.0 |
| DPT 240.x | since 5.0 |
| DPT 241.x | since 5.0 |
| DPT 242.x | since 5.0 |
| DPT 249.x | since 5.0 |
| DPT 251.x | since 5.0 |
#### DPT 001.x
| DPT | DPT_Name |
| ----- | ---------------------- |
| 1.001 | DPT_Switch |
| 1.002 | DPT_Bool |
| 1.003 | DPT_Enable |
| 1.004 | DPT_Ramp |
| 1.005 | DPT_Alarm |
| 1.006 | DPT_BinaryValue |
| 1.007 | DPT_Step |
| 1.008 | DPT_UpDown |
| 1.009 | DPT_OpenClose |
| 1.010 | DPT_Start |
| 1.011 | DPT_State |
| 1.012 | DPT_Invert |
| 1.013 | DPT_DimSendStyle |
| 1.014 | DPT_InputSource |
| 1.015 | DPT_Reset |
| 1.016 | DPT_Ack |
| 1.017 | DPT_Trigger |
| 1.018 | DPT_Occupancy |
| 1.019 | DPT_Window_Door |
| 1.021 | DPT_LogicalFunction |
| 1.022 | DPT_Scene_AB |
| 1.023 | DPT_ShutterBlinds_Mode |
| 1.024 | DPT_DayNight |
| 1.100 | DPT_Heat/Cool |
#### DPT 002.x
| DPT | DPT_Name |
| ----- | ----------------------- |
| 2.001 | DPT_Switch_Control |
| 2.002 | DPT_Bool_Control |
| 2.003 | DPT_Enable_Control |
| 2.004 | DPT_Ramp_Control |
| 2.005 | DPT_Alarm_Control |
| 2.006 | DPT_BinaryValue_Control |
| 2.007 | DPT_Step_Control |
| 2.008 | DPT_Direction1_Control |
| 2.009 | DPT_Direction2_Control |
| 2.010 | DPT_Start_Control |
| 2.011 | DPT_State_Control |
| 2.012 | DPT_Invert_Control |
#### DPT 003.x
| DPT | DPT_Name |
| ----- | ------------------- |
| 3.007 | DPT_Control_Dimming |
| 3.008 | DPT_Control_Blinds |
#### DPT 004.x
| DPT | DPT_Name |
| ----- | --------------- |
| 4.001 | DPT_Char_ASCII |
| 4.002 | DPT_Char_8859_1 |
#### DPT 005.x
| DPT | DPT_Name |
| ----- | ------------------ |
| 5.001 | DPT_Scaling |
| 5.003 | DPT_Angle |
| 5.004 | DPT_Percent_U8 |
| 5.005 | DPT_DecimalFactor |
| 5.006 | DPT_Tariff |
| 5.010 | DPT_Value_1_Ucount |
#### DPT 006.x
| DPT | DPT_Name |
| ----- | ----------------- |
| 6.001 | DPT_Percent_V8 |
| 6.010 | DPT_Value_1_Count |
| 6.020 | DPT_Status_Mode3 |
#### DPT 007.x
| DPT | DPT_Name |
| ----- | --------------------- |
| 7.001 | DPT_Value_2_Ucount |
| 7.002 | DPT_TimePeriodMsec |
| 7.003 | DPT_TimePeriod10MSec |
| 7.004 | DPT_TimePeriod100MSec |
| 7.005 | DPT_TimePeriodSec |
| 7.006 | DPT_TimePeriodMin |
| 7.007 | DPT_TimePeriodHrs |
| 7.010 | DPT_PropDataType |
| 7.011 | DPT_Length_mm |
| 7.012 | DPT_UElCurrentmA |
| 7.013 | DPT_Brightness |
#### DPT 008.x
| DPT | DPT_Name |
| ----- | -------------------- |
| 8.001 | DPT_Value_2_Count |
| 8.002 | DPT_DeltaTimeMsec |
| 8.003 | DPT_DeltaTime10MSec |
| 8.004 | DPT_DeltaTime100MSec |
| 8.005 | DPT_DeltaTimeSec |
| 8.006 | DPT_DeltaTimeMin |
| 8.007 | DPT_DeltaTimeHrs |
| 8.010 | DPT_Percent_V16 |
| 8.011 | DPT_Rotation_Angle |
| 8.012 | DPT_Length_m |
#### DPT 009.x
| DPT | DPT_Name |
| ----- | --------------------- |
| 9.001 | DPT_Value_Temp |
| 9.002 | DPT_Value_Tempd |
| 9.003 | DPT_Value_Tempa |
| 9.004 | DPT_Value_Lux |
| 9.005 | DPT_Value_Wsp |
| 9.006 | DPT_Value_Pres |
| 9.007 | DPT_Value_Humidity |
| 9.008 | DPT_Value_AirQuality |
| 9.010 | DPT_Value_Time1 |
| 9.011 | DPT_Value_Time2 |
| 9.020 | DPT_Value_Volt |
| 9.021 | DPT_Value_Curr |
| 9.022 | DPT_PowerDensity |
| 9.023 | DPT_KelvinPerPercent |
| 9.024 | DPT_Power |
| 9.025 | DPT_Value_Volume_Flow |
| 9.026 | DPT_Rain_Amount |
| 9.027 | DPT_Value_Temp_F |
| 9.028 | DPT_Value_Wsp_kmh |
#### DPT 010.x
| DPT | DPT_Name |
| ------ | ------------- |
| 10.001 | DPT_TimeOfDay |
#### DPT 011.x
| DPT | DPT_Name |
| ------ | -------- |
| 11.001 | DPT_Date |
#### DPT 012.x
| DPT | DPT_Name |
| ------- | ---------------------- |
| 12.001 | DPT_Value_4_Ucount |
| 12.1200 | DPT_VolumeLiquid_Litre |
| 12.1201 | DPT_Volume_m3 |
#### DPT 013.x
| DPT | DPT_Name |
| ------- | --------------------------- |
| 13.001 | DPT_Value_4_Count |
| 13.002 | DPT_FlowRate_m3/h |
| 13.010 | DPT_ActiveEnergy |
| 13.011 | DPT_ApparantEnergy |
| 13.012 | DPT_ReactiveEnergy |
| 13.013 | DPT_ActiveEnergy_kWh |
| 13.014 | DPT_ApparantEnergy_kVAh |
| 13.015 | DPT_ReactiveEnergy_kVARh |
| 13.100 | DPT_LongDeltaTimeSec |
| 13.1200 | DPT_DeltaVolumeLiquid_Litre |
| 13.1201 | DPT_DeltaVolume_m3 |
| 13.16 | DPT_ActiveEnergy_MWh |
#### DPT 014.x
| DPT | DPT_Name |
| ------- | -------------------------------------- |
| 14.000 | DPT_Value_Acceleration |
| 14.001 | DPT_Value_Acceleration_Angular |
| 14.002 | DPT_Value_Activation_Energy |
| 14.003 | DPT_Value_Activity |
| 14.004 | DPT_Value_Mol |
| 14.005 | DPT_Value_Amplitude |
| 14.006 | DPT_Value_AngleRad |
| 14.007 | DPT_Value_AngleDeg |
| 14.008 | DPT_Value_Angular_Momentum |
| 14.009 | DPT_Value_Angular_Velocity |
| 14.010 | DPT_Value_Area |
| 14.011 | DPT_Value_Capacitance |
| 14.012 | DPT_Value_Charge_DensitySurface |
| 14.013 | DPT_Value_Charge_DensityVolume |
| 14.014 | DPT_Value_Compressibility |
| 14.015 | DPT_Value_Conductance |
| 14.016 | DPT_Value_Electrical_Conductivity |
| 14.017 | DPT_Value_Density |
| 14.018 | DPT_Value_Electric_Charge |
| 14.019 | DPT_Value_Electric_Current |
| 14.020 | DPT_Value_Electric_CurrentDensity |
| 14.021 | DPT_Value_Electric_DipoleMoment |
| 14.022 | DPT_Value_Electric_Displacement |
| 14.023 | DPT_Value_Electric_FieldStrength |
| 14.024 | DPT_Value_Electric_Flux |
| 14.025 | DPT_Value_Electric_FluxDensity |
| 14.026 | DPT_Value_Electric_Polarization |
| 14.027 | DPT_Value_Electric_Potential |
| 14.028 | DPT_Value_Electric_PotentialDifference |
| 14.029 | DPT_Value_ElectromagneticMoment |
| 14.030 | DPT_Value_Electromotive_Force |
| 14.031 | DPT_Value_Energy |
| 14.032 | DPT_Value_Force |
| 14.033 | DPT_Value_Frequency |
| 14.034 | DPT_Value_Angular_Frequency |
| 14.035 | DPT_Value_Heat_Capacity |
| 14.035 | DPT_Value_Heat_Capacity |
| 14.036 | DPT_Value_Heat_FlowRate |
| 14.037 | DPT_Value_Heat_Quantity |
| 14.038 | DPT_Value_Impedance |
| 14.039 | DPT_Value_Length |
| 14.040 | DPT_Value_Light_Quantity |
| 14.041 | DPT_Value_Luminance |
| 14.042 | DPT_Value_Luminous_Flux |
| 14.043 | DPT_Value_Luminous_Intensity |
| 14.044 | DPT_Value_Magnetic_FieldStrength |
| 14.045 | DPT_Value_Magnetic_Flux |
| 14.046 | DPT_Value_Magnetic_FluxDensity |
| 14.047 | DPT_Value_Magnetic_Moment |
| 14.048 | DPT_Value_Magnetic_Polarization |
| 14.049 | DPT_Value_Magnetization |
| 14.050 | DPT_Value_MagnetomotiveForce |
| 14.051 | DPT_Value_Mass |
| 14.052 | DPT_Value_MassFlux |
| 14.053 | DPT_Value_Momentum |
| 14.054 | DPT_Value_Phase_AngleRad |
| 14.055 | DPT_Value_Phase_AngleDeg |
| 14.056 | DPT_Value_Power |
| 14.057 | DPT_Value_Power_Factor |
| 14.058 | DPT_Value_Pressure |
| 14.059 | DPT_Value_Reactance |
| 14.060 | DPT_Value_Resistance |
| 14.061 | DPT_Value_Resistivity |
| 14.062 | DPT_Value_SelfInductance |
| 14.063 | DPT_Value_SolidAngle |
| 14.064 | DPT_Value_Sound_Intensity |
| 14.065 | DPT_Value_Speed |
| 14.066 | DPT_Value_Stress |
| 14.067 | DPT_Value_Surface_Tension |
| 14.068 | DPT_Value_Common_Temperature |
| 14.069 | DPT_Value_Absolute_Temperature |
| 14.070 | DPT_Value_TemperatureDifference |
| 14.071 | DPT_Value_Thermal_Capacity |
| 14.072 | DPT_Value_Thermal_Conductivity |
| 14.073 | DPT_Value_ThermoelectricPower |
| 14.074 | DPT_Value_Time |
| 14.075 | DPT_Value_Torque |
| 14.076 | DPT_Value_Volume |
| 14.077 | DPT_Value_Volume_Flux |
| 14.078 | DPT_Value_Weight |
| 14.079 | DPT_Value_Work |
| 14.1200 | DPT_Volume_Flux_Meter |
| 14.1201 | DPT_Volume_Flux_ls |
#### DPT 015.x
| DPT | DPT_Name |
| ------ | --------------- |
| 15.000 | DPT_Access_Data |
#### DPT 016.x
| DPT | DPT_Name |
| ------ | ----------------- |
| 16.000 | DPT_String_ASCII |
| 16.001 | DPT_String_8859_1 |
#### DPT 017.x
| DPT | DPT_Name |
| ------ | --------------- |
| 17.001 | DPT_SceneNumber |
#### DPT 018.x
| DPT | DPT_Name |
| ------ | ---------------- |
| 18.001 | DPT_SceneControl |
#### DPT 019.x
| DPT | DPT_Name |
| ------ | ------------ |
| 19.001 | DPT_DateTime |
#### DPT 020.x
| DPT | DPT_Name |
| ------- | ------------------------------- |
| 20.001 | DPT_SCLOMode |
| 20.002 | DPT_BuildingMode |
| 20.003 | DPT_OccMode |
| 20.004 | DPT_Priority |
| 20.005 | DPT_LightApplicationMode |
| 20.006 | DPT_ApplicationArea |
| 20.007 | DPT_AlarmClassType |
| 20.008 | DPT_PSUMode |
| 20.011 | DPT_ErrorClass_System |
| 20.012 | DPT_ErrorClass_HVAC |
| 20.013 | DPT_Time_Delay |
| 20.014 | DPT_Beaufort_Wind_Force_Scale |
| 20.017 | DPT_SensorSelect |
| 20.020 | DPT_ActuatorConnectType |
| 20.100 | DPT_FuelType |
| 20.101 | DPT_BurnerType |
| 20.102 | DPT_HVACMode |
| 20.103 | DPT_DHWMode |
| 20.104 | DPT_LoadPriority |
| 20.105 | DPT_HVACContrMode |
| 20.106 | DPT_HVACEmergMode |
| 20.107 | DPT_ChangeoverMode |
| 20.108 | DPT_ValveMode |
| 20.109 | DPT_DamperMode |
| 20.110 | DPT_HeaterMode |
| 20.111 | DPT_FanMode |
| 20.112 | DPT_MasterSlaveMode |
| 20.113 | DPT_StatusRoomSetp |
| 20.120 | DPT_ADAType |
| 20.121 | DPT_BackupMode |
| 20.122 | DPT_StartSynchronization |
| 20.600 | DPT_Behaviour_Lock_Unlock |
| 20.601 | DPT_Behaviour_Bus_Power_Up_Down |
| 20.602 | DPT_DALI_Fade_Time |
| 20.603 | DPT_BlinkingMode |
| 20.604 | DPT_LightControlMode |
| 20.605 | DPT_SwitchPBModel |
| 20.606 | DPT_PBAction |
| 20.607 | DPT_DimmPBModel |
| 20.608 | DPT_SwitchOnMode |
| 20.609 | DPT_LoadTypeSet |
| 20.610 | DPT_LoadTypeDetected |
| 20.801 | DPT_SABExceptBehaviour |
| 20.802 | DPT_SABBehaviour_Lock_Unlock |
| 20.803 | DPT_SSSBMode |
| 20.804 | DPT_BlindsControlMode |
| 20.1000 | DPT_CommMode |
| 20.1001 | DPT_AddInfoTypes |
| 20.1002 | DPT_RF_ModeSelect |
| 20.1003 | DPT_RF_FilterSelect |
#### DPT 021.x
| DPT | DPT_Name |
| ------- | -------------------------- |
| 21.001 | DPT_StatusGen |
| 21.002 | DPT_Device_Control |
| 21.100 | DPT_ForceSign |
| 21.101 | DPT_ForceSignCool |
| 21.102 | DPT_StatusRHC |
| 21.103 | DPT_StatusSDHWC |
| 21.104 | DPT_FuelTypeSet |
| 21.105 | DPT_StatusRCC |
| 21.106 | DPT_StatusAHU |
| 21.601 | DPT_LightActuatorErrorInfo |
| 21.1000 | DPT_RF_ModeInfo |
| 21.1001 | DPT_RF_FilterInfo |
| 21.1010 | DPT_Channel_Activation_8 |
#### DPT 022.x
| DPT | DPT_Name |
| ------- | ------------------------- |
| 22.100 | DPT_StatusDHWC |
| 22.101 | DPT_StatusRHCC |
| 22.1000 | DPT_Media |
| 22.1010 | DPT_Channel_Activation_16 |
#### DPT 023.x
| DPT | DPT_Name |
| ------ | ------------------ |
| 23.001 | DPT_OnOff_Action |
| 23.002 | DPT_Alarm_Reaction |
| 23.003 | DPT_UpDown_Action |
| 23.102 | DPT_HVAC_PB_Action |
#### DPT 024.x
| DPT | DPT_Name |
| ------ | -------------------- |
| 24.001 | DPT_VarString_8859_1 |
#### DPT 025.x
| DPT | DPT_Name |
| ------- | ---------------- |
| 25.1000 | DPT_DoubleNibble |
#### DPT 026.x
| DPT | DPT_Name |
| ------ | ------------- |
| 26.001 | DPT_SceneInfo |
#### DPT 027.x
| DPT | DPT_Name |
| ------ | --------------------- |
| 27.001 | DPT_CombinedInfoOnOff |
#### DPT 028.x
| DPT | DPT_Name |
| ------ | --------- |
| 28.001 | DPT_UTF-8 |
#### DPT 029.x
| DPT | DPT_Name |
| ------ | ---------------------- |
| 29.010 | DPT_ActiveEnergy_V64 |
| 29.011 | DPT_ApparantEnergy_V64 |
| 29.012 | DPT_ReactiveEnergy_V64 |
#### DPT 030.x
| DPT | DPT_Name |
| ------- | ------------------------- |
| 30.1010 | DPT_Channel_Activation_24 |
#### DPT 031.x
| DPT | DPT_Name |
| ------ | --------------------------- |
| 31.101 | DPT_PB_Action_HVAC_Extended |
#### DPT 200.x
| DPT | DPT_Name |
| ------- | ----------------- |
| 200.100 | DPT_Heat/Cool_Z |
| 200.101 | DPT_BinaryValue_Z |
#### DPT 201.x
| DPT | DPT_Name |
| ------- | ------------------------------------- |
| 201.100 | DPT_HVACMode_Z |
| 201.102 | DPT_DHWMode_Z |
| 201.104 | DPT_HVACContrMode_Z |
| 201.105 | DPT_EnablH/Cstage_Z DPT_EnablH/CStage |
| 201.107 | DPT_BuildingMode_Z |
| 201.108 | DPT_OccMode_Z |
| 201.109 | DPT_HVACEmergMode_Z |
#### DPT 202.x
| DPT | DPT_Name |
| ------- | ------------------ |
| 202.001 | DPT_RelValue_Z |
| 202.002 | DPT_UCountValue8_Z |
#### DPT 203.x
| DPT | DPT_Name |
| ------- | ----------------------------- |
| 203.002 | DPT_TimePeriodMsec_Z |
| 203.003 | DPT_TimePeriod10Msec_Z |
| 203.004 | DPT_TimePeriod100Msec_Z |
| 203.005 | DPT_TimePeriodSec_Z |
| 203.006 | DPT_TimePeriodMin_Z |
| 203.007 | DPT_TimePeriodHrs_Z |
| 203.011 | DPT_UFlowRateLiter/h_Z |
| 203.012 | DPT_UCountValue16_Z |
| 203.013 | DPT_UElCurrentμA_Z |
| 203.014 | DPT_PowerKW_Z |
| 203.015 | DPT_AtmPressureAbs_Z |
| 203.017 | DPT_PercentU16_Z |
| 203.100 | DPT_HVACAirQual_Z |
| 203.101 | DPT_WindSpeed_Z DPT_WindSpeed |
| 203.102 | DPT_SunIntensity_Z |
| 203.104 | DPT_HVACAirFlowAbs_Z |
#### DPT 204.x
| DPT | DPT_Name |
| ------- | -------------------- |
| 204.001 | DPT_RelSignedValue_Z |
#### DPT 205.x
| DPT | DPT_Name |
| ------- | ---------------------- |
| 205.002 | DPT_DeltaTimeMsec_Z |
| 205.003 | DPT_DeltaTime10Msec_Z |
| 205.004 | DPT_DeltaTime100Msec_Z |
| 205.005 | DPT_DeltaTimeSec_Z |
| 205.006 | DPT_DeltaTimeMin_Z |
| 205.007 | DPT_DeltaTimeHrs_Z |
| 205.017 | DPT_Percent_V16_Z |
| 205.100 | DPT_TempHVACAbs_Z |
| 205.101 | DPT_TempHVACRel_Z |
| 205.102 | DPT_HVACAirFlowRel_Z |
#### DPT 206.x
| DPT | DPT_Name |
| ------- | -------------------- |
| 206.100 | DPT_HVACModeNext |
| 206.102 | DPT_DHWModeNext |
| 206.104 | DPT_OccModeNext |
| 206.105 | DPT_BuildingModeNext |
#### DPT 207.x
| DPT | DPT_Name |
| ------- | -------------------------- |
| 207.100 | DPT_StatusBUC |
| 207.101 | DPT_LockSign |
| 207.102 | DPT_ValueDemBOC |
| 207.104 | DPT_ActPosDemAbs |
| 207.105 | DPT_StatusAct |
| 207.600 | DPT_StatusLightingActuator |
#### DPT 209.x
| DPT | DPT_Name |
| ------- | ------------------ |
| 209.100 | DPT_StatusHPM |
| 209.101 | DPT_TempRoomDemAbs |
| 209.102 | DPT_StatusCPM |
| 209.103 | DPT_StatusWTC |
#### DPT 210.x
| DPT | DPT_Name |
| ------- | ----------------------- |
| 210.100 | DPT_TempFlowWaterDemAbs |
#### DPT 211.x
| DPT | DPT_Name |
| ------- | ------------------ |
| 211.100 | DPT_EnergyDemWater |
#### DPT 212.x
| DPT | DPT_Name |
| ------- | --------------------------- |
| 212.100 | DPT_TempRoomSetpSetShift[3] |
| 212.101 | DPT_TempRoomSetpSet[3] |
#### DPT 213.x
| DPT | DPT_Name |
| ------- | --------------------------- |
| 213.100 | DPT_TempRoomSetpSet[4] |
| 213.101 | DPT_TempDHWSetpSet[4] |
| 213.102 | DPT_TempRoomSetpSetShift[4] |
#### DPT 214.x
| DPT | DPT_Name |
| ------- | ------------------------ |
| 214.100 | DPT_PowerFlowWaterDemHPM |
| 214.101 | DPT_PowerFlowWaterDemCPM |
#### DPT 215.x
| DPT | DPT_Name |
| ------- | ------------- |
| 215.100 | DPT_StatusBOC |
| 215.101 | DPT_StatusCC |
#### DPT 216.x
| DPT | DPT_Name |
| ------- | ---------------- |
| 216.100 | DPT_SpecHeatProd |
#### DPT 217.x
| DPT | DPT_Name |
| ------- | ----------- |
| 217.001 | DPT_Version |
#### DPT 218.x
| DPT | DPT_Name |
| ------- | ------------------- |
| 218.001 | DPT_VolumeLiter_Z |
| 218.002 | DPT_FlowRate_m3/h_Z |
#### DPT 219.x
| DPT | DPT_Name |
| ------- | ------------- |
| 219.001 | DPT_AlarmInfo |
#### DPT 220.x
| DPT | DPT_Name |
| ------- | ------------------- |
| 220.100 | DPT_TempHVACAbsNext |
#### DPT 221.x
| DPT | DPT_Name |
| ------- | ---------- |
| 221.001 | DPT_SerNum |
#### DPT 222.x
| DPT | DPT_Name |
| ------- | ------------------------------ |
| 222.100 | DPT_TempRoomSetpSetF16[3] |
| 222.101 | DPT_TempRoomSetpSetShiftF16[3] |
#### DPT 223.x
| DPT | DPT_Name |
| ------- | ---------------- |
| 223.100 | DPT_EnergyDemAir |
#### DPT 224.x
| DPT | DPT_Name |
| ------- | ------------------------- |
| 224.100 | DPT_TempSupply AirSetpSet |
#### DPT 225.x
| DPT | DPT_Name |
| ------- | --------------------- |
| 225.001 | DPT_ScalingSpeed |
| 225.002 | DPT_Scaling_Step_Time |
| 225.003 | DPT_TariffNext |
#### DPT 229.x
| DPT | DPT_Name |
| ------- | ----------------- |
| 229.001 | DPT_MeteringValue |
#### DPT 230.x
| DPT | DPT_Name |
| -------- | ---------------- |
| 230.1000 | DPT_MBus_Address |
#### DPT 231.x
| DPT | DPT_Name |
| ------- | ---------------- |
| 231.001 | DPT_Locale_ASCII |
#### DPT 232.x
| DPT | DPT_Name |
| ------- | -------------- |
| 232.600 | DPT_Colour_RGB |
#### DPT 234.x
| DPT | DPT_Name |
| ------- | ---------------------------- |
| 234.001 | DPT_LanguageCodeAlpha2_ASCII |
| 234.002 | DPT_RegionCodeAlpha2_ASCII |
#### DPT 235.x
| DPT | DPT_Name |
| ------- | ----------------------- |
| 235.001 | DPT_Tariff_ActiveEnergy |
#### DPT 236.x
| DPT | DPT_Name |
| ------- | ---------------------------- |
| 236.001 | DPT_Prioritised_Mode_Control |
#### DPT 237.x
| DPT | DPT_Name |
| ------- | -------------------------------- |
| 237.600 | DPT_DALI_Control_Gear_Diagnostic |
#### DPT 238.x
| DPT | DPT_Name |
| ------- | -------------------- |
| 238.001 | DPT_SceneConfig |
| 238.600 | DPT_DALI_Diagnostics |
#### DPT 239.x
| DPT | DPT_Name |
| ------- | ------------------ |
| 239.001 | DPT_FlaggedScaling |
#### DPT 240.x
| DPT | DPT_Name |
| ------- | -------------------- |
| 240.800 | DPT_CombinedPosition |
#### DPT 241.x
| DPT | DPT_Name |
| ------- | ------------- |
| 241.800 | DPT_StatusSAB |
#### DPT 242.x
| DPT | DPT_Name |
| ------- | -------------- |
| 242.600 | DPT_Colour_xyY |
#### DPT 249.x
| DPT | DPT_Name |
| ------- | -------------------------------------------- |
| 249.600 | DPT_Brightness_Colour_Temperature_Transition |
#### DPT 251.x
| DPT | DPT_Name |
| ------- | --------------- |
| 251.600 | DPT_Colour_RGBW |
### Supported EIS
| EIS-Type | Version | Matching DPT |
| -------- | --------- | --------------------------------------------------------------------------------------------------------------------- |
| EIS1 | since 3.4 | DPT 001.x |
| EIS2 | since 3.4 | DPT 003.x |
| EIS3 | since 3.4 | DPT 010.x |
| EIS4 | since 3.4 | DPT 011.x |
| EIS5 | since 3.4 | DPT 009.x |
| EIS6 | since 3.4 | DPT 005.x |
| EIS7 | since 3.4 | DPT 001.x |
| EIS8 | since 3.4 | DPT 002.x |
| EIS9 | since 3.4 | DPT 014.x |
| EIS10 | since 3.4 | DPT 007.x , DPT 008.x |
| EIS11 | since 3.4 | DPT 012.x , DPT 013.x |
| EIS12 | since 3.4 | DPT 015.x |
| EIS13 | since 3.4 | DPT 004.x |
| EIS14 | since 3.4 | DPT 005.x , DPT 006.x |
| EIS15 | since 3.4 | DPT 016.x |
## KNX_RequestStatus
Source: https://www.symcon.de/en/service/documentation/module-reference/devices/knx/knx-requeststatus/
`bool KNX_RequestStatus(int $InstanceID)`
sends a read request for DPT instances on the bus
**Parameters**
- `$InstanceID` (int): Device ID
**Returns** (bool): If the command succeeds, it returns __TRUE__, otherwise __FALSE__.
Device ID
**Example**
```php
KNX_RequestStatus(12345); //Send read request
```
---
# LCN
> Symcon documentation · English · generated on 2026-09-26
> Index: https://www.symcon.de/en/llms.txt
Source: https://www.symcon.de/en/service/documentation/module-reference/devices/lcn/
LCN (Local Control Network) is a wired bus system.
> **Note:** The following devices are supported by IP-Symcon:
>
> [Supported devices](https://www.symcon.de/en/llms/modules/lcn.md)
> **Note:** The new modules with 12 variables (since firmware 160B13) are supported since IP-Symcon 3.0.
### Installation
In order to be able to connect an LCN bus to IP-Symcon, a Bus-Coupler ([LCN-PKU](https://www.lcn.eu/?wpdmdl=8100) ) with coupling program [PCHK](https://www.lcn.eu/?wpdmdl=8106) or an Ethernet-Coupler ([LCN-VISU](https://www.lcn.eu/?wpdmdl=8100) ) is required.
### Setup video-tutorial
[Video](https://www.youtube.com/embed/tZMETUfw-_M?rel=0&cc_load_policy=1)
### Integration in IP-Symcon
A configurator for the LCN system can be created via the Management Console.
After a configurator has been created, a red message may appear. This indicates an incorrect or incomplete configuration. To correct the error, the user name and password must be specified in the parent instance. The change is saved by clicking on "Apply".

If it is not possible to log in after applying, the network configuration within the interface must be checked. Also, in the gateway, the output mode can also be selected between 50 and 200 steps.
After successfully logging in, modules can be searched for on the bus in the configurator, created in IP-Symcon and the individual modules can be created as IP-Symcon splitter instances.

### Configure Modules
As soon as a module is created in the configurator and the configuration button is pressed, a new dialog opens.

In order to create the individual instances, the desired relays, inputs/outputs, etc. must be selected and "Create" must be clicked on.
New devices are created and sorted within the object tree into the category that matches the name of the module. These created instances can then be renamed accordingly and sorted elsewhere. It is also possible to call up the respective instance configuration via "Configure".

## Device list
Source: https://www.symcon.de/en/service/documentation/module-reference/devices/lcn/device-list/
### Supported Gateways
| Gateway | Description |
| ---------------------- | ---------------------------------------------------------- |
| LCN-PK (via LCN PCHK) | Serial port, communication via PCHK with IP-Symcon |
| LCN-PKU (via LCN PCHK) | USB connection, communication via PCHK with IP-Symcon |
| LCN-PKE | Ethernet connection, communication directly with IP-Symcon |
| LCN-VISU | Ethernet connection, communication directly with IP-Symcon |
### Supported Components
IP-Symcon supports all components.
> **Note:** The LCN-HL4 only supports the RGB color model (switch position 2)
## LCN_AddGroup
Source: https://www.symcon.de/en/service/documentation/module-reference/devices/lcn/lcn-addgroup/
`bool LCN_AddGroup(int $InstanceID, int $Group)`
adds a device to a group
**Parameters**
- `$InstanceID` (int): Instance ID; the ID of the splitter instance, not the device instance
- `$Group` (int): Group number (1..255)
**Returns** (bool): If the command succeeds, it returns __TRUE__, otherwise __FALSE__.
Group number (1..255)
**Example**
```php
//The device with ID 12345 is added to group 123
LCN_AddGroup(12345, 123);
```
## LCN_AddIntensity
Source: https://www.symcon.de/en/service/documentation/module-reference/devices/lcn/lcn-addintensity/
`bool LCN_AddIntensity(int $InstanceID, int $Intensity)`
**Parameters**
- `$InstanceID` (int): ID of the device to be switched
- `$Intensity` (int): 0-100%
**Returns** (bool): If the command succeeds, it returns __TRUE__, otherwise __FALSE__.
0-100%
**Example**
```php
LCN_AddIntensity(12345, 50); // Dim device brighter by 50 percentage points
```
## LCN_AddThresholdCurrent
Source: https://www.symcon.de/en/service/documentation/module-reference/devices/lcn/lcn-addthresholdcurrent/
`bool LCN_AddThresholdCurrent(int $InstanceID, int $Register, int $Threshold, float $Value)`
adds threshold to current value
**Parameters**
- `$InstanceID` (int): ID of the device to be switched
- `$Register` (int): Register of the threshold value to be switched (1x5
- `$Threshold` (int): Threshold to be set (1x5
- `$Value` (float): Threshold value (0..1000)
**Returns** (bool): If the command succeeds, it returns __TRUE__, otherwise __FALSE__.
Threshold value (0..1000)
**Example**
```php
// 1x5 threshold
// Adds the value 2.5 to the threshold 2 of the instance with ID 12345
LCN_AddThresholdCurrent(12345, 0, 2, 2.5);
// 4x4 threshold
// Adds the value 2.5 to the threshold 2 in register 3 of the instance with ID 12345
LCN_AddThresholdCurrent(12345, 3, 2, 2.5);
```
## LCN_AddThresholdDefined
Source: https://www.symcon.de/en/service/documentation/module-reference/devices/lcn/lcn-addthresholddefined/
`bool LCN_AddThresholdDefined(int $InstanceID, int $Register, int $Threshold, float $Value)`
adds threshold to predefined value
**Parameters**
- `$InstanceID` (int): ID of the device to be switched
- `$Register` (int): Register of the threshold value to be switched (1x5
- `$Threshold` (int): Threshold to be set (1x5
- `$Value` (float): Value of the threshold
**Returns** (bool): If the command succeeds, it returns __TRUE__, otherwise __FALSE__.
Value of the threshold
**Example**
```php
// 1x5 threshold
// Adds the value 2.5 relative to the programmed value into threshold 2 of the instance with ID 12345
LCN_AddThresholdDefined(12345, 0, 2, 2.5);
// 4x4 threshold
// Adds the value 2.5 relative to the programmed value into threshold 2 in register 3 of the instance with ID 12345
LCN_AddThresholdDefined(12345, 3, 2, 2.5);
```
## LCN_Beep
Source: https://www.symcon.de/en/service/documentation/module-reference/devices/lcn/lcn-beep/
`bool LCN_Beep(int $InstanceID, bool $SpecialTone, int $Number)`
**Parameters**
- `$InstanceID` (int): ID of the Instance; the ID of the splitter instance, not the device instance
- `$SpecialTone` (bool): __TRUE__ for On, __FALSE__ for Off
- `$Number` (int): Number between 1..15
**Returns** (bool): If the command succeeds, it returns __TRUE__, otherwise __FALSE__.
Number between 1..15
**Example**
```php
LCN_Beep(12345, true, 1); //Beep once (SpecialTone)
```
## LCN_DeductIntensity
Source: https://www.symcon.de/en/service/documentation/module-reference/devices/lcn/lcn-deductintensity/
`bool LCN_DeductIntensity(int $InstanceID, int $Intensity)`
**Parameters**
- `$InstanceID` (int): ID of the device to be switched
- `$Intensity` (int): 0-100%
**Returns** (bool): If the command succeeds, it returns __TRUE__, otherwise __FALSE__.
0-100%
**Example**
```php
LCN_DeductIntensity(12345, 10); //Dim device darker by 10 percentage points
```
## LCN_DeductThresholdCurrent
Source: https://www.symcon.de/en/service/documentation/module-reference/devices/lcn/lcn-deductthresholdcurrent/
`bool LCN_DeductThresholdCurrent(int $InstanceID, int $Register, int $Threshold, float $Value)`
deducts threshold from current value
**Parameters**
- `$InstanceID` (int): ID of the device to be switched
- `$Register` (int): Register of the threshold value to be switched (1x5
- `$Threshold` (int): Threshold to be set (1x5
- `$Value` (float): Threshold value (0..1000)
**Returns** (bool): If the command succeeds, it returns __TRUE__, otherwise __FALSE__.
Threshold value (0..1000)
**Example**
```php
// 1x5 threshold
// Deducts the value 2.5 from the threshold 2 of the instance with ID 12345
LCN_DeductThresholdCurrent(12345, 0, 2, 2.5);
// 4x4 threshold
// Deducts the value 2.5 from the threshold 2 in register 3 of the instance with ID 12345
LCN_DeductThresholdCurrent(12345, 3, 2, 2.5);
```
## LCN_DeductThresholdDefined
Source: https://www.symcon.de/en/service/documentation/module-reference/devices/lcn/lcn-deductthresholddefined/
`bool LCN_DeductThresholdDefined(int $InstanceID, int $Register, int $Threshold, float $Value)`
deducts threshold from predefined value
**Parameters**
- `$InstanceID` (int): ID of the device to be switched
- `$Register` (int): Register of the threshold value to be switched (1x5
- `$Threshold` (int): Threshold to be set (1x5
- `$Value` (float): Value of the threshold
**Returns** (bool): If the command succeeds, it returns __TRUE__, otherwise __FALSE__.
Value of the threshold
**Example**
```php
// 1x5 threshold
// Deducts the value 2.5 relative to the programmed value into Threshold 2 of instance with ID 12345
LCN_AddThresholdDefined(12345, 0, 2, 2.5);
// 4x4 threshold
// Deducts the value 2.5 relative to the programmed value into threshold 2 in register 3 of instance with ID 12345
LCN_AddThresholdDefined(12345, 3, 2, 2.5);
```
## LCN_FadeOut
Source: https://www.symcon.de/en/service/documentation/module-reference/devices/lcn/lcn-fadeout/
`bool LCN_FadeOut(int $InstanceID, int $Intensity, int $Ramp)`
**Parameters**
- `$InstanceID` (int): ID of the device to be switched
- `$Intensity` (int): 0-100%
- `$Ramp` (int): 0-200 seconds
**Returns** (bool): If the command succeeds, it returns __TRUE__, otherwise __FALSE__.
0-200 seconds
**Example**
```php
LCN_FadeOut(12345, 100, 5); //Dim down device in 5 seconds of 100% to 0%
```
## LCN_FlipRelay
Source: https://www.symcon.de/en/service/documentation/module-reference/devices/lcn/lcn-fliprelay/
`bool LCN_FlipRelay(int $InstanceID)`
**Parameters**
- `$InstanceID` (int): ID of the Relay to be switched
**Returns** (bool): If the command succeeds, it returns __TRUE__, otherwise __FALSE__.
ID of the Relay to be switched
**Example**
```php
LCN_FlipRelais(12345, true); //Switch relay
```
## LCN_LimitOutput
Source: https://www.symcon.de/en/service/documentation/module-reference/devices/lcn/lcn-limitoutput/
`bool LCN_LimitOutput(int $InstanceID, int $Value, int $Time, string $TimeType)`
limits an output for a certain period of time
**Parameters**
- `$InstanceID` (int): ID of the output to be switched
- `$Value` (int): Percentage value to be limited to (0..100)
- `$Time` (int): Period for which the output should be limited
- `$TimeType` (string): Indicates whether the limit should apply to seconds, minutes, hours or days
**Returns** (bool): If the command succeeds, it returns __TRUE__, otherwise __FALSE__.
Indicates whether the limit should apply to seconds, minutes, hours or days
**Example**
```php
//Limits the output with ID 12345 to 36% for 8 hours
LCN_LimitOutput(12345, 36, 8, 'H');
```
## LCN_LoadScene
Source: https://www.symcon.de/en/service/documentation/module-reference/devices/lcn/lcn-loadscene/
`bool LCN_LoadScene(int $InstanceID, int $Scene)`
calls up a scene for an output
**Parameters**
- `$InstanceID` (int): ID of the output to be switched
- `$Scene` (int): Which scene should be loaded (0.. 9, 15)
**Returns** (bool): If the command succeeds, it returns __TRUE__, otherwise __FALSE__.
Which scene should be loaded (0.. 9, 15)
**Example**
```php
//Calls scene 5 of the output with ID 12345
LCN_LoadScene(12345, 5);
```
## LCN_LockTargetValue
Source: https://www.symcon.de/en/service/documentation/module-reference/devices/lcn/lcn-locktargetvalue/
`bool LCN_LockTargetValue(int $InstanceID, int $Target)`
locks a controller of the device
**Parameters**
- `$InstanceID` (int): ID of the device to be switched
- `$Target` (int): Which controller should be locked (0,1,2,3)
**Returns** (bool): If the command succeeds, it returns __TRUE__, otherwise __FALSE__.
Which controller should be locked (0,1,2,3)
**Example**
```php
//Locks controller 0 of device 12345
LCN_LockTargetValue(12345, 0);
```
## LCN_RampStop
Source: https://www.symcon.de/en/service/documentation/module-reference/devices/lcn/lcn-rampstop/
`bool LCN_RampStop(int $InstanceID)`
**Parameters**
- `$InstanceID` (int): ID of the device to be switched
**Returns** (bool): If the command succeeds, it returns __TRUE__, otherwise __FALSE__.
ID of the device to be switched
**Example**
```php
LCN_RampStop(12345);
```
## LCN_ReleaseTargetValue
Source: https://www.symcon.de/en/service/documentation/module-reference/devices/lcn/lcn-releasetargetvalue/
`bool LCN_ReleaseTargetValue(int $InstanceID, int $Target)`
unlocks a controller of the device
**Parameters**
- `$InstanceID` (int): ID of the device to be switched
- `$Target` (int): Which controller to unlock (0,1,2,3)
**Returns** (bool): If the command succeeds, it returns __TRUE__, otherwise __FALSE__.
Which controller to unlock (0,1,2,3)
**Example**
```php
//Unlocks controller 0 of device 12345
LCN_ReleaseTargetValue(12345, 0);
```
## LCN_RemoveGroup
Source: https://www.symcon.de/en/service/documentation/module-reference/devices/lcn/lcn-removegroup/
`bool LCN_RemoveGroup(int $InstanceID, int $Group)`
removes a device from a group
**Parameters**
- `$InstanceID` (int): Instance ID; the ID of the splitter instance, not the device instance
- `$Group` (int): Group number (0..255)
**Returns** (bool): If the command succeeds, it returns __TRUE__, otherwise __FALSE__.
Group number (0..255)
**Example**
```php
//The device with ID 12345 is removed from group 123
LCN_RemoveGroup(12345, 123);
```
## LCN_RequestLights
Source: https://www.symcon.de/en/service/documentation/module-reference/devices/lcn/lcn-requestlights/
`bool LCN_RequestLights(int $InstanceID)`
queries the LEDs of the panel
**Parameters**
- `$InstanceID` (int): ID of the panel to be queried
**Returns** (bool): If the command succeeds, it returns __TRUE__, otherwise __FALSE__.
ID of the panel to be queried
**Example**
```php
//The LEDs of the panel with ID 12345 are queried
LCN_RequestLights(12345);
```
## LCN_RequestRead
Source: https://www.symcon.de/en/service/documentation/module-reference/devices/lcn/lcn-requestread/
`bool LCN_RequestRead(int $InstanceID)`
queries the values
**Parameters**
- `$InstanceID` (int): ID of the device to query
**Returns** (bool): If the command succeeds, it returns __TRUE__, otherwise __FALSE__.
ID of the device to query
**Example**
```php
//Query the device with ID 12345
LCN_RequestRead(12345);
```
## LCN_RequestStatus
Source: https://www.symcon.de/en/service/documentation/module-reference/devices/lcn/lcn-requeststatus/
`bool LCN_RequestStatus(int $InstanceID)`
queries all statuses of the module
**Parameters**
- `$InstanceID` (int): ID of the module to query
**Returns** (bool): If the command succeeds, it returns __TRUE__, otherwise __FALSE__.
ID of the module to query
**Example**
```php
// Get all the statuses of the module with ID 12345
LCN_RequestStatus(12345);
```
## LCN_RequestThresholds
Source: https://www.symcon.de/en/service/documentation/module-reference/devices/lcn/lcn-requestthresholds/
`bool LCN_RequestThresholds(int $InstanceID)`
queries thresholds and hysteresis
**Parameters**
- `$InstanceID` (int): ID of the threshold to query
**Returns** (bool): If the command succeeds, it returns __TRUE__, otherwise __FALSE__.
ID of the threshold to query
**Example**
```php
//Get the thresholds and hysteresis of threshold 12345
LCN_RequestThresholds(12345);
```
## LCN_SaveScene
Source: https://www.symcon.de/en/service/documentation/module-reference/devices/lcn/lcn-savescene/
`bool LCN_SaveScene(int $InstanceID, int $Scene)`
saves a scene for an output
**Parameters**
- `$InstanceID` (int): ID of the output to be switched
- `$Scene` (int): Which scene to save in (0..9, 15)
**Returns** (bool): If the command succeeds, it returns __TRUE__, otherwise __FALSE__.
Which scene to save in (0..9, 15)
**Example**
```php
// Saves scene 5 of the exit with ID 12345
LCN_SaveScene(12345, 5);
```
## LCN_SelectSceneRegister
Source: https://www.symcon.de/en/service/documentation/module-reference/devices/lcn/lcn-selectsceneregister/
`bool LCN_SelectSceneRegister(int $InstanceID, int $Register)`
selects a register
**Parameters**
- `$InstanceID` (int): ID of the device to be switched
- `$Register` (int): Which register should be selected (0..9)
**Returns** (bool): If the command succeeds, it returns __TRUE__, otherwise __FALSE__.
Which register should be selected (0..9)
**Example**
```php
// Selects register 2 of device with ID 12345
ULCN_SelectSceneRegister(12345, 2);
```
## LCN_SendCommand
Source: https://www.symcon.de/en/service/documentation/module-reference/devices/lcn/lcn-sendcommand/
`bool LCN_SendCommand(int $InstanceID, string $Function, string $Data)`
**Parameters**
- `$InstanceID` (int): ID of the Instance; the ID of the splitter instance, not the device instance
- `$Function` (string): The first two (2) signs of PCHK command (e.g. A1)
- `$Data` (string): The remaining characters of PCHK command (e.g. DI000000). Any numbers must be sent in the decimal representation (3 characters).
**Returns** (bool): If the command succeeds, it returns __TRUE__, otherwise __FALSE__.
The remaining characters of PCHK command (e.g. DI000000). Any numbers must be sent in the decimal representation (3 characters).
**Example**
```php
LCN_SendCommand(12345, "A1", "DI000000"); //Dim output 1 immediately to 0%.
```
## LCN_SetDisplayText
Source: https://www.symcon.de/en/service/documentation/module-reference/devices/lcn/lcn-setdisplaytext/
`bool LCN_SetDisplayText(int $InstanceID, int $Line, string $Text)`
Shows a text on a line of the display
**Parameters**
- `$InstanceID` (int): ID of the device to be switched
- `$Line` (int): Display line between 1..4
- `$Text` (string): Text with a maximum of 60 characters
**Returns** (bool): If the command succeeds, it returns __TRUE__, otherwise __FALSE__.
Text with a maximum of 60 characters
**Example**
```php
//Shows "Hello World" on line 1 of the display with the InstanceID 12345.
LCN_SetDisplayText(12345, 1, "Hello World");
```
## LCN_SetDisplayTime
Source: https://www.symcon.de/en/service/documentation/module-reference/devices/lcn/lcn-setdisplaytime/
`bool LCN_SetDisplayTime(int $InstanceID, int $Line, int $DisplayTime)`
sets the display time of a line in the display
**Parameters**
- `$InstanceID` (int): ID of the device to be switched
- `$Line` (int): Display line between 1..4
- `$DisplayTime` (int): Time units between 1..30
**Returns** (bool): If the command succeeds, it returns __TRUE__, otherwise __FALSE__.
Time units between 1..30
**Example**
```php
//Configure line 1 of display instance 12345 to 30 time units
LCN_SetDisplayTime(12345, 1, 30);
```
## LCN_SetIntensity
Source: https://www.symcon.de/en/service/documentation/module-reference/devices/lcn/lcn-setintensity/
`bool LCN_SetIntensity(int $InstanceID, int $Intensity, int $Ramp)`
**Parameters**
- `$InstanceID` (int): ID of the device to be switched
- `$Intensity` (int): 0-100%
- `$Ramp` (int): 0 = Immediately; n = Seconds
**Returns** (bool): If the command succeeds, it returns __TRUE__, otherwise __FALSE__.
0 = Immediately; n = Seconds
**Example**
```php
LCN_SetIntensity(12345, 100, 0); //Dim device to 100% immediately
```
## LCN_SetLamp
Source: https://www.symcon.de/en/service/documentation/module-reference/devices/lcn/lcn-setlamp/
`bool LCN_SetLamp(int $InstanceID, int $Lamp, string $Action)`
switching an LED
**Parameters**
- `$InstanceID` (int): Instance ID; the ID of the splitter instance, not the device instance
- `$Lamp` (int): Selection of the panel lamps to be switched (1..12)
- `$Action` (string): What action to take.
**Returns** (bool): If the command succeeds, it returns __TRUE__, otherwise __FALSE__.
What action to take.
**Example**
```php
// Blink panel light 2 of module with ID 12345.
LCN_SetLamp(12345, 2, 'B');
```
## LCN_SetRelay
Source: https://www.symcon.de/en/service/documentation/module-reference/devices/lcn/lcn-setrelay/
`bool LCN_SetRelay(int $InstanceID, string $Wert)`
sets all relays in a module (8 bit)
**Parameters**
- `$InstanceID` (int): ID of the Instance; the ID of the splitter instance, not the device instance
- `$Wert` (string): 8 times character combination of the following values
**Returns** (bool): If the command succeeds, it returns __TRUE__, otherwise __FALSE__.
8 times character combination of the following values
**Example**
```php
LCN_SetRelay(12345, "--1100UU");
```
## LCN_SetRGBW
Source: https://www.symcon.de/en/service/documentation/module-reference/devices/lcn/lcn-setrgbw/
`bool LCN_SetRGBW(int $InstanceID, int $Red, int $Green, int $Blue, int $White)`
sets an instance to an RGBW color value
**Parameters**
- `$InstanceID` (int): ID of the device to be switched
- `$Red` (int): Intensity between 1..100
- `$Green` (int): Intensity between 1..100
- `$Blue` (int): Intensity between 1..100
- `$White` (int): Intensity between 1..100
**Returns** (bool): If the command succeeds, it returns __TRUE__, otherwise __FALSE__.
Intensity between 1..100
**Example**
```php
//Set instance 12345 to full intensity red.
LCN_SetRGBW(12345, 100, 0, 0, 100);
```
## LCN_SetTargetValue
Source: https://www.symcon.de/en/service/documentation/module-reference/devices/lcn/lcn-settargetvalue/
`bool LCN_SetTargetValue(int $InstanceID, int $Target, float $Value)`
**Parameters**
- `$InstanceID` (int): ID of the Instance
- `$Target` (int): 0 = Regulator R1; 1 = Regulator R2; 2 = Regulator S1; 3 = Regulator S2
- `$Value` (float): Value
**Returns** (bool): If the command succeeds, it returns __TRUE__, otherwise __FALSE__.
Value
**Example**
```php
LCN_SetTargetValue(12345, 2, 24.3); //Set Regulator S1 to 24.3°C
```
## LCN_ShiftTargetValue
Source: https://www.symcon.de/en/service/documentation/module-reference/devices/lcn/lcn-shifttargetvalue/
`bool LCN_ShiftTargetValue(int $InstanceID, int $Target, float $RelativeValue)`
**Parameters**
- `$InstanceID` (int): ID of the device to be switched
- `$Target` (int): Which controller should be shifted (0,1,2,3)
- `$RelativeValue` (float): Value by which to shift
**Returns** (bool): If the command succeeds, it returns __TRUE__, otherwise __FALSE__.
Value by which to shift
**Example**
```php
// Shifts the target value of the controller 1 by -1.7°C
LCN_ShiftTargetValue(12345, 1, -1.7);
```
## LCN_ShutterMove
Source: https://www.symcon.de/en/service/documentation/module-reference/devices/lcn/lcn-shuttermove/
`bool LCN_ShutterMove(int $InstanceID, int $Position)`
starts shutter movement to percentage position
**Parameters**
- `$InstanceID` (int): ID of the device to be switched
- `$Position` (int): Percentage position of the shutter (0-100%)
**Returns** (bool): If the command succeeds, it returns __TRUE__, otherwise __FALSE__.
Percentage position of the shutter (0-100%)
**Example**
```php
//Roller shutter movement to 80% (20% closed)
LCN_ShutterMove(12345, 80);
```
## LCN_ShutterMoveDown
Source: https://www.symcon.de/en/service/documentation/module-reference/devices/lcn/lcn-shuttermovedown/
`bool LCN_ShutterMoveDown(int $InstanceID)`
starts a shutter movement downwards
**Parameters**
- `$InstanceID` (int): ID of the device to be switched
**Returns** (bool): If the command succeeds, it returns __TRUE__, otherwise __FALSE__.
ID of the device to be switched
**Example**
```php
//Start roller shutter downward movement
LCN_ShutterMoveDown(12345);
```
## LCN_ShutterMoveUp
Source: https://www.symcon.de/en/service/documentation/module-reference/devices/lcn/lcn-shuttermoveup/
`bool LCN_ShutterMoveUp(int $InstanceID)`
starts a shutter movement upwards
**Parameters**
- `$InstanceID` (int): ID of the device to be switched
**Returns** (bool): If the command succeeds, it returns __TRUE__, otherwise __FALSE__.
ID of the device to be switched
**Example**
```php
//Start roller shutter upward movement
LCN_ShutterMoveUp(12345);
```
## LCN_ShutterStop
Source: https://www.symcon.de/en/service/documentation/module-reference/devices/lcn/lcn-shutterstop/
`bool LCN_ShutterStop(int $InstanceID)`
stops a shutter movement
**Parameters**
- `$InstanceID` (int): ID of the device to be switched
**Returns** (bool): If the command succeeds, it returns __TRUE__, otherwise __FALSE__.
ID of the device to be switched
**Example**
```php
//Stop shutter movement
LCN_ShutterStop(12345);
```
## LCN_StartFlicker
Source: https://www.symcon.de/en/service/documentation/module-reference/devices/lcn/lcn-startflicker/
`bool LCN_StartFlicker(int $InstanceID, string $Flicker, string $Speed, int $FlickerCount)`
**Parameters**
- `$InstanceID` (int): ID of the device to be switched
- `$Flicker` (string): G = Low; M = Medium; S = Start
- `$Speed` (string): L = Slow (ca. 0,5x / Sec); M = Medium (ca. 1x / Sec); S = Fast (ca. 2x / Sec)
- `$FlickerCount` (int): Number between 1..15
**Returns** (bool): If the command succeeds, it returns __TRUE__, otherwise __FALSE__.
Number between 1..15
**Example**
```php
LCN_StartFlicker(12345, "G", "L", 5);
```
## LCN_StopFlicker
Source: https://www.symcon.de/en/service/documentation/module-reference/devices/lcn/lcn-stopflicker/
`bool LCN_StopFlicker(int $InstanceID)`
**Parameters**
- `$InstanceID` (int): ID of the device to be switched
**Returns** (bool): If the command succeeds, it returns __TRUE__, otherwise __FALSE__.
ID of the device to be switched
**Example**
```php
LCN_StopFlicker(12345);
```
## LCN_SwitchDurationMin
Source: https://www.symcon.de/en/service/documentation/module-reference/devices/lcn/lcn-switchdurationmin/
`bool LCN_SwitchDurationMin(int $InstanceID, int $Minutes, string $DimmingTime, bool $Preserving)`
after how many minutes it should be dimmed down
**Parameters**
- `$InstanceID` (int): ID of the device to be switched
- `$Minutes` (int): After how many minutes it should be dimmed down
- `$DimmingTime` (string): How fast to dim down
- `$Preserving` (bool): The device is only shut down after the time elapsed if it has not been on before.
**Returns** (bool): If the command succeeds, it returns __TRUE__, otherwise __FALSE__.
The device is only shut down after the time elapsed if it has not been on before.
**Example**
```php
// Slowly dim device 12345 after 10 minutes
LCN_SwitchDurationMin(12345, 10, 'L', false);
```
## LCN_SwitchDurationSec
Source: https://www.symcon.de/en/service/documentation/module-reference/devices/lcn/lcn-switchdurationsec/
`bool LCN_SwitchDurationSec(int $InstanceID, int $Seconds, string $DimmingTime, bool $Preserving)`
after how many seconds it should be dimmed down
**Parameters**
- `$InstanceID` (int): ID of the device to be switched
- `$Seconds` (int): After how many seconds it should be dimmed down
- `$DimmingTime` (string): How fast to dim down
- `$Preserving` (bool): The device is only shut down after the time elapsed if it has not been on before.
**Returns** (bool): If the command succeeds, it returns __TRUE__, otherwise __FALSE__.
The device is only shut down after the time elapsed if it has not been on before.
**Example**
```php
// Quickly dim device 12345 after 5 seconds
LCN_SwitchDurationSec(12345, 5, 'K', false);
```
## LCN_SwitchMemory
Source: https://www.symcon.de/en/service/documentation/module-reference/devices/lcn/lcn-switchmemory/
`bool LCN_SwitchMemory(int $InstanceID, int $Ramp)`
**Parameters**
- `$InstanceID` (int): ID of the device to be switched
- `$Ramp` (int): Number of seconds, 0 = Immediately
**Returns** (bool): If the command succeeds, it returns __TRUE__, otherwise __FALSE__.
Number of seconds, 0 = Immediately
**Example**
```php
LCN_SwitchMemory(12345, 0); //Turn off device immediately
```
## LCN_SwitchMode
Source: https://www.symcon.de/en/service/documentation/module-reference/devices/lcn/lcn-switchmode/
`bool LCN_SwitchMode(int $InstanceID, int $Ramp)`
switches a device on/off
**Parameters**
- `$InstanceID` (int): ID of the device to be switched
- `$Ramp` (int): Number of seconds, 0 = Immediately
**Returns** (bool): If the command succeeds, it returns __TRUE__, otherwise __FALSE__.
Number of seconds, 0 = Immediately
**Example**
```php
LCN_SwitchMode(12345, 0); //Switch device immediately
```
## LCN_SwitchRelay
Source: https://www.symcon.de/en/service/documentation/module-reference/devices/lcn/lcn-switchrelay/
`bool LCN_SwitchRelay(int $InstanceID, bool $Status)`
**Parameters**
- `$InstanceID` (int): ID of the device to be switched
- `$Status` (bool): __TRUE__ for On, __FALSE__ for Off
**Returns** (bool): If the command succeeds, it returns __TRUE__, otherwise __FALSE__.
__TRUE__ for On, __FALSE__ for Off
**Example**
```php
LCN_SwitchRelay(12345, true); //Turn on relay
```
## LCN_SwitchRelayTimer
Source: https://www.symcon.de/en/service/documentation/module-reference/devices/lcn/lcn-switchrelaytimer/
`bool LCN_SwitchRelayTimer(int $InstanceID, int $TimeFactor)`
switches a relay on a time factor
**Parameters**
- `$InstanceID` (int): ID of the device to be switched
- `$TimeFactor` (int): Time factor between 1..255
**Returns** (bool): If the command succeeds, it returns __TRUE__, otherwise __FALSE__.
Time factor between 1..255
**Example**
```php
//Set relay time factor to 255.
LCN_SwitchRelayTimer(12345, 255);
```
---
# LJQuick
> Symcon documentation · English · generated on 2026-09-26
> Index: https://www.symcon.de/en/llms.txt
Source: https://www.symcon.de/en/service/documentation/module-reference/devices/ljquick/
_Requires Symcon >= 7.2_
The KNX quick (Lingg&Janke) module helps to add KNX quick instances quickly and easily. By selecting a group, channel and clicking on the 'Create' button, the instances are created with the correct addresses. Date and time are sent to KNX address 30/3/254 every 10 minutes.
### functional scope
- Creation of instances based on group settings
### Software installation
- Install the 'KNX quick (Lingg&Janke)' module via the [Module Store](https://www.symcon.de/en/service/documentation/components/management-console/module-store/).
### Setting up the instances in IP-Symcon
- Under 'Add instance' the 'KNX quick (Lingg&Janke)' module can be found using the quick filter.
- More information about adding instances in the [Instances documentation](https://www.symcon.de/en/service/documentation/basics/instances/)
#### Configuration page:
The configurator is structured as a tree. First the device type, then the various groups under which the various channels are located. If one or more channels are selected, the corresponding KNX device instances with the corresponding group addresses can be created by clicking on the 'Create' button.
Available devices:
- Switches
- Dimming
- Shading
- Energy
- Water, Gas, Oil
- Heat Quantity
- Temperature
- Temperature/ Humidity
Each device contains group 1-F.
Each group contains channels 1-9.
The device groups switch, dimming, shading, temperature and temperature/humidity also contain channel 0.
## LJ_SendDateTime
Source: https://www.symcon.de/en/service/documentation/module-reference/devices/ljquick/lj-senddatetime/
`bool LJ_SendDateTime(int $InstanceID)`
_Requires Symcon >= 7.2_
**Parameters**
- `$InstanceID` (int): ID of the Instance
**Returns** (bool): If the command could be executed successfully, it returns __TRUE__ as result, otherwise __FALSE__.
ID of the Instance
**Example**
```text
LJ_SendDateTime(12345);
```
---
# Matter
> Symcon documentation · English · generated on 2026-09-26
> Index: https://www.symcon.de/en/llms.txt
Source: https://www.symcon.de/en/service/documentation/module-reference/devices/matter/
_Requires Symcon >= 8.2_
> **Note:** The Matter integration is still under development and will be released with version 8.2. Matter is currently not supported on Windows.
> **Warning:** In general, we do not recommend using the Matter integration with Docker, as there are various requirements and limitations involved, some of which are highly technical and nuanced. For experienced users, we have put together a [guide](https://www.symcon.de/en/llms/modules/matter.md).
#### Integration into Symcon
A Matter configurator is required to integrate Matter devices into Symcon. This can be added to the object tree via "+"->"Instance" using the quick filter "Matter Configurator".
### Setup
There are 2 ways to connect Matter devices to Symcon.

#### 1. the Symcon Visualization App
If the device is brand new or has been reset to factory settings, it can be added to the server via the Symcon app.
To do this, the Matter configurator must be opened and the "Pair via app" option selected via the "Pair device" button. The app can then be opened. Once the app is connected to the server, the setup page can be opened in the settings via the Matter menu item. The plus in the bottom right-hand corner can be used to start the pairing process for the respective operating system. After the QR code has been scanned or the pairing code has been entered manually, the device is released for the Symcon server. When the configurator signals that the device has been successfully connected, the available instances can be created.

#### 2. sharing with another controller
If the device is already connected to another controller (IKEA DIRIGERA Hub, Aqara Hub M3, Google Nest Hub or Apple Home Pod), a pairing code can be generated via the respective apps to release the device for other systems. In the configurator, the "Add device" option can be selected via the "Pair device" button. The pairing code can be entered in this dialog. The device is then set up and the available instances can be created.
> **Note:** Some devices (such as Shelly) that are in the same network as the Symcon server without being set up by a controller can be set up as described in option 2. The pairing code corresponds to that printed directly on the device under the Matter QR.

### Configurator
The configurator can be used to manage devices that have already been added.
#### Subscriptions
The subscription column displays the connection status of the individual nodes. Clicking on the text opens a dialog box that lists past and current connections and their status. In addition, a new connection can be established manually using the “Force subscription” button. This is only necessary in exceptional cases, as interrupted connections are resumed automatically.

#### Update device
All information about a device can be retrieved again by clicking on the round arrow icon. This is necessary if new devices have been added to an integrated bridge (Hue Bridge, IKEA DIRIGERA) that are not yet listed in the configurator.
#### Display advanced information
Clicking on the "i" in the configurator opens a dialog box that displays various information about the main node and the individual endpoints. This includes the type of connection (Ethernet, Wi-Fi, Thread), the software and hardware version, and all controllers to which the device is connected. All clusters of the selected device are also displayed.

#### Remove devices
The connection to the device can be disconnected by clicking on the "x" in the configurator.
### Matter Device Instance
A Matter device consists of one or more endpoints. An instance of the type "Matter Device" is created for each endpoint. An endpoint consists of several clusters, which represent the different functions of a device.

The "Show supported clusters" button opens a dialog box that displays the clusters available to the endpoint and whether they are supported by Symcon. The "Feature Map" is also displayed, which provides information about the range of functions of the individual clusters.
The "Update values" button reads the individual values of the device and writes them to the variables.
If a device supports the function, a time can be set using the "Identify Device" button. Upon confirmation, the physical device will respond for the specified duration, for example by flashing or buzzing.
All switchable variables are displayed in the lower area of the instance configuration and can be changed.
### Battery-powered devices
Some battery-powered devices are considered intermittently connected devices (ICDs). These devices may be unavailable for extended periods of time. Therefore, Symcon cannot reliably subscribe to them. The values of the ICDs can still be updated manually as long as Symcon can reach the device. Even if the device is paired with Symcon, it may not be displayed in the configurator temporarily.
### Supported clusters
A Matter device consists of one or more clusters.
Not all functions offered by the individual clusters are yet supported.
- OnOff
- LevelControl
- ColorControl
- OccupancySensing
- TemperatureMeasurement
- RelativeHumidityMeasurement
- IlluminanceMeasurement
- Switch
- BooleanState
- Pm25ConcentrationMeasurement
- FanControl
- RvcCleanMode
- RvcOperationalState
- RvcRunMode
- ServiceArea
- AirQuality
- PowerSource
- DoorLock
- Thermostat
- HepaFilterMonitoring
- ElectricalEnergyMeasurement
- ElectricalPowerMeasurement
- WindowCovering
- Descriptor
- Identify
## Note on Using Matter with Docker
Source: https://www.symcon.de/en/service/documentation/module-reference/devices/matter/docker/
- In general, we do not recommend using the Matter integration under Docker, as there are various requirements and restrictions here, some of which are also very technical and subtle.
- **Synology/QNAP NAS** have a kernel that is too old, so that Thread devices cannot run there at all, and LAN/Wi-Fi devices can only run in host/MacVLAN network mode.
If Matter is to be used under Docker, one of the two requirements **must** be met:
- Docker runs in MacVLAN network mode, so that the container has its own IP address in the network.
- Docker runs in host network mode. The host must not have Avahi installed. Otherwise there will be server collision error messages and the mDNS network resolution will not be reliable because two Avahi stacks are running in parallel.
Matter still does not work reliably with the following restrictions:
- Docker in bridge network mode does not work at all, as mDNS is not available as a result.
- Docker runs correctly in host network mode, but Avahi also runs on the host. As a result, Avahi runs twice. This is particularly the case with **Synology/QNAP NAS**. This will interfere with finding the devices via mDNS and devices will be sporadically unreachable/unreliable.
- If the kernel is too old, router announcements are not supported. This is particularly the case with **Synology/QNAP NAS**. In this case, Matter integration only works for LAN/WLAN devices and for Thread devices only if an IPv6 DHCP server is available that correctly assigns all addresses/routes to all devices/thread border routers.
- Incorrect or unset Sysctl settings. The configurator also points this out accordingly. In particular, this configures the router announcements so that Thread devices function reliably.
## Device list
Source: https://www.symcon.de/en/service/documentation/module-reference/devices/matter/device-list/
_Requires Symcon >= 8.2_
### Matter over Thread
If Matter devices are to be connected via Thread, a Thread Border Router (TBR) is required. To be able to add a "Matter over Thread" device to Symcon, the operating system (iOS or Android) must know the thread credentials of the TBR. Alternatively, learned devices can be released for Symcon via the manufacturer's app.
The TBRs of the following manufacturers were tested:
| Manufacturer | Product |
| ------------ | ---------------------------- |
| IKEA | DERIGERA Hub |
| Apple | e.g. HomePod mini |
| Google | e.g. Google TV Streamer (4K) |
| Aeotec | e.g. Smart Home Hub |
---
# M-Bus
> Symcon documentation · English · generated on 2026-09-26
> Index: https://www.symcon.de/en/llms.txt
Source: https://www.symcon.de/en/service/documentation/module-reference/devices/mbus/
M-Bus is a standardized protocol and bus system for recording consumption data. A LAN, serial or USB gateway is required to connect to IP-Symcon.
> **Note:** The following devices are supported by IP-Symcon:
>
> [Supported Devices](https://www.symcon.de/en/llms/modules/mbus.md)
### Installation
The __M-Bus LAN Gateway__ is connected to the PC via LAN. By default, DHCP and port 5000 are set up. If an individual IP address is required, the IP-Symcon "Network Configuration Tool" is required. This is available for [download](https://support.symcon.de/lan-gct) . A simple [description of how to configure the gateway](https://www.symcon.de/assets/files/service/NetworkConfigurationTool.pdf) is available. The gateway can then be reached via the configured IP address and port.
### Integration in IP-Symcon
The LAN gateway can be integrated via the [Device Search](https://www.symcon.de/en/llms/components/management-console.md). To do this, "M-Bus Discovery" must be selected as the system. The discovery instance then offers to create an M-Bus [Configurator](https://www.symcon.de/en/llms/concepts.md). After the configurator has been created, devices can be searched for and integrated there.
### Configurator
Default settings for newly created devices can be defined in the configurator:
| Property | Description |
| ------------------ | ------------------------------------------------------------------------------------------------------------------------------------------------------------------------------------------------------------------- |
| Default Addressing | Selection of whether devices are to be addressed via the primary address or secondary address. With "Automatic", the secondary address is used if the primary address is 0, otherwise the secondary address is used |
| Default Interval | At what intervals the values should be queried (in minutes) |
The default settings are only applied when creating new [Instances](https://www.symcon.de/en/llms/concepts.md). A change does not affect already existing [Instances](https://www.symcon.de/en/llms/concepts.md).
After defining the standard settings, the search for M-Bus devices can be started by clicking on the "Search for devices" button. The search may take a few minutes.
After the search, the devices found appear as instances that can be created in the configurator. To do this, a device must be selected from the list and "Create" must be clicked on.

New instances are created in the object tree in the main category. These created instances can then be renamed accordingly and sorted elsewhere. It is also possible to call up the respective instance configuration via "Configure" in the configurator.
### Configuration
Various properties can be set on the configuration page of the device.
| Property | Description |
| ---------------- | ---------------------------------------------------------------------------------------------------- |
| Addressing | Selection of whether the device should be addressed via the primary address or the secondary address |
| Address | Address or ID of the device |
| Refresh Interval | At what intervals the values should be queried in minutes |
| Limitation | Limitation of packets on the bus (0 = unlimited) |

## Device list
Source: https://www.symcon.de/en/service/documentation/module-reference/devices/mbus/device-list/
### Supported Gateways
In general, all M-Bus Gateways are supported.
Explicitly tested gateways:
| Manufacturer | Description |
| --------------------------------------------------------------------------------- | ------------------------ |
| SymBox with M-Bus extension [Order now](https://www.symcon.de/en/shop/symbox/bundle-symbox) | Serial integrated module |
| Symcon M-Bus LAN Gateway [order now](https://www.symcon.de/en/shop/gateways/lan-m-bus) | IP Gateway |
| PiiGAB | M-Bus 800 |
| Relay | M-Bus Micro-Master |
| Relay | Level converter PW3 |
| Relay | Level converter PW20 |
| Relay | Level converter PW60 |
| Relay | RelAir R2M HOME |
| Relay | RelAir R2M Pro |
### Supported Components
IP-Symcon supports all devices that use the M-Bus protocol.
## MBUS_UpdateValues
Source: https://www.symcon.de/en/service/documentation/module-reference/devices/mbus/mbus-updatevalues/
`bool MBUS_UpdateValues(int $InstanceID)`
updates all device-specific values
**Parameters**
- `$InstanceID` (int): ID of the device to update
**Returns** (bool): If the command succeeds, it returns __TRUE__, otherwise __FALSE__.
ID of the device to update
**Example**
```php
MBUS_UpdateValues(12345);
```
---
# Mennekes
> Symcon documentation · English · generated on 2026-09-26
> Index: https://www.symcon.de/en/llms.txt
Source: https://www.symcon.de/en/service/documentation/module-reference/devices/mennekes/
_Requires Symcon >= 7.0_
Mennekes offers various wallboxes/charging stations. These can be read out via ModBus TCP. A connection with Symcon is possible via a LAN-IP gateway or W-LAN, depending on the version.
> **Note:** The following devices are supported by Symcon:
>
> [Supported components](https://www.symcon.de/en/llms/modules/mennekes.md)
### installation
In order to use Mennekes wallboxes/charging columns in Symcon, a connection via Ethernet or W-LAN to the wallbox must be available. Within the wallbox/charging station, a USB->LAN converter is required for a wired solution, which is supplied with the wallbox/charging station.
### integration Symcon
First a "ModBus Device" instance must be added within the object tree of Symcon. In the following dialog the IP address of the wallbox has to be entered. The port is 502 by default. Both information can be viewed on the web interface of the wallbox/charging station.


Afterwards the ModBus template for Mennekes wallboxes/charging stations can be downloaded. This contains the whole configuration of the ModBus device. After downloading, the "MennekesModBusx_vx.json" can be loaded via "Import". Afterwards all ModBus addresses of the common Mennekes wallboxes/charging stations are configured.
> **Note:** Templates in the [device overview](https://www.symcon.de/en/llms/modules/mennekes.md)

### add addresses
If more addresses are to be added, this can be done via "Add".
Depending on the design of the wallbox, it may be that individual addresses must be de-/activated. This can be controlled via the Active column.
### protocol description
> **Note:** Protocol description in the[device overview](https://www.symcon.de/en/llms/modules/mennekes.md)
## Device List
Source: https://www.symcon.de/en/service/documentation/module-reference/devices/mennekes/device-list/
_Requires Symcon >= 7.0_
### Supported Components
#### AMEDIO Professional
All variants of the product family are supported.
[Protocol description](https://www.symcon.de/media/pages/service/dokumentation/modulreferenz/geraete/mennekes/geraeteliste/1e9bcc3e26-1790424938/ecu_modbus_tcp_server_spec_rev_1.07.pdf) of all datapoints.
| System | ModBus Template |
| ------------------------------ | ------------------------------------------------- |
| AMEDIO Professional 22 | [Download](https://www.symcon.de/media/pages/service/dokumentation/modulreferenz/geraete/mennekes/geraeteliste/88badc7d15-1790424938/mennekesmodbusall_v2.json) |
| AMEDIO Professional PnC 22 | [Download](https://www.symcon.de/media/pages/service/dokumentation/modulreferenz/geraete/mennekes/geraeteliste/88badc7d15-1790424938/mennekesmodbusall_v2.json) |
| AMEDIO Professional+ 22 | [Download](https://www.symcon.de/media/pages/service/dokumentation/modulreferenz/geraete/mennekes/geraeteliste/88badc7d15-1790424938/mennekesmodbusall_v2.json) |
| AMEDIO Professional+ PnC 22 | [Download](https://www.symcon.de/media/pages/service/dokumentation/modulreferenz/geraete/mennekes/geraeteliste/88badc7d15-1790424938/mennekesmodbusall_v2.json) |
| AMEDIO Professional PnC 22 C2 | [Download](https://www.symcon.de/media/pages/service/dokumentation/modulreferenz/geraete/mennekes/geraeteliste/88badc7d15-1790424938/mennekesmodbusall_v2.json) |
| AMEDIO Professional+ PnC 22 C2 | [Download](https://www.symcon.de/media/pages/service/dokumentation/modulreferenz/geraete/mennekes/geraeteliste/88badc7d15-1790424938/mennekesmodbusall_v2.json) |
#### AMTRON Charge Control
All variants of the product family are supported.
[Protocol description](https://www.symcon.de/media/pages/service/dokumentation/modulreferenz/geraete/mennekes/geraeteliste/1e9bcc3e26-1790424938/ecu_modbus_tcp_server_spec_rev_1.07.pdf) of all datapoints.
| System | ModBus Template |
| ---------------------------------- | -------------------------------------------------------- |
| AMTRON Charge Control 11 | [Download](https://www.symcon.de/media/pages/service/dokumentation/modulreferenz/geraete/mennekes/geraeteliste/88badc7d15-1790424938/mennekesmodbusall_v2.json) |
| AMTRON Charge Control 11 C2 | [Download](https://www.symcon.de/media/pages/service/dokumentation/modulreferenz/geraete/mennekes/geraeteliste/88badc7d15-1790424938/mennekesmodbusall_v2.json) |
#### AMTRON Professional
All variants of the product family are supported.
[Protocol description](https://www.symcon.de/media/pages/service/dokumentation/modulreferenz/geraete/mennekes/geraeteliste/1e9bcc3e26-1790424938/ecu_modbus_tcp_server_spec_rev_1.07.pdf) of all datapoints.
| System | ModBus Template |
| ---------------------------------- | -------------------------------------------------------- |
| AMTRON Professional 22 C2 | [Download](https://www.symcon.de/media/pages/service/dokumentation/modulreferenz/geraete/mennekes/geraeteliste/88badc7d15-1790424938/mennekesmodbusall_v2.json) |
| AMTRON Professional 22 | [Download](https://www.symcon.de/media/pages/service/dokumentation/modulreferenz/geraete/mennekes/geraeteliste/88badc7d15-1790424938/mennekesmodbusall_v2.json) |
| AMTRON Professional PnC 22 C2 | [Download](https://www.symcon.de/media/pages/service/dokumentation/modulreferenz/geraete/mennekes/geraeteliste/88badc7d15-1790424938/mennekesmodbusall_v2.json) |
| AMTRON Professional PnC 22 | [Download](https://www.symcon.de/media/pages/service/dokumentation/modulreferenz/geraete/mennekes/geraeteliste/88badc7d15-1790424938/mennekesmodbusall_v2.json) |
| AMTRON Professional+ 22 C2 | [Download](https://www.symcon.de/media/pages/service/dokumentation/modulreferenz/geraete/mennekes/geraeteliste/88badc7d15-1790424938/mennekesmodbusall_v2.json) |
| AMTRON Professional+ 22 | [Download](https://www.symcon.de/media/pages/service/dokumentation/modulreferenz/geraete/mennekes/geraeteliste/88badc7d15-1790424938/mennekesmodbusall_v2.json) |
| AMTRON Professional+ PnC 22 C2 | [Download](https://www.symcon.de/media/pages/service/dokumentation/modulreferenz/geraete/mennekes/geraeteliste/88badc7d15-1790424938/mennekesmodbusall_v2.json) |
| AMTRON Professional+ PnC 22 | [Download](https://www.symcon.de/media/pages/service/dokumentation/modulreferenz/geraete/mennekes/geraeteliste/88badc7d15-1790424938/mennekesmodbusall_v2.json) |
| AMTRON Professional TCX 22 C2 | [Download](https://www.symcon.de/media/pages/service/dokumentation/modulreferenz/geraete/mennekes/geraeteliste/88badc7d15-1790424938/mennekesmodbusall_v2.json) |
| AMTRON Professional TCX 22 | [Download](https://www.symcon.de/media/pages/service/dokumentation/modulreferenz/geraete/mennekes/geraeteliste/88badc7d15-1790424938/mennekesmodbusall_v2.json) |
| AMTRON Professional TCX PnC 22 C2 | [Download](https://www.symcon.de/media/pages/service/dokumentation/modulreferenz/geraete/mennekes/geraeteliste/88badc7d15-1790424938/mennekesmodbusall_v2.json) |
| AMTRON Professional TCX PnC 22 | [Download](https://www.symcon.de/media/pages/service/dokumentation/modulreferenz/geraete/mennekes/geraeteliste/88badc7d15-1790424938/mennekesmodbusall_v2.json) |
| AMTRON Professional+ TCX 22 C2 | [Download](https://www.symcon.de/media/pages/service/dokumentation/modulreferenz/geraete/mennekes/geraeteliste/88badc7d15-1790424938/mennekesmodbusall_v2.json) |
| AMTRON Professional+ TCX 22 | [Download](https://www.symcon.de/media/pages/service/dokumentation/modulreferenz/geraete/mennekes/geraeteliste/88badc7d15-1790424938/mennekesmodbusall_v2.json) |
| AMTRON Professional+ TCX PnC 22 C2 | [Download](https://www.symcon.de/media/pages/service/dokumentation/modulreferenz/geraete/mennekes/geraeteliste/88badc7d15-1790424938/mennekesmodbusall_v2.json) |
| AMTRON Professional+ TCX PnC 22 | [Download](https://www.symcon.de/media/pages/service/dokumentation/modulreferenz/geraete/mennekes/geraeteliste/88badc7d15-1790424938/mennekesmodbusall_v2.json) |
#### AMTRON Xtra
All variants of the product family are supported.
[Protocol description](https://www.symcon.de/media/pages/service/dokumentation/modulreferenz/geraete/mennekes/geraeteliste/98fae657f7-1790424938/amtron_modbus_description_extern_v0.1_premium-xrta.pdf) of all datapoints.
| System | ModBus Template |
| ---------------------------------- | -------------------------------------------------------- |
| AMTRON Xtra 11 C2 | [Download](https://www.symcon.de/media/pages/service/dokumentation/modulreferenz/geraete/mennekes/geraeteliste/ab710611ca-1790424938/mennekesmodbusamtronxtra_v1.json) |
| AMTRON Xtra 22 C2 | [Download](https://www.symcon.de/media/pages/service/dokumentation/modulreferenz/geraete/mennekes/geraeteliste/ab710611ca-1790424938/mennekesmodbusamtronxtra_v1.json) |
| AMTRON Xtra E 11/22 T2 | [Download](https://www.symcon.de/media/pages/service/dokumentation/modulreferenz/geraete/mennekes/geraeteliste/ab710611ca-1790424938/mennekesmodbusamtronxtra_v1.json) |
| AMTRON Xtra R 11 T2 | [Download](https://www.symcon.de/media/pages/service/dokumentation/modulreferenz/geraete/mennekes/geraeteliste/ab710611ca-1790424938/mennekesmodbusamtronxtra_v1.json) |
| AMTRON Xtra R 3,7/7,4 T2S | [Download](https://www.symcon.de/media/pages/service/dokumentation/modulreferenz/geraete/mennekes/geraeteliste/ab710611ca-1790424938/mennekesmodbusamtronxtra_v1.json) |
#### AMTRON 4You
All variants of the product family are supported.
[Protocol description](https://www.symcon.de/media/pages/service/dokumentation/modulreferenz/geraete/mennekes/geraeteliste/7227d0b91e-1790424938/amtron-4you500-4business700-modbus-tcp-register-v1.5.pdf) of all datapoints.
| System | ModBus Template |
| ---------------------------------- | -------------------------------------------------------- |
| AMTRON 4You 410 11 C2 | [Download](https://www.symcon.de/media/pages/service/dokumentation/modulreferenz/geraete/mennekes/geraeteliste/edbd7a1913-1790424938/mennekesmodbus4you4business.json) |
| AMTRON 4You 410 7.4/22 C2 | [Download](https://www.symcon.de/media/pages/service/dokumentation/modulreferenz/geraete/mennekes/geraeteliste/edbd7a1913-1790424938/mennekesmodbus4you4business.json) |
| AMTRON 4You 410 7.4/22 T2S | [Download](https://www.symcon.de/media/pages/service/dokumentation/modulreferenz/geraete/mennekes/geraeteliste/edbd7a1913-1790424938/mennekesmodbus4you4business.json) |
| AMTRON 4You 460 11 C2 | [Download](https://www.symcon.de/media/pages/service/dokumentation/modulreferenz/geraete/mennekes/geraeteliste/edbd7a1913-1790424938/mennekesmodbus4you4business.json) |
| AMTRON 4You 510 7.4 C2 | [Download](https://www.symcon.de/media/pages/service/dokumentation/modulreferenz/geraete/mennekes/geraeteliste/edbd7a1913-1790424938/mennekesmodbus4you4business.json) |
| AMTRON 4You 510 11 C2 | [Download](https://www.symcon.de/media/pages/service/dokumentation/modulreferenz/geraete/mennekes/geraeteliste/edbd7a1913-1790424938/mennekesmodbus4you4business.json) |
| AMTRON 4You 510 11 T2S | [Download](https://www.symcon.de/media/pages/service/dokumentation/modulreferenz/geraete/mennekes/geraeteliste/edbd7a1913-1790424938/mennekesmodbus4you4business.json) |
| AMTRON 4You 510 7.4/22 T2S | [Download](https://www.symcon.de/media/pages/service/dokumentation/modulreferenz/geraete/mennekes/geraeteliste/edbd7a1913-1790424938/mennekesmodbus4you4business.json) |
| AMTRON 4You 510 22 C2 | [Download](https://www.symcon.de/media/pages/service/dokumentation/modulreferenz/geraete/mennekes/geraeteliste/edbd7a1913-1790424938/mennekesmodbus4you4business.json) |
| AMTRON 4You 560 11 C2 | [Download](https://www.symcon.de/media/pages/service/dokumentation/modulreferenz/geraete/mennekes/geraeteliste/edbd7a1913-1790424938/mennekesmodbus4you4business.json) |
| AMTRON 4You 560 22 C2 | [Download](https://www.symcon.de/media/pages/service/dokumentation/modulreferenz/geraete/mennekes/geraeteliste/edbd7a1913-1790424938/mennekesmodbus4you4business.json) |
#### AMTRON 4Business
All variants of the product family are supported.
[Protocol description](https://www.symcon.de/media/pages/service/dokumentation/modulreferenz/geraete/mennekes/geraeteliste/7227d0b91e-1790424938/amtron-4you500-4business700-modbus-tcp-register-v1.5.pdf) of all datapoints.
| System | ModBus Template |
| ---------------------------------- | -------------------------------------------------------- |
| AMTRON 4Business 610 22 C2 | [Download](https://www.symcon.de/media/pages/service/dokumentation/modulreferenz/geraete/mennekes/geraeteliste/edbd7a1913-1790424938/mennekesmodbus4you4business.json) |
| AMTRON 4Business 610 22 T2 | [Download](https://www.symcon.de/media/pages/service/dokumentation/modulreferenz/geraete/mennekes/geraeteliste/edbd7a1913-1790424938/mennekesmodbus4you4business.json) |
| AMTRON 4Business 610 22 T2S | [Download](https://www.symcon.de/media/pages/service/dokumentation/modulreferenz/geraete/mennekes/geraeteliste/edbd7a1913-1790424938/mennekesmodbus4you4business.json) |
| AMTRON 4Business 620 22 T2 | [Download](https://www.symcon.de/media/pages/service/dokumentation/modulreferenz/geraete/mennekes/geraeteliste/edbd7a1913-1790424938/mennekesmodbus4you4business.json) |
| AMTRON 4Business 630 22 C2 | [Download](https://www.symcon.de/media/pages/service/dokumentation/modulreferenz/geraete/mennekes/geraeteliste/edbd7a1913-1790424938/mennekesmodbus4you4business.json) |
| AMTRON 4Business 630 22 T2 | [Download](https://www.symcon.de/media/pages/service/dokumentation/modulreferenz/geraete/mennekes/geraeteliste/edbd7a1913-1790424938/mennekesmodbus4you4business.json) |
| AMTRON 4Business 630 22 T2S | [Download](https://www.symcon.de/media/pages/service/dokumentation/modulreferenz/geraete/mennekes/geraeteliste/edbd7a1913-1790424938/mennekesmodbus4you4business.json) |
| AMTRON 4Business 710 7.4 C2 | [Download](https://www.symcon.de/media/pages/service/dokumentation/modulreferenz/geraete/mennekes/geraeteliste/edbd7a1913-1790424938/mennekesmodbus4you4business.json) |
| AMTRON 4Business 710 11 C2 | [Download](https://www.symcon.de/media/pages/service/dokumentation/modulreferenz/geraete/mennekes/geraeteliste/edbd7a1913-1790424938/mennekesmodbus4you4business.json) |
| AMTRON 4Business 710 22 C2 | [Download](https://www.symcon.de/media/pages/service/dokumentation/modulreferenz/geraete/mennekes/geraeteliste/edbd7a1913-1790424938/mennekesmodbus4you4business.json) |
| AMTRON 4Business 710 22 T2 | [Download](https://www.symcon.de/media/pages/service/dokumentation/modulreferenz/geraete/mennekes/geraeteliste/edbd7a1913-1790424938/mennekesmodbus4you4business.json) |
| AMTRON 4Business 710 22 T2S | [Download](https://www.symcon.de/media/pages/service/dokumentation/modulreferenz/geraete/mennekes/geraeteliste/edbd7a1913-1790424938/mennekesmodbus4you4business.json) |
| AMTRON 4Business 730 7.4 C2 | [Download](https://www.symcon.de/media/pages/service/dokumentation/modulreferenz/geraete/mennekes/geraeteliste/edbd7a1913-1790424938/mennekesmodbus4you4business.json) |
| AMTRON 4Business 730 11 C2 | [Download](https://www.symcon.de/media/pages/service/dokumentation/modulreferenz/geraete/mennekes/geraeteliste/edbd7a1913-1790424938/mennekesmodbus4you4business.json) |
| AMTRON 4Business 730 22 C2 | [Download](https://www.symcon.de/media/pages/service/dokumentation/modulreferenz/geraete/mennekes/geraeteliste/edbd7a1913-1790424938/mennekesmodbus4you4business.json) |
| AMTRON 4Business 730 22 T2 | [Download](https://www.symcon.de/media/pages/service/dokumentation/modulreferenz/geraete/mennekes/geraeteliste/edbd7a1913-1790424938/mennekesmodbus4you4business.json) |
| AMTRON 4Business 730 22 T2S | [Download](https://www.symcon.de/media/pages/service/dokumentation/modulreferenz/geraete/mennekes/geraeteliste/edbd7a1913-1790424938/mennekesmodbus4you4business.json) |
| AMTRON 4Business 760 11 C2 | [Download](https://www.symcon.de/media/pages/service/dokumentation/modulreferenz/geraete/mennekes/geraeteliste/edbd7a1913-1790424938/mennekesmodbus4you4business.json) |
| AMTRON 4Business 760 22 C2 | [Download](https://www.symcon.de/media/pages/service/dokumentation/modulreferenz/geraete/mennekes/geraeteliste/edbd7a1913-1790424938/mennekesmodbus4you4business.json) |
| AMTRON 4Business 760 22 T2 | [Download](https://www.symcon.de/media/pages/service/dokumentation/modulreferenz/geraete/mennekes/geraeteliste/edbd7a1913-1790424938/mennekesmodbus4you4business.json) |
| AMTRON 4Business 780 11 C2 | [Download](https://www.symcon.de/media/pages/service/dokumentation/modulreferenz/geraete/mennekes/geraeteliste/edbd7a1913-1790424938/mennekesmodbus4you4business.json) |
| AMTRON 4Business 780 22 C2 | [Download](https://www.symcon.de/media/pages/service/dokumentation/modulreferenz/geraete/mennekes/geraeteliste/edbd7a1913-1790424938/mennekesmodbus4you4business.json) |
| AMTRON 4Business 780 22 T2 | [Download](https://www.symcon.de/media/pages/service/dokumentation/modulreferenz/geraete/mennekes/geraeteliste/edbd7a1913-1790424938/mennekesmodbus4you4business.json) |
---
# Modbus RTU/TCP
> Symcon documentation · English · generated on 2026-09-26
> Index: https://www.symcon.de/en/llms.txt
Source: https://www.symcon.de/en/service/documentation/module-reference/devices/modbus-rtu-tcp/
ModBus is a protocol based on RTU (serial binary) and TCP/IP packets. A connection with IP-Symcon is possible via LAN or serial gateway.
> **Note:** The following devices are supported by IP-Symcon:
>
> [Supported devices](https://www.symcon.de/en/llms/modules/modbus-rtu-tcp.md)
### Integration in IP-Symcon
First a "ModBus" instance has to be added within IP-Symcon. There are several variants that can be created:
| Instance | Description |
| -------------- | ---------------------------------------------------------------------------------------------------- |
| ModBus Device | Instance, which can map multiple addresses (coils/registers) and supports templates (7.0 and higher) |
| ModBus Coil. | Instance which represents a single address (coil) |
| ModBus Address | Instance which represents a single address (register) |
> **Note:** Many templates can be found in our community: [Show templates](https://community.symcon.de/c/ip-symcon/vorlagen-modbus/86)
The configuration of the parent gateway and I/O instance must then be adapted to the connected device. It must be selected via which protocol and device ID the device is addressed. The device ID is particularly important for RTU connected devices. For devices connected to TCP, this is often device ID 1.

In order to be able to establish a connection to the device, IP address and port (default:502) must be entered in the gateway's parent I/O instance.
Further configuration (screenshot below) is as follows.
| Option | Description |
| ----------------------- | ----------------------------------------------------------------------------------------------------------------------------------------------------------------------------- |
| Unit | Data type of the variable of the device |
| Function (Read) | Function according to which the values are to be read |
| Address (Read) | Device address of the register to be read from |
| Function (Write) | Function according to which the values are to be written |
| Address (Write) | Device address of the register to be written to |
| Factor (Numeric values) | The factor multiplies or divides the received value and writes it to the device variable |
| Length (Strings) | If the length is greater than 0, it defines the precise number of characters (Bytes) queried. Note: 1 register = 2 characters (Bytes) |
| Byte order | Depending on the device, the byte order must be adapted. Often this is not documented, but must be tried out. Big Endian and Little Endian (byte swap) are the common values. |
| Emulate status | "Emulate status" means that the value of the variable is set to the new value if the write command is successful and does not depend on a read command |
| Interval | If the interval is greater than 0, the address (read) is queried cyclically on the ModBus device and the variable of the device is updated |

> **Note:** Due to the fact that we still support 32 bit systems Int64 values are mapped as Float64.
### Modbus device
If multiple addresses are to be queried for a device, the Modbus device should be used. Here several addresses can be entered as a table and virtual addresses can be defined.
Configuration:
| Name | Description |
| ------------------------------------------------ | ---------------------------------------------------------------------------------------------------------------------------------------------------------------------------------- |
| Addresses | Tabular listing of the defined addresses |
| Configure virtual addresses | Button with which a list of virtual addresses can be defined |
| Byte order | The byte order must be adjusted depending on the device. This is often not documented but has to be tried out. Big Endian and Little Endian (bytes swapped) are the common values. |
| Interval | If the interval is set to greater than 0, the address (read) of the ModBus device is queried cyclically and the device variable is updated. |
| Import template | Using this button, a template of the tables can be quickly inserted. |
| Export template | Through this button, |
> **Note:** The structure of template files is described in detail under [Templates (file format)](https://www.symcon.de/en/llms/modules/modbus-rtu-tcp.md).
| A template can be created from the settings made | |
Contents of the address list:
| Name | Description |
| -------------------- | ---------------------------------------------------------- |
| Active | Specifies whether the variable should be created |
| Name | Name, used as variable name |
| Unit | Data type of the register |
| Function (Read) | Function according to which the values should be read |
| Address (Read) | Register to be read from |
| Function (Writing) | Function according to which the values should be written |
| Address (writing) | Register to be written to |
| Profile | Profile, which should get the variable |
Under the expert options, the ident can be customized and a translation for the variable name can also be provided.
Contents of the virtual address list:
| Name | Description |
| ------------- | -------------------------------------------------------- |
| Active | The variable is created |
| Name | Name, used as variable name |
| Variable type | Type of variable |
| Profile | Profile of the variable |
| Read | Script that provides the values of the virtual address |
| Write | Script that passes the values to the variables. |
In the read script, all values with their respective idents are available in $VALUES. The new value,
which should load in the variable of the virtual address is simply returned with return. If no value is to be written (e.g. because invalid), null can be returned. (from 7.1)
```php
return ($VALUES["A_3_3_23296"] + $VALUES["A_3_3_23298"] + $VALUES["A_3_3_23300"])/3;
```
The write script expects an associative array as return, which contains all the idents to be written to. $VALUE contains the new value,
which was requested via RequestAction.
```php
return ["A_3_3_23296" => $VALUE];
```
### FunctionCodes
Depending on the FunctionCode, a suitable address must also be entered. This can be taken from the table.
The table below also provides an overview of which FunctionCode is sent with which parameterization within IP-Symcon:
| FunctionCode | Device address | Read/Write address | Surname |
| ------------ | -------------- | ---------------------- | ------------------------ |
| 0x01 (1) | 1 - 10000 | Device address - 1 | Read Coils |
| 0x05 (5) | 1 - 10000 | Device address - 1 | Write Single Coil |
| 0x02 (2) | 10001 - 20000 | Device address - 10001 | Read Discrete Inputs |
| 0x03 (3) | 40001 - 50000 | Device address - 40001 | Read Holding Registers |
| 0x10 (16) | 40001 - 50000 | Device address - 40001 | Write Multiple registers |
| 0x04 (4) | 30001 - 40000 | Device address - 30001 | Read Input Registers |
> **Note:** If, for example, address 40123 is to be written to (FunctionCode = 0x10), the appropriate data type (unit) must be selected and write address 122 (40123 - 40001) entered.
> **Warning:** Some manufacturers do not adhere to this convention. It must be checked in the respective instructions or data sheets whether the device address must be subtracted depending on the function code or whether absolute addresses apply
### Data types
| Data type | Sign | Bits |
| --------- | -------- | ---- |
| BOOL | unsigned | 1 |
| UINT8MSB | unsigned | 8 |
| UINT8LSB | unsigned | 8 |
| UINT16 | unsigned | 16 |
| UINT32 | unsigned | 32 |
| UINT64 | unsigned | 64 |
| INT8MSB | signed | 8 |
| INT8LSB | signed | 8 |
| INT16 | signed | 16 |
| INT32 | signed | 32 |
| INT64 | signed | 64 |
| FLOAT32 | signed | 32 |
| FLOAT64 | signed | 64 |
| STRING | | |
## Device list
Source: https://www.symcon.de/en/service/documentation/module-reference/devices/modbus-rtu-tcp/device-list/
### Supported Gateways/Components
IP-Symcon supports all devices that use the ModBus RTU or ModBus TCP protocol.
In particular, devices and PLCs from [Wago/Beckhoff/ABB](https://www.symcon.de/en/llms/modules/sps-wago-beckhoff-abb.md).
### Supported Components
IP-Symcon supports all components.
| Manufacturer | Description |
| ---------------------------------------------------------------------------------------------- | ------------------------------------------------------ |
| SymBox with RS485 (ModBus RTU) extension [Order now](https://www.symcon.de/en/shop/symbox/bundle-symbox) | Serial integrated module |
| Exsys EX-6051 (nonbinding recommendation) | Serial to LAN converter for mode "ModBus RTU over TCP" |
| Waveshare RS485 to Ethernet Converter (nonbinding recommendation) | Serial to LAN converter for mode "ModBus RTU over TCP" |
## ModBus_RequestRead
Source: https://www.symcon.de/en/service/documentation/module-reference/devices/modbus-rtu-tcp/modbus-requestread/
`bool ModBus_RequestRead(int $InstanceID)`
**Parameters**
- `$InstanceID` (int): ID of the device to be switched
**Returns** (bool): If the command succeeds, it returns __TRUE__, otherwise __FALSE__.
ID of the device to be switched
**Example**
```php
//Read out device with the ID 12345
ModBus_RequestRead(12345);
```
## ModBus_WriteCoil
Source: https://www.symcon.de/en/service/documentation/module-reference/devices/modbus-rtu-tcp/modbus-writecoil/
`bool ModBus_WriteCoil(int $InstanceID, bool $Status)`
**Parameters**
- `$InstanceID` (int): ID of the device to be switched
- `$Status` (bool): __TRUE__ for On, __FALSE__ for Off
**Returns** (bool): If the command succeeds, it returns __TRUE__, otherwise __FALSE__.
__TRUE__ for On, __FALSE__ for Off
**Example**
```php
//Turns instance with the ID "12345" on
ModBus_WriteCoil(12345, true);
```
## ModBus_WriteRegister
Source: https://www.symcon.de/en/service/documentation/module-reference/devices/modbus-rtu-tcp/modbus-writeregister/
`bool ModBus_WriteRegister(int $InstanceID, float $Value)`
writes a value to the write address
**Parameters**
- `$InstanceID` (int): ID of the device to be switched
- `$Value` (float): 32-bit floating point value according to IEEE754 or integer
**Returns** (bool): If the command succeeds, it returns __TRUE__, otherwise __FALSE__.
32-bit floating point value according to IEEE754 or integer
**Example**
```php
////Writes the value 23.5 to the register of the instance with ID 12345
ModBus_WriteRegister(12345, 23.5);
////Writes the value 12 to the register of the instance with ID 23456
ModBus_WriteRegister(23456, 12);
```
## ModBus_WriteRegisterByte
Source: https://www.symcon.de/en/service/documentation/module-reference/devices/modbus-rtu-tcp/modbus-writeregisterbyte/
`bool ModBus_WriteRegisterByte(int $InstanceID, int $Value)`
**Parameters**
- `$InstanceID` (int): ID of the device to be switched
- `$Value` (int): 0-255
**Returns** (bool): If the command succeeds, it returns __TRUE__, otherwise __FALSE__.
0-255
**Example**
```php
//Writes 123 into the register of the instance with the ID 12345
ModBus_WriteRegisterByte(12345, 123);
```
## ModBus_WriteRegisterChar
Source: https://www.symcon.de/en/service/documentation/module-reference/devices/modbus-rtu-tcp/modbus-writeregisterchar/
`bool ModBus_WriteRegisterChar(int $InstanceID, int $Value)`
_Requires Symcon >= 4.4_
Sets address with ID __InstanceID__ to __Value__
**Parameters**
- `$InstanceID` (int): ID of the device to be switched
- `$Value` (int): -128 to 127
**Returns** (bool): If the command succeeds, it returns __TRUE__, otherwise __FALSE__.
-128 to 127
**Example**
```php
//Writes -123 into the register of the instance with the ID 12345
ModBus_WriteRegisterChar(12345, -123);
```
## ModBus_WriteRegisterDWord
Source: https://www.symcon.de/en/service/documentation/module-reference/devices/modbus-rtu-tcp/modbus-writeregisterdword/
`bool ModBus_WriteRegisterDWord(int $InstanceID, int $Wert)`
**Parameters**
- `$InstanceID` (int): ID of the device to be switched
- `$Wert` (int): 0-4294967295
**Returns** (bool): If the command succeeds, it returns __TRUE__, otherwise __FALSE__.
0-4294967295
**Example**
```php
//Writes 123 into the register of the instance with the ID 12345
ModBus_WriteRegisterDWord(12345, 123);
```
## ModBus_WriteRegisterInt64
Source: https://www.symcon.de/en/service/documentation/module-reference/devices/modbus-rtu-tcp/modbus-writeregisterint64/
`bool ModBus_WriteRegisterInt64(int $InstanceID, int $Value)`
**Parameters**
- `$InstanceID` (int): ID of the device to be switched
- `$Value` (int): -9223372036854775808 bis 9223372036854775807
**Returns** (bool): If the command succeeds, it returns __TRUE__, otherwise __FALSE__.
-9223372036854775808 bis 9223372036854775807
**Example**
```php
//Writes -123 into the register of the instance with the ID 12345
ModBus_WriteRegisterInt64(12345, -123);
```
## ModBus_WriteRegisterInteger
Source: https://www.symcon.de/en/service/documentation/module-reference/devices/modbus-rtu-tcp/modbus-writeregisterinteger/
`bool ModBus_WriteRegisterInteger(int $InstanceID, int $Value)`
**Parameters**
- `$InstanceID` (int): ID of the device to be switched
- `$Value` (int): -2147483648 bis 2147483647
**Returns** (bool): If the command succeeds, it returns __TRUE__, otherwise __FALSE__.
-2147483648 bis 2147483647
**Example**
```php
//Writes -123 into the register of the instance with the ID 12345
ModBus_WriteRegisterInteger(12345, -123);
```
## ModBus_WriteRegisterReal
Source: https://www.symcon.de/en/service/documentation/module-reference/devices/modbus-rtu-tcp/modbus-writeregisterreal/
`bool ModBus_WriteRegisterReal(int $InstanceID, float $Value)`
**Parameters**
- `$InstanceID` (int): ID of the device to be switched
- `$Value` (float): 32bit floating point value according to IEEE754
**Returns** (bool): If the command succeeds, it returns __TRUE__, otherwise __FALSE__.
32bit floating point value according to IEEE754
**Example**
```php
//Writes 23.5 into the register of the instance with the ID 12345
ModBus_WriteRegisterReal(12345, 23.5);
```
## ModBus_WriteRegisterReal64
Source: https://www.symcon.de/en/service/documentation/module-reference/devices/modbus-rtu-tcp/modbus-writeregisterreal64/
`bool ModBus_WriteRegisterReal64(int $InstanceID, float $Value)`
**Parameters**
- `$InstanceID` (int): ID of the device to be switched
- `$Value` (float): 64bit floating point value according to IEEE754
**Returns** (bool): If the command succeeds, it returns __TRUE__, otherwise __FALSE__.
64bit floating point value according to IEEE754
**Example**
```php
//Writes 23.5 into the register of the instance with the ID 12345
ModBus_WriteRegisterReal64(12345, 23.5);
```
## ModBus_WriteRegisterShort
Source: https://www.symcon.de/en/service/documentation/module-reference/devices/modbus-rtu-tcp/modbus-writeregistershort/
`bool ModBus_WriteRegisterShort(int $InstanceID, int $Value)`
_Requires Symcon >= 4.4_
Sets address with ID __InstanceID__ to __Value__
**Parameters**
- `$InstanceID` (int): ID of the device to be switched
- `$Value` (int): -32768 to 32767
**Returns** (bool): If the command succeeds, it returns __TRUE__, otherwise __FALSE__.
-32768 to 32767
**Example**
```php
//Writes -123 into the register of the instance with the ID 12345
ModBus_WriteRegisterShort(12345, -123);
```
## ModBus_WriteRegisterString
Source: https://www.symcon.de/en/service/documentation/module-reference/devices/modbus-rtu-tcp/modbus-writeregisterstring/
`bool ModBus_WriteRegisterString(int $InstanceID, string $Value)`
**Parameters**
- `$InstanceID` (int): ID of the device to be switched
- `$Value` (string): String which should be written into register
**Returns** (bool): If the command succeeds, it returns __TRUE__, otherwise __FALSE__.
String which should be written into register
**Example**
```php
//Writes "Hello world" into the register of the instance with the ID 12345
ModBus_WriteRegisterString(12345, "Hello world");
```
## ModBus_WriteRegisterWord
Source: https://www.symcon.de/en/service/documentation/module-reference/devices/modbus-rtu-tcp/modbus-writeregisterword/
`bool ModBus_WriteRegisterWord(int $InstanceID, int $Value)`
**Parameters**
- `$InstanceID` (int): ID of the device to be switched
- `$Value` (int): 0-65535
**Returns** (bool): If the command succeeds, it returns __TRUE__, otherwise __FALSE__.
0-65535
**Example**
```php
//Writes 123 into the register of the instance with the ID 12345
ModBus_WriteRegisterWord(12345, 123);
```
## Templates (file format)
Source: https://www.symcon.de/en/service/documentation/module-reference/devices/modbus-rtu-tcp/templates/
_Requires Symcon >= 7.0_
The "ModBus Device" instance can export its complete configuration as a template and import it again. A template is a JSON file containing all addresses, virtual addresses, required variable profiles, the byte order and the polling settings. A device that has been set up once can thus be set up on other systems with a few clicks or shared with other users.
> **Note:** Many ready-made templates can be found in our community: [Show templates](https://community.symcon.de/c/symcon/vorlagen-modbus/86)
This page describes the file format completely, so that templates can also be created directly from a manufacturer's data sheet or generated by a script.
### Import and export
| Action | Description |
| --------------- | ---------------------------------------------------------------------------------------------------------------------------------------------------------------------------------------------------------------------------- |
| Export template | Creates a JSON file from the current configuration. All used profiles that do not start with "~" are exported as well. |
| Import template | Replaces addresses, virtual addresses, byte order and polling settings in the configuration form. The changes are only saved with "Apply". Missing profiles are created in the process, existing profiles are not modified. |
The file is checked before the import. If it does not contain the three keys "Addresses", "VirtualAddresses" and "Profiles", the import is aborted with the message "This is not a valid ModBus template!". If a profile already exists with different settings, a hint is shown (e.g. "2 profiles do not match!"). In this case the existing profile is used.
> **Warning:** The import overwrites the existing configuration of the instance. Variables whose ident no longer occurs in the new configuration are deleted when applying - including their archive data.
### Structure
A template is a JSON object with the following keys:
| Key | Type | Required | Description |
| ---------------- | ------ | -------- | -------------------------------------------------------------------------------------------- |
| Addresses | Array | Yes | List of Modbus addresses, see Addresses |
| VirtualAddresses | Array | Yes | List of virtual addresses, see Virtual addresses, may be empty |
| Profiles | Object | Yes | Variable profiles created on import, see Profiles, may be empty |
| ByteOrder | Number | No | Byte order of the instance, see Byte order |
| Requests | Object | No | Polling settings, see Polling |
The order of the keys is arbitrary. Unknown keys are ignored. A minimal, valid template with a single address looks like this:
```php
{
"Addresses": [
{
"Active": true,
"Name": "Battery state of charge",
"Ident": "battery_soc",
"Translation": [
{ "Language": "de", "Name": "Batterieladezustand" }
],
"DataType": 2,
"ReadFunctionCode": 4,
"ReadAddress": 33139,
"WriteFunctionCode": 0,
"WriteAddress": 0,
"Factor": 0,
"Length": 0,
"ByteOrder": -1,
"Profile": "~Battery.100"
}
],
"VirtualAddresses": [],
"Profiles": {},
"ByteOrder": 0,
"Requests": {
"Type": 0,
"Interval": 5000,
"DataBlocks": []
}
}
```
### Addresses
Each entry in "Addresses" describes one value of the device. A variable is created below the instance for each active entry.
| Field | Type | Description |
| ----------------- | ------ | ------------------------------------------------------------------------------------------------------------------------------------------------------------------------------ |
| Active | Bool | Defines whether the variable is created and the value is read. Inactive entries remain in the template and can be activated by the user later. |
| Name | String | Name of the variable. An English name translated via "Translation" is recommended. |
| Ident | String | Ident of the variable. If the field is empty, the ident is generated automatically, see Ident. |
| Translation | Array | Translations of the name as a list of objects with "Language" (e.g. "de") and "Name". |
| DataType | Number | Data type of the register, see Data types. |
| ReadFunctionCode | Number | Function code for reading: 0 (do not read), 1, 2, 3 or 4, see Function codes. |
| ReadAddress | Number | Read address (start register or coil), see Addressing. |
| WriteFunctionCode | Number | Function code for writing: 0 (do not write), 5, 6, 15 or 16. If a function code is set, the variable gets a standard action. |
| WriteAddress | Number | Write address. Usually identical to the read address. |
| Factor | Number | Factor the read value is multiplied with. 0 means "no factor", see Factor. |
| Length | Number | Strings only: length in bytes (2 bytes per register). 0 for all other data types. |
| ByteOrder | Number | Byte order of this address. -1 uses the setting of the instance, see Byte order. |
| Profile | String | Name of the variable profile or empty. The profile type must match the variable type, see Data types. |
> **Warning:** All fields should always be specified completely and with the correct JSON type. Numbers must not be given as a string ("3") or as null, otherwise applying the configuration fails. The exception is "Active": if it is missing, the address is considered active.
Older exports sometimes contain additional fields like "SwapBytes" or "CustomFactor". These are ignored and can be omitted. The value of a custom factor is always stored in the field "Factor".
### Data types in templates
In the template the data type is stored as a number. For compatibility reasons the numbers are not sorted by size.
| DataType | Shown in the console | Registers | Variable type (without factor) |
| -------- | -------------------- | --------- | ------------------------------ |
| 0 | BOOL | 1 bit | Boolean |
| 1 | UINT8 (MSB) | 1 | Integer |
| 12 | UINT8 (LSB) | 1 | Integer |
| 2 | UINT16 | 1 | Integer |
| 3 | UINT32 | 2 | Integer |
| 11 | UINT64 | 4 | Float |
| 4 | INT8 (MSB) | 1 | Integer |
| 13 | INT8 (LSB) | 1 | Integer |
| 5 | INT16 | 1 | Integer |
| 6 | INT32 | 2 | Integer |
| 8 | INT64 | 4 | Float |
| 7 | FLOAT32 | 2 | Float |
| 9 | FLOAT64 | 4 | Float |
| 10 | STRING (PLAIN) | Length/2 | String |
| 14 | STRING (HEX) | Length/2 | String |
- __MSB/LSB:__ UINT8/INT8 read a whole register and use the high-order (MSB) or the low-order byte (LSB). This way two 8 bit values can be read from one register with two entries on the same address.
- __64 bit:__ INT64 and UINT64 are mapped to a float variable because Symcon also supports 32 bit systems.
- __STRING (PLAIN):__ The bytes are interpreted as text. Spaces and null bytes at the beginning and end are removed.
- __STRING (HEX):__ The bytes are shown as a hex string (upper case), e.g. "0A1B". This is useful for bit fields, version numbers or MAC addresses.
- __Factor:__ As soon as a factor other than 0 is set, the variable is always created as float - also for integer data types and also for the factor 1.
> **Warning:** The type of a profile must match the variable type. A UINT16 register without factor results in an integer variable and can therefore not get the float profile "~Watt", for example. If an integer value should get a float profile, the factor 1 can be set.
### Function codes and addresses
| Function code | Direction | Name | Allowed data types |
| ------------- | --------- | ------------------------ | ------------------- |
| 1 | Read | Read Coils | BOOL |
| 2 | Read | Read Discrete Inputs | BOOL |
| 3 | Read | Read Holding Registers | all except BOOL |
| 4 | Read | Read Input Registers | all except BOOL |
| 5 | Write | Write Single Coil | BOOL |
| 15 | Write | Write Multiple Coils | BOOL |
| 6 | Write | Write Single Register | 8/16 bit types only |
| 16 | Write | Write Multiple Registers | all except BOOL |
Invalid combinations are rejected with an error message when applying, e.g. "Non-Bit values must use function Read Holding Registers/Read Input Registers" or "Writing in only one register is not possible for multi register values like Int32/UInt32, Int64/UInt64, Float32/Float64, String".
__Addressing:__ "ReadAddress" and "WriteAddress" are the addresses that are actually transmitted in the Modbus telegram, starting at 0. Many data sheets use the classic notation with a prefix instead (e.g. 40001 for the first holding register). In this case the prefix has to be subtracted, see [Function codes](https://www.symcon.de/en/llms/modules/modbus-rtu-tcp.md). Other manufacturers already specify the addresses directly (e.g. Solis with 33000 for an input register). If in doubt, a test with a known value like the serial number or the grid frequency helps.
### Byte order
The byte order is defined for the whole instance in the top-level key "ByteOrder". Single addresses can override it with their own "ByteOrder" field. The value -1 uses the setting of the instance. The examples show how the 32 bit value 0x11223344 is transmitted by the device:
| ByteOrder | Name | Transmitted bytes | Typical description in the data sheet |
| --------- | -------------------------- | ----------------- | ------------------------------------------------ |
| -1 | Inherited from device | - | address level only |
| 0 | Big-Endian (Standard) | 11 22 33 44 | "High word first", "ABCD", Modbus standard |
| 1 | Little-Endian | 44 33 22 11 | "DCBA" |
| 2 | Big-Endian (Byte Swap) | 22 11 44 33 | "BADC" |
| 3 | Little-Endian (Byte Swap) | 33 44 11 22 | "Low word first", "Word swap", "CDAB" |
For 16 bit values only 1 and 2 have an effect (bytes swapped within the register). The byte order has no meaning for BOOL values.
### Factor
The raw value is multiplied by "Factor" before it is written into the variable. When writing, the value is divided by the factor first. The factor is always a multiplier: a division by 10 is specified as 0.1.
| Data sheet | Factor |
| --------------------- | ------- |
| Unit 0.1 V | 0.1 |
| Unit 0.01 Hz | 0.01 |
| Unit 10 W | 10 |
| Wh, wanted in kWh | 0.001 |
| no factor | 0 |
The factor must be 0 for BOOL and string addresses. If the device provides its own scale factor in a register (e.g. SunSpec "Scale Factor"), it can be applied using a virtual address.
### Ident
The ident identifies the variable permanently. If "Ident" is empty, it is generated from data type, function code and read address: A_[DataType]_[ReadFunctionCode]_[ReadAddress], e.g. "A_7_3_100". For virtual addresses the name is used, with all characters except letters, digits and underscore replaced by "_".
> **Warning:** Without a fixed ident, the ident changes as soon as data type, function code or address (or the name for virtual addresses) are modified. The old variable is then deleted including its archive data and a new one is created. Templates should therefore always set a fixed, meaningful ident like "battery_soc". Each ident must only occur once - also not between addresses and virtual addresses.
The ident is also used in the scripts of the virtual addresses to access the values.
### Virtual addresses
Virtual addresses calculate a variable with PHP from the values of the other addresses or distribute a written value to one or more addresses.
| Field | Type | Description |
| ------------ | ------ | -------------------------------------------------------------------------------------------- |
| Active | Bool | Defines whether the variable is created and the scripts are executed. |
| Name | String | Name of the variable |
| Ident | String | Ident of the variable. If the field is empty, the ident is generated from the name. |
| Translation | Array | Translations of the name, like for addresses |
| VariableType | Number | 0 = Boolean, 1 = Integer, 2 = Float, 3 = String |
| Profile | String | Name of the variable profile or empty. The profile type must match the VariableType. |
| ReadAction | String | PHP code to calculate the value, empty for no calculation |
| WriteAction | String | PHP code for writing. If it is set, the variable gets a standard action. |
The scripts only contain the body of a function, i.e. without ` ($current & ~0x0F) | ($VALUE & 0x0F)];
```
> **Note:** The operator ?? 0 prevents errors as long as an address has not been read yet or is inactive. If a script outputs errors, they can be found in the debug of the instance under the ident of the virtual address.
Values are only written if they change or the variable is older than 60 seconds. This applies to read addresses as well as virtual addresses.
### Profiles
"Profiles" is an object with the profile name as key. Profiles whose name starts with "~" are system profiles. They are not exported and do not have to be contained in the template. Custom profiles should get a unique prefix (e.g. "Vendor.Name") so that they do not collide with profiles of other templates.
| Field | Type | Description |
| ------------ | ------ | ------------------------------------------------------------------------------- |
| Type | Number | 0 = Boolean, 1 = Integer, 2 = Float, 3 = String |
| Prefix | String | Prefix |
| Suffix | String | Suffix, including a leading space, e.g. " W" |
| MinValue | Number | Minimum value |
| MaxValue | Number | Maximum value |
| StepSize | Number | Step size. For switchable variables it defines the display as slider. |
| Digits | Number | Number of decimal places |
| Icon | String | Name of the icon or empty |
| Associations | Array | Associations, each with "Value", "Name", "Icon" and "Color" (-1 = no color) |
All fields must be specified. The JSON type of "Value" in the associations should match the profile type (true/false for Boolean, whole number for Integer).
```php
"Profiles": {
"Vendor.OperatingMode": {
"Type": 1,
"Prefix": "",
"Suffix": "",
"MinValue": 0.0,
"MaxValue": 0.0,
"StepSize": 0.0,
"Digits": 0,
"Icon": "Information",
"Associations": [
{ "Value": 0, "Name": "Standby", "Icon": "", "Color": -1 },
{ "Value": 1, "Name": "Running", "Icon": "", "Color": 65280 }
]
}
}
```
> **Note:** Only missing profiles are created on import. An existing profile with the same name is not modified, even if it differs.
### Polling
The key "Requests" contains the polling settings:
| Field | Type | Description |
| ---------- | ------ | ------------------------------------------------------------------------------------------------- |
| Type | Number | 0 = Single addresses, 1 = Data blocks |
| Interval | Number | Polling interval in milliseconds for the type "Single addresses". 0 disables polling. |
| DataBlocks | Array | Data blocks for the type "Data blocks" |
__Single addresses:__ In each interval every active address with a read function code is polled individually. This is simple, but creates a lot of requests for many addresses. Especially with Modbus RTU or slow data loggers the time is often not sufficient.
__Data blocks:__ Each data block reads a contiguous range with a single request and has its own interval. Afterwards all addresses that are completely within the block and use the same function code are updated. This way measured values can be read every 5 seconds and meter readings only every minute, for example.
| Field | Type | Description |
| -------- | ------ | ---------------------------------------------------- |
| Function | Number | Function code 1, 2, 3 or 4 |
| Address | Number | Start address |
| Quantity | Number | Number of registers or coils (at most 125 registers) |
| Poller | Number | Interval in milliseconds |
```php
"Requests": {
"Type": 1,
"Interval": 5000,
"DataBlocks": [
{ "Function": 4, "Address": 33049, "Quantity": 10, "Poller": 5000 },
{ "Function": 4, "Address": 33161, "Quantity": 20, "Poller": 60000 },
{ "Function": 3, "Address": 43110, "Quantity": 1, "Poller": 10000 }
]
}
```
> **Warning:** With the type "Data blocks", addresses that are not within any data block are not updated. A data block should only cover registers that the device actually supports - many devices answer a request with a gap in the register range with an error (ILLEGAL_DATA_ADDRESS) for the whole block.
### Checklist
- All three required keys "Addresses", "VirtualAddresses" and "Profiles" are present, even if they are empty.
- Each address contains all fields with the correct JSON type (no strings or null instead of numbers).
- Each address and virtual address has a fixed, unique ident.
- Names are English and have a German translation in "Translation".
- Addresses are specified as they are transmitted in the telegram (without 30001/40001 prefix).
- Function code and data type match (BOOL only with 1, 2, 5, 15; multi register values not with 6).
- The profile type matches the variable type (a factor other than 0 always results in float).
- Custom profiles have a unique prefix and are completely contained in "Profiles".
- Rarely needed values are included with "Active": false instead of being omitted.
- Data blocks are used for many addresses and every active address is within a block.
- The template has been imported, applied and exported again once. The export must contain the same addresses.
---
# Möhlenhoff Alpha 2
> Symcon documentation · English · generated on 2026-09-26
> Index: https://www.symcon.de/en/llms.txt
Source: https://www.symcon.de/en/service/documentation/module-reference/devices/moehlenhoff-alpha-2/
_Requires Symcon >= 4.0_
The module is used for receiving and switching Möhlenhoff Alpha2 data.
### Function scope
- Setting variables via script command or Visualization.
- Reading out the data of the Möhlenhoff Alpha 2
### Software installation
- Install the Möhlenhoff Alpha 2 module via the [Module Store](https://www.symcon.de/en/service/documentation/components/management-console/module-store/).
### Instance setup in IP-Symcon
- Under "Add Instance" the 'Möhlenhoff Alpha 2' module can be found using the quick filter.
- More information about adding instances in the [Documentation of Instances](https://www.symcon.de/en/service/documentation/basics/instances/)
#### Configuration page:
| Name | Description |
| ------------------ | ---------------------------------------------------------------------------------------------------- |
| IP address | IP address of the Alpha 2 |
| Interval | Adjustable interval in seconds in which the data of the Alpha 2 should be queried. (Default: 0) |
| Heating zone 1..12 | Activates the readout of the respective heating zone. (The heating circuits are always all read out) |
| "Read out device" | Reads out the data manually. Must also be done once at the beginning. |
### status variables and profiles
The status variables/categories are created automatically. Deleting individual ones can lead to malfunctions.
#### Statusvariables
The variables are created automatically.
| Name (base) | Type | Description |
| ----------------------------------------------- | ------- | ------------------------------------------------------------------------------------------------------------------------------------------ |
| Base Setback Temperature | Float | Serves as a "category" in which all monitored locations, as well as the time stamp and longitude/latitude are located. Created per device. |
| Base Setback Input | Boolean |
| Basic Automatic Time Change | Boolean | On/Off of automatic time change |
| Basic Operating Mode Heating/Cooling (CO input) | Boolean | Controls the operating mode (On = cooling, Off = heating) |
| Basic Frost Protection | Boolean | On/Off of Frost Protection |
| Basic Frost Protection Temperature | Integer | Temperature of Frost Protection |
| Base HW Version | String | Hardware Version of the Base |
| Base ID | String | Base ID |
| Base Cooling Mode | Boolean | Cooling Mode On/Off |
| Base Rank in System Network | Integer | Edge of Base (0 = Standalone, 1 = Master, 2 = Slave) |
| Base Smartstart on/off | Boolean | On/off of Smartstart |
| Base SW ETH Version | String | Software Version Ethernet |
| Basic SW STM Version | String | Software Version STM |
| Basic Dewpoint Sensor | Boolean | On/Off of Dewpoint Sensor |
| Basic Temperature Limiter | Boolean | On/Off of Temperature Limiter |
| Basic Temperature Unit | Integer | Setting whether Fahrenheit or Celsius (0 = °C, 1 = °F) |
| Basic Vacation Status | Integer | Vacation Status (0 = off, 1 = scheduled, 2 = active) |
| Base Vacation Temperature Heating | Float | Temperature during vacation |
####
| Name (heating zone 1..12) | Type | Description |
| -------------------------------------------------------- | ------- | ------------------------------------------------------------------------------------------------------------------------- |
| Heating Zone 01..12 Actual Temperature | Float | Actual Temperature |
| Heating zone 01..12 set temperature | float | set temperature |
| Heating zone 01..12 Operating mode | Integer | Operating mode of heating zone (0 = Auto, 1 = Day, 2 = Night) |
| Heating Zone 01..12 Actual Temperature Ext. Sensor | Float | Current Actual Temperature of External Sensor |
| Heating zone 01..12 Presence | Boolean | On/Off of presence |
| Heating zone 01..12 Heating system | Integer | The heating system used (0 = FBH standard, 1 = FHB low energy, 2 = radiator, 3 = convector passive, 4 = convector active) |
| Heating zone 01..12 Correction of actual value recording | Float | Correction of actual value (-2.0 .. +2.0) |
| Heating zone 01..12 Name | String | Name of heating zone |
| Heating zone 01..12 Party switching (hours) | Integer | How many hours the party switching should run |
| Heating zone 01..12 Party time remaining (min) | Integer | How long the party mode is still active |
| Heating zone 01..12 Weekend program | Integer | Which time program is active at the weekend |
| Heating zone 01..12 Program weekdays | Integer | Which time program is active during the week |
| Heating zone 01..12 Setpoint temperature max | Float | Setting range setpoint temperature (maximum) |
| Heating zone 01..12 Set temperature Min | Float | Adjustment range set temperature (minimum) |
| Heating zone 01..12 Status | Boolean | Status display (0 = OK, 1 = Error) |
####
| Name (heating zone 1..12) | Type | Description |
| ------------------------------------------- | ------- | ----------------------------------------------------------------------------- |
| Heating circuit 1..12 Active | Boolean | Whether the heating circuit is active (0 = No, 1 = Yes) |
| Heating circuit 1..12 Actuator | Boolean | On/Off of actuator |
| Heating circuit 1..12 actuator percent | Integer | Percentage activity of the actuator (Only with SW STM version 2.02 or higher) |
| Heating Circuit 1..12 Status | Integer | Status (0 = Off, 1 = On, 2 = Error) |
| Heating circuit 1..12 assigned heating zone | Integer | Which heating zone is connected to the heating circuit |
#### Profile:
| Name | Type |
| ----------------------------- | ------- |
| MH.AntifreezeTemp | Integer |
| MH.TemperatureUnit | Integer |
| MH.SummerWinter | Boolean |
| MH.ChangeOver | Boolean |
| MH.Mode | Integer |
| MH.EcoDiff | Float |
| MH.VacationState | Integer |
| MH.PumpTime | Integer |
| MH.RelayTime | Integer |
| MH.EmergencyTime | Integer |
| MH.PWMCycle | Integer |
| MH.PWMPercent | Integer |
| MH.HeatAreaMode | Integer |
| MH.HeatAreaProgram | Integer |
| MH.HeatAreaParty | Integer |
| MH.HeatAreaPartyRemainingTime | Integer |
| MH.HeatAreaState | Boolean |
| MH.HeatAreaRPMMotor | Integer |
| MH.HeatingSystem | Integer |
| MH.HeatAreaTActualTemp | Float |
| MH.HeatAreaTTarget | Float |
| MH.HeatAreaTHeatCool | Float |
| MH.HeatAreaOffset | Float |
| MH.HeatAreaBlockHC | Integer |
| MH.HeatAreaHeatCTRLState | Integer |
| MH.HeatAreaNo | Integer |
| MH.HeatCtrlActorPercent | Integer |
### Visualization
Via the Visualization or in the mobile apps, values are displayed and can be changed if possible.
Due to the amount of variables we recommend to disable the display of the whole Alpha 2 in the admin console and display all desired variables via links in a separate category.
## MA2_RequestStatus
Source: https://www.symcon.de/en/service/documentation/module-reference/devices/moehlenhoff-alpha-2/ma2-requeststatus/
`bool MA2_RequestStatus(int $InstanceID)`
_Requires Symcon >= 4.0_
Gets the values stored in the Alpha2 with the InstanceID and sets the associated variables.
**Parameters**
- `$InstanceID` (int): ID of the Instance
**Returns** (bool): If the command could be executed successfully, it returns __TRUE__ as result, otherwise __FALSE__.
ID of the Instance
**Example**
```text
MA2_RequestStatus(12345);
```
## MA2_WriteValue
Source: https://www.symcon.de/en/service/documentation/module-reference/devices/moehlenhoff-alpha-2/ma2-writevalue/
`bool MA2_WriteValue(int $InstanceID, string $Ident, mixed $Value)`
_Requires Symcon >= 4.0_
Writes the Value into the variable with the Ident in the Möhlenhoff Alpha 2 with the InstanceID.
**Parameters**
- `$InstanceID` (int): ID of the Instance
- `$Ident` (string): Ident of the variable
- `$Value` (mixed): Value of the variable
**Returns** (bool): If the command could be executed successfully, it returns __TRUE__ as result, otherwise __FALSE__.
Value of the variable
**Example**
```text
MA2_WriteValue(12345 , "HEATAREA1_T_TARGET", 23.3);
```
---
# MQTT
> Symcon documentation · English · generated on 2026-09-26
> Index: https://www.symcon.de/en/llms.txt
Source: https://www.symcon.de/en/service/documentation/module-reference/devices/mqtt/
MQTT is an open message protocol for machine-to-machine communication (M2M).
In this context, IP-Symcon acts both as a server (broker) and as a client.
> **Note:** The following devices are supported by IP-Symcon:
>
> [Supported Devices](https://www.symcon.de/en/llms/modules/mqtt.md)
### Integration in IP-Symcon
IP-Symcon both clients and servers (brokers) are available for using MQTT.
[Configure a MQTT-Server](https://www.symcon.de/en/llms/modules/mqtt.md)
[Configure a MQTT-Client](https://www.symcon.de/en/llms/modules/mqtt.md)
## Device list
Source: https://www.symcon.de/en/service/documentation/module-reference/devices/mqtt/device-list/
### Supported Gateways/Components
IP-Symcon supports all MQTT client devices.
### Supported Features
#### Since IP-Symcon 5.1
* MQTT 3.1/3.1.1 compatible
* Clients can connect/disconnect
* Clients can send messages on topics (QoS 0-2)
* Clients can subscribe to topics (including filters +/#) (These are always sent with QoS 0)
* Clients can authenticate with username/password
#### Since IP-Symcon 5.3
* Retain (persistent since 5.5)
* Session Management (See timeout and queue limit settings in the server)
* Last Will/Testament
* Publish of a client is only evaluated in IP-Symcon and not forwarded to the other clients
#### Since IP-Symcon 5.5
* Persistent retain
* MQTT clients
* TLS (Server Sockets)
* Keep Alive (+ Last Will send on timeout)
#### Currently missing functions
The following functions are missing but planned
* QoS 1-2 when sending
## MQTT Client
Source: https://www.symcon.de/en/service/documentation/module-reference/devices/mqtt/mqtt-client/
MQTT clients subscribe to an MQTT server and can receive and display values from it.
### Setup video-tutorial
[Video](https://www.youtube.com/embed/dVMgHm5LeX0?rel=0&cc_load_policy=1)
### Integration in IP-Symcon
In order to enable easy and convenient integration, it is recommended to use the [Configurator](https://www.symcon.de/en/llms/concepts.md) for the MQTT client. This can be added in the object tree via "+"->"Instance" via the "MQTT Configurator" quick filter.
The desired subscriptions can be created in the instance configuration of the associated MQTT client (gateway). A "#" is the standard and all data of the MQTT server is subscribed to.
In the instance configuration of the associated client socket the host address and the port can be defined and the connection activated. The port must be identical to the port of the MQTT server.
After setting up the MQTT client configurator, the next step is to add and create device instances.
#### Adding Devices
The client receives the values of the subscribed topics of the MQTT server. The configurator can read this data and displays all the topics that have reported.
"Refresh" updates the display of all received topics and their last received user data.
The selected instance can be created via "Create".
The MQTT client has a preconfigured ClientID. The username and password must match those of the server.

> **Note:** If the "#" is entered as a subscription, all topics of an MQTT server are received.
Messages can then be sent to the MQTT server via the configurator or manually created devices. This then forwards it to all other clients.

### Example
Script example for publishing a value on a topic.
The topic is defined by the MQTT device instance.
```php
//Publish of "AGreatValueForPublishing" to the variable with ID 12345
RequestAction(12345, "A great value for publishing");
```
## MQTT-Server
Source: https://www.symcon.de/en/service/documentation/module-reference/devices/mqtt/mqtt-server/
The MQTT-Server in IP-Symcon acts as a so-called MQTT-Broker. Clients can register with this and get their data from this.
### Setup video-tutorial
[Video](https://www.youtube.com/embed/5msmo1JSxSo?rel=0&cc_load_policy=1)
### Integration in IP-Symcon
In order to enable easy and convenient integration, it is recommended to use the [Configurator](https://www.symcon.de/en/llms/concepts.md) for MQTT-Servers. This can be added in the object tree via "+"->"Instance" via the "MQTT Server" quick filter.
IP-Symcon acts as an MQTT-Server (broker) and requires an open server socket interface for this. In the instance configuration of the associated server socket the port can be defined and the connection activated.
Furthermore, a user name and can be specified in the instance configuration of the MQTT-Server. The MQTT clients must then send to the configured port.
After setting up the MQTT configurator, the next step is to add and create device instances.
#### Adding Devices
The server (broker) receives the values and properties of the MQTT devices. The configurator can read this data and displays all devices that have reported.
If a device is not to be displayed, it must be ensured that this device has sent a message to the server.
"Refresh" updates the display of all received topics and their last received user data.
The selected instance can be created via "Create".

The configurator creates the path of the topic with the appropriate categories and the user data variable of the "String" data type. If a different data type is required, this can be changed in the instance.


> **Note:** Devices that can only receive ("subscribe") and not send ("publish") cannot be created using the configurator, as it never receives anything from the devices. For these devices, an MQTT-Device must be created, a topic entered and a data type specified. (See also: [Create instance](https://www.symcon.de/en/llms/how-to.md))
### Example
Script example for publishing a value on a topic.
The topic is defined by the MQTT device instance.
```php
//Publish of "AGreatValueForPublishing" to the variable with ID 12345
RequestAction(12345, "A great value for publishing");
```
---
# NEA Smart
> Symcon documentation · English · generated on 2026-09-26
> Index: https://www.symcon.de/en/llms.txt
Source: https://www.symcon.de/en/service/documentation/module-reference/devices/nea-smart/
_Requires Symcon >= 4.0_
> **Warning:** This module is only compatible with NEA Smart 1.0
> and is not compatible with NEA Smart 2.0 or newer
The module is used for receiving and switching NEA Smart data.
### Scope of functions
- Setting variables via script command or Visualization.
- Reading out the data of the NEA Smart
### Software installation
- Install the REHAU Nea Smart module via the [Module Store](https://www.symcon.de/en/service/documentation/components/management-console/module-store/).
### Setting up the instances in IP-Symcon
- Under "Add instance" the 'NEA Smart' module can be found using the quick filter.
- More information about adding instances in the [Instances documentation](https://www.symcon.de/en/service/documentation/basics/instances/)
#### Configuration Page:
| Name | Description |
| ------------------ | ---------------------------------------------------------------------------------------------------- |
| IP address | IP address of NEA Smart |
| Interval | Adjustable interval in seconds in which the data of the NEA Smart should be queried. (Default: 0) |
| Heating zone 1..12 | Activates the readout of the respective heating zone. (The heating circuits are always all read out) |
| "Read out device" | Reads out the data manually. Must also be done once at the beginning. |
### status variables and profiles
The status variables/categories are created automatically. Deleting individual ones can lead to malfunctions.
#### Status variables
The variables are created automatically.
| Name (base) | Type | Description |
| ----------------------------------------------- | ------- | ------------------------------------------------------------------------------------------------------------------------------------------ |
| Base Setback Difference Temperature | Float | Serves as a "category" in which all monitored locations, as well as the time stamp and longitude/latitude are located. Created per device. |
| Base Setback Input | Boolean |
| Basic Automatic Time Change | Boolean | On/Off of automatic time change |
| Basic Operating Mode Heating/Cooling (CO input) | Boolean | Controls the operating mode (On = cooling, Off = heating) |
| Basic Frost Protection | Boolean | On/Off of Frost Protection |
| Basic Frost Protection Temperature | Integer | Temperature of Frost Protection |
| Base HW Version | String | Hardware Version of the Base |
| Base ID | String | Base ID |
| Base Cooling Mode | Boolean | Cooling Mode On/Off |
| Base Rank in System Network | Integer | Edge of Base (0 = Standalone, 1 = Master, 2 = Slave) |
| Base Smartstart on/off | Boolean | On/off of Smartstart |
| Base SW ETH Version | String | Software Version Ethernet |
| Basic SW STM Version | String | Software Version STM |
| Basic Dewpoint Sensor | Boolean | On/Off of Dewpoint Sensor |
| Basic Temperature Limiter | Boolean | On/Off of Temperature Limiter |
| Basic Temperature Unit | Integer | Setting whether Fahrenheit or Celsius (0 = °C, 1 = °F) |
| Basic Vacation Status | Integer | Vacation Status (0 = off, 1 = scheduled, 2 = active) |
| Base Vacation Temperature Heating | Float | Temperature during vacation |
###
| Name (heating zone 1..12) | Type | Description |
| -------------------------------------------------------- | ------- | ------------------------------------------------------------------------------------------------------------------------- |
| Heating zone 01..12 actual temperature | Float | Current actual temperature |
| heating zone 01..12 set temperature | float | set temperature |
| Heating zone 01..12 Operating mode | Integer | Operating mode of heating zone (0 = Auto, 1 = Day, 2 = Night) |
| Heating Zone 01..12 Actual Temperature Ext. Sensor | Float | Current Actual Temperature of External Sensor |
| Heating zone 01..12 Presence | Boolean | On/Off of presence |
| Heating zone 01..12 Heating system | Integer | The heating system used (0 = FBH standard, 1 = FHB low energy, 2 = radiator, 3 = convector passive, 4 = convector active) |
| Heating zone 01..12 Correction of actual value recording | Float | Correction of actual value (-2.0 .. +2.0) |
| Heating zone 01..12 Name | String | Name of heating zone |
| Heating zone 01..12 Party switching (hours) | Integer | How many hours the party switching should run |
| Heating zone 01..12 Party time remaining (min) | Integer | How long the party mode is still active |
| Heating zone 01..12 Weekend program | Integer | Which time program is active at the weekend |
| Heating zone 01..12 Program weekdays | Integer | Which time program is active during the week |
| Heating zone 01..12 Setpoint temperature max | Float | Setting range setpoint temperature (maximum) |
| Heating zone 01..12 Set temperature Min | Float | Adjustment range set temperature (minimum) |
| Heating zone 01..12 Status | Boolean | Status display (0 = OK, 1 = Error) |
###
| Name (heating zone 1..12) | Type | Description |
| ------------------------------------------- | ------- | ----------------------------------------------------------------------------- |
| Heating circuit 1..12 Active | Boolean | Whether the heating circuit is active (0 = No, 1 = Yes) |
| Heating circuit 1..12 Actuator | Boolean | On/Off of actuator |
| Heating circuit 1..12 actuator percent | Integer | Percentage activity of the actuator (Only with SW STM version 2.02 or higher) |
| Heating Circuit 1..12 Status | Integer | Status (0 = Off, 1 = On, 2 = Error) |
| Heating circuit 1..12 assigned heating zone | Integer | Which heating zone is connected to the heating circuit |
#### Profile:
| Name | Type |
| ------------------------------- | ------- |
| NEAS.AntifreezeTemp | Integer |
| NEAS.TemperatureUnit | Integer |
| NEAS.SummerWinter | Boolean |
| NEAS.ChangeOver | Boolean |
| NEAS.Mode | Integer |
| NEAS.EcoDiff | Float |
| NEAS.VacationState | Integer |
| NEAS.PumpTime | Integer |
| NEAS.RelayTime | Integer |
| NEAS.EmergencyTime | Integer |
| NEAS.PWMCycle | Integer |
| NEAS.PWMPercent | Integer |
| NEAS.HeatAreaMode | Integer |
| NEAS.HeatAreaProgram | Integer |
| NEAS.HeatAreaParty | Integer |
| NEAS.HeatAreaPartyRemainingTime | Integer |
| NEAS.HeatAreaState | Boolean |
| NEAS.HeatAreaRPMMotor | Integer |
| NEAS.HeatingSystem | Integer |
| NEAS.HeatAreaTActualTemp | Float |
| NEAS.HeatAreaTTarget | Float |
| NEAS.HeatAreaTHeatCool | Float |
| NEAS.HeatAreaOffset | Float |
| NEAS.HeatAreaBlockHC | Integer |
| NEAS.HeatAreaHeatCTRLState | Integer |
| NEAS.HeatAreaNo | Integer |
| NEAS.HeatCtrlActorPercent | Integer |
### Visualization
Through the Visualization or in the mobile apps, values are displayed and can be changed if possible.
Due to the amount of variables, we recommend to disable the display of the entire NEA Smart in the management console and to display all desired variables via links in a separate category.
## NEAS_RequestStatus
Source: https://www.symcon.de/en/service/documentation/module-reference/devices/nea-smart/neas-requeststatus/
`bool NEAS_RequestStatus(int $InstanceID)`
_Requires Symcon >= 4.0_
Gets the values stored in the NEA Smart with the InstanceID and sets the associated variables.
**Parameters**
- `$InstanceID` (int): ID of the Instance
**Returns** (bool): If the command could be executed successfully, it returns __TRUE__ as result, otherwise __FALSE__.
ID of the Instance
**Example**
```text
NEAS_RequestStatus(12345);
```
## NEAS_WriteValue
Source: https://www.symcon.de/en/service/documentation/module-reference/devices/nea-smart/neas-writevalue/
`bool NEAS_WriteValue(int $InstanceID, string $Ident, mixed $Value)`
_Requires Symcon >= 4.0_
Writes the Value to the variable with the ident in the NEA Smart with the InstanceID.
**Parameters**
- `$InstanceID` (int): ID of the Instance
- `$Ident` (string): Ident of the variable
- `$Value` (mixed): Value of the variable
**Returns** (bool): If the command could be executed successfully, it returns __TRUE__ as result, otherwise __FALSE__.
Value of the variable
**Example**
```text
NEAS_WriteValue(12345 , "HEATAREA1_T_TARGET", 23.3);
```
---
# OCPP
> Symcon documentation · English · generated on 2026-09-26
> Index: https://www.symcon.de/en/llms.txt
Source: https://www.symcon.de/en/service/documentation/module-reference/devices/ocpp/
Via the OCPP protocol, wallboxes can be conveniently monitored and switched via Symcon.
### scope of functions
* Display of consumption of individual charging points
* Display of whether a transaction is currently in progress for charging points
* Enable charging process via Id Tag, typically RFID card
### software installation
- Install the 'OCPP' module via the Module Store.
- Under 'Add instance' the 'OCPP Configurator' module can be found using the quick filter.
- Further information on adding instances in the [Instance documentation](https://www.symcon.de/service/dokumentation/konzepte/instanzen/#Instanz_hinzufügen)
- On the configuration page of the splitter, the information for setting up a charging point can be taken.
Depending on the wallbox, the parameters must be specified individually or as a complete URL.
- Once the connection is established, the charging points are displayed in the configurator and can be created.
#### Configuration page (Charging Point)
| Name | Description |
| --------------------------------------------- | ----------------------------------------------------------------------------------------------------------------------------------------------------------------------------------------------------------------------------------------------------------------------------------------------------------------------------------------------------------------------------------------------------------------------------------------------------------------------------------------------------------------------------------------------------------------------------------------------------------------------------------------------------------------------------------------------------------------------------------------------------------------------------------------------------------------------------------------------------------------------------------------------------------------------------------------------------------------------------------------------------------------------------------------------------- |
| Charge Point Identity | Identifier of the charging station |
| Start transaction... | Defines when the charging process should be started automatically: "... automatically on connection": The charging process is started directly when a vehicle is connected. "... when an Id Tag is validated - Allow all Id Tags": The charging process is started when any Id Tag is scanned. The tag itself is not further validated. "... when an Id Tag is validated - Allow only Central Id Tag list": The charging process is started when an Id Tag from the central Id Tag list is scanned. This list can be configured in the splitter. "... when an Id Tag is validated - Allow only Local Id Tag list": The charging process is started when an Id Tag from the local Id Tag list is scanned. This list can be configured directly below this selection. "... when an Id Tag is validated - Allow both Id Tag lists": The charging process is started when an Id Tag from the local or central Id Tag list is scanned. The local list can be configured directly below this selection and the central list in the splitter. |
| Local list of valid Id Tags (e.g. RFID cards) | The local list for Id Tags at which the charging process should be started. In addition to the Id Tag, first name, last name, e-mail and general information about the Id Tag can be specified. These help to assign the tag. (Only displayed if "Start transaction..." is set to "... when an Id Tag is validated - Allow only Local Id Tag list" or "... when an Id Tag is validated - Allow both Id Tag lists".) |
#### Configuration page (Splitter)
| Name | Description |
| ----------------------------------------------- | --------------------------------------------------------------------------------------------------------------------------------------------------------------------------------------------------------------------------------------------- |
| Central list of valid Id Tags (e.g. RFID cards) | The central list for Id Tags which can be used to automatically start the charging process. In addition to the Id Tag, first name, last name, e-mail and general information about the Id Tag can be specified. These help to assign the tag. |
__Notes__
* The exact Id Tags of an RFID card can be determined by scanning it once at the charging station. The Id Tag can then be taken from the status variable "Last Id Tag".
* For the Pulsar Plus, all schedules must be removed before activating OCPP. Control via OCPP cannot overwrite the configured time schedules, as these always have priority.
### status variables: charging point
#### General Status Variables
These status variables exist once, independent of the connectors of the charging point.
| Name | Type | Description |
| ------------- | ------ | ----------------------------------- |
| Vendor | string | Name of the manufacturer |
| Model | string | Model of the charging point |
| Serial Number | string | Serial number of the charging point |
| Last Id Tag | string | Last read Id Tag |
#### Status Variables per Connector
A charging point can manage multiple connectors. In this case, each connector may create its own status variables. These are created at runtime based on the interaction with the connector. Therefore, not all variables must exist.
| Name | Type | Description |
| ----------------------- | ------- | ---------------------------------------------------------------------------------------------------------------- |
| Meter Value | float | The meter reading of the connector |
| Available | boolean | The availability of the connector - If the connector has been set to unavailable, charging is not possible there |
| Status | string | Current status of the connector |
| ErrorCode | string | Current error code, "" if there is currently no error |
| Transaction | boolean | If true, a transaction is active, so the connected vehicle is being charged. |
| Transaction Id | integer | ID of the current or last transaction |
| Transaction Meter Start | integer | Meter reading in Wh at the start of the current or last transaction |
| Transaction Meter End | integer | Meter reading in Wh at the end of the current or last transaction |
| Transaction Id Tag | string | Id Tag of the current or last transaction |
| Transaction Consumption | integer | Energy consumption in Wh of the current or last transaction |
## OCPP_RemoteStartTransaction
Source: https://www.symcon.de/en/service/documentation/module-reference/devices/ocpp/ocpp-remotestarttransaction/
`bool OCPP_RemoteStartTransaction(int $InstanceID, int $ConnectorID)`
**Parameters**
- `$InstanceID` (int): Instance ID
- `$ConnectorID` (int): ID of the connector
**Returns** (bool): If the command succeeds, it returns __TRUE__, otherwise __FALSE__.
ID of the connector
**Example**
```text
OCPP_RemoteStartTransaction(12345, 1);
```
## OCPP_RemoteStopCurrentTransaction
Source: https://www.symcon.de/en/service/documentation/module-reference/devices/ocpp/ocpp-remotestopcurrenttransaction/
`bool OCPP_RemoteStopCurrentTransaction(int $InstanzID, int $ConnectorID)`
If the state is 'Charging', this command can be used to stop charging.
**Parameters**
- `$InstanzID` (int): Instance ID
- `$ConnectorID` (int): ID of the connector
**Returns** (bool): If the command succeeds, it returns __TRUE__, otherwise __FALSE__.
ID of the connector
**Example**
```php
OCPP_RemoteStopCurrentTransaction(12345, 1);
```
## OCPP_RemoteStopTransaction
Source: https://www.symcon.de/en/service/documentation/module-reference/devices/ocpp/ocpp-remotestoptransaction/
`bool OCPP_RemoteStopTransaction(int $InstanzID, int $TransactionID)`
If the state is 'Charging', this command can be used to stop charging.
**Parameters**
- `$InstanzID` (int): Instance ID
- `$TransactionID` (int): ID of the transaction
**Returns** (bool): If the command succeeds, it returns __TRUE__, otherwise __FALSE__.
ID of the transaction
**Example**
```php
OCPP_RemoteStopTransaction(12345, 4479);
```
---
# OPC UA
> Symcon documentation · English · generated on 2026-09-26
> Index: https://www.symcon.de/en/llms.txt
Source: https://www.symcon.de/en/service/documentation/module-reference/devices/opc-ua/
_Requires Symcon >= 6.4_
> **Note:** The OPC UA module is a paid extension that can be purchased for any existing Symcon license in the [Shop](https://www.symcon.de/en/shop/enterprise/bundle-ips-enterprise-opcua). Up to 3 OPC UA nodes can be created free of charge for each Symcon license.
The OPC UA (Client) connection allows the comfortable setup of OPC UA devices within Symcon. The OPC UA address space of a device can be determined and traversed via an OPC UA configurator. Any OPC UA addresses (nodes) can be created. The nodes show the current value, which is automatically monitored and updated if the device supports this. Alternatively, the value can also be queried cyclically. The value can also be changed via visualization, script and flowchart.
### Video tutorial for setup
- Follows
#### Supported Protocol
* OPC UA (Binary Encoding)
#### Supported Transport
* TCP/IP
#### Supported Security Modes
* None
* Sign
* SignAndEncrypt
#### Supported Authentication Methods
* Anonymous
* Username/Password
#### Supported SecurityPolicies
* None
* Basic256
* Basic256Sha256
#### Supported data types
* Boolean, SByte, Byte, Int16, UInt16, Int32, UIn32, Int64, UIn64, Float, Double, String, DateTime, GUID, ByteString, XMLElement, NodeId, StatusCode, QualifiedName, LocalizedText, Variant
* Array of the respective types (represented as separate variables)
---
# SageGlass (BACnet)
> Symcon documentation · English · generated on 2026-09-26
> Index: https://www.symcon.de/en/llms.txt
Source: https://www.symcon.de/en/service/documentation/module-reference/devices/sageglass-bacnet/
_Requires Symcon >= 6.0_
This module enables the integration of SageGlass SIM II controllers via BACnet/IP.
### function scope
- Integrates the control of SageGlass zones and displays the current status including the transmitted lux values.
### Requirements
- IP-Symcon Enterprise from version 6.0 with BACnet extension
### Software Installation
- Via the [Module Store](https://www.symcon.de/en/service/documentation/components/management-console/module-store/) install the 'SageGlass' module.
### Setup in IP-Symcon
- It is recommended to have all BACnet objects automatically created on the SageGlass SIM II controller, making the individual data points available in IP-Symcon. In the second step, the following script can be used to create the SageGlass instances for the zones, which will prepare the information more nicely. It is also possible to do the linking manually by linking all properties to the correct BACnet objects. The names of the properties correspond to the descriptions of the BACnet objects and should be linked to the "Preset Value" variable.
```php
zone information
// e.g. Sensor 1 (Vertical) is used for Zone 10, Zone 20 and Zone 25
$sensorVertical = [
1 => [10, 20, 25]
];
$sensorHorizontal = [];
$zones = 250;
for ($i = 1; $i <= $zones; $i++) {
$variableTintID = searchBACnet(2 /* Analog Value */, $i + 1 /* Zone 1 = 2 */);
$automodeStateID = searchBACnet(2 /* Analog Value */, $i + 2001 /* Zone 1 = 2002 */);
$luxLevelSetPointID = searchBACnet(2 /* Analog Value */, $i + 4001 /* Zone 1 = 4002 */);
$statusID = searchBACnet(0 /* Analog Input */, $i + 4000 /* Zone 1 = 4001 */);
// Search for the our sensor the vertical sensor matrix
$verticalSensorID = searchSensorID($i, $sensorVertical);
if ($verticalSensorID) {
$verticalSensorID = searchBACnet(0 /* Analog input */, $verticalSensorID + 2000 /* Sensor 1 = 2001 */);
}
// Search for the our sensor the vertical sensor matrix
$horizontalSensorID = searchSensorID($i, $sensorHorizontal);
if ($horizontalSensorID) {
$horizontalSensorID = searchBACnet(0 /* Analog input */, $horizontalSensorID + 2000 /* Sensor 1 = 2001 */);
}
if (!@IPS_GetObjectIDByIdent("SageGlassZone" . $i)) {
if ($variableTintID && $automodeStateID && $luxLevelSetPointID && $verticalSensorID && $horizontalSensorID && $statusID) {
echo "Creating Zone " . $i . "..." . PHP_EOL;
$id = IPS_CreateInstance("{67CEA419-A625-703E-2BE6-BF51B3C913B9}");
IPS_SetName($id, "Zone " . $i);
IPS_SetIdent($id, "SageGlassZone" . $i);
IPS_SetProperty($id, "VariableTint", $variableTintID);
IPS_SetProperty($id, "AutomodeState", $automodeStateID);
IPS_SetProperty($id, "LuxLevelSetPoint", $luxLevelSetPointID);
IPS_SetProperty($id, "Status", $statusID);
IPS_SetProperty($id, "SensorVertical", $verticalSensorID);
IPS_SetProperty($id, "SensorHorizontal", $horizontalSensorID);
IPS_ApplyChanges($id);
}
}
}
function searchSensorID($zone, $sensorMatrix) {
foreach($sensorMatrix as $sensor => $matrix) {
foreach($matrix as $sensorZone) {
if ($zone == $sensorZone) {
return $sensor;
}
}
}
return 0;
}
function searchBACnet($objectType, $instanceNumber) {
$ids = IPS_GetInstanceListByModuleID("{CD5D5D10-3743-DA88-F16C-8B65CF4103F9}");
foreach ($ids as $id) {
if ((IPS_GetProperty($id, "ObjectType") == $objectType) && (IPS_GetProperty($id, "InstanceNumber") == $instanceNumber)) {
return IPS_GetObjectIDByIdent("PresentValue", $id);
}
}
return 0;
}
```
---
# Shutter Control
> Symcon documentation · English · generated on 2026-09-26
> Index: https://www.symcon.de/en/llms.txt
Source: https://www.symcon.de/en/service/documentation/module-reference/devices/shutter-control/
_Requires Symcon >= 5.0_
The "Shutter Control" offers the possibility to move a roller shutter/awning to a specific percentage position.
Furthermore, the position is updated when the shutter is controlled via function or manually.
In contrast to Shutter Control (legacy), the position can also be adjusted while in motion.
### Requirements
The IP-Symcon Shutter module needs a variable or an instance with a status variable that uses the ~ShutterMoveStop or ~ShutterMoveStep profile.
The travel times and start-up delay must also be entered in the module. The easiest way to do this is with a stopwatch.
> **Note:** By default, dS Shutter, EnOcean Shutter, KNX Shutter, LCN Shutter, xComfort Shutter and Z-Wave Shutter support these profiles. This means that when they are created, a variable with the required profile is available.
### Settings
| Option | Position | Description |
| ------------------ | -------- | ----------------------------------------------------------------- |
| Type | -------- | Shutter or awning |
| Delay | -------- | Starting delay of the engine after switching |
| Target | -------- | Actuator variable that is to be controlled |
| Move down (middle) | 50% | Measured time from open to center. |
| Move down (bottom) | 99% | (Shutter only) Measured time from open to down. (bars still open) |
| Move down (Closed) | 100% | Measured time from open to end position reached. Slats closed. |
| Move up (Bottom) | 99% | (Shutter only) Measured time from closed to bars open. |
| Move up (middle) | 50% | Measured time from closed to mid reached. |
| Move Up (Open) | 0% | Measured time from closed to end position reached. Fully open. |
### Add an individual device
If the device does not belong to one of the supported variants, an integer variable can be created by oneself.
This must have the ~ShutterMoveStop or ~ShutterMoveStep profile assigned.
Furthermore, the following action script must be stored.
```php
// Template for action script
switch($_IPS['VALUE']) {
case 0:
// Here is the open function
break;
case 1: // Only with ~ShutterMoveStep
// Here is the step-open function
break;
case 2:
// Here is the stop function
break;
case 3: // Only with ~ShutterMoveStep
// Here is the step-close function
break;
case 4:
// Here is the close function
break;
}
SetValue($_IPS['VARIABLE'], $_IPS['VALUE']);
```
## SC_Move
Source: https://www.symcon.de/en/service/documentation/module-reference/devices/shutter-control/sc-move/
`bool SC_Move(int $InstanceID, int $Position)`
moves the shutter to a specific position
**Parameters**
- `$InstanceID` (int): ID of Shutter Control Instance
- `$Position` (int): 0%-100%, 99% = Auf Spalt fahren
**Returns** (bool): If the command succeeds, it returns __TRUE__, otherwise __FALSE__.
0%-100%, 99% = Auf Spalt fahren
**Example**
```php
SC_Move(12345, 50); //Go to 50%
```
## SC_MoveDown
Source: https://www.symcon.de/en/service/documentation/module-reference/devices/shutter-control/sc-movedown/
`bool SC_MoveDown(int $InstanceID, int $Duration)`
moves the shutter down to the end position
**Parameters**
- `$InstanceID` (int): ID of Shutter Control Instance
- `$Duration` (int): 0 = End position, >1 = Duration in ms
**Returns** (bool): If the command succeeds, it returns __TRUE__, otherwise __FALSE__.
0 = End position, >1 = Duration in ms
**Example**
```php
SC_MoveDown(12345, 0); //Go downwards
```
## SC_MoveUp
Source: https://www.symcon.de/en/service/documentation/module-reference/devices/shutter-control/sc-moveup/
`bool SC_MoveUp(int $InstanceID, int $Duration)`
moves the shutter up to the end position
**Parameters**
- `$InstanceID` (int): ID of Shutter Control Instance
- `$Duration` (int): 0 = End position, >1 = Duration in ms
**Returns** (bool): If the command succeeds, it returns __TRUE__, otherwise __FALSE__.
0 = End position, >1 = Duration in ms
**Example**
```php
SC_MoveUp(12345, 0); //Go upwards
```
## SC_Stop
Source: https://www.symcon.de/en/service/documentation/module-reference/devices/shutter-control/sc-stop/
`bool SC_Stop(int $InstanceID)`
stops a movement
**Parameters**
- `$InstanceID` (int): ID of Shutter Control Instance
**Returns** (bool): If the command succeeds, it returns __TRUE__, otherwise __FALSE__.
ID of Shutter Control Instance
**Example**
```php
SC_Stop(12345); //Stop
```
---
# Siemens OZW
> Symcon documentation · English · generated on 2026-09-26
> Index: https://www.symcon.de/en/llms.txt
Source: https://www.symcon.de/en/service/documentation/module-reference/devices/siemens-ozw/
Siemens OZW is a web server that allows remote control and remote monitoring of KNX devices via web. IP-Symcon is connected to Siemens OZW via LAN(IP).
> **Note:** The following devices are supported by IP-Symcon:
>
> [Supported devices](https://www.symcon.de/en/llms/modules/siemens-ozw.md)
### introduction
This manual shall help to connect a __Siemens OZW 672 / Siemens OZW 772 Web-Server__ to the computer as fast and uncomplicated as possible. This should create the prerequisite to cover various application areas with IP-Symcon and to visualize them. The OZW web server enables remote control and remote monitoring of plants via the web. It is available in four versions: for the connection of one, four, 16 or 250 KNX devices of the ranges Synco 700, Synco RXB/RXL, room thermostats RDG/RDF/RDU and the Synco living central apartment units QAX9.
### video tutorial for setup
[Video](https://www.youtube.com/embed/2VoOVEPpbY0?rel=0&cc_load_policy=1)
### connection
It should be correctly connected all KNX devices before connecting the device through a network cable to the network and connect it to the power supply.
It is also possible to connect to the PC via USB, provided that there is a connection to the Internet, so that the RNDIS driver can be installed automatically when connecting via USB (provided that the Microsoft online update service is enabled). A manual installation of the driver is also possible.
### Installation
If the OZW is connected correctly and a DHCP server is used, it is now connected to the local network. _(The DHCP server automatically takes over the address assignment for the network participants.)_
The OZW now appears under the network devices in the category "Other devices".
Clicking on "OZW..." opens a window in which the IP address of the OZW is displayed in the lower area. By copying this address into any browser the Siemens web page opens.
At the first login the following applies: __"Username" = "Administrator" and "Password" = "Password"__.
The password should be changed after the first login.
The password is case sensitive. After the first login the web server language is "English", but this can be adjusted. On the left side are all connected KNX devices.
If no DHCP server is used, the IP address of the OZW is 192.168.2.10 (USB: 192.168.250.1 (not changeable)).
### Integration in IP-Symcon
In the [Management Console](https://www.symcon.de/en/llms/components/management-console.md) a "OZW Configurator" can be created via "Create Configurator". To do this, click "Next" twice and "OK" once. The following configuration page can be accessed via the cogwheel (bottom left).

The configuration of the "OZW splitter" opens. Here the default values from Siemens are already preset. If necessary, changed passwords or a different IP can be set here. With the click on "Apply" the changes are saved. In the OZW configurator you can now click on "Search". The OZW and all KNX devices connected to it then appear.

The ID on the left side is the identification number that can also be found on the back of each device. In case of a large number of installed KNX devices, this ensures easy assignment and configuration.
The ID on the right side is the instance ID assigned by IP-Symcon. This is unique and unchangeable.
Each device must be selected one after the other and set up in IP-Symcon by "Create".
These devices are now available and operable within IP-Symcon.
After a click on a selected KNX device and then a click on "Configure" the device can furthermore be set exactly. It is also possible to set what should be displayed in the Visualization.

To do this, click on the "+" and select the datapoint to be displayed in the Visualization. By clicking on "Create", the data point will be set up in IP-Symcon. The view can now be closed.
### configure query intervals
Once the individual desired data points have been selected, they can be opened via "Configure" and a query interval can be set. This is necessary, because IP-Symcon must actively query the values from the OZW.
> **Note:** A query takes about 800ms. So e.g. 13 data points can be queried every 10 seconds. If the intervals are too short, the queries are processed one after the other, delayed
## Device list
Source: https://www.symcon.de/en/service/documentation/module-reference/devices/siemens-ozw/device-list/
### Supported Gateways/Components
All KNX devices that are compatible with the Siemens OZW 672 / Siemens OZW 772 web server are supported.
## OZW_RequestStatus
Source: https://www.symcon.de/en/service/documentation/module-reference/devices/siemens-ozw/ozw-requeststatus/
`bool OZW_RequestStatus(int $InstanceID)`
requests the status of a device
**Parameters**
- `$InstanceID` (int): ID of the device to query
**Returns** (bool): If the command succeeds, it returns __TRUE__, otherwise __FALSE__.
ID of the device to query
**Example**
```php
OZW_RequestStatus(12345);
```
## OZW_WriteDataPoint
Source: https://www.symcon.de/en/service/documentation/module-reference/devices/siemens-ozw/ozw-writedatapoint/
`bool OZW_WriteDataPoint(int $InstanceID, mixed $Value)`
writes a specific value to a data point
**Parameters**
- `$InstanceID` (int): ID of the device to be modified
- `$Value` (mixed): E.g. 23.5
**Returns** (bool): If the command succeeds, it returns __TRUE__, otherwise __FALSE__.
E.g. 23.5
**Example**
```php
OZW_WriteDataPoint(12345, 1);
```
---
# SNMP
> Symcon documentation · English · generated on 2026-09-26
> Index: https://www.symcon.de/en/llms.txt
Source: https://www.symcon.de/en/service/documentation/module-reference/devices/snmp/
_Requires Symcon >= 6.0_
The SMNP module reads all available OIDs of a device and represents any of them as variables in IP-Symcon. These are updated cyclically and can also be written to if required. Support for OIDLib files gives the OIDs more information/context to simplify setup.
### feature scope
* Automatic walk of all OIDs of a device
* Creating individual OIDs as variables
* Writing values to the OIDs
* Additional information if OIDLib files are available
* SNMPv1/SNMPv2/SNMPv3 incl. authentication and encryption are supported
### software-installation
* Install the 'SMNP' module via the Module Store.
### instance setup in IP-Symcon
Under 'Add Instance' the 'SMNP' module can be found using the quick filter.
- More information about adding instances in the [Instances documentation](https://www.symcon.de/service/dokumentation/konzepte/instanzen/#Instanz_hinzufügen)
#### Configuration page
| name | description |
| ------------------------------------- | -------------------------------------------------------------------------------------------------------------------------------------------------------------------------------------------------------- |
| host | address of host |
| Version | Select between SNMPv1, SNMPv2, SNMPv3 |
| Start at | OID where the walk should start |
| User | Username |
| Community | Required for SNMPv1, SNMPv2 |
| Enable Authentication | Enable authentication option |
| Authentication Password | Password for authentication |
| Authentication Type | Select the authentication type: MD5, SHA1, SHA224, SHA256, SHA384, SHA512 |
| Enable encryption | Enable encryption |
| Encryption password | Password for encryption |
| Encryption type | Selection for encryption type: DES, AES128, 3DES, AES192, AES256, AES192blue, AES256blue |
| Show only known OIDs from the OIDLibs | If enabled, only OIDs are shown that are available in the OIDLibs |
| OIDLibs | List of files which provides the OIDs with description and name. The following tool can be used to convert MIB files to OIDLib files: [MIB files to OIDLibs](https://www.paessler.com/tools/mibimporter) |
| Update interval | Interval in seconds, in which time interval the values are updated |
| name | description |
| ---------------------- | ---------------------------------------------- |
| Start Walk / Stop Walk | Button to start and stop the walk |
| OID | Display of the OID |
| Name | Name given by the OIDLib |
| Description | Description given by the OIDLib |
| Value | Value of the OID given at the time of the walk |
| Active? | Creates a variable for the selected OID |
| Writeable? | Enables writing for the selected OID |
## SNMP_UpdateValues
Source: https://www.symcon.de/en/service/documentation/module-reference/devices/snmp/snmp-updatevalues/
`bool SNMP_UpdateValues(int $InstanzID)`
_Requires Symcon >= 6.0_
**Parameters**
- `$InstanzID` (int): Instance ID
**Returns** (bool): If the command could be executed successfully, it returns __TRUE__ as result, otherwise __FALSE__.
Instance ID
**Example**
```php
SNMP_UpdateValues(12345);
```
---
# Snom
> Symcon documentation · English · generated on 2026-09-26
> Index: https://www.symcon.de/en/llms.txt
Source: https://www.symcon.de/en/service/documentation/module-reference/devices/snom/
_Requires Symcon >= 7.0_
> **Note:** The Snom module was created in cooperation between Symcon and Snom. The module is available as open source and the current [Documentation](https://github.com/symcon/Snom) is available on GitHub.
---
# PLC: Siemens, Vipa, Logo
> Symcon documentation · English · generated on 2026-09-26
> Index: https://www.symcon.de/en/llms.txt
Source: https://www.symcon.de/en/service/documentation/module-reference/devices/sps-siemens-vipa-logo/
### Description
Programmable Logic Controllers (PLC) are independent electronic assemblies for controlling machines and systems. These work independently of a PC. The functions for control and regulation are stored directly in the PLC.
> **Note:** The following devices are supported by IP-Symcon:
>
> [Supported devices](https://www.symcon.de/en/llms/modules/sps-siemens-vipa-logo.md)
> **Note:** Due to the fact that PHP offers integers as the largest integer value, DWORDs (unsigend ints) can be read in IP-Symcon, but they are mapped to integers, which means that only the lower 31 bits can be evaluated.
### Integration in IP-Symcon
The Siemens PLCs can only be integrated via Ethernet connection.
> **Note:** The support of MPI and ProfiBus via LIBNODAVE is discontinued since version 4.0
> **Warning:** With newer S7 (1200/1500) the "Optimized block access" attribute must be deactivated. Further information can be found [HERE](https://snap7.sourceforge.net/snap7_client.html#1200_1500)
#### S7 Connection Configuration
The connection is configured via "TIA Portal" software (Totally Integrated Automation) from Siemens.
The following settings must be made.
* The IP address must be entered in the PROFINET interface (see screenshot)
* PN/IE subnet must be connected
* S7 connection to PROFINET must be inserted and the following points configured (see screenshot)
* Connection data must be entered in IP-Symcon (see screenshot)
__PROFINET Interface__

__S7 Connection__

__S7 Connection Secure__
If a Siemens PLC with additional security settings is used (e.g. S7-1517f), a connection can only be used with activated SIMATIC ACC on the PLC side. This means that the "SIMATIC-ACC" option must be activated for the local TSAP in the S7 connection of the PLC. This results in the remote TSAP 03.01 in the gateway configuration in IP-Symcon.


#### Logo 7/8 Configuration
The configuration of the PLC and the gateway must be set up as follows.
Configuration via LOGO!Soft Comfort 8.1.

The functions can then be tested. For a simple overview of whether everything is working correctly, the SoftComfort software offers an overview of the I/O states.
This can be called as follows.

#### Logo 7/8 Configurator
If the Logo has been integrated properly, the respective memory addresses can be created as an instance via the Logo 7/8 Configurator. To do this, the respective input, output or marker must be selected and "Create" clicked on.

As soon as a module is created in the configurator and the configuration button is pressed, a new dialog opens.
New instances are created in the object tree in the main category. These created instances can then be renamed accordingly and sorted elsewhere. It is also possible to call up the respective instance configuration via "Configure" in the configurator.

### Example with TIA Portal
This example on the S7-1200 reflects 2 buttons, which should switch a light on/off independently of each other. At the same time, it should also be possible to control the light via IP-Symcon.
* Configure Main (OB1) as on the screenshot. (See screenshot)
* Load the program onto the PLC and start it
* Add "Siemens S7" instance in IPS-Symcon
* Configure the configuration page of the "Siemens S7" instance (see screenshot)
* Address and bit result from the TIA Portal (see screenshot)
* The type is specified under the "Area" field (see screenshot)
* The type of variable in IP-Symcon is specified via unit (see screenshot)
* The marker status is queried at the entered interval. (See screenshot)
* The test environment (ON/OFF) can be used to test directly whether the marker is switched correctly
With the XOR circuit and the marker, it is possible to switch over with a button and IP-Symcon will notice the variable change. Thus, IP-Symcon always shows the status of the light without having to use a separate variable to read out the PLC output. It is also possible for IP-Symcon to switch the light directly via the marker.
Better results can be achieved in this example if an AND (edge) is placed in front of the respective XOR to get just one cycle. However, whether this is required must be tested on site and is not included in this example.

### Example with Logo Soft Comfort
This example on the Logo 8 reflects 2 buttons, which should switch a light on/off independently of each other. At the same time, it should also be possible to control the light via IP-Symcon.
* Configure 2 button circuit diagram as shown on the screenshot. (See screenshot)
* Load the program onto the PLC and start it
* Add instance in IPS-Symcon "Logo Configurator" and configure interface as described above
* Create the desired variables using the configurator
* Deactivate the "Read only" option for switchable marker M2
* The type of variable in IP-Symcon is specified via unit
* The marker status is queried at the entered interval. (See screenshot)
* The test environment (ON/OFF) can be used to test directly whether the marker is switched correctly
With the XOR circuit and the marker, it is possible to switch over with a button and IP-Symcon will notice the variable change if the Q2 is set up. It is also possible for IP-Symcon to switch the light directly via marker M2. This is not possible via marker M1 because the logo does not support this in this configuration. Marker M2 acts as a switch in IP-Symcon and as a button in the Logo.


### Data types
| Data type | Sign | Bit | Name IP-Symcon |
| --------- | --------- | --- | -------------- |
| BOOL | unsigned | 1 | Bit |
| BYTE | dependent | 8 | Char/Byte |
| WORD | dependent | 16 | Short/Word |
| DWORD | dependent | 32 | Integer/DWord |
| SINT | signed | 8 | Char |
| INT | signed | 16 | Short |
| DINT | signed | 32 | Integer |
| USINT | unsigned | 8 | Byte |
| UINT | unsigned | 16 | Word |
| UDINT | unsigned | 32 | DWord |
| REAL | signed | 32 | Real |
### Logo-VM-Addresses
The Logo has reserved fixed memory addresses in the VM memory above the 850th byte for inputs/outputs and markers.
These vary depending on the model (Logo7/8).
If the logo is to be read out with IP-Symcon, it is helpful to know these addresses.
A complete list can be found here: [Logo-VM-Addresses](https://www.symcon.de/en/llms/modules/sps-siemens-vipa-logo.md)
## Device list
Source: https://www.symcon.de/en/service/documentation/module-reference/devices/sps-siemens-vipa-logo/device-list/
### Supported Gateways/Components
| Manufacturer | Device name | Description |
| ------------ | -------------- | ---------------------------------------------------------------------------------------------------------------------------------------------------------------------------------------------------------------------------------------------------- |
| Siemens | Logo 7 | |
| Siemens | Logo 8 | |
| Siemens | S7 200/300/400 | Connected via Ethernet |
| Siemens | S7 1200/1500 | More information can be found [HERE](https://snap7.sourceforge.net/snap7_client.html#1200_1500) |
| Siemens | S7 1517f | More information can be found [HERE](https://snap7.sourceforge.net/snap7_client.html#1200_1500) Furthermore, the special [S7 Configuration](https://www.symcon.de/en/llms/modules/sps-siemens-vipa-logo.md) of the S7 must be considered |
## Logo-VM-Addresses
Source: https://www.symcon.de/en/service/documentation/module-reference/devices/sps-siemens-vipa-logo/logovmaddresses/
The Logo has fixed memory addresses for inputs/outputs and markers.
These vary depending on the model (Logo7/8). ([Source LOGO!Soft Comfort Online Help](https://cache.industry.siemens.com/dl/files/807/100782807/att_924631/v1/Help_de-DE_de-DE.pdf#page=119) )
> **Note:** These addresses must be entered within the logo configuration in IP-Symcon under "Area address". The respective bits under "Bit"
### Logo 7
[Inputs Bit](https://www.symcon.de/en/llms/modules/sps-siemens-vipa-logo.md)
[Outputs Bit](https://www.symcon.de/en/llms/modules/sps-siemens-vipa-logo.md)
[Analog Inputs Word](https://www.symcon.de/en/llms/modules/sps-siemens-vipa-logo.md)
[Analog Outputs Word](https://www.symcon.de/en/llms/modules/sps-siemens-vipa-logo.md)
[Marker Bit](https://www.symcon.de/en/llms/modules/sps-siemens-vipa-logo.md)
[Analog Marker Word](https://www.symcon.de/en/llms/modules/sps-siemens-vipa-logo.md)
### Logo 8
[Inputs Bit](https://www.symcon.de/en/llms/modules/sps-siemens-vipa-logo.md)
[Outputs Bit](https://www.symcon.de/en/llms/modules/sps-siemens-vipa-logo.md)
[Analog Inputs Word](https://www.symcon.de/en/llms/modules/sps-siemens-vipa-logo.md)
[Analog Outputs Word](https://www.symcon.de/en/llms/modules/sps-siemens-vipa-logo.md)
[Marker Bit](https://www.symcon.de/en/llms/modules/sps-siemens-vipa-logo.md)
[Analog Marker Word](https://www.symcon.de/en/llms/modules/sps-siemens-vipa-logo.md)
[Network Inputs Bit](https://www.symcon.de/en/llms/modules/sps-siemens-vipa-logo.md)
[Network Outputs Bit](https://www.symcon.de/en/llms/modules/sps-siemens-vipa-logo.md)
[Analog Network Inputs Word](https://www.symcon.de/en/llms/modules/sps-siemens-vipa-logo.md)
[Analog Network Outputs Word](https://www.symcon.de/en/llms/modules/sps-siemens-vipa-logo.md)
#### Logo 7 Inputs Bit
| Input | Address | Bit |
| ----- | ------- | --- |
| I1 | 923 | 0 |
| I2 | 923 | 1 |
| I3 | 923 | 2 |
| I4 | 923 | 3 |
| I5 | 923 | 4 |
| I6 | 923 | 5 |
| I7 | 923 | 6 |
| I8 | 923 | 7 |
| I9 | 924 | 0 |
| I10 | 924 | 1 |
| I11 | 924 | 2 |
| I12 | 924 | 3 |
| I13 | 924 | 4 |
| I14 | 924 | 5 |
| I15 | 924 | 6 |
| I16 | 924 | 7 |
| I17 | 925 | 0 |
| I18 | 925 | 1 |
| I19 | 925 | 2 |
| I20 | 925 | 3 |
| I21 | 925 | 4 |
| I22 | 925 | 5 |
| I23 | 925 | 6 |
| I24 | 925 | 7 |
#### Logo 7 Outputs Bit
| Output | Address | Bit |
| ------ | ------- | --- |
| Q1 | 942 | 0 |
| Q2 | 942 | 1 |
| Q3 | 942 | 2 |
| Q4 | 942 | 3 |
| Q5 | 942 | 4 |
| Q6 | 942 | 5 |
| Q7 | 942 | 6 |
| Q8 | 942 | 7 |
| Q9 | 943 | 0 |
| Q10 | 943 | 1 |
| Q11 | 943 | 2 |
| Q12 | 943 | 3 |
| Q13 | 943 | 4 |
| Q14 | 943 | 5 |
| Q15 | 943 | 6 |
| Q16 | 943 | 7 |
#### Logo 7 Analog Inputs Word
| Input | Address | Bit |
| ----- | ------- | --- |
| AI1 | 926 | 0 |
| AI2 | 928 | 0 |
| AI3 | 930 | 0 |
| AI4 | 932 | 0 |
| AI5 | 934 | 0 |
| AI6 | 936 | 0 |
| AI7 | 938 | 0 |
| AI8 | 940 | 0 |
#### Logo 7 Analog Outputs Word
| Word | Address | Bit |
| ---- | ------- | --- |
| AQ1 | 944 | 0 |
| AQ2 | 946 | 0 |
#### Logo 7 Marker Bit
| Marker | Address | Bit |
| ------ | ------- | --- |
| M1 | 948 | 0 |
| M2 | 948 | 1 |
| M3 | 948 | 2 |
| M4 | 948 | 3 |
| M5 | 948 | 4 |
| M6 | 948 | 5 |
| M7 | 948 | 6 |
| M8 | 948 | 7 |
| M9 | 949 | 0 |
| M10 | 949 | 1 |
| M11 | 949 | 2 |
| M12 | 949 | 3 |
| M13 | 949 | 4 |
| M14 | 949 | 5 |
| M15 | 949 | 6 |
| M16 | 949 | 7 |
| M17 | 950 | 0 |
| M18 | 950 | 1 |
| M19 | 950 | 2 |
| M20 | 950 | 3 |
| M21 | 950 | 4 |
| M22 | 950 | 5 |
| M23 | 950 | 6 |
| M24 | 950 | 7 |
| M25 | 951 | 0 |
| M26 | 951 | 1 |
| M27 | 951 | 2 |
#### Logo 7 Analog Marker Word
| Marker | Address | Bit |
| ------ | ------- | --- |
| AM1 | 952 | 0 |
| AM2 | 954 | 0 |
| AM3 | 956 | 0 |
| AM4 | 958 | 0 |
| AM5 | 960 | 0 |
| AM6 | 962 | 0 |
| AM7 | 964 | 0 |
| AM8 | 966 | 0 |
| AM9 | 968 | 0 |
| M10 | 970 | 0 |
| AM11 | 972 | 0 |
| AM12 | 974 | 0 |
| AM13 | 976 | 0 |
| AM14 | 978 | 0 |
| AM15 | 980 | 0 |
| AM16 | 982 | 0 |
### Logo 8
#### Logo 8 Inputs Bit
| Input | Address | Bit |
| ----- | ------- | --- |
| I1 | 1024 | 0 |
| I2 | 1024 | 1 |
| I3 | 1024 | 2 |
| I4 | 1024 | 3 |
| I5 | 1024 | 4 |
| I6 | 1024 | 5 |
| I7 | 1024 | 6 |
| I8 | 1024 | 7 |
| I9 | 1025 | 0 |
| I10 | 1025 | 1 |
| I11 | 1025 | 2 |
| I12 | 1025 | 3 |
| I13 | 1025 | 4 |
| I14 | 1025 | 5 |
| I15 | 1025 | 6 |
| I16 | 1025 | 7 |
| I17 | 1026 | 0 |
| I18 | 1026 | 1 |
| I19 | 1026 | 2 |
| I20 | 1026 | 3 |
| I21 | 1026 | 4 |
| I22 | 1026 | 5 |
| I23 | 1026 | 6 |
| I24 | 1026 | 7 |
#### Logo 8 Outputs Bit
| Output | Address | Bit |
| ------ | ------- | --- |
| Q1 | 1064 | 0 |
| Q2 | 1064 | 1 |
| Q3 | 1064 | 2 |
| Q4 | 1064 | 3 |
| Q5 | 1064 | 4 |
| Q6 | 1064 | 5 |
| Q7 | 1064 | 6 |
| Q8 | 1064 | 7 |
| Q9 | 1065 | 0 |
| Q10 | 1065 | 1 |
| Q11 | 1065 | 2 |
| Q12 | 1065 | 3 |
| Q13 | 1065 | 4 |
| Q14 | 1065 | 5 |
| Q15 | 1065 | 6 |
| Q16 | 1065 | 7 |
| Q17 | 1066 | 0 |
| Q18 | 1066 | 1 |
| Q19 | 1066 | 2 |
| Q20 | 1066 | 3 |
#### Logo 8 Analog Inputs Word
| Input | Address | Bit |
| ----- | ------- | --- |
| AI1 | 1032 | 0 |
| AI2 | 1034 | 0 |
| AI3 | 1036 | 0 |
| AI4 | 1038 | 0 |
| AI5 | 1040 | 0 |
| AI6 | 1042 | 0 |
| AI7 | 1044 | 0 |
| AI8 | 1046 | 0 |
#### Logo 8 Analog Outputs Word
| Outputs | Address | Bit |
| ------- | ------- | --- |
| AQ1 | 1072 | 0 |
| AQ2 | 1074 | 0 |
| AQ3 | 1076 | 0 |
| AQ4 | 1078 | 0 |
| AQ5 | 1080 | 0 |
| AQ6 | 1082 | 0 |
| AQ7 | 1084 | 0 |
| AQ8 | 1086 | 0 |
#### Logo 8 Marker Bit
| Marker | Address | Bit |
| ------ | ------- | --- |
| M1 | 1104 | 0 |
| M2 | 1104 | 1 |
| M3 | 1104 | 2 |
| M4 | 1104 | 3 |
| M5 | 1104 | 4 |
| M6 | 1104 | 5 |
| M7 | 1104 | 6 |
| M8 | 1104 | 7 |
| M9 | 1105 | 0 |
| M10 | 1105 | 1 |
| M11 | 1105 | 2 |
| M12 | 1105 | 3 |
| M13 | 1105 | 4 |
| M14 | 1105 | 5 |
| M15 | 1105 | 6 |
| M16 | 1105 | 7 |
| M17 | 1106 | 0 |
| M18 | 1106 | 1 |
| M19 | 1106 | 2 |
| M20 | 1106 | 3 |
| M21 | 1106 | 4 |
| M22 | 1106 | 5 |
| M23 | 1106 | 6 |
| M24 | 1106 | 7 |
| M25 | 1107 | 0 |
| M26 | 1107 | 1 |
| M27 | 1107 | 2 |
| M28 | 1107 | 3 |
| M29 | 1107 | 4 |
| M30 | 1107 | 5 |
| M31 | 1107 | 6 |
| M32 | 1107 | 7 |
| M33 | 1108 | 0 |
| M34 | 1108 | 1 |
| M35 | 1108 | 2 |
| M36 | 1108 | 3 |
| M37 | 1108 | 4 |
| M38 | 1108 | 5 |
| M39 | 1108 | 6 |
| M40 | 1108 | 7 |
| M41 | 1109 | 0 |
| M42 | 1109 | 1 |
| M43 | 1109 | 2 |
| M44 | 1109 | 3 |
| M45 | 1109 | 4 |
| M46 | 1109 | 5 |
| M47 | 1109 | 6 |
| M48 | 1109 | 7 |
| M49 | 1110 | 0 |
| M50 | 1110 | 1 |
| M51 | 1110 | 2 |
| M52 | 1110 | 3 |
| M53 | 1110 | 4 |
| M54 | 1110 | 5 |
| M55 | 1110 | 6 |
| M56 | 1110 | 7 |
| M57 | 1111 | 0 |
| M58 | 1111 | 1 |
| M59 | 1111 | 2 |
| M60 | 1111 | 3 |
| M61 | 1111 | 4 |
| M62 | 1111 | 5 |
| M63 | 1111 | 6 |
| M64 | 1111 | 7 |
#### Logo 8 Analog Marker Word
| Marker | Address | Bit |
| ------ | ------- | --- |
| AM1 | 1118 | 0 |
| AM2 | 1120 | 0 |
| AM3 | 1122 | 0 |
| AM4 | 1124 | 0 |
| AM5 | 1126 | 0 |
| AM6 | 1128 | 0 |
| AM7 | 1130 | 0 |
| AM8 | 1132 | 0 |
| AM9 | 1134 | 0 |
| AM10 | 1136 | 0 |
| AM11 | 1138 | 0 |
| AM12 | 1140 | 0 |
| AM13 | 1142 | 0 |
| AM14 | 1144 | 0 |
| AM15 | 1146 | 0 |
| AM16 | 1148 | 0 |
| AM17 | 1150 | 0 |
| AM18 | 1152 | 0 |
| AM19 | 1154 | 0 |
| AM20 | 1156 | 0 |
| AM21 | 1158 | 0 |
| AM22 | 1160 | 0 |
| AM23 | 1162 | 0 |
| AM24 | 1164 | 0 |
| AM25 | 1166 | 0 |
| AM26 | 1168 | 0 |
| AM27 | 1170 | 0 |
| AM28 | 1172 | 0 |
| AM29 | 1174 | 0 |
| AM30 | 1176 | 0 |
| AM31 | 1178 | 0 |
| AM32 | 1180 | 0 |
| AM33 | 1182 | 0 |
| AM34 | 1184 | 0 |
| AM35 | 1186 | 0 |
| AM36 | 1188 | 0 |
| AM37 | 1190 | 0 |
| AM38 | 1192 | 0 |
| AM39 | 1194 | 0 |
| AM40 | 1196 | 0 |
| AM41 | 1198 | 0 |
| AM42 | 1200 | 0 |
| AM43 | 1202 | 0 |
| AM44 | 1204 | 0 |
| AM45 | 1206 | 0 |
| AM46 | 1208 | 0 |
| AM47 | 1210 | 0 |
| AM48 | 1212 | 0 |
| AM49 | 1214 | 0 |
| AM50 | 1216 | 0 |
| AM51 | 1218 | 0 |
| AM52 | 1220 | 0 |
| AM53 | 1222 | 0 |
| AM54 | 1224 | 0 |
| AM55 | 1226 | 0 |
| AM56 | 1228 | 0 |
| AM57 | 1230 | 0 |
| AM58 | 1232 | 0 |
| AM59 | 1234 | 0 |
| AM60 | 1236 | 0 |
| AM61 | 1238 | 0 |
| AM62 | 1240 | 0 |
| AM63 | 1242 | 0 |
| AM64 | 1244 | 0 |
#### Logo 8 Network Inputs Bit
| Input | Address | Bit |
| ----- | ------- | --- |
| NI1 | 1246 | 0 |
| NI2 | 1246 | 1 |
| NI3 | 1246 | 2 |
| NI4 | 1246 | 3 |
| NI5 | 1246 | 4 |
| NI6 | 1246 | 5 |
| NI7 | 1246 | 6 |
| NI8 | 1246 | 7 |
| NI9 | 1247 | 0 |
| NI10 | 1247 | 1 |
| NI11 | 1247 | 2 |
| NI12 | 1247 | 3 |
| NI13 | 1247 | 4 |
| NI14 | 1247 | 5 |
| NI15 | 1247 | 6 |
| NI16 | 1247 | 7 |
| NI17 | 1248 | 0 |
| NI18 | 1248 | 1 |
| NI19 | 1248 | 2 |
| NI20 | 1248 | 3 |
| NI21 | 1248 | 4 |
| NI22 | 1248 | 5 |
| NI23 | 1248 | 6 |
| NI24 | 1248 | 7 |
| NI25 | 1249 | 0 |
| NI26 | 1249 | 1 |
| NI27 | 1249 | 2 |
| NI28 | 1249 | 3 |
| NI29 | 1249 | 4 |
| NI30 | 1249 | 5 |
| NI31 | 1249 | 6 |
| NI32 | 1249 | 7 |
| NI33 | 1250 | 0 |
| NI34 | 1250 | 1 |
| NI35 | 1250 | 2 |
| NI36 | 1250 | 3 |
| NI37 | 1250 | 4 |
| NI38 | 1250 | 5 |
| NI39 | 1250 | 6 |
| NI40 | 1250 | 7 |
| NI41 | 1251 | 0 |
| NI42 | 1251 | 1 |
| NI43 | 1251 | 2 |
| NI44 | 1251 | 3 |
| NI45 | 1251 | 4 |
| NI46 | 1251 | 5 |
| NI47 | 1251 | 6 |
| NI48 | 1251 | 7 |
| NI49 | 1252 | 0 |
| NI50 | 1252 | 1 |
| NI51 | 1252 | 2 |
| NI52 | 1252 | 3 |
| NI53 | 1252 | 4 |
| NI54 | 1252 | 5 |
| NI55 | 1252 | 6 |
| NI56 | 1252 | 7 |
| NI57 | 1253 | 0 |
| NI58 | 1253 | 1 |
| NI59 | 1253 | 2 |
| NI60 | 1253 | 3 |
| NI61 | 1253 | 4 |
| NI62 | 1253 | 5 |
| NI63 | 1253 | 6 |
| NI64 | 1253 | 7 |
#### Logo 8 Network Outputs Bit
| Output | Address | Bit |
| ------ | ------- | --- |
| NQ1 | 1390 | 0 |
| NQ2 | 1390 | 1 |
| NQ3 | 1390 | 2 |
| NQ4 | 1390 | 3 |
| NQ5 | 1390 | 4 |
| NQ6 | 1390 | 5 |
| NQ7 | 1390 | 6 |
| NQ8 | 1390 | 7 |
| NQ9 | 1391 | 0 |
| NQ10 | 1391 | 1 |
| NQ11 | 1391 | 2 |
| NQ12 | 1391 | 3 |
| NQ13 | 1391 | 4 |
| NQ14 | 1391 | 5 |
| NQ15 | 1391 | 6 |
| NQ16 | 1391 | 7 |
| NQ17 | 1392 | 0 |
| NQ18 | 1392 | 1 |
| NQ19 | 1392 | 2 |
| NQ20 | 1392 | 3 |
| NQ21 | 1392 | 4 |
| NQ22 | 1392 | 5 |
| NQ23 | 1392 | 6 |
| NQ24 | 1392 | 7 |
| NQ25 | 1393 | 0 |
| NQ26 | 1393 | 1 |
| NQ27 | 1393 | 2 |
| NQ28 | 1393 | 3 |
| NQ29 | 1393 | 4 |
| NQ30 | 1393 | 5 |
| NQ31 | 1393 | 6 |
| NQ32 | 1393 | 7 |
| NQ33 | 1394 | 0 |
| NQ34 | 1394 | 1 |
| NQ35 | 1394 | 2 |
| NQ36 | 1394 | 3 |
| NQ37 | 1394 | 4 |
| NQ38 | 1394 | 5 |
| NQ39 | 1394 | 6 |
| NQ40 | 1394 | 7 |
| NQ41 | 1395 | 0 |
| NQ42 | 1395 | 1 |
| NQ43 | 1395 | 2 |
| NQ44 | 1395 | 3 |
| NQ45 | 1395 | 4 |
| NQ46 | 1395 | 5 |
| NQ47 | 1395 | 6 |
| NQ48 | 1395 | 7 |
| NQ49 | 1396 | 0 |
| NQ50 | 1396 | 1 |
| NQ51 | 1396 | 2 |
| NQ52 | 1396 | 3 |
| NQ53 | 1396 | 4 |
| NQ54 | 1396 | 5 |
| NQ55 | 1396 | 6 |
| NQ56 | 1396 | 7 |
| NQ57 | 1397 | 0 |
| NQ58 | 1397 | 1 |
| NQ59 | 1397 | 2 |
| NQ60 | 1397 | 3 |
| NQ61 | 1397 | 4 |
| NQ62 | 1397 | 5 |
| NQ63 | 1397 | 6 |
| NQ64 | 1397 | 7 |
#### Logo 8 Analog Network Inputs Word
| Input | Address | Bit |
| ----- | ------- | --- |
| NAI1 | 1262 | 0 |
| NAI2 | 1264 | 0 |
| NAI3 | 1266 | 0 |
| NAI4 | 1268 | 0 |
| NAI5 | 1270 | 0 |
| NAI6 | 1272 | 0 |
| NAI7 | 1274 | 0 |
| NAI8 | 1276 | 0 |
| NAI9 | 1278 | 0 |
| NAI10 | 1280 | 0 |
| NAI11 | 1282 | 0 |
| NAI12 | 1284 | 0 |
| NAI13 | 1286 | 0 |
| NAI14 | 1288 | 0 |
| NAI15 | 1290 | 0 |
| NAI16 | 1292 | 0 |
| NAI17 | 1294 | 0 |
| NAI18 | 1296 | 0 |
| NAI19 | 1298 | 0 |
| NAI20 | 1300 | 0 |
| NAI21 | 1302 | 0 |
| NAI22 | 1304 | 0 |
| NAI23 | 1306 | 0 |
| NAI24 | 1308 | 0 |
| NAI25 | 1310 | 0 |
| NAI26 | 1312 | 0 |
| NAI27 | 1314 | 0 |
| NAI28 | 1316 | 0 |
| NAI29 | 1318 | 0 |
| NAI30 | 1320 | 0 |
| NAI31 | 1322 | 0 |
| NAI32 | 1324 | 0 |
#### Logo 8 Analog Network Outputs Word
| Output | Address | Bit |
| ------ | ------- | --- |
| NAQ1 | 1406 | 0 |
| NAQ2 | 1408 | 0 |
| NAQ3 | 1410 | 0 |
| NAQ4 | 1412 | 0 |
| NAQ5 | 1414 | 0 |
| NAQ6 | 1416 | 0 |
| NAQ7 | 1418 | 0 |
| NAQ8 | 1420 | 0 |
| NAQ9 | 1422 | 0 |
| NAQ10 | 1424 | 0 |
| NAQ11 | 1426 | 0 |
| NAQ12 | 1428 | 0 |
| NAQ13 | 1430 | 0 |
| NAQ14 | 1432 | 0 |
| NAQ15 | 1434 | 0 |
| NAQ16 | 1436 | 0 |
## S7_RequestRead
Source: https://www.symcon.de/en/service/documentation/module-reference/devices/sps-siemens-vipa-logo/s7-requestread/
`bool S7_RequestRead(int $InstanceID)`
performs a read operation on a device
**Parameters**
- `$InstanceID` (int): ID of the device to be switched
**Returns** (bool): If the command succeeds, it returns __TRUE__, otherwise __FALSE__.
ID of the device to be switched
**Example**
```php
// Read device
S7_RequestRead(12345);
```
## S7_Write
Source: https://www.symcon.de/en/service/documentation/module-reference/devices/sps-siemens-vipa-logo/s7-write/
`bool S7_Write(int $InstanceID, float $Value)`
writes a value to the configured address
**Parameters**
- `$InstanceID` (int): ID of the device to be switched
- `$Value` (float): 32-bit floating point value according to IEEE754 or integer
**Returns** (bool): If the command succeeds, it returns __TRUE__, otherwise __FALSE__.
32-bit floating point value according to IEEE754 or integer
**Example**
```php
// Float value
S7_Write(12345, 23.5);
// Integer
S7_Write(12345, 123);
```
## S7_WriteBit
Source: https://www.symcon.de/en/service/documentation/module-reference/devices/sps-siemens-vipa-logo/s7-writebit/
`bool S7_WriteBit(int $InstanceID, bool $Value)`
**Parameters**
- `$InstanceID` (int): ID of the device to be switched
- `$Value` (bool): __TRUE__ for On, __FALSE__ for Off
**Returns** (bool): If the command succeeds, it returns __TRUE__, otherwise __FALSE__.
__TRUE__ for On, __FALSE__ for Off
**Example**
```php
S7_WriteBit(12345, true); //Turn on device
```
## S7_WriteByte
Source: https://www.symcon.de/en/service/documentation/module-reference/devices/sps-siemens-vipa-logo/s7-writebyte/
`bool S7_WriteByte(int $InstanceID, int $Value)`
**Parameters**
- `$InstanceID` (int): ID of the device to be switched
- `$Value` (int): 0-255
**Returns** (bool): If the command succeeds, it returns __TRUE__, otherwise __FALSE__.
0-255
**Example**
```php
S7_WriteByte(12345, 123);
```
## S7_WriteChar
Source: https://www.symcon.de/en/service/documentation/module-reference/devices/sps-siemens-vipa-logo/s7-writechar/
`bool S7_WriteChar(int $InstanceID, int $Value)`
_Requires Symcon >= 4.4_
Set the address with the ID __InstanceID__ to __Value__
**Parameters**
- `$InstanceID` (int): ID of the device to be switched
- `$Value` (int): -128 to 127
**Returns** (bool): If the command succeeds, it returns __TRUE__, otherwise __FALSE__.
-128 to 127
**Example**
```php
S7_WriteChar(12345, -123);
```
## S7_WriteDWord
Source: https://www.symcon.de/en/service/documentation/module-reference/devices/sps-siemens-vipa-logo/s7-writedword/
`bool S7_WriteDWord(int $InstanceID, int $Value)`
**Parameters**
- `$InstanceID` (int): ID of the device to be switched
- `$Value` (int): 0-4294967295
**Returns** (bool): If the command succeeds, it returns __TRUE__, otherwise __FALSE__.
0-4294967295
**Example**
```php
S7_WriteDWord(12345, 123);
```
## S7_WriteInteger
Source: https://www.symcon.de/en/service/documentation/module-reference/devices/sps-siemens-vipa-logo/s7-writeinteger/
`bool S7_WriteInteger(int $InstanceID, int $Value)`
**Parameters**
- `$InstanceID` (int): ID of the device to be switched
- `$Value` (int): -2147483648 bis 2147483647
**Returns** (bool): If the command succeeds, it returns __TRUE__, otherwise __FALSE__.
-2147483648 bis 2147483647
**Example**
```php
S7_WriteInteger(12345, -123);
```
## S7_WriteReal
Source: https://www.symcon.de/en/service/documentation/module-reference/devices/sps-siemens-vipa-logo/s7-writereal/
`bool S7_WriteReal(int $InstanceID, float $Value)`
**Parameters**
- `$InstanceID` (int): ID of the device to be switched
- `$Value` (float): 64bit floating point value according to IEEE754
**Returns** (bool): If the command succeeds, it returns __TRUE__, otherwise __FALSE__.
64bit floating point value according to IEEE754
**Example**
```php
S7_WriteReal(12345, 23.5);
```
## S7_WriteShort
Source: https://www.symcon.de/en/service/documentation/module-reference/devices/sps-siemens-vipa-logo/s7-writeshort/
`bool S7_WriteShort(int $InstanceID, int $Value)`
_Requires Symcon >= 4.4_
Set the address with the ID __InstanceID__ to __Value__
**Parameters**
- `$InstanceID` (int): ID of the device to be switched
- `$Value` (int): -32768 to 32767
**Returns** (bool): If the command succeeds, it returns __TRUE__, otherwise __FALSE__.
-32768 to 32767
**Example**
```php
S7_WriteShort(12345, -123);
```
## S7_WriteWord
Source: https://www.symcon.de/en/service/documentation/module-reference/devices/sps-siemens-vipa-logo/s7-writeword/
`bool S7_WriteWord(int $InstanceID, int $Value)`
**Parameters**
- `$InstanceID` (int): ID of the device to be switched
- `$Value` (int): 0-65535
**Returns** (bool): If the command succeeds, it returns __TRUE__, otherwise __FALSE__.
0-65535
**Example**
```php
S7_WriteWord(12345, 123);
```
---
# PLC: Wago, Beckhoff, ABB
> Symcon documentation · English · generated on 2026-09-26
> Index: https://www.symcon.de/en/llms.txt
Source: https://www.symcon.de/en/service/documentation/module-reference/devices/sps-wago-beckhoff-abb/
PLCs that support ModBus RTU/TCP can be integrated into IP-Symcon. A connection is established via [ModBus RTU/TCP](https://www.symcon.de/en/llms/modules/modbus-rtu-tcp.md) .
> **Note:** The following devices are supported by IP-Symcon:
>
> [Supported devices](https://www.symcon.de/en/llms/modules/modbus-rtu-tcp.md)
For example
* Wago 750-841 - The connection to IP-Symcon is made via the LAN interface.
### Description
Programmable Logic Controllers (PLC) are independent electronic assemblies for controlling machines and systems. These work independently of a PC. The functions for control and regulation are stored in a program. IP-Symcon is used for visualization as well as the Human-Machine Interface (HMI), i.e. the interface between the operator and the machine.
### Setup in IP-Symcon
The Wago, Beckhoff and ABB PLCs can be controlled via the IP-Symcon ModBus RTU/TCP module. Since ModBus is the parent protocol for control, the names of the terminal device manufacturers are no longer explicitly mentioned in the control module. The documentation for this can be found here: [ModBus RTU/TCP](https://www.symcon.de/en/llms/modules/modbus-rtu-tcp.md)
### Convert IEC 61131 to ModBus Register
This tool can be used to quickly convert the WAGO (IEC 61131) addresses into the respective ModBus address.
### Tips & Ticks
* [WAGO ModBus Register Mapping Table](https://www.symcon.de/assets/files/service/ModBusRegisterMapping.pdf)
---
# Sync Remote
> Symcon documentation · English · generated on 2026-09-26
> Index: https://www.symcon.de/en/llms.txt
Source: https://www.symcon.de/en/service/documentation/module-reference/devices/sync-remote/
_Requires Symcon >= 7.1_
> **Note:** The Sync Remote module is a paid extension that can be purchased for any existing Symcon license. For each Symcon license, 1 remote system can be integrated free of charge. The extension can be purchased directly in the [Shop](https://www.symcon.de/en/shop/enterprise/bundle-ips-enterprise-sync-remote).
The Sync Remote enables a server to synchronize with a remote client. The entire content of the client's object tree is integrated into the server's object tree. The server can then use the client's object tree as if it were part of its own object tree and can both read and modify the objects in it.
[Video](https://www.youtube.com/embed/jNmV3x5tZeg?rel=0&cc_load_policy=1)
### Scope of functions
- Full access to the client from the server
- Object tree of the client seamlessly integrated into that of the server
- Server can read and modify client
### Software installation
- If the paid extension has been purchased for the server license, the module can be used there.
### Set up the instances in Symcon
- The 'Sync Remote' module can be found under "Add instance" using the quick filter.
- Further information in the [documentation of the instances](https://www.symcon.de/en/llms/concepts.md).
#### Configuration
The [Remote access](https://www.symcon.de/en/llms/components/remote-access.md) must be activated on the client for synchronization. Sync Remote must be configured on the server.
| Name | Description |
| ---------------------------------------------------------------------------- | ---------------------------------------------------------------------------------------------------------------------------------------------------------------------------------------------------------------------------------------------------------------------------------------------------------------------------------------------------------------------------------------------------------------------------------------------------------------------------------------------------------------------------------------------------------------------------------------------------------------------------------------------------------------------------------------------------------------------------------------------------------------------------------------------------------------------------------------------------------------------------------------------------------------------------------------------------------------------------------------------------------------------------------------------------------------------------------- |
| Enable synchronization of remote Symcon | The synchronization is performed if this switch is active |
| Host | The URL under which the client can be reached |
| Port | The port under which the client provides Symcon |
| Use SSL | If the switch is set, the connection to the client is encrypted via SSL |
| Verify Peer | Verify that the SSL certificate of the host is correct (only visible if Use SSL is active) |
| Verify Host | Verify that the host URL from the SSL certificate matches the host from the property (only visible if Use SSL is active) |
| Username | The user name, i.e. the license address, of the client |
| Password | The password for remote access to the client |
| Timeout | The timeout for requests to the client in milliseconds. If a request takes longer, the connection is marked as faulty and no synchronization is performed. |
| Strategy (Profile) | Selection of the strategy for synchronizing [Variable profiles](https://www.symcon.de/en/llms/concepts.md) of the client __Only assign existing profiles__: No new profiles are created on the server or existing ones are modified. This means that variables are displayed on the basis of the server's profiles and may differ from those of the client __Create profiles if not existent__: Profiles of the client that do not exist on the server are also created on the server. This means that variables with previously unknown profiles are displayed as on the client. However, existing profiles are retained. This means that these variables can be displayed differently under certain circumstances __Create/Update matching profiles__: Create profiles of the client that are missing on the server and modify existing profiles of the server so that they match the client. This ensures that the display of variables corresponds to that of the client. However, this could unintentionally modify the display of variables outside the synchronized area. |
| Interval | This option specifies how often the server synchronizes with the client |
| Reduce logging for cyclic updates | If this switch is activated, logging in the message window is reduced. |
| Save data transfer costs by loading only diffs (uses more CPU on both sides) | If this switch is activated, the client only sends the changes since the last synchronization to the client. This reduces the amount of data that is transferred, but requires more computing power on both systems to calculate and integrate the changes (from Symcon 7.2). |
| Burst Interval when actions happen | If the server switches a synchronized variable, the synchronization is carried out more frequently for a short time so that the associated changes are visible more quickly. This option specifies how short the update interval is for this burst (from Symcon 7.2) |
| Number of Burst updates after an action | If the server switches a synchronized variable, this option specifies how many update requests are performed during the burst (from Symcon 7.2) |
| "Update" button | When the button is pressed, synchronization is performed immediately |
> **Note:** The systems should use the same version of Symcon. When upgrading the systems, it is recommended to update the server first and then the client. Otherwise there may be unwanted interactions
.
---
# Technische Alternative
> Symcon documentation · English · generated on 2026-09-26
> Index: https://www.symcon.de/en/llms.txt
Source: https://www.symcon.de/en/service/documentation/module-reference/devices/technische-alternative/
Technische Alternative offers control of various controllers and system monitoring. A connection to IP-Symcon is established using CMI or BL-NET.
### Description
IP-Symcon supports both the BL-NET (UVR1611) and the CMI variants of Technische Alternative.
CMI Installation
BL-NET Installation
### CMI
The connection to IP-Symcon is established via LAN.
### Integration in IP-Symcon
After a suitable CMI instance has been created, the IP address of the CMI must be entered.
The device, node number and interval must also be specified.
If authentication is required, this must be entered in the parent instance of the WWW Reader.
The connection can be tested via "Update".
Variables are automatically created on first-time queries and updated at every interval.
### BL-NET
The connection to IP-Symcon is made via LAN or USB using the "BOOTLOADER" (BL-NET).
In any case, the DL (data line) must be used.
> **Warning:** Reading out via the CAN bus is not possible.
### Integration in IP-Symcon
After an instance has been created in IP-Symcon, the IP address of the BL-NET must be specified. If the USB version is to be used, a new parent instance must be created and the SerialPort must be selected when selecting it.
In order to display one or more variables in the Visualization, a profile (e.g. temperature) must be assigned to each of them in order to make it visually recognizable what type of value they are. As the UVR1611 controls and inputs are user defined, this cannot be done automatically by the system. More information about variable profiles can be found here: [Variable Profiles](https://www.symcon.de/en/llms/concepts.md)
If __two (2)__ UVR1611 are to be connected, two instances must be created. Once with ID = 1 and once with ID = 2. However, the timer may only be activated in one of the two instances, since a request delivers both data packets and thus updates both instances.
### Tips & Tricks
Since the BL-NET is not very resilient, as few applications as possible should access the device. Otherwise failures can occur during which the BL-NET cannot be reached.
The following entries in the log file are normal and not an error:
```php
Client Socket | Socket: Connect.... #1
Client Socket | Socket: Connected
Client Socket | Socket: Disconnected
```
## Device list
Source: https://www.symcon.de/en/service/documentation/module-reference/devices/technische-alternative/device-list/
### CMI
| Devices | Description |
| --------- | ------------------------------------------------------------------------------------- |
| CAN-BC2 | Interface device for CAN bus devices |
| CAN-EZ2 | Energy meter, heat meter |
| CAN-EZ3 | Energy meter, heat meter |
| CAN-I/O45 | RSM610/UVR16x2 Expansion unit for additional inputs/outputs |
| CAN-MTx2 | RSM610/UVR16x2 Expansion unit with 4.3" touch display, one operating and display unit |
| RSM610 | Freely programmable control and switching module. Possible extension of UVR1611/16x2 |
| UVR1611 | Universal control |
| UVR16x2 | Freely programmable universal controller |
| UVR610 | Freely programmable universal controller |
| UVR65* | Universal control |
| UVR67* | Universal control |
### BL-NET
| Devices | Description |
| ------- | ----------------- |
| UVR1611 | Universal control |
---
# Door Intercom
> Symcon documentation · English · generated on 2026-09-26
> Index: https://www.symcon.de/en/llms.txt
Source: https://www.symcon.de/en/service/documentation/module-reference/devices/door-intercom/
_Requires Symcon >= 8.0_
> **Note:** The door intercom module is a paid extension that can be purchased for any existing Symcon license in the [Shop](https://www.symcon.de/en/shop/enterprise/ips-extension-doorip/). The door intercom module can be tried out free of charge with any Symcon license.
### functional scope
- Support for Direct SIP and SIP with registration on PBX
- Intercom with SIP-compatible door stations
- Choice of audio/video, audio only or audio with external video (RTSP)
- Forward video from door station or RTSP to visualization (web + app)
- Audio incl. intercom from door station to visualization (web + app) and back
- Also supported via the Connect service
- Support for multiple parallel calls with different door stations
- When it rings, a dialog is displayed and it can be accepted or rejected
- The visualization can be used as a telephone that can be called
- If only audio is available, an RTSP stream can be specified as an external video source
- State variables (wait, ring, speak)
- Variables can be configured with a value as an action
- Notifications and calls are also displayed for open objects and in the settings.
- A ringtone is played in the visualization when a call is received
- Calls are displayed when notifications are opened
### Necessary technical parameters
- SIP: Direct SIP or SIP on with registration on a PBX
- Video: H264 (VoIP/SIP or RTSP as external source as with the streams)
- Audio: G711 (PCMA, PCMU)
### Setup
- Create a new instance called "Door Intercom". This must be in the visible area of the visualization so that the call is correctly routed to the visualization.
- When the doorbell rings, "sip:symcon_12345@192.168.1.5:5060" must then be called, for example
- When logging on to an external PBX, all incoming calls are forwarded to the visualization
### device-specific setup
- [2N](https://www.symcon.de/en/llms/modules/door-intercom.md)
- [FANVIL](https://www.symcon.de/en/llms/modules/door-intercom.md)
- [DoorBird](https://www.symcon.de/en/llms/modules/door-intercom.md)
- [FRITZ!Box](https://www.symcon.de/en/llms/modules/door-intercom.md)
#### Configuration page
| Name | Description |
| ------------ | ------------------------------------------------------------------------------------- |
| Active | Activates the module |
| Mode | Direct SIP or SIP with registration |
| Domain | Only for SIP with registration |
| User name | The user name to be used for the login |
| AuthID | Only visible for SIP with registration |
| Password | Password can be left blank for less secure authentication |
| Tracks | Audio/Video, Audio only, Audio with external video |
| Media Stream | With external video, a stream can be selected here that is displayed during the call. |
| Actions | Actions can be executed directly on the call screen |
### Actions
| Field | Description |
| ------ | ------------------------------------------------------------- |
| Name | The text that is displayed on the button in the visualization |
| Action | The variable to be switched or the action to be executed |
| Value | The value to which a selected variable should be set |
### status variables
| Name | Type | Description |
| -------------- | ------- | --------------------------------------------------------------------------------------------------------------------- |
| Call list | String | JSON-encoded list of recent calls that can be displayed in the visualization |
| Do not disturb | Boolean | If active, no dialog is displayed in full screen when a call is received. The call can still be answered via the tile |
| Doorbell | Integer | Doorbell status | (0: Waiting, 1: Ringing, 2: Speaking) |
| Missed calls | Integer | Number of missed calls. Are displayed with in the tile |
### visualization
The door intercom system has its own display in the visualization.
A list of past calls is displayed in the tile.

When the Door Intercom instance is called, a dialog is displayed to accept or reject the call.

Once the connection has been established, the configured actions can be executed from the dialog.

> **Note:** Internally, the integration of the door stations has the code name: DoorIP
## Device list
Source: https://www.symcon.de/en/service/documentation/module-reference/devices/door-intercom/device-list/
### Supported components
> **Note:** In general, all door stations that support SIP should be integrable. We guarantee functionality with the following components. The [Support](https://www.symcon.de/en/contact-us/#Door%20Intercoms) supported, should the setup of other devices cause difficulties.
| System | Description |
| ------------ | ----------- |
| 2N IP Verso | |
| 2N IP Style | |
| 2N IP One | |
| FANVIL I10SV | |
| DoorBird | |
## 2N
Source: https://www.symcon.de/en/service/documentation/module-reference/devices/door-intercom/2n/
### Settings in the 2N interface
- Domain: The IP address of the 2N
- Proxy address: The IP address of the Symcon server
- Display Name and Phone Number can be freely selected.

- Use sendrecv Attribute for Video: Activated

- The codec settings must be set as follows


- User Phone Numbers → Number 1: UserNameFromIntercomInstance@IPfromSymconServer:5060
- In the example: sip:symcon_28735@172.17.31.170
The previously configured user must be called when the bell is pressed.

## DoorBird
Source: https://www.symcon.de/en/service/documentation/module-reference/devices/door-intercom/doorbird/
### Settings in the Doorbird interface
- Expert setting → SIP settings → ONLY enter the SIP user. In this case "symcon_28735"
> **Note:** No other settings must be set for Direct SIP to work correctly
- Favorites → SIP numbers → Add → Name SYMCON-Direct → SIP address: UsernameFromDoorIntercomInstance@IPfromSymconServer. In this case symcon_28735@172.17.31.170
- Key configuration → Settings → Key → Store the "SYMCON-Direct" favorites
- If the button configuration item does not exist, the setting is located in Expert settings → Schedule for doorbell → SIP call
### Settings in the Door Intercom instance
- Mode: Direct SIP
- User name: symcon_28735
- Password: *leave empty*
- Tracks: Audio/Video
## FANVIL
Source: https://www.symcon.de/en/service/documentation/module-reference/devices/door-intercom/fanvil/
Update the firmware. Tested with 2.12.48.14
### Settings in the web interface
Username/Display: Can be freely selected
Server Address: The IP address of the Symcon server

- Dial Without Registered: Activated

#### Function Key Settings
- Type: Memory Key
- Name: Can be freely selected
- Value: User name in the Door Intercom instance

## FRITZ!Box
Source: https://www.symcon.de/en/service/documentation/module-reference/devices/door-intercom/fritz-box/
Telephones registered in the Fritzbox can call Symcon. Only audio transmission is supported.
### Settings in the FRITZ!Box
A new telephony device with the following settings must be added:


The user name corresponds to that in the Door Intercom instance.

### Settings in the Door Intercom instance

## DoorIP_Accept
Source: https://www.symcon.de/en/service/documentation/module-reference/devices/door-intercom/doorip-accept/
`void DoorIP_Accept(int $InstanceID)`
_Requires Symcon >= 8.0_
**Parameters**
- `$InstanceID` (int): ID of the instance of the device to be switched
**Returns** (void): If the command could be executed successfully, the result is __TRUE__, otherwise __FALSE__.
ID of the instance of the device to be switched
**Example**
```text
DoorIP_Accept(12345);
```
## DoorIP_Decline
Source: https://www.symcon.de/en/service/documentation/module-reference/devices/door-intercom/doorip-decline/
`void DoorIP_Accept(int $InstanceID)`
_Requires Symcon >= 8.0_
**Parameters**
- `$InstanceID` (int): ID of the instance of the device to be switched
**Returns** (void): If the command could be executed successfully, the result is __TRUE__, otherwise __FALSE__.
ID of the instance of the device to be switched
**Example**
```text
DoorIP_Decline(12345);
```
## DoorIP_SendDTMF
Source: https://www.symcon.de/en/service/documentation/module-reference/devices/door-intercom/doorip-senddtmf/
`void DoorIP_SendDTMF(int $InstanceID, string $Digits)`
_Requires Symcon >= 8.0_
sends DTMF characters on the current connection.
**Parameters**
- `$InstanceID` (int): ID of the instance of the device to be switched
- `$Digits` (string)
Characters to be sent as DTMF
> **Note:** Only these characters are allowed: 0-9, *, #
**Returns** (void): If the command could be executed successfully, the result is __TRUE__, otherwise __FALSE__.
Characters to be sent as DTMF
> **Note:** Only these characters are allowed: 0-9, *, #
**Example**
```text
DoorIP_SendDTMF(12345, '*123#');
```
---
# Voice over IP
> Symcon documentation · English · generated on 2026-09-26
> Index: https://www.symcon.de/en/llms.txt
Source: https://www.symcon.de/en/service/documentation/module-reference/devices/voip/
The VoIP module can set up/receive telephone connections, process DTMF signals, buffer connection-related data and play sounds.
> **Note:** The following devices are supported by IP-Symcon:
>
> __[Supported devices](https://www.symcon.de/en/llms/modules/voip.md) __
### Requirements
An active portal for telephony is required. This can be a Fritzbox or a service like Sipgate.
### Integration in IP-Symcon
For integration, a "VoIP" device can be added via Add object in the object tree.
Domain and user name for the telephone service must be specified in the instance configuration.
If required, AuthID and password must also be entered.
> **Note:** If the computer has several network cards or -interfaces (e.g. also virtual adapters such as VPN, Docker, Hyper-V) it may be necessary to define the IP address via which the VoIP connection is established. There is also the appropriate [special switch](https://www.symcon.de/en/llms/developer/special-switches.md) "VoIPInterface"

To manage what should happen when a connection is active, a processing script must be added.
### Processing script
The processing script determines the behavior for each incoming connection. The [Systemvariables](https://www.symcon.de/en/llms/concepts/automations.md) are also important for this.
### Examples
#### Script for incoming calls (processing script)
```php
if($_IPS['SENDER'] == "VoIP") {
// Only incoming calls are to be processed
// $_IPS["INSTANCE"] is available since IP-Symcon 5.4
if(VoIP_GetConnection($_IPS["INSTANCE"], $_IPS["CONNECTION"])["Direction"] == 1 /* Outbound */) {
return;
}
switch($_IPS["EVENT"]) {
case "Incoming":
IPS_LogMessage("VoIP", "An incoming call");
break;
case "Connect":
IPS_LogMessage("VoIP", "A connection was established");
break;
case "Disconnect":
IPS_LogMessage("VoIP", "A connection was terminated");
break;
case "DTMF":
IPS_LogMessage("VoIP", "A DTMF signal was received");
switch($_IPS["DATA"]) {
case '1':
case '2':
case '3':
case '4':
case '5':
case '6':
IPS_LogMessage("VoIP", "One of the keys 1 to 6 was pressed");
break;
case '#':
IPS_LogMessage("VoIP", "The # key was pressed");
break;
default:
IPS_LogMessage("VoIP", "The ". $_IPS["DATA"] ." button was pressed");
break;
}
break;
case "PlayFinish":
IPS_LogMessage("VoIP", "A sound file was played");
break;
default:
IPS_LogMessage("VoIP", "An unknown event was triggered");
break;
}
}
```
#### Outbound Call Script with TTS Module "AWS Polly" from the Module Store
```php
if($_IPS['SENDER'] == "Execute") {
$id = VoIP_Connect(12345, "0451305005xx");
//Wait a maximum of 10 seconds for someone to pick up
for($i = 0; $i < 10; $i++) {
IPS_Sleep(1000);
$c = VoIP_GetConnection(12345, $id);
if($c['Connected']) {
// VoIP_Playwave() only supports WAV in the format: 16 Bit, 8000 Hz, Mono.
VoIP_PlayWave(12345, $id, TTSAWSPOLLY_GenerateFile(23456, "IP-Symcon wishes you a wonderful day"));
return;
}
}
//Hang up if nobody picks up
VoIP_Disconnect(12345, $id);
}
```
### Example setup on the FritzBox
The VoIP module can be used with the help of the FritzBox. A separate unused telephone number in the FritzBox is recommended for this and the following steps must be kept in mind.
> **Note:** If necessary, a new number must be set up under "Telephony" -> "Own number" -> "New number"
As a first step, a new telephony device must be added to the FritzBox under "Telephony" -> "Telephony Devices".
This must be added as a new "phone".

Since IP-Symcon acts as an IP telephone, this and then a separate telephone number must be selected. A descriptive name should be chosen for the telephony device.

Then a user name and password must be specified, these are later entered into the VoIP in IP-Symcon.

The telephony device to be set up must be confirmed and its setup then completed.


Now the telephony device can be taken over in IP-Symcon within the VoIP module.
If everything went well, the status "Registration was successful" is displayed.

A test call can be made with the Processing-Script set up. In the [Messages](https://www.symcon.de/en/llms/components/management-console.md) the following messages should appear when the number keys on the phone are pressed.

## Device list
Source: https://www.symcon.de/en/service/documentation/module-reference/devices/voip/device-list/
### Supported Components
An excerpt of supported components.
* Fritzbox
* Sipgate
> **Note:** These are only the tested devices. Other devices may also work.
## VoIP_AcceptCall
Source: https://www.symcon.de/en/service/documentation/module-reference/devices/voip/voip-acceptcall/
`bool VoIP_AcceptCall(int $InstanceID, int $ConnectionID)`
_Requires Symcon >= 5.4_
accepts a connection
**Parameters**
- `$InstanceID` (int): ID of the device to be switched
- `$ConnectionID` (int): ID of the connection to be switched
**Returns** (bool): If the command succeeds, it returns __TRUE__, otherwise __FALSE__.
ID of the connection to be switched
**Example**
```php
// Accepts the connection with ID 3 of the instance with ID 12345
VoIP_AcceptCall(12345, 3)
```
## VoIP_Connect
Source: https://www.symcon.de/en/service/documentation/module-reference/devices/voip/voip-connect/
`int VoIP_Connect(int $InstanceID, string $Number)`
_Requires Symcon >= 5.2_
**Parameters**
- `$InstanceID` (int): ID of the device to be switched
- `$Number` (string): Phone number to connect to
**Returns** (int): Returns the ID of the connection
Phone number to connect to
**Example**
```php
// Establishes a connection with the phone number 0451305005xx
VoIP_Connect(12345, "0451305005xx");
```
## VoIP_Disconnect
Source: https://www.symcon.de/en/service/documentation/module-reference/devices/voip/voip-disconnect/
`bool VoIP_Disconnect(int $InstanceID, int $ConnectionID)`
_Requires Symcon >= 5.2_
terminates a connection
**Parameters**
- `$InstanceID` (int): ID of the device to be switched
- `$ConnectionID` (int): ID of the connection to be switched
**Returns** (bool): If the command succeeds, it returns __TRUE__, otherwise __FALSE__.
ID of the connection to be switched
**Example**
```php
// Disconnects with ID 3 of the instance with ID 12345
VoIP_Disconnect(12345, 3);
```
## VoIP_GetConnection
Source: https://www.symcon.de/en/service/documentation/module-reference/devices/voip/voip-getconnection/
`array VoIP_GetConnection(int $InstanceID, int $ConnectionID)`
_Requires Symcon >= 5.2_
returns information about a connection
**Parameters**
- `$InstanceID` (int): ID of the device to be switched
- `$ConnectionID` (int): ID of the connection to be switched
**Returns** (array): Array with the following information
| Field | Data type | Description |
| ------------ | --------- | ------------------------------------------------------------------- |
| ID | integer | ConnectionID |
| TimeStamp | integer | Time stamp of the call |
| Number | string | Number with which a connection was established |
| Direction | integer | Call direction: 0 = Incoming call, 1 = Outgoing call |
| Connected | boolean | Connection status: FALSE = not connected, TRUE = connected |
| Disconnected | boolean | Disconnection status: FALSE = not disconnected, TRUE = disconnected |
ID of the connection to be switched
**Example**
```php
// Returns information of the connection with ID 3.
print_r(VoIP_GetConnection(12345, 3));
// Sample output:
/*
Array
(
[ID] => 3
[TimeStamp] => 1566915689
[Number] => 045130500511
[Data] =>
[Direction] => 1
[Connected] => 1
[Disconnected] =>
)
*/
```
## VoIP_GetData
Source: https://www.symcon.de/en/service/documentation/module-reference/devices/voip/voip-getdata/
`string VoIP_GetData(int $InstanceID, int $ConnectionID)`
_Requires Symcon >= 5.2_
returns data of a connection
**Parameters**
- `$InstanceID` (int): ID of the device to be switched
- `$ConnectionID` (int): ID of the connection to be switched
**Returns** (string): Content of the connection data as a string
ID of the connection to be switched
**Example**
```php
// Returns the content of the data of the connection with ID 3.
VoIP_SetData(12345, 3, "Hello World");
print_r(VoIP_GetData(12345, 3));
// Sample output
/*
Hello World
*/
```
## VoIP_PlayWave
Source: https://www.symcon.de/en/service/documentation/module-reference/devices/voip/voip-playwave/
`bool VoIP_PlayWave(int $InstanceID, int $ConnectionID, string $Filename)`
_Requires Symcon >= 5.2_
plays a wave file
**Parameters**
- `$InstanceID` (int): ID of the device to be switched
- `$ConnectionID` (int): ID of the connection to be switched
- `$Filename` (string): Path and name of the file to be played
**Returns** (bool): If the command succeeds, it returns __TRUE__, otherwise __FALSE__.
Path and name of the file to be played
**Example**
```php
// Plays the sound file "welcome.wav" on the connection with ID 3
VoIP_PlayWave(12345, 3, IPS_GetKernelDir() . "/media/welcome.wav");
```
## VoIP_RejectCall
Source: https://www.symcon.de/en/service/documentation/module-reference/devices/voip/voip-rejectcall/
`bool VoIP_RejectCall(int $InstanceID, int $ConnectionID)`
_Requires Symcon >= 5.4_
rejects a connection
**Parameters**
- `$InstanceID` (int): ID of the device to be switched
- `$ConnectionID` (int): ID of the connection to be switched
**Returns** (bool): If the command succeeds, it returns __TRUE__, otherwise __FALSE__.
ID of the connection to be switched
**Example**
```php
// Rejects the connection with the ID 3 of the instance with the ID 12345
VoIP_RejectCall(12345, 3)
```
## VoIP_SendDTMF
Source: https://www.symcon.de/en/service/documentation/module-reference/devices/voip/voip-senddtmf/
`bool VoIP_SendDTMF(int $InstanceID, int $ConnectionID, string $DTMF)`
_Requires Symcon >= 5.3_
sends a sequence of characters as DTMF
**Parameters**
- `$InstanceID` (int): ID of the device to be switched
- `$ConnectionID` (int): ID of the connection to be switched
- `$DTMF` (string): Characters to be sent as DTMF
**Returns** (bool): If the command succeeds, it returns __TRUE__, otherwise __FALSE__.
Characters to be sent as DTMF
**Example**
```php
// Sends the DTMF signals for "*123#" on the connection with ID 3
VoIP_SendDTMF(12345, 3, "*123#");
```
## VoIP_SetData
Source: https://www.symcon.de/en/service/documentation/module-reference/devices/voip/voip-setdata/
`bool VoIP_SetData(int $InstanceID, int $ConnectionID, string $Data)`
_Requires Symcon >= 5.2_
sets the data of a connection
**Parameters**
- `$InstanceID` (int): ID of the device to be switched
- `$ConnectionID` (int): ID of the connection to be switched
- `$Data` (string): Data for which connection is to be set
**Returns** (bool): If the command succeeds, it returns __TRUE__, otherwise __FALSE__.
Data for which connection is to be set
**Example**
```php
// Sets the content of the data of the connection with ID 3 to "Hello World"
VoIP_SetData(12345, 3, "Hello World");
```
---
# Weishaupt
> Symcon documentation · English · generated on 2026-09-26
> Index: https://www.symcon.de/en/llms.txt
Source: https://www.symcon.de/en/service/documentation/module-reference/devices/weishaupt/
_Requires Symcon >= 7.0_
Weishaupt offers various heat pumps. These can be read out via ModBus TCP. A connection with Symcon is possible via a MobBus gateway from Weishaupt.
> **Note:** [List of supported components](https://www.symcon.de/en/llms/modules/weishaupt.md)
### Installation
To be able to use Weishaupt heat pumps in Symcon, there must be a connection to the heat pump via Ethernet or Wifi.
### Symcon integration
First, a "ModBus Device" instance must be added within the Symcon object tree. The IP address of the heat pump must be entered in the following dialog. The port is 502 by default. Both pieces of information can be viewed on the web interface of the heat pump.


The ModBus template for Weishaupt heat pumps can then be [downloaded](https://www.symcon.de/en/llms/modules/weishaupt.md). This contains the entire configuration of the ModBus device. After downloading, the "WeishauptModBusx_vx.json" can be loaded via "Import". All ModBus addresses of the standard Weishaupt heat pump are then set up.
> **Note:** Templates in the [Device overview](https://www.symcon.de/en/llms/modules/weishaupt.md)

### Adding addresses
If further addresses are to be added, this can be done via "Add".
Depending on the design of the wallbox, individual addresses may need to be deactivated/activated. This can be controlled via the Active column.
### protocol description
> **Note:** Protocol description in the [Device overview](https://www.symcon.de/en/llms/modules/weishaupt.md)
## Device List
Source: https://www.symcon.de/en/service/documentation/module-reference/devices/weishaupt/device-list/
_Requires Symcon >= 7.0_
### Supported gateways
| Product | Description |
| ---------------- | ------------------------- |
| Modbus TCP (WWP) | IP Gateway for ModBus TCP |
### Supported devices
[Protocol description](https://www.symcon.de/media/pages/service/dokumentation/modulreferenz/geraete/weishaupt/geraeteliste/2ce580e739-1790424938/modbus_tcp_wwp_3259_d_11_20225.pdf) of all data points.
| Product | Description | ModBus Template |
| ---------------- | --------------------- | ----------------------------------------- |
| Aeroblock (WAB) | Air/water heat pump | [Download](https://www.symcon.de/media/pages/service/dokumentation/modulreferenz/geraete/weishaupt/geraeteliste/52ea62c57c-1790424938/weishaupt-wem.json) |
| Biblock (WBB) | Air/water heat pump | [Download](https://www.symcon.de/media/pages/service/dokumentation/modulreferenz/geraete/weishaupt/geraeteliste/52ea62c57c-1790424938/weishaupt-wem.json) |
| Splitblock (WSB) | Air/water heat pump | [Download](https://www.symcon.de/media/pages/service/dokumentation/modulreferenz/geraete/weishaupt/geraeteliste/52ea62c57c-1790424938/weishaupt-wem.json) |
| Geoblock (WGB) | Brine/water heat pump | [Download](https://www.symcon.de/media/pages/service/dokumentation/modulreferenz/geraete/weishaupt/geraeteliste/52ea62c57c-1790424938/weishaupt-wem.json) |
---
# WinLIRC
> Symcon documentation · English · generated on 2026-09-26
> Index: https://www.symcon.de/en/llms.txt
Source: https://www.symcon.de/en/service/documentation/module-reference/devices/winlirc/
Using infrared signals allows an inexpensive and easy integration of existing audio and video equipment into home automation. Moreover, e.g. light scenarios using the infrared remote control can be activated or blinds can be lowered. For this, in principle, only one transmitter and receiver diode is necessary - as you want as a finished device or for crafting ...
Find out more about WinLIRC:
[https://winlirc.sourceforge.net](https://winlirc.sourceforge.net)
For those who like to pick up once again the soldering iron, find more information here:
[https://www.lirc.org/receivers.html](https://www.lirc.org/receivers.html)
[https://www.lirc.org/transmitters.html](https://www.lirc.org/transmitters.html)
### Installation
To receive/send IR signals via IP Symcon, you need a LIRC compatible device.
* WinLIRC Applikation must be installed and running
* Download: [winlirc.sourceforge.net/de/](https://winlirc.sourceforge.net/de/)
* Remote control/buttons must be trained in the WinLIRC application
* Create WinLIRC module in IP-Symcon.
* Host: localhost
* Port: 8765
### Use in IP Symcon
The WinLIRC module providess itself in the object tree as follows:

A successful installation can be seen at the open socket.

To output IR commands from IP-Symcon, the WinLIRC_SendOnce function is used.
```php
$id = 18076 /*[Media IR\WinLIRC]*/;
// Turn on ZDF
WinLIRC_SendOnce($id, "humax", "power");
IPS_Sleep(1000);
WinLIRC_SendOnce($id, "humax", "power");
IPS_Sleep(200);
WinLIRC_SendOnce($id, "sat", "power");
// here is still place for lighting commands...
```
## WinLIRC_SendOnce
Source: https://www.symcon.de/en/service/documentation/module-reference/devices/winlirc/winlirc-sendonce/
`bool WinLIRC_SendOnce(int $InstanceID, string $RemoteControl, string $Button)`
**Parameters**
- `$InstanceID` (int): ID of the device to be switched
- `$RemoteControl` (string): Name of the remote control, which is/ was registered in the remote database.
- `$Button` (string): Name of the remote control function, which is/ was registered in the remote database.
**Returns** (bool): If the command succeeds, it returns __TRUE__, otherwise __FALSE__.
Name of the remote control function, which is/ was registered in the remote database.
**Example**
```php
WinLIRC_SendOnce(37279,"soundmaster", "power");
```
---
# Wireless M-Bus
> Symcon documentation · English · generated on 2026-09-26
> Index: https://www.symcon.de/en/llms.txt
Source: https://www.symcon.de/en/service/documentation/module-reference/devices/wireless-m-bus/
Wireless M-Bus is a protocol standardized by the OMS Group for recording consumption data. A LAN, serial or USB gateway is required to connect to IP-Symcon.
> **Note:** The following devices are supported by IP-Symcon:
>
> [Supported devices](https://www.symcon.de/en/llms/modules/wireless-m-bus.md)
### Installation
The __Wireless M-Bus LAN Gateway__ is connected to the PC via LAN. DHCP and port 5000 are set up by default. If an individual IP address is required, the IP-Symcon "Network Configuration Tool" is needed. This is available for [Download](https://support.symcon.de/lan-gct). A simple [Description for configuring the gateway](https://www.symcon.de/assets/files/service/NetworkConfigurationTool.pdf) is available. The gateway can then be accessed via the configured IP address and port.
### Integration in IP-Symcon
The LAN gateway can be integrated via the [device search](https://www.symcon.de/en/llms/components/management-console.md). To do this, "Wireless M-Bus Discovery" must be selected as the system. The Discovery instance then offers the creation of a Wireless M-Bus [Configurator](https://www.symcon.de/en/llms/concepts.md). Once the configurator has been created, all received devices that are integrated are shown.
### Configurator
The configurator displays all received devices in the public information. Information such as manufacturer, device type, encryption and the last received date are displayed in the respective columns. The received raw data can be viewed in the Data column so that it can be sent to Symcon Support if necessary.

New instances are created in the object tree in the main category. These created instances can then be renamed accordingly and sorted elsewhere. It is also possible to call up the respective instance configuration via "Configure" in the configurator.
### Configuration
The device key can be entered on the configuration page of the device. This must consist of 32 characters and may only contain capital letters/numbers without spaces. Alternatively, key lists can also be imported into the Wireless M-Bus Gateway instance, which are then used directly by the instance.
### Configuration
Key lists can be imported into the Wireless M-Bus Gateway instance so that they are available to the Symcon system more quickly and automatically. The following formats are supported:
```
012345678;00000000000000000000000000000000 (Address;Key)
012345678;TESTTEST;00000000000000000000000000000000 (Any other columns)
SOX;012345678;00000000000000000000000000000000 (Any other columns)
012345678;00 00 00 00 00 00 00 00 00 00 00 00 00 00 00 00 00 (Spaces may appear anywhere in the key)
012345678,00000000000000000000000000000000 (Comma and semicolon are permitted as separators)
0SOX012345678;00000000000000000000000000000000 (Address in DIN format)
```
Support for the OMS SecProfile A format is planned.
## Device list
Source: https://www.symcon.de/en/service/documentation/module-reference/devices/wireless-m-bus/device-list/
### Supported Gateways
The following wireless M-Bus gateways are compatible:
| Manufacturer | Description |
| ------------------------------------------------------------------------------------ | ------------------------------------------- |
| SymBox with Wireless M-Bus extension [Order now](https://www.symcon.de/en/product/symbox/) | Serial integrated module |
| Wireless M-Bus LAN Gateway [Order now](https://www.symcon.de/en/shop/gateways/) | IP Gateway |
| Würth Elektronik 2605056083001 | METIS I, USB, AMB8465-M, integrated antenna |
| Würth Elektronik 2607056283001 | METIS II, USB, AMB8665-M, external antenna |
| IMST iU891A-XL | New model with external antenna |
| IMST iM871-A | Old model |
| WEPTECH SWAN2 | Over HTTP/HTTPS |
| WEPTECH SWAN3 | Over HTTP/HTTPS |
### Supported components
IP-Symcon supports the following encryption modes according to DIN EN 13757-7
- Mode 0 (no encryption)
- Mode 5 (OMS)
- Mode 7 (BSI)
IP-Symcon supports the following encryption modes according to DIN EN 13757-4
- AES-128-CTR
IP-Symcon supports the frame format A/B and the receive mode C/T. In addition, the somewhat more specialized Compact Frames, which are often used by Kamstrup devices, are supported.
---
# WMRS200
> Symcon documentation · English · generated on 2026-09-26
> Index: https://www.symcon.de/en/llms.txt
Source: https://www.symcon.de/en/service/documentation/module-reference/devices/wmrs200/
WMRS200 is a weather station system and uses radio-based sensor components. A connection to IP-Symcon is possible via a USB gateway.
> **Note:** The following devices are supported by IP-Symcon:
>
> [Supported components](https://www.symcon.de/en/llms/modules/wmrs200.md)
### Installation
A properly connected USB communication-hub is required for operation with IP-Symcon.
### Integration in IP-Symcon
In the object tree, WMRS can be searched for via "+" -> "Add instance" or by right-clicking -> "Add object" -> Instance in the dialog that appears. The individual devices are available for selection.
Gateway and I/O instances are created automatically and all that needs to be done is selecting the correct USB connection in the gateway and the device type in the instance as well as entering the appropriate device ID. The device ID can be entered via the "Search" function within the instance configuration.
## Device list
Source: https://www.symcon.de/en/service/documentation/module-reference/devices/wmrs200/device-list/
### Supported Gateways
| Gateways | Manufacturer | Connection type | Description |
| --------------------- | ----------------- | --------------- | --------------------------------------------- |
| USB communication hub | Oregon Scientific | Serial/ USB | USB interface from the weather station bundle |
### Supported Components
| Component | Manufacturer | Connection type | Description |
| --------------------- | ----------------- | --------------- | ------------------------------------------------- |
| Wind sensor | Oregon Scientific | Wireless | From bundle of the weather station |
| Rain sensor | Oregon Scientific | Wireless | From bundle of the weather station |
| Air pressure sensor | Oregon Scientific | Wireless | From bundle of the weather station |
| Temperature/ Humidity | Oregon Scientific | Wireless | From bundle of the weather station |
| THGR800 | Oregon Scientific | Wireless | Thermo-Hygro (3-channel) - Temperature/ Humidity |
| THGR810 | Oregon Scientific | Wireless | Thermo-Hygro (10-channel) - Temperature/ Humidity |
| UVN800 | Oregon Scientific | Wireless | Pyranometer - Remote-UV-Sensor |
---
# W&T
> Symcon documentation · English · generated on 2026-09-26
> Index: https://www.symcon.de/en/llms.txt
Source: https://www.symcon.de/en/service/documentation/module-reference/devices/wut/
The W&T Web-IO Digital Boxes allow access via a variety of protocols and applications via a TCP/IP Ethernet 10/100BaseT interface.
### Installation
A properly connected Web-IO and a DHCP server are required for operation with IP-Symcon. (The DHCP server automatically assigns the addresses for the network participants)
Initial configuration options and setting options (e.g. reassignment of the IP address) are possible using the __Wutility-Software__. If this is not available, it can be downloaded from [www.wut.de](https://www.wut.de/e-wwwww-ww-hpus-000.php) . After installing the software, the Web-IO can be recognized and used.
> **Note:** If no DHCP server is available, the IP address can also be configured with the Wutility-Software

The configuration web page of the Web-IO can be called up in the browser by entering the IP. Initial settings, especially for test purposes, are possible here.
### Integration in IP-Symcon

A function corresponding to the connected devices must be selected in IP-Symcon from counter, input and output. If several channels of the device are to be integrated, the step in the instructions can be repeated as often as necessary. Now, “Next” must be clicked on twice and “OK” once. For example, the configuration of the "WuT Output" opens. Settings for the channel of the device are possible here. The exact assignment of the channels can be found in the instructions for the W&T device.
The IP address of the Web-IO must then be entered on the configuration page. This can be opened by clicking on the cogwheel (bottom left).

> **Note:** A password is optional. The factory settings do not include a password.
The timer must be activated so that IP-Symcon receives new data from the Web-IO within a manually entered time and a change becomes visible.
(The described configuration of the Wut Gateway is only necessary for the first installation. This step can be skipped when adding more devices.)
## WUT_SwitchMode
Source: https://www.symcon.de/en/service/documentation/module-reference/devices/wut/wut-switchmode/
`bool WUT_SwitchMode(int $InstanceID, bool $Status)`
**Parameters**
- `$InstanceID` (int): ID of the device to be switched
- `$Status` (bool): __TRUE__ for On, __FALSE__ for Off
**Returns** (bool): If the command succeeds, it returns __TRUE__, otherwise __FALSE__.
__TRUE__ for On, __FALSE__ for Off
**Example**
```php
WUT_SwitchMode(12345, true); //Turn on channel
```
---
# XBee
> Symcon documentation · English · generated on 2026-09-26
> Index: https://www.symcon.de/en/llms.txt
Source: https://www.symcon.de/en/service/documentation/module-reference/devices/xbee/
XBee is a module based on the ZigBee radio standard. It allows to serve as a radio bridge for hardwired systems.
### Installation
To connect to IP-Symcon, an XBee coordinator (gateway) is required, which is connected via serial or serial USB.
### Integration in IP-Symcon
The XBee gateway (coordinator) is integrated into IP-Symcon via serial port.
An XBee Splitter instance must be created for each end device. This only contains the device ID for communication within XBee.
For the end-device gateways, the XBee splitter instances serve as a replacement parent instance. (See ["Example object tree"](https://www.symcon.de/en/llms/modules/xbee.md) )
### Example
#### Data Flow
For a better understanding the abstract representation of the data flow can be seen here.

#### Example object tree
In this example, a Z-Wave gateway and a register variable are connected to a coordinator.
XBee uses the DeviceID to ensure that the data from the register variable is made available in the associated script as [System variables](https://www.symcon.de/en/llms/concepts/automations.md), as well as that the Z-Wave device data via the Z-Wave Gateway (parent instance: XBee Splitter Z-Wave) is updated.

In the contemporary example, this results in the following topology:
```php
Serial Port -> XBee Gateway -> XBee Splitter Z-Wave -> Z-Wave Gateway -> Z-Wave Dimmer
|
-> XBee Splitter RegVar -> Register Variable -> RegVarScript (System variable)
```
## XBee_SendBuffer
Source: https://www.symcon.de/en/service/documentation/module-reference/devices/xbee/xbee-sendbuffer/
`bool XBee_SendBuffer(int $InstanceID, int $TargetDevice, string $Buffer)`
sends a data string to a specific device
**Parameters**
- `$InstanceID` (int): ID of the device to query
- `$TargetDevice` (int): ID of the target device
- `$Buffer` (string): Data buffer to be sent
**Returns** (bool): If the command succeeds, it returns __TRUE__, otherwise __FALSE__.
Data buffer to be sent
**Example**
```php
XBee_SendBuffer(12345, 2, "Any DataString");
```
## XBee_SendCommand
Source: https://www.symcon.de/en/service/documentation/module-reference/devices/xbee/xbee-sendcommand/
`bool XBee_SendCommand(int $InstanceID, string $Command)`
sends a command to a specific XBee-Splitter
**Parameters**
- `$InstanceID` (int): ID of the device to be modified
- `$Command` (string): Command to be sent
**Returns** (bool): If the command succeeds, it returns __TRUE__, otherwise __FALSE__.
Command to be sent
**Example**
```php
XBee_SendCommand(12345, "Any CommandString");
```
---
# Eaton xComfort
> Symcon documentation · English · generated on 2026-09-26
> Index: https://www.symcon.de/en/llms.txt
Source: https://www.symcon.de/en/service/documentation/module-reference/devices/xcomfort/
Eaton xComfort is a bidirectional radio-based system. To enable a setup in Symcon the configuration file of the installation or the programming interface (CRSZ-00/01) is required. The connection to Symcon is established with the communication interface CKOZ-00/03 or an Eaton USB or LAN gateway.
> **Note:** The following devices are supported by Symcon:
>
> [Supported devices](https://www.symcon.de/en/llms/modules/xcomfort.md)
### Installation
For connection to Symcon, Eaton (formerly Moeller) uses the __xComfort communication interface (CKOZ-00/03)__.
For programming the system in Eaton Comfort mode, the Eaton __xComfort programming interface (CRSZ-00/01)__ is used.
Alternatively, it is also possible to connect an Eaton USB gateway or a LAN gateway for connection to Symcon.
The Eaton xComfort wireless system can be used to automatically control the monitoring of windows, air conditioning and lighting systems as well as many other building functions. The system can be retrofitted without the need to lay new cables. It is a bidirectional system, i.e. all sensors and actuators (switches) can communicate with each other, as they each contain a transmitter and a receiver unit.
### Video tutorial for setup
[Video](https://www.youtube.com/embed/VC8fYf9LB-g?rel=0&cc_load_policy=1)
### port
In order to be able to connect the Eaton Xcomfort system with Symcon, a corresponding gateway is required. In this example this is the communication interface CKOZ-00/03. The programming interface CRZ-00/01 for the Comfort mode is not suitable for this, but is also needed, because it is needed for programming the system in Comfort mode from Eaton.
> **Warning:** When using the RS232 port, please note that additional power must be supplied via the USB port. This is possible via a suitable adapter (230V->USB)
The programming interface CRZ-00/01 can also be connected via the USB interface (optional cable: RS232->USB) or via the RS232 port.
### Installation
After the correct connection of the device(s), "Control Panel -> Hardware and Sounds -> Devices and Printers" must be opened. There you have to look for "Prolific USB-to-Serial Comm Port". The used port (e.g.: COM4) can be found in the brackets behind it, this should be noted or remembered.
The [Eaton Firmware / MRF Software](https://www.eaton.com/content/dam/eaton/products/residential/xcomfort/software/setup-mrf-de.exe) must be downloaded and installed. After starting the software, click on "Edit -> Options", select the correct port (e.g. COM4) and activate the appropriate options.

In the upper tab you can now click on "Gateway -> Read in". The system can now be programmed in comfort mode.
### Add secondary devices
With the Eaton firmware, secondary devices from the Eaton company (e.g. intermediate plugs, room controllers, remote control, etc.) can now be integrated into the system.
This can be done in the upper tab via "Actions -> 2x Read".
Now the system will first search for the mains powered devices. If necessary, you have to go near the secondary devices for scanning, if they are not in the immediate reception area.

When all mains-powered devices have been read in, "Continue to battery-powered devices" must be clicked. The battery-powered devices must now be activated so that a connection to the gateway can be established. After this has been done, "Exit" must be clicked. Now a password entry is requested. It should be entered as __password "0000"__ and confirmed.
In the upper tab "Actions" you should then click on "Read reception quality..." and then again on "Read".
> **Note:** If devices with question marks are still displayed, but all secondary devices are already assigned to another symbol, they can be deleted. This can be done by right-clicking on the symbol to be deleted and then left-clicking on "Remove". The following dialog must be confirmed with "Yes" and then "No".
> Renaming is also possible with a click on the right mouse button and then on "Rename"
Now the devices are displayed in the Eaton firmware. Now the pencil symbol must be clicked on and the devices connected to the gateway via virtual pencil. After that you have to click on "Load changes" under "Actions".
So that Symcon later knows what is on data point 1 or on data point 2, for example, the right mouse button must be clicked on the gateway and then the left mouse button must be clicked on "Create data point list". This must be saved. Finally, the entire project must be saved. The Eaton firmware is no longer required.

### Integration in Symcon
In the management console, an ‘xComfort Configurator’ can be created in the object tree via ‘Add object -> Instance’. After selecting the mode appropriate for the gateway used, the connection to the gateway is configured.
Depending on the mode, an IP address must be entered, the Comport selected, or the appropriate USB device chosen, and the I/O activated. Finally, after confirming the dialogue, the configurator will open. Use the ‘Data point list’ file selection to upload the previously saved data point lists. Once the changes have been applied, the devices can be created.
> **Note:** To receive routable feedback, the data point list must have been loaded in the configurator. This is the only way to assign a serial number to a data point number


### tips & tricks
* New versions of the firmware/MRF software can be downloaded here:
[Eaton Downloads](https://www.eaton.com/content/dam/eaton/products/residential/xcomfort/software/setup-mrf-de.exe)
* The gateway is compatible with all common USB->LAN converters (e.g. from Silex, Lantronix).
* Status variables are not routed by the Eaton Xcomfort system. This means that the gateway must be positioned in a place that all relevant devices are within range.
* Several gateways can be used simultaneously in Symcon and commands can also be forwarded via scripts. So it is common to place one gateway per floor.
* Only from RF version __9.2__ (approx. July/2008) the "Acknowledges" sent on the protocol level are evaluated by the USB gateway. In the previous versions it is not recognizable in the system whether a command has been successfully transmitted to a device. The RF version is a hardware upgrade and must not be confused with the FW version, which can be updated via software. (Concerns only PC Manager CKOZ-00/03)
* The new thermostat requires an ECI LAN gateway or a USB gateway with at least firmware 2.6 and RF version 9.2. If the device is too old, the following error messages may appear in the message window: "Invalid RF-firmware revision"
* The port for the ClientSocket configuration from the ECI is 7153
## Device list
Source: https://www.symcon.de/en/service/documentation/module-reference/devices/xcomfort/device-list/
### Supported Interfaces
| Product | Description |
| ---------- | ------------------------------------------- |
| CCIA-01/01 | Eaton ECI WLAN Interface |
| CCIA-02/01 | Eaton ECI LAN Interface |
| CCIA-03/01 | Eaton ECI LAN Interface Power over Ethernet |
| CKOZ-00/03 | Communication interface (USB/RS232) |
| CKOZ-00/11 | Communication interface (USB/RS232) |
| CKOZ-00/14 | USB communication stick |
### Supported Components
| Product | Description |
| ----------------------------- | ----------------------------------------- |
| CAAE* | Analog actuator |
| CAEE* | Analog input |
| CBEU* | Binary input |
| CBMA* | Motion detector |
| CDAE* | Dimming actuator |
| CDAE* | Switch actuator |
| CDAP* | Switch/Dim actuator |
| CDAU* | Dimming actuator |
| CDWA*(since version 5.4) | Window/door contact |
| CEMU* | Energy measurement sensor |
| CHAP* | Heating actuator |
| CHAU* | Heating actuator |
| CHAZ* | Heating actuator for electric panels |
| CHAZ* | Heating actuator 12-fold |
| CHSZ* | Remote controls |
| CHVZ* | Radiator valve |
| CIZE* | Pulse counting input |
| CJAU* | Blind actuator |
| CJAE* | Blind actuator plug-in type |
| CRCA* | Room controller |
| CRMA* | Room-Manager |
| CROU* | Router |
| CSAE* | Switch actuator |
| CSAP* | Switch actuator |
| CSAU* | Switch actuator |
| CSEZ* | Window contact (via binary input) |
| CSEZ* | Humidity sensor (via analog input) |
| CSEZ* | Brightness sensor (via analog input) |
| CSEZ* | Air quality sensor (via analog input) |
| CSEZ* | Presence detector (via binary input) |
| CSEZ* | Smoke detector (via binary input) |
| CSEZ* | Temperature sensor |
| CSEZ* | Water leakage sensor (via binary sensor) |
| CSGZ* | Signal generator (via switching actuator) |
| CTAA* | Pushbutton |
| CTEU* | Temperature input |
## MXC_DimBrighter
Source: https://www.symcon.de/en/service/documentation/module-reference/devices/xcomfort/mxc-dimbrighter/
`bool MXC_DimBrighter(int $InstanceID)`
starts dimming to a brighter level
**Parameters**
- `$InstanceID` (int): ID of the device to be switched
**Returns** (bool): If the command succeeds, it returns __TRUE__, otherwise __FALSE__.
ID of the device to be switched
**Example**
```php
MXC_DimBrigther(12345); //Dim brighter
IPS_Sleep(1000): //Wait 1 sec
MXC_DimStop(12345);
```
## MXC_DimDarker
Source: https://www.symcon.de/en/service/documentation/module-reference/devices/xcomfort/mxc-dimdarker/
`bool MXC_DimDarker(int $InstanceID)`
starts dimming to a darker level
**Parameters**
- `$InstanceID` (int): ID of the device to be switched
**Returns** (bool): If the command succeeds, it returns __TRUE__, otherwise __FALSE__.
ID of the device to be switched
**Example**
```php
MXC_DimDarker(12345); //Dim darker
IPS_Sleep(1000);
MXC_DimStop(12345);
```
## MXC_DimSet
Source: https://www.symcon.de/en/service/documentation/module-reference/devices/xcomfort/mxc-dimset/
`bool MXC_DimSet(int $InstanceID, int $Intensity)`
dims an xComfort device to a specific level
**Parameters**
- `$InstanceID` (int): ID of the device to be switched
- `$Intensity` (int): Value from 0-100 (in %)
**Returns** (bool): If the command succeeds, it returns __TRUE__, otherwise __FALSE__.
Value from 0-100 (in %)
**Example**
```php
MXC_DimSet(12345, 50); //Dimming to 50%
```
## MXC_DimStop
Source: https://www.symcon.de/en/service/documentation/module-reference/devices/xcomfort/mxc-dimstop/
`bool MXC_DimStop(int $InstanceID)`
stops a dimming process
**Parameters**
- `$InstanceID` (int): ID of the device to be switched
**Returns** (bool): If the command succeeds, it returns __TRUE__, otherwise __FALSE__.
ID of the device to be switched
**Example**
```php
MXC_DimStop(12345, true); //Turn on device
```
## MXC_RequestStatus
Source: https://www.symcon.de/en/service/documentation/module-reference/devices/xcomfort/mxc-requeststatus/
`bool MXC_RequestStatus(int $InstanceID)`
sends a status request to a device
**Parameters**
- `$InstanceID` (int): ID of the device
**Returns** (bool): If the command succeeds, it returns __TRUE__, otherwise __FALSE__.
ID of the device
**Example**
```php
MXC_RequestStatus(12345); //Request a status report
```
## MXC_SendBoolean
Source: https://www.symcon.de/en/service/documentation/module-reference/devices/xcomfort/mxc-sendboolean/
`bool MXC_SendBoolean(int $InstanceID, bool $Value)`
**Parameters**
- `$InstanceID` (int): ID of the device to be switched
- `$Value` (bool): True for On, False for Off
**Returns** (bool): If the command succeeds, it returns __TRUE__, otherwise __FALSE__.
True for On, False for Off
**Example**
```php
MXC_SendBoolean(12345, true);
```
## MXC_SendFloat
Source: https://www.symcon.de/en/service/documentation/module-reference/devices/xcomfort/mxc-sendfloat/
`bool MXC_SendFloat(int $InstanceID, float $Value)`
**Parameters**
- `$InstanceID` (int): ID of the device to be switched
- `$Value` (float): Number with decimal places
**Returns** (bool): If the command succeeds, it returns __TRUE__, otherwise __FALSE__.
Number with decimal places
**Example**
```php
MXC_SendFloat(12345, 35.34); //Send 35.34 as value
```
## MXC_SendInteger
Source: https://www.symcon.de/en/service/documentation/module-reference/devices/xcomfort/mxc-sendinteger/
`bool MXC_SendInteger(int $InstanceID, int $Value)`
**Parameters**
- `$InstanceID` (int): ID of the device to be switched
- `$Value` (int): Number without decimal places
**Returns** (bool): If the command succeeds, it returns __TRUE__, otherwise __FALSE__.
Number without decimal places
**Example**
```php
MXC_SendInteger(12345, 40); //Send value 40
```
## MXC_SetTemperature
Source: https://www.symcon.de/en/service/documentation/module-reference/devices/xcomfort/mxc-settemperature/
`bool MXC_SetTemperature(int $InstanceID, float $Temperature)`
**Parameters**
- `$InstanceID` (int): ID of the device to be switched
- `$Temperature` (float): Temperature in °C
**Returns** (bool): If the command succeeds, it returns __TRUE__, otherwise __FALSE__.
Temperature in °C
**Example**
```php
MXC_SetTemperature(12345, 21.5); //Set to 21.5 ° C
```
## MXC_ShutterMoveDown
Source: https://www.symcon.de/en/service/documentation/module-reference/devices/xcomfort/mxc-shuttermovedown/
`bool MXC_ShutterMoveDown(int $InstanceID)`
moves the shutter down to the end position/stop
**Parameters**
- `$InstanceID` (int): ID of the device to be switched
**Returns** (bool): If the command succeeds, it returns __TRUE__, otherwise __FALSE__.
ID of the device to be switched
**Example**
```php
MXC_ShutterMoveDown(12345); //Move downwards
```
## MXC_ShutterMoveUp
Source: https://www.symcon.de/en/service/documentation/module-reference/devices/xcomfort/mxc-shuttermoveup/
`bool MXC_ShutterMoveUp(int $InstanceID)`
moves the shutter up to the end position/stop
**Parameters**
- `$InstanceID` (int): ID of the device to be switched
**Returns** (bool): If the command succeeds, it returns __TRUE__, otherwise __FALSE__.
ID of the device to be switched
**Example**
```php
MXC_ShutterMoveUp(12345); //Move upwards
```
## MXC_ShutterStepDown
Source: https://www.symcon.de/en/service/documentation/module-reference/devices/xcomfort/mxc-shutterstepdown/
`bool MXC_ShutterStepDown(int $InstanceID)`
moves the shutter down a step
**Parameters**
- `$InstanceID` (int): ID of the device to be switched
**Returns** (bool): If the command succeeds, it returns __TRUE__, otherwise __FALSE__.
ID of the device to be switched
**Example**
```php
MXC_ShutterStepDown(12345); //Move one step down
```
## MXC_ShutterStepUp
Source: https://www.symcon.de/en/service/documentation/module-reference/devices/xcomfort/mxc-shutterstepup/
`bool MXC_ShutterStepUp(int $InstanceID)`
moves the shutter up a step
**Parameters**
- `$InstanceID` (int): ID of the device to be switched
**Returns** (bool): If the command succeeds, it returns __TRUE__, otherwise __FALSE__.
ID of the device to be switched
**Example**
```php
MXC_ShutterStepUp(12345); //Move one setp up
```
## MXC_ShutterStop
Source: https://www.symcon.de/en/service/documentation/module-reference/devices/xcomfort/mxc-shutterstop/
`bool MXC_ShutterStop(int $InstanceID)`
stops a movement
**Parameters**
- `$InstanceID` (int): ID of the device to be switched
**Returns** (bool): If the command succeeds, it returns __TRUE__, otherwise __FALSE__.
ID of the device to be switched
**Example**
```php
MXC_ShutterStop(12345); //Stop
```
## MXC_SwitchMode
Source: https://www.symcon.de/en/service/documentation/module-reference/devices/xcomfort/mxc-switchmode/
`bool MXC_SwitchMode(int $InstanceID, bool $Status)`
switches an xComfort device on/off
**Parameters**
- `$InstanceID` (int): ID of the device to be switched
- `$Status` (bool): __TRUE__ for On, __FALSE__ for Off
**Returns** (bool): If the command succeeds, it returns __TRUE__, otherwise __FALSE__.
__TRUE__ for On, __FALSE__ for Off
**Example**
```php
MXC_SwitchMode(12345, true); //Turn on device
```
---
# Z-Wave
> Symcon documentation · English · generated on 2026-09-26
> Index: https://www.symcon.de/en/llms.txt
Source: https://www.symcon.de/en/service/documentation/module-reference/devices/z-wave/
Z-Wave is a wireless system used by several manufacturers. Either a [LAN or USB gateway](https://www.symcon.de/en/llms/modules/z-wave.md) is required to connect to IP-Symcon.
> **Note:** The following devices are supported by IP-Symcon:
>
> [__Supported devices__](https://www.symcon.de/en/llms/modules/z-wave.md)
### Integration in IP-Symcon
When using the LAN gateway, this can be integrated via the [Device Search](https://www.symcon.de/en/llms/components/management-console.md). For this purpose, "Z-Wave Discovery" must be selected as the system. The Discovery instance then offers to create a Z-Wave [configurator](https://www.symcon.de/en/llms/concepts.md). After the configurator has been created, the individual devices can be integrated there as described below.
If a Z-Wave Configurator is to be created manually, "Z-Wave Configurator" can be searched for in the "Add instance" dialog.
After setting up a Z-Wave configurator, the next step is to teach-in devices.
> **Warning:** Care must be taken to select the [matching gateway](https://www.symcon.de/en/llms/modules/z-wave.md) , the matching client socket (default port: 5000) or Serial Port is set up and configured
This is done within the configurator by pressing the "Add device" key and then pressing the teach-in key of the device at least three times in quick succession.
IP-Symcon automatically finds the device and shows this green in the list.
When this is selected and the "Create" button is pressed, IP-Symcon creates an instance of the device, which can then be configured.
The configuration window of the instance can be opened via "Configure" in the Z-Wave Configurator or in the object tree by double-clicking on the instance.
The properties ([Command classes see device list](https://www.symcon.de/en/llms/modules/z-wave.md) ) of the device can be displayed under "Show" after "Loading". Status variables are added automatically and can be checked in the object tree.
> **Note:** To grant IP-Symcon access to certain functions (e.g. Z-Wave device database) from the outside it may be necessary to set them up in the firewall. Further information can be found under [Firewall](https://www.symcon.de/en/llms/getting-started.md).
### Setup Video-Tutoria[Video](https://www.youtube.com/embed/7jFMxEpCGxU?rel=0&cc_load_policy=1)
### Special equipment - Setup
[link to forum post](https://community.symcon.de/t/einrichtung-und-beschreibung-von-z-wave-geraeten/19688)
## Device list
Source: https://www.symcon.de/en/service/documentation/module-reference/devices/z-wave/device-list/
### Supported Gateways
| Product | Description |
| ------------------------------------------------------------------------------------------------------------------- | ----------------------------------- |
| Symcon Z-Wave-Plus LAN Gateway | [Product information](https://www.symcon.de/assets/files/product/z-wave-lan-gateway.pdf) | IP Gateway |
| 300ZW-US-W | TrickleStar USB Stick |
| AEO_USB | USB stick from Aeon Labs |
| ZW090 | USB Z-Stick from Aeotec |
| RaZberry | Z-Wave Transceiver for Rasperrry PI |
| VIS_ZU1401 | Vision USB stick |
| ZME_Serial | Serial adapter plate |
| ZME_UZB1 | USB stick |
| ZME_ZSTICKC | Z-Wave.Me USB stick |
### Devices
All listed command classes are supported by IP-Symcon. In addition, we offer a list of devices which have been successfully tested by us or our customers.
On [request](https://www.symcon.de/en/contact-us/) we will be happy to check other devices that are not listed for their compatibility.
### Supported Command Classes
Each Z-Wave device has different Command classes. These classes indicate which functions are supported by the respective device. In IP-Symcon, all functions are available with the following listed command classes.
| Command Class | Class Version | IP-Symcon Version |
| -------------------------- | ------------- | ------------------------- |
| ALARM | ------------- | Replaced by NOTIFICATION |
| ASSOCIATION | 2 | |
| ASSOCIATION_GRP_INFO | 2 | since 5.1 |
| BASIC | 2 | |
| BASIC_WINDOW_COVERING | 1 | |
| BATTERY | 1 | |
| CENTRAL_SCENE | 1 | since 4.1 |
| CLOCK | 1 | |
| COLOR | 1 | since 4.1 |
| CONFIGURATION | 1 | |
| CRC_16 | 1 | |
| DOOR_LOCK | 2 | since 4.1 |
| LOCK | 2 | |
| MANUFACTURER_SPECIFIC | 2 | |
| METER | 5 | |
| MULTI_CHANNEL | 4 | |
| MULTI_CHANNEL_ASSOCIATION | 3 | since 5.1 |
| MULTI_CMD | 1 | |
| MULTI_INSTANCE | ------------- | Replaced by MULTI_CHANNEL |
| NOTIFICATION | 8 | since 4.3 |
| PROTECTION | 2 | |
| SCENE_ACTIVATION | 1 | since 4.1 |
| SECURITY | 1 | since 4.1 |
| SENSOR_ALARM | 1 | |
| SENSOR_BINARY | 2 | |
| SENSOR_MULTILEVEL | 11 | |
| SWITCH_ALL | 1 | since 4.1 |
| SWITCH_BINARY | 2 | |
| SWITCH_MULTILEVEL | 4 | |
| SWITCH_SHUTTER | 1 | |
| THERMOSTAT_FAN_MODE | 1 | |
| THERMOSTAT_FAN_STATE | 1 | |
| THERMOSTAT_MODE | 1 | |
| THERMOSTAT_OPERATING_STATE | 1 | |
| THERMOSTAT_SETPOINT | 1 | |
| TIME | 2 | since 4.1 |
| USER_CODE | 1 | since 4.1 |
| Unknown | 1 | |
| VERSION | 2 | |
| WAKE_UP | 2 | |
| ZWAVEPLUS_INFO | 2 | since 5.1 |
### Tested components
sorted by alphabet
#### ACT
| Product | Description |
| ------- | -------------------------------- |
| ZRM230 | Wall Switch/Transmitter (2-gang) |
| ZTM230 | RF Wall Transmitter (2-gang) |
#### Aeon Labs
| Product | Description |
| -------------- | ------------------------- |
| AEO_DSC20-EU | Door/Window Sensor |
| AEO_DSB54 | Recessed Door Sensor |
| AEO_DSD31 | Siren |
| AEO_EXTENDER | Extender |
| AEO-HEM2, HEM3 | Clamp Meter 40 |
| AEO_KFOB | Key Fob |
| AEO-MEI | Micro Dimmer |
| AEO-MES | Micro Switch |
| AEO-MSEI | Micro Smart Energy Dimmer |
| AEO-MSES | Micro Smart Energy Switch |
| AEO_MULTISENS | Multisensor |
| AEO-SES3 | Smart Energy Switch 3 |
| AEO_ZW088 | Key Fob Gen 5 |
| AEO_ZW089 | Recessed Doorsensor |
| DSD31 | Outlet Plugable Siren |
#### AeoTec
| Product | Description |
| ------- | -------------------------------------------- |
| ZW078 | Heavy Duty Smart Switch |
| ZW080 | Siren 5 |
| ZW095 | Home Energy Meter |
| ZW096 | Smart Switch 6 |
| ZW100 | MultiSensor 6 |
| ZW111 | Nano Dimmer |
| ZW112 | Door/Window Sensor 6 |
| ZW116 | Nano Switch with Power Metering |
| ZW117 | Range Extender 6 |
| ZW120 | Door/Window Sensor Gen5 with Tamper Sensor |
| ZW121 | LED Strip |
| ZW122 | Water Sensor 6 |
| ZW129 | WallMote |
| ZW130 | WallMote Quad |
| ZW132 | Dual Nano Switch with Power Metering |
| ZW139 | Nano Switch |
| ZW140 | Dual Nano Switch |
| ZW141 | Nano Shutter |
| ZW158 | WallSwipe |
| ZW160 | Water Sensor 6 Dock |
| ZW162 | Doorbell 6 |
| ZW166 | Button |
| ZW164 | Siren 6 |
| ZW175 | Smart Switch 7 |
| ZW189 | Range Extender 7 |
| ZWA001 | LED Bulb 6 Multi-White |
| ZWA002 | LED Bulb 6 Multi-Colour |
| ZWA003 | NanoMote Quad |
| ZWA004 | NanoMote One |
| ZWA005 | TriSensor |
| ZWA006 | Smart Boost Timer Switch |
| ZWA008 | Door/Window Sensor 7 |
#### Danfoss
| Product | Description |
| ----------------------- | ------------------------- |
| DAN_LC-13 (014G0013) | Thermostat Radiator Valve |
| DAN_LIVC_RAK (014G0012) | Thermostat Radiator Valve |
#### Everspring
| Product | Description |
| --------- | --------------------------------- |
| EVR_AD142 | Dimmer Plug |
| EVR_AN145 | Screw-In Lamp Holder |
| EVR_AN157 | On/Off Plug |
| EVR_AN158 | On/Off Plug with power meter |
| EVR_HSM02 | Door/Window Detector |
| EVR_HSP02 | Motion Detector |
| EVR_SE812 | Siren |
| EVR_SF812 | Smoke Detector with Alarm |
| EVR_SP103 | Motion Sensor |
| EVR_SP814 | Motion Detector |
| EVR_ST812 | Flood Sensor |
| EVR_ST814 | Temperature & Humidity Sensor |
#### Fibaro
| Product | Description |
| ---------------------------------- | ----------------------- |
| FGBS-001 | Universal Binary Sensor |
| FGD-211 | Universal Dimmer |
| FGFS-101 | Flood Sensor |
| FGK 101-107 Door/Window Sensor 2.5 | Door/Window Sensor |
| FGK-001 | Door/Window Sensor |
| FGMS-001 | Motion Sensor |
| FGRGB-101 | RGBW Controller |
| FGRGBWM-441 | RGBW Controller |
| FGRM-222 | Roller Shutter 2 |
| FGS-211 | 1x3KW Relay |
| FGS-221 | 2x1.5KW Relay |
| FGSS-001 | Smoke Sensor |
| FGSS-101 | Smoke Sensor |
| FGWPE/F-101 | Wall Plug |
#### NorthQ
| Product | Description |
| ----------------------------- | ------------------------------ |
| Energy Guard Electrical Meter | Meter (incomplete support) |
| Energy Guard Gas Meter | Gas Meter (incomplete support) |
#### Philio
| Product | Description |
| --------------------------- | -------------------------------------------------------------- |
| In Wall Dual Relay (1 Way) | 230VAC powered static controller with binary switch capability |
| In Wall Dual Relay(1 Way) | In-wall switch module |
| In Wall Dual Relay(1 Way) | In-wall dual relay switch module |
| In Wall Single Relay(1 way) | In-wall switch module |
| PAN04 | 2 x 1.5Kw Relay with Power Measurement |
| PAN06 | 2 x 1.5Kw Relay |
| PAN08 | In-Wall Roller Shutter Controller |
| PAN11-1 | Plugin Switch with meter functionality PAN11-1 |
| PAT02-1A | Flood multisensor (flood, temperature and humidity) |
| PSE02 | Wireless multiple sound siren |
| PSG01 | Smoke Sensor |
| PSM01 | 3-in-1 Sensor (Door, Light, Temp) |
| PSM02 | 4-in-1 Sensor (PIR, Door, Light, Temp) |
| PSM02-1 | PIR, door/window, temperature and illumination Sensor |
| PSP01 | 3-in-1 Sensor (PIR, Light, Temp) |
| PSR03 | Remote |
| PST02 | Slim Multisensor |
#### Polycontrol
| Product | Description |
| --------------- | ---------------- |
| Danalock Circle | Z-Wave Door Lock |
| Danalock Square | Z-Wave Door Lock |
#### Popp
| Product | Description |
| ------------- | ------------------------------ |
| POP_004308 | Smoke Detector and Temp Sensor |
| POP_123610 | Plug-in Switch |
| POP_123658 | Plug-in Switch with Meter |
| POP_123665-58 | Wall Plug Switch/Meter |
| POP_123xxx | On/Off Plug |
| POP_123xxx | Dimmer Plug |
#### Vision
| Product | Description |
| ----------------- | ------------------------------------------------------------- |
| PIR Sensor | PIR Motion Sensor |
| Plugin ON/OFF | Light Relay |
| Power Monitor | Power Monitor |
| VIS_ZD2102EU 2013 | Door Window Sensor with external digital input |
| VIS_ZD3102EU 2013 | Motion detector with Temperature sensor and temper protection |
| VIS_ZG8101 | Garage Door Detector |
| VIS_ZL7432 | In-Wall Dual Relay Switch |
| VIS_ZM1601 | Siren (Battery) |
| VIS_ZM1602 | Siren (Mains) |
| VIS_ZS5102 | Shock & Vibration Sensor |
| VIS_ZS6101 | Smoke Detector |
| VIS_ZS6301 | CO Detector |
#### Zipato
| Product | Description |
| ----------------------- | ----------------------------- |
| Mini Keypad RFID/Z-Wave | Mini Keypad with RFID support |
| RGBW bulb | RGBW Bulb |
#### Z-Wave.ME
| Product | Description |
| ------------------------ | -------------------------------------------------------------- |
| Mini remote control KFOB | Mini remote control 4 buttons Z-Wave KFOB, Version 2 Z-WAVE.ME |
#### Other
| Manufacturer | Product | Description |
| --------------- | -------- | -------------------------------------------------- |
| Express Control | EZMotion | Motion detector, luminosity and temperature sensor |
> **Warning:** The following are the currently definitely unsupported devices
### Non-supported components
sorted by alphabet
#### Merten
| Product | Description |
| ------- | ----------------------------------------------------------------------------- |
| All | Almost all Merten products cannot be addressed via the normal Z-Wave standard |
## ZW_Basic
Source: https://www.symcon.de/en/service/documentation/module-reference/devices/z-wave/zw-basic/
`bool ZW_Basic(int $InstanceID, int $Value)`
**Parameters**
- `$InstanceID` (int): ID of the device
- `$Value` (int): 0..255
**Returns** (bool): If the command succeeds, it returns __TRUE__, otherwise __FALSE__.
0..255
**Example**
```php
ZW_Basic(12345, 255); //z.B. Turn on
```
## ZW_ColorCW
Source: https://www.symcon.de/en/service/documentation/module-reference/devices/z-wave/zw-colorcw/
`bool ZW_ColorCW(int $InstanceID, int $ColdWhite)`
_Requires Symcon >= 5.4_
sets the cold-white channel of a RGBWW Z-Wave device
**Parameters**
- `$InstanceID` (int): Device ID
- `$ColdWhite` (int): ColdWhite intensity from 0..255
**Returns** (bool): If the command succeeds, it returns __TRUE__, otherwise __FALSE__.
ColdWhite intensity from 0..255
**Example**
```php
// Set ColdWhite to 50%
ZW_ColorCW(12345, 128);
```
## ZW_ColorRGB
Source: https://www.symcon.de/en/service/documentation/module-reference/devices/z-wave/zw-colorrgb/
`bool ZW_ColorRGB(int $InstanceID, int $Red, int $Green, int $Blue)`
_Requires Symcon >= 5.4_
sets the color of a Z-Wave device
**Parameters**
- `$InstanceID` (int): Device ID
- `$Red` (int): Red Intensity from 0..255
- `$Green` (int): Green Intensity from 0..255
- `$Blue` (int): Blue Intensity from 0..255
**Returns** (bool): If the command succeeds, it returns __TRUE__, otherwise __FALSE__.
Blue Intensity from 0..255
**Example**
```php
// Set dark red
ZW_ColorRGB(12345, 255, 0, 0);
```
## ZW_ColorRGBWW
Source: https://www.symcon.de/en/service/documentation/module-reference/devices/z-wave/zw-colorrgbww/
`bool ZW_ColorRGBWW(int $InstanceID, int $Red, int $Green, int $Blue, int $WarmWhite, int $ColdWhite)`
_Requires Symcon >= 4.1_
sets the colors and intensity of an RGBWW Z-Wave device
**Parameters**
- `$InstanceID` (int): Device ID
- `$Red` (int): Red intensity from 0..255
- `$Green` (int): Green intensity from 0..255
- `$Blue` (int): Blue intensity from 0..255
- `$WarmWhite` (int): WarmWhite Intensity from 0..255
- `$ColdWhite` (int): ColdWhite intensity from 0..255
**Returns** (bool): If the command succeeds, it returns __TRUE__, otherwise __FALSE__.
ColdWhite intensity from 0..255
**Example**
```php
// Set dark red
ZW_ColorRGBWW(12345, 255, 0, 0, 0, 50);
// Set warm white
ZW_ColorRGBWW(12345, 0, 0, 0, 255, 0);
```
## ZW_ColorWW
Source: https://www.symcon.de/en/service/documentation/module-reference/devices/z-wave/zw-colorww/
`bool ZW_ColorWW(int $InstanceID, int $WarmWhite)`
_Requires Symcon >= 4.1_
sets the WarmWhite channel of a Z-Wave device
**Parameters**
- `$InstanceID` (int): Device ID
- `$WarmWhite` (int): WarmWhite Intensity from 0..255
**Returns** (bool): If the command succeeds, it returns __TRUE__, otherwise __FALSE__.
WarmWhite Intensity from 0..255
**Example**
```php
// Set WarmWhite to 50%
ZW_ColorWW(12345, 128);
```
## ZW_DimDown
Source: https://www.symcon.de/en/service/documentation/module-reference/devices/z-wave/zw-dimdown/
`bool ZW_DimDown(int $InstanceID)`
**Parameters**
- `$InstanceID` (int): ID of the device to be switched
**Returns** (bool): If the command succeeds, it returns __TRUE__, otherwise __FALSE__.
ID of the device to be switched
**Example**
```php
//The device with the ID 12345 starts to dim down
ZW_DimDown(12345);
```
## ZW_DimDownEx
Source: https://www.symcon.de/en/service/documentation/module-reference/devices/z-wave/zw-dimdownex/
`bool ZW_DimDownEx(int $InstanceID, int $Duration)`
starts dimming down with a runtime
**Parameters**
- `$InstanceID` (int): ID of the device to be switched
- `$Duration` (int): Running time until dimming down completely (0..255) (see table)
**Returns** (bool): If the command succeeds, it returns __TRUE__, otherwise __FALSE__.
Running time until dimming down completely (0..255) (see table)
**Example**
```php
//The device with ID 12345 begins to dim down over a runtime of 10 minutes
ZW_DimDownEx(12345, 138);
//The device with the ID 12345 begins to dim down over a period of 5 seconds
ZW_DimDownEx(12345, 5);
```
## ZW_DimSet
Source: https://www.symcon.de/en/service/documentation/module-reference/devices/z-wave/zw-dimset/
`bool ZW_DimSet(int $InstanceID, int $Intensity)`
dims a Z-Wave device to a specific level
**Parameters**
- `$InstanceID` (int): ID of the device to be switched
- `$Intensity` (int): Value from 0-100 (in %)
**Returns** (bool): If the command succeeds, it returns __TRUE__, otherwise __FALSE__.
Value from 0-100 (in %)
**Example**
```php
ZW_DimSet(12345, 50); //Dimming to 50%
```
## ZW_DimSetEx
Source: https://www.symcon.de/en/service/documentation/module-reference/devices/z-wave/zw-dimsetex/
`bool ZW_DimSetEx(int $InstanceID, int $Intensity, int $Duration)`
dims a Z-Wave device to a specific level within a runtime
**Parameters**
- `$InstanceID` (int): ID of the device to be switched
- `$Intensity` (int): Value from 0-100 (in %)
- `$Duration` (int): Runtime until the intensity is reached (0..255) (see table)
**Returns** (bool): If the command succeeds, it returns __TRUE__, otherwise __FALSE__.
Runtime until the intensity is reached (0..255) (see table)
**Example**
```php
//Dims the device with ID 12345 to 50% in 10 minutes
ZW_DimSetEx(12345, 50, 138);
//Dims the device with ID 12345 to 30% in 5 seconds
ZW_DimSetEx(12345, 30, 5);
```
## ZW_DimStop
Source: https://www.symcon.de/en/service/documentation/module-reference/devices/z-wave/zw-dimstop/
`bool ZW_DimStop(int $InstanceID)`
stops dimming a Z-Wave device
**Parameters**
- `$InstanceID` (int): Device ID
**Returns** (bool): If the command succeeds, it returns __TRUE__, otherwise __FALSE__.
Device ID
**Example**
```php
ZW_DimStop(12345);
```
## ZW_DimUp
Source: https://www.symcon.de/en/service/documentation/module-reference/devices/z-wave/zw-dimup/
`bool ZW_DimUp(int $InstanceID)`
**Parameters**
- `$InstanceID` (int): ID of the device to be switched
**Returns** (bool): If the command succeeds, it returns __TRUE__, otherwise __FALSE__.
ID of the device to be switched
**Example**
```php
//The device with ID 12345 starts to dim up
ZW_DimUp(12345);
```
## ZW_DimUpEx
Source: https://www.symcon.de/en/service/documentation/module-reference/devices/z-wave/zw-dimupex/
`bool ZW_DimUpEx(int $InstanceID, int $Duration)`
starts dimming up within a runtime
**Parameters**
- `$InstanceID` (int): ID of the device to be switched
- `$Duration` (int): Runtime until dimming up completely (0..255) (see table)
**Returns** (bool): If the command succeeds, it returns __TRUE__, otherwise __FALSE__.
Runtime until dimming up completely (0..255) (see table)
**Example**
```php
//The device with the ID 12345 starts to dim up over a runtime of 10 minutes
ZW_DimUpEx(12345, 138);
//The device with ID 12345 begins to dim up over a runtime of 5 seconds
ZW_DimUpEx(12345, 5);
```
## ZW_DoorLockOperation
Source: https://www.symcon.de/en/service/documentation/module-reference/devices/z-wave/zw-doorlockoperation/
`bool ZW_DoorLockOperation(int $InstanceID, int $Mode)`
_Requires Symcon >= 4.1_
Sets the door lock operation mode of a Z-Wave device
**Parameters**
- `$InstanceID` (int): ID of the device to be switched
- `$Mode` (int): Mode to set the Z-Wave device to
**Returns** (bool): If the command succeeds, it returns __TRUE__, otherwise __FALSE__.
Mode to set the Z-Wave device to
**Example**
```php
//e.g. Switches the door lock operation mode to unsecured with a timeout
ZW_DoorLockOperation(12345,1);
```
## ZW_LockMode
Source: https://www.symcon.de/en/service/documentation/module-reference/devices/z-wave/zw-lockmode/
`bool ZW_LockMode(int $InstanceID, int $Value)`
**Parameters**
- `$InstanceID` (int): Device ID
- `$Value` (int): 0..255
**Returns** (bool): If the command succeeds, it returns __TRUE__, otherwise __FALSE__.
0..255
**Example**
```php
ZW_LockMode(12345, 0);
```
## ZW_MeterReset
Source: https://www.symcon.de/en/service/documentation/module-reference/devices/z-wave/zw-meterreset/
`bool ZW_MeterReset(int $InstanceID)`
**Parameters**
- `$InstanceID` (int): Device ID
**Returns** (bool): If the command succeeds, it returns __TRUE__, otherwise __FALSE__.
Device ID
**Example**
```php
ZW_MeterReset(12345);
```
## ZW_Optimize
Source: https://www.symcon.de/en/service/documentation/module-reference/devices/z-wave/zw-optimize/
`bool ZW_Optimize(int $InstanceID)`
_Requires Symcon >= 4.1_
Starts the wireless network optimization process for a Z-Wave device
**Parameters**
- `$InstanceID` (int): Device ID
**Returns** (bool): If the command succeeds, it returns __TRUE__, otherwise __FALSE__.
Device ID
**Example**
```php
ZW_Optimize(12345);
```
## ZW_ProtectionSet
Source: https://www.symcon.de/en/service/documentation/module-reference/devices/z-wave/zw-protectionset/
`bool ZW_ProtectionSet(int $InstanceID, int $Mode)`
**Parameters**
- `$InstanceID` (int): Device ID
- `$Mode` (int): 0..255
**Returns** (bool): If the command succeeds, it returns __TRUE__, otherwise __FALSE__.
0..255
**Example**
```php
ZW_ProtectionSet(12345, 1);
```
## ZW_RequestStatus
Source: https://www.symcon.de/en/service/documentation/module-reference/devices/z-wave/zw-requeststatus/
`bool ZW_RequestStatus(int $InstanceID)`
**Parameters**
- `$InstanceID` (int): ID of the device
**Returns** (bool): If the command succeeds, it returns __TRUE__, otherwise __FALSE__.
ID of the device
**Example**
```php
ZW_RequestStatus(12345);
```
## ZW_ShutterMoveDown
Source: https://www.symcon.de/en/service/documentation/module-reference/devices/z-wave/zw-shuttermovedown/
`bool ZW_ShutterMoveDown(int $InstanceID)`
**Parameters**
- `$InstanceID` (int): ID of the device to be switched
**Returns** (bool): If the command succeeds, it returns __TRUE__, otherwise __FALSE__.
ID of the device to be switched
**Example**
```php
ZW_ShutterMoveDown(12345); //Move downwards
```
## ZW_ShutterMoveUp
Source: https://www.symcon.de/en/service/documentation/module-reference/devices/z-wave/zw-shuttermoveup/
`bool ZW_ShutterMoveUp(int $InstanceID)`
**Parameters**
- `$InstanceID` (int): ID of the device to be switched
**Returns** (bool): If the command succeeds, it returns __TRUE__, otherwise __FALSE__.
ID of the device to be switched
**Example**
```php
ZW_ShutterMoveUp(12345); //Move upwards
```
## ZW_ShutterStop
Source: https://www.symcon.de/en/service/documentation/module-reference/devices/z-wave/zw-shutterstop/
`bool ZW_ShutterStop(int $InstanceID)`
**Parameters**
- `$InstanceID` (int): ID of the device to be switched
**Returns** (bool): If the command succeeds, it returns __TRUE__, otherwise __FALSE__.
ID of the device to be switched
**Example**
```php
ZW_ShutterStop(12345); //Stop
```
## ZW_SwitchAllMode
Source: https://www.symcon.de/en/service/documentation/module-reference/devices/z-wave/zw-switchallmode/
`bool ZW_SwitchAllMode(int $InstanceID, int $Mode)`
_Requires Symcon >= 4.1_
Sets the Switch All mode of a Z-Wave device
**Parameters**
- `$InstanceID` (int): ID of the device to be switched
- `$Mode` (int): Mode to set the Z-Wave device to
**Returns** (bool): If the command succeeds, it returns __TRUE__, otherwise __FALSE__.
Mode to set the Z-Wave device to
**Example**
```php
//Mode is set to Only On
ZW_SwitchAllMode(12345, 2);
```
## ZW_SwitchMode
Source: https://www.symcon.de/en/service/documentation/module-reference/devices/z-wave/zw-switchmode/
`bool ZW_SwitchMode(int $InstanceID, bool $Status)`
switches a Z-Wave device on/off
**Parameters**
- `$InstanceID` (int): ID of the device
- `$Status` (bool): __TRUE__ for on, __FALSE__ for Off
**Returns** (bool): If the command succeeds, it returns __TRUE__, otherwise __FALSE__.
__TRUE__ for on, __FALSE__ for Off
**Example**
```php
ZW_SwitchMode(12345, true); //Turn on device
```
## ZW_Test
Source: https://www.symcon.de/en/service/documentation/module-reference/devices/z-wave/zw-test/
`bool ZW_Test(int $InstanceID)`
_Requires Symcon >= 4.1_
Tests if a connection to a Z-Wave device is working
**Parameters**
- `$InstanceID` (int): Device ID
**Returns** (bool): If the command succeeds, it returns __TRUE__, otherwise __FALSE__.
Device ID
**Example**
```php
ZW_Test(12345);
```
## ZW_ThermostatFanModeSet
Source: https://www.symcon.de/en/service/documentation/module-reference/devices/z-wave/zw-thermostatfanmodeset/
`bool ZW_ThermostatFanModeSet(int $InstanceID, int $FanMode)`
Sets the FanMode for the thermostat
**Parameters**
- `$InstanceID` (int): Device ID
- `$FanMode` (int): 0..255
**Returns** (bool): If the command succeeds, it returns __TRUE__, otherwise __FALSE__.
0..255
**Example**
```php
ZW_ThermostatFanModeSet(12345,1); //e.g. Switches the FanMode to OnLow
```
## ZW_ThermostatModeSet
Source: https://www.symcon.de/en/service/documentation/module-reference/devices/z-wave/zw-thermostatmodeset/
`bool ZW_ThermostatModeSet(int $InstanceID, int $Mode)`
Sets the thermostat mode
**Parameters**
- `$InstanceID` (int): Device ID
- `$Mode` (int): 0..255
**Returns** (bool): If the command succeeds, it returns __TRUE__, otherwise __FALSE__.
0..255
**Example**
```php
ZW_ThermostatModeSet(12345, 1); //e.g., Sets the mode to Heat
```
## ZW_ThermostatSetPointSet
Source: https://www.symcon.de/en/service/documentation/module-reference/devices/z-wave/zw-thermostatsetpointset/
`bool ZW_ThermostatSetPointSet(int $InstanceID, int $SetPoint, float $Value)`
Sets the PointSet Value
**Parameters**
- `$InstanceID` (int): Device ID
- `$SetPoint` (int): 0..255
- `$Value` (float): 0..255
**Returns** (bool): If the command succeeds, it returns __TRUE__, otherwise __FALSE__.
0..255
**Example**
```php
ZW_ThermostatSetPointSet(12345, 1, 20); //e.g. switch on
```
---
# Zevvy
> Symcon documentation · English · generated on 2026-09-26
> Index: https://www.symcon.de/en/llms.txt
Source: https://www.symcon.de/en/service/documentation/module-reference/devices/zevvy/
_Requires Symcon >= 7.0_
This module sends the data of selected variables to a Zevvy account, which then appears under "Settings" -> "Device list" with the ID of the variable.
### functional scope
- Sending the values
### Setting up the instances in IP-Symcon
The 'Zevvy' module can be found under 'Add instance' using the quick filter.
- Further information on adding instances can be found in the [Instances documentation](https://www.symcon.de/service/dokumentation/konzepte/instanzen/#Instanz_hinzufügen)
Before the variables can be set up, the Register button must be clicked. A new tab will now open in the browser with the Zevvy login screen.

After entering the login data, the following dialog is displayed if successful.

You can now return to IP-Symcon. A token should now be present in the Zevvy instance.
__Configuration page__:
| Name | Description |
| ------------- | ------------------------------------------------ |
| Device list | List with the variable IDs that are to be sent. |
| Interval | Interval for automatically sending the data |
| Transmit data | Button which sends the data manually |
| Registration | Links the Zevvy account to IP-Symcon using OAuth |
## ZY_SendMeasurements
Source: https://www.symcon.de/en/service/documentation/module-reference/devices/zevvy/zy-sendmeasurements/
`bool ZY_SendMeasurements(int $InstanzID)`
_Requires Symcon >= 7.0_
**Parameters**
- `$InstanzID` (int): Id of the Zevvy instance
**Returns** (bool): If the command could be executed successfully, the result is __TRUE__, otherwise __FALSE__.
Id of the Zevvy instance
**Example**
```php
ZY_SendMeasurements(12345);
```
---
# Active List
> Symcon documentation · English · generated on 2026-09-26
> Index: https://www.symcon.de/en/llms.txt
Source: https://www.symcon.de/en/service/documentation/module-reference/logic/active-list/
_Requires Symcon >= 5.0_
The 'Active List' shows all active variables in the Visualization and offers the possibility to switch them off simultaneously.
To do this, they must have been added to the list on the configuration page beforehand.
### function scope
- Displays all active variables in the Visualization and allows switching them off.
### Software Installation
- Use the [Module Store](https://www.symcon.de/en/service/documentation/components/management-console/module-store/) to install the Active List module.
### Setting up instances in IP-Symcon
- Under "Add Instance" the 'Active List' module can be found using the quick filter.
- More information in the [Instances documentation](https://www.symcon.de/en/service/documentation/basics/instances/).
#### configuration page
| Name | Description |
| --------------- | --------------------------------------------------------- |
| Turn Off Action | Creates an action to turn off the variable simultaneously |
| Variables | A list of variables whose status is checked. |
Variables are considered active when ...
- the value of an integer or float variable is greater than the minimum value. If the variable has a .reversed profile it is considered active if the value is less than the maximum value.
- the value of a boolean variable is true. If the variable has a .reversed profile, false is the active state.
- the value of a string variable is not empty.
###
Accordingly, variables are considered inactive if ...
- the value of an integer or float variable is the minimum value. If the variable has a .Reversed profile, it is considered inactive if the value is the maximum value.
- the value of a boolean is false. If the variable has a .reversed profile, true is the inactive state.
- the value of a string variable is empty.
### statusvariables
The status variables/categories are created automatically. Deleting individual ones can lead to malfunctions.
#### Statusvariables
| Name | Type | Description |
| ------- | ------ | --------------------------------------------- |
| Disable | Script | Disables all variables that are still active. |
### Visualization
All active variables will be displayed on the Visualization. With a click on "Switch off" all displayed variables are switched to inactive.
## AL_SwitchOff
Source: https://www.symcon.de/en/service/documentation/module-reference/logic/active-list/al-switchoff/
`bool AL_SwitchOff(int $InstanzID)`
_Requires Symcon >= 5.0_
**Parameters**
- `$InstanzID` (int): ID des zu schaltenden Geräts
**Returns** (bool): If the command could be executed successfully, it returns __TRUE__ as result, otherwise __FALSE__.
ID des zu schaltenden Geräts
**Example**
```text
AL_SwitchOff(12345);
```
---
# Presence Simulation
> Symcon documentation · English · generated on 2026-09-26
> Index: https://www.symcon.de/en/llms.txt
Source: https://www.symcon.de/en/service/documentation/module-reference/logic/presence-simulation/
_Requires Symcon >= 5.0_
Simulates the presence of persons in the household. For this purpose, the module randomly obtains the daily data from one of the last 4 identical weekdays. If there are not enough switching operations logged on any of these 4 days, one of the last 30 days is selected at random.
If also within these 30 days no valid day data record is available, no simulation is possible. If no simulation is possible, this is displayed as a message in the "Simulation source (day)" string variable.
### function scope
- Switching of selected actuators/variables via logged values.
- Adjustability of the required average switching operations before a tag is allowed as a source for simulation.
- Switching on/off via Visualization button or script function.
- Display which day is used for simulation.
- Automatic update when day changes.
### software installation
- Via the [Module Store](https://www.symcon.de/en/service/documentation/components/management-console/module-store/) install the module 'Presence Simulation'.
### Setting up instances in IP-Symcon
- Under "Add Instance" the 'Presence Simulation' module can be found using the quick filter.
- More information in the [Instances documentation](https://www.symcon.de/en/service/documentation/basics/instances/).
- All variables to be switched must be added to the variables list in the instance configuration.
#### Configuration Page
| Name | Description |
| -------------- | ------------------------------------------------------------------------------------------------------------------ |
| Variables | A list of variables to be used for the presence simulation. The added variables need an action and must be logged. |
| Minimum number | This describes the average minimum number of variable switches of all selected variables that must be present. |
### statusvariables
The status variables/categories are created automatically. Deleting individual ones can lead to malfunctions.
| name | type | description |
| ----------------------- | ------- | --------------------------------------------------------------------------------------- |
| Simulation active | Boolean | Indicates whether the simulation is activated or not. True = Enabled; False = Disabled; |
| Simulation Source (Day) | String | The string contains the date after which the simulation data was selected. |
| Simulation Preview | String | Shows a table which gives an overview of the future switching operations. |
### Visualization
Via the Visualization the simulation can be de-/activated.
The information which tag is used for simulation is also displayed.
If there is not enough or invalid data, this is also displayed here. A list with all selected variables is displayed, which contains the current and next value, as well as the time of the circuit.
## AS_SetSimulation
Source: https://www.symcon.de/en/service/documentation/module-reference/logic/presence-simulation/as-setsimulation/
`bool AS_SetSimulation(int $InstanceID, bool $SetActive)`
_Requires Symcon >= 5.0_
De-/Activate the presence simulation
**Parameters**
- `$InstanceID` (int): ID of the presence simulation
- `$SetActive` (bool): Enables/Disables Presence Simulation
**Returns** (bool): If the command could be executed successfully, it returns __TRUE__ as result, otherwise __FALSE__.
Enables/Disables Presence Simulation
**Example**
```text
AS_SetSimulation(12345, true);
```
---
# Image Archive
> Symcon documentation · English · generated on 2026-09-26
> Index: https://www.symcon.de/en/llms.txt
Source: https://www.symcon.de/en/service/documentation/module-reference/logic/image-archive/
_Requires Symcon >= 4.2_
The module copies an image when triggered by a selected variable. It is adjustable how many images should be saved.
### Function scope
- Selectable source image and selectable trigger variable
- Adjustable number of images to be saved
- When a trigger variable is selected, an event is created that reacts to its update
- The event can be fully personalized except for the trigger variable
- Images get the time of triggering as name
- Images are displayed chronologically from old -> new in the category images
- Automatic deletion of the oldest images, when the maximum number of images is reached
### software installation
- Install the 'Image-Archive' module via the [Module Store](https://www.symcon.de/en/service/documentation/components/management-console/module-store/).
### Setting up instances in IP-Symcon
- Under "Add Instance" the 'Image-Archive' module can be found using the quick filter.
- More information about adding instances in the [Instances documentation](https://www.symcon.de/en/service/documentation/basics/instances/)
#### configuration page
| Name | Description |
| ---------------- | ------------------------------------------------------------------------- |
| Image | Source image to be copied |
| Number | Maximum number of images to be saved |
| Trigger Variable | Variable at whose change the source image should be copied to the archive |
### status variables
The status variables/categories are created automatically. Deleting individual ones can lead to malfunctions.
#### Statusvariables
| Name | Type | Description |
| -------- | -------- | ------------------------------------------------------------------------------ |
| Images | Category | The source images are copied into here |
| AddImage | Event | Triggered by the trigger variable and triggers the copying of the source image |
### Visualization
The Visualization is used to display the variable. No further control or separate display is integrated.
To display the images in the 'Bildarchiv' category, a content divider can be added in the Visualization or a link of the category can be made.
Attention: It is not useful to link directly the images from the archive, because the updates change the ID's.
## BA_AddImage
Source: https://www.symcon.de/en/service/documentation/module-reference/logic/image-archive/ba-addimage/
`bool BA_AddImage(int $InstanceID)`
_Requires Symcon >= 4.2_
Copies the current source image to the "Images" category of the "ImageArchive" module with the InstanceID.
**Parameters**
- `$InstanceID` (int): ID of the Instance
**Returns** (bool): If the command could be executed successfully, it returns __TRUE__ as result, otherwise __FALSE__.
ID of the Instance
**Example**
```text
BA_AddImage(12345);
```
---
# Countdown
> Symcon documentation · English · generated on 2026-09-26
> Index: https://www.symcon.de/en/llms.txt
Source: https://www.symcon.de/en/service/documentation/module-reference/logic/countdown/
_Requires Symcon >= 5.0_
The module allows to display a countdown to an event in the webfront.
### feature
- Allows to display a countdown in the web front that is updated every minute
- Setting a time and name of an event
### Software installation
- Using the [Store module](https://www.symcon.de/en/service/documentation/components/management-console/module-store/), install the 'Countdown' module.
### Setting up the instances in IP-Symcon
- Under "Add Instance", the 'Countdown' module can be found using the quick filter.
- More information about adding instances in the [Instances documentation](https://www.symcon.de/en/service/documentation/basics/instances/)
#### configurationpage
| name | description |
| ------------- | ------------------------------------- |
| Date and Time | Date and Time |
| Event | Name to be displayed in Visualization |
### status variables
The status variables/categories are created automatically. Deleting individual ones can lead to malfunctions.
#### Status variables
| Name | Type | Description |
| -------------- | ------- | --------------------------------------- |
| Event reached | Boolean | Indicates whether the event was reached |
| Time Remaining | String | Contains the remaining time |
### Visualization
Displays the countdown and a message when the event has occurred.
---
# CSV ZIP Export
> Symcon documentation · English · generated on 2026-09-26
> Index: https://www.symcon.de/en/llms.txt
Source: https://www.symcon.de/en/service/documentation/module-reference/logic/csv-zip-export/
_Requires Symcon >= 5.5_
This module provides the possibility to export the aggregated values of a variable as a CSV file in a ZIP archive.
### function scope
- Exporting aggregated data of a variable or several variables
- Export data to CSV file in a ZIP archive
- Listing of all logged variables
- Period of aggregation can be freely selected
- Aggregation level can be selected
- Cyclic creation and sending of an archive by email or ftp/ftps/sftp
### software installation
- Install the 'CSVZipExport' module via the [Module Store](https://www.symcon.de/en/service/documentation/components/management-console/module-store/).
### Setting up instances in IP-Symcon
- Under "Add Instance", the 'CSV-ZIP-Export' module can be found using the quick filter.
- More information about adding instances in the [Instances documentation](https://www.symcon.de/en/service/documentation/basics/instances/)
#### configuration page
| Name | Description |
| ---------------------- | --------------------------------------------------------------------------------------------------------------------------------------------------- |
| Export Options | Option whether one or more variables per file should be exported, or a single variable used by MySQL should be exported |
| Selected variables | [Export options: One file per variable, One file with multiple variables] List of variables that can be set for the CSV column |
| Filter | [Export options: MySQL] Filters the selection of logged variables |
| Logged Variables | [Export options: MySQL] Selection of the variable to be exported |
| Create zip file | Checkbox whether the file should be compressed into a zip archive |
| Decimal separator | Select whether point or comma should be used as decimal separator |
| Start of aggregation | Start of aggregation period |
| End of aggregation | End of aggregation period |
| Decimal separator | Selection of decimal separator comma or point. |
| Aggregation Level | Level of Aggregation |
| Export | The aggregated data of the variable will be exported |
| Cyclic send | |
| Enable cyclic send | Activates the cyclical sending of data |
| Interval | Interval at which data is sent. With “Weekly”, data is sent on Monday and with “Monthly”, data is sent on the 1st of the month at the selected time |
| Time | Time at which to send |
| Mail | |
| Send by mail | Checkbox whether the data should be sent by mail |
| SMPT instance | Select the e-mail instance |
| Send mail now | Sends a mail manually |
| FTP, FTPS, SFTP | |
| Send via SFTP/FTP/FTPS | Checkbox whether the data should be sent via SFTP, FTP or FTPS |
| Connection type | Connection whether to send via SFTP, FTP or FTPS |
| Host | IP address of the server |
| Port | Port |
| Username | Username for the SFTP connection |
| Password | Password for the SFTP connection |
## CSV_DeleteZip
Source: https://www.symcon.de/en/service/documentation/module-reference/logic/csv-zip-export/csv-deletezip/
`bool CSV_DeleteZip(int $InstanceID)`
_Requires Symcon >= 5.5_
**Parameters**
- `$InstanceID` (int): ID of the Instance
**Returns** (bool): If the command could be executed successfully, it returns __TRUE__ as result, otherwise __FALSE__.
ID of the Instance
**Example**
```text
CSV_DeleteZip(12345);
```
## CSV_Export
Source: https://www.symcon.de/en/service/documentation/module-reference/logic/csv-zip-export/csv-export/
`string CSV_Export(int $InstanceID, int $ArchiveVariable, int $AggregationStage, int $AggregationStart, int $AggregationEnd)`
_Requires Symcon >= 5.5_
**Parameters**
- `$InstanceID` (int): ID of the Instance
- `$ArchiveVariable` (int): VariableID, which should be exported
- `$AggregationStage` (int): Aggregation level analogous to [AC_GetAggregatedValues](https://www.symcon.de/en/service/documentation/module-reference/archive-control/ac-getaggregatedvalues/)
- `$AggregationStart` (int): Date/time as Unix timestamp (0 = from beginning)
- `$AggregationEnd` (int): Datum/Zeit as Unix timestamp (0 = until now)
**Returns** (string): The relative path of the zip archive.
Datum/Zeit as Unix timestamp (0 = until now)
**Example**
```text
CSV_Export(12345, 54321, 4, 2293574400, 3127161600);
```
## CSV_SendMail
Source: https://www.symcon.de/en/service/documentation/module-reference/logic/csv-zip-export/csv-sendmail/
`bool CSV_SendMail(int $InstanceID)`
_Requires Symcon >= 5.5_
**Parameters**
- `$InstanceID` (int): ID of the Instance
**Returns** (bool): If the command could be executed successfully, it returns __TRUE__ as result, otherwise __FALSE__.
ID of the Instance
**Example**
```text
CSV_SendMail(12345);
```
---
# Dummy Module
> Symcon documentation · English · generated on 2026-09-26
> Index: https://www.symcon.de/en/llms.txt
Source: https://www.symcon.de/en/service/documentation/module-reference/logic/dummy-module/
The dummy module is an instance, that does not provide its own function or status variables, but can be used as a placeholder only to get a presentation as a device in the visualization.
So it is conceivable that you create several variables that belong to a device for which IP-Symcon provides no module. To represent these variables within an unit together in the visualization (e.g. Visualization) you can create the dummy instance and place the dummy variable in the instance.
In combination with the variable profiles and the variable actions you can create your own "instances", which have similar functionality in the function and automatic visualization of virgin instances.
---
# Egg Timer
> Symcon documentation · English · generated on 2026-09-26
> Index: https://www.symcon.de/en/llms.txt
Source: https://www.symcon.de/en/service/documentation/module-reference/logic/egg-timer/
_Requires Symcon >= 5.0_
An egg timer that runs for a certain amount of time and can be rewound at any time. Ideal for use in events and scripts.
### function scope
- A simple egg timer
- Can be rewound at any time
- Runs for an adjustable time
- Controllable via the Visualization
- Easy integration into events and scripts via the active variable
### software installation
Install the 'Egg Timer' module via the [Module Store](https://www.symcon.de/en/service/documentation/components/management-console/module-store/).
### Setting up the instances in IP-Symcon
- Under 'Add Instance' the 'Eggtimer' module is listed under the vendor '(device)'.
- More information about adding instances in the [Instances documentation](https://www.symcon.de/en/service/documentation/basics/instances/)
#### Configuration Page:
| Name | Description |
| --------------- | ----------------------------------------------------------------------------------------------------------------------------------------------------------------------------------------- |
| Update Interval | The interval at which the remaining time is updated (If the selected interval is greater than the remaining time, "Active" will not be set to false again until the interval has expired) |
### statusvariables
The status variables/categories are created automatically. Deleting individual ones can lead to malfunctions.
#### Status variables
| Name | Type | Description |
| --------------- | ------- | --------------------------------------------------------------------------------------------------------------------- |
| Active | boolean | Determines whether the egg timer is running or not; Setting it again restarts the timer |
| Time in seconds | integer | The duration in seconds that the egg timer runs; After the time has elapsed, "Active" is set to false |
| Remaining | string | Displays the remaining time of the running egg timer |
| Canceled | integer | Indicates whether the Active variable was switched off again before the time expired and thus the timer was canceled. |
### Visualization
In the Visualization the running time of the egg timer can be set and enabled/disabled
---
# Group Control
> Symcon documentation · English · generated on 2026-09-26
> Index: https://www.symcon.de/en/llms.txt
Source: https://www.symcon.de/en/service/documentation/module-reference/logic/group-control/
_Requires Symcon >= 5.0_
With the help of the 'Group Control', variables can be switched together in groups.
### function scope
- When one variable in the group is switched, all remaining variables in the group are switched as well
- All variables that are added to a list can be switched with a separate variable at the same time
### Software installation
- Via the [Module Store](https://www.symcon.de/en/service/documentation/components/management-console/module-store/) install the 'Group Control' module.
### Setting up the instances in IP-Symcon
Under 'Add Instance' the 'Group Control' module can be found using the quick filter. - More information about adding instances in the [Instances documentation](https://www.symcon.de/en/service/documentation/basics/instances/)
#### Configuration Page:
| Name | Description |
| --------- | -------------------------------------------------------------------------------------------------------------------------------------- |
| Variables | The variables present in this list belong to the group; All variables must be of the same type and have the same profile and an action |
### status variables
The status variables/categories are created automatically. Deleting individual ones can lead to malfunctions.
#### Status variables
| Name | Type | Description |
| ------ | ------- | ---------------------------------------- |
| Status | variant | Displays the status of the current group |
#### Visualization
This displays the status variable that can switch the group.
---
# JSON Decoder
> Symcon documentation · English · generated on 2026-09-26
> Index: https://www.symcon.de/en/llms.txt
Source: https://www.symcon.de/en/service/documentation/module-reference/logic/json-decoder/
_Requires Symcon >= 6.0_
The JSON Decoder is a module that breaks down JSON-coded content into its components and makes the elements available as variables.
### Integration in IP-Symcon
The JSON decoder can be searched for and added as an instance using the "+" in the object tree.
By default, a [HTTP Client](https://www.symcon.de/en/llms/modules/httpclient.md) is created and used as source. Within the configuration of the JSON decoder, a gateway that provides the text to be edited can be selected via "Change gateway".
### Example
As an example, the page [https://filesamples.com/samples/code/json/sample4.json](https://filesamples.com/samples/code/json/sample4.json) should be read and decoded using the JSON decoder.
To do this, the URL of the page must be entered in the HTTP client and then read in.
The page contains the following JSON.
```php
{
"people" : [
{
"firstName": "Joe",
"lastName": "Jackson",
"gender": "male",
"age": 28,
"number": "7349282382"
},
{
"firstName": "James",
"lastName": "Smith",
"gender": "male",
"age": 32,
"number": "5678568567"
},
{
"firstName": "Emily",
"lastName": "Jones",
"gender": "female",
"age": 24,
"number": "456754675"
}
]
}
```
The JSON read in via the HTTP client is now processed with the JSON decoder and the following information is made available as variables in the object tree.

---
# JSON Exporter
> Symcon documentation · English · generated on 2026-09-26
> Index: https://www.symcon.de/en/llms.txt
Source: https://www.symcon.de/en/service/documentation/module-reference/logic/json-exporter/
_Requires Symcon >= 5.5_
The module offers the possibilities to represent the current values of variables as JSON export. The object structure can be defined in advance, so that e.g. an array of objects with ID, name, value and profile suffix is returned. Any number of objects can then be returned in this structure, with the individual fields linked to variables or defined as free text.
### function scope
* Individual structure of the objects can be defined
* Output of current values in JSON format, returning an array of objects
### software-installation
* Install the 'JSON Exporter' module via the Module Store.
### setting up the instances in IP-Symcon
Under 'Add instance' the 'JSON Exporter' module is listed under the vendor '(core)'.
#### configuration page
| name | description |
| ------------------- | ------------------------------------------------------------------------------------------------------------------------------------------ |
| Ident | Selectable name |
| Configure structure | The data set to be provided can be configured via __Configure structure__. Each value is entered in the table __Variables to be exported__ |
| Value | __User defined__ Selection of what to select from the variable |
| Variables to export | List, where the variables can be listed and added according to the structure |
| Open in browser | Opens the JSON structure in a browser |
---
# Logic Gate
> Symcon documentation · English · generated on 2026-09-26
> Index: https://www.symcon.de/en/llms.txt
Source: https://www.symcon.de/en/service/documentation/module-reference/logic/logic-gate/
_Requires Symcon >= 5.0_
This module enables the determination of logical connection between several variables. Here, the Boolean interpretation of the input variables is used.
### functional scope
- Determining the logical relationship of variable values
- Supported operations:
- OR
- AND
- NOR
- NAND
- Output is kept up to date and is updated as soon as one of the input variables changes
### software installation
- Via the [Module Store](https://www.symcon.de/en/service/documentation/components/management-console/module-store/) install the 'Logic Gate' module.
### Setting up the instances in IP-Symcon
- Under "Add instance" the 'Logik Gate' module is listed under the manufacturer '(Other)'
- At 'Calculation' select the desired operation
- In the list 'Input' select the desired input variables
- 'Invert' can be activated to negate the input value of this variable
- If a non-Boolean variable is selected, it will be interpreted as a boolean value, e.g. 0 as false
### status variables
The status variable "output" contains the current result of the logical operation
### Visualization
The current output is displayed.
---
# Computation Module
> Symcon documentation · English · generated on 2026-09-26
> Index: https://www.symcon.de/en/llms.txt
Source: https://www.symcon.de/en/service/documentation/module-reference/logic/computation-module/
Modules, which enables various calculations within IP-Symcon
## Computation Module
Source: https://www.symcon.de/en/service/documentation/module-reference/logic/computation-module/computation-module/
_Requires Symcon >= 4.3_
This module can perform various auxiliary calculations on a set of variables, for example, the sum or the average.
### function scope
- Calculations of various values based on a set of variables:
- Sum
- Minimum
- Maximum
- Average
- Number of variables
- Output of the calculated values in variables
- Updating of the values as soon as one of the variables changes
### software installation
- Via the [Module Store](https://www.symcon.de/en/service/documentation/components/management-console/module-store/) install the 'Computation Module'.
### Setting up instances in IP-Symcon
- Under "Add Instance", the 'Computation Modulel' can be found using the quick filter.
- More information about adding instances in the [Instances documentation](https://www.symcon.de/en/service/documentation/basics/instances/)
#### configuration page:
| name | description |
| ----------- | -------------------------------------------------------------------------------------------------------------------------------------------------------------- |
| Calculation | Selection of the performed calculation(s) |
| Variables | VariableIDs of the variables on which the calculation(s) will be performed; for all calculations except Number, all variables must be of type Float or Integer |
#### _possible_calculations:_
| Name | Description |
| ------- | ------------------------------------------------------------------------------------ |
| All | All calculations presented in this table are performed |
| Sum | The sum of all selected variables is stored in the status variable Sum |
| Minimum | The minimum value of the selected variables is stored in the Minimum status variable |
| Maximum | The maximum value of the selected variables is stored in the status variable Maximum |
| Average | The average of the selected variables is stored in the status variable Average |
| Number | The number of selected variables is stored in the status variable Number |
### status variables
The status variables are created automatically. Deleting individual ones can lead to malfunctions.
#### Status variables
A corresponding status variable is created for each calculation.
| Name | Type | Description |
| ------- | ----- | ------------------------------------------- |
| Sum | Float | The sum of all selected variables |
| Minimum | Float | The minimum value of the selected variables |
| Maximum | Float | The maximum value of the selected variables |
| Average | Float | The average of the selected variables |
| Number | Float | The number of selected variables |
## RM_Update
Source: https://www.symcon.de/en/service/documentation/module-reference/logic/computation-module/computation-module/rm-update/
`bool RM_Update(int $InstanceID)`
_Requires Symcon >= 4.3_
**Parameters**
- `$InstanceID` (int): ID of the Instance
**Returns** (bool): If the command could be executed successfully, it returns __TRUE__ as result, otherwise __FALSE__.
ID of the Instance
**Example**
```text
RM_Update(12345);
```
## Converter
Source: https://www.symcon.de/en/service/documentation/module-reference/logic/computation-module/converter/
_Requires Symcon >= 4.3_
### function scope
- Calculates a value from a selected source variable using a set-up formula.
- If the source variable is changed, the value is automatically recalculated.
### Software installation
- Install the 'Converter' module via the [Module Store](https://www.symcon.de/en/service/documentation/components/management-console/module-store/).
### Setting_up_instances_in IP-Symcon
- Under "Add Instance" the 'Converter' module can be found using the quick filter.
- More information about adding instances in the [Instances documentation](https://www.symcon.de/en/service/documentation/basics/instances/)
#### Configuration Page:
| Name | Description |
| --------- | ------------------------------------------- |
| Source | Source variable to be used for calculation. |
| Formula | Formula where calculation is to be used. |
| Value | Test value to test the formula |
| Calculate | Calculates the value using the test value |
### status variables
The status variables/categories are created automatically. Deleting individual ones can lead to malfunctions.
#### Status variables
| Name | Type | Description |
| ----- | ----- | ------------------------------------------------------- |
| Value | Float | Contains the value calculated using the set up formula. |
## UMR_Calculate
Source: https://www.symcon.de/en/service/documentation/module-reference/logic/computation-module/converter/umr-calculate/
`float UMR_Calculate(int $InstanceID, float $Value)`
_Requires Symcon >= 4.3_
Calculates the return of the formula for the Value and returns it.
**Parameters**
- `$InstanceID` (int): ID of the Instance
- `$Value` (float): Value to be inserted in the formula
**Returns** (float): Converted Value __Value__
Value to be inserted in the formula
**Example**
```text
//Function in the configuration: $Value/10\n$output = UMR_Calculate(12345, 50);\nvar_dump($output) //Output is 5
```
## ConvertMultiBoundaries
Source: https://www.symcon.de/en/service/documentation/module-reference/logic/computation-module/convertmultiboundaries/
_Requires Symcon >= 4.3_
### function scope
- Calculates a value from a selected source variable using set-up formulas.
- Which formula is to be used is decided via configurable limit values.
- If the source variable is changed, the value is automatically recalculated.
- If no calculation/limits apply, the original value is entered.
### Software installation
- Install the 'ConvertMultiBoundaries' module via the [Module Store](https://www.symcon.de/en/service/documentation/components/management-console/module-store/).
### Set up instances in IP-Symcon)
- Under "Add Instance" the 'ConvertMultiBoundaries' module can be found using the quick filter.
- More information about adding instances in the [Instances documentation](https://www.symcon.de/en/service/documentation/basics/instances/)
#### Configuration Page:
| Name | Description |
| ------------ | ------------------------------------------------------ |
| Source | Source variable to be used for calculation. |
| Formula 1-10 | Formula to be applied to the source variable. |
| Limit 0-10 | Limit values between which the set up formula is used. |
| Value | Test Value to test the formula |
| Calculate | Calculates the value based on the test value |
The value of the source variable can be implemented inside the formula with "$Value". Example:
```php
10*$Value+20
```
### status variables
The status variables/categories are created automatically. Deleting individual ones can lead to malfunctions.
#### Status variables
| Name | Type | Description |
| ----- | ----- | ------------------------------------------------------- |
| Value | Float | Contains the value calculated using the set up formula. |
## UMG_Calculate
Source: https://www.symcon.de/en/service/documentation/module-reference/logic/computation-module/convertmultiboundaries/umg-calculate/
`float UMG_Calculate(int $InstanceID, float $Value)`
_Requires Symcon >= 4.3_
**Parameters**
- `$InstanceID` (int): ID of the Instance
- `$Value` (float): In die Formel einzusetzender Wert
**Returns** (float): Result of the calculation.
In die Formel einzusetzender Wert
**Example**
```text
//Funktion in der Konfiguration: $Value/10\n$ausgabe = UMG_Calculate(12345, 50);\nvar_dump($ausgabe) //Ausgabe ist 5
```
## ValueRangeScale
Source: https://www.symcon.de/en/service/documentation/module-reference/logic/computation-module/valuerangescale/
_Requires Symcon >= 4.3_
### functional scope
* Input from input value range
* Input from output value range
* Conversion from an input value
* Calculation on change of value of the input value
### software installation
* Via the [Module Store](https://www.symcon.de/en/llms/components/management-console.md) install the 'ValueRangeScale' module.
### Setting up the instances in IP-Symcon
Under 'Add Instance' the 'ValueRangeScaling' module can be found using the quick filter.
- More information about adding instances in the [Instances documentation](https://www.symcon.de/en/llms/concepts.md)
#### configuration page:
| Name | Description |
| -------------------- | ------------------------------------ |
| Input variable | Variable which serves as input value |
| Minimum input value | The lower value limit of the input |
| Maximum input value | The upper value limit of the input |
| Minimum output value | The lower value limit of the output |
| Maximum output value | The upper value limit of the output |
### status variables
The status variables/categories are created automatically. Deleting individual ones can lead to malfunctions.
#### Status variables
| Name | Type | Description |
| ------ | ----- | ------------------------------- |
| Output | float | Output value of the calculation |
## VRC_Scale
Source: https://www.symcon.de/en/service/documentation/module-reference/logic/computation-module/valuerangescale/vrc-scale/
`bool VRC_Scale(int $InstanceID)`
_Requires Symcon >= 4.3_
Scales the input variable value
**Parameters**
- `$InstanceID` (int): ID of the instance
**Returns** (bool): If the command could be executed successfully, it returns __TRUE__ as result, otherwise __FALSE__.
ID of the instance
**Example**
```php
VRC_Scale(12345)
```
---
# RGBMultiplexer
> Symcon documentation · English · generated on 2026-09-26
> Index: https://www.symcon.de/en/llms.txt
Source: https://www.symcon.de/en/service/documentation/module-reference/logic/rgbmultiplexer/
_Requires Symcon >= 4.2_
### function scope
- Provides a color wheel that controls three individual R, G, B channels in the background
- If the R, G, B channels change the value the new state is also transferred to the color wheel
### Software installation
- Install the RGB Multiplexer module via the [Module Store](https://www.symcon.de/en/service/documentation/components/management-console/module-store/).
### Setting up instances in IP-Symcon
- Under "Add Instance" the 'RGB Multiplexer' module can be found using the quick filter.
- More information about adding instances in the [Instances documentation](https://www.symcon.de/en/service/documentation/basics/instances/)
#### Configuration Page:
| Name | Description |
| ---------------- | ----------------------------------- |
| Variable (R) | Variable for the Red Channel |
| Variable (G) | Variable for the Green Channel |
| Variable (B) | Variable for the Blue Channel |
| Button "Set RGB" | Sends the RGB value to the channels |
### statusvariables
The status variables/categories are created automatically. Deleting individual ones can lead to malfunctions.
#### Statusvariables
| Name | Type | Description |
| ----- | ------- | ----------------------------------- |
| Color | Integer | Contains value matching color wheel |
### Visualization
The Visualization is used to display the variables. The color can be set via the color wheel.
## RGBM_RequestStatus
Source: https://www.symcon.de/en/service/documentation/module-reference/logic/rgbmultiplexer/rgbm-requeststatus/
`bool RGBM_RequestStatus(int $InstanceID)`
_Requires Symcon >= 4.2_
**Parameters**
- `$InstanceID` (int): ID of the Instance
**Returns** (bool): If the command could be executed successfully, it returns __TRUE__ as result, otherwise __FALSE__.
ID of the Instance
**Example**
```text
RGBM_RequestStatus(12345);
```
## RGBM_SetRGB
Source: https://www.symcon.de/en/service/documentation/module-reference/logic/rgbmultiplexer/rgbm-setrgb/
`bool RGBM_SetRGB(int $InstanceID, int $Red, int $Green, int $Blue)`
_Requires Symcon >= 4.2_
**Parameters**
- `$InstanceID` (int): ID of the Instance
- `$Red` (int): Value of the red color channel
- `$Green` (int): Value of the green color channel
- `$Blue` (int): Value of the blue color channel
**Returns** (bool): If the command could be executed successfully, it returns __TRUE__ as result, otherwise __FALSE__.
Value of the blue color channel
**Example**
```text
RGBM_SetRGB(12345, 255, 255, 255);
```
---
# DragPointer
> Symcon documentation · English · generated on 2026-09-26
> Index: https://www.symcon.de/en/llms.txt
Source: https://www.symcon.de/en/service/documentation/module-reference/logic/dragpointer/
_Requires Symcon >= 6.0_
A variable that remains at the highest or lowest value until reset.
### function scope
* Variable that shows the highest/lowest value since the last reset
* Reset via timer or manually possible
### Software installation
* Install the 'drag pointer' module via the Module Store.
### Setting up the instances in IP-Symcon
Under 'Add Instance' the 'Drag Pointer' module can be found using the quick filter.
- More information about adding instances in the [Instances documentation](https://www.symcon.de/service/dokumentation/konzepte/instanzen/#Instanz_hinzufügen)
__Configuration page__:
| Name | Description |
| --------------- | ----------------------------------------------------------------------------------------- |
| Target variable | Variable whose values are read out |
| Options | __Maximum__ Specifies whether the drag pointer should display the highest or lowest value |
| Interval | Time in seconds until the drag pointer is reset to the value of the target variable. |
### status variables and profiles
The status variables/categories are created automatically. Deleting individual ones can lead to malfunctions.
#### Status variables
| Name | Type | Description |
| ------------ | ------- | -------------------------------------------------- |
| Drag pointer | float | Displays the highest/lowest value since last reset |
| Reset | boolean | Association to reset the drag pointer |
#### Profiles
| Name | type |
| -------- | ---- |
| SZ.Reset | bool |
### Visualization
Display of drag pointer, as well as reset of drag pointer
## SZ_Reset
Source: https://www.symcon.de/en/service/documentation/module-reference/logic/dragpointer/sz-reset/
`bool SZ_Reset(int $InstanceID)`
_Requires Symcon >= 6.0_
**Parameters**
- `$InstanceID` (int): ID of the drag pointer instance
**Returns** (bool): If the command could be executed successfully, it returns **TRUE** as result, otherwise **FALSE**.
ID of the drag pointer instance
**Example**
```text
SZ_Reset(12345);
```
---
# Game Collection
> Symcon documentation · English · generated on 2026-09-26
> Index: https://www.symcon.de/en/llms.txt
Source: https://www.symcon.de/en/service/documentation/module-reference/logic/game-collection/
A collection of simple games which can be played via the Visualization.
## Rock Paper Scissors
Source: https://www.symcon.de/en/service/documentation/module-reference/logic/game-collection/rock-paper-scissors/
_Requires Symcon >= 5.0_
### function scope
- Rock, Paper, Scissors in IP-Symcon
### Software Installation
- Via the [Module Store](https://www.symcon.de/de/service/dokumentation/komponenten/verwaltungskonsole/module-store/) install the game collection module.
### Setting up the instances in IP-Symcon
- Under "Add Instance" the 'RockPaperSissors' module can be easily found using the quick search.
### status variables and profiles
The status variables/categories are created automatically. Deleting individual ones can lead to malfunctions.
#### Statusvariables
| Name | Type | Description |
| -------------- | ------- | --------------------------------- |
| Your choice | Integer | Player's choice. |
| Computer chose | Integer | Shows the choice of the computer. |
| Result | String | Shows the result. |
#### Profile:
| Name | Type |
| ---------- | ------- |
| SSP.Choice | Integer |
### Visualization
This is where the game is played.
## Number Guessing
Source: https://www.symcon.de/en/service/documentation/module-reference/logic/game-collection/number-guessing/
_Requires Symcon >= 5.0_
### range of functions
- A little game where a random number has to be guessed.
### Software installation
- Via the [Module Store](https://www.symcon.de/de/service/dokumentation/komponenten/verwaltungskonsole/module-store/) install the game collection module.
### Setting up the instances in IP-Symcon
- Under "Add Instance" the 'Number Guessing' module can be easily found using the quick search.
#### Configuration page:
| name | type | description |
| ------------------------------- | ------- | ---------------------------------------------------------- |
| Minimum of the generated number | Integer | The minimum of the number that will be generated. |
| Maximum of the generated number | Integer | Maximum of the generated number. |
| Number of allowed attempts | Integer | The number of attempts the player has to guess the number. |
### status variables
The status variables/categories are created automatically. Deleting individual ones can lead to malfunctions.
#### Status variables
| Name | Type | Description |
| -------------- | ------- | --------------------------------------------------------------- |
| Moves left | Integer | Shows the number of remaining attempts. |
| Your number is | String | Shows if the guess is greater or less than the number to guess. |
| Your Hint | Integer | The input field for the player's hint. |
### Visualization
This is where the game is played.
## ZR_Generate
Source: https://www.symcon.de/en/service/documentation/module-reference/logic/game-collection/number-guessing/zr-generate/
`bool ZR_Generate(int $InstanceID)`
_Requires Symcon >= 5.0_
**Parameters**
- `$InstanceID` (int): ID of the Instance
**Returns** (bool): If the command could be executed successfully, it returns __TRUE__ as result, otherwise __FALSE__.
ID of the Instance
**Example**
```text
ZR_Generate(12345);
```
---
# Scene Control
> Symcon documentation · English · generated on 2026-09-26
> Index: https://www.symcon.de/en/llms.txt
Source: https://www.symcon.de/en/service/documentation/module-reference/logic/scene-control/
_Requires Symcon >= 5.0_
The scene control saves values of variables stored in a list in scenes and can call them up again from the Visualization and mobile apps at the press of a button.
The variables to be switched must be added to the "Variables" list in the instance configuration. Once all the variables required for a scene have been added and set to the desired value, they can be added to the corresponding scene using the "Save" button (in the Visualization). Now the scene can be called up at any time with the corresponding "Execute" button. The variables are set to the previously saved values.
### function scope
- Allows variables stored in a list to be saved and recalled via scenes.
- The currently active scene is displayed
- Display and operation via Visualization and mobile apps
- When a variable is replaced, scenes already created are retained and switch the new device
### software installation
- Install the 'Scene Controll' module via the [Module Store](https://www.symcon.de/de/service/dokumentation/komponenten/verwaltungskonsole/module-store/).
### Set up the instances in IP-Symcon
- Under "Add Instance" the 'Scene Controll' module can be found using the quick filter.
- More information about adding instances in the [Instances documentation](https://www.symcon.de/en/service/documentation/basics/instances/)
#### Configuration Page:
| Name | Description |
| --------- | --------------------------------- |
| Scenes | Number of scenes provided. |
| Variables | List of variables to be switched. |
### status variables and profiles
The status variables are created automatically. Deleting individual ones can lead to malfunctions.
#### Statusvariables
The scenes are numbered 1,2..n in ascending order.
| Name | Type | Description |
| ------------ | ------- | ----------------------------------------------------------------------------------------------------------------------------------------------------------------------------------------------------------------------- |
| Active scene | String | Displays the name of the currently active scene. If the values of the variables can be assigned to a scene, this is also displayed. If the values of the variables do not correspond to a scene, 'Unknown' is displayed |
| Scene 1..n | Integer | For display in the Visualization and the mobile apps. Calls "Save" or "Call". |
#### Profile:
| Name | Type |
| ---------------- | ------- |
| SZS.SceneControl | Integer |
### Visualization
Via the Visualization the current values of the listed target variables can be stored in a Scene. Via "Execute" already saved scenes can be called.
## SZS_CallScene
Source: https://www.symcon.de/en/service/documentation/module-reference/logic/scene-control/szs-callscene/
`bool SZS_CallScene(int $InstanceID, int $SceneNumber)`
_Requires Symcon >= 5.0_
Calls the scene and sets it associated variables
**Parameters**
- `$InstanceID` (int): ID of the Instance
- `$SceneNumber` (int): Number of the Scene
**Returns** (bool): If the command could be executed successfully, it returns __TRUE__ as result, otherwise __FALSE__.
Number of the Scene
**Example**
```text
SZS_CallScene(12345, 1);
```
## SZS_GetActiveScene
Source: https://www.symcon.de/en/service/documentation/module-reference/logic/scene-control/szs-getactivescene/
`int SZS_GetActiveScene(int $InstanceID)`
_Requires Symcon >= 5.0_
**Parameters**
- `$InstanceID` (int): ID of the Instance
**Returns** (int): Number of the active scene. If an unknown scene is active, 0 is returned.
ID of the Instance
**Example**
```text
SZS_GetActiveScene(12345);
```
## SZS_SaveScene
Source: https://www.symcon.de/en/service/documentation/module-reference/logic/scene-control/szs-savescene/
`bool SZS_SaveScene(int $InstanceID, int $SceneNumber)`
_Requires Symcon >= 5.0_
**Parameters**
- `$InstanceID` (int): ID of Instance
- `$SceneNumber` (int): Number of the Scene
**Returns** (bool): Konnte der Befehl erfolgreich ausgeführt werden, liefert er als Ergebnis __TRUE__, andernfalls __FALSE__.
Number of the Scene
**Example**
```text
SZS_SaveScene(12345, 1);
```
---
# Dew Point Temperature Calculation
> Symcon documentation · English · generated on 2026-09-26
> Index: https://www.symcon.de/en/llms.txt
Source: https://www.symcon.de/en/service/documentation/module-reference/logic/dew-point-temperature-calculation/
Calculation of the dew point with the relative humidity and room temperature.
The calculation is based on the formulas from the page [Wetterochs](https://www.wetterochs.de/wetter/feuchte.html).
### function scope
* Calculation of dew point temperature
* Calculation of the temperature above which the risk of mold growth increases
### Software installation
* Install the 'DewPointCalculation' module via the Module Store.
### Set up the instances in IP-Symcon
Under 'Add Instance' the 'DewPointCalculation' module can be found using the quick filter.
- More information about adding instances in the [Instances documentation](https://www.symcon.de/service/dokumentation/konzepte/instanzen/#Instanz_hinzufügen)
__Configuration page__:
| name | description |
| ---------------- | ---------------------------------------- |
| Room temperature | Temperature prevailing in the room in °C |
| Humidity | Relative humidity, which prevails |
### status variables
The status variables/categories are created automatically. Deleting individual ones can lead to malfunctions.
#### Status variables
| Name | Type | Description |
| ---------------------------- | ------- | --------------------------------------------------------------------------------------------------------------------------------------------------------------------------------- |
| dew point | float | temperature, when falling below, excess water vapor will turn into water |
| temperature for risk of mold | float | temperature, when falling below this increases the risk of mold growth |
| Alarm for mold risk | boolean | Alarm, which is triggered when the temperature falls below the temperature for mold risk. It will be turned off when the room temperature is 1°C above the mold risk temperature. |
---
# Staircase Light Controls
> Symcon documentation · English · generated on 2026-09-26
> Index: https://www.symcon.de/en/llms.txt
Source: https://www.symcon.de/en/service/documentation/module-reference/logic/staircase-light-controls/
_Requires Symcon >= 5.0_
After a trigger is activated, the light in the staircase turns on. If the trigger is activated repeatedly, the light remains on and the timer is reset. Only when no further triggering takes place for a predefined time will the light be switched off.
### Function scope
- Selection of input and output variables in a list.
- Selection of the duration before the light is switched off.
- Specification of brightness depending on a night mode variable
- .Reversed profiles are supported for both input and output variables
- Possibility to display the remaining time before the light turns off.
### Software installation
- Use the [Module Store](https://www.symcon.de/en/service/documentation/components/management-console/module-store/) to install the 'Staircase Light Controls' module.
### Setting up instances in IP-Symcon
- Under "Add Instance" the 'Staircase Light Controls' module can be found using the quick filter.
- More information about adding instances in the [instances documentation](https://www.symcon.de/en/service/documentation/basics/instances/)
#### Configuration Page:
| Name | Description |
| ---------------------- | ------------------------------------------------------------------------------------------------------------------------------------------------------------------------------------------------------------------------------------------------------------------------------------------------------------------------------------- |
| Input Sensors | List of input sensors, which should activate the light, e.g. motion sensors or push buttons - The light will be activated as soon as a variable is set to active. Variables with a value that is not false, 0, or "" are considered active here. If the variable has a .Reversed profile, the mentioned values are considered active. |
| Output variables | List of variables that are active, i.e. set to their maximum value and represent the light. If a variable has a .Reversed profile it will be switched to its minimum value. Variables of the type String are not switched. The variables are switched active when a sensor from the input sensor list is triggered. |
| Duration | After the selected duration elapses without another input sensor being triggered, the light will be deactivated. |
| Resend action | If an unreliable radio system is used, it may be necessary to resend the action at each pulse. Normally this option should remain deactivated, because continuous sending of the action for radio actuators may use up the duty cycle. |
| Display remaining time | If active, the remaining time until switch off is displayed in a variable. |
| Update interval | The interval in which the "Remaining time" variable is updated. |
| Night/Day Mode | Allows to switch the selected variables to different values based on the time of day, or the ambient brightness |
#### Night/Day Mode - Night/Day Varaible
| Name | Description |
| ----------------------- | -------------------------------------------------------------------------------------------------------------------------------------------------------------------------------------------- |
| Day/Night | A variable that indicates whether it is night or day. |
| Inverted | Specifies whether the value of the night mode variable should be inverted. This is necessary if the actual day variable is to be used by the location instance. This is FALSE if it is dark. |
| Brightness (night mode) | Specifies the brightness in percent that should be switched at night. |
| Brightness (Day Mode) | Specifies the brightness in percent to switch to during the day. |
#### night/day-mode-ambient-brightness-variable
| Name | Description |
| ---------------------------- | ------------------------------------------------------------------------------------------- |
| Ambient Brightness | The variable used as ambient brightness. |
| Ambient Brightness Threshold | The threshold at which to switch between day and night values. |
| Brightness (night mode) | Specifies the brightness in percent to be switched when the brightness falls below. |
| Brightness (Day mode) | Specifies the brightness in percent that is to be switched when the brightness is exceeded. |
### status variables
#### Statusvariablen
| name | type | description |
| ------------------------ | ------- | ----------------------------------------------------------------------------------------- |
| Staircase control active | Boolean | The variable indicates whether the staircase control is active |
| Remaining time | String | If "Show remaining time" is active, the remaining time until switch off is displayed here |
## THL_SetActive
Source: https://www.symcon.de/en/service/documentation/module-reference/logic/staircase-light-controls/thl-setactive/
`bool THL_SetActive(int $InstanceID, bool $Value)`
_Requires Symcon >= 5.0_
**Parameters**
- `$InstanceID` (int): ID of the Instance
- `$Value` (bool): __TODO__
**Returns** (bool): If the command could be executed successfully, it returns __TRUE__ as result, otherwise __FALSE__.
__TODO__
**Example**
```text
THL_SetActive(12345, true);
```
## THL_Start
Source: https://www.symcon.de/en/service/documentation/module-reference/logic/staircase-light-controls/thl-start/
`bool THL_Start(int $InstanceID)`
_Requires Symcon >= 5.0_
**Parameters**
- `$InstanceID` (int): ID of the Instance
**Returns** (bool): If the command could be executed successfully, it returns __TRUE__ as result, otherwise __FALSE__.
ID of the Instance
**Example**
```text
THL_Start(12345);
```
## THL_Stop
Source: https://www.symcon.de/en/service/documentation/module-reference/logic/staircase-light-controls/thl-stop/
`bool THL_Stop(int $InstanceID)`
_Requires Symcon >= 5.0_
**Parameters**
- `$InstanceID` (int): ID of the Instance
**Returns** (bool): If the command could be executed successfully, it returns __TRUE__ as result, otherwise __FALSE__.
ID of the Instance
**Example**
```text
THL_Stop(12345);
```
---
# Renamer
> Symcon documentation · English · generated on 2026-09-26
> Index: https://www.symcon.de/en/llms.txt
Source: https://www.symcon.de/en/service/documentation/module-reference/logic/renamer/
_Requires Symcon >= 4.4_
Enables renaming objects from the Visualization.
### function scope
- Allows renaming multiple objects from the Visualization.
- Name changes of objects that are not made by the module are not passed to the status variables.
### software installation
- Via the [Module Store](https://www.symcon.de/en/service/documentation/components/management-console/module-store/) install the 'Renamer' module.
### Setting up instances in IP-Symcon
- Under "Add instance" the 'Renamer' module can be found using the quick filter.
- More information about adding instances in the [Instances documentation](https://www.symcon.de/en/service/documentation/basics/instances/)
#### Configuration Page:
| name | description |
| ------- | ------------------------------------------------------------------------------------------------- |
| Objects | A list to which all objects must be added that should be able to be renamed in the Visualization. |
### status variables
#### Status variables
A status variable of type string is created for each object selected in the instance configuration. The name of the variable is the current location of the object which is renamed.
### Visualization
Here the previously selected objects can be renamed.
---
# Rain Central
> Symcon documentation · English · generated on 2026-09-26
> Index: https://www.symcon.de/en/llms.txt
Source: https://www.symcon.de/en/service/documentation/module-reference/logic/rain-central/
_Requires Symcon >= 4.2_
The module calculates a weighted rain value in a selected area of the radar image.
### function scope
- Calculates instantaneous rainfall in a self-determined area of the rain radar.
- Selection between statewide or nationwide radar images.
- The radar image and the calculation takes place automatically every 15 min.
### software installation
- Install the module 'Rain Central' via the [Module Store](https://www.symcon.de/en/service/documentation/components/management-console/module-store/).
### Setting up the instances in IP-Symcon
- Under "Add Instance" the 'RainCentral' module can be found using the quick filter.
- More information about adding instances in the [Instances documentation](https://www.symcon.de/en/service/documentation/basics/instances/)
#### Configuration page:
| Name | Description |
| ------ | -------------------------------------------- |
| Area | Selection of state or nationwide map section |
| X | X-position from the center of the rectangle |
| Y | Y-position from the center of the rectangle |
| Radius | Edge length of the rectangle in pixels |
### status variables
The status variables/categories are created automatically. Deleting individual ones can lead to malfunctions.
#### Status variables
| Name | Type | Description |
| ----------- | ------- | -------------------------------------------------------------------------------------------------------------------------------- |
| Rain Value | Integer | Weighted value of the evaluated rain amount. 8-level weighting: Light rain = light blue = 1 -> ... -> Heavy rain = dark blue = 8 |
| Radar image | Media | Radar image of the selected map section |
### Visualization
The Visualization is used to display the variables and the radar image. No further control or separate display is integrated. The radar image also shows the evaluated section of the car.
## UWZ_RequestInfo
Source: https://www.symcon.de/en/service/documentation/module-reference/logic/rain-central/uwz-requestinfo/
`bool UWZ_RequestInfo(int $InstanceID)`
_Requires Symcon >= 4.2_
**Parameters**
- `$InstanceID` (int): ID of the Instance
**Returns** (bool): If the command could be executed successfully, it returns __TRUE__ as result, otherwise __FALSE__.
ID of the Instance
**Example**
```text
UWZ_RequestInfo(12345);
```
---
# Variable Comparison
> Symcon documentation · English · generated on 2026-09-26
> Index: https://www.symcon.de/en/llms.txt
Source: https://www.symcon.de/en/service/documentation/module-reference/logic/variable-comparison/
_Requires Symcon >= 6.0_
This module was sponsored by [IB-Jaetzel](https://ib-jaetzel.de/).
The module creates a graph of point clouds based on one or more pairs of variables and a line through the point cloud using simple linear regression. The diagram can be output as SVG or PNG.
### feature
- Create a diagram with one or more pairs of values
- Output of the diagram as SVG or PNG
- Output of slope, y-axis intercept, function and coefficient of determination of the graph
### software installation
- Via the [Module Store](https://www.symcon.de/en/service/documentation/components/management-console/module-store/) install the 'VariableComparison' module.
### Set up instances in IP-Symcon
- Under 'Add Instance' the 'VariableComparison' module can be found using the quick filter.
- More information about adding instances in the [Instances documentation](https://www.symcon.de/en/service/documentation/basics/instances/)
#### Configuration Page:
Values:
| name | description |
| ----------------- | ---------------------------------------------------------- |
| X value | Variable selection for the X axis |
| Y value | Variable selection for the Y axis |
| point | Color selection for the point macro |
| Line | Color selection for the line |
| Aggregation Level | Level of how detailed the data is fetched from the archive |
Diagram settings:
| Name | Description |
| ---------------- | ------------------------------------------------------------ |
| Axes small steps | Specifies in which steps small markings should be |
| Axes large steps | Specifies in which steps the marking with labeling is |
| Width | Specifies how wide the diagram is |
| Height | Indicates how high the diagram is |
| Y - Min | Indicates the minimum value on the Y-axis |
| Y - Max | Indicates the maximum value on the Y-axis |
| X - Min | Indicates the minimum value on the X-axis |
| X - Max | Indicates the maximum value on the X-axis |
| Digram Format | Specifies whether the diagram should be output as SVG or PNG |
### status variables
The status variables/categories are created automatically. Deleting individual ones can lead to malfunctions.
#### Status variables
| Name | Type | Description |
| ---------------------------- | -------------- | -------------------------------------------------------- |
| Function | string | Specifies the mathematical function of the graph |
| b | Float | Describes the y-axis intercept of the graph |
| m | Float | Describes the slope of the graph |
| Coefficient of determination | Float | Describes how exactly the graph fits the point cloud |
| Start Date | Integer | Date from which the point cloud should start |
| End Date | Integer | Date to which the point cloud goes |
| Chart | String / Media | Returns the chart as PNG or SVG depending on the setting |
## LR_Download
Source: https://www.symcon.de/en/service/documentation/module-reference/logic/variable-comparison/lr-download/
`void LR_Download(int $InstanceID)`
_Requires Symcon >= 6.0_
Regenerates the graph and outputs an address
**Parameters**
- `$InstanceID` (int): ID of the Instance
**Returns** (void): No return.
ID of the Instance
**Example**
```text
LR_Download(12345);
```
## LR_GenerateChart
Source: https://www.symcon.de/en/service/documentation/module-reference/logic/variable-comparison/lr-generatechart/
`array LR_GenerateChart(int $InstanceID)`
_Requires Symcon >= 6.0_
Regenerates the chart and returns it as SVG and PNG.
**Parameters**
- `$InstanceID` (int): Id of the Instance
**Returns** (array): SVG and PNG diagram
Id of the Instance
**Example**
```text
LR_GenerateChart(12345);
```
## LR_UpdateChart
Source: https://www.symcon.de/en/service/documentation/module-reference/logic/variable-comparison/lr-updatechart/
`void LR_UpdateChart(int $InstanceID)`
_Requires Symcon >= 6.0_
**Parameters**
- `$InstanceID` (int): ID of the Instance
**Returns** (void): No return.
ID of the Instance
**Example**
```text
LR_UpdateChart(12345);
```
---
# Virtuelle Devices
> Symcon documentation · English · generated on 2026-09-26
> Index: https://www.symcon.de/en/llms.txt
Source: https://www.symcon.de/en/service/documentation/module-reference/logic/virtuelle-devices/
The virtual devices simulate various functions of different devices.
## E-Car (Simulation)
Source: https://www.symcon.de/en/service/documentation/module-reference/logic/virtuelle-devices/e-car-simulation/
_Requires Symcon >= 6.0_
The electric car simulates the charging process of an electric car.
### range of functions
- Simulates the charging process via a wallbox
- Simulates a charging process with specified power in a simplified manner
### software installation
- Install the 'Virtual Devices' module via the Module Store
### Setting up the instances in IP-Symcon
Under 'Add instance' the 'E-Auto (Simulation)' module can be found using the quick filter.
- Further information on adding instances in the [Documentation of instances](https://www.symcon.de/en/llms/concepts.md)
#### Configuration page:
| name | description |
| -------- | ---------------------------------------------------------------------------------------------------------------------------------------------- |
| Mode | Options: 'Simple', in which only the power is specified. 'Wallbox', with extensive configuration to simulate the charging process at a wallbox |
| Variance | Specification of how much the consumption should fluctuate |
| Interval | Time between updates |
##### Mode: Simple
| Name | Description |
| ----- | -------------------- |
| Power | Maximum power needed |
##### Mode: Wallbox
| Name | Description |
| ------------------------------------------------------------------------ | ------------------------------------------ |
| Phases | How many phases the wallbox charges over |
| Split the phases into individual variables (simulates the Alfen Wallbox) | Split the phases into individual variables |
| Minimum current (per phase) | Minimum current per phase |
| Maximum current (per phase) | Maximum current per phase |
### status variables
The status variables/categories are created automatically. Deleting individual ones can lead to malfunctions.
#### status variables
| Name | Type | Description |
| -------------- | ------- | ---------------------------------------------------------------------------------------------------------------- |
| Status | Boolean | Staus, whether the loading process is currently running |
| Intensity | Integer | Available in Simpel mode and switches the intensity of consumption |
| Consumption | Float | Maximum charging power |
| SoC (current) | Integer | Current charge level |
| Power (target) | Float | Switches the consumption of the charging process |
| Current | Float | Available in wallbox mode and switches the current amperage of the phases. Can be divided into several variables |
## Heater (Simulation)
Source: https://www.symcon.de/en/service/documentation/module-reference/logic/virtuelle-devices/heater-simulation/
Simulates a heater.
### range of functions
- Simulates a heater.
### Software installation
Install the 'Virtual Devices' module via the Module Store.
### Setting up the instances in IP-Symcon
The 'Heater (simulation)' module can be found under 'Add instance' using the quick filter.
- Further information on adding instances can be found in the [Documentation of instances](https://www.symcon.de/service/dokumentation/konzepte/instanzen/#Instanz_hinzufügen)
__Configuration page__:
| Name | Description |
| -------- | ---------------------------------------------------------- |
| Power | Specification of how much the heater should consume |
| Variance | Specification of how much the consumption should fluctuate |
| Interval | Time interval of the updates |
### status variables
The status variables/categories are created automatically. Deleting individual ones can lead to malfunctions.
#### Status variables
| Name | Type | Description |
| ----------- | ------- | ------------------------------------ |
| Status | Boolean | Switches the heater on/off |
| Intensity | Integer | Switches the intensity of the heater |
| Consumption | Float | Displays the current consumption |
## Light (Simulation)
Source: https://www.symcon.de/en/service/documentation/module-reference/logic/virtuelle-devices/light-simulation/
Simulates a light.
### range of functions
- Simulates a light
### Software installation
Install the 'Virtual Devices' module via the Module Store.
### Setting up the instances in IP-Symcon
Under 'Add instance', the 'Light (simulation)' module can be found using the quick filter.
- Further information on adding instances can be found in the [Instances documentation](https://www.symcon.de/service/dokumentation/konzepte/instanzen/#Instanz_hinzufügen)
### status variables
The status variables/categories are created automatically. Deleting individual ones can lead to malfunctions.
#### Status variables
| Name | Type | Description |
| ----------------- | ------- | ------------------------------------------- |
| Status | Boolean | Switches the light on/off. |
| Brightness | Integer | Switches the brightness of the light |
| Color | Integer | Switches the color of the light |
| Color temperature | Integer | Switches the color temperature of the light |
### Visualization
Initially displays the light tile with several options in the tile visualization.
## Mediaplayer (Simulation)
Source: https://www.symcon.de/en/service/documentation/module-reference/logic/virtuelle-devices/mediaplayer-simulation/
Simulates a media player.
### range of functions
- Simulates a media player
### Software installation
Install the 'Virtual Devices' module via the Module Store.
### Setting up the instances in IP-Symcon
Under 'Add instance', the 'Mediaplayer (Simulation)' module can be found using the quick filter.
- Further information on adding instances can be found in the [Instances documentation](https://www.symcon.de/service/dokumentation/konzepte/instanzen/#Instanz_hinzufügen)
### status variables
The status variables/categories are created automatically. Deleting individual ones can lead to malfunctions.
#### Status variables
| Name | Type | Description |
| -------- | ------- | ------------------------------------------------------------- |
| Progress | Float | Shows the progress of the song |
| Artist | String | Displays the artist of the current song |
| Volume | Integer | Displays the volume |
| Song | String | Displays the current song |
| Mute | Boolean | Indicates whether the output is deactivated/activated |
| Playback | Integer | Displays the current playback status |
| Playlist | String | JSON encoded string with the next songs and their information |
| Repeat | Integer | Indicates whether the playlist, song or nothing is repeated |
| Shuffle | Boolean | Switches the random playback of the songs on/off |
| Cover | Image | Shows the cover of the song |
## PV-System (Simulation)
Source: https://www.symcon.de/en/service/documentation/module-reference/logic/virtuelle-devices/pv-system-simulation/
Simulation of a PV system
### range of functions
* Simulation of a PV system
### Software installation
* Install the 'Virtual Devices' module via the Module Store.
### Setting up the instances in IP-Symcon
Under 'Add instance', the 'PV system (simulation)' module can be found using the quick filter.
- Further information on adding instances can be found in the [Instances documentation](https://www.symcon.de/service/dokumentation/konzepte/instanzen/#Instanz_hinzufügen)
__Configuration page__:
| Name | Description |
| ----- | ------------------------------------------------------ |
| Power | Specification of how much the PV system should consume |
### status variables and profiles
The status variables/categories are created automatically. Deleting individual ones can lead to malfunctions.
#### Status variables
| Name | Type | Description |
| ---------- | ----- | ------------------------------------------ |
| Generation | Float | Indicates how much the PV system generates |
#### Profiles
| Name | Type |
| ------------- | ----- |
| WattSlider.10 | float |
## Shutter (Simulation)
Source: https://www.symcon.de/en/service/documentation/module-reference/logic/virtuelle-devices/shutter-simulation/
Simulates a roller shutter.
### range of functions
* Simulates a roller shutter
### Software installation
* Install the 'Virtual Devices' module via the Module Store.
### Setting up the instances in IP-Symcon
Under 'Add instance', the 'Rollo (simulation)' module can be found using the quick filter.
- Further information on adding instances can be found in the [Instances documentation](https://www.symcon.de/service/dokumentation/konzepte/instanzen/#Instanz_hinzufügen)
### status variables
The status variables/categories are created automatically. Deleting individual ones can lead to malfunctions.
#### Status variables
| Name | Type | Description |
| ------- | ------- | ------------------- |
| Blind | Integer | Height of the blind |
| Lamella | Integer | Height of slats |
### visualization
The shutter tile is displayed in the tile visualization.
## Thermostat (Simulation)
Source: https://www.symcon.de/en/service/documentation/module-reference/logic/virtuelle-devices/thermostat-simulation/
Simulates a thermostat.
### range of functions
* Simulates a thermostat
### Software installation
* Install the 'Virtual Devices' module via the Module Store.
### Setting up the instances in IP-Symcon
Under 'Add instance', the 'Thermostat (simulation)' module can be found using the quick filter.
- Further information on adding instances can be found in the [Instances documentation](https://www.symcon.de/service/dokumentation/konzepte/instanzen/#Instanz_hinzufügen)
__Configuration page__:
| Name | Description |
| ------------------------------------------------ | ---------------------------------- |
| Create logged values for the current temperature | |
| hour value | table with the values to be logged |
### status variables
The status variables/categories are created automatically. Deleting individual ones can lead to malfunctions.
#### Status variables
| Name | Type | Description |
| ------------------ | ----- | ------------------------------------ |
| Set temperature | Float | Variable for setting the temperature |
| Actual temperature | Float | Current temperature |
### Visualization
The heating tile is displayed in the tile visualization.
## Consumption/Costs
Source: https://www.symcon.de/en/service/documentation/module-reference/logic/virtuelle-devices/consumption-costs/
Calculates the costs with consumption in standby mode.
### range of functions
* Calculates the costs of the given consumption
### Software installation
* Install the 'Virtual Devices' module via the Module Store.
### Setting up the instances in IP-Symcon
Under 'Add instance', the 'Consumption/costs' module can be found using the quick filter.
- Further information on adding instances can be found in the [Instances documentation](https://www.symcon.de/service/dokumentation/konzepte/instanzen/#Instanz_hinzufügen)
### status variables and profiles
The status variables/categories are created automatically. Deleting individual ones can lead to malfunctions.
#### Status variables
| Name | Type | Description |
| ------------------- | ----- | --------------------------- |
| Standby consumption | Float | Consumption in standby mode |
| Costs per kWh | Float | Costs per kWh |
| Total cost per year | Float | Total cost per year |
#### Profiles
| Name | Type |
| ---------- | ----- |
| WattSlider | Float |
| EuroCent | Float |
## Counter (Simulation)
Source: https://www.symcon.de/en/service/documentation/module-reference/logic/virtuelle-devices/counter-simulation/
Simulates an adjustable number of counters.
### range of functions
- Simulates several meters
### Software installation
Install the 'Virtual Devices' module via the Module Store.
### Setting up the instances in IP-Symcon
Under 'Add instance', the 'Counter (simulation)' module can be found using the quick filter.
- Further information on adding instances can be found in the [Instances documentation](https://www.symcon.de/service/dokumentation/konzepte/instanzen/#Instanz_hinzufügen)
__Configuration page__:
| Name | Description |
| ---------------------------------------------- | ----------------------------------------- |
| Number of counters | Number of counters to be simulated. |
| Minimum value per hour | Minimum value to be added |
| Maximum value per hour | Maximum value to be added |
| Maximum distance between two subsequent values | Maximum distance between two values |
| Use a different profile for each variable | Each counter receives a different profile |
| Create graph | Creates a multigraph |
### status variables
The status variables/categories are created automatically. Deleting individual ones can lead to malfunctions.
#### Status variables
| Name | Type | Description |
| --------- | ---------- | ---------------------------------------------------------- |
| Counter x | Float | A counter variable. x stands for the number of the counter |
| Graph | Multigraph | A multigraph of the counters |
---
# Random Lighting
> Symcon documentation · English · generated on 2026-09-26
> Index: https://www.symcon.de/en/llms.txt
Source: https://www.symcon.de/en/service/documentation/module-reference/logic/random-lighting/
_Requires Symcon >= 5.0_
The module allows to switch the color value of lamps randomly between different colors.
### function scope
- Color variables can be added to a list
- A list of colors can be selected from which can be expanded
- When the module is deactivated, the selected color variables are set to the value before activation
- Setting of the interval in which the colors should be changed
### software installation
- Using the [Module Store](https://www.symcon.de/de/service/dokumentation/komponenten/verwaltungskonsole/module-store/) install the 'Random Lighting' module.
### Set up instances in IP-Symcon
- Under 'Add Instance' the 'Random Lighting' module can be found using the quick filter.
- More information about adding instances in the [Instances documentation](https://www.symcon.de/service/dokumentation/konzepte/instanzen/#Instanz_hinzuf%C3%BCgen)
#### Configuration Page:
| name | description |
| ---------------------- | ----------------------------------------------------------------------------- |
| Color Variables | List of color variables to be switched |
| Colors | Colors from which one is randomly selected for switching |
| Change Interval | Interval between each switching in seconds |
| Simultaneous switching | defines if all color variables are set to the same color or to different ones |
### status variables
The status variables/categories are created automatically. Deleting individual ones can lead to malfunctions.
#### Status variables
| Name | Type | Description |
| ------ | ------- | ----------------------------- |
| Active | Boolean | Switches the module on or off |
## ZB_ChangeLight
Source: https://www.symcon.de/en/service/documentation/module-reference/logic/random-lighting/zb-changelight/
`bool ZB_ChangeLight(int $InstanceID)`
_Requires Symcon >= 5.0_
**Parameters**
- `$InstanceID` (int): ID of the Instance
**Returns** (bool): If the command could be executed successfully, it returns __TRUE__ as result, otherwise __FALSE__.
ID of the Instance
**Example**
```text
ZB_ChangeLight(12345);
```
---
# Work Efficiency
> Symcon documentation · English · generated on 2026-09-26
> Index: https://www.symcon.de/en/llms.txt
Source: https://www.symcon.de/en/service/documentation/module-reference/energy/work-efficiency/
_Requires Symcon >= 6.3_
The efficiency is calculated.
### function scope
* The efficiency for the past 365 days
* The efficiency for the past 30 days
### software-installation
Using the Module Store, install the 'work efficiency' module.
### Setting up the instances in IP-Symcon
Under 'Add Instance' the 'Work efficiency' module can be found using the quick filter.
- More information about adding instances in the [Instances documentation](https://www.symcon.de/en/llms/concepts.md)
#### configuration page
| name | description |
| ----------------------- | ----------------------------------- |
| Thermal energy (kWh) | Variable logged as counter |
| Electrical Energy (kWh) | Variable which is logged as counter |
### status variables
The status variables are created automatically. Deleting individual ones can lead to malfunctions.
| Name | Type | Description |
| --------- | ----- | --------------------------------------------------- |
| SPF Month | Float | Stands for the sessional performance facto on month |
| SPF Year | Float | Stands for the sessional performance factor on year |
## ARZ_Calculation
Source: https://www.symcon.de/en/service/documentation/module-reference/energy/work-efficiency/arz-calculation/
`bool ARZ_Calculation(int $InstanceID)`
_Requires Symcon >= 6.3_
**Parameters**
- `$InstanceID` (int): Instance ID
**Returns** (bool): If the command could be executed successfully, it returns __TRUE__ as result, otherwise __FALSE__.
Instance ID
**Example**
```php
ARZ_Calculation(12345)
```
---
# Operating Hours Counter
> Symcon documentation · English · generated on 2026-09-26
> Index: https://www.symcon.de/en/llms.txt
Source: https://www.symcon.de/en/service/documentation/module-reference/energy/operating-hours-counter/
_Requires Symcon >= 5.2_
With the help of the operating hours counter module, the operating time of a device can be determined and displayed.
### Function scope
- Displaying the hours a device is active
- Adding the device by a Boolean type variable
- Displaying the costs for the current period, the last period and prediction for the end of the period
- Possibility to calculate the costs with a dynamic price
### software installation
Through the [Module Store](https://www.symcon.de/en/service/documentation/components/management-console/module-store/) install the 'Operating Hours Counter' module.
### Setting up instances in IP-Symcon
- Under 'Add Instance' the 'Operating Hours Counter' module can be found using the quick filter.
- More information about adding instances in the [Instances documentation](https://www.symcon.de/en/service/documentation/basics/instances/).
#### configuration page
| Name | Description |
| ---------------- | ------------------------------------------------------------------------------------------------------------------------------------------------------------------------ |
| Active | Determines if the invoice is updated based on the set interval |
| Source | The Boolean type variable that indicates the activity status of a device, where true is considered active. To calculate the operating hours this variable must be logged |
| Level | The level specifies the start of the period that is considered (start of day, week, month, year) as well as the aggregation level |
| Update interval | The interval in minutes in which the operating time is recalculated |
| Cost calculation | Defines if the cost calculation will be executed |
| Price type | Option whether the price is fixed or dynamically calculated by a variable |
| Price | The price which is calculated per operating hour |
| Calculate | Calculates the operating time with all specified parameters |
If the option "Dynamic" is set in the price type, a logged variable is required which contains the cost price.
### status variables and profiles
The status variables/categories are created automatically. Deleting individual ones can lead to malfunctions.
#### Statusvariablen
| Name | Type | Description |
| ----------------------------------- | ----- | ---------------------------------------------------------------------------- |
| Operating hours | float | The calculated operating hours of the source variable in the selected period |
| Cost of the current period | float | The calculated cost of the current period |
| Cost of the last period | float | The calculated cost of the last completed period |
| Prediction at the end of the period | float | Prediction of the costs at the end of the current period |
#### Profile
| name | type |
| ------------------ | ----- |
| BSZ.OperatingHours | float |
### Visualization
The Visualization displays the operating hours.
## BSZ_Calculate
Source: https://www.symcon.de/en/service/documentation/module-reference/energy/operating-hours-counter/bsz-calculate/
`void BSZ_Calculate(int $InstanceID)`
_Requires Symcon >= 5.2_
**Parameters**
- `$InstanceID` (int): ID of the Instance
**Returns** (void): No return.
ID of the Instance
**Example**
```text
BSZ_Calculate(12345);
```
---
# Energy Dashboard
> Symcon documentation · English · generated on 2026-09-26
> Index: https://www.symcon.de/en/llms.txt
Source: https://www.symcon.de/en/service/documentation/module-reference/energy/energy-dashboard/
_Requires Symcon >= 8.1_
The energy dashboard serves as an overview of several meters with several diagrams.
> **Note:** The Energy Dashboard is a paid extension that can be purchased for any existing Symcon license. The extension can be purchased directly in the [Shop](https://www.symcon.de/en/shop/enterprise/ips-enterprise-edb).
> **Warning:** The enterprise features are explained below. The features for all users are still under development.
### setting up the energy dashboard
To use the energy dashboard, it must first be set up. To do this, the instance of a ‘tile visualisation’ is called up in the console. Here you should ensure that the checkbox with the label ‘Show energy dashboard’ is activated in the ‘Appbar’ section. This will display the lightning bolt and thus the access in the visualisation.
The types and areas can now be defined in the ‘Energy dashboard’ section.

#### Definition of types
Initially, the types electricity, water and gas are defined.
| name | type | description |
| ------------ | ----------------- | ------------------------------------------------------------------------------------------------------------------------------------ |
| Name | Free text | The name of the type, which can be freely specified by the user. |
| Basic colour | Colour selection | Selection of a basic colour for the diagrams. All areas of the same type are displayed in a variation of the colour in the diagrams. |
| Profile | Profile selection | Selection of a profile. This allows the values of the diagrams to be formatted with a suffix/prefix. |
#### configuration of areas

The areas are set up as a tree. Click on Add to create an area at the top level.
Click on an area and then click on Add to create an area below the selected area.
Each area has the following configurations:
| Name | Type | Description |
| --------- | --------------------- | ------------------------------------------------------------------------------------------ |
| Area name | Free text | Freely assignable name for the area. This will be displayed later in the energy dashboard. |
| Location | Coordinates selection | Optional selection of the coordinates of the area. |
| Meters | List | Configuration of the relevant meters |
#### configuration of the counters
The counters can be added optionally.
| name | type | description |
| ------- | ------------------ | ------------------------------------------------------------------------------------ |
| Counter | Variable selection | Selection of the counter variable that provides the aggregated values for this area. |
| Type | Type selection | The type of counter based on the previously defined types |
### utilisation of the energy dashboard
If the energy dashboard has been activated, a lightning bolt icon appears in the app bar of the visualisation. Click on it to open the energy dashboard.
#### The Energy Dashboard

##### Tree
The tree reflects the configuration of the areas by name.
The first area is initially selected. If there is an arrow next to the area, the area can be expanded, allowing you to access subordinate areas.
Clicking on the various areas updates the values of the diagrams and the map.
##### Diagrams
When calling up the energy dashboard, the current day is selected as the time period and the time span hour.
###### Detail view
The selected time period is displayed in the detailed view.
###### Consumption diagram

The consumption diagram shows the selected period with the time span of the day. The outer doughnut shows the selected counter, if necessary, and the counters directly below it. The inner doughnut is displayed if there is still a level below the selected area.

Click on the maximise button to enlarge the doughnut and display a detailed list of the entries.
###### Conditional display of counters
Counters are displayed conditionally in the detailed view and the doughnut chart.
- If the selected area has a counter and no areas below it, this is displayed.
- If the selected area has no counter and no areas below it, it is not displayed.
- If the selected area has areas below it, the area counters below it are displayed.
- If the area has a counter and its total does not match the subordinate area counters, the difference is displayed in grey in addition to the subordinate area counters.
###### Trend diagram

The trend diagram shows the percentage relationship between the top area and the selected area.
##### map

The map lists the configured coordinates. If no coordinates are configured for the selected area, the subordinate areas are searched for coordinates. This means that there can also be several markers on the map. If no area is found, a text is displayed instead of the map. OpenStreetMap is used for the map.
Translated with DeepL.com (free version)
---
# Energy Manager
> Symcon documentation · English · generated on 2026-09-26
> Index: https://www.symcon.de/en/llms.txt
Source: https://www.symcon.de/en/service/documentation/module-reference/energy/energy-manager/
_Requires Symcon >= 6.3_
The module automatically switches variables when the source energy falls below a certain level.
### Functional Scope
- Switching a device on when sufficient energy is available
- Switching a device off when there is no longer sufficient energy available
- Overnight charging of devices to ensure that an electric vehicle or energy storage is charged in the morning
- Cheap charging to automatically activate devices when electricity prices are low
- Restriction of devices in accordance with §14a EnWG and §9 EEG
- Management of energy storages to compensate for deficits
- Various calculation options
### Software Installation
- Via the [Module Store](https://www.symcon.de/en/llms/components/management-console.md) install the 'Energy Manager' module.
### Setting up the instances in IP-Symcon
- Under 'Add Instance' the 'Energy Manager' module can be found using the quick filter.
- More information about adding instances in the [Instances documentation](/en/service/documentation/basics/instances/#Create_instance)
#### Configuration page:
| Name | Description |
| --------------------------------- | ------------------------------------------------------------------------------------------------------------------------------------------------------------------------------------------------------------------------------------------------------------------------------------------------------------------------------------------------ |
| Mode | Selection of calculation option Absolute: Devices are switched on until the source energy is reached and switched off when the power exceeds the source energy Relative: Devices are switched on when the source energy is above zero and switched off when the source energy falls below zero |
| Hysteresis | Tolerance at which switching does not take place |
| Constellation for Surplus/Deficit | Selection of whether surplus and deficit are specified via a shared variable or two separate variables (only for Relative mode, since Symcon 8.1) |
| Available power (W) | Reference variable that contains the absolute available power for the Energy Manager (only for absolute mode) |
| Surplus (W) | Reference variable containing the current surplus (only for Relative mode) |
| Deficit (W) | Reference variable containing the current deficit (only for Relative mode and configuration "Two variables, one per function", since Symcon 8.1) |
| Invert | Selection of whether available power or surplus is positive or negative |
| Update Mode | With Timer: The status is updated at a fixed interval On Source Change: The status is always updated when Available power or Surplus is updated |
| Interval | Update interval of status (only for update mode With Timer) |
| Energy prices | Reference variable that contains the current electricity prices, provided by the module [Power Price](https://www.symcon.de/en/llms/modules/power-price.md) or another module that uses its format. This variable is only required for night-time charging or night-time runtime. If it is not selected, night-time charging or night-time runtime cannot be used. |
| Consumers | List of all consumers, see Consumers |
| Energy Storages | List of all energy storages, see Energy Storages |
| Electric Vehicles | List of all electric vehicles, see Electric vehicles |
| Configuration for §14a and §9 | Area to configure restrictions according to §14a EnWG and §9 EEG, see Configuration for §14a and §9 (since Symcon 8.1) |
#### Consumers
| Name | Description |
| ----------------------------------------------------------------------------- | ----------------------------------------------------------------------------------------------------------------------------------------------------------------------------------------------------------------------------------------------------------------------------------------------------------------------------------------------------------------------------------------------------------------------------------------------------------------------------------------------------------------------------- |
| Consumer | The variable to switch the consumer. If the variable is of type integer or float, the Energy Manager attempts to scale it if necessary. With Boolean, the consumer can only be switched on and off. |
| Maximum Usage | Consumption in watts when the consumer is completely switched on. |
| Current Usage (Optional) | Variable with the current usage of the device in watts. If none is set, the consumption is calculated based on the Consumer variable and the Maximum Usage (since Symcon 8.1) |
| Name (Optional) | The displayed name of the consumer. If no name is specified, the name of the consumer variable is used. |
| Condition (Optional) | If a condition is specified, the consumer is only activated if the condition defined here is fulfilled. |
| Hint for blocked by condition (Optional) | If the condition is not fulfilled, this text is displayed in the visualization. If no hint is defined, a standard text is displayed. |
| Minimum Runtime | If the consumer is activated, it runs for at least the time defined here in seconds. The Energy Manager can only deactivate the consumer again once the minimum runtime has expired after the initial activation. If the consumer is scalable, it can be scaled appropriately if there is not enough energy available, but it is never deactivated completely. |
| Follow-up Time | If there is no longer enough energy available for the consumer, it is only deactivated if the energy is not available for the duration defined here in seconds. In this way, short gaps in the available energy can be bridged. If the consumer is scalable, it can be scaled appropriately if there is not enough energy available, but is never deactivated completely. |
| If minimum runtime/follow-up time is active but condition is not fulfilled... | Define the behavior of the device if the condition is no longer met during the minimum runtime or follow-up time ...stop immediately: The device is deactivated at the next status update even though the time is still running ... only stop once minimum runtime/follow-up time has elapsed: The current time continues to run. The device is only deactivated after it has expired. (only if both a condition is set and minimum or follow-up time are positive, since Symcon 8.1) |
#### Energy Storages
| Name | Description |
| ----------------------------------------------------------------------------- | ----------------------------------------------------------------------------------------------------------------------------------------------------------------------------------------------------------------------------------------------------------------------------------------------------------------------------------------------------------------------------------------------------------------------------------------------------------------------------------------------------------------------------------------------------------------------------------------------------------------------------------------- |
| Template | Selection of a template via which the technical parameters of the device can be entered automatically. If "User-defined" is selected, all parameters are released and can be adjusted manually, otherwise they are locked and set by the template (since Symcon 8.1) |
| Instance | Selection of the instance matching the selected template. After selecting an instance, all parameters of the template are entered in the configuration. In some templates, specific parameters remain editable, as they are not explicitly contained in the template. In this case, corresponding information appears. (only if the template is not set to "User-defined", since Symcon 8.1) |
| Energy storage controllable? | Specify whether the energy storage device has variables for switching Controlled directly: The variables can be switched directly. If the Energy Manager wants to make adjustments, the corresponding variables are switched Controlled indirectly by omitting energy: The variables cannot be switched, but the current status can be read. If the Energy Manager wants to make changes to the energy storage, this is done indirectly, for example by deliberately releasing energy and not consuming it, so that the energy storage's automatic system uses it for charging (since Symcon 8.1) |
| Constellation for Charge/Discharge | Selection of whether charge and discharge are controlled via a shared variable or two separate variables (only if energy storage is controllable, since Symcon 8.1) |
| Charge Variable | The variable to switch the charging of the energy storage. If the variable is of type integer or float, the Energy Manager attempts to scale it as required. With Boolean, charging can only be activated or deactivated. |
| Discharge Variable | The variable to switch the discharging of the energy storage device. If the variable is of type Integer or Float, the Energy Manager attempts to scale it as required. With Boolean, discharging can only be activated or deactivated. (only if energy storage is controllable and configuration "Two variables, one per function", since Symcon 8.1) |
| Invert | Specify whether discharging is represented as a positive or negative variable value. Charging is represented accordingly by the opposite sign. (only if energy storage is controllable and configuration "One combined variable for both", since Symcon 8.1) |
| Control Discharge to avoid purchasing energy | If this switch is set, the Energy Manager activates the discharge of this energy storage if there is a deficit and the energy storage still has charge (only if energy storage is controllable, since Symcon 8.1) |
| Variable for switching between charge/discharge (Optional) | If the device is not only controlled via the variable for charge/discharge, but also has a status variable that must be switched to a specific value for charging or discharging, it can be specified here. (only if energy storage is controllable, since Symcon 8.1) |
| Value for charging | Value to which the Variable for switching between charge/discharge must be switched for charging (only if Variable for charging/discharging is set, since Symcon 8.1) |
| Value for discharging | Value to which the Variable for switching between charge/discharge must be switched for discharging (only if Variable for charging/discharging is set, since Symcon 8.1) |
| Level Variable | Variable that contains the current charge level. The minimum value of the variable is interpreted as completely empty and the maximum value as completely full. This means that both percentage and absolute representations can be used. |
| Maximum Usage | Usage in watts when the energy storage is fully charging. |
| Current Charge/Feed-In (Optional) | Variable with the current charge or feed-in of the energy storage. This variable is optional for controllable energy storage devices. If it has not been set, the current value is calculated based on the charge/discharge variable and the maximum usage (since Symcon 8.1) |
| Invert Current Charge/Feed-In? | Specifies whether charging is positive and feed-in is negative or vice versa (only if Current Charge/Feed-In is set, since Symcon 8.1) |
| Start charging when below | If the energy storage charge level falls below this percentage value, the energy storage is charged with available energy until it reaches the "Stop charging when above" charge level. |
| Stop charging when above | If the charge level reaches this percentage value, the energy storage is no longer charged until it falls below the "Start charging when below" charge level again. |
| Continue charging when every other device is done | If this switch is set, the energy storage is charged regardless of the "Start charging below" and "Stop charging above" settings if there are no other consumers and any excess energy would otherwise remain unused. |
| Name (Optional) | The displayed name of the energy storage. If no name is specified, the name of the instance provided for the template is used. If no instance is selected either, the name of the charge variable is used. If no charge variable is set due to the energy storage not being controllable, the name of the Current Charge/Feed-In variable is used. |
| Capacity (Optional, required for overnight charge) | The capacity of the energy storage in kWh. This value is only required for overnight charge. If it is not set, overnight charge cannot be used for the energy storage. |
| Condition (Optional) | If a condition is specified, the consumer is only activated if the condition defined here is fulfilled. |
| Note for blocking by condition )Optional) | If the condition is not fulfilled, this text is displayed in the visualization. If no note is defined, a standard text is displayed. |
| Minimum Runtime | If the energy storage is charging, it runs for at least the time defined here in seconds. The Energy Manager can only deactivate the energy storage again once the minimum runtime has expired after the initial activation. If the energy storage is scalable, it can be scaled appropriately if there is not enough energy available, but it is never deactivated completely. |
| Follow-up Time | If there is no longer enough energy available for the energy storage, it is only deactivated if the energy is not available for the duration defined here in seconds. In this way, short gaps in the available energy can be bridged. If the energy storage is scalable, it can be scaled appropriately if there is not enough energy available, but is never deactivated completely. |
| If minimum runtime/follow-up time is active but condition is not fulfilled... | Define the behavior of the device if the condition is no longer met during the minimum runtime or follow-up time ...stop immediately: The device is deactivated at the next status update even though the time is still running ... only stop once minimum runtime/follow-up time has elapsed: The current time continues to run. The device is only deactivated after it has expired. (only if both a condition is set and minimum or follow-up time are positive, since Symcon 8.1) |
#### Electric Vehicles
| Name | Description |
| ----------------------------------------------------------------------------- | ----------------------------------------------------------------------------------------------------------------------------------------------------------------------------------------------------------------------------------------------------------------------------------------------------------------------------------------------------------------------------------------------------------------------------------------------------------------------------------------------------------------------------- |
| Template | Selection of a template via which the technical parameters of the device can be entered automatically. If "User-defined" is selected, all parameters are released and can be adjusted manually, otherwise they are locked and set by the template (since Symcon 8.1) |
| Instance | Selection of the instance matching the selected template. After selecting an instance, all parameters of the template are entered in the configuration. In some templates, specific parameters remain editable, as they are not explicitly contained in the template. In this case, corresponding information appears. (only if the template is not set to "User-defined", since Symcon 8.1) |
| Power (Target) | The variable to switch the target power of the electric vehicle in watts. |
| Unit for Power | Specify whether the target power is specified in watts or amperes (since Symcon 8.1) |
| On/Off Variable (Optional) | If the device is not only switched via the target value, but also has a variable that switches the device On or Off, it can be specified here. (since Symcon 8.1) |
| Phases | Selection of how many phases the electric vehicle supports. |
| Set power | Select whether the power is switched per phase or in total (only if at least 2-phase, since Symcon 8.1) |
| Supports switching between 1-phased and multi-phased charging | The switch indicates whether the electric vehicle supports switching the phases from the above selection to one phase and back. (only if at least 2-phase) |
| Min. charging current per phase | Minimum charging current per phase in amperes |
| Max. charging current per phase Charging current per phase | Maximum charging current per phase in amperes |
| Current Usage (Optional) | Variable with the current usage of the device in watts. If none is set, the consumption is assumed to be equal to the target power (since Symcon 8.1) |
| Name (Optional) | The displayed name of the electric vehicle. If no name is specified, the name of the instance provided for the template is used. If no instance is selected either, the name of the power variable is used. |
| Delay | If the target power of the electric vehicle is adjusted by the Energy Manager, no further switching operations are carried out for the duration specified here in seconds. |
| State of Charge | Variable that contains the current state of charge. The minimum value of the variable is interpreted as completely empty and the maximum value as completely full. This means that both percentage and absolute representations can be used. The variable is only required for night charging. If it is not set, overnight charging is not possible. |
| Capacity | The capacity of the electric vehicle in kWh. This value is only required for overnight charging. If it is not set, night charging cannot be used for the vehicle. |
| Energy per km | The energy in Wh that the electric vehicle consumes per kilometer. This value is only required for overnight charging. If it is not set, overnight charging cannot be used for the vehicle. (only if target for night charging should be specified in kilometers) |
| Condition (Optional) | If a condition is specified, the electric vehicle is only charged if the condition defined here is fulfilled. |
| Note for blocking by condition (Optional) | If the condition is not fulfilled, this text is displayed in the visualization. If no note is defined, a standard text is displayed. |
| Minimum Runtime | If the electric vehicle is charging, it runs for at least the time defined here in seconds. The Energy Manager can only deactivate the electric vehicle again once the minimum runtime has expired after the initial activation. If the electric vehicle is scalable, it can be scaled appropriately if there is not enough energy available, but it is never deactivated completely. |
| Follow-up Time | If there is no longer enough energy available for the electric vehicle, it is only deactivated if the energy is not available for the duration defined here in seconds. In this way, short gaps in the available energy can be bridged. If the electric vehicle is scalable, it can be scaled appropriately if there is not enough energy available, but is never deactivated completely. |
| If minimum runtime/follow-up time is active but condition is not fulfilled... | Define the behavior of the device if the condition is no longer met during the minimum runtime or follow-up time ...stop immediately: The device is deactivated at the next status update even though the time is still running ... only stop once minimum runtime/follow-up time has elapsed: The current time continues to run. The device is only deactivated after it has expired. (only if both a condition is set and minimum or follow-up time are positive, since Symcon 8.1) |
### Configuration for §14a and §9 (since Symcon 8.1)
| Name | Description |
| --------------------------------------- | ------------------------------------------------------------------------------------------------------------------------------------------------------------------------------------------------------------------------------------ |
| Limitation Variable (§14a) | Selection of a variable of type Boolean. If this is set, usage is limited in accordance with §14a EnWG. While the variable is active, the entire behavior of the Energy Manager is also saved in a media file |
| Variable for Maximum Feed-In (§9) | Selection of a variable of type Integer or Float. If this is set, it specifies the maximum feed-in in accordance with §9 EEG. If a restriction exists, the Energy Manager will restrict the feed-in to remain compliant with §9 EEG. |
| Energy production | List of all energy producers, see Energy production |
| Simulate restrictions according to §14a | If this switch is set, a restriction is applied in accordance with §14a EnWG, regardless of the actual value of the variable for restriction |
| Current consumption | Listing of all consumers and the relevant parameters according to §14a EnWg to verify that the Energy Manager is behaving correctly |
#### Energy production (since Symcon 8.1)
| Name | Description |
| -------------------------- | ------------------------------------------------------------------------------- |
| Energy Production Variable | Variable that specifies the current energy production of the device in watts |
| Restriction Variable | Variable via which the maximum feed-in of the device can be restricted in watts |
| Maximum Production | Maximum production of the device in watts |
### Status Variables and Profiles
The status variables are created automatically. Deleting individual ones can lead to malfunctions.
#### Status variables
Here, the term "device" covers consumers, energy storages and electric vehicles.
| Name | Type | Description |
| ----------------------------------- | ---------------- | --------------------------------------------------------------------------------------------------------------------------------------------------- |
| Planned usage | Float | The current consumption of all entered devices calculated by the Energy Manager |
| PMin (§14a) | Float | The calculated value PMin for applying the restriction in the sense of §14a EnWG (only if Variable for restriction (§14a) is set, since Symcon 8.1) |
| Protocol for restrictions (§14a/§9) | Media - Document | Protocol with all operations while a restriction by §14a EnWG is active as well as all restrictions made according to §9 EEG (since Symcon 8.1) |
All other status variables are created per device. If there are 3 devices in the module, 12 to 27 variables are created depending on the configuration.
| Name | Type | Description |
| ------------------------------------------- | ------- | ------------------------------------------------------------------------------------------------------------------------------------------------------------------------------------------------------------------------------------------------------------------------ |
| Priority | Integer | Order in which the devices are viewed; lower priority values are preferentially activated |
| Status | Link | Link to the status of the device, i.e. "Consumer" for consumers, "Charge Variable" for energy storages and "Power (Target)" for electric vehicles |
| Mode | Integer | If "Automatic", the device is managed by the Energy Manager, otherwise it can be overridden with this |
| Current Consumption | Link | Linking to the variable with the current consumption of the device (only if variable for the device was set, since Symcon 8.1) |
| Charging | Link | Linking to the variable with the current charge level of the energy storage device (only if variable for the energy storage device was set, since Symcon 8.1) |
| Operating Mode | Integer | Specifies whether the energy storage device is currently charging, discharging or passive (only for energy storage devices, since Symcon 8.1) |
| Condition | String | Current status of the condition of the device |
| Locked | Boolean | If this variable is set, the device is locked due to the minimum runtime or run-on time and must not be deactivated. The variable is only created if the device has a minimum runtime or run-on time. |
| Locked until | Integer | If the device is locked, this variable contains the time when this lock will be removed. The variable is only created if the device has a minimum runtime or follow-up time. |
| Overnight Charge/Overnight Runtime | Boolean | Activates overnight charging (for energy storage and electric vehicle) or overnight runtime (for consumers). This variable is only created if the device supports overnight charging or overnight runtime. |
| Overnight Charge: Range | Float | Desired range after overnight charging for the electric vehicle. This variable is only created for electric vehicles that support overnight charging and has its goal for overnight charge defined in km. |
| Overnight Charge: Range available at | Integer | Time at which the desired range should be available the next day. This variable is only created for electric vehicles that support overnight charging and has its goal for overnight charge defined in km. |
| Overnight Charge: Charge | Float | Desired percentage charge level for the energy storage after overnight charging. This variable is only created for energy storages or electric vehicles that support overnight charging. In addition, an electric vehicle must have its goal defined in percentage. |
| Overnight Charge: Charge available at | Integer | Time at which the desired charge should be available the next day. This variable is only created for energy storages or electric vehicles that support overnight charging. In addition, an electric vehicle must have its goal defined in percentage. |
| Overnight Runtime: Duration | Float | Duration in seconds that the consumer should be active overnight. This variable is only created for loads that support overnight runtime. |
| Overnight Runtime: Done until | Integer | Time at which the desired overnight runtime should be completed. This variable is only created for consumers that support night-time runtime |
| Cheap Charge/Runtime: Active | Boolean | Activates Cheap Charge (for energy storage devices and electric vehicles) or Cheap Runtime (for consumers). This variable is only created if a variable for energy prices is set. Non-switchable energy storage devices do not support this function. (since Symcon 8.1) |
| Cheap Charge/Runtime: Maximum Price per kWh | Float | Specification of the maximum price in cents up to which Cheap Charge/Runtime should be activated (since Symcon 8.1) |
#### Profile
| Name | Type |
| -------------- | ------- |
| EO.Mode | Integer |
| EO.Priority | Integer |
| EO.Range | Float |
| EO.Percentage | Float |
| EO.Duration | Float |
| EO.Cents | Float |
| EO.BatteryMode | Float |
Associations EO.Mode
| Name | Description |
| --------- | --------------------------------------------------------------------- |
| Active | The variable is switched to active and is excluded from consideration |
| Inactive | The variable is switched off and is excluded from consideration |
| Automatic | The variable is switched according to priority and energy. |
### Functionality
#### Optimization
During operation of the Energy Manager, the energy is optimized in individual steps so that the energy produced is used as sensibly as possible. Depending on the configuration, steps are taken at a fixed time interval or when the available power is updated. Only one appliance is switched in each step so that differences between entered and actual consumption can be detected and managed at an early stage. In the Energy Manager, each device can be assigned a priority by the user.
In each step, the system initially checks whether there is a "gap" in the activated devices, i.e. whether devices with a lower priority are active although devices with a higher priority are still inactive and enough energy would be available to activate them. In this case, a device with a lower priority is deactivated in order to release the energy for devices with a higher priority in the next step.
Otherwise, the current surplus is determined. If this is positive, a device with the highest priority is determined, which can absorb the surplus. The device is then activated or scaled accordingly.
If the surplus is negative, a device with the lowest priority is deactivated or scaled down to compensate for the missing energy.
#### Overnight Charge/Overnight Runtime
Overnight charge or overnight runtime is considered as soon as the day ends according to the [Location Control](https://www.symcon.de/en/llms/modules/location-control.md). If overnight charge or overnight runtime is activated for devices, the Energy Manager calculates how long the corresponding device must be activated. This duration is compared with the energy prices from the current time to the corresponding target time and determines at which times this runtime can be used most favorably. If such a cheapest price is available at an optimization step, the device is activated at maximum scaling, otherwise it is deactivated.
#### Cheap Charge/Cheap Runtime
Cheap Charge or Cheap Runtime can be used to activate a device as soon as the electricity price falls below a user-defined value. If the electricity price is sufficiently low during an update, one of the affected devices is primarily activated, regardless of its set priority and the current surplus. Only when all corresponding devices are already active will an update cycle proceed as usual.
#### Restriction according to §14a EnWG
If the restriction according to §14a becomes active, an update is carried out immediately. This occurs in addition to the usual update at intervals or when the source variable is updated. If the restriction is active during an update, the permissible maximum consumption "PMin" for energy storage systems and electric vehicles is calculated. If the energy storage systems and electric vehicles are currently consuming more, they are immediately regulated down. Devices that are not locked by minimum runtime or follow-up time are preferentially deactivated. However, if this is not sufficient, devices with active minimum runtime or follow-up time will also be deactivated. For devices that are not in automatic mode, the value before the restriction is saved and restored as soon as the restriction ends. If an attempt is made to manually activate energy storage systems or electric vehicles above PMin, the switching operations are reversed. However, they are saved so that they can be switched to the desired value when the restriction ends. For more information on §14a EnWG, see [here](https://www.gesetze-im-internet.de/enwg_2005/__14a.html).
#### Restriction according to §9 EEG
If a restriction according to §9 is present, i.e., below 100%, the energy producers are restricted accordingly after each update step. For this, the maximum permissible energy production is calculated. This is composed of the permissible feed-in, i.e., the restriction value multiplied by the maximum total production, and the currently self-consumed energy, which is calculated across all devices. If the current restriction of the energy producers is above the permissible restriction, it is reduced. Preference is given to applying a restriction to devices that are not producing anyway. If this is not sufficient, energy producers that are currently producing energy are restricted. For more information on §9 EEG, see [here](https://www.gesetze-im-internet.de/eeg_2014/__9.html).
### Visualization
The Energy Manager has its own [presentation](https://www.symcon.de/en/llms/components/object-presentation.md) in the visualization.
---
# Energy Distribution
> Symcon documentation · English · generated on 2026-09-26
> Index: https://www.symcon.de/en/llms.txt
Source: https://www.symcon.de/en/service/documentation/module-reference/energy/energy-distribution/
_Requires Symcon >= 7.0_
The energy distribution provides an overview of the energy generated/consumed and fed in/referred.

### Range of functions
- Graphical representation of the energy flow between different devices
- Division of devices according to producer and consumer
- Special displays for grid and storage
- Calculation of total consumption, total generation, consumption and surplus
- Grouping of several appliances of the same type
### Set up the instances in IP-Symcon
Under 'Add instance', the 'Energy distribution' module can be found using the quick filter.
- Further information on adding instances can be found in the [Instances documentation](https://www.symcon.de/en/service/documentation/basics/instances/)
#### configuration page
> **Note:** All selected variables should offer the values in the same unit to ensure error-free display and function.
| Name | Description |
| ------------------------------------- | --------------------------------------------------------------------------------------------------------------------------------------------- |
| Calculate summarized values | If activated, status variables are created that calculate generation, consumption, reference and surplus values based on the added variables. |
##### Configuration list
| Name | Description |
| ---------------------- | -------------------------------------------------------------------------------------------------------------------------------------------------------------------------- |
| Type | The selection of the type determines whether the device is treated as a producer or consumer and offers corresponding [further configuration options](#Type_configuration) |
| Name | The name used for the display. If this remains empty, the variable name is used. |
| Group | All devices of the same type are grouped together in the visualization. |
| Additional information | A variable whose value can be displayed in brackets after the actual variable value. For example, the percentage charge level of an e-vehicle or a meter reading |
| Calculation type | Either the sum or the mean value is calculated from the values of the additional information variables in a group. (only if 'Grouping' is activated) |
##### Type configuration
Wind/Solar
| Name | Description |
| ---------- | ------------------------------------------------- |
| Generation | The variable that specifies the generated energy. |
Consumer/Wallbox/Heat/Heat Pump
| Name | Description |
| -------- | ------------------------------------------------ |
| Consumer | The variable that specifies the energy consumed. |
Grid
| Name | Description |
| ------------------ | --------------------------------------------------------------------------------------------------------------------------------------------------------------- |
| Configuration type | Determines whether the value results from one or two variables. |
| Supply / Surplus | If the value of the variable is positive, it is counted as supply. If it is negative, it is counted as surplus. (only for configuration type 'Single variable') |
| Inverted | Inverts the behavior of the individual variable. (only for 'Configuration type' 'Single variable') |
| Supply | The variable that specifies the supply. (only for 'Configuration type' 'Two variables') |
| Surplus | The variable that specifies the surplus energy. (only for 'Configuration type' 'Two variables') |
Storage
| Name | Description |
| ------------------ | --------------------------------------------------------------------------------------------------------------------------------------------------------------------- |
| Configuration type | Determines whether the value results from one or two variables. |
| Charge / Discharge | If the value of the variable is positive, it is counted as charging. If it is negative, it is counted as discharging. (only for configuration type 'Single variable') |
| Inverted | Inverts the behavior of the individual variable. (only for 'Configuration type' 'Single variable') |
| Charge | The variable that specifies the charged energy. (only for 'Configuration type' 'Two variables') |
| Discharge | The variable that specifies the discharged energy. (only for 'Configuration type' 'Two variables') |
##### Layout
The house in the middle is fixed as the central point of energy exchange. The objects around it are arranged according to their position in the list above. The positioning is as follows:
- Top left
- Top right
- Bottom left
- Bottom right
- Top center
- Bottom center
- Left center
- Right center
#### status variables
The status variables are created automatically. Deleting individual ones can lead to malfunctions.
##### Statusvariables
The status variables are only created if the corresponding setting has been activated on the [configuration page]( #Calculate_summary_values)
| Name | Type | Description |
| ------------------- | ----- | ----------------------------------------------------------------------------- |
| Consumption (total) | Float | The sum of the consumption of the type Consumer, Wallbox, Heat pump and Heat. |
| Generation (Total) | Float | The sum of solar and wind generation. |
| Draw | Float | The difference between energy consumed and energy generated. |
| Surplus | Float | Difference between generated energy and consumed energy. |
### Visualization

Each device and each group can be clicked to display a breakdown of the individual values. Once the selected variables have been logged, the corresponding diagram can be opened directly.
If required, a resource-saving mode can be activated by clicking on the house in the middle, which replaces the moving points with static arrows.
> **Note:** The energy distribution does not have its own presentation in the WebFront
---
# Energy Counter
> Symcon documentation · English · generated on 2026-09-26
> Index: https://www.symcon.de/en/llms.txt
Source: https://www.symcon.de/en/service/documentation/module-reference/energy/energy-counter/
Calculates the consumption
## Energy Counter Pulse
Source: https://www.symcon.de/en/service/documentation/module-reference/energy/energy-counter/energy-counter-pulse/
_Requires Symcon >= 4.2_
The module calculates the instantaneous and cumulative power consumption via an electricity meter (e.g. S0 connection).
### Function scope
- Calculates the instantaneous power consumption in watts and the total power consumption in kWh.
- Adjustability of the pulses of the counting device.
- Adjustability of interval frequency in seconds for recalculation of consumption
### software installation
- Install the 'Energy Counter Pulse' module via the [Module Store](https://www.symcon.de/en/service/documentation/components/management-console/module-store/).
### Setting up instances in IP-Symcon
- Under "Add Instance", the 'Energy Counter Pulse' module can be found using the quick filter.
- More information about adding instances in the [Instances documentation](https://www.symcon.de/en/service/documentation/basics/instances/)
#### Configuration Page:
| Name | Description |
| -------- | ------------------------------------------------------------------------------------------------------------------------------------------------------------------------------------------------------------------------------------------------------------------------------------------------------------------------- |
| Source | Source variable (pulse counter) to be used for the calculation. |
| Pulses | How many pulses the device sends per kilowatt. This must be taken from the respective operating manual of the device. |
| Interval | In which seconds interval the device should recalculate automatically. (Note: Intervals that are set too short (faster than incoming pulses), can lead to strong fluctuations in the indication of the current consumption. It has no influence on the calculated total consumption. => Recommendation: min. 300 seconds) |
### statusvariables
The status variables/categories are created automatically. Deleting individual ones can lead to malfunctions.
#### Statusvariables
| Name | Type | Description |
| ---------------------- | ----- | ----------------------------------------------------------------------- |
| Current | Float | Specification in W |
| Counter | Float | Specification in kWh |
| Last Value (Temporary) | Float | Auxiliary variable for last value. Required for difference calculation. |
## EZI_Update
Source: https://www.symcon.de/en/service/documentation/module-reference/energy/energy-counter/energy-counter-pulse/ezi-update/
`bool EZI_Update(int $InstanceID)`
_Requires Symcon >= 4.2_
**Parameters**
- `$InstanceID` (int): ID of the Instance
**Returns** (bool): If the command could be executed successfully, it returns __TRUE__ as result, otherwise __FALSE__.
ID of the Instance
**Example**
```text
EZI_Update(12345);
```
## Energy Counter Power
Source: https://www.symcon.de/en/service/documentation/module-reference/energy/energy-counter/energy-counter-power/
_Requires Symcon >= 4.2_
The module calculates the instantaneous and cumulative power consumption via an electricity meter (current or power).
### function scope
- Calculates instantaneous power consumption in watts and total power consumption in kWh.
- Adjustability of type and source of the counting device.
- Adjustability of the interval frequency in seconds to recalculate the consumption if the source variable has not changed.
### Software installation
- Install the 'Energy Counter Power' module via the [Module Store](https://www.symcon.de/en/service/documentation/components/management-console/module-store/).
### Setting up instances in IP-Symcon
- Under "Add Instance", the 'Energy Counter Power' module can be found using the quick filter.
- More information about adding instances in the [Instances documentation](https://www.symcon.de/en/service/documentation/basics/instances/)
#### Configuration Page:
| Name | Description |
| -------- | ---------------------------------------------------------------------------------------------------------------------- |
| Type | Is the source variable of type power (W) or current (A). |
| Source | Source variable to be used for the calculation. |
| Voltage | Voltage (V) to be used for conversion. |
| Interval | At which seconds interval the calculation should be automatically recalculated if the source variable has not changed. |
### status variables
The status variables/categories are created automatically. Deleting individual ones can lead to malfunctions.
#### Status variables
| Name | Description |
| -------- | ---------------------------------------------------------------------------------------------------------------------- |
| Type | Is the source variable of type power (W) or current (A). |
| Source | Source variable to be used for the calculation. |
| Voltage | Voltage (V) to be used for conversion. |
| Interval | At which seconds interval the calculation should be automatically recalculated if the source variable has not changed. |
## EZS_Update
Source: https://www.symcon.de/en/service/documentation/module-reference/energy/energy-counter/energy-counter-power/ezs-update/
`bool EZS_Update(int $InstanceID)`
_Requires Symcon >= 4.2_
**Parameters**
- `$InstanceID` (int): ID of the Instance
**Returns** (bool): If the command could be executed successfully, it returns __TRUE__ as result, otherwise __FALSE__.
ID of the Instance
**Example**
```text
EZS_Update(12345);
```
---
# Power Billing Module
> Symcon documentation · English · generated on 2026-09-26
> Index: https://www.symcon.de/en/llms.txt
Source: https://www.symcon.de/en/service/documentation/module-reference/energy/power-billing-module/
_Requires Symcon >= 5.0_
The module provides a cost statement similar to the annual statement from the energy provider.
### Scope of functions
- Generates a cost statement using some key data.
### Software installation
- Via the [Module Store](https://www.symcon.de/en/service/documentation/components/management-console/module-store/) install the 'Power Billing' Module.
### Setting up the instances in IP-Symcon
- Under "Add Instance" the 'Power Billing Module' can be found using the quick filter.
- More information about adding instances in the [Instances documentation](https://www.symcon.de/en/service/documentation/basics/instances/)
#### Configuration Page:
| Name | Description |
| ------------------- | -------------------------------------------------------- |
| Source | The variable of the main meter, which is logged as meter |
| Base price | The base price |
| Energy price | The energy price |
| Meter reading date | Date of last meter reading |
| Last meter reading | The meter reading on the last meter reading date |
| Planned consumption | The planned electricity consumption/year |
### status variables and profiles
The status variables/categories are created automatically. Deleting individual ones can lead to malfunctions.
#### Status variables
| Name | Type | Description |
| --------------------------------------- | ------- | -------------------------------------------------------------------------- |
| Energy price | Float | Energy price including basic price |
| Days until next meter reading | Integer | Days until next meter reading (1 year starting from last meter reading) |
| Days since last meter reading | Integer | Days since last meter reading |
| Meter Reading(Target) | Float | The target value of today's meter reading based on the planned consumption |
| Planned Consumption/Day | Float | The planned consumption per day based on the planned annual consumption |
| Average consumption of the last 30 days | Float | The average value of the consumption of the last 30 days |
| Deviation | Float | The deviation of the actual meter reading from the target value |
| Credit/Repayment | Float | The amount of repayment or credit calculated by the deviation |
#### Profile:
| Name | Type |
| -------------- | ------- |
| SAM.EuroRating | Float |
| SAM.PowerPrice | Float |
| SAM.Calendar | Integer |
### Visualization
All important calculated values are displayed here.
## SAM_UpdateCalculations
Source: https://www.symcon.de/en/service/documentation/module-reference/energy/power-billing-module/sam-updatecalculations/
`bool SAM_UpdateCalculations(int $InstanceID)`
_Requires Symcon >= 5.0_
**Parameters**
- `$InstanceID` (int): ID of the Instance
**Returns** (bool): If the command could be executed successfully, it returns __TRUE__ as result, otherwise __FALSE__.
ID of the Instance
**Example**
```text
SAM_UpdateCalculations(12345);
```
---
# Power price
> Symcon documentation · English · generated on 2026-09-26
> Index: https://www.symcon.de/en/llms.txt
Source: https://www.symcon.de/en/service/documentation/module-reference/energy/power-price/
_Requires Symcon >= 7.1_
Reads out the current/predicted electricity prices from aWATTar, Tibber or Epex Spot (via ENTSO-E).
### range of functions
* Reads out electricity prices from various providers
* Visual history of market data
* Manual input of taxes, surcharge and base price
### software installation
* Install the 'Electricity price' module via the Module Store.
* Alternatively, add the following URL via the Module Control
### Set up the instances in IP-Symcon
Under 'Add instance', the 'Electricity price' module can be found using the quick filter.
- Further information on adding instances can be found in the [Instances documentation](https://www.symcon.de/service/dokumentation/konzepte/instanzen/#Instanz_hinzufügen)
__Configuration page__:
| Name | Description |
| ---------------------- | ----------------------------------------------------------------------------------------------------------------------------------------------------------------------------------------------------------------------------------------------------------------------------------------------------------- |
| Provider | Electricity provider from which the data is to be obtained |
| Postal code | Postal code to determine electricity prices (only for provider "Tibber") |
| ENTSO-E Security Token | Security token from ENTSO-E, which is used for the query. A token can be requested free of charge. The process is explained here: [Instructions](https://transparencyplatform.zendesk.com/hc/en/articles/12845911031188-How-to-get-security-token) (only for provider "EPEX Spot (via ENTSO-E)") |
| Market | Selection of country (not for provider "Tibber") |
| Base price | Base price of the electricity (not for provider "Tibber") |
| Surcharge | Percentage surcharge on the market price (not for provider "Tibber") |
| Tax rate | Tax rate to be added to the electricity (not for provider "Tibber") |
### status variables and profiles
The status variables/categories are created automatically. Deleting individual ones can lead to malfunctions.
#### status variables
| Name | Type | Description |
| ------------- | ------ | ------------------------- |
| Market data | String | Data to display the chart |
| Current price | Float | Current electricity price |
#### profiles
| Name | Type |
| ---- | ----- |
| Cent | Float |
### visualization
In the tile visualization, the module offers a bar chart that shows the course of the electricity price.
## SPX_Update
Source: https://www.symcon.de/en/service/documentation/module-reference/energy/power-price/spx-update/
`bool SPX_Update(int $InstanceID)`
_Requires Symcon >= 7.1_
**Parameters**
- `$InstanceID` (int): ID of the instance
**Returns** (bool): If the command could be executed successfully, the result is __TRUE__, otherwise __FALSE__.
ID of the instance
**Example**
```text
SPX_Update(12345)
```
---
# Consumption per Category
> Symcon documentation · English · generated on 2026-09-26
> Index: https://www.symcon.de/en/llms.txt
Source: https://www.symcon.de/en/service/documentation/module-reference/energy/consumption-per-category/
_Requires Symcon >= 6.3_
Calculates consumption in percent per freely selectable category according to specified start and end dates. The calculation is based on daily aggregation.
### function scope
* Selection of multiple variables
* Free text for category
### software installation
* Install the 'Consumption per category' module via the Module Store.
### Instance setup in IP-Symcon
Under 'Add instance' the 'Consumption per category' module can be found using the quick filter.
- More information about adding instances in the [Instances documentation](https://www.symcon.de/service/dokumentation/konzepte/instanzen/#Instanz_hinzufügen)
__Configuration page__:
| Name | Description |
| -------- | ----------------------------------------------------------- |
| Interval | Interval in which the calculation is executed. 0 = Disabled |
| Sources | List of variables and categories |
### status variables
The status variables/categories are created automatically. Deleting individual ones can lead to malfunctions.
#### Status variables
| Name | Type | Description |
| ---------- | ------- | ------------------------------------------------------------------------------------------------------------------------------------------------------------------------------------------------------------------------------------------------------- |
| Category | Float | A variable is created per category, in which the percentage consumption is displayed. The category name is internally reduced to A-Z, a-z, 0-9 and _ (underscore). This means that the category "Test" and "Test €" will also be categorized to "Test". |
| Start time | Integer | Date from when the calculation should start |
| End time | Integer | Date until when the calculation should go |
## VIK_CalculationConsumption
Source: https://www.symcon.de/en/service/documentation/module-reference/energy/consumption-per-category/vik-calculationconsumption/
`bool VIK_CalculateConsumption(int $InstanceID)`
_Requires Symcon >= 6.3_
Recalculates the categories
**Parameters**
- `$InstanceID` (int): Instance Id
**Returns** (bool): If the command could be executed successfully, it returns** TRUE** as result, otherwise **FALSE**.
Instance Id
**Example**
```php
VIK_CalculateConsumption(12345);
```
---
# Consumption within Timespan
> Symcon documentation · English · generated on 2026-09-26
> Index: https://www.symcon.de/en/llms.txt
Source: https://www.symcon.de/en/service/documentation/module-reference/energy/consumption-within-timespan/
_Requires Symcon >= 4.2_
### function scope
- Calculates consumption for a time span based on the aggregation of the selected source variable.
- When the time span is changed, the consumption is recalculated
- Different detail lines for start and end date
- Adjustable interval for updating the calculation
### software installation
- Install the module 'Consumption within Timespan' via the [Module Store](https://www.symcon.de/en/service/documentation/components/management-console/module-store/).
### Set up instances in IP-Symcon
- Under "Add instance" the 'Consumption within Timespan' module can be found using the quick filter.
- More information about adding instances in the [Instances documentation](https://www.symcon.de/en/service/documentation/basics/instances/)
#### Configuration Page:
| name | description |
| ---------------------- | ---------------------------------------------------------------------------------- |
| Source | Source variable to be used for consumption |
| Level of Detail | Determines how precisely the start and end time can be set (date, time, date/time) |
| Use interval to update | If active, an interval will be used to update the calculation |
| Interval | The interval in minutes at which the calculation will be updated |
> **Note:** If the date is selected in level of detail, the start date with the time 00:00 and the end date with the time 23:59:59 is used.
### status variables
The status variables/categories are created automatically. Deleting individual ones can lead to malfunctions.
#### Status variables
| Name | Type | Description |
| ----------- | ------- | ----------------------------------------------------------- |
| Start | Integer | Start date/start time for consumption (seconds are ignored) |
| End | Integer | End date/end time for consumption (seconds are ignored) |
| Consumption | Float | Consumption between start and end date |
## VIZ_Calculate
Source: https://www.symcon.de/en/service/documentation/module-reference/energy/consumption-within-timespan/viz-calculate/
`bool VIZ_Calculate(int $InstanceID)`
_Requires Symcon >= 4.2_
**Parameters**
- `$InstanceID` (int): ID of the Instance
**Returns** (bool): If the command could be executed successfully, it returns __TRUE__ as result, otherwise __FALSE__.
ID of the Instance
**Example**
```text
VIZ_Calculate(12345);
```
---
# Consumption Behaviour
> Symcon documentation · English · generated on 2026-09-26
> Index: https://www.symcon.de/en/llms.txt
Source: https://www.symcon.de/en/service/documentation/module-reference/energy/consumption-behaviour/
_Requires Symcon >= 6.0_
The module calculates the probable consumption for the period based on an outdoor temperature variable and a meter variable using linear regression. The more values are available for the outdoor temperature and the meter, the more accurately the expected consumption can be determined.
### functional scope
- Calculates a probable consumption from two variables
### Software installation
- Via the [Module Store](https://www.symcon.de/en/service/documentation/components/management-console/module-store/) install the 'Consumption Behaviour' module.
### Set up instances in IP-Symcon
- Under 'Add Instance' the 'Consumption Behaviour' module can be found using the quick filter.
- More information about adding instances in the [Instances documentation](https://www.symcon.de/en/service/documentation/basics/instances/)
#### Configuration Page:
| name | description |
| -------------------------------- | --------------------------------------------------------------------------- |
| Variable for outdoor temperature | Logged variable for outdoor temperature |
| Variable for counter | Logged variable for counter |
| Period | Period for which the calculation is to be performed |
| Limit | Maximum number of records to be used for the regression. 0 = No limit |
| Interval | Time interval of the timer in which the variable should be calculated again |
| Calculate | Button to recalculate the variable |
For the counter variable, there must be at least 2 records for 3 consecutive periods for a calculation to take place. For period day, the hourly aggregation of the variables is used. For all other periods the daily aggregation of the variables is used.
### status variables
The status variables/categories are created automatically. Deleting individual ones can lead to malfunctions.
#### Status variables
| Name | Type | Description |
| -------------------------------------------------- | ----- | ---------------------------------------------------------------------------------------- |
| Expectation of current period | float | Displays the expected consumption based on the outdoor temperature of the current period |
| Expectation of the last period | float | Displays the expected consumption based on the outdoor temperature of the last period |
| Extrapolation of the current period | float | Displays the extrapolated consumption of the current period |
| Extrapolation of the last period | float | Displays the extrapolated consumption of the last period |
| Value of the current period | float | Displays the current consumption of the current period |
| Value of the last period | float | Displays the consumption of the last period |
| Percent of the current period | float | Shows how far the extrapolated consumption differs from the expected value in percent |
| Percent of the last period | float | Shows how far the extrapolated consumption differs from the expected value in percent |
| Coefficient of determination of the current period | float | Accuracy of the expectation calculation of the current period |
| Coefficient of determination of the last period | float | Accuracy of the expectation calculation of the last period |
#### Mathematical formulas
Expectation is calculated using simple linear regression. [Mathematically Explained](https://en.wikipedia.org/wiki/Simple_linear_regression). Here the sum of the positive result is calculated from the calculation m * temperature average (depending on the period) * b. m and b are determined by the linear regression.
The extrapolation again consists of the average value of the period multiplied by the period length.
## VBV_UpdateCalculation
Source: https://www.symcon.de/en/service/documentation/module-reference/energy/consumption-behaviour/vbv-updatecalculation/
`bool VBV_UpdateCalculation(int $InstanceID)`
_Requires Symcon >= 5.0_
**Parameters**
- `$InstanceID` (int): ID of the Instance
**Returns** (bool): If the command could be executed successfully, it returns __TRUE__ as result, otherwise __FALSE__.
ID of the Instance
**Example**
```text
VBV_UpdateCalculation(12345);
```
---
# Calculated Counter
> Symcon documentation · English · generated on 2026-09-26
> Index: https://www.symcon.de/en/llms.txt
Source: https://www.symcon.de/en/service/documentation/module-reference/energy/calculated-counter/
_Requires Symcon >= 5.5_
Calculates positive variable changes with changes of a main variable according to adjustable rules and adds this to the value of a variable.
*The "Smart Energy Box" module was developed in cooperation between Symcon GmbH, Stark Elektronik GmbH and Biberach University of Applied Sciences (IGE Institute) as part of the state project EnMa HAW: Concept for automation-supported energy management at non-university universities in Baden-Württemberg.*
### functional scope
- Selection of a logged variable as primary measuring point
- Selection of any number of variables as secondary measuring points
- Adjustable whether the changes of the secondary measuring points should be added or subtracted to the changes of the primary measuring points
### software installation
- Install the 'Calculated Counter' module via the [Module Store](https://www.symcon.de/en/service/documentation/components/management-console/module-store/).
### Set up instances in IP-Symcon
- Under 'Add instance' the 'Calculated Counter' module can be found using the quick filter.
- More information about adding instances in the [Instances documentation](https://www.symcon.de/en/service/documentation/basics/instances/)
### Configuration Page:
| Name | Description |
| ------------------------- | -------------------------------------------------------------------------------------------------------------------------------------- |
| Primary measuring point | Selection of a logged variable |
| Secondary measuring point | Multiple selection of variables |
| Operation | Add/Subtract Option whether to add or subtract the positive change of the secondary measurement point to the primary measurement point |
| Variable | Selection of a logged variable as secondary measuring point |
### status variables
The status variables/categories are created automatically. Deleting individual ones can lead to malfunctions.
#### Status variables
| Name | Type | Description |
| ------ | ----- | ----------------- |
| Result | Float | Calculated Result |
## VM_Update
Source: https://www.symcon.de/en/service/documentation/module-reference/energy/calculated-counter/vm-update/
`bool VM_Update(int $InstanceID, float $PrimaryDelta)`
_Requires Symcon >= 5.5_
Berechnet die Steigung der sekundären Messstellen und addiert dieses mit dem Ergebnis
**Parameters**
- `$InstanceID` (int): ID of the Instance
- `$PrimaryDelta` (float): Positive Veränderung der Hauptmessstelle
**Returns** (bool): If the command could be executed successfully, it returns __TRUE__ as result, otherwise __FALSE__.
Positive Veränderung der Hauptmessstelle
**Example**
```text
VM_Update(12345, 5.3);
```
---
# Virtual Counter
> Symcon documentation · English · generated on 2026-09-26
> Index: https://www.symcon.de/en/llms.txt
Source: https://www.symcon.de/en/service/documentation/module-reference/energy/virtual-counter/
_Requires Symcon >= 6.0_
The module provides an input mask for manually read meter readings. It accepts the manual entry, checks it for plausibility and transfers the value to a counter variable. To check for plausibility, a limit value can be set.
### functional scope
- Check for plausibility
- Display of the last entered counter reading
- Input mask for new meter reading
### Software installation
- Install the 'Virtual Counter' module via the [Module Store](https://www.symcon.de/en/service/documentation/components/management-console/module-store/).
### Set_up_the_instances in IP-Symcon
- Under "Add Instance" the 'Virtual Counter' module can be found using the quick filter.
- More information about adding instances in the [Instances documentation](https://www.symcon.de/en/service/documentation/basics/instances/)
#### Configuration Page:
| Name | Description |
| ------------------------------ | --------------------------------------------------------------------------------------------------------- |
| Limit | Number by which a new counter value may increase at most. If the limit value is 0, it will not be checked |
| Require confirmation to accept | If enabled, a script must be executed to trigger the plausibility check |
| Activate Logging | Button, which activates the logging of the counter variable. It will be hidden if logging is enabled. |
### status variables and profiles
The status variables/categories are created automatically. Deleting individual ones can lead to malfunctions.
#### Status variables
| Name | Type | Description |
| ------------------------------------------------------- | ------- | -------------------------------------------------------------------------------------------------------------------------------- |
| Current counter reading | Float | Displays the last entered counter reading |
| New counter reading | String | Input variable for new counter reading |
| Set safe new counter reading: Enter new counter reading | Boolean | Appears if the new counter reading exceeds the current one by the limit value. The value can still be accepted with confirmation |
#### Profile
| Name | Type |
| -------------------- | ------- |
| VZ.Confirm | Boolean |
| VZ.NewCounterReading | String |
#### Scripts
| Name | Description |
| ----------------- | ----------------------------------------------------------------------------------------------------------- |
| Set Meter Reading | Executes the plausibility check and pushes the value into the vaiable "Current Meter Reading" if successful |
### Webfront
Via the Visualization the new counter value can be entered and the script can be executed, furthermore the last accepted counter value is displayed.
## VZ_WriteNewCounterValue
Source: https://www.symcon.de/en/service/documentation/module-reference/energy/virtual-counter/vz-writenewcountervalue/
`void VZ_WriteNewCounterValue(int $InstanceID)`
_Requires Symcon >= 6.0_
After checking, sets the current counter reading
**Parameters**
- `$InstanceID` (int): ID of the Instance
**Returns** (void): The function does not return any value.
ID of the Instance
**Example**
```php
VZ_WriteNewCounterValue(12345);
```
---
# Reading (Day)
> Symcon documentation · English · generated on 2026-09-26
> Index: https://www.symcon.de/en/llms.txt
Source: https://www.symcon.de/en/service/documentation/module-reference/energy/reading-day/
_Requires Symcon >= 4.2_
The module allows to select a date and then displays the respective (First/Last) counter value of that day.
### Function scope
- When the date is changed, the First/Last read counter value of the logged variable is output, depending on the value selection.
### Software installation
- Via the [Module Store](https://www.symcon.de/en/service/documentation/components/management-console/module-store/) install the module 'Reading (Day)'.
### Set up instances in IP-Symcon
- Under "Add Instance", the 'Reading (Day)' module can be found using the quick filter.
- More information about adding instances in the [Instances documentation](https://www.symcon.de/en/service/documentation/basics/instances/)
#### Configuration Page:
| name | description |
| ------ | ------------------------------------------ |
| Source | Source variable to be used as data source. |
| Value | First/Last value of the day. |
### status variables
The status variables/categories are created automatically. Deleting individual ones can lead to malfunctions.
#### Statusvariables
| Name | Type | Description |
| ------------- | ------------- | ---------------------------- |
| Counter value | integer/float | Value for the selected date. |
### Visualization
The Visualization is used to display the variable. A date can be selected for which the counter reading (first/last of the day) will be displayed.
## ZST_Calculate
Source: https://www.symcon.de/en/service/documentation/module-reference/energy/reading-day/zst-calculate/
`bool ZST_Calculate(int $InstanceID)`
_Requires Symcon >= 4.2_
**Parameters**
- `$InstanceID` (int): ID of the Instance
**Returns** (bool): If the command could be executed successfully, it returns __TRUE__ as result, otherwise __FALSE__.
ID of the Instance
**Example**
```text
ZST_Calculate(12345);
```
---
# Meter Overflow
> Symcon documentation · English · generated on 2026-09-26
> Index: https://www.symcon.de/en/llms.txt
Source: https://www.symcon.de/en/service/documentation/module-reference/energy/meter-overflow/
_Requires Symcon >= 4.2_
The module represents overflowing counters as continuous counters.
### function scope
- Calculates the total value of a variable and counts it up even though the device has an overflow.
### Software installation
- Install the 'Meter Overflow' module via the [Module Store](https://www.symcon.de/en/service/documentation/components/management-console/module-store/).
### Set up instances in IP-Symcon
- Under "Add Instance", the 'Meter Overflow' module can be found using the quick filter.
- More information about adding instances in the [Instances documentation](https://www.symcon.de/en/service/documentation/basics/instances/)
#### Configuration Page:
| name | description |
| ------------- | ---------------------------------------------------------------------------------------- |
| Source | Source variable to be used for the calculation. |
| Maximum value | From which value an overflow takes place. The maximum value which the device will count. |
### status variables
The status variables/categories are created automatically. Deleting individual ones can lead to malfunctions.
#### Status variables
| name | type | description |
| ------- | ----- | -------------------------------- |
| Counter | Float | Continuously incrementing value. |
---
# Tile Visualization
> Symcon documentation · English · generated on 2026-09-26
> Index: https://www.symcon.de/en/llms.txt
Source: https://www.symcon.de/en/service/documentation/module-reference/visualizations/tile-visualization/
_Requires Symcon >= 7.0_
> **Note:** A general tutorial can be found in the section [Tile Visualization](https://www.symcon.de/en/llms/components/tile-visualization.md).
| Function | Description |
| ---------------------------------------------------------------- | ------------------------------------------------------------------------------------------------- |
| [Send Notification](https://www.symcon.de/en/llms/modules/tile-visualization.md) | Push notifications, can be sent to all connected devices and assigned a notification type. |
| [Send advanced notification](https://www.symcon.de/en/llms/modules/tile-visualization.md) | Push notifications, can be sent to all connected devices and be assigned a custom icon and sound. |
## VISU_OpenObject
Source: https://www.symcon.de/en/service/documentation/module-reference/visualizations/tile-visualization/visu-openobject/
`void VISU_OpenObject(int $InstanzID, int $ObjektID, string $TokenList)`
_Requires Symcon >= 8.2_
opens a specific object in the Tile Visualization.
**Parameters**
- `$InstanzID` (int): ID of the Tile Visualization
- `$ObjektID` (int): ID of the object to be displayed in the visualization.
- `$TokenList` (string)
List of tokens of the devices on which the object can be opened. Can be left blank to open the object on all devices.
> **Note:** The TokenList parameter is not yet supported and should be passed as an empty string.
**Returns** (void): If the command could be executed successfully, it returns __TRUE__ as the result, otherwise __FALSE__.
List of tokens of the devices on which the object can be opened. Can be left blank to open the object on all devices.
> **Note:** The TokenList parameter is not yet supported and should be passed as an empty string.
**Example**
```php
VISU_OpenObject(12345, 54321, '');
```
## VISU_PostNotification
Source: https://www.symcon.de/en/service/documentation/module-reference/visualizations/tile-visualization/visu-postnotification/
`mixed VISU_PostNotification(int $InstanceID, string $Title, string $Text, string $Type, int $TargetID)`
_Requires Symcon >= 7.0_
sends a push notification to the tile visualization
**Parameters**
- `$InstanceID` (int): ID of the tile visualization
- `$Title` (string): Title of the message (maximum 32 characters). Can also be empty.
- `$Text` (string): message text (up to 256 characters).
- `$Type` (string): Currently, the default sounds and icons of the device are used regardless of the type.
- `$TargetID` (int): The ID of the object that will be opened when tapping the message
**Returns** (mixed): If the command could be executed successfully, it returns the ID of the notification as the result, otherwise __FALSE__.
The ID of the object that will be opened when tapping the message
**Example**
```php
VISU_PostNotification(12345, 'Weather', 'It's raining soon', 'Info', 54321);
```
## VISU_PostNotificationEx
Source: https://www.symcon.de/en/service/documentation/module-reference/visualizations/tile-visualization/visu-postnotificationex/
`mixed VISU_PostNotificationEx(int $InstanceID, string $Title, string $Text, string $Icon, string $Sound, int $TargetID)`
_Requires Symcon >= 7.0_
sends a push notification to the tile visualization
**Parameters**
- `$InstanceID` (int): ID of the tile visualization
- `$Title` (string): Title of the message (maximum 32 characters). Can also be empty.
- `$Text` (string): message text (up to 256 characters).
- `$Icon` (string): If not empty, then the icon is displayed. See [Icons](https://www.symcon.de/en/llms/components/icons.md)
- `$Sound` (string)
Sound played when receiving the message. (alarm
bell, boom, buzzer, connected, dark, digital, drums, duck, full, happy, horn, inception, kazoo, roll, siren, space, trickling, turn)
- `$TargetID` (int): The ID of the object that will be opened when tapping the message
**Returns** (mixed): If the command could be executed successfully, it returns the ID of the notification as the result, otherwise __FALSE__.
The ID of the object that will be opened when tapping the message
**Example**
```php
VISU_PostNotificationEx(12345, 'Front Door', 'Movement detected', 'Alert', 'alarm', 54321);
```
---
# WebFront Visualization
> Symcon documentation · English · generated on 2026-09-26
> Index: https://www.symcon.de/en/llms.txt
Source: https://www.symcon.de/en/service/documentation/module-reference/visualizations/webfront-visualization/
> **Note:** A general description can be found in the [WebFront Visualization](https://www.symcon.de/en/llms/components/webfront-visualization.md) area
From IP-Symcon version 2.2 it is possible to control the WebFront from IP Symcon and send messages to the WebFront. The following functions are available for the user to influence the WebFront.
| Function | Description |
| -------------------------------------------------------------- | -------------------------------------------------------------------------------------------------------------------------------------------------------- |
| [Open Popup](https://www.symcon.de/en/llms/modules/webfront-visualization.md) | To view larger messages a pop can be opened which almost fills the whole screen and displays important messages that do not fit in a small notification. |
| [Reload WebFront](https://www.symcon.de/en/llms/modules/webfront-visualization.md) | Loading the WebFront completely new (like a reload of the page in the browser (F5)). |
| [Select WebFront Tab](https://www.symcon.de/en/llms/modules/webfront-visualization.md) | Selects the tab with the specified ID. This feature is useful e.g. to jump during a movement at the front door to door camera tab. |
| [Send Audio Notification](https://www.symcon.de/en/llms/modules/webfront-visualization.md) | Audio notifications can be sent to the WebFront, which are then played audibly. |
| [Send Notification](https://www.symcon.de/en/llms/modules/webfront-visualization.md) | Small reports can be sent which are displayed with an icon, header and text on the right side in WebFront. (Similarly Growl/Snarl) |
| [Send Push Notification](https://www.symcon.de/en/llms/modules/webfront-visualization.md) | Push notifications can be sent to the mobile apps (iOS/Android), which are displayed on the mobile device and signalled audibly. |
## WFC_AudioNotification
Source: https://www.symcon.de/en/service/documentation/module-reference/visualizations/webfront-visualization/wfc-audionotification/
`bool WFC_AudioNotification(int $InstanceID, string $Title, int $MediaID)`
_Requires Symcon >= 3.0_
sends an audio message to the WebFront
**Parameters**
- `$InstanceID` (int): ID of the WebFront visualization
- `$Title` (string): Audio message title
- `$MediaID` (int): ID of the media object, which is of type "Sound”
**Returns** (bool): If the command succeeds, it returns __TRUE__, otherwise __FALSE__.
ID of the media object, which is of type "Sound”
**Example**
```php
WFC_AudioNotification(12345, 'Gong!', 55541); //55541 is the ID of the media object in IP-Symcon
```
## WFC_OpenCategory
Source: https://www.symcon.de/en/service/documentation/module-reference/visualizations/webfront-visualization/wfc-opencategory/
`bool WFC_OpenCategory(int $InstanceID, int $CategoryID)`
_Requires Symcon >= 4.1_
Opens a category as a popup in the WebFront
**Parameters**
- `$InstanceID` (int): ID of the WebFront visualization
- `$CategoryID` (int): Category ID
**Returns** (bool): If the command succeeds, it returns __TRUE__, otherwise __FALSE__.
Category ID
**Example**
```php
WFC_OpenCategory(12345, 45678);
```
## WFC_PushNotification
Source: https://www.symcon.de/en/service/documentation/module-reference/visualizations/webfront-visualization/wfc-pushnotification/
`bool WFC_PushNotification(int $InstanceID, string $Title, string $Text, string $Sound, int $TargetID)`
_Requires Symcon >= 3.4_
sends a push message to the mobile apps
**Parameters**
- `$InstanceID` (int): ID of the WebFront visualization
- `$Title` (string): Title of the message (maximum 32 characters). Can also be empty.
- `$Text` (string): Text of the message (maximum 256 characters).
- `$Sound` (string): Evaluated in the apps since version 3.0.6
- `$TargetID` (int): It is possible to jump directly to an object when opening the push message. (since version 5.0)
**Returns** (bool): If the command succeeds, it returns __TRUE__, otherwise __FALSE__.
It is possible to jump directly to an object when opening the push message. (since version 5.0)
**Example**
```php
WFC_PushNotification(12345, 'Warning', 'It will be raining soon!', '', 0 );
```
## WFC_Reload
Source: https://www.symcon.de/en/service/documentation/module-reference/visualizations/webfront-visualization/wfc-reload/
`bool WFC_Reload(int $InstanceID)`
_Requires Symcon >= 2.2_
reloads the WebFront on the client computer
**Parameters**
- `$InstanceID` (int): ID of the WebFront configurator
**Returns** (bool): If the command succeeds, it returns __TRUE__, otherwise __FALSE__.
ID of the WebFront configurator
**Example**
```php
WFC_Reload(12345);
```
## WFC_SendNotification
Source: https://www.symcon.de/en/service/documentation/module-reference/visualizations/webfront-visualization/wfc-sendnotification/
`bool WFC_SendNotification(int $InstanceID, string $Title, string $Text, string $Icon, int $Timeout)`
_Requires Symcon >= 2.2_
sends a small message to the WebFront
**Parameters**
- `$InstanceID` (int): ID of the WebFront configurator
- `$Title` (string): Titel of the message
- `$Text` (string): Text of the message. Can also be empty.
- `$Icon` (string): If not empty, then the icon will be displayed. See [Icons](https://www.symcon.de/en/llms/components/icons.md)
- `$Timeout` (int): Time to be displayed in seconds. 0 = Only hide when the user clicks on the message.
**Returns** (bool): If the command succeeds, it returns __TRUE__, otherwise __FALSE__.
Time to be displayed in seconds. 0 = Only hide when the user clicks on the message.
**Example**
```php
WFC_SendNotification(12345, 'Test', 'This is a nice Test', 'Speaker', 4);
```
## WFC_SendPopup
Source: https://www.symcon.de/en/service/documentation/module-reference/visualizations/webfront-visualization/wfc-sendpopup/
`bool WFC_SendPopup(int $InstanceID, string $Title, string $Text)`
_Requires Symcon >= 2.2_
**Parameters**
- `$InstanceID` (int): ID of the WebFront configurator
- `$Title` (string): Title to be displayed
- `$Text` (string): Text to be displayed (HTML is filtered!)
**Returns** (bool): If the command succeeds, it returns __TRUE__, otherwise __FALSE__.
Text to be displayed (HTML is filtered!)
**Example**
```php
WFC_SendPopup(12345, "Test", "A nice message");
```
## WFC_SwitchPage
Source: https://www.symcon.de/en/service/documentation/module-reference/visualizations/webfront-visualization/wfc-switchpage/
`bool WFC_SwitchPage(int $InstanceID, string $PageName)`
_Requires Symcon >= 2.2_
switches the tab in the WebFront
**Parameters**
- `$InstanceID` (int): ID of the WebFront configurator
- `$PageName` (string): Name of tab (e.g. item1234)
**Returns** (bool): If the command succeeds, it returns __TRUE__, otherwise __FALSE__.
Name of tab (e.g. item1234)
**Example**
```php
WFC_SwitchPage(12345, "item1234");
```
---
# Amazon Alexa
> Symcon documentation · English · generated on 2026-09-26
> Index: https://www.symcon.de/en/llms.txt
Source: https://www.symcon.de/en/service/documentation/module-reference/voice-assistents/amazon-alexa/
_Requires Symcon >= 5.0_
### Description
The Amazon Alexa module enables the control of devices via Amazon Alexa. This includes the voice control via Echo Dots.
### Integration in IP-Symcon
> **Note:** Using the Amazon Alexa module requires an active connection to the [Connect Service](https://www.symcon.de/en/llms/modules/connect-control.md), which in turn requires an active subscription.
[Video](https://www.youtube.com/embed/AbvauPdbLa8?rel=0&cc_load_policy=1)
#### Create Amazon Alexa Instance
Using the Amazon Alexa module requires its installation via the [Module Store](https://www.symcon.de/en/llms/components/management-console.md). First, the [Module Store](https://www.symcon.de/en/llms/components/management-console.md) needs to be opened. It can be found in the upper right area. The Amazon Alexa module can be found by entering "Alexa" into the search field. When opening the found module, the installation of the module can be started in the next dialog by clicking "Install".


Afterwards, an add dialog for creating an Amazon Alexa instance opens.
If the instance should be created manually, an [Instance](https://www.symcon.de/en/llms/concepts.md) of the Amazon Alexa module needs to be created. This is done by opening the Object Tree. Here, the add button "+" at the bottom right needs to be clicked and [Instance](https://www.symcon.de/en/llms/concepts.md) selected.

In the module list, select the device "Amazon Alexa" from the vendor "Amazon". The location should not be changed. The name can be chosen at will. Finally, confirm with "OK".

After the creation of the Amazon Alexa instance, it is opened automatically and can be configured.
#### Configure Amazon Alexa Instance
The module offers multiple device types that can be used. Especially the initial setup can be sped up significantly by using the Device Search. Later on, additional devices can easily be added manually.
The Device Search is started by clicking the button "Search for Devices" at the top of the instance configuration.

Then, a dialog is opened. After a loading time, found devices that are not yet implemented into Alexa are shown. These instances are seperated by device type. Below each instance, the status variables that are used upon implementation are shown. If an instance should be implemented, the check box at the beginning of the instances row must be checked. By default, the name of the instance is used. If it should be updated, the "Edit" button at the right of the list entry can be clicked. After all desired instances are selected and eventually their names updated, the selection is confirmed by clicking "Add Devices". Then, the selected devices are added to the respective lists in the instance configuration.

To prepare a device manually, expand its panel and create a new entry in its list by clicking "Add" below the list.

Each entry requires a name, under which the device will be known to Alexa. Additional parameters depend on the device type and can be found in the corresponding site of the documentation. After setting all parameters, the device is confirmed with "OK".

#### Possible Device Types
* [Light (Switch)](https://www.symcon.de/en/llms/modules/amazon-alexa.md)
* [Light (Dimmer)](https://www.symcon.de/en/llms/modules/amazon-alexa.md)
* [Light (Color)](https://www.symcon.de/en/llms/modules/amazon-alexa.md)
* [Light (Expert)](https://www.symcon.de/en/llms/modules/amazon-alexa.md)
* [Lock](https://www.symcon.de/en/llms/modules/amazon-alexa.md)
* [Temperature Sensor](https://www.symcon.de/en/llms/modules/amazon-alexa.md)
* [Thermostat](https://www.symcon.de/en/llms/components/object-presentation.md)
* [Speaker](https://www.symcon.de/en/llms/modules/amazon-alexa.md)
* [Speaker (Muteable)](https://www.symcon.de/en/llms/modules/amazon-alexa.md)
* [Television](https://www.symcon.de/en/llms/modules/amazon-alexa.md)
* [Mediaplayer](https://www.symcon.de/en/llms/modules/amazon-alexa.md)
* [Shutters](https://www.symcon.de/en/llms/modules/amazon-alexa.md)
* [Generic Switch](https://www.symcon.de/en/llms/modules/amazon-alexa.md)
* [Generic Slider](https://www.symcon.de/en/llms/modules/amazon-alexa.md)
* [Scenes](https://www.symcon.de/en/llms/components/object-presentation.md)
* [Scenes (deactivatable)](https://www.symcon.de/en/llms/modules/amazon-alexa.md)
After all devices are configured, confirm the settings by clicking "Apply Changes".

After applying, it is recommended to check that the column "Status" contains "OK" for all devices. If this is not the case, the column contains an error message that contains further information about the complication.
It should also be checked that the label at the top of the instance states "Status: Symcon Connect is OK". Otherwise, the [Connect Service](https://www.symcon.de/en/llms/modules/connect-control.md) needs to be activated.

#### Connect IP-Symcon with Amazon Alexa
Finally, IP-Symcon must be linked to Amazon Alexa so that the Amazon Alexa instance can receive requests from Amazon Alexa. To do this, the Symcon skill for Amazon Alexa must first be installed.
The installation is done via the Amazon Alexa app.
From the start page of the app, go to "More" and click on "Skills and games".

Search for the skill "Symcon", click on the first entry "Symcon" and press the "Activate for use" button.

The browser should then open. In the field, enter the e-mail address to which the IP Symcon license used is registered and confirm with "Send verification code". An e-mail with a code will be sent to the specified e-mail address. Enter the code in this e-mail in the pop-up and confirm with "Verify code".

A message "Symcon has been successfully connected" should appear. Finally, the devices set up by Amazon Alexa must be searched for. This can be done, for example, by saying "Alexa, search for devices".
## Expert Options
Source: https://www.symcon.de/en/service/documentation/module-reference/voice-assistents/amazon-alexa/expert-options/
_Requires Symcon >= 5.0_
> **Warning:** The Expert Options usually do not need to be adjusted. Handle these options carefully to ensure that the Amazon Alexa module works as intended.
### Options
| Name | Description |
| ------------------- | -------------------------------------------------------------------------------------------------------------------------------------------------------------------------------------- |
| Emulate Status | If Emulate Status is active, the module does not wait for the update of switched variables. Instead, it returns the new state based on the triggered value. |
| Show Expert Devices | If Show Expert Devices is active, expert devices are displayed. Expert devices are devices that are more complex in the configuration and require a deeper understanding of IP-Symcon. |
## Television
Source: https://www.symcon.de/en/service/documentation/module-reference/voice-assistents/amazon-alexa/television/
_Requires Symcon >= 5.3_
> **Note:** Television is an expert device and is only shown if the corresponding [Expert Option](https://www.symcon.de/en/llms/modules/amazon-alexa.md) is set.
### Description
For devices of the type Television, diverse parameters be set. The device can be switched on and off, change the channel, set the volume, supports muting and can change the input. When a television supports only some of these properties, only the corresponding variables need to be defined.
### Parameter
| Name | Description |
| ---------------- | -------------------------------------------------------------------------------------------------------------------------------------------------------------------------------- |
| Name | Name that is used to address the device via Amazon Alexa |
| Switch Variable | A triggerable variable of type Boolean, that switches the device on or off (optional) |
| Channel Variable | A triggerable variable of type Integer with a profile that has associations and step size 0. The associations need to be numbered consecutively and start with 0 or 1 (optional) |
| Volume Variable | A triggerable variable of type Integer or Float that controls the volume (optional) |
| Mute Variable | A triggerable variable of type Boolean, that controls the muting (optional) |
| Input Variable | A triggerable variable of type String, that controls the used input (optional) |
| Supported Inputs | The supported inputs for the Input Variable are defined in this list. If the Input Variable is set, at least one input needs to be selected |
At least one of the optional variables needs to be defined
> **Note:** When optional variables are not set, Alexa recognizes that the device does not support the corresponding properties. If optional variables are defined later on, a new search for devices needs to be executed before the newly unlocked functions can be used.
#### Possible Actions
| Action | Description | Possible Sentence for Activation |
| ---------------------- | ------------------------------------------------------------------------------------------------------------------------------------------------------------------------------------- | ------------------------------------------------ |
| Switch On or Off | Trigger the Switch Variable to True or False | "Alexa, switch __ on." |
| Switch to channel | Switch the channel variable to the value whose association corresponds to the mentioned channel. For this process, upper and lower case and not differenciated and spaces are ignored | "Alexa, change the channel to PBS on __." |
| Switch to next channel | Increase the Channel Variable by 1. If the variable is currently at the last channel, it is set to the first channel instead | "Alexa, next channel on __." |
| Set volume | Switch the Volume Variable to the given value | "Alexa, switch the volume of __ to 40." |
| Mute or unmute | Switch the Mute Variable to True or False | "Alexa, mute __." |
| Change input | Switch the Input Variable to the name of the input | "Alexa, change the input to DVD on __" |
#### Device Search
This device type is not supported by the device search.
## Generic Switch
Source: https://www.symcon.de/en/service/documentation/module-reference/voice-assistents/amazon-alexa/generic-switch/
_Requires Symcon >= 5.0_
### Description
Devices of the type Generic Switch can be switched On or Off. Within Amazon Alexa, the device is interpreted as a common switch and can be used for different devices.
### Parameter
| Name | Description |
| --------------- | -------------------------------------------------------- |
| Name | Name that is used to address the device via Amazon Alexa |
| Switch Variable | A triggerable variable of type Boolean |
#### Possible Actions
| Action | Description | Possible Sentence for Activation |
| ---------------- | ------------------------------------- | -------------------------------- |
| Switch On or Off | Trigger the variable to True or False | "Alexa, switch __ on." |
#### Device Search
An instance must have status variables with the fitting profiles to be detected by the device search.
| Variable | Possible Profiles |
| --------------- | ----------------- |
| Switch Variable | ~Switch |
## Generic Slider
Source: https://www.symcon.de/en/service/documentation/module-reference/voice-assistents/amazon-alexa/generic-slider/
_Requires Symcon >= 5.0_
### Description
Devices of the type Generic Slider can be set to are percentual value. Within Amazon Alexa, the device is interpreted as a common switch and can be used for different devices.
### Parameter
| Name | Description |
| --------------- | -------------------------------------------------------- |
| Name | Name that is used to address the device via Amazon Alexa |
| Slider Variable | A triggerable variable of type Integer or Float |
#### Possible Actions
| Action | Description | Possible Sentence for Activation |
| ---------------- | ------------------------------------------- | --------------------------------- |
| Switch On or Off | Switch the variable towards 100% or 0% | "Alexa, switch __ on." |
| Set Value | Switch the variable towards the given value | "Alexa, switch __ to 40%." |
#### Device Search
An instance must have status variables with the fitting profiles to be detected by the device search.
| Variable | Possible Profiles |
| --------------- | -------------------------------------------- |
| Slider Variable | ~Intensity.100, ~Intensity.255, ~Intensity.1 |
## Speaker
Source: https://www.symcon.de/en/service/documentation/module-reference/voice-assistents/amazon-alexa/speaker/
_Requires Symcon >= 5.0_
### Description
For devices of the type Speaker, the volume can be set.
### Parameter
| Name | Description |
| --------------- | ------------------------------------------------------------------------ |
| Name | Name that is used to address the device via Amazon Alexa |
| Volume Variable | A triggerable variable of type Integer or Float that controls the volume |
#### Possible Actions
| Action | Description | Possible Sentence for Activation |
| ---------- | -------------------------------------- | ---------------------------------------------- |
| Set volume | Switch the variable to the given value | "Alexa, switch the volume of __ to 40." |
#### Device Search
This device type is not supported by the device search.
## Speaker (Muteable)
Source: https://www.symcon.de/en/service/documentation/module-reference/voice-assistents/amazon-alexa/speaker-muteable/
_Requires Symcon >= 5.3_
### Description
For devices of the type Speaker, the volume can be set. In addition, the device can be muted and unmuted without loosing the configured volume.
### Parameter
| Name | Description |
| --------------- | ----------------------------------------------------------------------------------- |
| Name | Name that is used to address the device via Amazon Alexa |
| Volume Variable | A triggerable variable of type Integer or Float that controls the volume (optional) |
| Mute Variable | A triggerable variable of type Boolean, that controls the muting (optional) |
Either the Volume Variable or the Mute Variable needs to be defined
> **Note:** When optional variables are not set, Alexa recognizes that the device does not support the corresponding properties. If optional variables are defined later on, a new search for devices needs to be executed before the newly unlocked functions can be used.
#### Possible Actions
| Action | Description | Possible Sentence for Activation |
| -------------- | --------------------------------------------- | ---------------------------------------------- |
| Set volume | Switch the Volume Variable to the given value | "Alexa, switch the volume of __ to 40." |
| Mute or unmute | Switch the Mute Variable to True or False | "Alexa, mute __." |
#### Device Search
This device type is not supported by the device search.
## Light (Dimmer)
Source: https://www.symcon.de/en/service/documentation/module-reference/voice-assistents/amazon-alexa/light-dimmer/
_Requires Symcon >= 5.0_
### Description
Devices of the type Light (Dimmer) describe lamps that can be dimmed.
### Parameter
| Name | Description |
| ------------------- | ------------------------------------------------------------------- |
| Name | Name that is used to address the device via Amazon Alexa |
| Brightness Variable | A triggerable variable of type Integer or Float that dims the light |
#### Possible Actions
| Action | Description | Possible Sentence for Activation |
| ---------------- | --------------------------------------- | -------------------------------- |
| Switch On or Off | Trigger the variable to 100% or 0% | "Alexa, switch __ on." |
| Dim | Trigger the variable to the given value | "Alexa, dim __ to 40%." |
#### Device Search
An instance must have status variables with the fitting profiles to be detected by the device search.
| Variable | Possible Profiles |
| ------------------- | -------------------------------------------- |
| Brightness Variable | ~Intensity.100, ~Intensity.255, ~Intensity.1 |
## Light (Expert)
Source: https://www.symcon.de/en/service/documentation/module-reference/voice-assistents/amazon-alexa/light-expert/
_Requires Symcon >= 5.0_
### Description
Devices of the type Light (Expert) describe lamps whose properties within multiple variables can be switched independently.
### Parameter
| Name | Description |
| -------------------------- | ------------------------------------------------------------------------------------------------------------------ |
| Name | Name that is used to address the device via Amazon Alexa |
| Switch Variable | A triggerable variable of type Boolean, that switches the light on or off |
| Brightness Variable | A triggerable variable of type Integer or Float that dims the light (optional) |
| Color Variable | A triggerable Variable of type Integer with the profile ~HexColor, that triggers the color of the light (optional) |
| Color Temperature Variable | A triggerable variable of type Integer or Float that contains the color temperature in Kelvin (optional) |
> **Note:** If optional variables are not set, Alexa recognizes that the lamp does not have the corresponding properties. If optional variables are set later on, a search for devices is required to discover the changed properties.
#### Possible Actions
| Action | Description | Possible Sentence for Activation |
| ------------------------ | ----------------------------------------------------------------- | -------------------------------------- |
| Switch On or Off | Trigger the Switch Variable to True or False | "Alexa, switch __ on." |
| Dim | Trigger the Brightness Variable to the given value | "Alexa, dim __ to 40%." |
| Switch Color | Trigger the Color Variable to the given color | "Alexa, switch __ to red." |
| Switch Color Temparature | Trigger the Color Temperature Variable to the corresponding value | "Alexa, switch __ to daylight." |
#### Device Search
An instance must have status variables with the fitting profiles to be detected by the device search. To be detected as Expert light, at least the Switch Variable and another variable need to be detected.
| Variable | Possible Profiles |
| -------------------------- | -------------------------------------------- |
| Switch Variable | ~Switch |
| Brightness Variable | ~Intensity.100, ~Intensity.255, ~Intensity.1 |
| Color Variable | ~HexColor |
| Color Temperature Variable | ~TWColor |
## Light (Color)
Source: https://www.symcon.de/en/service/documentation/module-reference/voice-assistents/amazon-alexa/light-color/
_Requires Symcon >= 5.0_
### Description
Devices of the type Light (Color) describe lamps, that can be switched to any color.
### Parameter
| Name | Description |
| -------------- | ------------------------------------------------------------------------------------------------------- |
| Name | Name that is used to address the device via Amazon Alexa |
| Color Variable | A triggerable Variable of type Integer with the profile ~HexColor, that triggers the color of the light |
#### Possible Actions
| Action | Description | Possible Sentence for Activation |
| ---------------- | -------------------------------------------------------------- | --------------------------------- |
| Switch On or Off | Trigger the variable to white or black | "Alexa, switch __ on." |
| Dim | Trigger the brightness of the current color to the given value | "Alexa, dim __ to 40%." |
| Switch Color | Trigger the variable to the given color | "Alexa, switch __ to red." |
#### Device Search
An instance must have status variables with the fitting profiles to be detected by the device search.
| Variable | Possible Profiles |
| -------------- | ----------------- |
| Color Variable | ~HexColor |
## Light (Switch)
Source: https://www.symcon.de/en/service/documentation/module-reference/voice-assistents/amazon-alexa/light-switch/
_Requires Symcon >= 5.0_
### Description
Devices of the type Light (Switch) describe lamps that can be switched on or off.
### Parameter
| Name | Description |
| --------------- | ------------------------------------------------------------------------- |
| Name | Name that is used to address the device via Amazon Alexa |
| Switch Variable | A triggerable variable of type Boolean, that switches the light on or off |
#### Possible Actions
| Action | Description | Possible Sentence for Activation |
| ---------------- | -------------------------------------- | -------------------------------- |
| Switch On or Off | Triggers the variable to True or False | "Alexa, switch __ on." |
#### Device Search
An instance must have status variables with the fitting profiles to be detected by the device search.
| Variable | Possible Profiles |
| --------------- | ----------------- |
| Switch Variable | ~Switch |
## Mediaplayer
Source: https://www.symcon.de/en/service/documentation/module-reference/voice-assistents/amazon-alexa/mediaplayer/
_Requires Symcon >= 5.4_
### Description
For devices of the type Mediaplayer, diverse parameters can be set. The device can be switched on and off, set the volume, supports muting and can control the playback. When a mediaplayer supports only some of these properties, only the corresponding variables need to be defined.
### Parameter
| Name | Description |
| ----------------- | ---------------------------------------------------------------------------------------------------------------------------------------------------------------------------------------------------------------------------------------------------------------------------------------------------------------------------- |
| Name | Name that is used to address the device via Amazon Alexa |
| Switch Variable | A triggerable variable of type Boolean, that switches the device on or off (optional) |
| Volume Variable | A triggerable variable of type Integer or Float that controls the volume (optional) |
| Mute Variable | A triggerable variable of type Boolean, that controls the muting (optional) |
| Playback Variable | A triggerable variable of type Integer with the profile ~Playback or ~PlaybackPreviousNext that defines the state of the playback; Depending on the profile, Alexa only provides the corresponding actions, i.e., Stop, Play and Pause for ~Playback and additionally Previous and Next for ~PlaybackPreviousNext (optional) |
At least one of the optional variables needs to be defined
> **Note:** When optional variables are not set, Alexa recognizes that the device does not support the corresponding properties. If optional variables are defined later on, a new search for devices needs to be executed before the newly unlocked functions can be used.
#### Possible Actions
| Action | Description | Possible Sentence for Activation |
| ---------------- | -------------------------------------------------- | ---------------------------------------------- |
| Switch On or Off | Trigger the Switch Variable to True or False | "Alexa, switch __ on." |
| Set volume | Switch the Volume Variable to the given value | "Alexa, switch the volume of __ to 40." |
| Mute or unmute | Switch the Mute Variable to True or False | "Alexa, mute __." |
| Set playback | Switch the Playback Variable to the provided value | "Alexa, play __" |
#### Device Search
An instance must have status variables with the fitting profiles to be detected by the device search. To be detected as Mediaplayer, at least the Playback Variable needs to be detected.
| Variable | Possible Profiles |
| ----------------- | ----------------------------------------------- |
| Switch Variable | ~Switch |
| Volume Variable | This variable is not detected via device search |
| Mute Variable | This variable is not detected via device search |
| Playback Variable | ~Playback, ~PlaybackPreviousNext |
## Shutters
Source: https://www.symcon.de/en/service/documentation/module-reference/voice-assistents/amazon-alexa/shutters/
_Requires Symcon >= 5.3_
### Description
Devices of the type Shutters can be opened and closed. If the device supports percentual opening, it can be controlled as well.
### Parameter
| Name | Description |
| ---------------- | --------------------------------------------------------------------------------------------------------------------------------------------------------------------------------------------------------- |
| Name | Name that is used to address the device via Amazon Alexa |
| Shutter Variable | A triggerable variable of the type Integer or Float with the profile ~ShutterMoveStop or ~ShutterMoveStep. Alternatively, a variable that has a defined minimum and maximum value via profile can be used |
#### Possible Actions
| Action | Description | Possible Sentence for Activation |
| ----------------- | -------------------------------------------------------------------------------------------------------------------------------------------------------------------------------------------------------------------------------------------------------------------------------------------------------------------------------------------------------------------------------------------------------------------------------- | -------------------------------- |
| Open | When a ~ShutterMove profile is used, trigger the variable to "Open". Otherwise, the variable is triggered to the minimal value of the profile. | "Alexa, open __" |
| Close | When a ~ShutterMove profile is used, trigger the variable to "Close". Otherwise, the variable is triggered to the maximum value of the profile. | "Alexa, close __" |
| Open percentually | When a ~ShutterMove profile is used, trigger the variable to "Open" if the percentual value is bigger than 50% and to "Close" otherwise. Otherwise, the variable is triggered according to the percentage value. It should be mentioned, that the variable is triggered to 0% on a complete opening and similar computations are applied for other values as well. For example, opening by 30% will trigger the variable to 70%. | "Alexa, open __ by 30%" |
#### Device Search
An instance must have status variables with the fitting profiles to be detected by the device search.
| Variable | Possible Profiles |
| --------------- | -------------------------------------------------------------------------------- |
| Switch Variable | ~ShutterMoveStop, ~ShutterMoveStep, ~Intensity.100, ~Intensity.255, ~Intensity.1 |
## Lock
Source: https://www.symcon.de/en/service/documentation/module-reference/voice-assistents/amazon-alexa/lock/
_Requires Symcon >= 5.0_
### Description
Devices of the type Lock can be locked.
### Parameter
| Name | Description |
| ------------- | ----------------------------------------------------------------- |
| Name | Name that is used to address the device via Amazon Alexa |
| Lock Variable | A triggerable variable of the type Boolean that triggers the lock |
#### Possible Actions
> **Note:** Before a lock can be unlocked, unlocking needs to be enabled via the Alexa App.
| Action | Description | Possible Sentence for Activation |
| ------ | ----------------------------- | -------------------------------- |
| Lock | Trigger the variable to True | "Alexa, lock __." |
| Unlock | Trigger the variable to False | "Alexa, unlock __." |
#### Device Search
An instance must have status variables with the fitting profiles to be detected by the device search.
| Variable | Possible Profiles |
| ------------- | -------------------------------------------- |
| Lock Variable | ~Lock, ~Lock.Reversed, ~Door, ~Door.Reversed |
## Scenes
Source: https://www.symcon.de/en/service/documentation/module-reference/voice-assistents/amazon-alexa/scenes/
_Requires Symcon >= 5.0_
### Description
Devices of the type Scene can be activated and execute any kind of action.
### Parameter
| Name | Description |
| --------------- | -------------------------------------------------------- |
| Name | Name that is used to address the device via Amazon Alexa |
| Activate Action | An action that is executed on activation of the scene |
#### Possible Actions
| Action | Description | Possible Sentence for Activation |
| -------------- | ------------------ | -------------------------------- |
| Activate Scene | Execute the action | "Alexa, activate __." |
#### Device Search
This device type is not supported by the device search.
## Scenes (deactivatable)
Source: https://www.symcon.de/en/service/documentation/module-reference/voice-assistents/amazon-alexa/scenes-deactivatable/
_Requires Symcon >= 5.0_
### Description
Devices a the type Scene (deactivatable) can be activated and deactivated and execute any kind of action in the process.
### Parameter
| Name | Description |
| ----------------- | -------------------------------------------------------- |
| Name | Name that is used to address the device via Amazon Alexa |
| Activate Action | An action that is executed on activation of the scene |
| Deactivate Action | An action that is executed on deactivation of the scene |
#### Possible Actions
| Action | Description | Possible Sentence for Activation |
| ---------------- | ----------------------------- | -------------------------------- |
| Activate Scene | Execute the Activate Action | "Alexa, activate __." |
| Deactivate Scene | Execute the Deactivate Action | "Alexa, deactivate __." |
#### Device Search
This device type is not supported by the device search.
## Temperature Sensor
Source: https://www.symcon.de/en/service/documentation/module-reference/voice-assistents/amazon-alexa/temperature-sensor/
_Requires Symcon >= 5.0_
### Description
Devices of the type Temperature Sensor measure temperatures.
### Parameter
| Name | Description |
| --------------- | -------------------------------------------------------------------- |
| Name | Name that is used to address the device via Amazon Alexa |
| Sensor Variable | A variable of type Float that contains the current temperature in °C |
#### Possible Actions
> **Note:** Currently, Alexa does not support direct requests to a temperature sensor. Thus, a [group](https://www.amazon.com/gp/help/customer/display.html?nodeId=GS8URL9U6PW8SPTA) needs to be used to request the temperature via voice command. Once the temperature sensor is part of a group, the temperature of that group can be requested.
| Action | Description | Possible Sentence for Activation |
| ------------------- | --------------------------------------------- | ---------------------------------------------- |
| Request temperature | Request the current temperature of the sensor | "Alexa, what's the temperature of __?" |
#### Device Search
This device type is not supported by the device search.
## Thermostat
Source: https://www.symcon.de/en/service/documentation/module-reference/voice-assistents/amazon-alexa/thermostat/
_Requires Symcon >= 5.0_
### Description
Devices of the type Thermostat can set temperatures.
### Parameter
| Name | Description |
| ------------------ | -------------------------------------------------------------- |
| Name | Name that is used to address the device via Amazon Alexa |
| Temperaturvariable | A triggerable variable of type Float that sets the temperature |
#### Possible Actions
| Action | Description | Possible Sentence for Activation |
| --------------- | -------------------------------------------------- | ----------------------------------- |
| Set Temperature | Trigger the variable toward the given temperature. | "Alexa, switch __ to 35 °C." |
#### Device Search
An instance must have status variables with the fitting profiles to be detected by the device search.
| Variable | Possible Profiles |
| ------------------ | ------------------------------- |
| Temperaturvariable | ~Temperature, ~Temperature.Room |
---
# Google Assistant
> Symcon documentation · English · generated on 2026-09-26
> Index: https://www.symcon.de/en/llms.txt
Source: https://www.symcon.de/en/service/documentation/module-reference/voice-assistents/google-assistant/
_Requires Symcon >= 5.0_
### Description
The Google Assistant module enables the control of devices via Google Assistant. This includes the voice control via Google Home.
### Inclusion in IP-Symcon
> **Note:** Using the Google Assistant module requires an active connection to the [Connect Service](https://www.symcon.de/en/llms/modules/connect-control.md), which in turn requires an active subscription.
#### Create Google Assistant Instance
Using the Google Assistant module requires its installation via the [Module Store](https://www.symcon.de/en/llms/components/management-console.md). First, the [Module Store](https://www.symcon.de/en/llms/components/management-console.md) needs to be opened. It can be found in the upper right area. The Google Assistant module can be found by entering "Assistant" into the search field. When opening the found module, the installation of the module can be started in the next dialog by clicking "Install".


Afterwards, an add dialog for creating an Google Assistant instance opens.
If the instance should be added manually, an [Instance](https://www.symcon.de/en/llms/concepts.md) of the Google Assistant module needs to be created. This is done by opening the Object Tree. Here, the add button "+" at the bottom right needs to be clicked and [Instance](https://www.symcon.de/en/llms/concepts.md) selected.

In the module list, select the device "Google Assistant" or "Google Home" from the vendor "Google". The location should not be changed. The name can be chosen at will. Finally, confirm with "OK".

After the creation of the Google Assistant instances, it is opened automatically and can be configured.
#### Configure Google Assistant Instance
The module offers multiple device types that can be used. Especially the initial setup can be sped up significantly by using the Device Search. Later on, additional devices can easily be added manually.
The Device Search is started by clicking the button "Search for Devices" at the top of the instance configuration.

Then, a dialog is opened. After a loading time, found devices that are not yet implemented into Alexa are shown. These instances are seperated by device type. Below each instance, the status variables that are used upon implementation are shown. If an instance should be implemented, the check box at the beginning of the instances row must be checked. By default, the name of the instance is used. If it should be updated, the "Edit" button at the right of the list entry can be clicked. After all desired instances are selected and eventually their names updated, the selection is confirmed by clicking "Add Devices". Then, the selected devices are added to the respective lists in the instance configuration.

To prepare a device manually, expand its panel and create a new entry in its list by clicking "Add" below the list.

Each entry requires a name, under which the device will be known to Google Assistant. Additional parameters depend on the device type and can be found in the corresponding site of the documentation. After setting all parameters, confirm with "OK".

#### Possible Device Types
* [Light (Switch)](https://www.symcon.de/en/llms/modules/amazon-alexa.md)
* [Light (Dimmer)](https://www.symcon.de/en/llms/modules/amazon-alexa.md)
* [Light (Color)](https://www.symcon.de/en/llms/modules/amazon-alexa.md)
* [Light (Expert)](https://www.symcon.de/en/llms/modules/amazon-alexa.md)
* [Thermostat](https://www.symcon.de/en/llms/components/object-presentation.md)
* [Shutter](https://www.symcon.de/en/llms/components/object-presentation.md)
* [Generic Switch](https://www.symcon.de/en/llms/modules/amazon-alexa.md)
* [Scenes](https://www.symcon.de/en/llms/components/object-presentation.md)
* [Scenes (deactivatable)](https://www.symcon.de/en/llms/modules/amazon-alexa.md)
After all devices are configured, confirm the settings by clicking "Apply Changes".

After applying, it is recommended to check that the column "Status" contains "OK" for all devices. If this is not the case, the column contains an error message that contains further information about the complication.
It should also be checked that the label at the top of the instance states "Status: Symcon Connect is OK". Otherwise, the [Connect Service](https://www.symcon.de/en/llms/modules/connect-control.md) needs to be activated.

#### Connect IP-Symcon to Google Assistant
Finally, IP-Symcon needs to be connected to Google Assistant so the Google Assistant instance can receive requests from Google.
The installation is done with the Google Home app.
Within the app, select the home control tab at the bottom left and tap on "Add".

Tap "Set up device" in the menu.

Tap "Have something already set up?".

Tap "Symcon" in the displayed list.

Enter the e-mail address, that the IP-Symcon is registered to, in the popup and confirm with "Send verification code".

An e-mail with a code is sent to the provided e-mail address. Enter the code from the e-mail into the popup and confirm with "Verify code".

After successful confirmation, the prepared devices appear in the Google Home app and can be used.

## Expert Options
Source: https://www.symcon.de/en/service/documentation/module-reference/voice-assistents/google-assistant/expert-options/
_Requires Symcon >= 5.0_
> **Warning:** The Expert Options usually do not need to be adjusted. Handle these options carefully to ensure that the Google Assistant module works as intended.
### Options
| Name | Description |
| --------------------- | ------------------------------------------------------------------------------------------------------------------------------------------------------------------------------------------ |
| Emulate Status | If Emulate Status is active, the module does not wait for the update of switched variables. Instead, it returns the new state based on the triggered value. |
| Request device update | A device update can be requested from Google with this button, synchronizing the configured devices again with Google Assistant. This is usually done automatically when applying changes. |
## Generic Switch
Source: https://www.symcon.de/en/service/documentation/module-reference/voice-assistents/google-assistant/generic-switch/
_Requires Symcon >= 5.0_
### Description
Devices of the type Generic Switch can be switched On or Off. Within Google Assistant, the device is interpreted as a common switch and can be used for different devices.
### Parameter
| Name | Description |
| --------------- | ------------------------------------------------------------ |
| Name | Name that is used to address the device via Google Assistant |
| Switch Variable | A triggerable variable of type Boolean |
#### Possible Actions
| Action | Description | Possible Sentence for Activation |
| ---------------- | ------------------------------------- | --------------------------------- |
| Switch On or Off | Trigger the variable to True or False | "Ok Google, switch __ on." |
#### Device Search
An instance must have status variables with the fitting profiles to be detected by the device search.
| Variable | Possible Profiles |
| --------------- | ----------------- |
| Switch Variable | ~Switch |
## Light (Dimmer)
Source: https://www.symcon.de/en/service/documentation/module-reference/voice-assistents/google-assistant/light-dimmer/
_Requires Symcon >= 5.0_
### Description
Devices of the type Light (Dimmer) describe lamps that can be dimmed.
### Parameter
| Name | Description |
| -------- | ------------------------------------------------------------------- |
| Name | Name that is used to address the device via Google Assistant |
| Variable | A triggerable variable of type Integer or Float that dims the light |
#### Possible Actions
| Action | Description | Possible Sentence for Activation |
| ---------------- | --------------------------------------- | ---------------------------------- |
| Switch On or Off | Trigger the variable to 100% or 0% | "Ok Google, switch __ on." |
| Dim | Trigger the variable to the given value | "Ok Google, dim __ to 40%." |
#### Device Search
An instance must have status variables with the fitting profiles to be detected by the device search.
| Variable | Possible Profiles |
| -------- | -------------------------------------------- |
| Variable | ~Intensity.100, ~Intensity.255, ~Intensity.1 |
## Light (Expert)
Source: https://www.symcon.de/en/service/documentation/module-reference/voice-assistents/google-assistant/light-expert/
_Requires Symcon >= 5.0_
### Description
Devices of the type Light (Expert) describe lamps whose properties within multiple variables can be switched independently.
### Parameter
| Name | Description |
| ------------------- | ------------------------------------------------------------------------------------------------------------------ |
| Name | Name that is used to address the device via Amazon Alexa |
| Switch Variable | A triggerable variable of type Boolean, that switches the light on or off |
| Brightness Variable | A triggerable variable of type Integer or Float that dims the light (optional) |
| Color Variable | A triggerable Variable of type Integer with the profile ~HexColor, that triggers the color of the light (optional) |
> **Note:** If optional variables are not set, Google recognizes that the lamp does not have the corresponding properties. If optional variables are set later on, a device update is required to discover the changed properties.
#### Possible Actions
| Action | Description | Possible Sentence for Activation |
| ---------------- | -------------------------------------------------- | ------------------------------------- |
| Switch On or Off | Trigger the Switch Variable to True or False | "Ok Google, switch __ on." |
| Dim | Trigger the Brightness Variable to the given value | "Ok Google, dim __ to 40%." |
| Switch Color | Trigger the Color Variable to the given color | "Ok Google, switch __ to red." |
#### Device Search
An instance must have status variables with the fitting profiles to be detected by the device search. To be detected as Expert light, at least the Switch Variable and another variable need to be detected.
| Variable | Possible Profiles |
| ------------------- | -------------------------------------------- |
| Switch Variable | ~Switch |
| Brightness Variable | ~Intensity.100, ~Intensity.255, ~Intensity.1 |
| Color Variable | ~HexColor |
## Light (Color)
Source: https://www.symcon.de/en/service/documentation/module-reference/voice-assistents/google-assistant/light-color/
_Requires Symcon >= 5.0_
### Description
Devices of the type Light (Color) describe lamps, that can be switched to any color.
### Parameter
| Name | Description |
| -------- | ------------------------------------------------------------------------------------------------------- |
| Name | Name that is used to address the device via Google Assistant |
| Variable | A triggerable Variable of type Integer with the profile ~HexColor, that triggers the color of the light |
#### Possible Actions
| Action | Description | Possible Sentence for Activation |
| ---------------- | -------------------------------------------------------------- | ------------------------------------- |
| Switch On or Off | Trigger the variable to white or black | "Ok Google, switch __ on." |
| Dim | Trigger the brightness of the current color to the given value | "Ok Google, dim __ to 40%." |
| Switch Color | Trigger the variable to the given color | "Ok Google, switch __ to red." |
#### Device Search
An instance must have status variables with the fitting profiles to be detected by the device search.
| Variable | Possible Profiles |
| -------- | ----------------- |
| Variable | ~HexColor |
## Light (Switch)
Source: https://www.symcon.de/en/service/documentation/module-reference/voice-assistents/google-assistant/light-switch/
_Requires Symcon >= 5.0_
### Description
Devices of the type Light (Switch) describe lamps that can be switched on or off.
### Parameter
| Name | Description |
| -------- | ------------------------------------------------------------------------- |
| Name | Name that is used to address the device via Google Assistant |
| Variable | A triggerable variable of type Boolean, that switches the light on or off |
#### Possible Actions
| Action | Description | Possible Sentence for Activation |
| ---------------- | -------------------------------------- | --------------------------------- |
| Switch On or Off | Triggers the variable to True or False | "Ok Google, switch __ on." |
#### Device Search
An instance must have status variables with the fitting profiles to be detected by the device search.
| Variable | Possible Profiles |
| --------------- | ----------------- |
| Switch Variable | ~Switch |
## Shutter
Source: https://www.symcon.de/en/service/documentation/module-reference/voice-assistents/google-assistant/shutter/
_Requires Symcon >= 5.0_
### Description
Devices of the type Shutter can be opened and closed. If the device supports percentual opening, this is controllable as well.
### Parameter
| Name | Description |
| ---------------- | ---------------------------------------------------------------------------------------------------------------------------------------------------------------------------------------------------------- |
| Name | Name that is used to address the device via Google Assistant |
| Shutter Variable | A triggerable variable of type Integer or Float, with the profile ~ShutterMoveStop or ~ShutterMoveStep. Alternatively, a variable can be used that has defined minimum and maximum values from its profile |
#### Possible Actions
| Action | Description | Possible Sentence for Activation |
| ------------------ | ------------------------------------------------------------------------------------------------------------------------------------------------------------------------------------------------------------------------------------------------------------------------------------------------------------------------------------------------------------------------------------------------------------------------------------------------ | ---------------------------------- |
| Open | Switch the variable to "Open" if it has a ~ShutterMove profile. Otherwise the variable is switched to the minimal value of the profile. | "Ok Google, open __" |
| Close | Switch the variable to "Close" if it has a ~ShutterMove profile. Otherwise the variable is switched to the maximum value of the profile. | "Ok Google, close __" |
| Percentual Opening | If the variable has a ~ShutterMove profile, switch it to "Open" if the percentual value is more than 50% and to "Close" otherwise. If the variable has another profile, the variable is switched according to the percentual value. It should be considered that the variable is switched to 0% if it is completely opened and other percentual values are applied analogously. For example, opening by 30% will result in 70% for the variable. | "Ok Google, open __ by 30%" |
#### Device Search
An instance must have status variables with the fitting profiles to be detected by the device search.
| Variable | Possible Profiles |
| --------------- | -------------------------------------------------------------------------------- |
| Switch Variable | ~ShutterMoveStop, ~ShutterMoveStep, ~Intensity.100, ~Intensity.255, ~Intensity.1 |
## Scenes
Source: https://www.symcon.de/en/service/documentation/module-reference/voice-assistents/google-assistant/scenes/
_Requires Symcon >= 5.0_
### Description
Devices of the type Scene can be activated and execute any kind of action.
### Parameter
| Name | Description |
| ------ | ------------------------------------------------------------ |
| Name | Name that is used to address the device via Google Assistant |
| Action | An action that is executed on activation of the scene |
#### Possible Actions
| Action | Description | Possible Sentence for Activation |
| -------------- | ------------------ | -------------------------------- |
| Activate Scene | Execute the action | "Ok Google, activate __." |
#### Device Search
This device type is not supported by the device search.
## Scenes (deactivatable)
Source: https://www.symcon.de/en/service/documentation/module-reference/voice-assistents/google-assistant/scenes-deactivatable/
_Requires Symcon >= 5.0_
### Description
Devices a the type Scene (deactivatable) can be activated and deactivated and execute any kind of action in the process.
### Parameter
| Name | Description |
| ----------------- | ------------------------------------------------------------ |
| Name | Name that is used to address the device via Google Assistant |
| Activate Action | An action that is executed on activation of the scene |
| Deactivate Action | An action that is executed on deactivation of the scene |
#### Possible Actions
| Action | Description | Possible Sentence for Activation |
| ---------------- | ----------------------------- | ---------------------------------- |
| Activate Scene | Execute the Activate Action | "Ok Google, activate __." |
| Deactivate Scene | Execute the Deactivate Action | "Ok Google, deactivate __." |
#### Device Search
This device type is not supported by the device search.
## Thermostat
Source: https://www.symcon.de/en/service/documentation/module-reference/voice-assistents/google-assistant/thermostat/
_Requires Symcon >= 5.0_
### Description
Devices of the type Thermostat can set temperatures.
### Parameter
| Name | Description |
| ------------------- | ----------------------------------------------------------------------------- |
| Name | Name that is used to address the device via Amazon Alexa |
| Setpoint | A triggerable variable of type Float that sets the setpoint temperature in °C |
| Ambient Temperature | A variable of type Float that contains the ambient temperature in °C |
#### Possible Actions
| Action | Description | Possible Sentence for Activation |
| --------------- | -------------------------------------------------- | ----------------------------------- |
| Set Temperature | Trigger the variable toward the given temperature. | "Ok Google, set __ to 22 °C" |
#### Device Search
This device type is not supported by the device search.
---
# Alerting
> Symcon documentation · English · generated on 2026-09-26
> Index: https://www.symcon.de/en/llms.txt
Source: https://www.symcon.de/en/service/documentation/module-reference/notifications/alerting/
_Requires Symcon >= 5.3_
The module triggers an alarm when one of the sensor variables becomes active. In this case, target variables are set to the maximum value or On (True) in the event of an alarm. Once an alarm has been switched, it is not automatically deactivated; it must be reset manually.
### Function scope
- Configuration of sensor and target variables via list selection, which trigger the alarm or are switched in the event of an alarm
- Adjustable switch-on delay
- Switching on/off via Visualization button or script function
- Conversion function for old versions of the alarm module
### software installation
- Install the 'Alerting' module via the [Module Store](https://www.symcon.de/en/service/documentation/components/management-console/module-store/).
### Setting up the instances in IP-Symcon
- Under "Add Instance" the 'Alerting' module can be found using the quick filter.
- More information in the [Instances documentation](https://www.symcon.de/en/service/documentation/basics/instances/).
#### configuration page
| Name | Description |
| ------------------- | -------------------------------------------------------------------------------------------------------------------------------------------------------------------------------------------------------------------------------------------------------- |
| Button "Conversion" | (Only shown if the lists are empty and old links are present) If an old version of the module has been detected, the old links can be merged into the new lists by pressing a button. If this is successful, a message window appears. |
| Sensor variables | This list contains the variables that trigger an alarm when updated to an active value. Variables with the value true or a value unequal 0 are considered active. If the variable has a .reversed profile, the values false and 0 are considered active. |
| Target variables | This list contains the variables that are switched on alarm. These must contain a default action or action script. |
| Switch-on delay | If greater than 0, the alarm will only be active after the set time. |
### status variables and profiles
The status variables/categories are created automatically. Deleting individual ones can lead to malfunctions.
#### Status variables
| Name | Type | Description |
| ------------------ | ------- | --------------------------------------------------------------------------------------------------------------------------------------------- |
| Active | Boolean | Disables/enables alerting. If the alarm is deactivated, any existing alarm will also be deactivated as well as all selected target variables. |
| Time to activation | Integer | Displays the remaining time during the activation process. The value contains the Unix timestamp of the upcoming activation and is displayed using the [Duration presentation](https://www.symcon.de/en/llms/components/object-presentation.md). |
| Alarm | Boolean | Deactivates/activates the alarm and all selected target variables. |
| Active Sensors | String | Lists all active sensors and is hidden if none are active. |
### Visualization
The Visualization can be used to disable/enable alarms.
It is also displayed whether there is an alarm or not. A list of all still active sensors is displayed. The alarm can also be de-/activated manually.
## ARM_GetLastAlertID
Source: https://www.symcon.de/en/service/documentation/module-reference/notifications/alerting/arm-getlastalertid/
`int ARM_GetLastAlertID(int $InstanceID)`
_Requires Symcon >= 5.3_
**Parameters**
- `$InstanceID` (int): ID of the device to be switched
**Returns** (int): ID of the variable that last triggered an alarm.
ID of the device to be switched
**Example**
```text
ARM_GetLastAlertID(12345); //Get variable ID
```
## ARM_SetActive
Source: https://www.symcon.de/en/service/documentation/module-reference/notifications/alerting/arm-setactive/
`bool ARM_SetActive(int $InstanceID, bool $Value)`
_Requires Symcon >= 5.3_
**Parameters**
- `$InstanceID` (int): ID of the device to be switched
- `$Value` (bool): Value to which the module is to be switched
**Returns** (bool): If the command could be executed successfully, it returns __TRUE__ as result, otherwise __FALSE__.
Value to which the module is to be switched
**Example**
```text
ARM_SetActive(12345, true); //Activate Alarmierungsmodul
```
## ARM_SetAlert
Source: https://www.symcon.de/en/service/documentation/module-reference/notifications/alerting/arm-setalert/
`bool ARM_SetAlert(int $InstanceID, bool $Value)`
_Requires Symcon >= 5.3_
**Parameters**
- `$InstanceID` (int): ID of the device to be switched
- `$Value` (bool): Value to which the alarm is to be switched
**Returns** (bool): If the command could be executed successfully, it returns __TRUE__ as result, otherwise __FALSE__.
Value to which the alarm is to be switched
**Example**
```text
ARM_SetAlert(12345, false); //Deactivate alarm
```
---
# Notification
> Symcon documentation · English · generated on 2026-09-26
> Index: https://www.symcon.de/en/llms.txt
Source: https://www.symcon.de/en/service/documentation/module-reference/notifications/notification/
_Requires Symcon >= 5.1_
This module enables multi-level notification, where the level increases after a defined time and is reset when acknowledged. Various actions can be performed when a new level is reached.
### function scope
- Starting a multi-stage notification chain with a variable
- Actions can be set individually at each stage:
- Execute scripts
- Send push messages, e-mails or SMS
- Make a phone call with an announcement (if the "Phone Announcement" module is installed)
- Make an announcement over the loudspeaker (if the "Announcement" module is installed)
- Send message via Telegram (if "TelegramBot" module is installed)
- Increase to next level after certain time
- Acknowledgement via attached script or push message ends notifications
- Individual levels can be deactivated if required
### software installation
Via the [Module Store](https://www.symcon.de/en/service/documentation/components/management-console/module-store/) install the 'Notification' module.
### Setting up instances in IP-Symcon
- Under "Add Instance" the 'Notification' module can be found using the quick filter.
- More information about adding instances in the [documentation of instances](https://www.symcon.de/en/service/documentation/basics/instances/).
- Select a variable at 'Trigger
- If this variable takes a value that is not neutral (false for boolean, 0 for integer and float, '' for string), the notification chain is started at level 1
- Add any number of levels to the notification levels list and configure them
- Duration defines the time until the next level is activated
- Actions are executed when a level is reached
- Active defines whether the stage should be executed. Stages that are not active are skipped
- 'Status' contains error messages if something is not correct when configuring the stage, otherwise "OK".
#### Set up actions
Each action has parameters for the action type, a recipient object, a recipient address, a title, a message and a message variable. The "action" defines what should be called. (e.g. A script or an email sent).
Further information like "title" and "message" will be sent to the set "recipient object". The content of the message is defined by the text in the configuration field "Message". This is concatenated with the text in the "Message variable".
For generic messages, the content of the message variable is available as '{variable}'. Likewise, line breaks can be inserted by '\n'. The recipient address has different functionality depending on the action.
#### Script
The script selected as recipient object will be executed. During this call the following system variables can be used:
| System variable | Description |
| ------------------------- | ------------------------------------------------- |
| $_IPS['RECIPIENT'] | The contents of the recipient address table field |
| $_IPS['TITLE'] | The content of the table field Title |
| $_IPS['MESSAGE'] | The content of the table field Message |
| $_IPS['MESSAGE_VARIABLE'] | The ID of the message variable |
#### Push
A push message is sent to all devices in the selected web front. This message links the acknowledgement script. So by tapping on the push message, the notification can be acknowledged. The recipient address has no effect with this action type. The message has a maximum length of 256 characters.
#### E-mail (SMTP)
An e-mail is sent via the selected SMTP instance. If a recipient address is specified, the email will be sent to that address. If no recipient address is specified, the e-mail will be sent to the specified recipient of the SMTP instance. If the 'Advanced Response' option is enabled, a block of links can be inserted with the keyword '{actions}', through which the available actions can be executed.
#### SMS
An SMS will be sent via the selected SMS instance to the phone number specified in the recipient address. If the 'Extended response' option is enabled, a link can be inserted with the '{actions}' keyword, through which the available actions can be performed. If a message is longer than 160 characters (limitation by SMS), it will be split up to 2 additional SMS (maximum 459 characters).
#### Telephone announcement (only available if the [Telephone announcement](https://www.symcon.de/en/llms/modules/phone-announcement.md) module is installed)
The phone number specified in the recipient's address will be called and the title and the message will be read out. If the 'Extended answer' option is enabled, the corresponding action can be performed with the 0-9 keys. If desired, the '{actions}' keyword can be used to include the available actions in the message.
#### Passage (only available if the [Announcement](https://www.symcon.de/en/llms/modules/announcement.md) module is installed)
The title and message are read out using the selected instance. The recipient address has no effect with this action type.
#### Telegram (only available if the [Telegram Bot](https://www.symcon.de/en/llms/modules/telegrambot.md) module is installed)
The title and message are sent to the recipient using the selected instance. The recipient address can be either the name or the UserID of the Telegram recipient. If the recipient address is left empty, all recipients stored in the Telegram bot will be notified.
#### AdvancedReply
If extended reply is enabled, different actions can be defined in the corresponding list. To define what is additionally executed on an action, a triggering event can be created. The variable 'Response action' is selected as the triggering variable and 'On certain value' as the trigger. The desired action can now be selected as the value.
### statusvariables
| Statusvariable | Description |
| ------------------- | ----------------------------------------------------------------------------------- |
| Response action | Can be clicked via the Visualization or called by command to reset the notification |
| Notification active | Controls whether the notification module is active or not |
| Notification level | Contains the current notification level |
### Visualization
- Via the Visualization "Reply action" can be executed to reset the notification.
- The Visualization can be used to switch the notification on/off via "Notification active".
- The current notification level is displayed.
## BN_IncreaseLevel
Source: https://www.symcon.de/en/service/documentation/module-reference/notifications/notification/bn-increaselevel/
`bool BN_IncreaseLevel(int $InstanceID)`
_Requires Symcon >= 5.1_
Increases the level and performs the action
**Parameters**
- `$InstanceID` (int): ID of the Instance
**Returns** (bool): If the command could be executed successfully, it returns __TRUE__ as result, otherwise __FALSE__.
ID of the Instance
**Example**
```text
BN_IncreaseLevel(12345);
```
## BN_Reset
Source: https://www.symcon.de/en/service/documentation/module-reference/notifications/notification/bn-reset/
`bool BN_Reset(int $InstanceID)`
_Requires Symcon >= 5.1_
Resets the notification level and disables the chain
**Parameters**
- `$InstanceID` (int): ID of the Instance
**Returns** (bool): If the command could be executed successfully, it returns __TRUE__ as result, otherwise __FALSE__.
ID of the Instance
**Example**
```text
BN_Reset(12345);
```
## BN_SetNotifyLevel
Source: https://www.symcon.de/en/service/documentation/module-reference/notifications/notification/bn-setnotifylevel/
`bool BN_SetNotifyLevel(int $InstanceID, int $Level)`
_Requires Symcon >= 5.1_
Sets the notification to a specified level
**Parameters**
- `$InstanceID` (int): ID of the Instance
- `$Level` (int): Notification module level
**Returns** (bool): If the command could be executed successfully, it returns __TRUE__ as result, otherwise __FALSE__.
Notification module level
**Example**
```text
BN_SetNotifyLevel(12345, 2);
```
---
# Announcement
> Symcon documentation · English · generated on 2026-09-26
> Index: https://www.symcon.de/en/llms.txt
Source: https://www.symcon.de/en/service/documentation/module-reference/notifications/announcement/
_Requires Symcon >= 5.4_
The 'Announcement' module offers the possibility to play back audio data generated by AWS Polly via Sonos or under Windows the Media Player.
### function scope
- Playback of audio data generated by AWS Polly via a Sonos player or the "Symcon" media player
- Volume of the announcement is adjustable
- Announcement on change of text variable. Alternatively via offered function
### software installation
- Install the 'Announcement' module via the [Module Store](https://www.symcon.de/en/service/documentation/components/management-console/module-store/).
### Setting up the instances in IP-Symcon
- Under 'Add Instance' the 'Announcement' module can be found using the quick filter.
- More information about adding instances in the [Instances documentation](https://www.symcon.de/en/service/documentation/basics/instances/)
#### Configuration Page:
| name | description |
| ------------------------ | ---------------------------------------------------------------------------------------------------------------------------------------------------------------------------------------------------------- |
| Text-to-Speeach instance | AWS Polly instance, which should be used to create the announcement. The output format must be mp3. Sonos can only be used with sampling rates 16000 Hz, 22050 Hz, 24000 Hz, 32000 Hz, 44100 Hz, 48000 Hz |
| Output Device | Output Instance Type |
| Symcon IP | The IP address where the Sonos player reaches IP Symcon. |
| Sonos/Media Player | Instance over which the announcement is played |
| Volume | Sonos: the volume change of the announcement (0 → no change , 50 → 50, +10 → louder by 10) Media Player: the volume of the announcement in percent (will not be reset) |
### status variables
The status variables/categories are created automatically. Deleting individual ones can lead to malfunctions.
#### Statusvariables
| Name | Type | Description |
| ---- | ------ | -------------------------------------------------------------------------------------------------- |
| Text | String | Text which is used for the announcement. When the variable is updated, the content is played back. |
## DS_Play
Source: https://www.symcon.de/en/service/documentation/module-reference/notifications/announcement/ds-play/
`bool DS_Play(int $InstanceID, string $Text)`
_Requires Symcon >= 5.4_
**Parameters**
- `$InstanceID` (int): ID of the Instance
- `$Text` (string): Text to be played
**Returns** (bool): If the command could be executed successfully, it returns __TRUE__ as result, otherwise __FALSE__.
Text to be played
**Example**
```text
DS_Play(12345, "This is a text");
```
---
# Dynamic Mail
> Symcon documentation · English · generated on 2026-09-26
> Index: https://www.symcon.de/en/llms.txt
Source: https://www.symcon.de/en/service/documentation/module-reference/notifications/dynamic-mail/
_Requires Symcon >= 7.1_
Sends an e-mail with a dynamic text.
### Range of functions
* Sending an e-mail with a fixed/dynamic text
* Dynamic by replacing placeholders with the variable values
### Software installation
* Install the 'Dynamic e-mail' module via the Module Store.
### Setting up the instances in IP-Symcon
Under 'Add instance', the 'Dynamic E-Mail' module can be found using the quick filter.
- Further information on adding instances can be found in the [Instances documentation](https://www.symcon.de/service/dokumentation/konzepte/instanzen/#Instanz_hinzufügen)
__Configuration page__:
| Name | Description |
| --------------- | --------------------------------------- |
| SMTP instance | SMTP instance which is fully configured |
| Dynamic subject | Text input which can be set. |
| Dynamic text | Multi-line text input. |
The subject and the text are given a dynamic by inserting variable values. These can be set within the text by the variable ID placed in curly brackets. If the ID is too short or not a variable, the brackets with the number remain.

__Action area__:
| Name | Description |
| --------------------------- | --------------------------------------------- |
| Send Test | Sends an e-mail with the set subject and text |
| Preview e-mail with subject | A preview with set variable values |
| Placeholder variables | Table with the given placeholders |
Table:
The placeholders found are listed in the table with their current value and status. If a placeholder is not available, the number entered is not an ID. If a placeholder is invalid, the ID found is not a variable.
### Status variables and profiles
No variables or profiles are created.
### Visualization
The instance has no functionality in the visualization.
## DM_SendMail
Source: https://www.symcon.de/en/service/documentation/module-reference/notifications/dynamic-mail/dm-sendmail/
`bool DM_SendMail(int $InstanceID)`
_Requires Symcon >= 7.1_
**Parameters**
- `$InstanceID` (int): ID of the instance
**Returns** (bool): If the command could be executed successfully, the result is __TRUE__, otherwise __FALSE__.
ID of the instance
**Example**
```php
DM_SendMail(12345);
```
---
# Done Notifier
> Symcon documentation · English · generated on 2026-09-26
> Index: https://www.symcon.de/en/llms.txt
Source: https://www.symcon.de/en/service/documentation/module-reference/notifications/done-notifier/
_Requires Symcon >= 4.2_
The ready indicator signals whether a device is ready. For this purpose, the variable of the power consumption of the device is selected and a limit value is defined. As soon as this limit value is exceeded for the first time, the ready detector is started. If the power consumption falls below this limit value and does not exceed it again within an adjustable period of time, the status variable is set to "Ready".
### function scope
- Switching the entire module on/off
- Selection of a source variable
- Setting the limit value
- Time span until ready message is set after limit value is undershot
### software installation
- Under "Add Instance" is 'Done Notifier' module can be found using the quick filter.
- More information about adding instances in the [Instances documentation](https://www.symcon.de/en/service/documentation/basics/instances/)
#### Configuration Page:
| Name | Description |
| -------- | ----------------------------------------------------------------------------------------------------- |
| Source | Source variable which is used for comparison with the limit value. |
| Limit | Value below which a ready message is set. |
| Interval | Period until a ready message is set. Only becomes active after the value falls below the limit value. |
### status variables and profiles
The status variables/categories are created automatically. Deleting individual ones can lead to malfunctions.
#### Status variables
| Name | Type | Description |
| ------ | ------- | ------------------------------------------- |
| Active | boolean | Turns the module on/off |
| Status | integer | Indicates the status (Off/Running/Complete) |
#### Profile:
| Name | Type |
| --------- | ------- |
| FM.Status | Integer |
---
# IMAP
> Symcon documentation · English · generated on 2026-09-26
> Index: https://www.symcon.de/en/llms.txt
Source: https://www.symcon.de/en/service/documentation/module-reference/notifications/imap/
_Requires Symcon >= 2.2_
The IMAP module can be configured using the configuration page within the [Object Tree](https://www.symcon.de/en/llms/components/management-console.md) of the [Management Console](https://www.symcon.de/en/llms/components/management-console.md). The parameters for host and port can be taken from the manual of the mail provider. The username and password are the login data for the e-mail account.
> **Warning:** Since October 2022 a connection to Microsoft 365 (outlook.office365.com) isn't supported. This is because of the only use of OAuth2 authentification supported by Microsoft.
To display the e-mails in the visualization, the interval must be set. It determines the cyclic request of the inbox. Only the subject line is requested. The complete e-mail will only be loaded when requested by the visualization.
On the variable "Last Message" can be determined if and when new mails arrive. If no e-mails are in the mailbox, the variable has the value 0. The "Unread Messages" variable returns the number of unread messages.

| Property | Description |
| ------------------------ | ----------------------------------------------------------------------------------------------------------- |
| Host | Server name or IP of email provider |
| Port | Port, that is handled by the server |
| Use SSL | Defines if SSL should be used |
| Verify Peer | Verify that hosts SSL certificate is correct (Only visible if Use SSL is active) |
| Verify Host | Verify that host URL from the SSL certificate matches the property Host (Only visible if Use SSL is active) |
| Use Basic Authentication | Defines if a username password is required |
| Username | Username |
| Password | Password |
| Interval | Number of seconds in which the inbox is requested |
> **Note:** An overview for host, port, and authentication for many providers can be found here: [Table](https://www.arclab.com/en/kb/email/list-of-smtp-and-imap-servers-mailserver-list.html)
## IMAP_DeleteMail
Source: https://www.symcon.de/en/service/documentation/module-reference/notifications/imap/imap-deletemail/
`bool IMAP_DeleteMail(int $InstanceID, string $UID)`
_Requires Symcon >= 5.0_
deletes a mail with a specific e-mail(UID)
**Parameters**
- `$InstanceID` (int): ID of the IMAP-Instance
- `$UID` (string): UID of the email to be deleted
**Returns** (bool): If the command succeeds, it returns __TRUE__, otherwise __FALSE__.
UID of the email to be deleted
**Example**
```php
// Deletes the mail with the e-mail(UID) 1234
IMAP_DeleteMail (12345, "1234"));
```
## IMAP_GetCachedMails
Source: https://www.symcon.de/en/service/documentation/module-reference/notifications/imap/imap-getcachedmails/
`array IMAP_GetCachedMails(int $InstanceID)`
_Requires Symcon >= 2.2_
**Parameters**
- `$InstanceID` (int): ID of the IMAP-Instance
**Returns** (array): If the command was executed successfully, it returns as its result an array of data to the cached emails, otherwise a Boolean with the value __FALSE__.
ID of the IMAP-Instance
**Example**
```php
print_r(IMAP_GetCachedMails(12345));
/* returns e.g.:
Array
(
[0] => Array
(
[Date] => 1295756412
[Flags] => SEEN
[Recipient] => recipient@test.test
[SenderAddress] => sender@test.test
[SenderName] => Test Sender
[Subject] => 3 2 1 Test
[UID] => 1234
)
)
*/
```
## IMAP_GetMailEx
Source: https://www.symcon.de/en/service/documentation/module-reference/notifications/imap/imap-getmailex/
`array IMAP_GetMailEx(int $InstanceID, string $UID)`
_Requires Symcon >= 2.2_
**Parameters**
- `$InstanceID` (int): ID of teh IMAP-Instance
- `$UID` (string): UID of the email to be loaded
**Returns** (array): If the command was executed successfully, it returns as its result an array of data to the cached emails, otherwise a Boolean with the value __FALSE__.
UID of the email to be loaded
**Example**
```php
print_r(IMAP_GetMailEx(12345, "1234"));
/* returns e.g.:
Array
(
[ContentType] => text/plain
[Date] => 1295756412
[Flags] => SEEN
[Recipient] => ips@test.test
[SenderAddress] => sender@test.test
[SenderName] => Test Sender
[Subject] => 3 2 1 Test
[Text] => This is a test!
[UID] => 1234
)
*/
```
---
# MediaPlayer
> Symcon documentation · English · generated on 2026-09-26
> Index: https://www.symcon.de/en/llms.txt
Source: https://www.symcon.de/en/service/documentation/module-reference/notifications/mediaplayer/
With the media player module, various sound files as Wave, Midi or MP3 can be played. The module allows the use of several sound cards. This allows speech outputs (Information, Warnings) or your favorite music to be played.
### Tips & Tricks
* You can create as many Media Player instances, and even configure them on the same sound card. This allows to continue to running the music in the background (quiet), while a second instance makes an announcement.
## WAC_AddFile
Source: https://www.symcon.de/en/service/documentation/module-reference/notifications/mediaplayer/wac-addfile/
`bool WAC_AddFile(int $InstanceID, string $Filename)`
adds a music file to the playlist
**Parameters**
- `$InstanceID` (int): ID of the controlled media player
- `$Filename` (string): Path to the file to be played
**Returns** (bool): If the command succeeds, it returns __TRUE__, otherwise __FALSE__.
Path to the file to be played
**Example**
```php
//Please note the slashes in the path.
//The exact meaning you can read in the PHP manual:
//http://de.php.net/manual/de/language.types.string.php
WAC_AddFile(12345, "D:/MP3s/favoritesong.mp3");
```
## WAC_ClearPlaylist
Source: https://www.symcon.de/en/service/documentation/module-reference/notifications/mediaplayer/wac-clearplaylist/
`bool WAC_ClearPlaylist(int $InstanceID)`
clears the playlist
**Parameters**
- `$InstanceID` (int): ID of the controlled media player
**Returns** (bool): If the command succeeds, it returns __TRUE__, otherwise __FALSE__.
ID of the controlled media player
**Example**
```php
WAC_ClearPlaylist(12345);
```
## WAC_GetPlaylistLength
Source: https://www.symcon.de/en/service/documentation/module-reference/notifications/mediaplayer/wac-getplaylistlength/
`int WAC_GetPlaylistLength(int $InstanceID)`
returns the length of the playlist
**Parameters**
- `$InstanceID` (int): ID of the controlled media player
**Returns** (int): Number of tracks, which are registered in the playlist.
ID of the controlled media player
**Example**
```php
$len = WAC_GetPlaylistLength(12345);
if($len > 0)
WAC_Play(12345);
```
## WAC_GetPlaylistPosition
Source: https://www.symcon.de/en/service/documentation/module-reference/notifications/mediaplayer/wac-getplaylistposition/
`int WAC_GetPlaylistPosition(int $InstanceID)`
returns the current position in the playlist
**Parameters**
- `$InstanceID` (int): ID of the device to be switched
**Returns** (int): Value between 1 and [WAC_GetPlayListLength](https://www.symcon.de/en/llms/modules/mediaplayer.md), if the playlist should be empty, it returns -1.
ID of the device to be switched
**Example**
```php
$pos = WAC_GetPlaylistPosition(12345);
```
## WAC_Next
Source: https://www.symcon.de/en/service/documentation/module-reference/notifications/mediaplayer/wac-next/
`bool WAC_Next(int $InstanceID)`
plays the next title of the playlist
**Parameters**
- `$InstanceID` (int): ID of the controlled media player
**Returns** (bool): If the command succeeds, it returns __TRUE__, otherwise __FALSE__.
ID of the controlled media player
**Example**
```php
WAC_Next(12345);
```
## WAC_Pause
Source: https://www.symcon.de/en/service/documentation/module-reference/notifications/mediaplayer/wac-pause/
`bool WAC_Pause(int $InstanceID)`
pauses the playback
**Parameters**
- `$InstanceID` (int): ID of the controlled media player
**Returns** (bool): If the command was executed successfully, it returns the result __TRUE__, otherwise __FALSE__. It is also returned __TRUE__ if no active playback is available.
ID of the controlled media player
**Example**
```php
WAC_Pause(12345);
```
## WAC_Play
Source: https://www.symcon.de/en/service/documentation/module-reference/notifications/mediaplayer/wac-play/
`bool WAC_Play(int $InstanceID)`
plays the playlist
**Parameters**
- `$InstanceID` (int): ID of the controlled media player
**Returns** (bool): If the command succeeds, it returns __TRUE__, otherwise __FALSE__.
ID of the controlled media player
**Example**
```php
WAC_Play(12345); //Play
```
## WAC_PlayFile
Source: https://www.symcon.de/en/service/documentation/module-reference/notifications/mediaplayer/wac-playfile/
`bool WAC_PlayFile(int $InstanceID, string $Filename)`
plays a music file directly
**Parameters**
- `$InstanceID` (int): ID of the controlled media player
- `$Filename` (string): Path to the file to play
**Returns** (bool): If the command succeeds, it returns __TRUE__, otherwise __FALSE__.
Path to the file to play
**Example**
```php
//Please note the slashes in the path.
//The exact meaning, read the PHP manual: http://de.php.net/manual/de/language.types.string.php
WAC_PlayFile(12345, "D:/MP3s/Favorite song.mp3");
```
## WAC_Prev
Source: https://www.symcon.de/en/service/documentation/module-reference/notifications/mediaplayer/wac-prev/
`bool WAC_Prev(int $InstanceID)`
plays the previous title of the playlist
**Parameters**
- `$InstanceID` (int): ID of the controlled media player
**Returns** (bool): If the command succeeds, it returns __TRUE__, otherwise __FALSE__.
ID of the controlled media player
**Example**
```php
WAC_Prev(12345);
```
## WAC_SetPlaylistPosition
Source: https://www.symcon.de/en/service/documentation/module-reference/notifications/mediaplayer/wac-setplaylistposition/
`bool WAC_SetPlaylistPosition(int $InstanceID)`
sets the position in the playlist
**Parameters**
- `$InstanceID` (int): ID of the device to be switched
**Returns** (bool): If the command succeeds, it returns __TRUE__, otherwise __FALSE__.
ID of the device to be switched
**Example**
```php
WAC_SetPlaylistPosition(12345, 0); //An Anfang setzen
```
## WAC_SetPosition
Source: https://www.symcon.de/en/service/documentation/module-reference/notifications/mediaplayer/wac-setposition/
`bool WAC_SetPosition(int $InstanceID, int $Seconds)`
**Parameters**
- `$InstanceID` (int): ID of the controlled media player
- `$Seconds` (int): Label in seconds
**Returns** (bool): If the command succeeds, it returns __TRUE__, otherwise __FALSE__.
Label in seconds
**Example**
```php
WAC_PlayFile(12345, "my.mp3"); //Play title
WAC_SetPosition(12345, 60); //jump on the 1 minute mark in the song
```
## WAC_SetRepeat
Source: https://www.symcon.de/en/service/documentation/module-reference/notifications/mediaplayer/wac-setrepeat/
`bool WAC_SetRepeat(int $InstanceID, bool $Repeat)`
switches the repetition of the playlist on/off
**Parameters**
- `$InstanceID` (int): ID of the controlled media player
- `$Repeat` (bool): __TRUE__ for On, __FALSE__ for Off
**Returns** (bool): If the command succeeds, it returns __TRUE__, otherwise __FALSE__.
__TRUE__ for On, __FALSE__ for Off
**Example**
```php
WAC_SetRepeat(12345, true); //Activate playlist repeat
```
## WAC_SetShuffle
Source: https://www.symcon.de/en/service/documentation/module-reference/notifications/mediaplayer/wac-setshuffle/
`bool WAC_SetShuffle(int $InstanceID, bool $Shuffle)`
switches the shuffle playback on/off
**Parameters**
- `$InstanceID` (int): ID of the controlled media player
- `$Shuffle` (bool): __TRUE__ for On, __FALSE__ for Off
**Returns** (bool): If the command succeeds, it returns __TRUE__, otherwise __FALSE__.
__TRUE__ for On, __FALSE__ for Off
**Example**
```php
WAC_SetShuffle(12345, true); //Zufallswiedergabe einschalten
```
## WAC_SetVolume
Source: https://www.symcon.de/en/service/documentation/module-reference/notifications/mediaplayer/wac-setvolume/
`bool WAC_SetVolume(int $InstanceID, int $Volume)`
sets the volume
**Parameters**
- `$InstanceID` (int): ID of the controlled media player
- `$Volume` (int): 0-100 (%)
**Returns** (bool): If the command succeeds, it returns __TRUE__, otherwise __FALSE__.
0-100 (%)
**Example**
```php
WAC_SetVolume(12345, 85);
```
## WAC_Stop
Source: https://www.symcon.de/en/service/documentation/module-reference/notifications/mediaplayer/wac-stop/
`bool WAC_Stop(int $InstanceID)`
**Parameters**
- `$InstanceID` (int): ID of the controlled media player
**Returns** (bool): If the command was executed successfully, it returns the result __TRUE__, otherwise __FALSE__. It is also returned __TRUE__ if no active playback is available.
ID of the controlled media player
**Example**
```php
WAC_Stop(12345);
```
---
# POP3
> Symcon documentation · English · generated on 2026-09-26
> Index: https://www.symcon.de/en/llms.txt
Source: https://www.symcon.de/en/service/documentation/module-reference/notifications/pop3/
_Requires Symcon >= 2.2_
The POP3 module can be configured using the configuration page within the [Object Tree](https://www.symcon.de/en/llms/components/management-console.md) of the [Management Console](https://www.symcon.de/en/llms/components/management-console.md). The parameters for host and port can be taken from the manual of the mail provider. The username and password are the login data for the e-mail account.
To display the e-mails in the visualization, the interval must be set. It determines the cyclic request of the inbox. Only the subject line is requested. The complete e-mail will only be loaded when requested by the visualization.
On the variable "Last Message" can be determined if and when new mails arrive. If no e-mails are in the mailbox, the variable has the value 0. Unlike IMAP, the display of the number of unread variables is technically not possible for POP3.

| Property | Description |
| ------------------------ | ----------------------------------------------------------------------------------------------------------- |
| Host | Server name or IP of email provider |
| Port | Port, that is handled by the server |
| Use SSL | Defines if SSL should be used |
| Verify Peer | Verify that hosts SSL certificate is correct (Only visible if Use SSL is active) |
| Verify Host | Verify that host URL from the SSL certificate matches the property Host (Only visible if Use SSL is active) |
| Use Basic Authentication | Defines if a username password is required |
| Username | Username |
| Password | Password |
| Interval | Number of seconds in which the inbox is requested |
> **Note:** An overview for host, port, and authentication for many providers can be found here: [Table](https://www.arclab.com/en/kb/email/list-of-smtp-and-imap-servers-mailserver-list.html)
## POP3_DeleteMail
Source: https://www.symcon.de/en/service/documentation/module-reference/notifications/pop3/pop3-deletemail/
`bool POP3_DeleteMail(int $InstanceID, string $UID)`
_Requires Symcon >= 5.0_
deletes a mail with a specific e-mail(UID)
**Parameters**
- `$InstanceID` (int): ID of the POP3-Instance
- `$UID` (string): UID of the email to be deleted
**Returns** (bool): If the command succeeds, it returns __TRUE__, otherwise __FALSE__.
UID of the email to be deleted
**Example**
```php
// Deletes the mail with the e-mail(UID) 1234
POP3_DeleteMail(12345, "1234");
```
## POP3_GetCachedMails
Source: https://www.symcon.de/en/service/documentation/module-reference/notifications/pop3/pop3-getcachedmails/
`array POP3_GetCachedMails(int $InstanceID)`
_Requires Symcon >= 2.2_
**Parameters**
- `$InstanceID` (int): ID of POP3-Instance
**Returns** (array): If the command was executed successfully, it returns as result an array of data of the cached emails, otherwise a Boolean with the value __FALSE__.
ID of POP3-Instance
**Example**
```php
print_r(POP3_GetCachedMails(12345));
/* returns e.g.:
Array
(
[0] => Array
(
[Date] => 1295756412
[Flags] =>
[Recipient] => recipient@test.test
[SenderAddress] => sender@test.test
[SenderName] => Test Sender
[Subject] => 3 2 1 Test
[UID] => 1234
)
)
*/
```
## POP3_GetMailEx
Source: https://www.symcon.de/en/service/documentation/module-reference/notifications/pop3/pop3-getmailex/
`array POP3_GetMailEx(int $InstanceID, string $UID)`
_Requires Symcon >= 2.2_
returns an array with information for a specific e-mail (UID)
**Parameters**
- `$InstanceID` (int): ID of POP3-Instance
- `$UID` (string): UID of the email to be loaded
**Returns** (array): If the command was executed successfully, it returns the result in an array with data from the e-mail, otherwise a Boolean with __FALSE__.
UID of the email to be loaded
**Example**
```php
print_r(POP3_GetMailEx(12345, "1234"));
/* returns e.g.:
Array
(
[ContentType] => text/plain
[Date] => 1295756412
[Flags] =>
[Recipient] => ips@test.test
[SenderAddress] => sender@test.test
[SenderName] => Test Sender
[Subject] => 3 2 1 Test
[Text] => This is a test!
[UID] => 1234
)
*/
```
---
# Popup Module
> Symcon documentation · English · generated on 2026-09-26
> Index: https://www.symcon.de/en/llms.txt
Source: https://www.symcon.de/en/service/documentation/module-reference/notifications/popup-module/
The Popup Module is an instance that does not contain its own function or status variables. The module can be used as a stylistic means to display objects within a popup.
### Application
Several objects belong to a subject group, which should only be viewed quickly when required. In order to display the objects in the popup, they must be copied into the popup instance themselves or via a link.
### Visualization
How the module is displayed can be seen here:
[Popup display](https://www.symcon.de/en/llms/components/object-presentation.md)
> **Note:** In the mobile apps, the popup instance has the same representation as a [Dummy Module](https://www.symcon.de/en/llms/modules/dummy-module.md), as these do not allow nesting.
---
# SMS
> Symcon documentation · English · generated on 2026-09-26
> Index: https://www.symcon.de/en/llms.txt
Source: https://www.symcon.de/en/service/documentation/module-reference/notifications/sms/
_Requires Symcon >= 4.1_
SMS is an IP-Symcon module which enables sending SMS via Clickatell. A connection to IP-Symcon is established via the REST API.
> **Warning:** Since November 2016, Clickatell has only offered the REST API, which IP-Symcon has integrated with the SMS (Clickatell) module.
### Installation (REST API)
In order to be able to use the SMS module, an account at [https://www.clickatell.com](https://www.clickatell.com) is required.
The following step-by-step instructions explain the registration process:
1. The following URL opens the login page for registering with the SMS gateway:
[https://www.clickatell.com/sign-up/](https://www.clickatell.com/sign-up/)
2. After confirming the verification email, one must log in at [https://portal.clickatell.com/#/login](https://portal.clickatell.com/#/login) . "Platform" must be selected.
3. Telephone numbers must be verified and an "integration" set up via the dashboard on the [https://portal.clickatell.com/#/](https://portal.clickatell.com/#/) page.
4. An integration configures the type of communication.
5. Credit is managed through [https://portal.clickatell.com/#/billing/details](https://portal.clickatell.com/#/billing/details) .
In order for IP-Symcon to be able to communicate with the gateway, the API key for the integration in IP-Symcon must also be entered.
1. The following URL must be opened:
[https://portal.clickatell.com/#/integrations/sms](https://portal.clickatell.com/#/integrations/sms)
2. The "__API key__" option must be copied.
3. The APIKey received must be specified in IP-Symcon on the configuration page of the SMS module.
> **Note:** The sender number must be verified in the Clickatell account before this SMS can be sent.
### Installation (deprecated, Https API)
This API is no longer supported by Clickatell as of November 2016.
For this reason, the module has been revised.
### Integration in IP-Symcon
The configuration consists exclusively of the API key that was set up in the account.
> **Warning:** So far there is no way to query the credit with the new REST API. SMS_RequestBalance is still functional only for the old API.
### Country Code Area Code Number
No leading zeros need to be specified.
Example: +49171123456789
There is also the option of integrating an automatic country code on the Settings page of the Clickatell homepage.
"Convert mobile numbers into international format"
Thus, the +49 for the country code is omitted.
## SMS_Send
Source: https://www.symcon.de/en/service/documentation/module-reference/notifications/sms/sms-send/
`bool SMS_Send(int $InstanceID, string $Number, string $Text)`
sends an SMS to a number
**Parameters**
- `$InstanceID` (int): ID of the device to be switched
- `$Number` (string): Mobile number of the recipient
- `$Text` (string): Text of the SMS (max. 160 characters)
**Returns** (bool): If the command succeeds, it returns __TRUE__, otherwise __FALSE__.
Text of the SMS (max. 160 characters)
**Example**
```php
SMTP_SendMailEx(12345, "me@example.com", "Alarm!", "The heating system has broken.!");
```
---
# SMTP
> Symcon documentation · English · generated on 2026-09-26
> Index: https://www.symcon.de/en/llms.txt
Source: https://www.symcon.de/en/service/documentation/module-reference/notifications/smtp/
_Requires Symcon >= 2.2_
SMTP is a module of IP-Symcon that can send e-mails. The module is set up as an instance in IP-Symcon. It can be found under Manufacturer "None" and "Send Email (SMTP)". The individual properties can be found in the table.
> **Note:** In order to send a message to one or more e-mail addresses, the [SMTP_SendMailEx](https://www.symcon.de/en/llms/modules/smtp.md) function must be used.
> **Note:** The emails cannot be specially formatted. /n /r are functional but any formatting such as bold, italics etc will not work. A PHPMailer, for example, must be used for this instead.

| Property | Meaning |
| -------------- | ---------------------------------------------------------------------------------------------------------------------------------------------- |
| Host | Server name or IP to the mail provider |
| Port | Port on which the server is working |
| SSL | Indicates whether SSL should be used |
| Authentication | Indicates whether a username/password is required |
| Username | Username (details are available from the mail provider) |
| Password | Password |
| Sender-Name | The name visible to the recipient |
| Sender-Address | The address visible to the recipient. Depending on the provider, the sender address must match ones own address. |
| Recipient | Only required for the [SMTP_SendMail](https://www.symcon.de/en/llms/modules/smtp.md) function, which automatically sends to the recipient of this field. |
> **Note:** An overview of host, port and authentication for many providers can be viewed here: [table](https://www.arclab.com/en/kb/email/list-of-smtp-and-imap-servers-mailserver-list.html)
### Example with Gmail
Gmail does not allow direct access with the username and password without further settings. With these settings, it depends on whether two-factor authentication is activated.
#### Without two-factor authentication
For use without two-factor authentication, "Access through less secure apps" must be activated in the administration of the Google account under "Security". A direct link would be [https://myaccount.google.com/lesssecureapps](https://myaccount.google.com/lesssecureapps) .
When access is enabled, it looks like this. Username and password can now be used to log in.

#### With two-factor authentication
When using two-factor authentication, an app password must be assigned in the administration of the Google account under "Security" in the "Sign in to Google" section.
Click on the line "App passwords".

A new password with an individual name can be generated in the overview.

The generated password must then be entered in IP-Symcon.

## SMTP_SendMail
Source: https://www.symcon.de/en/service/documentation/module-reference/notifications/smtp/smtp-sendmail/
`bool SMTP_SendMail(int $InstanceID, string $Subject, string $Body)`
_Requires Symcon >= 2.2_
sends an e-mail to the default address
**Parameters**
- `$InstanceID` (int): ID of the device to be switched
- `$Subject` (string): Subject of mail
- `$Body` (string): Content of the email. Sent as HTML (since 7.0) if and is found, otherwise as text
**Returns** (bool): If the command succeeds, it returns __TRUE__, otherwise __FALSE__.
Content of the email. Sent as HTML (since 7.0) if and is found, otherwise as text
**Example**
```php
SMTP_SendMail(12345, "Alarm!", "The heating system has broken.!");
```
## SMTP_SendMailAttachment
Source: https://www.symcon.de/en/service/documentation/module-reference/notifications/smtp/smtp-sendmailattachment/
`bool SMTP_SendMailAttachment(int $InstanceID, string $Subject, string $Body, string $FilePath)`
_Requires Symcon >= 2.2_
sends an e-mail with attachment to the default address
**Parameters**
- `$InstanceID` (int): ID of the SMTP instance
- `$Subject` (string): Email subject
- `$Body` (string): Content of the email. Sent as HTML (since 7.0) if and is found, otherwise as text
- `$FilePath` (string): Path to the file
**Returns** (bool): If the command succeeds, it returns __TRUE__, otherwise __FALSE__.
Path to the file
**Example**
```php
SMTP_SendMailAttachment(12345, "Alarm!", "The heater is down!", "media/webcam.jpg");
```
## SMTP_SendMailAttachmentEx
Source: https://www.symcon.de/en/service/documentation/module-reference/notifications/smtp/smtp-sendmailattachmentex/
`bool SMTP_SendMailAttachmentEx(int $InstanceID, string $Recipient, string $Subject, string $Body, string $FilePath)`
_Requires Symcon >= 2.2_
sends an email with an attachment to any address
**Parameters**
- `$InstanceID` (int): ID of the SMTP instance
- `$Recipient` (string): Recipient's e-mail address
- `$Subject` (string): Subject of the email
- `$Body` (string): Content of the email. Sent as HTML (since 7.0) if and is found, otherwise as text
- `$FilePath` (string): Path to the file
**Returns** (bool): If the command succeeds, it returns __TRUE__, otherwise __FALSE__.
Path to the file
**Example**
```php
SMTP_SendMailAttachmentEx(12345, "me@example.com", "Alarm!", "The heater is down!", "media/webcam.jpg");
```
## SMTP_SendMailEx
Source: https://www.symcon.de/en/service/documentation/module-reference/notifications/smtp/smtp-sendmailex/
`bool SMTP_SendMailEx(int $InstanceID, string $Receiver, string $Subject, string $Body)`
_Requires Symcon >= 2.2_
sends an e-mail to any address
**Parameters**
- `$InstanceID` (int): ID of the device to be switched
- `$Receiver` (string): E-mail Address of the receiver
- `$Subject` (string): Subject of mail
- `$Body` (string): Content of the email. Sent as HTML (since 7.0) if and is found, otherwise as text
**Returns** (bool): If the command succeeds, it returns __TRUE__, otherwise __FALSE__.
Content of the email. Sent as HTML (since 7.0) if and is found, otherwise as text
**Example**
```php
SMTP_SendMailEx(12345, "me@example.com", "Alarm!", "The heating system has broken.!");
```
## SMTP_SendMailMedia
Source: https://www.symcon.de/en/service/documentation/module-reference/notifications/smtp/smtp-sendmailmedia/
`bool SMTP_SendMailMedia(int $InstanceID, string $Subject, string $Body, int $MediaID)`
_Requires Symcon >= 4.0_
sends an email with an attachment of a media object of type "image/sound" to the default address
**Parameters**
- `$InstanceID` (int): ID of the SMTP instance
- `$Subject` (string): Subject of the email
- `$Body` (string): Content of the email. Sent as HTML (since 7.0) if and is found, otherwise as text
- `$MediaID` (int): Media object ID (image/sound and document only)
**Returns** (bool): If the command succeeds, it returns __TRUE__, otherwise __FALSE__.
Media object ID (image/sound and document only)
**Example**
```php
SMTP_SendMailMedia(12345, "Alarm!", "Someone rang the doorbell, but you're not here!", 23456);
```
## SMTP_SendMailMediaEx
Source: https://www.symcon.de/en/service/documentation/module-reference/notifications/smtp/smtp-sendmailmediaex/
`bool SMTP_SendMailMediaEx(int $InstanceID, string $Recipient, string $Subject, string $Body, int $MediaID)`
_Requires Symcon >= 4.0_
sends an e-mail with an attachment of a media object of the "image/sound" type to any address
**Parameters**
- `$InstanceID` (int): ID of the SMTP instance
- `$Recipient` (string): Recipient's e-mail address
- `$Subject` (string): Subject of the email
- `$Body` (string): Content of the email. Sent as HTML (since 7.0) if and is found, otherwise as text
- `$MediaID` (int): Media object ID (image/sound and document only)
**Returns** (bool): If the command succeeds, it returns __TRUE__, otherwise __FALSE__.
Media object ID (image/sound and document only)
**Example**
```php
SMTP_SendMailMediaEx(12345, "me@example.com", "Alarm!", "Someone rang the doorbell, but you're not here!", 23456);
```
---
# Spotify
> Symcon documentation · English · generated on 2026-09-26
> Index: https://www.symcon.de/en/llms.txt
Source: https://www.symcon.de/en/service/documentation/module-reference/notifications/spotify/
_Requires Symcon >= 5.3_
The Spotify module allows linking to a Spotify Premium account. Playback can be controlled via the account. Thus, it is possible to start a playback or to change or stop the current playback. Options like repeat or random playback can also be set. Favorites are stored within the module, which can then be conveniently retrieved from the visualization.
### range of functions
- Linking to a Spotify Premium account
- Play or pause playback
- Switch to next or previous song
- Select or change device for playback
- Save and recall favorites
- Enable repeat or shuffle playback
### requirements
- Spotify Premium account
### Software Installation
- Via the [Module Store](https://www.symcon.de/en/service/documentation/components/management-console/module-store/), install the 'Spotify' module.
### Setting up instances in IP-Symcon
- Under 'Add Instance', the 'Spotify' module can be found using the quick filter.
- More information about adding instances in the [Instances documentation](https://www.symcon.de/en/service/documentation/basics/instances/)
#### Configuration Page:
Initially, the module needs to be linked to a Spotify Premium account by clicking on the 'Register' button. The click opens a login dialog from Spotify. After entering the user data, the link must be confirmed. After that, all functions of the module are available.
#### _Advanced settings_
| Name | Description |
| --------------------- | ----------------------------------------------------------------------------------------------------------------------------------------------------------------- |
| Refresh interval | In this interval the values of the status variables are matched with the current playback of Spotify. This includes the device, play or pause, shuffle and repeat |
| Cover: Maximum width | Maximum width of the displayed cover |
| Cover: Maximum height | Maximum height of the displayed cover |
#### _Search_
| Name | Description |
| ------------------- | -------------------------------------------------------------------------------------------------------------------------------- |
| Search | This field is used to enter a search term for a search |
| Search by Albums | Specifies whether the next search should include albums |
| Search for Artists | Specifies whether the next search should include artists |
| Search by Playlists | Specifies whether the next search should include playlists |
| Search for Songs | Specifies whether the next search should include songs |
| Start Search | Starts a search |
| Search results | This list contains the results of the current search - By activating the field "Favorite" a result can be added to the favorites |
The list "Your Playlists" contains the playlists of the linked Spotify account. These can be added to the favorites via the "Favorite" field. The "Favorites" list contains the set favorites. Favorites can be removed by clicking on the trash can icon.
### status variables and profiles
The status variables/categories are created automatically. Deleting individual ones can lead to malfunctions.
#### Status variables
| Name | Type | Description |
| -------------- | ------- | ----------------------------------------------------------------------------------------------------------------------------------------------------------------------------------------- |
| Current Cover | HTMLBox | The cover of the currently played album is displayed here, if available |
| Current Song | string | The name of the currently played song is displayed here |
| Current Artist | string | The artist of the currently played song is displayed here |
| Current Album | string | The album of the currently played song is displayed here |
| Action | integer | Here you can start or pause a playback. It is also possible to switch to the previous or next song |
| Device | integer | With this variable a playback device can be selected. If a playback is currently active, it will be switched to the new device |
| Favorite | integer | This variable represents the favorites configured in the module. By selecting a favorite, it will be played on the currently selected device |
| Repeat | integer | This variable can be used to activate the repeat function - "Off": No repeat, "Context": The current context, i.e. album, playlist, ... is repeated, "Song": The current song is repeated |
| Random Play | boolean | Enables or disables random play |
#### Profile:
| name | type |
| ------------------------------ | ------- |
| Spotify.Favorites. | Integer |
| Spotify.Devices | Integer |
| Spotify.Repeat | Integer |
### Visualization
Via the Visualization or in the mobile apps status variables are displayed and can be switched.
## SPO_MakeAPIRequest
Source: https://www.symcon.de/en/service/documentation/module-reference/notifications/spotify/spo-makeapirequest/
`string SPO_MakeAPIRequest(int $InstanceID, string $Method, string $Url, string $Body)`
_Requires Symcon >= 5.3_
**Parameters**
- `$InstanceID` (int): ID of the Instance
- `$Method` (string): Type of HTML request
- `$Url` (string): Path, which follows `https://api.spotify.com/v1
- `$Body` (string): Message to be sent to the recipient
**Returns** (string): The function returns the API return as a string or false on error.
Message to be sent to the recipient
**Example**
```text
SPO_MakeAPIRequest(12345, 'GET', '/me', '');
```
## SPO_NextTrack
Source: https://www.symcon.de/en/service/documentation/module-reference/notifications/spotify/spo-nexttrack/
`bool SPO_NextTrack(int $InstanceID)`
_Requires Symcon >= 5.3_
**Parameters**
- `$InstanceID` (int): ID of the Instance
**Returns** (bool): If the command could be executed successfully, it returns __TRUE__ as result, otherwise __FALSE__.
ID of the Instance
**Example**
```text
SPO_NextTrack(12345);
```
## SPO_Pause
Source: https://www.symcon.de/en/service/documentation/module-reference/notifications/spotify/spo-pause/
`bool SPO_Pause(int $InstanceID)`
_Requires Symcon >= 5.3_
**Parameters**
- `$InstanceID` (int): ID of the Instance
**Returns** (bool): If the command could be executed successfully, it returns __TRUE__ as result, otherwise __FALSE__.
ID of the Instance
**Example**
```text
SPO_Pause(12345);
```
## SPO_Play
Source: https://www.symcon.de/en/service/documentation/module-reference/notifications/spotify/spo-play/
`bool SPO_Play(int $InstanceID)`
_Requires Symcon >= 5.3_
**Parameters**
- `$InstanceID` (int): ID of the Instance
**Returns** (bool): If the command could be executed successfully, it returns __TRUE__ as result, otherwise __FALSE__.
ID of the Instance
**Example**
```text
SPO_Play(12345);
```
## SPO_PlayURI
Source: https://www.symcon.de/en/service/documentation/module-reference/notifications/spotify/spo-playuri/
`bool SPO_PlayURI(int $InstanceID, string $URI)`
_Requires Symcon >= 5.3_
**Parameters**
- `$InstanceID` (int): ID of the Instance
- `$URI` (string): URI of the Spotify resource
**Returns** (bool): If the command could be executed successfully, it returns __TRUE__ as result, otherwise __FALSE__.
URI of the Spotify resource
**Example**
```text
SPO_PlayURI(12345, 'spotify:artist:1Lw1vZvhgNZk7hVSvdY4OA');
```
## SPO_PreviousTrack
Source: https://www.symcon.de/en/service/documentation/module-reference/notifications/spotify/spo-previoustrack/
`bool SPO_PreviousTrack(int $InstanceID)`
_Requires Symcon >= 5.3_
**Parameters**
- `$InstanceID` (int): ID of the Instance
**Returns** (bool): If the command could be executed successfully, it returns __TRUE__ as result, otherwise __FALSE__.
ID of the Instance
**Example**
```text
SPO_PreviousTrack(12345);
```
## SPO_ResetToken
Source: https://www.symcon.de/en/service/documentation/module-reference/notifications/spotify/spo-resettoken/
`bool SPO_ResetToken(int $InstanceID)`
_Requires Symcon >= 5.3_
**Parameters**
- `$InstanceID` (int): ID of the Instance
**Returns** (bool): If the command could be executed successfully, it returns __TRUE__ as result, otherwise __FALSE__.
ID of the Instance
**Example**
```text
SPO_ResetToken(12345);
```
## SPO_SetRepeat
Source: https://www.symcon.de/en/service/documentation/module-reference/notifications/spotify/spo-setrepeat/
`bool SPO_SetRepeat(int $InstanceID, string $Repeat)`
_Requires Symcon >= 5.3_
**Parameters**
- `$InstanceID` (int): ID of the Instance
- `$Repeat` (string)
| Wert | Bedeutung |
| ---- | ------------------------ |
| 0 | Wiederholung deaktiviert |
| 1 | Wiederholung des Kontext |
| 2 | Wiederholung des Songs |
**Returns** (bool): If the command could be executed successfully, it returns __TRUE__ as result, otherwise __FALSE__.
| Wert | Bedeutung |
| ---- | ------------------------ |
| 0 | Wiederholung deaktiviert |
| 1 | Wiederholung des Kontext |
| 2 | Wiederholung des Songs |
**Example**
```text
SPO_SetRepeat(12345, 2);
```
## SPO_SetShuffle
Source: https://www.symcon.de/en/service/documentation/module-reference/notifications/spotify/spo-setshuffle/
`bool SPO_SetShuffle(int $InstanceID, bool $Shuffle)`
_Requires Symcon >= 5.3_
**Parameters**
- `$InstanceID` (int): ID of the Instance
- `$Shuffle` (bool): De-/Aktiviert die zufällige Wiedergabe
**Returns** (bool): If the command could be executed successfully, it returns __TRUE__ as result, otherwise __FALSE__.
De-/Aktiviert die zufällige Wiedergabe
**Example**
```text
SPO_SetShuffle(12345, true);
```
---
# Fault Manager
> Symcon documentation · English · generated on 2026-09-26
> Index: https://www.symcon.de/en/llms.txt
Source: https://www.symcon.de/en/service/documentation/module-reference/notifications/fault-manager/
_Requires Symcon >= 6.0_
The module is used to display active variables in the Visualization and, depending on the setting, to hide them after they have been entered or deactivated. If 'Auto hide' but not 'Confirmation' has been activated, a link will be visible as soon as the monitored variable is active. This link disappears as soon as the monitored variable is deactivated. If 'Confirmation' and 'Auto Hide' have been activated, a variable will be created as soon as the monitored variable is active. This disappears as soon as the value of the created variable has been changed to 1 or 'In process' and the monitored variable is inactive. If 'Confirmation' but not 'Auto Hide' has been activated, a variable will be created as soon as the monitored variable is active. This disappears as soon as the value of the created variable has been changed to over 2 or 'All right'.
### function scope
- Display of active variables
- Possibility to acknowledge them depending on the selection
### Software installation
- Install the 'Fault Manager' module via the [Module Store](https://www.symcon.de/en/service/documentation/components/management-console/module-store/).
### Setting up the instances in IP-Symcon
- Under "Add Instance", the 'Fault Manager' module can be found using the quick filter.
- More information about adding instances in the [Instances documentation](https://www.symcon.de/en/service/documentation/basics/instances/)
#### Configuration Page:
| Name | Description |
| ------------------ | ------------------------------------------------------------------------------------------ |
| Variable | Variable to be monitored. |
| Confirmation | Checkbox to confirm or not the message. |
| Hide automatically | Checkbox, so that the message is automatically hidden again when the state is deactivated. |
| Message handling | Selection how to handle the variables when they are active. |
### status variables and profiles
The status variables/categories are created automatically. Deleting individual ones can lead to malfunctions.
#### Status variables
| Name | Type | Description |
| ----------------------- | ------- | ---------------------------------------------------------------------------------------------------------------------------- |
| Link: Variable Name | Link | Link which is visible or invisible. Will be created if 'Message disappears automatically' is selected. |
| Variable Names - Status | Integer | Variable which is created when 'Acknowledge message' or 'Acknowledge message, disappears when error is cleared' is selected. |
#### Profile:
| name | description |
| --------------- | -------------------------------------------- |
| STA.Confirm | Profile for created variables, with 3 levels |
| STA.ConfirmHide | Profile for created variables, with 2 levels |
### Visualization
Via the Visualization the created variables are displayed and can be changed if they need to be confirmed.
---
# SymconReport
> Symcon documentation · English · generated on 2026-09-26
> Index: https://www.symcon.de/en/llms.txt
Source: https://www.symcon.de/en/service/documentation/module-reference/notifications/symconreport/
Creates a report as CSV or PDF depending on the modules
## MailReport
Source: https://www.symcon.de/en/service/documentation/module-reference/notifications/symconreport/mailreport/
_Requires Symcon >= 5.5_
The module regularly sends the logged aggregated data of a variable via e-mail.
### function scope
- Send e-mails with aggregated data of a variable
- E-mails are sent after each completion of the selected time interval (Daily, Weekly or Monthly)
- E-mails contain aggregated data, which would also be displayed in a corresponding graph (Hourly for daily time interval, Daily for weekly or monthly time interval)
- The email contains a CSV file, which is formatted analogously to the CSV export of graphs.
### prerequisites
- Set up SMTP instance for sending e-mails
### Software Installation
The module can be found via the [Module Store](https://www.symcon.de/en/service/documentation/components/management-console/module-store/) under the category "Information"=>"Preparation" or directly by searching for "Report Module". By pressing the button "Install" the module is made available to IP-Symcon.
### Setting up the instances in IP-Symcon
- Via "Add Instance" the 'Report(Mail)' module can be found using the quick filter.
- More information about adding instances in the [Instances documentation](https://www.symcon.de/en/service/documentation/basics/instances/)
#### Configuration Page:
| Name | Description |
| -------------------- | -------------------------------------------------------------------- |
| Email SMTP | Selection of the SMTP instance through which the emails will be sent |
| Aggregated Variable | Selection of the variable whose aggregated data should be sent |
| Decimal separator | Selection of decimal separator comma or point. |
| Interval of messages | Select the time interval in which the messages should be sent |
| Send data | Click to send an info mail about the last completed time interval |
### status variables
The status variables/categories are created automatically. Deleting individual ones can lead to malfunctions.
#### Statusvariablen
| Name | Type | Description |
| ------------------ | -------- | ----------------------------------- |
| Mail Report active | Variable | Activates or deactivates the module |
### Visualization
The Visualization can be used to activate or deactivate the module.
## MR_SendInfo
Source: https://www.symcon.de/en/service/documentation/module-reference/notifications/symconreport/mailreport/mr-sendinfo/
`bool MR_SendInfo(int $InstanceID)`
_Requires Symcon >= 5.5_
**Parameters**
- `$InstanceID` (int): ID of the Instance
**Returns** (bool): If the command could be executed successfully, it returns __TRUE__ as result, otherwise __FALSE__.
ID of the Instance
**Example**
```text
MR_SendInfo(12345);
```
## MR_SetActive
Source: https://www.symcon.de/en/service/documentation/module-reference/notifications/symconreport/mailreport/mr-setactive/
`bool MR_SetActive(int $InstanceID, bool $Active)`
_Requires Symcon >= 5.5_
**Parameters**
- `$InstanceID` (int): ID of the Instance
- `$Active` (bool): De-/Activate the module
**Returns** (bool): If the command could be executed successfully, it returns __TRUE__ as result, otherwise __FALSE__.
De-/Activate the module
**Example**
```text
// Activates the module MR_SetActive(12345, true);
```
## PDFReport (Energy)
Source: https://www.symcon.de/en/service/documentation/module-reference/notifications/symconreport/pdfreport-energy/
_Requires Symcon >= 5.5_
This module provides the function of displaying the archive values of two variables as graphs, and providing selected information as PDF for the past month.
### scope of functions
- Allows to create and download created PDF.
- Setting via instance configuration
- Logo selection for header is possible
### Software installation
Via the [Module Store](https://www.symcon.de/en/service/documentation/components/management-console/module-store/) the module can be found under the category "Information"=>"Preparation" or directly via the search for "Report Module". By pressing the button "Install" the module is made available to IP-Symcon.
### Setting up the instances in IP-Symcon
- Under "Add Instance" the 'Report (PDF, Energy)' module can be found using the quick filter.
- More information about adding instances in the [Instances documentation](https://www.symcon.de/en/service/documentation/basics/instances/)
#### Configuration Page:
| Name | Description |
| ------------------- | ---------------------------------------------------------------------------------------------------------------------------------------------------------------------------------------------------------- |
| Logo | (optional) Selectable graphic as PNG |
| Consumption type | Free text which is below the date |
| Decimal separator | Selection of decimal separator comma or point. |
| Consumption counter | Variable logged as counter |
| Temperature | (optional) Logged variable |
| prediction | (optional) Variable which can predict consumption based on behavior, for example from the module [consumption behavior](https://www.symcon.de/de/service/dokumentation/modulreferenz/verbrauchsverhalten/) |
| CO2 type | (optional) CO2 equivalent for consumption type |
#### Example document

### status variables
The status variables/categories are created automatically. Deleting individual ones can lead to malfunctions.
### Status variables
The PDF is generated as a "Report (PDF)".
| Name | Type | Description |
| ------------ | ----- | --------------------------------------------------------------------------- |
| Report (PDF) | Media | Generated PDF which can be downloaded from Visualization or sent by e-mail. |
### Visualization
The generated PDF can be downloaded via the Visualization.
## RAC_GenerateEnergyReport
Source: https://www.symcon.de/en/service/documentation/module-reference/notifications/symconreport/pdfreport-energy/rac-generateenergyreport/
`bool RAC_GenerateEnergyReport(int $InstanceID)`
_Requires Symcon >= 5.5_
**Parameters**
- `$InstanceID` (int): ID of the Instance
**Returns** (bool): If the command could be executed successfully, it returns __TRUE__ as result, otherwise __FALSE__.
ID of the Instance
**Example**
```text
RAC_GenerateEnergyReport(12345);
```
## PDFReport (Multi)
Source: https://www.symcon.de/en/service/documentation/module-reference/notifications/symconreport/pdfreport-multi/
_Requires Symcon >= 5.5_
This module provides the function to summarize archive values as a report in a PDF.
### function scope
- Allows to create and download created PDF.
- Setting via instance configuration
- Logo selection for header is possible
- Adjustable number of records, aggregation strength, min and max values of selected variables
### software installation
The module can be found via the [Module Store](https://www.symcon.de/en/service/documentation/components/management-console/module-store/) under the category "Information"=>"Preparation" or directly by searching for "Report Module". By pressing the button "Install" the module is made available to IP-Symcon.
### Setting up the instances in IP-Symcon
- Under "Add Instance" the 'Report (PDF, Multi)' module can be found using the quick filter.
- More information about adding instances in the [Instances documentation](https://www.symcon.de/en/service/documentation/basics/instances/)
#### Configuration Page:
| Name | Description |
| ----------------- | ------------------------------------------------------------------------------ |
| Logo | Selectable graphic as PNG |
| Company | Company name |
| Title | PDF Title |
| Footer | Footer line |
| Data Source | Multiple variables from which the records per column are created |
| Decimal separator | Selection of decimal separator comma or point. |
| Aggregation | Defines aggregation level of the listed records (hour - year) |
| Number | Number of records listed |
| Skip record | If this option is enabled, the most recent incomplete record will be discarded |
#### Example document

### status variables
The status variables/categories are created automatically. Deleting individual ones can lead to malfunctions.
#### Statusvariables
The PDF is generated as "Report (PDF)".
| Name | Type | Description |
| ------------ | ----- | -------------------------------------------------------------------------- |
| Report (PDF) | Media | Generated PDF which can be downloaded via Visualization or sent by e-mail. |
### Visualization
The generated PDF can be downloaded via the Visualization.
## RAC_GenerateReport
Source: https://www.symcon.de/en/service/documentation/module-reference/notifications/symconreport/pdfreport-multi/rac-generatereport/
`bool RAC_GenerateReport(int $InstanceID)`
_Requires Symcon >= 5.5_
**Parameters**
- `$InstanceID` (int): ID of the Instance
**Returns** (bool): If the command could be executed successfully, it returns __TRUE__ as result, otherwise __FALSE__.
ID of the Instance
**Example**
```text
RAC_GenerateReport(12345);
```
## PDFReport (Multi Energy)
Source: https://www.symcon.de/en/service/documentation/module-reference/notifications/symconreport/pdfreport-multi-energy/
This module offers the function of displaying the total consumption of the selected variables as well as the individual consumption in the time period.
### scope of functions
- Enables the creation and download of created PDFs.
- Setting via instance configuration
### Software installation
The module can be found via the [Module Store](https://www.symcon.de/de/service/dokumentation/komponenten/verwaltungskonsole/module-store/) under the category "Information"=>"Preparation" or directly by searching for "Report module". The "Install" button makes the module available to IP-Symcon.
### Setting up the instances in IP-Symcon
- Under "Add instance", the 'Report (PDF, Energy)' module can be found using the quick filter.
- Further information on adding instances can be found in the [Instances documentation](https://www.symcon.de/service/dokumentation/konzepte/instanzen/#Instanz_hinzuf%C3%BCgen)
#### Configuration page:
| Name | Description |
| ----------------- | ---------------------------------------------------------- |
| Aggregation Level | Selection of the level of detail of the data used |
| Decimal Separator | Selection of how the decimal separator should be displayed |
| Energy Counters | List of energy counters to be used |
#### Example document

### Status variables
The status variables/categories are created automatically. Deleting individual ones can lead to malfunctions.
### Status variables
The PDF is generated as a "Report (PDF)".
| Name | Type | Description |
| ------------ | ------- | ----------------------------------------------------------------------------- |
| Start | Integer | Specifies the start date from which the data should be used |
| End | Integer | Specifies the end date until when the data should be used |
| Generate | Script | Executable to update the PDF |
| Report (PDF) | Media | Created PDF, which can be downloaded via the visualization or sent by e-mail. |
### Visualization
The start and end date can be entered via the visualization and the PDF can be generated and downloaded.
## PDFReport (Single)
Source: https://www.symcon.de/en/service/documentation/module-reference/notifications/symconreport/pdfreport-single/
_Requires Symcon >= 5.5_
This module provides the function to summarize archive values as a report in a PDF. A single target variable is displayed with its min/max/avg values.
### Scope of functions
- Allows to create and download created PDF.
- Setting via instance configuration
- Logo selection for header is possible
- Adjustable number of records, aggregation strength, min and max values of selected variables
### software installation
The module can be found via the [Module Store](https://www.symcon.de/en/service/documentation/components/management-console/module-store/) under the category "Information"=>"Preparation" or directly by searching for "Report Module". By pressing the button "Install" the module is made available to IP-Symcon.
### Setting up the instances in IP-Symcon
- Under "Add Instance" the 'Report (PDF, Single)' module can be found using the quick filter.
- More information about adding instances in the [Instances documentation](https://www.symcon.de/en/service/documentation/basics/instances/)
#### Configuration Page:
| Name | Description |
| ----------------- | ----------------------------------------------------------------------------------------------- |
| Logo | Selectable graphic as PNG |
| Company | Company name |
| Title | PDF Title |
| Footer | Footer line |
| Data Source | Variable from which the records are created |
| Aggregation | Defines aggregation level of the listed records (hour - year) |
| Decimal separator | Selection of decimal separator comma or point. |
| Number | Number of records listed |
| Skip record | If this option is enabled, the most recent incomplete record will be discarded |
| Tolerance (Min) | Accepted minimum value of aggregated records. Values outside the tolerance will be ignored. |
| Tolerance (Max) | Accepted maximum value of the aggregated records. Values outside the tolerance will be ignored. |
#### Example document

### status variables
The status variables/categories are created automatically. Deleting individual ones can lead to malfunctions.
#### Status variables
The PDF is generated as "Report (PDF)".
| Name | Type | Description |
| ------------ | ----- | -------------------------------------------------------------------------- |
| Report (PDF) | Media | Generated PDF which can be downloaded via Visualization or sent by e-mail. |
### Visualization
The generated PDF can be downloaded via the Visualization.
## RAC_GenerateReport
Source: https://www.symcon.de/en/service/documentation/module-reference/notifications/symconreport/pdfreport-single/rac-generatereport/
`bool RAC_GenerateReport(int $InstanceID)`
_Requires Symcon >= 5.5_
**Parameters**
- `$InstanceID` (int): ID of the Instance
**Returns** (bool): If the command could be executed successfully, it returns __TRUE__ as result, otherwise __FALSE__.
ID of the Instance
**Example**
```text
RAC_GenerateReport(12345);
```
---
# Phone Announcement
> Symcon documentation · English · generated on 2026-09-26
> Index: https://www.symcon.de/en/llms.txt
Source: https://www.symcon.de/en/service/documentation/module-reference/notifications/phone-announcement/
_Requires Symcon >= 5.5_
The Telephone Announcement Module allows the convenient linking of a VoIP instance and a text-to-speech instance (Polly) to call a phone number and output a text when the call is answered. In addition, the module can respond to DTMF tones and output other texts.
### Scope of functions
- Calling a phone number and outputting a text
- Evaluating DTMF tones
- Output of further texts on an existing connection
### prerequisites
- Installed VoIP instance
- Installed [text-to-speech instance (AWS Polly)](https://www.symcon.de/en/llms/modules/ttsawspolly.md)
### Software Installation
- Using the [Module Store](https://www.symcon.de/en/service/documentation/components/management-console/module-store/), install the 'Phone Announcement module.
### Setting up the instances in IP-Symcon
- Under 'Add Instance' the 'Phone Announcement' module can be found using the quick filter.
- More information about adding instances in the [Instances documentation](https://www.symcon.de/en/service/documentation/basics/instances/)
#### Configuration Page:
| Name | Description |
| ------------------------------- | ------------------------------------------------------------------- |
| VoIP instance | The VoIP instance that manages the calls |
| Text-to-Speech instance (Polly) | The text-to-speech instance that converts the texts into audio data |
| Duration until disconnected | The maximum time to wait for a call to be answered |
### status variables
The status variables/categories are created automatically. Deleting individual ones can lead to malfunctions.
#### Statusvariables
| Name | Type | Description |
| ------------ | ------ | ------------------------------------------------------------------------------------------------------------------------------------------------------------------------- |
| Phone Number | String | The phone number that will be called when "Start Call" is pressed |
| Text | String | The text that will be output initially when "Start call" is pressed. If this variable is switched while a connection is established, the new text will be output directly |
| DTMF Tone | String | If a DTMF tone is used during the call, it will be stored in this variable |
| Start Call | Script | Starts a call with the currently set phone number and the current text |
## TA_StartCall
Source: https://www.symcon.de/en/service/documentation/module-reference/notifications/phone-announcement/ta-startcall/
`void TA_StartCall(int $InstanceID)`
_Requires Symcon >= 5.5_
**Parameters**
- `$InstanceID` (int): ID of the Instance
**Returns** (void): The function does not return any value.
ID of the Instance
**Example**
```text
TA_StartCall(12345);
```
## TA_StartCallEx
Source: https://www.symcon.de/en/service/documentation/module-reference/notifications/phone-announcement/ta-startcallex/
`void TA_StartCallEx(int $InstanzID, string $Telefonnummer, string $Text)`
_Requires Symcon >= 5.5_
Starts a call to a phone number and outputs the text
**Parameters**
- `$InstanzID` (int): ID of the Instance
- `$Telefonnummer` (string): Phone number to call
- `$Text` (string): Text to be output
**Returns** (void): The function does not return any value.
Text to be output
**Example**
```text
TA_StartCallEx(12345, "+4945130500511", "I love IP-Symcon!");
```
---
# Phone Chain
> Symcon documentation · English · generated on 2026-09-26
> Index: https://www.symcon.de/en/llms.txt
Source: https://www.symcon.de/en/service/documentation/module-reference/notifications/phone-chain/
_Requires Symcon >= 5.5_
The 'Telefonkette' module allows to call a list of telephone numbers one after another.
### function scope
- A list of phone numbers can be called in descending order
- If accepted, a TTS file can be played
- Further calls are terminated when a called party confirms by a DTMF character
- DTMF character freely selectable
- Duration until a call is terminated freely selectable
- Boolean variable as trigger
### requirements
- Custom VoIP processing script for audio announcement or a TTSAWSPOLLY instance established
### Software Installation
- Via the [Module Store](https://www.symcon.de/en/service/documentation/components/management-console/module-store/) install the 'Phone Chain' module
### Setting up the instances in IP-Symcon
- Under 'Add Instance', the 'Phone Chain' module can be found using the quick filter.
- More information about adding instances in the [Instances documentation](https://www.symcon.de/en/service/documentation/basics/instances/)
#### Configuration Page:
| Name | Description |
| -------------------------------------------------- | ----------------------------------------------------------------------------------------- |
| Trigger | Boolean variable which is used as trigger |
| VoIP instance | VoIP instance to be used for calls |
| TTS instance | TTSAWSPOLLY Instance to be used for the announcement |
| TTS Type | __Static__, static text for an announcement or dynamic announcement via a string variable |
| Phone numbers can be switched in the visualization | Option to switch the phone numbers on and off in the visualization |
| Phone Numbers | List and sequence of numbers with description which should be called |
| Number of simultaneous calls | Number of calls that will be made in parallel |
| Call duration | Time in seconds to wait for call to be answered |
| DTMF confirmation key | key with which a call is confirmed |
Note on the 'Phone numbers switchable in visualization' option: This ensures that the phone numbers in the list are created as variables. The telephone numbers are only called if the corresponding variable has the value 'True' and is activated in the visualization.
### status variables
The status variables/categories are created automatically. Deleting individual ones can lead to malfunctions.
#### Status variables
| Name | Type | Description |
| ----------------- | ------- | ------------------------------------------- |
| Call confirmed by | String | Contains the number that confirmed the call |
| Status | Integer | Shows at which point the chain is currently |
| Reset status | Script | Resets the status |
---
# TelegramBot
> Symcon documentation · English · generated on 2026-09-26
> Index: https://www.symcon.de/en/llms.txt
Source: https://www.symcon.de/en/service/documentation/module-reference/notifications/telegrambot/
_Requires Symcon >= 6.0_
Allows sending messages to specified persons and performing actions within IP-Symcon.
### function scope
- Send messages (to all or individual persons)
- Send images (from media) (to all or individual people)
- Respond to chat commands with actions
### requirements
- A Telegram Bot
### Create Telegram Bot
- In the Telegram client, search for [BotFather](https://t.me/botfather)
- Use ***/newbot*** to create a new bot
- Under the username the bot can be found and should be populated with for example random numbers

- In the Telegram client search for RawDataBot
- When the bot is contacted, it returns some data, from which you can get your own userID
- This process must be repeated for each user that should be reached by the bot

- Write the bot with */start* to start it
### software installation
- Install the 'TelegramBot' module via the [Module Store](https://www.symcon.de/en/service/documentation/components/management-console/module-store/).
### Instance setup in IP-Symcon
- Under 'Add Instance', the 'TelegramBot' module can be found using the quick filter.
- More information about adding instances in the [Instances documentation](https://www.symcon.de/en/service/documentation/basics/instances/)
#### ConfigurationPage:
| Name | Description |
| ------------ | ------------------------------------------------ |
| Bot API Key | The API key of the created bot |
| Bot Username | The username of the created bot |
| Users | A list of users that can be contacted by the bot |
| Actions | A list of commands and their actions |
### actions
#### Send-image
This action can be used to send an image to the selected recipient
#### _Parameter:_
- Image: the media object to be sent
- Recipient: A specific person or all persons defined in the user list
#### SendMessage
With this action a message can be sent to the selected recipient
#### _Parameter:_
- Text: The content of the message
- Recipient: A specific person or all persons defined in the user list
[More information about using actions](https://www.symcon.de/en/service/documentation/basics/automations/flow-scripts/actions/)
---
# Text to Speech
> Symcon documentation · English · generated on 2026-09-26
> Index: https://www.symcon.de/en/llms.txt
Source: https://www.symcon.de/en/service/documentation/module-reference/notifications/text-to-speech/
The TTS module can convert text to speech. The system-internal speech software or a post-installed one is used for this.
> **Warning:** The TTS module can currently only be used in the Windows installation. Alternatively, the "[Text to Speech (AWS Polly)](https://www.symcon.de/en/llms/modules/ttsawspolly.md)" module from the Module Store can be used. This works on all operating systems.
### Setup in IP-Symcon
The speech engine and the audio output device can be set in the configuration tab.
In order to make a voice output, the PHP function [TTS_Speak](https://www.symcon.de/en/llms/modules/text-to-speech.md) or [TTS_GenerateFile](https://www.symcon.de/en/llms/modules/text-to-speech.md) must be called from a script.
> **Warning:** The TTS_Speak function is deprecated and no longer supported on Windows Vista or higher. TTS_GenerateFile works in all versions.
When using [TTS_GenerateFile](https://www.symcon.de/en/llms/modules/text-to-speech.md), the use of [MediaPlayer](https://www.symcon.de/en/llms/modules/amazon-alexa.md) is necessary.
An example code can be found under [TTS_GenerateFile](https://www.symcon.de/en/llms/modules/text-to-speech.md).
### Installation
In addition to possible standard voices, other German and international versions can be found [here](http://ttssamples.syntheticspeech.de/deutsch/index.html) .
#### Exception Windows Vista/7
In order to be able to use the speech output under Windows Vista/7, the IP-Symcon service must be run as a local user. It should be noted that this means that the IPS_ExecuteEx function is no longer available.
Call up the service management via Start > Run
_%SystemRoot%\system32\services.msc /s_

Double click on the entry IP-Symcon Environment. The following dialog should open and the password for the current user must be entered in the "Login" tab.

After confirming with Apply/OK, the IP-Symcon service must be restarted. The easiest way to stop and start this is via the tray.
## TTS_GenerateFile
Source: https://www.symcon.de/en/service/documentation/module-reference/notifications/text-to-speech/tts-generatefile/
`bool TTS_GenerateFile(int $InstanceID, string $Text, string $Filename, int $Format)`
generates a WAV file with the desired text
**Parameters**
- `$InstanceID` (int): ID of the device to be switched
- `$Text` (string): Text to be said
- `$Filename` (string): Filename/-path in the system
- `$Format` (int)
| Format | Value |
| -------------------- | ----- |
| Default | 0 |
| 8kHz, 8Bit, Mono | 4 |
| 8kHz, 8Bit, Stereo | 5 |
| 8kHz, 16Bit, Mono | 6 |
| 8kHz, 16Bit, Stereo | 7 |
| 11kHz, 8Bit, Mono | 8 |
| 11kHz, 8Bit, Stereo | 9 |
| 11kHz, 16Bit, Mono | 10 |
| 11kHz, 16Bit, Stereo | 11 |
| 12kHz, 8Bit, Mono | 12 |
| 12kHz, 8Bit, Stereo | 13 |
| 12kHz, 16Bit, Mono | 14 |
| 12kHz, 16Bit, Stereo | 15 |
| 16kHz, 8Bit, Mono | 16 |
| 16kHz, 8Bit, Stereo | 17 |
| 16kHz, 16Bit, Mono | 18 |
| 16kHz, 16Bit, Stereo | 19 |
| 22kHz, 8Bit, Mono | 20 |
| 22kHz, 8Bit, Stereo | 21 |
| 22kHz, 16Bit, Mono | 22 |
| 22kHz, 16Bit, Stereo | 23 |
| 24kHz, 8Bit, Mono | 24 |
| 24kHz, 8Bit, Stereo | 25 |
| 24kHz, 16Bit, Mono | 26 |
| 24kHz, 16Bit, Stereo | 27 |
| 32kHz, 8Bit, Mono | 28 |
| 32kHz, 8Bit, Stereo | 29 |
| 32kHz, 8Bit, Stereo | 30 |
| 32kHz, 16Bit, Stereo | 31 |
| 44kHz, 8Bit, Mono | 32 |
| 44kHz, 8Bit, Stereo | 33 |
| 44kHz, 16Bit, Mono | 34 |
| 44kHz, 16Bit, Stereo | 35 |
| 48kHz, 8Bit, Mono | 36 |
| 48kHz, 8Bit, Stereo | 37 |
| 48kHz, 16Bit, Mono | 38 |
| 48kHz, 16Bit, Stereo | 39 |
**Returns** (bool): If the command succeeds, it returns __TRUE__, otherwise __FALSE__.
| Format | Value |
| -------------------- | ----- |
| Default | 0 |
| 8kHz, 8Bit, Mono | 4 |
| 8kHz, 8Bit, Stereo | 5 |
| 8kHz, 16Bit, Mono | 6 |
| 8kHz, 16Bit, Stereo | 7 |
| 11kHz, 8Bit, Mono | 8 |
| 11kHz, 8Bit, Stereo | 9 |
| 11kHz, 16Bit, Mono | 10 |
| 11kHz, 16Bit, Stereo | 11 |
| 12kHz, 8Bit, Mono | 12 |
| 12kHz, 8Bit, Stereo | 13 |
| 12kHz, 16Bit, Mono | 14 |
| 12kHz, 16Bit, Stereo | 15 |
| 16kHz, 8Bit, Mono | 16 |
| 16kHz, 8Bit, Stereo | 17 |
| 16kHz, 16Bit, Mono | 18 |
| 16kHz, 16Bit, Stereo | 19 |
| 22kHz, 8Bit, Mono | 20 |
| 22kHz, 8Bit, Stereo | 21 |
| 22kHz, 16Bit, Mono | 22 |
| 22kHz, 16Bit, Stereo | 23 |
| 24kHz, 8Bit, Mono | 24 |
| 24kHz, 8Bit, Stereo | 25 |
| 24kHz, 16Bit, Mono | 26 |
| 24kHz, 16Bit, Stereo | 27 |
| 32kHz, 8Bit, Mono | 28 |
| 32kHz, 8Bit, Stereo | 29 |
| 32kHz, 8Bit, Stereo | 30 |
| 32kHz, 16Bit, Stereo | 31 |
| 44kHz, 8Bit, Mono | 32 |
| 44kHz, 8Bit, Stereo | 33 |
| 44kHz, 16Bit, Mono | 34 |
| 44kHz, 16Bit, Stereo | 35 |
| 48kHz, 8Bit, Mono | 36 |
| 48kHz, 8Bit, Stereo | 37 |
| 48kHz, 16Bit, Mono | 38 |
| 48kHz, 16Bit, Stereo | 39 |
**Example**
```php
TTS_GenerateFile(44007, "Hello World", "C:/HelloWorld.WAV", 19);
```
## TTS_Speak
Source: https://www.symcon.de/en/service/documentation/module-reference/notifications/text-to-speech/tts-speak/
`bool TTS_Speak(int $InstanceID, string $Text, bool $Waiting)`
speaks any text on the selected sound card
**Parameters**
- `$InstanceID` (int): ID of the device to be switched
- `$Text` (string): Text to be said
- `$Waiting` (bool): __TRUE__ for On, __FALSE__ for Off
**Returns** (bool): If the command succeeds, it returns __TRUE__, otherwise __FALSE__.
__TRUE__ for On, __FALSE__ for Off
**Example**
```php
TTS_Speak(12345, "Hallo Welt!", true); //Wait until it was spoken to the end
```
---
# TTSAWSPolly
> Symcon documentation · English · generated on 2026-09-26
> Index: https://www.symcon.de/en/llms.txt
Source: https://www.symcon.de/en/service/documentation/module-reference/notifications/ttsawspolly/
_Requires Symcon >= 5.1_
The Text to Speech (AWS Polly) module is used to generate sound data/files, which can be used e.g. for audio notifications or VoIP announcements.
### function scope
- Create sound data that can be stored in a media file for output via audio notifications, for example
- Create sound files that can be used for an output in the VoIP module
### requirements
- Account with Amazon Web Services
- User with appropriate Access Key/Secret Key and access rights to Polly (e.g. AmazonPollyFullAccess)
### Software Installation
The "Text to Speech (AWS Polly)" module can be installed directly from the [Module Store](https://www.symcon.de/en/service/documentation/components/management-console/module-store/).
### User setup in AWS IAM
On the Amazon AWS home page, you need to search for the IAM in AWS Services.

Within the IAM a new user has to be added


Afterwards, a speaking username should be assigned and "Program controlled access" should be activated.

As a policy "AmazonPollyFullAccess" must be activated.

Skip the next dialog with "Next: Check".
Create the user by clicking on "Create user".
After creating the user, it will be assigned an access key ID and a secret access key.

### setting up the instances in IP-Symcon
- Under "Add Instance", the 'Text to Speech (AWS Polly)' module can be found using the quick filter.
- For more information on adding instances, see the [Instances documentation](https://www.symcon.de/en/service/documentation/basics/instances/)
#### ConfigurationPage:
| Name | Description |
| ------------- | ----------------------------------------------------------------- |
| Access Key | Access Key from AWS user who has access to Polly |
| Secret Key | Secret Key of the AWS user who has access to Polly |
| Region | Region in which Polly should be used |
| Language | Language in which the output should take place |
| Output Format | Format (MP3/WAV/OGG) of the output |
| Sample Rate | Sample Rate (Standard, 8000 Hz, 16000 Hz, 22050 Hz) of the output |
| Text type | Type of text. For SSML the special SSML tags can be used |
After entering the Access Key/Secret Key the configuration must be saved to load the available languages.
## TTSAWSPOLLY_GenerateData
Source: https://www.symcon.de/en/service/documentation/module-reference/notifications/ttsawspolly/ttsawspolly-generatedata/
`string TTSAWSPOLLY_GenerateData(int $InstanceID, string $Text)`
_Requires Symcon >= 5.1_
Queries the text via AWS and returns the speech data in the return.
**Parameters**
- `$InstanceID` (int): ID of the Instance
- `$Text` (string): Voice data
**Returns** (string): Base64 encoded voice data
Voice data
**Example**
```text
echo TTSAWSPOLLY_GenerateData(12345, "This is a test");
```
## TTSAWSPOLLY_GenerateFile
Source: https://www.symcon.de/en/service/documentation/module-reference/notifications/ttsawspolly/ttsawspolly-generatefile/
`string TTSAWSPOLLY_GenerateFile(int $InstanceID, string $Text)`
_Requires Symcon >= 5.1_
**Parameters**
- `$InstanceID` (int): ID of the Instance
- `$Text` (string): Voice data
**Returns** (string): Voice data filename
Voice data
**Example**
```text
echo TTSAWSPOLLY_GenerateFile(12345, "this is a test");
```
---
# Consumption Alert
> Symcon documentation · English · generated on 2026-09-26
> Index: https://www.symcon.de/en/llms.txt
Source: https://www.symcon.de/en/service/documentation/module-reference/notifications/consumption-alert/
_Requires Symcon >= 6.0_
The module is used to detect unusual consumption. It reacts to a counter variable and switches an alarm under certain conditions. There are two state variables.
A high consumption state, which switches when an adjustable limit value is exceeded. A low consumption state, which ticks up in 7 steps if a set limit value (e.g. dripping faucet) is exceeded over a longer period of time. The interval for both controls can be set via the configuration. An alarm, which switches when the high consumption state is switched to alarm, or the low consumption alarm exceeds a set value.
### function range
- Selection of the counter variable
- Large/small consumption timer adjustable in minutes
- Large/small consumption limit value adjustable
- 7 steps display for small consumption
- Alarm display for large consumption
### software installation
- Install the 'VerbrauchsAlarm' module via the [Module Store](https://www.symcon.de/en/service/documentation/components/management-console/module-store/).
### Set up instances in IP-Symcon
- Under 'Add Instance' the 'VerbrauchsAlarm' module can be found using the quick filter.
- More information about adding instances in the [Instances documentation](https://www.symcon.de/en/service/documentation/basics/instances/)
#### Configuration Page:
| Name | Description |
| --------------------------------- | ------------------------------------------------------------------------------------------------- |
| Counter variable | Variable that represents the counter value. |
| Alarm trigger | Default: 6 Low consumption level at which the alarm is triggered. |
| Low Consumption Interval | Default: 1min Time interval to check if the consumption is too high. |
| Low consumption limit | Default: 0 Limit value at which the state is changed. If this is not set, it will not be checked. |
| High consumption interval | Default: 5min Time interval in which it is checked if the consumption is too high. |
| Limit value for large consumption | Default: 0 Limit value at which the state is changed. If this is not set, it is not checked. |
### status variables and profiles
The status variables/categories are created automatically. Deleting individual ones can lead to malfunctions.
#### Statusvariables:
| Name | Type | Description |
| ---------------------- | ------- | ------------------------------------------------------------------------- |
| Alarm notification | Boolean | Alarm when large consumption switched or small consumption exceeds value. |
| Low Consumption State | Integer | 7 level indicator for the state of the alarm level. |
| High consumption state | Boolean | Alarm if the flow is too high. |
#### Profile:
| Name | Description |
| ------------------ | ------------------------------------------------------------------------------------------ |
| VBA.LeakLevel | Profile for small consumption - 7 alarm levels with different symbols and color indicators |
| VBA.ThresholdValue | Profile for small/large consumption threshold value |
Breakdown VBA.LeakLevel
| Level | Value |
| ------------------ | ----- |
| No activity | 0 |
| Everything okay | 1 |
| Normal activity | 2 |
| Increased activity | 3 |
| Abnormal Activity | 4 |
| Pre-Alarm | 5 |
| Alarm | 6 |
### Visualization
The limit values can be set via the Visualization.
It is additionally displayed whether an alarm is present or not.
## VBA_CheckAlert
Source: https://www.symcon.de/en/service/documentation/module-reference/notifications/consumption-alert/vba-checkalert/
`void VBA_CheckAlert(int $InstanceID, string $BorderValue, string $OldValue)`
_Requires Symcon >= 6.0_
Checks whether a limit value is exceeded
**Parameters**
- `$InstanceID` (int): ID of the Instance
- `$BorderValue` (string): Border Value
- `$OldValue` (string): Old Value
**Returns** (void): The function does not return any value.
Old Value
**Example**
```text
VBA_CheckAlert(12345, "SmallUserThreashold", "SmallUserBuffer");
```
---
# Water Alert
> Symcon documentation · English · generated on 2026-09-26
> Index: https://www.symcon.de/en/llms.txt
Source: https://www.symcon.de/en/service/documentation/module-reference/notifications/water-alert/
_Requires Symcon >= 4.2_
The module is used to detect unnaturally high water consumption. It reacts to a counter variable and switches an alarm under certain conditions. There are two alarm variables.
A pipe burst alarm, which switches when large quantities flow at once. A leakage alarm, which ticks up in 7 steps when a small amount flows over a longer period of time (e.g. dripping faucet). The interval for both controls can be set via the configuration.
### function range
- Selection of water meter variable
- Pipe burst timer adjustable in minutes
- Leakage timer adjustable in minutes
- 7 steps display for leakage
- Alarm display for pipe breakage
### software installation
- Install the 'Water Alert' module via the [Module Store](https://www.symcon.de/en/service/documentation/components/management-console/module-store/).
### Setting up the instances in IP-Symcon
- Under "Add Instance" the 'Water Alert' module can be found using the quick filter.
- More information about adding instances in the [Instances documentation](https://www.symcon.de/en/service/documentation/basics/instances/)
#### Configuration Page:
| Name | Description |
| ------------------- | ---------------------------------------------------------------------------------------------- |
| Counter variable | Variable that represents the counter value. |
| Leakage interval | Default: 1min Time interval in which it is checked whether too much water has flowed through. |
| Pipe burst interval | Default: 15min Time interval in which it is checked whether too much water has flowed through. |
### status variables and profiles
The status variables/categories are created automatically. Deleting individual ones can lead to malfunctions.
#### Statusvariables
| Name | Type | Description |
| ------------------- | ------- | --------------------------------------------------------------------------------------------------------------------------------------------------------------------------------------------------- |
| Leakage Limit | Float | Difference value, which is checked in the set "Leakage Interval" and if exceeded, the "Leakage" is increased by 1. If the difference is below or equal to the limit, the alarm level will be reset. |
| Leakage | Integer | 7 step display for the status of the alarm level. |
| Pipe breakage limit | Float | Limit value, which is checked and may be the trigger for an alarm. |
| Pipe break | Boolean | Alarm if the flow is too high. |
#### Profile:
| Name | Description |
| ------------------ | -------------------------------------------------------------------------------- |
| WAA.LeakLevel | Profile for leakage - 7 alarm levels with different symbols and color indicators |
| WAA.ThresholdValue | Profile for leakage/pipe breakage threshold value |
### Visualization
The threshold values can be set via the Visualization.
It is additionally displayed whether an alarm is present or not.
## WAA_CheckAlert
Source: https://www.symcon.de/en/service/documentation/module-reference/notifications/water-alert/waa-checkalert/
`bool WAA_CheckAlert(int $InstanzID, string $BorderValue, string $OldValue)`
_Requires Symcon >= 4.2_
Checks whether the limit values have been exceeded
**Parameters**
- `$InstanzID` (int): ID of the Instance
- `$BorderValue` (string): Border Value
- `$OldValue` (string): Old Value
**Returns** (bool): If the command could be executed successfully, it returns __TRUE__ as result, otherwise __FALSE__.
Old Value
**Example**
```text
WAA_CheckAlert(12345, "LeakThreashold", "LeakBuffer");
```
---
# Watchdog
> Symcon documentation · English · generated on 2026-09-26
> Index: https://www.symcon.de/en/llms.txt
Source: https://www.symcon.de/en/service/documentation/module-reference/notifications/watchdog/
_Requires Symcon >= 5.1_
Checks whether variables defined in a list are overdue. If variables are overdue, an alarm is set and a list of them is displayed in the Visualization.
### scope
- Monitoring of listed variables.
- Set whether the variables are to be checked for changes or updates.
- Set how long the listed variables may be overdue.
- Switching on/off via Visualization button or script function.
- Display when the listed variables were last checked.
- Display of the original path or an individual name.
### software installation
- Install the Watchdog module via the [Module Store](https://www.symcon.de/en/service/documentation/components/management-console/module-store/).
### Setting up the instances in IP-Symcon
- Under "Add Instance" the 'Watchdog' module can be found using the quick filter.
- More information about adding instances in the [Instances documentation](https://www.symcon.de/en/service/documentation/basics/instances/).
- All variables to be switched must be added to the "Variables" list in the instance configuration.
#### ConfigurationPage:
| name | description |
| --------- | -------------------------------------------------------------------- |
| Variables | Variables to watch are added to this list. |
| Time | Duration of inactivity until the listed variables trigger the alarm. |
| Unit | Unit of time. |
If variables have different allowed inactivity time, it is recommended to use multiple instances of the watchdog module.
### status variables
The status variables/categories are created automatically. Deleting individual ones can lead to malfunctions.
| name | type | description |
| --------------- | ------- | ------------------------------------------------------------------------------------- |
| Active alarms | String | Contains the table for the display in the Visualization. |
| Alarm | Boolean | The variable indicates whether an alarm is present. True = Alarm; False = OK; |
| Last Check | Integer | UnixTimestamp which indicates the time when the last check was done. |
| Watchdog active | Boolean | Indicates whether the watchdog is activated or not. True = Enabled; False = Disabled; |
### Visualization
The watchdog can be enabled/disabled via the Visualization.
Additionally the information is displayed at which time the watchdog was last checked.
## WD_GetAlertTargets
Source: https://www.symcon.de/en/service/documentation/module-reference/notifications/watchdog/wd-getalerttargets/
`array WD_GetAlertTargets(int $InstanzID)`
_Requires Symcon >= 5.1_
returns an array with the overdue variables
**Parameters**
- `$InstanzID` (int): ID of the Instanz
**Returns** (array): Array of active alarms of the watchdog instance with InstanceID __InstanceID__.
ID of the Instanz
**Example**
```text
WD_GetAlertTargets(12345);
```
## WD_SetActive
Source: https://www.symcon.de/en/service/documentation/module-reference/notifications/watchdog/wd-setactive/
`bool WD_SetActive(int $InstanzID, bool $SetActive)`
_Requires Symcon >= 5.1_
de-/activate the instance
**Parameters**
- `$InstanzID` (int): ID of the Instanz
- `$SetActive` (bool): Enables/disables the watchdog
**Returns** (bool): If the command could be executed successfully, it returns __TRUE__ as result, otherwise __FALSE__.
Enables/disables the watchdog
**Example**
```text
WD_SetActive(12345, true);
```
---
# Archive Control
> Symcon documentation · English · generated on 2026-09-26
> Index: https://www.symcon.de/en/llms.txt
Source: https://www.symcon.de/en/service/documentation/module-reference/core-instances/archive-control/
The Archive Control module takes care of storing the variable values in a database.
### Storagetype
With version 4.0 was the SQLite database deleted for an easier usability, using CSV files.
| IPS Version | Storagetype |
| ---------------- | --------------- |
| to Version 3.4 | SQLite database |
| from Version 4.0 | CSV files |
### Activate logging
To log a variable in the database, it must be selected for it. You will need to edit the variable and select the checkbox "Log all changes of this variable". If no button for showing the graph is wanted, deactivate the option "Show aggregation in Visualization".

| Aggregation Type | Description |
| ---------------- | -------------------------------------------------------------------------------------------------------------------------------- |
| Standard | For all aggregationlevels (hour, day, week, month, year) will min / max / average calculated. |
| Counter | For all aggregationlevels (hour, day, week, month, yea) will the delta (difference) of the values as min / max / sum calculated. |
> **Note:** If the Counter aggregation is used, the first value logged in the archive is used as reference value and the sum of positive delta starts with the following value. That means a variable with the logged values 500, 505, 520, and 521 is displayed with the values 0, 5, 15, 1.
| Archive settings | Description |
| --------------------------------- | ---------------------------------------------------------------------------------------------------------------------------------------------------------------------------------------------- |
| Log all changes of this varaible | Activates the logging of the variable. |
| Show aggregation in Visualization | Deactivate/Hide the button for showing the visualization of the logged variable. The logging ist still active for the varabelDas Aufzeichnen der Datenpunkte der Variable ist immernoch aktiv. |
> **Note:** If the aggregationtype is changed, the aggregation of this variable starts automatically. This could take some time.
As soon as logging is selected, all data is saved in the database. The data is saved two times. All raw data is logged in the database and these datasets are summarized as individual intervals (days, weeks, months, years) for faster generation of graphs. The graphs can, if activated for the variable, be accessed via Visualization.
### Archive Handler
The Archive Handler is a function to manage all logged variables. All values can be viewed and edited.


The header provide following functions:
| Function | Description |
| --------------- | ---------------------------------------------------------------------------------------------------------------------------------------------------------------------------- |
| Clean up | Removes all archivedata from nonexistent variables. Data of deactivated variables won't get deleted. |
| Reaggregate all | Aggregates all logged variables again. Depending on the scope, this may take a very long time. Regular status and finishing messages are available in the tab "Message Log". |
Clicking the eye icon opens the view with saved raw data of the selected variable and allows the deletion of individual datasets. __After deletion, it is required to reaggregate the variable data.__ This function is not available for variables that do not exist any more. A click on the cog wheel opens a dialog with extended functions for the selected variable

| Function | Description |
| --------------- | ------------------------------------------------------------------------------------------------------------------------------------------------------------------------------------------------------------------------------------------------------------------------------------------------------------------------------------------------------------------------------------------------------------------------------------------- |
| Reaggregate | Aggregates the selected variable again. Depending on the scope, this could take very long. Regular status and finishing messages are available in the tab "Message Log". |
| Delete | Deletes all the raw data from the archive. |
| Delete timespan | A time interval can be selected here. All datasets within that interval are deleted. |
| Transfer data | The raw data of a variable is transferred to another variable. This can be useful if a VariableID does not exist any more or a sensor is replaced. A variable must be selected which is not logged yet and whose variable type fits the data. The data of the old variable will be automatically deleted in this process. |
| Edit variable | Opens the dialog to edit the Variable |
| Add logged data | Additional datasets can be added here. Datasets can either be entered manually or from files. For manual adding, another dialog opens, in which a list of times and values can be entered, that are added to the variable with a click on "Add Values". If datasets from files should be added, accordingly prepared csv files are required. In an additional step the values can be checked manually and finally be added to the variable. |
#### Possible datastructures for "Add logged data"
In .csv files for adding logged data, every row must note a point in time and a data value. Two basic notations are possible:
1. Comma as seperator and dot as decimal seperator (Date, 1.5)
2. Semicolon as seperator and comma as decimal seperator (Date; 1,5)
Several formats for the date are supported:
1. Unix Timestamp, e.g., 1522527010
2. German format, e.g., 31.03.2018 22:10:10
3. American format, e.g., 03/31/2018 10:10:10 PM
4. RFC2822, e.g., Sat, 31 Mar 2018 22:10:10 +0000
5. ISO8601, e.g., 2018-03-31 22:10:10
#### Add files from Excel file
It is possible to prepare the .csv files for adding with Microsoft Excel. Here, the points in time are entered into the first column and the values into the second. Verify that the point of time is formatted in one of the supported formats. For example, the German format can be used with the user defined number format DD.MM.YYYY hh:mm:ss.

Finally, the list can be saved as .csv file via "Save as" and the type "CSV (Seperator delimited)" and finally confirming with "Save". The generated .csv file kann be added in IP-Symcon via "Add Data" of a [Variable](https://www.symcon.de/en/llms/concepts.md).
## AC_AddLoggedValues
Source: https://www.symcon.de/en/service/documentation/module-reference/core-instances/archive-control/ac-addloggedvalues/
`bool AC_AddLoggedValues(int $InstanceID, int $VariableID, array $Datasets)`
_Requires Symcon >= 5.1_
adds further data records to a logged variable
**Parameters**
- `$InstanceID` (int): ID for the archive
- `$VariableID` (int): ID of the variable to which the datasets are to be added
- `$Datasets` (array)
An array with datasets, where each set is an array with the following __key => value__ pairs:
| Parameters | Type | Description |
| ---------- | ----------- | -------------------------------------------------------------------------------------------- |
| TimeStamp | Integer | Time of the new data record as a Unix Timestamp |
| Value | by variable | The value of the new data record - the type of the value must match the type of the variable |
**Returns** (bool): If the command succeeds, it returns __TRUE__, otherwise __FALSE__.
An array with datasets, where each set is an array with the following __key => value__ pairs:
| Parameters | Type | Description |
| ---------- | ----------- | -------------------------------------------------------------------------------------------- |
| TimeStamp | Integer | Time of the new data record as a Unix Timestamp |
| Value | by variable | The value of the new data record - the type of the value must match the type of the variable |
**Example**
```php
// Add three additional data records to an Integer variable
AC_AddLoggedValues(12345, 34567, [
[
'TimeStamp' => 1128255120,
'Value' => 30
],
[
'TimeStamp' => 1128257851,
'Value' => 50
],
[
'TimeStamp' => 1128278514,
'Value' => 130
]
]);
```
## AC_ChangeVariableID
Source: https://www.symcon.de/en/service/documentation/module-reference/core-instances/archive-control/ac-changevariableid/
`bool AC_ChangeVariableID(int $InstanceID, int $OldVariableID, int $NewVariableID)`
_Requires Symcon >= 3.0_
migrates the data of a variable into a variable that has not yet been logged
**Parameters**
- `$InstanceID` (int): ID for the archive
- `$OldVariableID` (int): ID of the variable to be migrated
- `$NewVariableID` (int): ID of the new variable
**Returns** (bool): __True__ if successful, otherwise __False__
ID of the new variable
**Example**
```php
// The data of the 34567 variable are migrated to the 56789 variable
AC_ChangeVariableID(12345, 34567, 56789);
```
## AC_DeleteVariableData
Source: https://www.symcon.de/en/service/documentation/module-reference/core-instances/archive-control/ac-deletevariabledata/
`int AC_DeleteVariableData(int $InstanceID, int $VariableID, int $StartTime, int $EndTime)`
_Requires Symcon >= 3.0_
deletes all data records of a logged variable in a certain period of time
**Parameters**
- `$InstanceID` (int): ID for the archive
- `$VariableID` (int): ID of the variable in which the data records are to be deleted
- `$StartTime` (int): Date/time as Unix Timestamp (0 = from the beginning)
- `$EndTime` (int): Date/time as Unix Timestamp (0 = until now)
**Returns** (int): Returns the number of deleted records
Date/time as Unix Timestamp (0 = until now)
**Example**
```php
// Deletes all data of the variable "TestVariable" in the period 07.10.2015 16:00 UTC+2(CEST) to 07.10.2015 17:00 UTC+2(CEST)
AC_DeleteVariableData(12345 /*[Archive]*/, 45678 /*[Variable]*/, 1444226400, 1444237200);
// Deletes all data of the variable "TestVariable" in the period 07.10.2015 16:00 UTC+2(CEST) until now
AC_DeleteVariableData(12345 /*[Archive]*/, 45678 /*[Variable]*/, 1444226400, 0);
// Delete completely and remove from the Archive Control
// Deletes all data of the variable and deactivates the variable in the Archive Control
AC_DeleteVariableData(12345 /*[Archive]*/, 45678 /*[TestVariable]*/, 0, 0);
```
## AC_GetAggregatedValues
Source: https://www.symcon.de/en/service/documentation/module-reference/core-instances/archive-control/ac-getaggregatedvalues/
`array AC_GetAggregatedValues(int $InstanceID, int $VariableID, int $AggregationLevel, int $StartTime, int $EndTime, int $Limit)`
_Requires Symcon >= 3.0_
gets aggregated data from the archive
**Parameters**
- `$InstanceID` (int): ID for the archive
- `$VariableID` (int): ID of the variable to be queried
- `$AggregationLevel` (int)
| Aggregation Level | Description |
| ----------------- | ------------------------------------------------------------------------------ |
| 0 | Hourly Aggregation (00:00 - 59:59) |
| 1 | Daily Aggregation (00:00:00 - 23:59:59) |
| 2 | Weekly Aggregation (Monday 00:00:00 - Sunday 23:59:59) |
| 3 | Monthly Aggregation (First day of month 00:00:00 - Last day of month 23:59:59) |
| 4 | Annual Aggregation (01.01. 00:00:00 - 31.12. 23:59:59) |
| 5 | 5-Minute Aggregation (Calculated from raw data) |
| 6 | 1-Minute Aggregation (Calculated from raw data) |
| 8 | 15-Minute Aggregation (Calculated from raw data) (from version 8.1) |
- `$StartTime` (int): Date/time as Unix Timestamp (0 = from the beginning)
- `$EndTime` (int): Date/time as Unix Timestamp (0 = until now)
- `$Limit` (int): Maximum number of datasets. (0 = no limit, 10000 is the hard limit, which always applies)
**Returns** (array): An array with the following __key => value__ pairs.
> **Note:** The output starts with the newest dataset and then, in descending order, with the older data sets.
Meaning of the fields for the aggregation type __Standard__
| Index | Type | Description |
| ------------- | ------- | -------------------------------------------------------------------- |
| __Avg__ | variant | Average value within this aggregation period |
| __Duration__ | integer | Duration of the aggregation period in seconds |
| __Max__ | variant | Largest value within this aggregation period |
| __MaxTime__ | variant | Date/time of __Max__ as Unix Timestamp |
| __Min__ | variant | Smallest value within this aggregation period |
| __MinTime__ | variant | Date/time of __min__ as Unix Timestamp |
| __TimeStamp__ | integer | Date/time of the start of the aggregation period as a Unix Timestamp |
Meaning of the fields for the aggregation type __Counter__
| Index | Type | Description |
| ------------- | ------- | -------------------------------------------------------------------- |
| __Avg__ | variant | Sum of the positive delta within this aggregation period |
| __Duration__ | integer | Duration of the aggregation period in seconds |
| __Max__ | variant | Largest positive delta within this aggregation period |
| __MaxTime__ | variant | Date/time of __Max__ as Unix Timestamp |
| __Min__ | variant | Smallest positive delta within this aggregation period |
| __MinTime__ | variant | Date/time of __min__ as Unix Timestamp |
| __TimeStamp__ | integer | Date/time of the start of the aggregation period as a Unix Timestamp |
Maximum number of datasets. (0 = no limit, 10000 is the hard limit, which always applies)
**Example**
```php
// Query all data records from 01/01/2013 to 12/31/2013 (daily aggregation level)
// e.g. to determine the consumption on the respective day or the average temperature on the respective day
$values = AC_GetAggregatedValues(12345, 55554, 1 /* daily */, mktime(0, 0, 0, 1, 1, 2013), mktime(23, 59, 59, 12, 31, 2013), 0); //55554 is the variable ID, 12345 from the archive
// Query all current data records (daily aggregation level)
// e.g. to determine today's consumption or today's average temperature
$values = AC_GetAggregatedValues(12345, 55554, 1 /* daily */, strtotime("today 00:00"), time(), 0); //55554 is the ID of the variable, 12345 from the archive
// Query all yesterday's records (hourly aggregation level)
// For example, to check yesterday's consumption or the average wind speed every hour
$values = AC_GetAggregatedValues(12345, 55554, 0 /* hourly */, strtotime("yesterday 00:00"), strtotime("today 00:00")-1, 0); //55554 is the ID of the variable, 12345 from the archive
// This part creates an output in the script window with the queried values
foreach($values as $value) {
echo date("d.m.Y H:i:s", $value['TimeStamp']) . " -> " . $value['Avg'] . PHP_EOL;
}
```
## AC_GetAggregationType
Source: https://www.symcon.de/en/service/documentation/module-reference/core-instances/archive-control/ac-getaggregationtype/
`int AC_GetAggregationType(int $InstanceID, int $VariableID)`
_Requires Symcon >= 3.0_
indicates the aggregation type of a variable
**Parameters**
- `$InstanceID` (int): ID for the archive
- `$VariableID` (int): ID of the variable to be queried
**Returns** (int): An integer that represents the type of aggregation.
| Return value | Description |
| ------------ | ----------- |
| 0 | Standard |
| 1 | Counter |
ID of the variable to be queried
**Example**
```php
// The variable is aggregated as a counter
echo AC_GetAggregationType(39147 /*[Archive]*/, 53716 /*[TestVariableCounter]*/);
// Output: 1
```
## AC_GetAggregationVariables
Source: https://www.symcon.de/en/service/documentation/module-reference/core-instances/archive-control/ac-getaggregationvariables/
`array AC_GetAggregationVariables(int $InstanceID, bool $DatabaseQuery)`
_Requires Symcon >= 3.0_
returns an array of all logged variables
**Parameters**
- `$InstanceID` (int): ID for the archive
- `$DatabaseQuery` (bool): True, if additional information is to be displayed, otherwise False (with version 4.0 and above unimportant, but required)
**Returns** (array): An array with the following __key => value__ pairs.
| Index | Type | Description |
| ------------------ | ------- | ---------------------------------------------------------------------------------------------------------------------------------- |
| FirstTime | integer | Date/time from the beginning of the aggregation period as a Unix Timestamp |
| LastTime | integer | Date/time of the last entry of the aggregation period as a Unix Timestamp |
| RecordCount | integer | Number of records |
| RecordSize | integer | Size of all data records in bytes |
| VariableID | integer | ID of the variable |
| AggregationType | integer | Aggregation type as an Integer. See also [AC_GetAggregationType](https://www.symcon.de/en/llms/modules/archive-control.md) |
| AggregationVisible | boolean | Indicates whether the variable is displayed in the visualization. See also [AC_GetGraphStatus](https://www.symcon.de/en/llms/modules/archive-control.md) |
| AggregationActive | boolean | Indicates whether logging is active for this variable. See also [AC_GetLoggingStatus](https://www.symcon.de/en/llms/modules/archive-control.md) |
| Compaction | array | Array of compaction entries. Each entry contains MonthOffset and CompactionType. See also [AC_SetCompaction](https://www.symcon.de/en/llms/modules/archive-control.md) |
True, if additional information is to be displayed, otherwise False (with version 4.0 and above unimportant, but required)
**Example**
```php
// Output with additional information
var_dump(AC_GetAggregationVariables(39147 /*[Archive]*/, true));
// Sample output:
array(1) {
[0]=>
array(9) {
["FirstTime"]=>
int(1444221643)
["LastTime"]=>
int(1444221705)
["RecordCount"]=>
int(6)
["RecordSize"]=>
int(78)
["VariableID"]=>
int(53716)
["AggregationType"]=>
int(0)
["AggregationVisible"]=>
bool(true)
["AggregationActive"]=>
bool(true)
["Compaction"]=>
array(1) {
[0]=>
array(2) {
["MonthOffset"]=>
int(-1)
["CompactionType"]=>
int(1)
}
}
}
}
*/
```
## AC_GetCompaction
Source: https://www.symcon.de/en/service/documentation/module-reference/core-instances/archive-control/ac-getcompaction/
`array AC_GetCompaction(int $InstanceID, int $VariableID)`
_Requires Symcon >= 6.3_
returns the compaction entries of a variable
**Parameters**
- `$InstanceID` (int): ID for the archive
- `$VariableID` (int): ID of the variable to be queried
**Returns** (array): An array containing the compaction entries of the variable.
Each entry contains the following fields:
| Field | Type | Description |
| -------------- | ---- | ---------------------------------- |
| MonthOffset | int | Month offset for the compaction |
| CompactionType | int | Type of compaction (see below) |
**Compaction Types**
| CompactionType | Description |
| -------------- | ---------------------------------- |
| 0 | Compact to one value per minute |
| 1 | Compact to one value per 5 minutes |
| 2 | Compact to one value per hour |
| 3 | Compact to one value per day |
| 4 | Compact to one value per week |
| 5 | Compact to one value per month |
| 6 | Compact to one value per year |
| 7 | Delete values |
ID of the variable to be queried
**Example**
```php
// Query the compaction entries for "TestVariable"
$compaction = AC_GetCompaction(39147 /*[Archive]*/, 53716 /*[TestVariable]*/);
print_r($compaction);
/* Sample output:
Array
(
[0] => Array
(
[MonthOffset] => -1
[CompactionType] => 1
)
[1] => Array
(
[MonthOffset] => 3
[CompactionType] => 2
)
)
*/
```
## AC_GetCounterIgnoreZeros
Source: https://www.symcon.de/en/service/documentation/module-reference/core-instances/archive-control/ac-getcounterignorezeros/
`bool AC_GetCounterIgnoreZeros(int $InstanceID, int $VariableID)`
_Requires Symcon >= 5.5_
gets the status whether zeros and negative values are ignored
**Parameters**
- `$InstanceID` (int): ID for the archive
- `$VariableID` (int): ID of the variable to be queried
**Returns** (bool): True if ignoring zeros and negative values is active for the variable, otherwise False
ID of the variable to be queried
**Example**
```php
// Query the variable "54321" from the ArchivControl "12345"
AC_GetCounterIgnoreZeros(12345, 54321);
```
## AC_GetGraphStatus
Source: https://www.symcon.de/en/service/documentation/module-reference/core-instances/archive-control/ac-getgraphstatus/
`bool AC_GetGraphStatus(int $InstanceID, int $VariableID)`
_Requires Symcon >= 3.0_
asks whether a variable is being visualized
**Parameters**
- `$InstanceID` (int): ID for the archive
- `$VariableID` (int): ID of the variable to be queried
**Returns** (bool): __True__ if the visualization of the variable is active, otherwise __False__
ID of the variable to be queried
**Example**
```php
// Query the variable "TestVariable"
var_dump(AC_GetGraphStatus(39147 /*[Archive]*/, 53716 /*[TestVariable]*/));
echo AC_GetGraphStatus(39147 /*[Archive]*/, 53716 /*[TestVariable]*/);
/* Sample output
var_dump:
bool(true)
echo:
1
*/
```
## AC_GetLoggedValues
Source: https://www.symcon.de/en/service/documentation/module-reference/core-instances/archive-control/ac-getloggedvalues/
`array AC_GetLoggedValues(int $InstanceID, int $VariableID, int $StartTime, int $End time, int $Limit)`
_Requires Symcon >= 3.0_
gets raw data from the Archive Control
**Parameters**
- `$InstanceID` (int): ID for the archive
- `$VariableID` (int): ID of the variable to be queried
- `$StartTime` (int): Date/time as Unix Timestamp. (0 = from the beginning)
- `$End time` (int): Date/time as Unix Timestamp. (0 = until now)
- `$Limit` (int): Maximum number of records. (0 = no limit, 10000 is the hard limit, which always applies)
**Returns** (array): An array with the following __key => value__ pairs.
> **Note:** The output starts with the newest data set and then, in descending order, with the older dataset / datasets.
| Index | Type | Description |
| ------------- | ------- | --------------------------------------------------------------------- |
| __Duration__ | integer | Duration in seconds that the data record was set |
| __TimeStamp__ | integer | Date/time when the dataset / datasets was created as a Unix Timestamp |
| __Value__ | variant | Value |
Maximum number of records. (0 = no limit, 10000 is the hard limit, which always applies)
**Example**
```php
//Get the last value that was saved in the database
$last_value = AC_GetLoggedValues(12345, 55554, 0, 0, 1)[0]['Value'];
// Query all data records from 01/01/2013 to 01/07/2013
$values = AC_GetLoggedValues(12345, 55554, mktime(0, 0, 0, 1, 1, 2013), mktime(23, 59, 59, 1, 7, 2013), 0); //55554 is the ID of the variable, 12345 from the Archive Control
//Query all of today's records
$values = AC_GetLoggedValues(12345, 55554, strtotime("today 00:00"), time(), 0); //55554 is the ID of the variable, 12345 from the Archive Control
//Query all of yesterday's records
$values = AC_GetLoggedValues(12345, 55554, strtotime("yesterday 00:00"), strtotime("today 00:00")- 1, 0); //55554 is the ID of the variable, 12345 from the Archive Control
//This part creates an output in the script window with the queried values
foreach($values as $value) {
echo date("d.m.Y H:i:s", $value['TimeStamp']) . " -> " . $value['Value'] . PHP_EOL;
}
//Auxiliary function that simulates the functionality of IP-Symcon 2.x.
function AC_GetLoggedValuesCompatibility($instanceID, $variableID, $startTime, $endTime, $limit) {
$values = AC_GetLoggedValues($instanceID, $variableID, $startTime, $endTime, $limit );
if((sizeof($values) == 0) || (end($values)['TimeStamp'] > $startTime)) {
$previousRow = AC_GetLoggedValues($instanceID, $variableID, 0, $startTime - 1, 1 );
$values = array_merge($values, $previousRow);
}
return $values;
}
```
## AC_GetLoggingStatus
Source: https://www.symcon.de/en/service/documentation/module-reference/core-instances/archive-control/ac-getloggingstatus/
`bool AC_GetLoggingStatus(int $InstanceID, int $VariableID)`
_Requires Symcon >= 3.0_
asks whether a variable is logged
**Parameters**
- `$InstanceID` (int): ID for the archive
- `$VariableID` (int): ID of the variable to be queried
**Returns** (bool): __True__ if logging is active for the variable, otherwise __False__
ID of the variable to be queried
**Example**
```php
// Query the variable "TestVariable"
var_dump(AC_GetLoggingStatus(39147 /*[Archive]*/, 53716 /*[TestVariable]*/));
echo AC_GetLoggingStatus(39147 /*[Archive]*/, 53716 /*[TestVariable]*/);
/* Sample output
var_dump:
bool(true)
echo:
1
*/
```
## AC_ReAggregateVariable
Source: https://www.symcon.de/en/service/documentation/module-reference/core-instances/archive-control/ac-reaggregatevariable/
`bool AC_ReAggregateVariable(int $InstanceID, int $VariableID)`
_Requires Symcon >= 3.0_
starts the re-aggregation of a variable
**Parameters**
- `$InstanceID` (int): ID for the archive
- `$VariableID` (int): ID of the variable to be re-aggregated
**Returns** (bool): __True__ if successful, otherwise __False__
ID of the variable to be re-aggregated
**Example**
```php
// This starts the re-aggregation of the variable "test variable"
AC_ReAggregateVariable(39147 /*[Archive]*/, 53716 /*[TestVariable]*/);
/* Sample output in the message window
07.10.2015 15:50:05 | Archive Control | Reaggregation for VariableID #53716 is in progress... 10/2015! (6 rows)
07.10.2015 15:50:05 | Archive Control | Reaggregation for VariableID #53716 is complete! (6 rows)
*/
```
## AC_SetAggregationType
Source: https://www.symcon.de/en/service/documentation/module-reference/core-instances/archive-control/ac-setaggregationtype/
`bool AC_SetAggregationType(int $InstanceID, int $VariableID, int $Aggregation_Type)`
_Requires Symcon >= 3.0_
sets the aggregation type of a variable
**Parameters**
- `$InstanceID` (int): ID for the archive
- `$VariableID` (int): ID of the variable for which the aggregation type is to be set
- `$Aggregation_Type` (int)
| Aggregationstyp | Description |
| --------------- | ----------- |
| 0 | Standard |
| 1 | Counter |
**Returns** (bool): __True__ if successful, otherwise __False__
| Aggregationstyp | Description |
| --------------- | ----------- |
| 0 | Standard |
| 1 | Counter |
**Example**
```php
// Sets the aggregation type of the "TestVariable" variable to 1 (counter)
AC_SetAggregationType(39147 /*[Archive]*/, 53716 /*[TestVariable]*/, 1);
```
## AC_SetCompaction
Source: https://www.symcon.de/en/service/documentation/module-reference/core-instances/archive-control/ac-setcompaction/
`bool AC_SetCompaction(int $InstanceID, int $VariableID, int $MonthOffset, int $CompactionType)`
_Requires Symcon >= 6.3_
Configures the compression of the variable
**Parameters**
- `$InstanceID` (int): ID for the archive
- `$VariableID` (int): ID of the variable for which the compaction is to be set
- `$MonthOffset` (int): The number of months after which the compaction is applied; 0 = After the current month is ended, -1 = Compact values directly
- `$CompactionType` (int)
| CompactionType | Description |
| -------------- | ---------------------------------- |
| -1 | Deactivate compaction |
| 0 | Compact to one value per minute |
| 1 | Compact to one value per 5 minutes |
| 2 | Compact to one value per hour |
| 3 | Compact to one value per day |
| 4 | Compact to one value per week |
| 5 | Compact to one value per month |
| 6 | Compact to one value per year |
| 7 | Delete values |
**Returns** (bool): **True** if successful, otherwise **False**
| CompactionType | Description |
| -------------- | ---------------------------------- |
| -1 | Deactivate compaction |
| 0 | Compact to one value per minute |
| 1 | Compact to one value per 5 minutes |
| 2 | Compact to one value per hour |
| 3 | Compact to one value per day |
| 4 | Compact to one value per week |
| 5 | Compact to one value per month |
| 6 | Compact to one value per year |
| 7 | Delete values |
**Example**
```text
// Set the direct compaction of the variable "TestVariable" to 1 (One value per 5 minutes)
AC_SetCompaction(39147 /*[Archive]*/, 53716 /*[TestVariable]*/, -1, 1);
```
## AC_SetCounterIgnoreZeros
Source: https://www.symcon.de/en/service/documentation/module-reference/core-instances/archive-control/ac-setcounterignorezeros/
`bool AC_SetCounterIgnoreZeros(int $InstanceID, int $VariableID, bool $IgnoreZeros)`
_Requires Symcon >= 5.5_
sets the status whether zeros and negative values are ignored
**Parameters**
- `$InstanceID` (int): ID for the archive
- `$VariableID` (int): ID of the variable to be queried
- `$IgnoreZeros` (bool): True if zeros and negative values are to be ignored, otherwise False.
**Returns** (bool)
True if zeros and negative values are to be ignored, otherwise False.
**Example**
```php
```
## AC_SetGraphStatus
Source: https://www.symcon.de/en/service/documentation/module-reference/core-instances/archive-control/ac-setgraphstatus/
`bool AC_SetGraphStatus(int $InstanceID, int $VariableID, bool $Active)`
_Requires Symcon >= 3.0_
sets the property for the visualization of a variable
**Parameters**
- `$InstanceID` (int): ID for the archive
- `$VariableID` (int): ID of the variable to be queried
- `$Active` (bool): True if the display of the variable is to be activated in the visualization, otherwise False.
**Returns** (bool): __True__ if successful, otherwise __False__
True if the display of the variable is to be activated in the visualization, otherwise False.
**Example**
```php
// Sets the property of the "test variable" for visualization to true
AC_SetGraphStatus(39147 /*[Archive]*/, 53716 /*[TestVariable]*/, true);
```
## AC_SetLoggingStatus
Source: https://www.symcon.de/en/service/documentation/module-reference/core-instances/archive-control/ac-setloggingstatus/
`bool AC_SetLoggingStatus(int $InstanceID, int $VariableID, bool $Active)`
_Requires Symcon >= 3.0_
sets the property for logging a variable
**Parameters**
- `$InstanceID` (int): ID for the archive
- `$VariableID` (int): ID of the variable to be queried
- `$Active` (bool): True if the logging of the variable is to be activated, otherwise False.
**Returns** (bool): __True__ if successful, otherwise __False__
True if the logging of the variable is to be activated, otherwise False.
**Example**
```php
// Sets the property of the "test variable" for logging to true
AC_SetLoggingStatus(39147 /*[Archive]*/, 53716 /*[TestVariable]*/, true);
```
## Data Format
Source: https://www.symcon.de/en/service/documentation/module-reference/core-instances/archive-control/data-format/
> **Note:** Since version 4.0 of IP-Symcon CSV files are used for logging. Before, an SQL database was used.
The archive saves two different types of values.
* Primaryly, all raw data is stored.
* Secondaryly, the aggregated data is calculated and stored for different timespans (year, month, week, day, hour)
### CSV Structure
* all files include the VariableID in their name and end with .csv
* Raw data is written into individual folders per year and month
* Aggregation data is stored in the db mainfolder
* Files are only created when data is available
* The decimal seperator is always a dot (.)
#### Content of Raw Data
One set of data per row.
Values are seperated by comma (,).
* Unix Timestamp
* Raw Data
> **Note:** The logged values are always stored in UTC, independent of the configured server time.
> **Note:** String values are stored Base64 encoded.
#### Folder Structure of Raw Data
* db\2010\01\12345.csv
* db\2010\01\23456.csv
* db\2010\02\12345.csv
* db\2010\02\23456.csv
#### Content of Aggregation Data
One set of data per row.
Values are seperated by comma (,).
* Unix Timestamp for Avg value
* Avg value
* Delta to the Unix Timestamp for Min value
* Min value
* Delta to the Unix Timestamp for Max value
* Max value
#### Folder Structure of Aggregation Data
* db\12345.year.csv
* db\12345.month.csv
* db\12345.week.csv
* db\12345.day.csv
* db\12345.hour.csv
---
# Permission Control
> Symcon documentation · English · generated on 2026-09-26
> Index: https://www.symcon.de/en/llms.txt
Source: https://www.symcon.de/en/service/documentation/module-reference/core-instances/permission-control/
_Requires Symcon >= 8.0_
> **Note:** The authorization control is a paid extension, which can be purchased for every existing Symcon license. For a suitable demo version, please contact our [Support](https://www.symcon.de/en/contact-us/#RBAC%20Extension). The extension can be purchased directly in the [Shop](https://www.symcon.de/en/shop/enterprise/ips-enterprise-rbac).
The authorization control makes it possible to create users and roles and assign certain authorizations to them. Users can also be synchronized with an existing LDAP authentication server.
### LDAP configuration (optional)
Once all the data for the connection has been entered, the user and role lists can be filled with the equivalents set up with LDAP by clicking on "Synchronize now". If automatic synchronization is activated, users and roles are synchronized at the specified interval.

### Users
By default there is the @admin user. This user cannot be edited and has all authorizations. The password for remote access is used to log in with this user. The permissions for accessing a visualization, for example, can be defined in the corresponding [instance](https://www.symcon.de/en/llms/components/tile-visualization.md). If necessary, a user can be deactivated without deleting them directly.

#### Add user
When adding a user, a first name and surname can be entered in addition to the password. These are displayed in the visualization, among other things. When creating, you can choose between the account types "Local account" and "LDAP Sync". If "LDAP Sync" is selected, the UserDN must be entered instead of a password. All desired roles can be selected in the list.
### Roles
By default there is the @admin role. This cannot be edited and has all authorizations. Created roles can be added to the created users. The permissions for accessing a visualization, for example, can be defined in the corresponding [instance](https://www.symcon.de/en/llms/components/tile-visualization.md).

#### Add roles
Each role can be given a name when it is created.
---
# Calendar Control
> Symcon documentation · English · generated on 2026-09-26
> Index: https://www.symcon.de/en/llms.txt
Source: https://www.symcon.de/en/service/documentation/module-reference/core-instances/calendar-control/
_Requires Symcon >= 4.0_
### Description
The “Calendar Control” module offers the possibility to define periods in which one is expecting to be present or absent.
### Integration in IP-Symcon

In the “Calendar” instance (“Logical tree view” -> “Core instances”), new time periods can be added via the configuration page.
During these periods, the appropriate variable is switched to “True”. If both variables are set to false, no time period is defined for the current time.

### Examples
__Planned presence__
A family visit is recorded as a planned presence. At times when normally no one is in the home, the heating is automatically reduced to save energy. By taking into account the variable “planned presence”, this can be prevented without changing or manually switching off established scripts or weekly schedules.
__Planned absence__
The family vacation to the Baltic Sea is recorded as a planned absence. Due to the planned absence, an energy-saving automation system can be permanently activated for the period of time that would normally only be active at certain times in everyday life.
---
# Connect Control
> Symcon documentation · English · generated on 2026-09-26
> Index: https://www.symcon.de/en/llms.txt
Source: https://www.symcon.de/en/service/documentation/module-reference/core-instances/connect-control/
_Requires Symcon >= 4.0_
### Description
The Connect Control module offers the possibility to securely access the system from the outside. This connection can be used to manage the system from anywhere via the management console or to access it via the visualizations and mobile apps.
The measures mentioned under [Security](https://www.symcon.de/en/llms/getting-started.md) must always be taken in order to prevent unwanted access from the outside after activating the Connect module.
The module works completely without port sharing or setting up a DynDNS. A URL is automatically provided by our server. Thanks to secure tunneling, no special firewall settings are required and access within a company network is also possible.
> **Warning:** In the event of an error, further information can be viewed in the Notification Window. Further information can be found under Solutions in Case of an Error

### Integration in IP-Symcon
> **Note:** The prerequisite for using the Symcon Connect service is an active subscription. A maximum of one active server connection is possible per license

In the instance "Connect" ("Logical tree view" -> "Core instances") the module can be activated via "Activate Symcon Connect".
The following 3 access methods are available:
__"Open WebFront"__
This opens the personal URL in the web browser, which has the following format (http://32-figure-lettersequence.ipmagic.de). The WebFront can now be accessed from anywhere using the address shown in the address bar. This can be entered in any browser and on any smartphone. An encrypted connection is then established.
> **Note:** It is recommended to secure the WebFront with a password.
__"Open on smartphone"__
The address can be read in on mobile devices via QR code. (Any QR code reading software is required for this. As of iOS11, scanning can be carried out directly via the integrated camera app.) In the QR code, the link is formatted in the form of a [WebFront Share Link](https://www.symcon.de/en/llms/components/webfront-visualization.md) and thus automatically opens the required IP-Symcon app, including the selected WebFront.
> **Note:** Some QR code reading software may have issues with the created links. In this case, try using another QR code software.
__"Send via email"__
The default e-mail program will open automatically and it is only required to enter the recipient's address.
This way, the link and the associated IP-Symcon can be made available to third parties.
> **Warning:** In order to be able to access the Management Console via the Connect module, [Remote Access](https://www.symcon.de/en/llms/components/remote-access.md) must be activated and a password must be set. An encrypted connection may now be established and used via an installed Management Console and URL input.
### Limitations
#### Data Volume
The total amount of data Connect Control can send each day is 1GB.
#### Daily Reconnects
By default, 25 reconnects to the Connect service are possible per day. These can be increased to 100 using the [Special switches](https://www.symcon.de/en/llms/developer/special-switches.md) (ConnectLimit).
### Solutions in Case of an Error
In connection with the Connect Control, a few settings must be minded as they could lead to errors. In the event of an error, instructions are given in the Notification Window as to where an error has occurred.
#### Status
The current server status of Connect Control can be seen on this [Status Page](https://status.symcon.de/) .
#### Restart The System
If an unforeseeable connection error has occurred, restarting the service via the tray icon or reactivating the server may help. Information on this may be found under Reactivate Server .
#### Adjustments in The Firewall
In order to grant IP-Symcon access to certain remote functions (e.g. Connect Control) it may be necessary to set them up in the firewall. Further information can be found under [Firewall](https://www.symcon.de/en/llms/getting-started.md).
#### Reactivate The Server
For additional security, the sending server authenticates itself using a token so that it can be clearly identified as the sender. If the server is changed, replaced, or reinstalled, reactivation may be required. This reactivation can be done every 24 hours and started using the "Reactivate server" button. You will be notified about this change by email. This is done in order to detect misuse of a license at an early stage.
> **Note:** A reactivation is required if the following error message appears: Your server authentication token has changed. Please reactivate your server.
#### Firewall Setup
Access to live.symcon.de (443/TCP) and ipmagic.de (50000/TCP, 60000/TCP) must be enabled. The TTL (Time To Live) for DNS requests must be equal to or less than 60 seconds, as AWS (Amazon Web Services) changes these every minute.
#### Telekom with DSL and LTE
For Telekom customers using a hybrid DSL+LTE solution, an exception should be created for the SymBox or the IP-Symcon service so that it only communicates via DSL.

---
# Cutter
> Symcon documentation · English · generated on 2026-09-26
> Index: https://www.symcon.de/en/llms.txt
Source: https://www.symcon.de/en/service/documentation/module-reference/core-instances/cutter/
The cutter is used to extract sections from an incoming data stream using separators or a fixed number of steps and forwards them.
### Integration in IP-Symcon
The cutter acts as a splitter instance and is therefore often between the I/O and device instance.
Thus the cutter takes apart the incoming data stream and passes it on.
#### Use characters for cuts
This setting sets separators from left (start of data stream) to right (end of data stream). Everything that is between the separators is passed on. Optionally, hex characters can be switched on and thus the separators can be entered in hexadecimal. If only the left or right separator is entered, the entire data stream is forwarded before (only set on the right) or after (only set on the left).
In the drop-down menu there are standard control commands, which are often used and forward the 1:1.
> **Note:** The separators themselves are not passed on. These are also cut out so that only the pure user data is forwarded.
#### Use fixed cuts
A search is done for the sync character in the data stream. The subsequent data stream (including sync characters) is cut off according to the set input length and forwarded. If the input length = 0, the entire data stream including sync characters is forwarded.
#### Transfer to variable
The data stream can be transferred to a variable via a [RegisterVariable](https://www.symcon.de/en/llms/modules/registervariable.md) (using a script).
#### Special option Timeout
If the delay between two data stream packets is greater than the set "timeout" time, the two packets are not treated as a coherent data stream, but rather as two separate data packets.

## Cutter_ClearBuffer
Source: https://www.symcon.de/en/service/documentation/module-reference/core-instances/cutter/cutter-clearbuffer/
`bool Cutter_ClearBuffer(int $InstanceID)`
clears the buffer of the cutter instance
**Parameters**
- `$InstanceID` (int): ID to the cutter
**Returns** (bool): If the command succeeds, it returns __TRUE__, otherwise __FALSE__.
ID to the cutter
**Example**
```php
// Cleans the buffer of the clutter instance with the ID 12345
Cutter_ClearBuffer(12345);
```
---
# DNS-SD Control
> Symcon documentation · English · generated on 2026-09-26
> Index: https://www.symcon.de/en/llms.txt
Source: https://www.symcon.de/en/service/documentation/module-reference/core-instances/dns-sd-control/
_Requires Symcon >= 5.0_
The DNS-SD control module manages established Bonjour services.
> **Note:** For further information one can search for Zeroconf or mDNS.
### Installation
The DNS-SD Control is automatically installed as a core instance. This can be found in the object tree under core instances.
### Configuration
New services (list element) can be added via the configuration page of the DNS-SD Control.

These need a Name, RegType and Port. Domain and Host are optional, as are values. These are saved as key -> value pairs.
> **Warning:** The same Name and RegType may not be reused for different list elements.

After successfully adding, the new RegType and Name can be found and used directly via a Bonjour browser.

## ZC_QueryService
Source: https://www.symcon.de/en/service/documentation/module-reference/core-instances/dns-sd-control/zc-queryservice/
`array ZC_QueryService(int $InstanceID, string $Name, string $RegType, string $Domain)`
_Requires Symcon >= 5.3_
requests information from a single service
**Parameters**
- `$InstanceID` (int): ID of the DNS-SD control to be requested
- `$Name` (string): Name of the service
- `$RegType` (string): The RegType of the service
- `$Domain` (string): Domain of the service
**Returns** (array): Returns all information about the service found as an array.
Domain of the service
**Example**
```php
ZC_QueryService(12345, "NAS", "_http._tcp", "local.");
// Sample output:
/*
Array
(
[0] => Array
(
[Name] => NAS._http._tcp.local.
[Host] => NAS.local.
[Port] => 5000
[TXTRecords] => Array
(
[0] => vendor=Synology
[1] => model=RS818+
[2] => serial=xxxxx
[3] => version_major=6
[4] => version_minor=2
[5] => version_build=24922
[6] => admin_port=5000
[7] => secure_admin_port=5001
[8] => mac_address=xxxxxx
)
[IPv4] => Array
(
[0] => 192.168.1.105
)
[IPv6] => Array
(
[0] => fe60::cc4b:5ccf:fac7:5d82
)
)
)
*/
```
## ZC_QueryServiceType
Source: https://www.symcon.de/en/service/documentation/module-reference/core-instances/dns-sd-control/zc-queryservicetype/
`array ZC_QueryServiceType(int $InstanceID, string $RegType, string $Domain (optional))`
_Requires Symcon >= 5.3_
requests information from services of a certain type
**Parameters**
- `$InstanceID` (int): ID of the DNS-SD control to be requested
- `$RegType` (string): The RegType of the service
- `$Domain (optional)` (string): Domain of the service
**Returns** (array): Returns all found services as an array.
Domain of the service
**Example**
```php
ZC_QueryServiceType(12345, "_http._tcp", "");
// Sample output
/*
Array
(
[0] => Array
(
[Name] => NAS
[Type] => _http._tcp.
[Domain] => local.
)
)
*/
```
## ZC_QueryServiceTypes
Source: https://www.symcon.de/en/service/documentation/module-reference/core-instances/dns-sd-control/zc-queryservicetypes/
`array ZC_QueryServiceTypes(int $InstanceID)`
_Requires Symcon >= 5.3_
Queries all the services that have been set up
**Parameters**
- `$InstanceID` (int): ID of the DNS-SD control to be requested
**Returns** (array): Returns all services and information as an array.
ID of the DNS-SD control to be requested
**Example**
```php
// Request the registered services of the DNS-SD Control with the ID 12345
ZC_QueryServiceTypes(12345);
// Sample output
/*
Array
(
[0] => Array
(
[Name] => _afpovertcp
[Type] => _tcp.local.
[Domain] => .
)
[1] => Array
(
[Name] => _airplay
[Type] => _tcp.local.
[Domain] => .
)
[2] => Array
(
[Name] => _airtame
[Type] => _tcp.local.
[Domain] => .
)
[3] => Array
(
[Name] => _apple-mobdev2
[Type] => _tcp.local.
[Domain] => .
)
[4] => Array
(
[Name] => _axis-video
[Type] => _tcp.local.
[Domain] => .
)
)
*/
```
---
# Event Control
> Symcon documentation · English · generated on 2026-09-26
> Index: https://www.symcon.de/en/llms.txt
Source: https://www.symcon.de/en/service/documentation/module-reference/core-instances/event-control/
This module allows the user to react to certain events in IP-Symcon and to start a script. It is created automatically and is available to the user at any time. It can be found in the object tree at the following location:
Core Instances -> Events

The following events are available:
| Event | Description |
| ---------------------------------------------- | ---------------------------------------------------------------------------------------------------------------------------------------------------------------------------------------------------------------------------------------------------------------------------------------------------------- |
| At startup (start-script) | After IP-Symcon has started, this event is called. At this point in time, all interfaces should already be available and all devices should be able to be switched. The following [system variables](https://www.symcon.de/en/llms/concepts/automations.md) are available within the start-script. |
| When shutting down (shutdown-script) | This event is called just before IP-Symcon shuts down. At this point, all devices should still be switchable. The following [system variables](https://www.symcon.de/en/llms/concepts/automations.md) are available within the shutdown script. |
| Profile border crossing (watchdog-script) | This event is called as soon as a variable (integer/float only) comes outside the limit range of the associated variable profile. A variable must have a profile to be monitored. The following [system variables](https://www.symcon.de/en/llms/concepts/automations.md) are available within the watchdog script. |
| On status update (status event) | When the status of an instance updates, a specified script can act on that update. The following [system variables](https://www.symcon.de/en/llms/concepts/automations.md) are available within the status event script. |
> **Note:** This module should not be deleted.
> If it is deleted, it will be recreated on the next start.
---
# Location Control
> Symcon documentation · English · generated on 2026-09-26
> Index: https://www.symcon.de/en/llms.txt
Source: https://www.symcon.de/en/service/documentation/module-reference/core-instances/location-control/
_Requires Symcon >= 4.0_
### Description
The location control module offers the possibility to calculate twilight times. This simply requires the longitude and latitude of the location to be calculated.
### Integration in IP-Symcon

In the “Location” instance (“Logical Tree View” -> “Core Instances”), the longitude N and latitude E can be entered to exactly 2 decimal places. A method for determining latitude and longitude can be found under [Tips & Tricks](https://www.symcon.de/en/llms/modules/location-control.md) .
Thereby civil, nautical and astronomical twilight values for sunrise and sunset are calculated.
The two selection menus start of day and end of day form the boundary between which the boolean variable “Is it day” is set to true.

The twilight values also determine the time of recalculation. This entails that when the time for sunrise is reached, the new value for the next sunrise is calculated.
### Example
An example would be a script to move down the shutters. This is started automatically when it is executed by an event that reacts to the variable change of “Sunset”.

---
# Module Control
> Symcon documentation · English · generated on 2026-09-26
> Index: https://www.symcon.de/en/llms.txt
Source: https://www.symcon.de/en/service/documentation/module-reference/core-instances/module-control/
_Requires Symcon >= 4.0_
### Description
The "Module Control" module offers the possibility to integrate own PHP modules or ones provided by other users.
### Integration in IP-Symcon

In the "Modules" instance ("Logical tree view"->"Core instances"), a Git-Repository link/URL can be entered via "+". The module is then installed via this and is immediately available in the "Add instance" dialog. Which link is needed for which module can usually be seen in the documentation or forum entry of the module. If the data is incomplete, the respective module developer can be contacted via the forum using a private message.
### Update
The "Check for updates" button checks whether there is an update for modules that have already been added. If an update is possible, the respective module can be updated via the appearing update button. If a module is up to date, a tick is displayed instead.
### Change branch
The cogwheel next to the respective module allows to change the branch of the repository. What these are called depends on the naming by the repository creator.

### Develop individual modules
In the [developer area](https://www.symcon.de/en/llms/developer/index.md) all the information necessary to develop individual modules is available.
Further information can be found directly in the [SDK for PHP](https://www.symcon.de/en/llms/developer/sdk-tools/sdk-php.md) .
### Examples
There is a [link collection](https://community.symcon.de/t/archiv-veraltet-uebersicht-der-php-module/37958) in the forum, which lists PHP modules developed by users.
---
# Notification Control
> Symcon documentation · English · generated on 2026-09-26
> Index: https://www.symcon.de/en/llms.txt
Source: https://www.symcon.de/en/service/documentation/module-reference/core-instances/notification-control/
The Notification Control module provides a quick overview of the devices currently registered for push notifications. In the list all devices are displayed with a unique ID, the changeable name and the assigned configurators. By selecting a device and clicking the "Send test message" button, a test message can be sent to the selected device.
Push notifications can be sent via [WFC_PushNotification](https://www.symcon.de/en/llms/modules/webfront-visualization.md).
> **Warning:** Per license only one IP-Symcon server can send push notifications. Further information can be found in the [Rights of Use](https://www.symcon.de/en/llms/getting-started.md) section.
> **Note:** In order to grant IP-Symcon access to certain functions (e.g. push notifications), it may be necessary to set them up in the firewall. Further information can be found under [Firewall](https://www.symcon.de/en/llms/getting-started.md).

### Add devices
New devices can only be added via the mobile apps. To do this, the configuration of the server must be carried out again within the respective app. In the last step, when selecting the configurator, the option of activating/deactivating the notifications for each configurator prevails. As soon as the device has been registered on the server, it appears in the registered configurator and in the notification control overview.
### Rename devices
The name of a device can be changed at any time. To do this, the small arrow icon in the list must be clicked.
### Remove devices
In the Notification Control, devices can be removed from the notification completely. If devices are to be removed from an individual configurator, this can be set in the respective configurator under the "Notifications" tab.
### Reactivate server
The push notifications are sent via the IP-Symcon. For additional security, the sending server authenticates itself so that it can be clearly identified as the sender. If the server is changed, replaced, or reinstalled, reactivation may be required. This reactivation can be done every 24 hours and started using the "Reactivate server" button. You will be notified about this change by email. This is done in order to detect misuse of a license at an early stage.
#### Daily push notifications
As a standard, 250 push messages from [Notification Control](https://www.symcon.de/en/llms/modules/notification-control.md) are possible per day. These can be increased to 1000 using the [special switch](https://www.symcon.de/en/llms/developer/special-switches.md) (NotificationLimit).
> **Note:** A reactivation is required if the following error message appears: “Your server authentication token has changed. Please reactivate your server.”
---
# Presence Control
> Symcon documentation · English · generated on 2026-09-26
> Index: https://www.symcon.de/en/llms.txt
Source: https://www.symcon.de/en/service/documentation/module-reference/core-instances/presence-control/
_Requires Symcon >= 5.1_
The "Presence Control" offers the possibility to evaluate presence within an area. For this evaluation, sensors are diveded into two groups. Impulse variables trigger a signal on activation which confirms presence for a specific duration. The other group are state variables that evaluate presence by their current state.
The status variable "Presence" displays the current presence. It is set if at least one variable confirms presence within the area. Alternatively, the presence can be set manually. In this case, the set presence is held for a lock time. During this time, updates of impulse and state variables are not evaluated. The status variable "Detection" informs whether the "Presence" variable is currently locked by the lock time after a manual setting or is active, i.e., is evaluated by impulse and state variables.
### Impulse Variables
| Option | Description |
| -------- | ------------------------------------------------------------------------------------------------------------------ |
| Variable | Boolean variable that contains the impulse |
| Validity | Validity in seconds - An impulse on the variable confirms presence for this duration |
| Invert? | By default, the module reacts to variable updates to true. If "Invert?" is set, the module reacts to false instead |
If an impulse variable is updated to true (or false, if "Invert?" is set), the presence is confirmed for the validity duration.
> **Note:** Changes to the validity or removing an impulse variable does not affect current pulses. Current impulses use the settings from the time the impulse was triggered.
### State Variables
| Option | Description |
| -------- | --------------------------------------------------------------------------------------------------------------------- |
| Variable | Boolean variable that contains the state |
| Invert? | By default, presence is confirmed while the variable is true. If "Invert?" is set, the module reacts to false instead |
If a state variable is true (or false, if "Invert?" is set), the presence is confirmed.
### Lock Time
The lock time in seconds after a manual adjustment to presence can be defined here. During the lock time Presence stays at its set value. Impulses are ignored during the lock time. After the lock time, Presence is evaluated as usual.
> **Note:** A change to the lock time is only applied at the next manual adjustment. Current lock times use the settings from the time of manual adjustment.
## PC_Enter
Source: https://www.symcon.de/en/service/documentation/module-reference/core-instances/presence-control/pc-enter/
`bool PC_Enter(int $InstanceID)`
_Requires Symcon >= 5.1_
sets presence to true
**Parameters**
- `$InstanceID` (int): ID of the Presence-Control-Instance
**Returns** (bool): If the command succeeds, it returns __TRUE__, otherwise __FALSE__.
ID of the Presence-Control-Instance
**Example**
```php
// Sets Presence-Control-Instance 12345 to "true"
PC_Enter(12345);
```
## PC_Leave
Source: https://www.symcon.de/en/service/documentation/module-reference/core-instances/presence-control/pc-leave/
`bool PC_Leave(int $InstanceID)`
_Requires Symcon >= 5.1_
sets presence to false
**Parameters**
- `$InstanceID` (int): ID of the Presence-Control-Instance
**Returns** (bool): If the command succeeds, it returns __TRUE__, otherwise __FALSE__.
ID of the Presence-Control-Instance
**Example**
```php
// Sets the presence of Presence-Control-Instance 12345 to "false"
PC_Leave(12345);
```
---
# RegisterVariable
> Symcon documentation · English · generated on 2026-09-26
> Index: https://www.symcon.de/en/llms.txt
Source: https://www.symcon.de/en/service/documentation/module-reference/core-instances/registervariable/
The RegisterVariable provides a data forwarding interface and data processing interface.
### Configuration
If you have not set up your device, please follow the steps on this page: [embed devices] [2]
The RegisterVariable module connects automatically with a parent instance. You need to select parent instance or create a new one. You can also add another splitter (e.g. cutter) to synchronize the incoming data directly before evaluation.
The parent instance can be adjusted easily by using the function "Change Gateway" at the top of the configuration.

The execution of scripts is __serial__. It means that you do not have to protect your scripts with semaphores.
### Date processing
If the the parent instance (communication interface) receives new data, the target script of the RegisterVariable instance will be run. In this the received data over $ _IPS ['VALUE'] is available.
There are data sources that provide a meaningful evaluation after receiving several data transmissions. Therefore, the received data is temporarily stored. Problem can occur, if you store binary data in a normal string variable in IP-Symcon (defective IP-Symcon configuration). There is the function RegVar_SetBuffer (integer $InstanzID, string $buffer) that stores the data in the buffer associated to the RegisterVariable instance. The data stored in the buffer can be read with the function RegVar_GetBuffer (integer $InstanzID). The function RegVar_SendText (integer $InstanzID, string $ text) can send data strings over the communication interface. Internally, the appropriate transmission function (e.g. COMPort_SendText) is executed.
> **Note:** The buffer is cleared after restarting IP-Symcon
> **Warning:** Please DO NOT use VARIABLE as a buffer. Otherwise, it may cause instability within IP-Symcon and at worst cause a completely destroyed configuration. Since this problem can also affect the incremental backup folder, you may not even have a backup configuration. Take advantage of the internal buffer of the instance, to cache data.
> [RegVar_SetBuffer](https://www.symcon.de/en/llms/modules/registervariable.md) / [RegVar_GetBuffer](https://www.symcon.de/en/llms/modules/registervariable.md)
### Example
The following example chaines received data and gives out by ; separated records at completion:
```php
// wenn das Skript von einer RegisterVariable-Instanz aus aufgerufen worden ist
if ($_IPS['SENDER'] == "RegisterVariable")
{
// bereits im Puffer der Instanz vorhandene Daten in $data kopieren
$data = RegVar_GetBuffer($_IPS['INSTANCE']);
// neu empfangene Daten an $data anhängen
$data .= $_IPS['VALUE'];
// wenn das Trennzeichen ; in $data gefunden worden ist
if (strpos($data, ';'))
{
// $data in durch ; separierte Datensätze zerlegen
$datasets = explode(';', $data);
// alle nicht durch ; terminierten Datensätze ausgeben
for ($i = 0; $i < count($datasets) - 1; $i++)
{
echo "empfangener Datensatz: ".$datasets[$i]."\n";
}
// $data auf den Inhalt des letzten (unvollständigen) Datensatzes setzen
$data = $datasets[count($datasets) - 1];
}
// Inhalt von $data im Puffer der RegisterVariable-Instanz speichern
RegVar_SetBuffer($_IPS['INSTANCE'], $data);
}
```
Following example chaines received data and outputs blocks from a length of exactly 16 characters:
```php
// wenn das Skript von einer RegisterVariable-Instanz aus aufgerufen worden ist
if ($_IPS['SENDER'] == "RegisterVariable")
{
// bereits im Puffer der Instanz vorhandene Daten in $data kopieren
$data = RegVar_GetBuffer($_IPS['INSTANCE']);
// neu empfangene Daten an $data anhängen
$data .= $_IPS['VALUE'];
// wenn $data mindestens 16 Zeichen lang ist
if (strlen($data) >= 16)
{
// $data in Blöcke von bis zu 16 Zeichen zerlegen
$datasets = str_split($data, 16);
// $data leeren
$data = "";
// alle Datensätze durcharbeiten
for ($i = 0; $i < count($datasets); $i++)
{
// vollständige Datensätze (genau 16 Zeichen lang) ausgeben
if (strlen($datasets[$i]) == 16)
{
echo "empfangener Datensatz: ".$datasets[$i]."\n";
}
else
{
// Unvollständige Datensätze in $data schreiben
$data = $datasets[$i];
}
}
}
// Inhalt von $data im Puffer der RegisterVariable-Instanz speichern
RegVar_SetBuffer($_IPS['INSTANCE'], $data);
}
```
## RegVar_GetBuffer
Source: https://www.symcon.de/en/service/documentation/module-reference/core-instances/registervariable/regvar-getbuffer/
`bool RegVar_GetBuffer(int $InstanceID)`
**Parameters**
- `$InstanceID` (int): ID of the device to be switched
**Returns** (bool): String of the current buffer
ID of the device to be switched
**Example**
```php
$buf = RegVar_GetBuffer(12345);
$buf .= $_IPS['VALUE']; //Concatenating
//verarbeiten ...
RegVar_SetBuffer(12345, $buf); //Write back remaining buffer
```
## RegVar_SendEvent
Source: https://www.symcon.de/en/service/documentation/module-reference/core-instances/registervariable/regvar-sendevent/
`bool RegVar_SendEvent(int $InstanceID, int $ReportID, string $Text)`
_Requires Symcon >= 4.1_
sends an event to the parent HID instance
**Parameters**
- `$InstanceID` (int): ID of the RegisterVariable-Instance
- `$ReportID` (int): The record type as ReportID
- `$Text` (string): Buffer to send
**Returns** (bool): If the command succeeds, it returns __TRUE__, otherwise __FALSE__.
Buffer to send
**Example**
```php
//Send an event “Hello World” to the parent instance with the ReportID 0
RegVar_SendEvent(12345, 0, "Hello World");
```
## RegVar_SendPacket
Source: https://www.symcon.de/en/service/documentation/module-reference/core-instances/registervariable/regvar-sendpacket/
`bool RegVar_SendPacket(int $InstanceID, string $Text, string $ClientIP, string $ClientPort)`
_Requires Symcon >= 4.1_
sends a data packet to the specified IP address
**Parameters**
- `$InstanceID` (int): ID of the RegisterVariable-Instance
- `$Text` (string): Buffer to send
- `$ClientIP` (string): IP address to send to
- `$ClientPort` (string): Port to send to
**Returns** (bool): If the command succeeds, it returns __TRUE__, otherwise __FALSE__.
Port to send to
**Example**
```php
// Sends the packet "Hello World" via ServerSocket to IP:Port 192.168.1.2:1234
RegVar_SendPacket(12345, "Hello World", "192.168.1.2", 1234);
```
## RegVar_SendText
Source: https://www.symcon.de/en/service/documentation/module-reference/core-instances/registervariable/regvar-sendtext/
`bool RegVar_SendText(int $InstanceID, string $Text)`
sends data to the parent instance
**Parameters**
- `$InstanceID` (int): ID of the device to be switched
- `$Text` (string): Buffer to be sent
**Returns** (bool): If the command succeeds, it returns __TRUE__, otherwise __FALSE__.
Buffer to be sent
**Example**
```php
RegVar_SendText(12345, "Hallo World");
```
## RegVar_SetBuffer
Source: https://www.symcon.de/en/service/documentation/module-reference/core-instances/registervariable/regvar-setbuffer/
`bool RegVar_SetBuffer(int $InstanceID, string $Buffer)`
sets the internal buffer
**Parameters**
- `$InstanceID` (int): ID of the device to be switched
- `$Buffer` (string): Data to be written into the buffer
**Returns** (bool): If the command succeeds, it returns __TRUE__, otherwise __FALSE__.
Data to be written into the buffer
**Example**
```php
$buf = RegVar_GetBuffer(12345);
$buf .= $_IPS['VALUE']; //Concatenating
//verarbeiten ...
RegVar_SetBuffer(12345, $buf); //Write back remaining buffer
```
---
# Skin Control
> Symcon documentation · English · generated on 2026-09-26
> Index: https://www.symcon.de/en/llms.txt
Source: https://www.symcon.de/en/service/documentation/module-reference/core-instances/skin-control/
_Requires Symcon >= 4.0_
### Description
The "Skin Control" module offers the possibility to integrate individual skins or those provided by other users.
### Integration in IP-Symcon
In the "Modules" instance ("Logical tree view"->"Core instances"), a Git repository link can be entered via "Add". Here, the skin is then installed and is immediately available.

### Update
The "Check for updates" button checks whether an update for already added skins is available. If an update is possible, the respective skin can be updated via the displayed update button. If a skin is up to date, a green tick is displayed instead.
### Choose login skin
Separate to the respective WebFront skins, which are selected in the respective WebFront configurator, the skin of the login area of the WebFront can also be changed. This can be set via selection in the skin control.
### Develop individual skins
Information on developing individual skins can be found here:
[SDK for Skins](https://www.symcon.de/en/llms/developer/sdk-tools.md)
### Examples
The following skins are maintained and provided by us:
* DarkSkin: [https://github.com/symcon/SkinDark](https://github.com/symcon/SkinDark)
* LightSkin: [https://github.com/symcon/SkinLight](https://github.com/symcon/SkinLight)
---
# SSDP Control
> Symcon documentation · English · generated on 2026-09-26
> Index: https://www.symcon.de/en/llms.txt
Source: https://www.symcon.de/en/service/documentation/module-reference/core-instances/ssdp-control/
The SSDP (Simple Service Discovery Protocol) control module allows searching for UPnP devices in the network.
SSDP is a UDP-based protocol that allows UPnP devices to identify themselves in the network and communicate only the most important information. These include, for example, device name, device type, or a URL describing the device.
> **Note:** Further information can be found for example on [Wikipedia](https://en.wikipedia.org/wiki/Simple_Service_Discovery_Protocol)
### Installation
The SSDP Control is automatically installed as a core instance. This can be found in the object tree under core instances.
### Configuration
The module does not require any further configuration. By default it uses port 1900 to search for devices.
## YC_SearchDevices
Source: https://www.symcon.de/en/service/documentation/module-reference/core-instances/ssdp-control/yc-searchdevices/
`array YC_SearchDevices(int $InstanceID, string $SearchTarget)`
_Requires Symcon >= 5.3_
sends a request to the local network
**Parameters**
- `$InstanceID` (int): ID of the SSDP control to be requested
- `$SearchTarget` (string): .
**Returns** (array): Returns all information about found devices as an array.
.
**Example**
```php
YC_SearchDevices(27253, "ssdp:all");
// Sample output
var_dump(YC_SearchDevices(27253, "ssdp:all"));
/*
array(97) {
[...]
[11]=>
array(9) {
["CacheControl"]=>
string(14) "max-age = 1800"
["Date"]=>
string(0) ""
["Ext"]=>
string(0) ""
["Location"]=>
string(52) "http://172.17.31.142:1400/xml/device_description.xml"
["Server"]=>
string(38) "Linux UPnP/1.0 Sonos/53.2-70210 (ZPS5)"
["ST"]=>
string(47) "urn:schemas-upnp-org:service:DeviceProperties:1"
["USN"]=>
string(78) "uuid:RINCON_000E58507DEA01400::urn:schemas-upnp-org:service:DeviceProperties:1"
["Fields"]=>
array(5) {
[0]=>
string(52) "X-RINCON-HOUSEHOLD: HHID_tZkieK2lkPYES3tycishsbwfXIz"
[1]=>
string(21) "X-RINCON-BOOTSEQ: 636"
[2]=>
string(20) "X-RINCON-WIFIMODE: 0"
[3]=>
string(19) "X-RINCON-VARIANT: 0"
[4]=>
string(83) "HOUSEHOLD.SMARTSPEAKER.AUDIO: HHID_tZkieK2lkPYES3tycishsbwfXIz.hPqvaa7W35eMY2P3XidJ"
}
["IPv4"]=>
string(13) "172.17.31.142"
)
[...]
}
*/
```
---
# System Information
> Symcon documentation · English · generated on 2026-09-26
> Index: https://www.symcon.de/en/llms.txt
Source: https://www.symcon.de/en/service/documentation/module-reference/core-instances/system-information/
With the system features, you can read out information over your system and the existing hardware to visualize it or otherwise use it in scripts.
## Sys_GetBattery
Source: https://www.symcon.de/en/service/documentation/module-reference/core-instances/system-information/sys-getbattery/
`array Sys_GetBattery()`
displays information about the battery
**Returns** (array): Array with information about the battery
Gives information about the presence of a battery, whether it is in use and what percentage of the battery charge is left. The remaining time and maximum battery life are indicated in seconds.
**Example**
```php
print_r(Sys_GetBattery());
/*
// Sample output on a desktop PC without battery
// HasBattery is available with IP-Symcon 7.0+
Array
(
[HasBattery] =>
[OnBattery] =>
[IsCharging] =>
[BatteryLevel] => -1
[BatteryRemainingTime] => -1
[BatteryMaxTime] => -1
)
*/
```
## Sys_GetCPUInfo
Source: https://www.symcon.de/en/service/documentation/module-reference/core-instances/system-information/sys-getcpuinfo/
`array Sys_GetCPUInfo()`
shows the CPU usage
**Returns** (array): Array with information about CPU utilization
Provides for each CPU the current load (CPU_ *) and the average load of the last 60 seconds for all CPU cores (CPU_AVG). The average load is calculated by taking a measurement of each second of the value of the current load and is stored afterwards.The average load is calculated by adding the last 60 measured values and then divided by 60.
> **Note:** The average load is not the average load of the current load, but the average load of the last 60 seconds.
**Example**
```php
print_r(Sys_GetCPUInfo());
/*
Array
(
[CPU_0] => 3
[CPU_AVG] => 3
)
*/
```
## Sys_GetHardDiskInfo
Source: https://www.symcon.de/en/service/documentation/module-reference/core-instances/system-information/sys-getharddiskinfo/
`array Sys_GetHardDiskInfo()`
shows the hard disk space/usage
**Returns** (array): Array of information about all the hard drives
Provides information on the existing disks in the system, including the size and the already used memory.
**Example**
```php
print_r(Sys_GetHarddiskInfo());
/*
Array
(
[HDD0] => Array
(
[LETTER] => c:\
[LABEL] =>
[TOTAL] => 53684989952
[FREE] => 23275171840
)
[NUMDRIVES] => 1
)
*/
```
## Sys_GetMemoryInfo
Source: https://www.symcon.de/en/service/documentation/module-reference/core-instances/system-information/sys-getmemoryinfo/
`array Sys_GetMemoryInfo()`
shows the memory usage
**Returns** (array): Array of information on the overall memory usage and virtual memory usage
Provides information about the memory usage of the operating system.
**Example**
```php
print_r(Sys_GetMemoryInfo());
/*
Array
(
[TOTALPHYSICAL] => 1072467968
[AVAILPHYSICAL] => 526647296
[TOTALPAGEFILE] => 2420019200
[AVAILPAGEFILE] => 1386422272
[TOTALVIRTUAL] => 2147352576
[AVAILVIRTUAL] => 1906978816
)
*/
```
## Sys_GetNetworkInfo
Source: https://www.symcon.de/en/service/documentation/module-reference/core-instances/system-information/sys-getnetworkinfo/
`array Sys_GetNetworkInfo()`
shows information about the network adapters
**Returns** (array): Array with information about all network adapters
Provides information about all network adapters.
**Example**
```php
print_r(Sys_GetNetworkInfo());
/*
// Example output
Array
(
[0] => Array
(
[InterfaceIndex] => 10
[IP] => 192.168.1.2
[MAC] => 00:A0:03:AD:14:BD
[Description] => Siemens I BT USB Remote NDIS Network Device
[Speed] => 9728000
[InTotal] => 40236
[OutTotal] => 247248
)
[1] => Array
(
[InterfaceIndex] => 13
[IP] => 172.12.1.200
[MAC] => 00:A0:03:AD:14:BD
[Description] => Qualcomm Atheros AR8151 PCI-E Gigabit Ethernet Controller (NDIS 6.30)
[Speed] => 1000000000
[InTotal] => 169987950
[OutTotal] => 86029648
)
)
*/
```
## Sys_GetProcessInfo
Source: https://www.symcon.de/en/service/documentation/module-reference/core-instances/system-information/sys-getprocessinfo/
`array Sys_GetProcessInfo()`
lists all processes
**Returns** (array): Array of information, such as e.g. Memory usage and number of threads
Provides information about the process of IP Symcon.
**Example**
```php
print_r(Sys_GetProcessInfo());
/*
Array
(
[IPS_HANDLECOUNT] => 635
[IPS_NUMTHREADS] => 53
[IPS_VIRTUALSIZE] => 240373760
[IPS_WORKINGSETSIZE] => 32706560
[IPS_PAGEFILE] => 52719616
[PROCESSCOUNT] => 53
)
*/
```
## Sys_GetSpooler
Source: https://www.symcon.de/en/service/documentation/module-reference/core-instances/system-information/sys-getspooler/
`array Sys_GetSpooler()`
displays information about the printer queues
**Returns** (array): Array of information about all the printing queues and being printed documents
Provides information about all print queues
> **Warning:** This function only works in Windows
**Example**
```php
print_r(Sys_GetSpooler());
```
## Sys_GetURLContent
Source: https://www.symcon.de/en/service/documentation/module-reference/core-instances/system-information/sys-geturlcontent/
`string Sys_GetURLContent(string $URL)`
reads the content from an URL as String
**Parameters**
- `$URL` (string): Complete URL
**Returns** (string): If the command was executed successfully, it returns the result of the website contents (including binary code), otherwise __FALSE__.
Complete URL
**Example**
```php
echo Sys_GetURLContent("http://www.google.de");
```
## Sys_GetURLContentEx
Source: https://www.symcon.de/en/service/documentation/module-reference/core-instances/system-information/sys-geturlcontentex/
`string Sys_GetURLContentEx(string $URL, array $Parameter)`
Reads the contents of the __URL__ and returns it as a return value. Here, some __Parameter__ for timeouts, authentication and proxy are made.
-
**Parameters**
- `$URL` (string): Complete URL
- `$Parameter` (array)
Array with index => value pairs
| Index | Type | Description |
| ---------- | ------- | ------------------------------------------------------------------------------------------- |
| Timeout | Integer | __Default = 10000__. Timeout in milliseconds |
| AuthUser | String | __Default = ""__. Username for basic authentication |
| AuthPass | String | __Default = ""__. Password for basic authentication |
| VerifyPeer | Boolean | __Default = true__. Verify that hosts SSL certificate is correct |
| VerifyHost | Boolean | __Default = true__. Verify that host URL from the SSL certificate matches the property Host |
**Returns** (string): If the command was executed successfully, it returns the result of the website contents (including binary code), otherwise __FALSE__.
Array with index => value pairs
| Index | Type | Description |
| ---------- | ------- | ------------------------------------------------------------------------------------------- |
| Timeout | Integer | __Default = 10000__. Timeout in milliseconds |
| AuthUser | String | __Default = ""__. Username for basic authentication |
| AuthPass | String | __Default = ""__. Password for basic authentication |
| VerifyPeer | Boolean | __Default = true__. Verify that hosts SSL certificate is correct |
| VerifyHost | Boolean | __Default = true__. Verify that host URL from the SSL certificate matches the property Host |
**Example**
```php
echo Sys_GetURLContentEx("http://www.google.de", Array("AuthUser"=> "test", "AuthPass"=> "test"));
```
## Sys_Ping
Source: https://www.symcon.de/en/service/documentation/module-reference/core-instances/system-information/sys-ping/
`bool Sys_Ping(string $Host, int $Timeout)`
sends a ping to a network device
**Parameters**
- `$Host` (string): Hostname or IP address
- `$Timeout` (int): Time in milliseconds
**Returns** (bool): If the command succeeds, it returns __TRUE__, otherwise __FALSE__.
Time in milliseconds
**Example**
```php
Sys_Ping("meinrechner", 1000); //Wait max. 1 second
```
---
# Tailscale VPN
> Symcon documentation · English · generated on 2026-09-26
> Index: https://www.symcon.de/en/llms.txt
Source: https://www.symcon.de/en/service/documentation/module-reference/core-instances/tailscale-vpn/
_Requires Symcon >= 7.1_
This module offers the possibility to use Tailscale VPN on the SymBox.
> **Note:** This module is only available for the SymBox!
### Range of functions
- Downloading and updating Tailscale VPN
- Authentication via Auth Keys
- Access via VPN to the SymBox (incl. SSH)
- Access to devices behind the SymBox (subnets)
- Activate/deactivate VPN via variable
### Software installation
- Install the 'Tailscale VPN' module via the Module Store.
### Set up the instances in IP-Symcon
- Under "Add instance" the 'Tailscale VPN' module can be found using the quick filter.
- Further information on adding instances in the [Documentation of the instances](https://www.symcon.de/de/service/dokumentation/grundlagen/instanzen/#Instanz_erstellen)
### Set up Tailscale
- Create Auth Key: https://login.tailscale.com/admin/settings/keys
- Open Tailscale instance
- Press the buttons to download, install and start Tailscale.
- The authentication can then be carried out using the Auth Key created at the beginning. The Auth Key is no longer required afterwards and does not need to be saved anywhere.
### share network
- Switch the VPN in IP-Symcon off and on again.
- To access devices behind the SymBox, the "Advertise Routes" function must be set up
- To do this, enter the subnet e.g. 192.168.178.0/24 in the CIDR notation in the list and accept the configuration.
- The routes must still be activated in the Tailscale Dashboard. To do this, open the following page: https://login.tailscale.com/admin/machines
- Select the correct machine there, click Review and confirm the activation of the subnet.
#### Configuration page
| Name | Description |
| ---------------- | ---------------------------------------------------------- |
| Advertise Routes | Subnet to be shared in CIDR notation e.g. 192.168.178.0/24 |
---
# TextParser
> Symcon documentation · English · generated on 2026-09-26
> Index: https://www.symcon.de/en/llms.txt
Source: https://www.symcon.de/en/service/documentation/module-reference/core-instances/textparser/
The TextParser is a module that provide text snippets from websites or files.
### Integration into IP-Symcon
The TextParser can be searched and added as instance via the "+" in the Object Tree. Within the configuration of the TextParser, a gateway that provides the raw text can be selected via "Change Gateway". For example, an [HTTP Client](https://www.symcon.de/en/llms/modules/httpclient.md) can be selected.
### Description
The TextParser in IP-Symcon allows to cut off certain parts e.g. of a web page or a file by executing several rules consecutively. The following rules are available:
| Function | Description |
| -------------------- | ----------------------------------------------------------------- |
| __Cut Before__ | Cuts off all text before Tag1 |
| __Cut After__ | Cuts off all text after Tag1 |
| __Get Text__ | Brings all text until Tag1 in the variable |
| __Get Text Between__ | Cuts the text between Tag1 and Tag2 and writes it in the variable |
Multiple rules can be applied consecutively and even additional "Get Text" - "Get Text Between" operations can be used.
### Example
A small example will show how to read the first headline of heise.de to show it e.g. in the Visualization.
1. Create a Text Parser.
2. Next, create a parent instance. In this example, a [HTTP Client](https://www.symcon.de/en/llms/modules/httpclient.md) is required.
3. In the HTTP Client, the URL [https://www.heise.de](https://www.heise.de) must be entered and eventually the timer activatec, which requests the page cyclically.
4. Back in the Text Parser, the HTTP Client needs to be configured as Gateway. It can be selected via "Change Gateway".
5. In the Text Parser, the following rules need to be defined to read the title.
These rules can be deducted by looking at the HTML Code that is read by the HTTP Client. In the code, it should be searched for significant parts, that should be cut. This is repeated until the desired text remains. Those rules are the entered into IP-Symcon.
6. With "Get Text" a variable is defined where the completely cur text is saved.
### Rules
| Description | Rule |
| --------------- | --------- |
| Cut Text Before | |
| Get Text | |
### Screenshot

---
# Translation Control
> Symcon documentation · English · generated on 2026-09-26
> Index: https://www.symcon.de/en/llms.txt
Source: https://www.symcon.de/en/service/documentation/module-reference/core-instances/translation-control/
_Requires Symcon >= 7.1_
> **Note:** The translation module is a paid extension that can be purchased for any existing Symcon license. With each Symcon license, up to 10 strings per language can be translated free of charge. The extension can be purchased directly in the [Shop.](https://www.symcon.de/en/shop/enterprise/ips-enterprise-localization)
> **Note:** It is recommended to translate from English into different languages. Therefore, the Symcon system should be run in English. The language of the operating system can be changed for this purpose. If the device on which Symcon is installed is not to be influenced, the special switch Locale can be set to en
The translation control allows any text in Symcon to be translated into different languages.
The various translations can be adapted here at any time. The entire system can be automatically translated using the service [DeepL](https://www.deepl.com/de/translator). An API key from [DeepL](https://www.deepl.com/de/pro-api) is required for this. The translations apply to both the console and the visualization.

### Add language
A new language can be added with the corresponding ISO language code.
### Actions
| Action | Description |
| --------------- | --------------------------------------------------------------------------------------------------------------------------------------------------------- |
| Auto update | Adds all texts from the system to the translation table. These can be translated manually or automatically. |
| Auto translate | All values of the 'Original text' column that do not have the status 'Unused' are translated using DeepL and transferred to the 'Translated text' column. |
| Cleanup | All entries that are no longer in the system are removed |
| Delete language | Deletes the translation table |
### Translation table
| Column | Description |
| -------------------------- | ----------------------------------------------------------------------------------------------------------------------------------------------------------------------------------------------------------------------------------------------------------- |
| Source text | The text found in the system and used for the translation with DeepL |
| Translated text | Initially empty. Can be filled manually or by the automatic translation. If the field is empty, the original text is displayed. |
| Reference | Shows whether the text originates from a profile or object and whether it is, for example, an object name or the suffix of a profile trade. This context can be used to improve the translation. |
| Status (New, Unused, Done) | The current status of the individual translations. New is set when the translation is initially recognized. If the translation has been successfully completed, the status is set to Finished. Entries with the status Unused are not sent for translation. |
---
# Util Control
> Symcon documentation · English · generated on 2026-09-26
> Index: https://www.symcon.de/en/llms.txt
Source: https://www.symcon.de/en/service/documentation/module-reference/core-instances/util-control/
This module is an interface between the service and the IP-Symcon console. It allows advanced features such as finding and replacing in files.
> **Note:** This module should not be deleted.
> If it is cleared, the next time it will be re-created.
---
# WebHook Control
> Symcon documentation · English · generated on 2026-09-26
> Index: https://www.symcon.de/en/llms.txt
Source: https://www.symcon.de/en/service/documentation/module-reference/core-instances/webhook-control/
_Requires Symcon >= 4.0_
### Description
The WebHook Control module offers the possibility to call up scripts via a browser. Calls outside the local network are also possible via the Symcon Connect service.
It also offers the option of supplying data to the script.
> **Note:** Scripts executed by the WebHook include these [Systemvariables](https://www.symcon.de/en/llms/concepts/automations.md)

#### Determine the best WebHook
The called hook must not match exactly. The **Best Match**, which is the **longest match**, will always be used. This means that the hook path can be shorter than the hook called, for example, in the browser.
Example Configuration:
* Hook: /hook/ocpp, Target: 12345
* Hook: /hook/ocpp/extra, Target: 55555
Example Calls:
* Call: /hook/ocpp, Best Match: 12345
* Call: /hook/ocpppui, Best Match: 12345
* Call: /hook/ocpp/wallbox1, Best Match: 12345
* Call: /hook/ocpp/extra, Best Match: 55555
* Call: /hook/tester, No Match
#### WebSocket Support
Since Symcon Version 5.2, the WebHook Control uses WebSockets and thus enables real-time transmission.
Received data can be recorded and output as follows:
```php
// When receiving, the data end up in the php://input stream.
IPS_LogMessage("WebSocket", file_get_contents("php://input"));
```
### Integration in Symcon
The WebHook Control is one of the core instances and can therefore be configured immediately.
Within a browser, the respectively linked script can be called with "IP:PORT/hook/HOOKNAME".
To set up a hook, "Add" of the first list must be clicked on in the "WebHook Control" instance. The call name of the hook must first be entered and then the script to be executed by the hook must be selected.
> **Note:** Calls via [Connect Control](https://www.symcon.de/en/llms/modules/connect-control.md) are also possible.
### Example
#### Script call
The sample script to be called is "WebHook TestScript" with ObjectID "35909".
```php
IPS_LogMessage("WebHook GET", print_r($_GET, true));
IPS_LogMessage("WebHook POST", print_r($_POST, true));
IPS_LogMessage("WebHook IPS", print_r($_IPS, true));
IPS_LogMessage("WebHook RAW", file_get_contents("php://input"));
echo "Message: " . $_GET['Message'];
```
The call and the result would be as follows:

The data is passed to the script in arrays at Symcon.

### Authentication
An example of how automatic authentication was implemented via the Control module.
"Symcon" was selected as the user name and "password" was selected as the password.
> **Warning:** Authentication is always recommended to prevent unauthorized access to Symcon from outside.
___Source code___
```php
if(!isset($_SERVER['PHP_AUTH_USER']))
$_SERVER['PHP_AUTH_USER'] = "";
if(!isset($_SERVER['PHP_AUTH_PW']))
$_SERVER['PHP_AUTH_PW'] = "";
if(($_SERVER['PHP_AUTH_USER'] != "Symcon") || ($_SERVER['PHP_AUTH_PW'] != "passwort")) {
header('WWW-Authenticate: Basic Realm="Geofency WebHook"');
header('HTTP/1.0 401 Unauthorized');
echo "Authorization required";
return;
}
echo "Welcome to the protected area";
```
If the hook is called, the query for username and password appears. And the data is sent to the script via $post array.

### Integration via PHP-Module
In addition to the call via script, it is also possible to react to hook calls within a PHP module using the [ProcessHookData](https://www.symcon.de/en/llms/developer/sdk-tools/sdk-php/module.md) function.
To do this, a hook is registered per [RegisterHook](https://www.symcon.de/en/llms/developer/sdk-tools/sdk-php/module.md) on the own InstanceID. Subsequently, the "ProcessHookData()" function is automatically called by the Hook Control.
### Example
The example [HookServe](https://github.com/symcon/SymconTest/blob/master/HookServeSimpleStrict/module.php) contains the source code for the complete handling of a WebHook via PHP module with the modern IPSModuleStrict. Usage with the old IPSModule is listed here: [HookServe (Legacy)](https://github.com/symcon/SymconTest/blob/master/HookServeSimple/module.php)
## WC_PushMessage
Source: https://www.symcon.de/en/service/documentation/module-reference/core-instances/webhook-control/wc-pushmessage/
`bool WC_PushMessage(int $InstanceID, string $HookPath, string $Message)`
_Requires Symcon >= 5.2_
sends a WebSocket message to all connected clients
**Parameters**
- `$InstanceID` (int): ID of the WebHook Control
- `$HookPath` (string): Path of the hook
- `$Message` (string): Message to send
**Returns** (bool): If the command succeeds, it returns __TRUE__, otherwise __FALSE__.
Message to send
**Example**
```php
// Sends "Hello World" to the "test" hook of the WebHook Control with ID 12345
WC_PushMessage(12345, "/hook/test", "Hello World");
```
## WC_PushMessageEx
Source: https://www.symcon.de/en/service/documentation/module-reference/core-instances/webhook-control/wc-pushmessageex/
`bool WC_PushMessageEx(int $InstanceID, string $HookPath, string $Text, string $DestinationAddress, int $DestinationPort)`
_Requires Symcon >= 5.3_
sends a WebSocket message to a specific client
**Parameters**
- `$InstanceID` (int): ID des WebHook Control
- `$HookPath` (string): Path of the hook
- `$Text` (string): Message to send
- `$DestinationAddress` (string): IP address to send to
- `$DestinationPort` (int): Port to send to
**Returns** (bool): If the command succeeds, it returns __TRUE__, otherwise __FALSE__.
Port to send to
**Example**
```php
// Sends "Hello World back" to the "test" hook of the WebHook Control with ID 12345. In addition, the client with the address $_SERVER["REMOTE_ADDR"] and port $_SERVER["REMOTE_PORT"] is determined as the recipient.
WC_PushMessageEx(12345, "/hook/test", "Hello world back", $_SERVER["REMOTE_ADDR"], $_SERVER["REMOTE_PORT"]);
```
---
# WebServer
> Symcon documentation · English · generated on 2026-09-26
> Index: https://www.symcon.de/en/llms.txt
Source: https://www.symcon.de/en/service/documentation/module-reference/core-instances/webserver/
The WebServer module in IP-Symcon is used to make the Visualization available via another port. By default, the Visualization is available via port 3777. In particular, another WebServer is advantageous if SSL encryption is to be used.
Optionally, it is possible to enable basic authentication, which provides additional protection for the "user" folder.
> **Note:** Scripts executed by the WebServer include these [system variables](https://www.symcon.de/en/llms/concepts/automations.md) .
> **Note:** The JSON-RPC API (/api/) is available on any WebServer and is secured by [remote access](https://www.symcon.de/en/llms/components/remote-access.md). Since IP-Symcon 4.0, the WebHooks (/hook/) are also available, each of which is secured by the authentication of the respective WebHook.
> **Note:** Since version 4.0, the WebServer is no longer added automatically. To be able to use it, it must be added via "Add object -> Add instance -> WebServer"
> **Warning:** Basic authentication applies to the "user" folder only. The start page with the list of available configurators is always accessible without a password. If a Visualization password is to be assigned for each Visualization configurator, this can be set up in the configuration of the respective Visualization configurator
### SSL Encryption
To use SSL, at least the certificate and the private key are required.
| Option | Description |
| ---------------------------------- | ------------------------------------------------------------------------------------------------------------------ |
| Certificate | Selection of the *.pem file containing the certificate |
| Private key | Selection of the *.pem file containing the private key |
| Certification body (optional) | Selection of the *.pem file which contains the certification authority for a trusted access |
| DH parameters (optional) | Select the dhparam.pem file for the Diffie-Hellman parameter which prevents a logjam. This brings increased safety |

#### Create certificate
Using OpenSSL, certificates and private keys can be created.
```php
// Generate a private key
openssl genrsa -out pk.pem 1024
// Create a certificate signing request
openssl req -new -key pk.pem -out req.csr
// Self-sign the csr
openssl x509 -req -days 3650 -in req.csr -signkey pk.pem -out cert.pem
```
> **Note:** For a Browser to accept a certificate, IP-Symcon must be accessible via a public domain and a certificate issued by a recognized certificate authority must be present.
### "user" Folder
The "user" folder contains user-defined contents of IP-Symcon (e.g. additional display scripts).
The path to this folder depends on the operating system used.
* SymBox: /var/lib/symcon/webfront/user/
* Windows: C:\ProgramData\Symcon\webfront\user\
* MacOS: /Library/Application Support/Symcon/webfront/user/
* Linux: /var/lib/symcon/webfront/user/
* Raspberry Pi: /var/lib/symcon/webfront/user/
> **Warning:** If files are stored under another path, they will be deleted automatically during the next update of IP-Symcon. This is the only way to ensure that the installation of IP-Symcon always remains free of file version conflicts.
> **Note:** Up to and including IP-Symcon 6.4 the paths were the following:
>
> * SymBox: /var/lib/symcon/user/
> * Windows: C:\ProgramData\Symcon\user\
> * MacOS: /Library/Application Support/Symcon/user/
> * Linux: /var/lib/symcon/user/
> * Raspberry Pi: /var/lib/symcon/user/
### Protect "user" folder
If the content has been stored in the special "user" folder, it is advisable to activate basic-authentication. In this way, these contents are additionally protected and require the respective username/password combination within the Visualization or the mobile Apps.
The authentication setup is located at the [Special Switches](https://www.symcon.de/en/llms/developer/special-switches.md).
> **Warning:** If the authentication base has been activated in a previous IP-Symcon version (up to and including 5.0) in a web server, this is valid until it is deactivated.
### Log files
The option "Create log files" creates a file named access_12345.log in the "logs" directory of IP-Symcon for each WebServer, where the number 12345 stands for the InstanceID of the WebServer.
The created log files are Webalizer compatible and can thus be evaluated graphically.
The path to this folder depends on the operating system used.
* SymBox: /var/log/symcon/
* Windows: C:\ProgramData\Symcon\logs\
* MacOS: /Library/Logs/Symcon/
* Linux: /var/log/symcon/
* Raspberry Pi: /var/log/symcon/
### Tips and tricks
[Forum: "Order SSL certificate and set it up in IP-Symcon"](https://community.symcon.de/t/ssl-zertifikat-bestellen-und-in-ip-symcon-einrichten/37272)
---
# Client Socket
> Symcon documentation · English · generated on 2026-09-26
> Index: https://www.symcon.de/en/llms.txt
Source: https://www.symcon.de/en/service/documentation/module-reference/i-o-instances/clientsocket/
_Requires Symcon >= 2.0_
The client socket opens an interface, which is often used for communication between the gateway/ splitter instance and the connected device. It uses the TCP protocol.
### Integration in IP-Symcon
On the configuration page, the IP/ host name must be specified under "Host" and the port of the device to be controlled under "Port".
If SSL is activated, it can also be selected whether the host or peer should be checked.
Only a click on "Apply" saves the settings and then an attempt is made to establish the connection.

## CSCK_SendText
Source: https://www.symcon.de/en/service/documentation/module-reference/i-o-instances/clientsocket/csck-sendtext/
`bool CSCK_SendText(int $InstanceID, string $Text)`
_Requires Symcon >= 2.0_
sends a string to the I/O
**Parameters**
- `$InstanceID` (int): ID of the client socket to be updated
- `$Text` (string): The string to be sent
**Returns** (bool): If the command succeeds, it returns __TRUE__, otherwise __FALSE__.
The string to be sent
**Example**
```php
CSCK_SendText(12345, "Any data record"); // Sends the text "Any data record" on the client socket with the ID 12345
```
---
# HID
> Symcon documentation · English · generated on 2026-09-26
> Index: https://www.symcon.de/en/llms.txt
Source: https://www.symcon.de/en/service/documentation/module-reference/i-o-instances/hid/
_Requires Symcon >= 2.0_
The HID (Human Interface Device) opens a USB interface, which is often used for communication between the gateway/ splitter instance and the connected device.
### Integration in IP-Symcon
The device to be controlled must be specified on the configuration page under "Device".
Checking "Open HID device" sets the connection to active after "Apply".
All settings/changes are only saved after "Apply" is clicked.

## HID_SendEvent
Source: https://www.symcon.de/en/service/documentation/module-reference/i-o-instances/hid/hid-sendevent/
`bool HID_SendEvent(int $InstanceID, int $ReportID, string $Text)`
_Requires Symcon >= 2.0_
sends a string to the I/O
**Parameters**
- `$InstanceID` (int): ID of the HID to be updated
- `$ReportID` (int): ID of the ReportID to be sent
- `$Text` (string): The string to be sent
**Returns** (bool): If the command succeeds, it returns __TRUE__, otherwise __FALSE__.
The string to be sent
**Example**
```php
HID_SendEvent(12345, 0, "Any data record"); //Sends the text "Any data record" to the HID with the ID 12345
```
---
# HTTP Client
> Symcon documentation · English · generated on 2026-09-26
> Index: https://www.symcon.de/en/llms.txt
Source: https://www.symcon.de/en/service/documentation/module-reference/i-o-instances/httpclient/
_Requires Symcon >= 2.3_
The HTTP Client reads data from a URL and makes it available.
### Integration in IP-Symcon
Authentication via username and password can optionally be set up on the configuration page.
#### Read website
If a website is to be read in, the URL must be entered.
The interval determines how often this query is carried out.

## WWW_UpdatePage
Source: https://www.symcon.de/en/service/documentation/module-reference/i-o-instances/httpclient/www-updatepage/
`bool WWW_UpdatePage(int $InstanceID)`
_Requires Symcon >= 2.3_
lets you query the configured URL
**Parameters**
- `$InstanceID` (int): ID of the HTTP Client to be updated
**Returns** (bool): If the command succeeds, it returns __TRUE__, otherwise __FALSE__.
ID of the HTTP Client to be updated
**Example**
```php
//Manual query of the configured URL of the HTTP Client with the InstanceID 12345
WWW_UpdatePage(12345);
```
---
# Multicast Socket
> Symcon documentation · English · generated on 2026-09-26
> Index: https://www.symcon.de/en/llms.txt
Source: https://www.symcon.de/en/service/documentation/module-reference/i-o-instances/multicastsocket/
_Requires Symcon >= 4.1_
The Multicast Socket opens an interface which is often used for communication between the gateway/splitter instance and the connected device. It uses the UDP protocol.
### Integration in IP-Symcon
The multicast socket can be set up and activated on the configuration page.
Only a click on "Apply" saves the settings and then an attempt is made to establish the connection with activated "Open socket".

#### Send-Host/Port
IP and port of the device to be controlled.
#### Receive-Host/Port
Determines on which network and via which IP and port the data is received.
#### Multicast
Multicast group address that is logged on and obeyed.
#### Activatable Options
| Option | Description |
| ------------- | ------------------------------------------------------------------------------------------------------------------ |
| Broadcast | Allows broadcast messages to be sent |
| Reuse Address | Allows the socket to be connected to an address that is already in use. |
| Loopback | Activates the reception of Multicast-Packets on the send socket, provided this is a member of the Multicast Group. |
## MSCK_SendText
Source: https://www.symcon.de/en/service/documentation/module-reference/i-o-instances/multicastsocket/msck-sendtext/
`bool MSCK_SendText(int $InstanceID, string $Text)`
_Requires Symcon >= 4.1_
sends a string to the I/O
**Parameters**
- `$InstanceID` (int): ID of the Multicast Socket to be updated
- `$Text` (string): The string to be sent
**Returns** (bool): If the command succeeds, it returns __TRUE__, otherwise __FALSE__.
The string to be sent
**Example**
```php
//Sends the string "Any data record" on the Multicast Socket with the ID 12345
MSCK_SendText(12345, "Any data record");
```
---
# Serial Port
> Symcon documentation · English · generated on 2026-09-26
> Index: https://www.symcon.de/en/llms.txt
Source: https://www.symcon.de/en/service/documentation/module-reference/i-o-instances/serialport/
_Requires Symcon >= 2.0_
The serial port opens an interface which is often used for communication between the gateway/splitter instance and the connected device.
### Integration in IP-Symcon
The serial port, to which the device to be controlled is connected, must be specified on the configuration page.
If necessary, the baud rate, data bits, stop bits and parity can be set.
Only a click on "Apply" saves the settings and then an attempt is made to establish the connection.

## SPRT_SendText
Source: https://www.symcon.de/en/service/documentation/module-reference/i-o-instances/serialport/sprt-sendtext/
`bool SPRT_SendText(int $InstanceID, string $Text)`
_Requires Symcon >= 2.0_
sends a string to the I/O
**Parameters**
- `$InstanceID` (int): ID of the serial port to be updated
- `$Text` (string): The string to be sent
**Returns** (bool): If the command succeeds, it returns __TRUE__, otherwise __FALSE__.
The string to be sent
**Example**
```php
//Sends the text "Any data record" to the serial port with the ID 12345
SPRT_SendText(12345, "Any data record");
```
## SPRT_SetBreak
Source: https://www.symcon.de/en/service/documentation/module-reference/i-o-instances/serialport/sprt-setbreak/
`bool SPRT_SetBreak(int $InstanceID, bool $OnOff)`
_Requires Symcon >= 2.6_
switches the break of a serial port instance
**Parameters**
- `$InstanceID` (int): ID of the serial port to be updated
- `$OnOff` (bool): Switches the break On __True__ or Off __False__
**Returns** (bool): If the command succeeds, it returns __TRUE__, otherwise __FALSE__.
Switches the break On __True__ or Off __False__
**Example**
```php
// switches the break of the serial port instance with the ID 12345 to "On"
SPRT_SetBreak(12345, true);
```
## SPRT_SetDTR
Source: https://www.symcon.de/en/service/documentation/module-reference/i-o-instances/serialport/sprt-setdtr/
`bool SPRT_SetDTR(int $InstanceID, bool $OnOff)`
_Requires Symcon >= 2.6_
switches the DTR of a serial port instance
**Parameters**
- `$InstanceID` (int): ID of the serial port to be updated
- `$OnOff` (bool): Switches the DTR On __True__ or Off __False__
**Returns** (bool): If the command succeeds, it returns __TRUE__, otherwise __FALSE__.
Switches the DTR On __True__ or Off __False__
**Example**
```php
// switches the DTR of the serial port instance with the ID 12345 to "On"
SPRT_SetDTR(12345, true);
```
## SPRT_SetRTS
Source: https://www.symcon.de/en/service/documentation/module-reference/i-o-instances/serialport/sprt-setrts/
`bool SPRT_SetRTS(int $InstanceID, bool $OnOff)`
_Requires Symcon >= 2.6_
switches the RTS of a serial port instance
**Parameters**
- `$InstanceID` (int): ID of the serial port to be updated
- `$OnOff` (bool): Switches the RTS On __True__ or Off __False__
**Returns** (bool): If the command succeeds, it returns __TRUE__, otherwise __FALSE__.
Switches the RTS On __True__ or Off __False__
**Example**
```php
// switches the RTS of the serial port instance with the ID 12345 to "On"
SPRT_SetRTS(12345, true);
```
---
# Server Sent Event Client
> Symcon documentation · English · generated on 2026-09-26
> Index: https://www.symcon.de/en/llms.txt
Source: https://www.symcon.de/en/service/documentation/module-reference/i-o-instances/serversenteventclient/
The Server Sent Event Client opens an interface which automatically reacts to the Server Event. It uses a HTTP connection.
### Integration in IP-Symcon
On the configuration page, the address of the server to which one is responding must be specified under "URL".
Only a click on "Apply" saves the settings and then an attempt is made to establish the connection.

---
# Server Socket
> Symcon documentation · English · generated on 2026-09-26
> Index: https://www.symcon.de/en/llms.txt
Source: https://www.symcon.de/en/service/documentation/module-reference/i-o-instances/serversocket/
_Requires Symcon >= 4.1_
The server socket opens a port for all networks on the server. The port can then be listened on and data can be received on it.
Only a click on "Apply" saves the settings and then the port is opened.
If SSL is activated, the certificate and the private key must be specified.

#### Create certificate
Using OpenSSL, certificates and private keys can be created.
```php
// Generate a private key
openssl genrsa -out pk.pem 1024
// Create a certificate signing request
openssl req -new -key pk.pem -out req.csr
// Self-sign the csr
openssl x509 -req -days 3650 -in req.csr -signkey pk.pem -out cert.pem
```
> **Note:** The certificate for the certification authority is optional.
## SSCK_SendPacket
Source: https://www.symcon.de/en/service/documentation/module-reference/i-o-instances/serversocket/ssck-sendpacket/
`bool SSCK_SendPacket(int $InstanceID, string $Text, string $ClientIP, int $ClientPort)`
_Requires Symcon >= 4.1_
sends a string to the I/O
**Parameters**
- `$InstanceID` (int): ID of the server socket to be updated
- `$Text` (string): The string to be sent
- `$ClientIP` (string): Recipient's IP
- `$ClientPort` (int): Recipient's port
**Returns** (bool): If the command succeeds, it returns __TRUE__, otherwise __FALSE__.
Recipient's port
**Example**
```php
//Sends the packet with the data record "Any data record" on the server socket with ID 12345 to the IP:Port 192.168.1.123:1234
SSCK_SendPacket(12345, "Any data record", "192.168.1.123", 1234);
```
## SSCK_SendText
Source: https://www.symcon.de/en/service/documentation/module-reference/i-o-instances/serversocket/ssck-sendtext/
`bool SSCK_SendText(int $InstanceID, string $Text)`
_Requires Symcon >= 4.1_
sends a string to the I/O
**Parameters**
- `$InstanceID` (int): ID of the server socket to be updated
- `$Text` (string): The string to be sent
**Returns** (bool): If the command succeeds, it returns __TRUE__, otherwise __FALSE__.
The string to be sent
**Example**
```php
SSCK_SendText(12345, "Any data record"); //Sends the text "Any data record" to the server socket with the ID 12345
```
---
# UDP Socket
> Symcon documentation · English · generated on 2026-09-26
> Index: https://www.symcon.de/en/llms.txt
Source: https://www.symcon.de/en/service/documentation/module-reference/i-o-instances/udpsocket/
_Requires Symcon >= 3.3_
The UDP socket opens an interface which is often used for communication between the gateway/splitter instance and the connected device. It uses the UDP protocol.
### Integration in IP-Symcon
A new UDP socket instance can be created via "+" in the object tree.
The following settings can be made on the configuration page.
| Option | Description |
| ---------------------- | -------------------------------------------------------------------------------------------------------------------------------------------------- |
| Open Socket | Whether the socket should be open or closed. |
| Send-Host | Which IP address the data should be sent to. |
| Send-Port | On which port the data should be sent. |
| Receive-Host | On which TCP interface the data should be listened to. |
| Receive-Port | On which port the data should be listened to. |
| Activate Broadcast | When activated, the UDP socket sends to the broadcast address of the selected Receive-Host interface. The entered Send-Host address is irrelevant. |
| Activate Reuse Address | Allows other programs to listen to the Receive-Port when the "Reuse address" is also activated. |
Only a click on "Apply" saves the settings and then an attempt is made to establish the connection.

## USCK_SendPacket
Source: https://www.symcon.de/en/service/documentation/module-reference/i-o-instances/udpsocket/usck-sendpacket/
`bool USCK_SendPacket(int $InstanceID, string $Text, string $ClientIP, int $ClientPort)`
_Requires Symcon >= 5.0_
sends a string to the I/O
**Parameters**
- `$InstanceID` (int): ID of the UDP socket to be updated
- `$Text` (string): The string to be sent
- `$ClientIP` (string): Recipient's IP
- `$ClientPort` (int): Recipient's port
**Returns** (bool): If the command succeeds, it returns __TRUE__, otherwise __FALSE__.
Recipient's port
**Example**
```php
//Sends the packet with the data record "Any data record" on the server socket with ID 12345 to the IP:Port 192.168.1.123:1234
USCK_SendPacket(12345, "Any data record", "192.168.1.123", 1234);
```
## USCK_SendText
Source: https://www.symcon.de/en/service/documentation/module-reference/i-o-instances/udpsocket/usck-sendtext/
`bool USCK_SendText(int $InstanceID, string $Text)`
_Requires Symcon >= 3.3_
sends a string to the I/O
**Parameters**
- `$InstanceID` (int): ID of the UDP socket to be updated
- `$Text` (string): The string to be sent
**Returns** (bool): If the command succeeds, it returns __TRUE__, otherwise __FALSE__.
The string to be sent
**Example**
```php
USCK_SendText(12345, "Any data record"); // Sends the text "Any data record" to the UDP socket with the ID 12345
```
---
# Virtual I/O
> Symcon documentation · English · generated on 2026-09-26
> Index: https://www.symcon.de/en/llms.txt
Source: https://www.symcon.de/en/service/documentation/module-reference/i-o-instances/virtualio/
_Requires Symcon >= 3.3_
The virtual I/O opens an interface that is used for communication between the gateway/splitter instance and the connected device. It does not use a specific protocol, but is used for test purposes to ensure correct behavior of the connected entities.
The virtual I/O is able to send data packets of the type [Simple](https://www.symcon.de/en/llms/developer/sdk-tools/sdk-php.md) and [Extended (Socket)](https://www.symcon.de/en/llms/developer/sdk-tools/sdk-php.md). The rule is that functions with "text" use such simple data packets. Connect, Disconnect and Functions with "Packet" use the extended data packet (Socket).
### Integration in IP-Symcon
A new virtual I/O instance can be created via "+" in the object tree.
The following settings can be made on the configuration page.
| Option | Description |
| ------ | ----------------------------------------------- |
| Active | Whether the interface should be open or closed. |
Only a click on "Apply" saves the settings and then an attempt is made to establish the connection.

For a better understanding, the graphic shows which direction and data packet types are used by the individual commands.

## VIO_Connect
Source: https://www.symcon.de/en/service/documentation/module-reference/i-o-instances/virtualio/vio-connect/
`bool VIO_Connect(int $InstanceID, string $ClientIP, int $ClientPort)`
_Requires Symcon >= 5.1_
sends a Connect Data-Packet
**Parameters**
- `$InstanceID` (int): ID of the Virtual I/O to be updated
- `$ClientIP` (string): The ClientIP to be connected
- `$ClientPort` (int): The port to be connected
**Returns** (bool): If the command succeeds, it returns __TRUE__, otherwise __FALSE__.
The port to be connected
**Example**
```php
// Sends a data packet to the virtual I/O instance with the ID 12345 with the IP-address 192.168.0.8 and port 502
VIO_Connect(12345, "192.168.0.8", 502);
```
## VIO_Disconnect
Source: https://www.symcon.de/en/service/documentation/module-reference/i-o-instances/virtualio/vio-disconnect/
`bool VIO_Disconnect(int $InstanceID, string $ClientIP, int $ClientPort)`
_Requires Symcon >= 5.1_
sends a Disconnect Data-Packet
**Parameters**
- `$InstanceID` (int): ID of the virtual I/O to be updated
- `$ClientIP` (string): The ClientIP to be connected
- `$ClientPort` (int): The port to be connected
**Returns** (bool): If the command succeeds, it returns __TRUE__, otherwise __FALSE__.
The port to be connected
**Example**
```php
// Sends a data packet to the virtual I/O instance with the ID 12345 with the IP-address 192.168.0.8 and port 502
VIO_Disconnect(12345, "192.168.0.8", 502);
```
## VIO_GetPacketList
Source: https://www.symcon.de/en/service/documentation/module-reference/i-o-instances/virtualio/vio-getpacketlist/
`array VIO_GetPacketList(int $InstanceID)`
_Requires Symcon >= 5.1_
supplies an array of extended Data-Packets
**Parameters**
- `$InstanceID` (int): ID of the virtual I/O to be updated
**Returns** (array): Supplies an array of extended Data-Packets
ID of the virtual I/O to be updated
**Example**
```php
// Returns an array of all extended data packets of the virtual I/O instance with the ID 12345
$allPackets = VIO_GetPacketList(12345);
print_r($allPackages);
/* returns, for example:
Array
(
[0] => Array
(
[Type] => 0
[Buffer] => Hello world
[ClientIP] => 192.168.0.8
[ClientPort] => 502
)
[1] => Array
(
[Type] => 0
[Buffer] => IP-Symcon
[ClientIP] => 192.168.0.4
[ClientPort] => 3777
)
...
)
*/
```
## VIO_GetTextList
Source: https://www.symcon.de/en/service/documentation/module-reference/i-o-instances/virtualio/vio-gettextlist/
`array VIO_GetTextList(int $InstanceID)`
_Requires Symcon >= 5.1_
returns an array of simple Data-Packets
**Parameters**
- `$InstanceID` (int): ID of the virtual I/O to be updated
**Returns** (array): Returns an array of simple Data-Packets
ID of the virtual I/O to be updated
**Example**
```php
// Returns an array of all simple data packages of the virtual I/O instance with the ID 12345
$allTexts = VIO_GetTextList(12345);
print_r($allTexts);
/* returns, for example:
Array
(
[0] => Hello world
[1] => IP-Symcon
...
)
*/
```
## VIO_PushPacket
Source: https://www.symcon.de/en/service/documentation/module-reference/i-o-instances/virtualio/vio-pushpacket/
`bool VIO_PushPacket(int $InstanceID, string $Text, string $ClientIP, int $ClientPort)`
_Requires Symcon >= 5.1_
sends an extended Data-Packet
**Parameters**
- `$InstanceID` (int): ID of the virtual I/O to be updated
- `$Text` (string): The string to be sent
- `$ClientIP` (string): On the ClientIP to be sent
- `$ClientPort` (int): On the port to be sent
**Returns** (bool): If the command succeeds, it returns __TRUE__, otherwise __FALSE__.
On the port to be sent
**Example**
```php
// Sends the text "Hello World" to the virtual I/O instance with the ID 12345, and with the IP address 192.168.0.8 and port 502
VIO_PushPacket(12345, "Hello World", "192.168.0.8", 502);
```
## VIO_PushPacketHEX
Source: https://www.symcon.de/en/service/documentation/module-reference/i-o-instances/virtualio/vio-pushpackethex/
`bool VIO_PushPacketHEX(int $InstanceID, string $Text, string $ClientIP, int $ClientPort)`
_Requires Symcon >= 5.1_
sends an extended Data-Packet
**Parameters**
- `$InstanceID` (int): ID of the virtual I/O to be updated
- `$Text` (string): The string to be sent in HEX
- `$ClientIP` (string): On the ClientIP to be sent
- `$ClientPort` (int): On the port to be sent
**Returns** (bool): If the command succeeds, it returns __TRUE__, otherwise __FALSE__.
On the port to be sent
**Example**
```php
// Sends the hex string "1a2fee" with the IP address 192.168.0.8 and port 502 to the virtual I/O instance with the ID 12345
VIO_PushPacketHEX(12345, "1A 2F EE", "192.168.0.8", 502);
```
## VIO_PushText
Source: https://www.symcon.de/en/service/documentation/module-reference/i-o-instances/virtualio/vio-pushtext/
`bool VIO_PushText(int $InstanceID, string $Text)`
_Requires Symcon >= 3.3_
sends a simple Data-Packet
**Parameters**
- `$InstanceID` (int): ID of the virtual I/O to be updated
- `$Text` (string): The string to be sent
**Returns** (bool): If the command succeeds, it returns __TRUE__, otherwise __FALSE__.
The string to be sent
**Example**
```php
// Sends the text "Hello world" to the virtual I/O instance with the ID 12345
VIO_PushText(12345, "Hello World");
```
## VIO_PushTextHEX
Source: https://www.symcon.de/en/service/documentation/module-reference/i-o-instances/virtualio/vio-pushtexthex/
`bool VIO_PushTextHEX(int $InstanceID, string $Text)`
_Requires Symcon >= 3.3_
sends a simple Data-Packet
**Parameters**
- `$InstanceID` (int): ID of the virtual I/O to be updated
- `$Text` (string): The string to be sent in HEX
**Returns** (bool): If the command succeeds, it returns __TRUE__, otherwise __FALSE__.
The string to be sent in HEX
**Example**
```php
// Sends the hex string "1a2fee" to the virtual I/O instance with ID 12345
VIO_PushTextHEX(12345, "1A 2F EE");
```
## VIO_SendPacket
Source: https://www.symcon.de/en/service/documentation/module-reference/i-o-instances/virtualio/vio-sendpacket/
`bool VIO_SendPacket(int $InstanceID, string $Text, string $ClientIP, int $ClientPort)`
_Requires Symcon >= 5.1_
sends an extended Data-Packet to itself
**Parameters**
- `$InstanceID` (int): ID of the virtual I/O to be updated
- `$Text` (string): The string to be sent
- `$ClientIP` (string): On the ClientIP to be sent
- `$ClientPort` (int): On the port to be sent
**Returns** (bool): If the command succeeds, it returns __TRUE__, otherwise __FALSE__.
On the port to be sent
**Example**
```php
// Sends the text "Hello world" with the IP address 192.168.0.8 and the port 502 to the Virtual I/O instance with the ID 12345
VIO_PushPacket(12345, "Hello World", "192.168.0.8", 502);
```
## VIO_SendText
Source: https://www.symcon.de/en/service/documentation/module-reference/i-o-instances/virtualio/vio-sendtext/
`bool VIO_SendText(int $InstanceID, string $Text)`
_Requires Symcon >= 3.3_
sends a simple Data-Packet to itself
**Parameters**
- `$InstanceID` (int): ID of the virtual I/O to be updated
- `$Text` (string): The string to be sent
**Returns** (bool): If the command succeeds, it returns __TRUE__, otherwise __FALSE__.
The string to be sent
**Example**
```php
// Sends the text "Hello world" to the virtual I/O instance with ID 12345
VIO_SendText(12345, "Hello World");
```
---
# WebSocket Client
> Symcon documentation · English · generated on 2026-09-26
> Index: https://www.symcon.de/en/llms.txt
Source: https://www.symcon.de/en/service/documentation/module-reference/i-o-instances/websocketclient/
_Requires Symcon >= 5.5_
The WebSocket Client opens an interface which is often used for bidirectional communication with web applications/web servers. It uses the TCP protocol.
### Integration in IP-Symcon
The address of the web application/ web server must be specified under "URL" on the configuration page. If "Verify Certificates" is activated, the SSL certificates are checked.
Only a click on "Apply" saves the settings and then an attempt is made to establish the connection.

## WSC_SendMessage
Source: https://www.symcon.de/en/service/documentation/module-reference/i-o-instances/websocketclient/wsc-sendmessage/
`bool WSC_SendMessage(int $InstanceID, string $Message)`
_Requires Symcon >= 5.5_
sends a message using the WebSocket
**Parameters**
- `$InstanceID` (int): ID of the WebSocket client to be updated
- `$Message` (string): The string to be sent
**Returns** (bool): If the command succeeds, it returns __TRUE__, otherwise __FALSE__.
The string to be sent
**Example**
```php
// Sends the message "Hello World" to the WebSocket Client instance with ID 12345
WSC_SendMessage(12345, "Hello World");
```
---
# Backup
> Symcon documentation · English · generated on 2026-09-26
> Index: https://www.symcon.de/en/llms.txt
Source: https://www.symcon.de/en/service/documentation/module-reference/backups/backup/
_Requires Symcon >= 6.3_
Creates a backup via SFTP, FTP or FTPS.
### range of functions
* Creates a backup via SFTP, FTP or FTPS on a server
* Updates a backup via SFTP, FTP or FTPS on a server
### Software installation
* Install the 'Backup (SFTP/FTP/FTPS)' module via the Module Store.
### Set up the instances in IP-Symcon
The 'Backup (SFTP/FTP/FTPS)' module can be found under 'Add instance' using the quick filter.
- Further information on adding instances can be found in the [Instances documentation](https://www.symcon.de/service/dokumentation/konzepte/instanzen/#Instanz_hinzufügen)
__Configuration page__:
| Name | Description |
| -------------------------- | --------------------------------------------------------------------------------------------------------------- |
| Connection type | Selection of the connection type |
| Host | IP address of the server |
| Port | Port on which the client connects to the server. For FTPS and FTP this is normally 21, for SFTP this is port 22 |
| User name | User name for the SFTP connection |
| Password | Password for the SFTP connection |
| Mode | Mode for which a backup is to be created |
| Change folder to | A new folder is created at the beginning of the period |
| Destination folder | Folder on the server where the backup is to be created |
| Search target folder | Browse through the folders and a valid path can be created |
| Activate automatic backups | Activates a daily update |
| Daily at | Time when the update starts daily |
| Expert options | --------------------------------------------------------------------------------------------------------------- |
| Size limit | If a file is larger than this limit, it is ignored |
| Filtered folders | Filter to not transfer certain folders |
| Create backup | Button which starts an update immediately. |
| Test connection | Tests whether a connection can be established |
__Mode__:
Full backup: Creates a complete copy in a separate folder according to the pattern: symcon-backup-{year}-{month}-{day}-{hour}-{minute}-{second}
Incremental backup: Updates an existing backup.
If the 'Change by folder' option is not set to 'Never', the folder is changed after the set time.
The folders that are created during the incremental backup follow the following pattern:
- Never: symcon-backup
- Week: symcon-backup-{year}-0{calendar-week}
- Month: symcon-backup-{year}-{month}
- Year: symcon-backup-{year}
### status variables
The status variables/categories are created automatically. Deleting individual ones can lead to malfunctions.
| Name | Type | Description |
| --------------------- | ------- | -------------------------------------------- |
| Last completed backup | Integer | Time at which the last backup was completed |
| Megabytes transferred | Float | Megabytes transferred during the last update |
## SB_CreateBackup
Source: https://www.symcon.de/en/service/documentation/module-reference/backups/backup/sb-createbackup/
`bool SB_CreateBackup(int $InstanceID)`
**Parameters**
- `$InstanceID` (int): ID of the instance
**Returns** (bool): If the command could be executed successfully, it returns **TRUE** as the result, otherwise **FALSE**
ID of the instance
**Example**
```php
SB_CreateBackup(12345);
```
---
# RRDTool
> Symcon documentation · English · generated on 2026-09-26
> Index: https://www.symcon.de/en/llms.txt
Source: https://www.symcon.de/en/service/documentation/module-reference/legacy/rrdtool/
RRDtool is the OpenSource industry standard, high performance data logging and graphing system for time series data. Use it to write your custom monitoring shell scripts or create whole applications using its Perl, Python, Ruby, TCL or PHP bindings.
The RRDTool module is a direct integration of RRDTool as PHP function in IP-Symcon.
No other functions are offered.
The RRDTool manual is the first point of contact to find information about using this module.
The current version number you can find out as follows:
```php
echo RRD_Execute("version -");
```
## RRD_Exexute
Source: https://www.symcon.de/en/service/documentation/module-reference/legacy/rrdtool/rrd-exexute/
`bool RRD_Execute(int $InstanceID, string $Command)`
Directs a command to the RRD Tool Library and executes it. Once the command has been executed, the execution will be proceed.
**Parameters**
- `$InstanceID` (int): ID of the device to be switched
- `$Command` (string): RRD command. See
**Returns** (bool): If the command succeeds, it returns __TRUE__, otherwise __FALSE__.
RRD command. See
**Example**
```php
//No example available
```
---
# Shutter Control (legacy)
> Symcon documentation · English · generated on 2026-09-26
> Index: https://www.symcon.de/en/llms.txt
Source: https://www.symcon.de/en/service/documentation/module-reference/legacy/shutter-control-legacy/
> **Warning:** This is a deprecated version. From version 5.0 onwards it is recommended to use the new [Shutter Control](https://www.symcon.de/en/product/application-examples/shutter-control/) version.
To make the IP-Symcon shutter module hardware-independent, the module needs a script that takes care of passing the functions to the hardware.
Anyone with the following hardware can easily copy and use the script. Other hardware is easy to add. (More on that below the script).
> **Note:** Scripts executed by the shutter control include these [System variables](https://www.symcon.de/en/service/documentation/basics/scripts/system-variables/#ShutterControl)
* Eaton Xcomfort Shutter
* 1-Wire Shutter
* Homematic (Thanks to [hengesb](https://community.symcon.de/u/hengesb/summary) )
* LCN (Thanks to [philipp](https://community.symcon.de/u/philipp/summary) )
* FS20MS
This script normally only needs to exist once in IP-Symcon and can be accessed by any number of instances. Nothing needs to be edited.
### Calibrate Shutters
In the second step, the times it takes for the shutter to move to the individual positions are measured. This calibration must be carried out twice. For up and down. To start, the corresponding button is pressed, whereupon the shutter should start moving. The button must be pressed again when the position labelled on it is reached.
> **Note:** After each teach-in, the values must be transferred with the “Set” button.
### Tips & Tricks
> **Note:** When moving to 0% and 100%, five seconds are added to the driving time to reach a defined position.
> **Warning:** If the runtime of the shutter is above the PHP script limit (180sec), it must be increased in php.ini. (see [PHP](https://www.symcon.de/en/llms/components/service.md))
### Information for LCN users
With the script, the shutter module can be used universally to control the shutter/blind via the outputs as well as via the relays.
If the shutter module is to control a shutter/blind that is connected to the two outputs of a UPP/SH/HU, then the instance of output 1 of the module must be selected under “Instance1″ and the instance of output 2 of the module for “instance2″. This configuration then corresponds to the standard direction, as it is activated from the LCN-Pro by moving up or down. If the port is reversed, it is only necessary to change the assignment of output 1 and output 2 to the settings “Instance1″ and “Instance2″.
When operating with relays, the first relay of the two must always be specified for “Instance1". The first relay is the one that switches the power ON/OFF. “Instance2″ is always the relay that controls the direction.
If the direction of travel is to be rotated, this must be changed manually in the script. In the “case block for LCN” of the shutter script, there is a corresponding comment in both places.
If differently wired shutters/blinds on the relays are used, two shutter scripts must therefore be used for the respective configurations.
### Shutter Script
```php
//Variables provided by ShutterControl Module
//IPS_LogMessage("InstanceID", $_IPS['INSTANCE']); /* InstanceID */
//IPS_LogMessage("Direction", $_IPS['DIRECTION']); /* {0..2} Stop, Up, Down */
//IPS_LogMessage("Duration", $_IPS['DURATION']); /* ms */
if($_IPS['SENDER'] != "ShutterControl") {
die("This script can only be started by the ShutterControl Module");
}
define("SC_DIRECTION_STOP", 0);
define("SC_DIRECTION_UP", 1);
define("SC_DIRECTION_DOWN", 2);
$instance = IPS_GetInstance($_IPS['INSTANCE']);
switch($instance['ModuleInfo']['ModuleID']) {
//Siemens Device S7/LOGO
case "{932076B1-B18E-4AB6-AB6D-275ED30B62DB}":
switch($_IPS['DIRECTION']) {
case SC_DIRECTION_STOP:
S7_WriteBit($_IPS['INSTANCE'], false);
S7_WriteBit($_IPS['INSTANCE2'], false);
break;
case SC_DIRECTION_UP:
S7_WriteBit($_IPS['INSTANCE'], true);
if($_IPS['DURATION'] > 0) {
IPS_Sleep($_IPS['DURATION']);
S7_WriteBit($_IPS['INSTANCE'], false);
}
break;
case SC_DIRECTION_DOWN:
S7_WriteBit($_IPS['INSTANCE2'], true);
if($_IPS['DURATION'] > 0) {
IPS_Sleep($_IPS['DURATION']);
S7_WriteBit($_IPS['INSTANCE2'], false);
}
break;
}
break;
//FS20
case "{48FCFDC1-11A5-4309-BB0B-A0DB8042A969}":
$running = CreateVariableByName($_IPS['INSTANCE'], "Moving", 0);
$value = GetValue(IPS_GetObjectIDByIdent("StatusVariable", $_IPS['INSTANCE']));
switch($_IPS['DIRECTION']) {
case SC_DIRECTION_STOP:
if(GetValue($running)) {
FS20_SwitchMode($_IPS['INSTANCE'], $value);
SetValue($running, false);
}
break;
case SC_DIRECTION_UP:
if(!GetValue($running)) {
FS20_SwitchMode($_IPS['INSTANCE'], true);
SetValue($running, true);
}
if($_IPS['DURATION'] > 0) {
IPS_Sleep($_IPS['DURATION']);
FS20_SwitchMode($_IPS['INSTANCE'], true);
SetValue($running, false);
}
break;
case SC_DIRECTION_DOWN:
if(!GetValue($running)) {
FS20_SwitchMode($_IPS['INSTANCE'], false);
SetValue($running, true);
}
if($_IPS['DURATION'] > 0) {
IPS_Sleep($_IPS['DURATION']);
FS20_SwitchMode($_IPS['INSTANCE'], false);
SetValue($running, false);
}
break;
}
break;
//EnOcean
case "{1463CAE7-C7D5-4623-8539-DD7ADA6E92A9}":
switch($_IPS['DIRECTION']) {
case SC_DIRECTION_STOP:
ENO_ShutterStop($_IPS['INSTANCE']);
break;
case SC_DIRECTION_UP:
ENO_ShutterMoveUp($_IPS['INSTANCE']);
if($_IPS['DURATION'] > 0) {
IPS_Sleep($_IPS['DURATION']);
ENO_ShutterStop($_IPS['INSTANCE']);
}
break;
case SC_DIRECTION_DOWN:
ENO_ShutterMoveDown($_IPS['INSTANCE']);
if($_IPS['DURATION'] > 0) {
IPS_Sleep($_IPS['DURATION']);
ENO_ShutterStop($_IPS['INSTANCE']);
}
break;
}
break;
//digitalStrom
case "{3DDA1E2B-B807-4680-AB6D-E7E8FBD6093A}":
switch($_IPS['DIRECTION']) {
case SC_DIRECTION_STOP:
DS_ShutterStop($_IPS['INSTANCE']);
break;
case SC_DIRECTION_UP:
DS_ShutterMoveUp($_IPS['INSTANCE']);
if($_IPS['DURATION'] > 0) {
IPS_Sleep($_IPS['DURATION']);
DS_ShutterStop($_IPS['INSTANCE']);
}
break;
case SC_DIRECTION_DOWN:
DS_ShutterMoveDown($_IPS['INSTANCE']);
if($_IPS['DURATION'] > 0) {
IPS_Sleep($_IPS['DURATION']);
DS_ShutterStop($_IPS['INSTANCE']);
}
break;
}
break;
//xComfort
case "{1B7B5B7D-CAA9-4AB5-B9D8-EC805EC955AD}":
switch($_IPS['DIRECTION']) {
case SC_DIRECTION_STOP:
MXC_ShutterStop($_IPS['INSTANCE']);
break;
case SC_DIRECTION_UP:
MXC_ShutterMoveUp($_IPS['INSTANCE']);
if($_IPS['DURATION'] > 0) {
IPS_Sleep($_IPS['DURATION']);
MXC_ShutterStop($_IPS['INSTANCE']);
}
break;
case SC_DIRECTION_DOWN:
MXC_ShutterMoveDown($_IPS['INSTANCE']);
if($_IPS['DURATION'] > 0) {
IPS_Sleep($_IPS['DURATION']);
MXC_ShutterStop($_IPS['INSTANCE']);
}
break;
}
break;
//LCN Unit
case "{2D871359-14D8-493F-9B01-26432E3A710F}":
$type=IPS_GetProperty($_IPS['INSTANCE'],'Unit');
switch($type) {
//Outputs
case 0:
switch($_IPS['DIRECTION'])
{
case SC_DIRECTION_STOP:
LCN_SetIntensity($_IPS['INSTANCE'],0,0);
LCN_SetIntensity($_IPS['INSTANCE2'],0,0);
break;
case SC_DIRECTION_UP:
LCN_SetIntensity($_IPS['INSTANCE'],100,4);
if($_IPS['DURATION'] > 0) {
IPS_Sleep($_IPS['DURATION']);
LCN_SetIntensity($_IPS['INSTANCE'],0,0);
}
break;
case SC_DIRECTION_DOWN:
LCN_SetIntensity($_IPS['INSTANCE2'],100,4);
if($_IPS['DURATION'] > 0) {
IPS_Sleep($_IPS['DURATION']);
LCN_SetIntensity($_IPS['INSTANCE2'],0,0);
}
break;
}
break;
//Relay
case 2:
switch($_IPS['DIRECTION']) {
case SC_DIRECTION_STOP:
LCN_SwitchRelay($_IPS['INSTANCE'],false);
break;
case SC_DIRECTION_UP:
LCN_SwitchRelay($_IPS['INSTANCE2'],false); //To change relay direction, please set it to true
LCN_SwitchRelay($_IPS['INSTANCE'],true);
if($_IPS['DURATION'] > 0) {
IPS_Sleep($_IPS['DURATION']);
LCN_SwitchRelay($_IPS['INSTANCE'],false);
}
break;
case SC_DIRECTION_DOWN:
LCN_SwitchRelay($_IPS['INSTANCE2'],true);//To change relay direction, please set false
LCN_SwitchRelay($_IPS['INSTANCE'],true);
if($_IPS['DURATION'] > 0) {
IPS_Sleep($_IPS['DURATION']);
LCN_SwitchRelay($_IPS['INSTANCE'],false);
}
break;
}
break;
}
break;
//LCN Shutter
case "{C81E019F-6341-4748-8644-1C29D99B813E}":
switch($_IPS['DIRECTION']) {
case SC_DIRECTION_STOP:
LCN_ShutterStop($_IPS['INSTANCE']);
break;
case SC_DIRECTION_UP:
LCN_ShutterMoveUp($_IPS['INSTANCE']);
if($_IPS['DURATION'] > 0) {
IPS_Sleep($_IPS['DURATION']);
LCN_ShutterStop($_IPS['INSTANCE']);
}
break;
case SC_DIRECTION_DOWN:
LCN_ShutterMoveDown($_IPS['INSTANCE']);
if($_IPS['DURATION'] > 0) {
IPS_Sleep($_IPS['DURATION']);
LCN_ShutterStop($_IPS['INSTANCE']);
}
break;
}
break;
//1-Wire Shutter Modul (e-service Online)
case "{BD0F2622-F67C-4248-9A04-316DF13914C3}":
switch($_IPS['DIRECTION']) {
case SC_DIRECTION_STOP:
OW_SetPin($_IPS['INSTANCE'], 0, true);
OW_SetPin($_IPS['INSTANCE'], 1, true);
IPS_Sleep(100);
OW_SetPin($_IPS['INSTANCE'], 0, false);
OW_SetPin($_IPS['INSTANCE'], 1, false);
break;
case SC_DIRECTION_UP:
OW_SetPin($_IPS['INSTANCE'], 0, true);
IPS_Sleep(100);
OW_SetPin($_IPS['INSTANCE'], 0, false);
if($_IPS['DURATION'] > 0) {
IPS_Sleep($_IPS['DURATION']);
OW_SetPin($_IPS['INSTANCE'], 0, true);
OW_SetPin($_IPS['INSTANCE'], 1, true);
IPS_Sleep(100);
OW_SetPin($_IPS['INSTANCE'], 0, false);
OW_SetPin($_IPS['INSTANCE'], 1, false);
}
break;
case SC_DIRECTION_DOWN:
OW_SetPin($_IPS['INSTANCE'], 1, true);
IPS_Sleep(100);
OW_SetPin($_IPS['INSTANCE'], 1, false);
if($_IPS['DURATION'] > 0) {
IPS_Sleep($_IPS['DURATION']);
OW_SetPin($_IPS['INSTANCE'], 0, true);
OW_SetPin($_IPS['INSTANCE'], 1, true);
IPS_Sleep(100);
OW_SetPin($_IPS['INSTANCE'], 0, false);
OW_SetPin($_IPS['INSTANCE'], 1, false);
}
break;
}
break;
//1-Wire Shutter (1-wire.de)
case "{6A75828A-25CD-4CF3-83EA-DAAB914030A7}":
switch($_IPS['DIRECTION']) {
case SC_DIRECTION_STOP:
OneWireShutter($_IPS['INSTANCE'], 0, $_IPS['DURATION']);
break;
case SC_DIRECTION_UP:
if($_IPS['DURATION'] == 0) {
$_IPS['DURATION'] = 120000;
}
OneWireShutter($_IPS['INSTANCE'], 0, $_IPS['DURATION']);
break;
case SC_DIRECTION_DOWN:
if($_IPS['DURATION'] == 0) {
$_IPS['DURATION'] = 120000;
}
OneWireShutter($_IPS['INSTANCE'], 1, $_IPS['DURATION']);
break;
}
break;
//Homematic Shutter
case "{EE4A81C6-5C90-4DB7-AD2F-F6BBD521412E}":
switch($_IPS['DIRECTION']) {
case SC_DIRECTION_STOP:
HM_WriteValueBoolean($_IPS['INSTANCE'], "STOP", true);
break;
case SC_DIRECTION_UP:
HM_WriteValueFloat($_IPS['INSTANCE'], "LEVEL", 1.0);
if($_IPS['DURATION'] > 0) {
IPS_Sleep($_IPS['DURATION']);
HM_WriteValueBoolean($_IPS['INSTANCE'], "STOP", true);
}
break;
case SC_DIRECTION_DOWN:
HM_WriteValueFloat($_IPS['INSTANCE'], "LEVEL", 0.0);
if($_IPS['DURATION'] > 0) {
IPS_Sleep($_IPS['DURATION']);
HM_WriteValueBoolean($_IPS['INSTANCE'], "STOP", true);
}
break;
}
break;
//DMXOUT
case "{E19C2E41-7347-4A3B-B7D9-A9A88E0D133E}":
switch($_IPS['DIRECTION']) {
case SC_DIRECTION_STOP:
DMX_SetValue($_IPS['INSTANCE'],1,0); //Relay Up
DMX_SetValue($_IPS['INSTANCE2'],1,0); //Relay Down
break;
case SC_DIRECTION_UP:
DMX_SetValue($_IPS['INSTANCE2'],1,0); //Relay Down
DMX_SetValue($_IPS['INSTANCE'],1,255); //Relay Up
if($_IPS['DURATION'] > 0) {
IPS_Sleep($_IPS['DURATION']);
DMX_SetValue($_IPS['INSTANCE'],1,0); //Relay Up
}
break;
case SC_DIRECTION_DOWN:
DMX_SetValue($_IPS['INSTANCE'],1,0); //Relay Up
DMX_SetValue($_IPS['INSTANCE2'],1,255); //Relay Down
if($_IPS['DURATION'] > 0) {
IPS_Sleep($_IPS['DURATION']);
DMX_SetValue($_IPS['INSTANCE2'],1,0); //Relay Down
}
break;
}
break;
default:
die("No Handler for Module ".$instance['ModuleInfo']['ModuleName']." found");
}
function OneWireShutter($ins, $dir, $sec) {
@OW_SetStrobe($ins, True);
$res = ($dir * 128) + ($sec / 1000);
@OW_SetPort((integer)$ins, (integer)$res);
}
function CreateVariableByName($id, $name, $type) {
$vid = @IPS_GetVariableIDByName($name, $id);
if($vid===false) {
$vid = IPS_CreateVariable($type);
IPS_SetParent($vid, $id);
IPS_SetName($vid, $name);
IPS_SetInfo($vid, "This Variable was created by Script");
}
return $vid;
}
```
### Information to extend the script
Three parameters are always transferred when a call is made.
* The InstanceID of the “Transmit Device” set in the shutter control instance
* The direction in which to move.
* The time for which should be moved. (This value is 0 for STOP and for the TEST buttons in the properties page)
The [GUIDs](https://www.symcon.de/en/llms/concepts.md) for the respective module must be inserted in the “case statements”. All IP-Symcon functions can be used. No output may be generated (echo), otherwise this is considered an error and will be displayed in the message log and the status of the “position” variable will not be updated.
## SC_Move
Source: https://www.symcon.de/en/service/documentation/module-reference/legacy/shutter-control-legacy/sc-move/
`bool SC_Move(int $InstanceID, int $Position)`
moves the shutter to a specific position
**Parameters**
- `$InstanceID` (int): ID of the shutter control instance
- `$Position` (int): 0%-100%, 99% = leave a gap
**Returns** (bool): If the command succeeds, it returns __TRUE__, otherwise __FALSE__.
0%-100%, 99% = leave a gap
**Example**
```php
SC_Move(12345, 50); //Move to 50%
```
## SC_MoveDown
Source: https://www.symcon.de/en/service/documentation/module-reference/legacy/shutter-control-legacy/sc-movedown/
`bool SC_MoveDown(int $InstanceID, int $Duration)`
moves the shutter down to the end position
**Parameters**
- `$InstanceID` (int): ID of the shutter control instance
- `$Duration` (int): 0 = limit switch, >1 = duration in ms
**Returns** (bool): If the command succeeds, it returns __TRUE__, otherwise __FALSE__.
0 = limit switch, >1 = duration in ms
**Example**
```php
SC_MoveDown(12345, 0); //Move down
```
## SC_MoveUp
Source: https://www.symcon.de/en/service/documentation/module-reference/legacy/shutter-control-legacy/sc-moveup/
`bool SC_MoveUp(int $InstanceID, int $Duration)`
moves the shutter up to the end position
**Parameters**
- `$InstanceID` (int): ID of the shutter control instance
- `$Duration` (int): 0 = limit switch, >1 = duration in ms
**Returns** (bool): If the command succeeds, it returns __TRUE__, otherwise __FALSE__.
0 = limit switch, >1 = duration in ms
**Example**
```php
SC_MoveUp(12345, 0); //Move up
```
## SC_Stop
Source: https://www.symcon.de/en/service/documentation/module-reference/legacy/shutter-control-legacy/sc-stop/
`bool SC_Stop(int $InstanceID)`
stops a motion
**Parameters**
- `$InstanceID` (int): ID of the shutter control instance
**Returns** (bool): If the command succeeds, it returns __TRUE__, otherwise __FALSE__.
ID of the shutter control instance
**Example**
```php
SC_Stop(12345); //Stop
```
---
# USBMapper
> Symcon documentation · English · generated on 2026-09-26
> Index: https://www.symcon.de/en/llms.txt
Source: https://www.symcon.de/en/service/documentation/module-reference/legacy/usbmapper/
_Requires Symcon >= 5.5_
> **Warning:** This module is deprecated and should no longer be used
.
The module automatically sets the correct USB port to the entered serial ports.
### function scope
- The module automatically maps entered SerialPorts to the respective correct USB port.
- Several serial ports can be entered in the list.
- It is checked at the start of IP-Symcon and every minute whether the SerialPorts are configured correctly.
### requirements
- Linux or Raspberry Pi
### Software Installation
- Via the [Module Store](https://www.symcon.de/en/service/documentation/components/management-console/module-store/) install the module USB-Mapper.
### Setting up the instances in IP-Symcon
- Under "Add instance" the 'USBMapper' module can be found using the quick filter.
- More information about adding instances in the [Instances documentation](https://www.symcon.de/en/service/documentation/basics/instances/)
#### Configuration Page:
| Name | Description |
| ------- | ------------------------------------------------- |
| Devices | List, which contains the SerialPorts to be mapped |
## USBM_FixPorts
Source: https://www.symcon.de/en/service/documentation/module-reference/legacy/usbmapper/usbm-fixports/
`bool USBM_FixPorts(int $InstanceID)`
_Requires Symcon >= 5.5_
Checks whether the USB ports are still configured correctly
**Parameters**
- `$InstanceID` (int): ID of the Instance
**Returns** (bool): If the command could be executed successfully, it returns __TRUE__ as result, otherwise __FALSE__.
ID of the Instance
**Example**
```text
USBM_FixPorts(12345);
```
---
# Web Graph
> Symcon documentation · English · generated on 2026-09-26
> Index: https://www.symcon.de/en/llms.txt
Source: https://www.symcon.de/en/service/documentation/module-reference/legacy/web-graph/
_Requires Symcon >= 4.3_
The module is used to make already existing diagrams available via WebHook. The WebHook can then be called both locally and via Connect Service. Stylistic configurations are also possible via parameters in the URL.
### function scope
- Creates a custom Webhook
- Adding the allowed object IDs for diagrams via list
- Ability to secure via username and password
- Deployment via WebHook both locally or via Connect Service
- Configuration of the display via URL parameters
### prerequisites
- Active subscription when using the Connect Service
### Software installation
- Using the [Module Store](https://www.symcon.de/en/service/documentation/components/management-console/module-store/) to install the Web Graph module.
### Setting up instances in IP-Symcon
- Under "Add Instance" the 'Web Graph' module can be found using the quick filter.
- More information about adding instances in the [Instances documentation](https://www.symcon.de/en/service/documentation/basics/instances/)
#### Configuration page:
| Name | Description |
| --------------------------- | ----------------------------------------------------------------------------------- |
| Access List | The list contains the object IDs of diagram media which may be provided via WebHook |
| User Name/Password (Expert) | Restricts access using a user name and password |
| Test environment | Here you can try out different settings and read out the appropriate URL |
After entry in the "Access List" the graphs are available with their ID.
#### Example
Diagram media with the ID 12345 is entered into the "Access List". Thereupon this is visible under:
Local:
http://127.0.0.1:3777/hook/webgraph/?id=12345
Symcon Connect Service: https://xxxxxxxxxxxxxxxxxxxxxxxxxxxxxxxx.ipmagic.de/hook/webgraph/?id=12345
Additional settings can be appended to the URL.
/hook/webgraph/?id=12345&startTime=&timeSpan=3&isHighDensity=1&isExtrema=&isDynamic=1&isContinuous=&width=0&height=0&showTitle=&showLegend=
### status variables and profiles
No additional status variables or profiles are created. Only the WebHook "/hook/webgraph/" is entered.
### Visualization
No further configuration or display is possible via the Visualization.
---
# Wunderground Weather
> Symcon documentation · English · generated on 2026-09-26
> Index: https://www.symcon.de/en/llms.txt
Source: https://www.symcon.de/en/service/documentation/module-reference/legacy/wunderground-weather/
_Requires Symcon >= 4.2_
> **Warning:** This module is deprecated and should no longer be used
.
The module queries weather data via the Wunderground API.
You need to register at [Wunderground](https://www.wunderground.com/) to get an API key.
Current data, severe weather warnings, as well as hourly and daily forecasts can be queried.
### functional scope
- Enable/disable query of desired weather data.
- Adjustability of the amount of severe weather, hourly and daily data.
- Timer for automatic updating of data.
### Software Installation
- Via the [Module Store](https://www.symcon.de/en/service/documentation/components/management-console/module-store/) install the WundergroundWeather module.
### Set up the instances in IP-Symcon
- Under "Add instance" the 'WundergroundWeather' module can be found using the quick filter.
- More information about adding instances in the [Instances documentation](https://www.symcon.de/en/service/documentation/basics/instances/).
#### Configuration Page:
| name | description |
| ------------------------------------- | ------------------------------------------------------------------------------------------------------------------------------------------------------------------------------------------------------------------------------------- |
| Location | Location from which the data should be taken. Whether a location is available can be tried on the [wunderground.com](https://www.wunderground.com/) page. If a location is not available, a nearest larger location should be chosen. |
| Country | The country must be entered here. |
| PWS ID | ID of the 'Personal Weatherstation' Here you can query a specific weather station |
| API Key | Wunderground API Key. Can be requested on the Wunderground homepage after registration. "More"->"Weather API for Developers". |
| Query Current Data | Enables the query of current weather data. |
| Hourly Forecast | Enables the query of the hourly forecast. |
| 12-hourly forecast | Activates the query of the 12-hourly forecast. |
| Daily forecast | Activates the query of the daily forecast. |
| Poll severe weather warning | Activates polling of the severe weather forecast. |
| number of forecasts (12-hourly) | The number of 12-hourly forecasts. Maximum value: 8 |
| Number of forecasts (daily) | The number of daily forecasts. Maximum value: 4 |
| number of predictions (hourly) | The number of hourly predictions. Maximum value: 24 |
| Number of severe weather warnings | The number of severe weather forecasts. Maximum value: 6 |
| Update Weather Data | Sets the timer in minutes how often the weather data should be updated. (current/hourly/12-hourly) |
| Update severe weather warnings | Sets the timer in minutes how often the severe weather warnings should be updated. |
| Update Weather button | Updates the weather data (current/hourly/12-hourly/daily). If all three queries are deactivated or the timer is set to 0 => Timer deactivated |
| Button Update severe weather warnings | Updates the severe weather warnings. Provided the severe weather warning query is deactivated or the timer is set to 0 => Timer deactivated |
### status variables and profiles
The status variables/categories are created automatically. Deleting individual ones can lead to malfunctions.
#### Current weather data
| Name | Type | Description |
| --------------------- | ------- | -------------------------------------------------------------------------------------------------------------------------------------- |
| Air pressure | Float | Specification in hPa |
| Humidity | Float | Indication in % |
| Precipitation/h | Float | Indication in liters/m² |
| Precipitation day | Float | in liters/m² |
| Visibility | Float | Indication in km |
| Solar Radiation | Float | Specified in W/m² |
| Temperature | Float | in °C |
| Temperature felt | Float | Indication in °C |
| Temperature dew point | Float | value in °C |
| UV radiation | Integer | Information: [UVIndex Explanation](https://www.wunderground.com/article/science/weather-explainers/news/uv-index-sunburn-skin-dangers) |
| Wind Gust | Float | Specification in km/h |
| Wind Speed | Float | Specification in km/h |
| wind direction | float | indication in cardinal points |
#### Hourly forecast
The variables are marked with 1..24h. (1 = forecast next full hour; 24 = forecast of the 24th full hour)
| Name | Type | Description |
| ------------------- | ------- | ------------------------------------------------------ |
| Condition | String | Describes the weather e.g. "Overcast", "Rain possible" |
| Humidity | Float | Specification in % |
| Air Pressure | Float | Indication in hPa |
| Rainfall Amount | Float | Indication in liters/m² |
| Probability of rain | Integer | Indication in % |
| Temperature | Float | in °C |
| Cloud cover | Integer | Specified in % |
| Wind Speed | Float | in km/h |
| wind direction | float | indication in cardinal directions |
#### 12-hourly-forecast
The variables are marked with 12, 24..96h (12 = forecast in 12 hours; 96 = forecast in 96 hours)
**Note: the 12h-hourly forecast is no longer provided by Wunderground. The variables remain for compatibility reasons, but contain the values of the daily forecast.**
| Name | Type | Description |
| ------------------- | ----- | ------------------- |
| maximum temperature | float | specification in °C |
| Lowest temperature | Float | Indication in °C |
#### Daily forecast
The variables are marked with 1..4d (1 = tomorrow; 2 = the day after tomorrow ... )
| Name | Type | Description |
| ------------------- | ------- | ------------------------------------------------------ |
| Condition | String | Describes the weather e.g. "Overcast", "Rain possible" |
| Highest Temperature | Float | Specifies in °C |
| Lowest Temperature | Float | Indication in °C |
| Humidity | Float | Indication in % |
| Rainfall Amount | Float | Indication in Liter/m² |
| Probability of rain | Integer | Specified in % |
| Wind Speed | Float | in km/h |
| Wind Direction | Float | Indication in Cardinal Points |
#### Weatherwarning
| Name | Type | Description |
| ----------- | ------- | --------------------------------------------------------------------------------------------------------------- |
| Description | String | Describes the warning with possible additional information such as wind speeds or rain amounts. |
| Date | Integer | Specified in UnixTimeStamp. Date when the warning was issued. |
| Name | String | Written out type. e.g. thunderstorm |
| Type | String | 3-letter abbreviation for the warning [Overview](https://www.wunderground.com/weather/api/d/docs?d=data/alerts) |
#### Profile:
| name | type |
| --------------------- | ------- |
| WGW.Rainfall | Float |
| WGW.Sunray | Float |
| WGW.Visibility | Float |
| WGW.WindSpeedkmh | Float |
| WGW.UVIndex | Integer |
| WGW.ProbabilityOfRain | Integer |
## WGW_UpdateStormWarningData
Source: https://www.symcon.de/en/service/documentation/module-reference/legacy/wunderground-weather/wgw-updatestormwarningdata/
`bool WGW_UpdateStormWarningData(int $InstanceID)`
_Requires Symcon >= 4.2_
**Parameters**
- `$InstanceID` (int): ID of the Instance
**Returns** (bool): If the command could be executed successfully, it returns __TRUE__ as result, otherwise __FALSE__.
ID of the Instance
**Example**
```text
WGW_UpdateStormWarningData(12345);
```
## WGW_UpdateWeatherData
Source: https://www.symcon.de/en/service/documentation/module-reference/legacy/wunderground-weather/wgw-updateweatherdata/
`bool WGW_UpdateWeatherData(int $InstanceID)`
_Requires Symcon >= 4.2_
**Parameters**
- `$InstanceID` (int): ID of the Instance
**Returns** (bool): If the command could be executed successfully, it returns __TRUE__ as result, otherwise __FALSE__.
ID of the Instance
**Example**
```text
WGW_UpdateWeatherData(12345);
```