# Basics
> Symcon documentation · English · generated on 2026-09-26
> Index: https://www.symcon.de/en/llms.txt
Source: https://www.symcon.de/en/service/documentation/basics/
### Objects
IP-Symcon contains seven different types of objects:
__Objects can be categories, instances, variables, automations, events, media, or links.__
> **Note:** Every object is identified by a fixed and unchangable ID (identification number). This leads to multiple advantages:
>
> * Every object is unique and distintively identifiable
> * The name of an object can be changed at any time
> * Bigger projects are processed faster
> * Extensive functions of object management
> * Performant links within the software
### Properties of an object
The properties or settings of an object can be called via double click or "Right click" -> "Edit object".
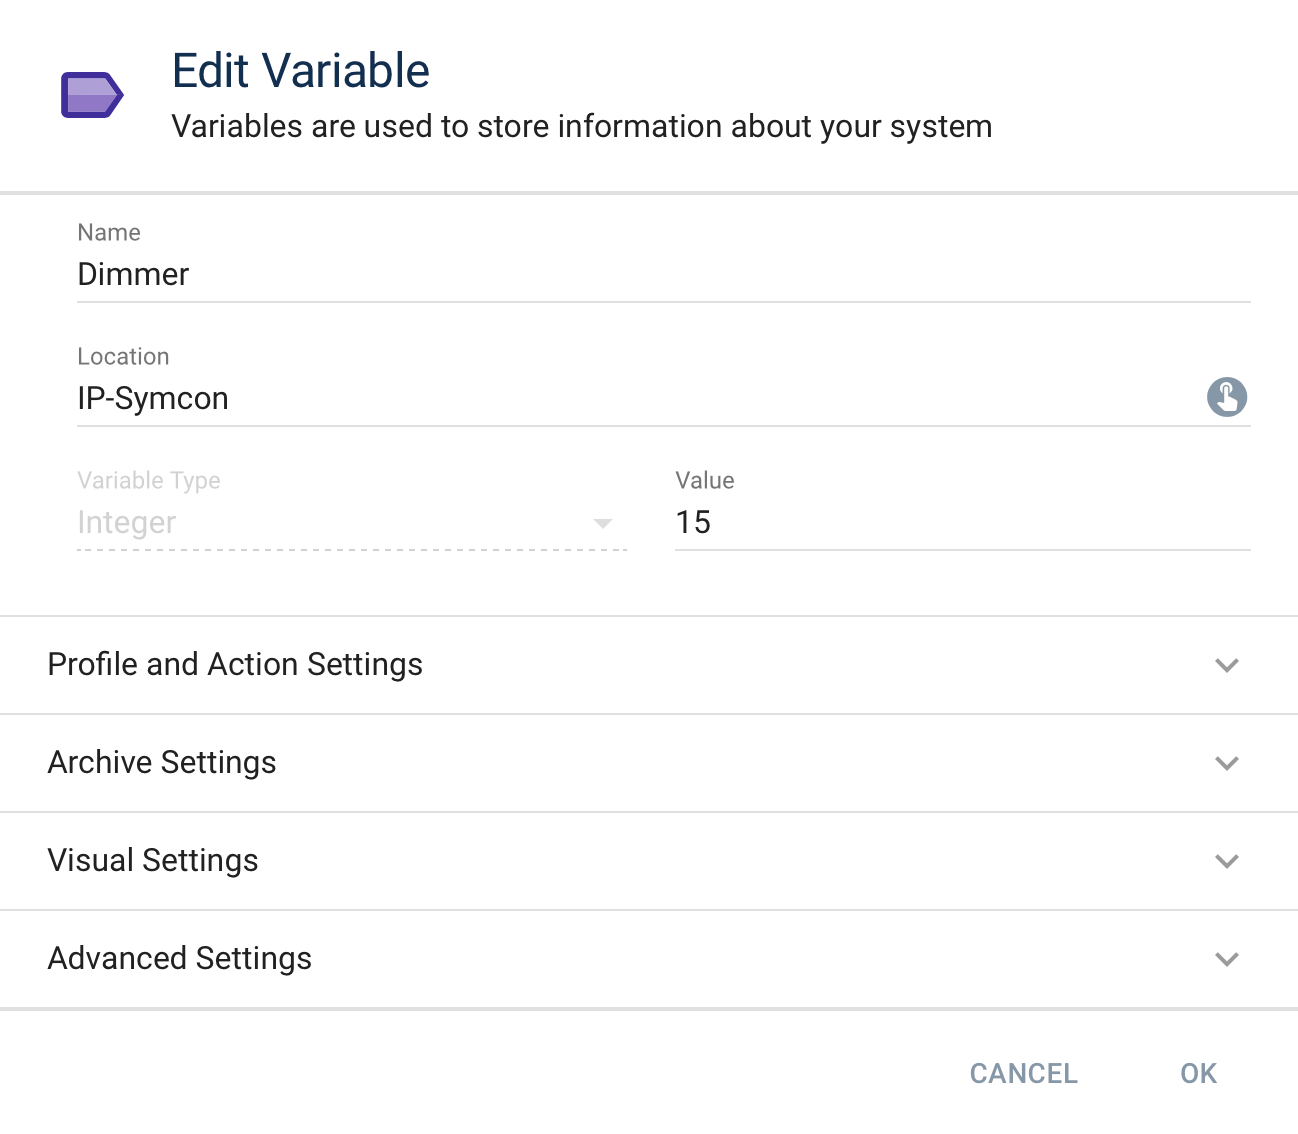
__ObjectID__
Every object within IP-Symcon posesses a unique and unchangable identification number (ObjectID). Thus, every object is distinctively identifiable and referencable.

__Name__
This is the name of the object. The name is also used when the object is shown in [Visualizations](modules/index.md).
__Location__
The location is the parent object in the object tree and defines its position in the object tree as well as the WebFront.
> **Note:** Certain instances, e.g., configurators, are positioned in specific special categories. These instances cannot be moved.
#### Visual Settings
These settings define the behavior in the WebFront.
__Icon__
This is a symbol that is used in [Visualizations](modules/index.md). For further informations, see [Icons](components/icons.md).
__Show object__
The check box controls whether the object is shown in the [Visualizations](modules/index.md) or remains hidden.
__Show title (since Symcon 9.1)__
Controls whether the title of the object's tile is shown or hidden in the visualization.
__Show maximize button (since Symcon 9.1)__
Controls whether the maximize button of the object's tile is shown or hidden in the visualization.
__Activate object__
Theis option controls if an object is active. If it is deactivated, the object is shown in grey in the [Visualizations](modules/index.md) and cannot be controlled.
#### Advanced Settings
Additional optional settings
__Description__
This is a description of the object. It can be used to store important notes and provide a direct description.
__Ident__
Objects possess an additional identifier Ident. Unlike a name, every value of Ident within a category of the logical tree view needs to be distinct.
### Context Menu
The context menu in the [Object Tree](components/management-console.md) provides a multitude of functions.
> **Note:** In addition to the described functions, each object type provides additional type specific options, see Object Type Specific Context Entries
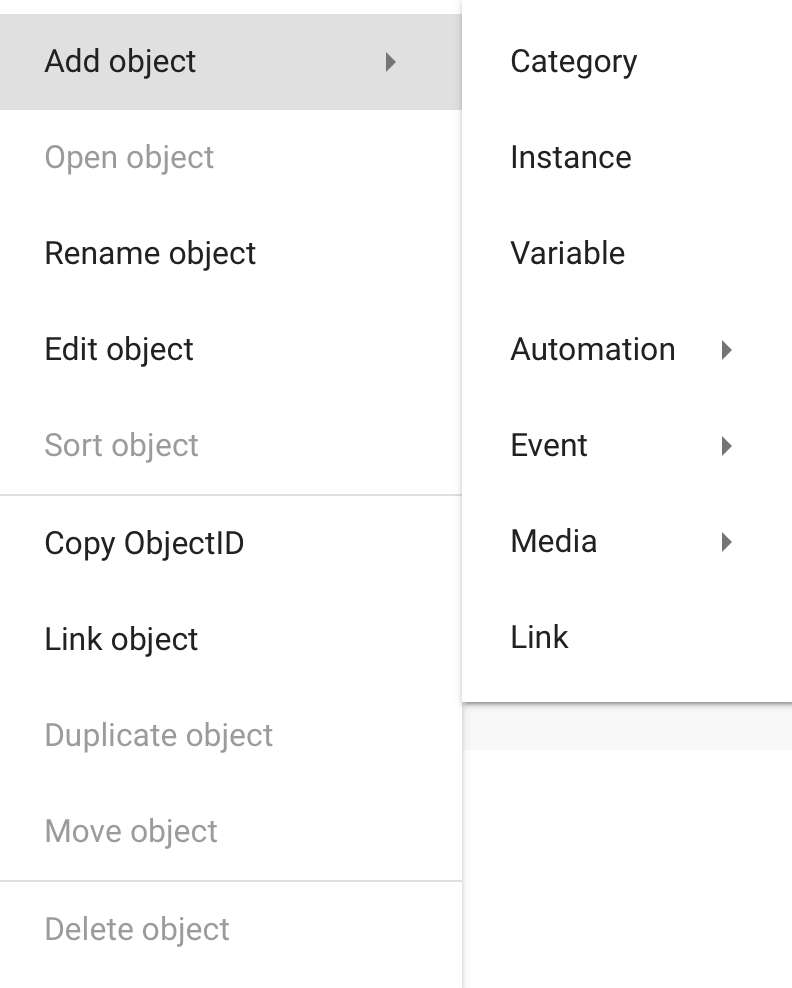
#### Add Object
Add a new object. A dialog is opened that configures all relevant settings step by step.
For further information, see [Add Object](how-to.md).
#### Open object
If the object has an object specific action, it is called. For instances, the configuration is opened, for automations the corresponding editor, media shows a preview. Otherwise, the option is deactivated. If possible a double click opens the object. Otherwise it edits the object.
#### Rename Object
Change the name of an object. The ObjectID and Ident remain unchanged. Multiple objects can have the same name.
#### Edit Object
Every object offers the option "Edit Object". It can be used to read different informations and configure settings.

#### Sort Object
Position the object at any position in the object tree. This option also controls the position in the [Visualizations](modules/index.md).
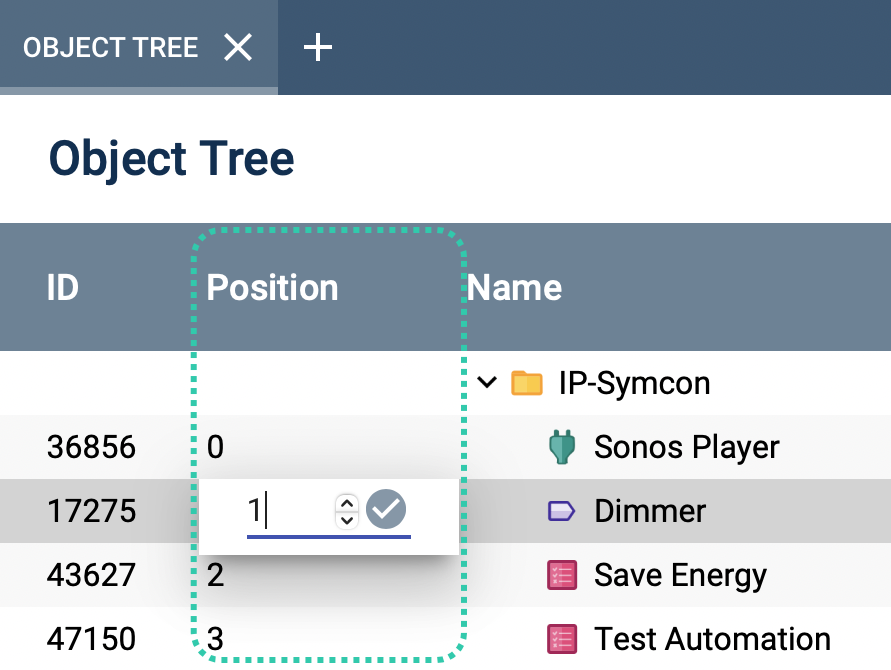
> **Note:** The "Position" column can be displayed permanantly with the "Columns" option. Thus, objects can be sorted faster via double click on the Position value instead of clicking "Sort object" for each object in the context menu.
#### Copy ObjectID
Copy the ObjectID into the clipboard. It is useful to insert the IDs into scripts. ("Right click->Insert" or "Ctrl + V" in the editor)
#### Link Object
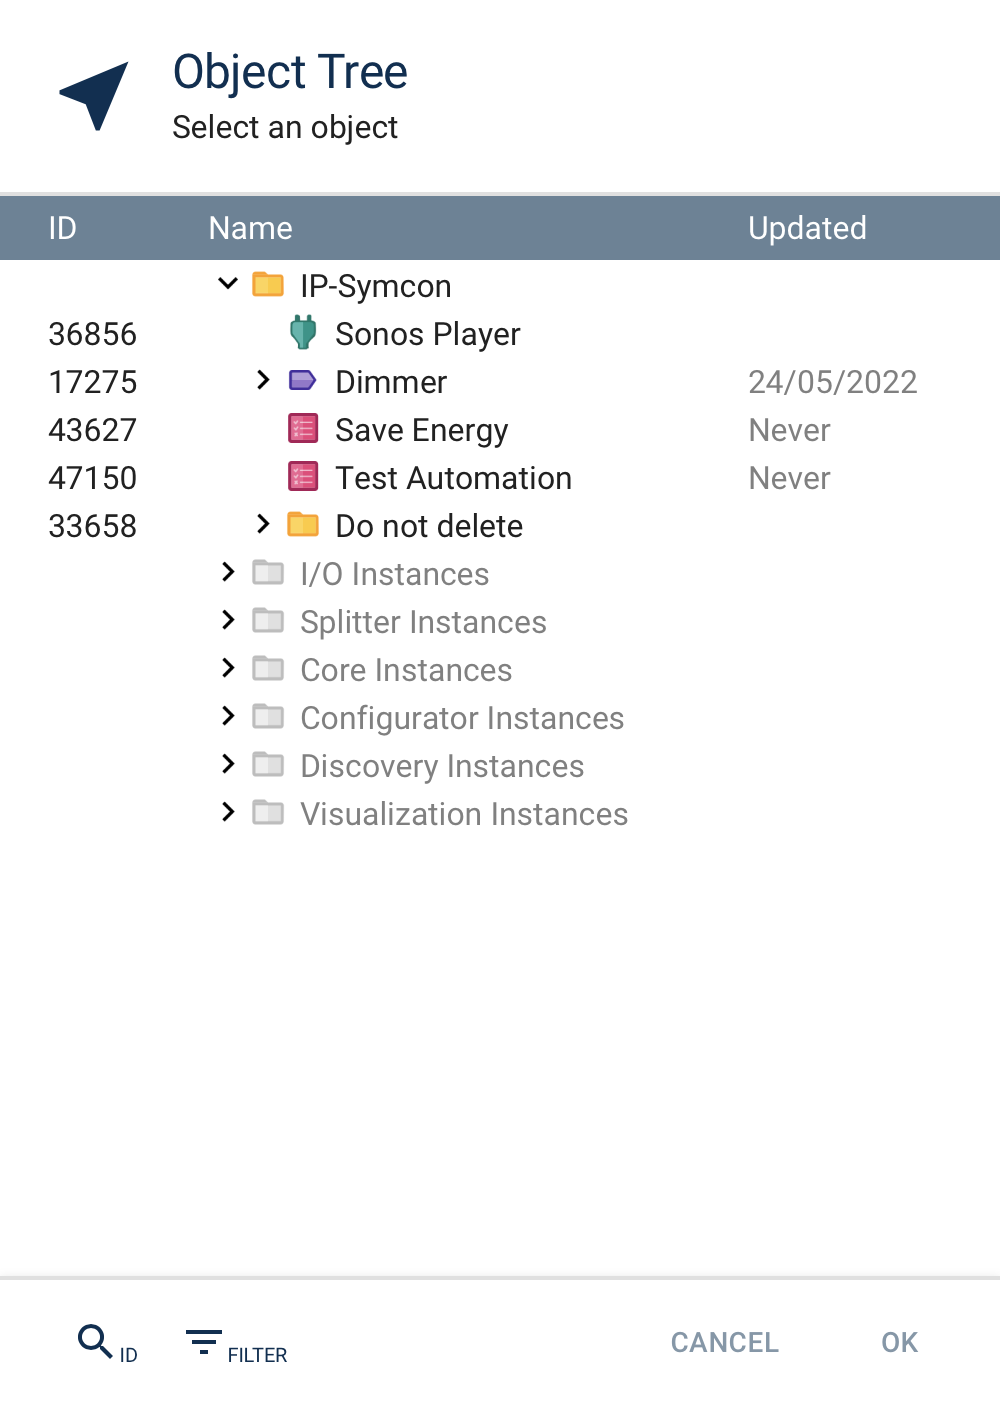
Create a link to the object. Multiple links can refer to the same object. The position of the link object is chosen in the dialog window.
#### Duplicate Object
Create an identical object with its own distinct ObjectID.
#### Move Object
Open a dialog to select the new selection of the object and place it there.
#### Delete Object
Delete the object and all its children, if applicable.
### Object Type Specific Context Entries
#### Search for references (All except for category)
Open a dialog that either states that there are no references or lists all references.
The depending criteria are checked depending on the object type:
| Object Type | Where is checked for the reference/ID? |
| ----------- | ---------------------------------------------------------------------------- |
| Variable | The IDs for "VariableAction" and "VariableCustomAction" are checked. |
| PHP Script | The content of the PHP Script is checked for the ID. |
| Event | The content and the trigger are checked for the ID. |
| Link | The TargetID/Value is checked. |
| Instance | IDs of possible Objects that are used on the configuration page are checked. |
#### Test Commands (Instances only)
Open a dialog to test the most relevant [Actions](concepts/automations.md) of an instance.
__For Experts:__ With the keyboard combination Ctrl + C, the currently set action can be copied as PHP Code and can be inserted into a script editor.
#### Change Variable (Variables only)
Open the dialog for setting a variable value.
#### Execute Automation (Automations only)
Executes the automation without opening it.
Eventual output is shown in a dialog.
#### Jump to source object (Links only)
Jump to the source object within the object tree.
## Categories
Source: https://www.symcon.de/en/service/documentation/basics/categories/
To simplify the handling of multiple active devices and keep an overview over a multitude of instances, categories can be used. The instances within the location tree can be assigned to different categories.
### Setup
A category can be created with the "+" at the bottom left or via "right click"->"__Add object__"->"__Category__". In a next step, the category can be configured. This includes the name and location. A suitable name could refer to the area where the according devices are localized. _For example, in a one family house, the categories could refer to the floors._
> **Warning:** When a category is deleted, consider that all subcategories and devices within that category are removed from the location tree as well.
### Configuration
The created category can be found in the [Object Tree](components/management-console.md). Further categories can be created in the same way, e.g., multiple categories for different floors.
With a right click on the chosen main categorie and "Add Object -> Add Category", the main location is already selected as location. Afterwards, the subcategory can be configured, e.g., naming it "living room". This procedure can be repeated multiple times.
The order of the categories can be modified with "Right click -> Sort Objects".
Nesting categories within each other can also be done via Drag and Drop.
> **Note:** We recommend to use the structure __Category/Subcategory/Device__ as follows:
> __Floor / Room / Device__
### Hint
For a better overview, this naming should be done from the start as more devices are added over time. Every device name should explain itself und contain no previously named components.
E.g., Ground Floor / Living Room / Ceiling Lamp (North)
### WebFront
An additional advantage of this structure is the automatic direct visualization within the WebFront.
When a shown category contains visible subcategories, a navigation bar for categories is shown automatically.
When a subcategory is selected, the object area shows its content.
When the shown subcategory contains further subcategories, the navigation is extended automatically.
Categories that are linked with the "Link" object are shown in the navigation bar as well. The property "Show Navigation" can be used to hide the navigation bar when needed.
## Instances
Source: https://www.symcon.de/en/service/documentation/basics/instances/
Instances usually represent devices that are connected to IP-Symcon. Other instances include non-physical modules like [Text To Speech](modules/text-to-speech.md) or [Mediaplayer](modules/amazon-alexa.md) . The states of devices are represented via [Variables](concepts.md) in the [Management Console](components/management-console.md) and [WebFront](components/webfront-visualization.md).
### Inclusion
New devices can be added via the "Add Instance" dialog or the configurators within the management console. In addition, IP-Symcon automatically creates further instances that establish the communication between devices and IP-Symcon when required. These parent instances are exchangable and reconfigurable without including the device another time. For example, if the communication protocol should be changed from radio to serial, it can be changed in the corresponding gateway or I/O instance. From then on, the devices that are connected via the corresponding gateway are handled accordingly. However, the state variables, the existing scripts, or the originally created instance for those devices are unaffected.
### Parent Instances
Parent instances know and use the required protocols and interface properties to provide a connection between the devices and IP-Symcon. These instances need to be gateway or I/O instances.
If parent instances are required for a connection, IP-Symcon automatically creates and configures them. Eventually, further configuration is required, e.g., setting the IP address.
The fastest way to access the parent instance of a device/module is to use the gear within the corresponding configuration tab.
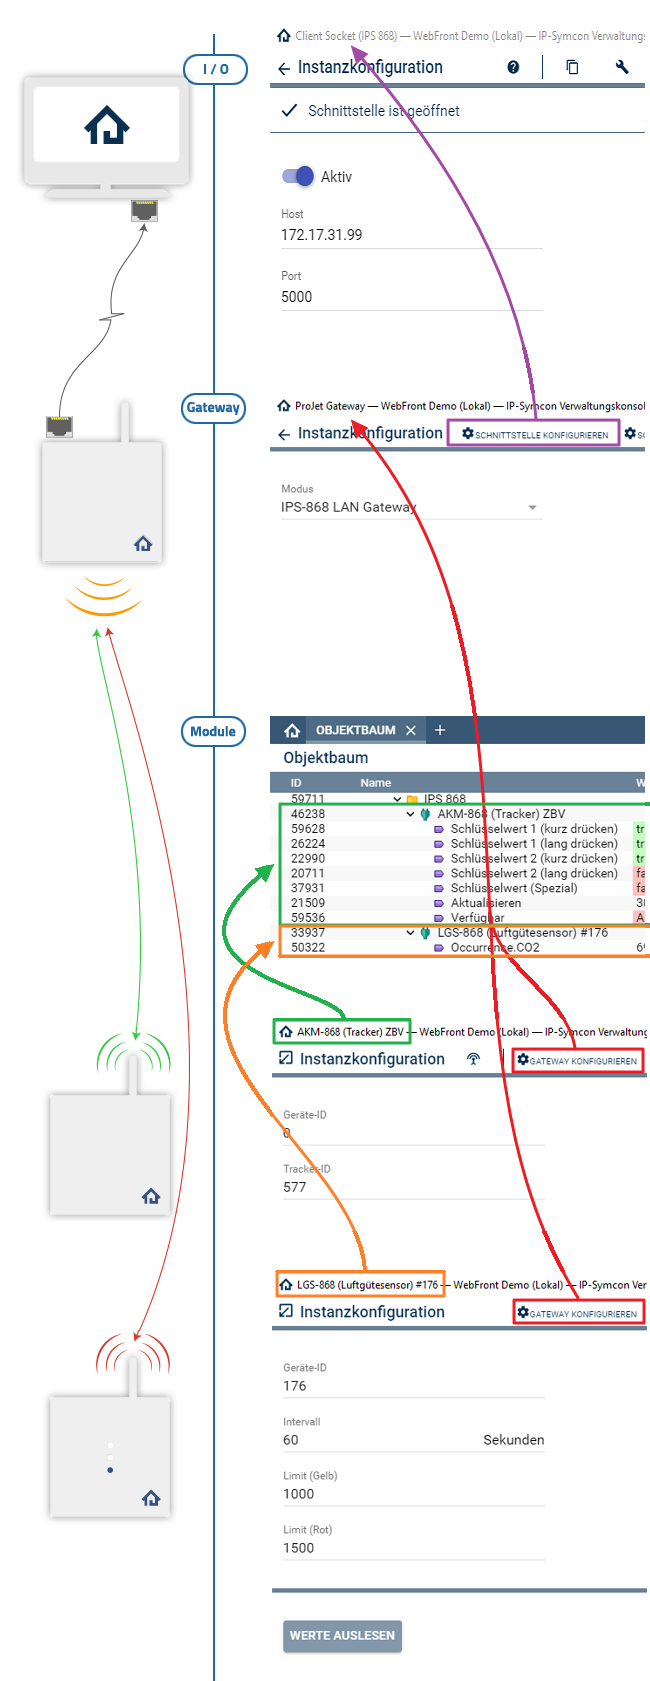
As shown in the example below, the two devices "AKM-868" and "LGS-868" communicate via radio with their parent instance "ProJet Gateway". The gateway itself communicates with its parent I/O instance "Client Socket IPS 868" via LAN.
The communication of the I/O instance could easily be changed from LAN to serial (which only makes sense if the new gateway communicates with IP-Symcon via a serial cable). The change can be done by changing the mode within "ProJet Gateway" to "Connection via: Serial". IP-Symcon automatically creates a new serial port instance that is connected to the gateway. The parent instance "Serial Port IPS 868" could be accessed via the gear on the configuration tab of the gateway. The two devices AKM and LGS would be completely unaffected by this change.
### Types of Inclusion
Instances are always included into IP-Symcon with a similar pattern.
There are three types of inclusion.
| Type | Description | Example Systems |
| ----- | ------------------------------- | ----------------- |
| 1:1:n | 1 I/O - 1 Gateway - n Instances | EnOcean |
| 1:m:n | 1 I/O - m Gateway - n Instances | LCN |
| 1:n | 1 I/O - n Instances | Register Variable |
### Connection Components
__I/O:__
I/O describes the type of communication between the gateway and the server (IP-Symcon).
| Type | Description |
| ------------- | ------------------------------------------------------------ |
| Client Socket | TCP client based communication |
| UDP Socket | UPD client based communication |
| Serial Port | serial based communication |
| Virtual I/O | emulation of a Serial Port, a Client Socket, or a UDP socket |
| WWW Reader | HTTP(Get) requests |
| HID | HID based communication (USB) |
| Server Socket | TCP server based communication |
__Gateway/Splitter:__
One or more instances of devices can be connected to one gateway. The gateway handles the communication between the devices and I/O.
> **Warning:** If a non-standard configuration is used, it needs to be controlled if the according I/O instance fits the corresponding configuration, e.g., LAN is used instead of a serial connection. In that case, the I/O instance needs to be changed.
### GUID
Every instance has a unique GUID that determines the type, e.g., an AKM-868 or WDT-868.
The GUID is a UUID and has the format 8-4-4-4-12. The numbers describe the amount of letters. Each letter is either 0-9 or A-F. Hypens and braces are required and only capital letters are allowed. (Example: {12345678-90AB-CDEF-1234-567890ABCDEF})
> **Warning:** The GUID should not be confused with die 5-digit ObjectID, which distinctly identifies an individual object but not its type.
### Create instance
The creation of an instance and the inclusion of devices is described here:
[Include Device](how-to.md)
### Example
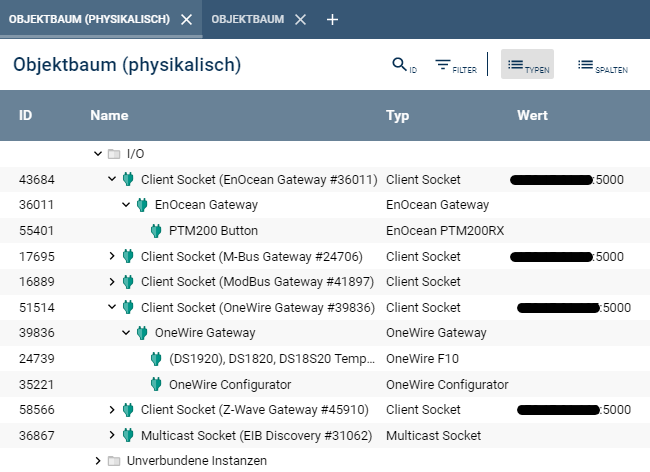
This is an example with the physical tree view.
Device instance "PTM200 Button"
-> (parent) gateway instance "EnOcean Gateway"
-> (parent) I/O instance "Client Socket (EnOcean Gateway #36011)"
## Configurators
Source: https://www.symcon.de/en/service/documentation/basics/instances/configurators/
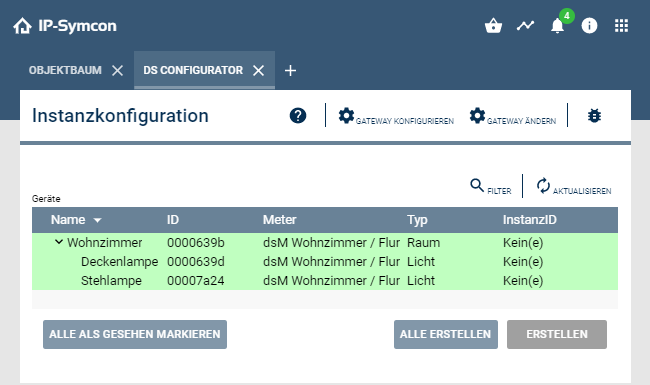
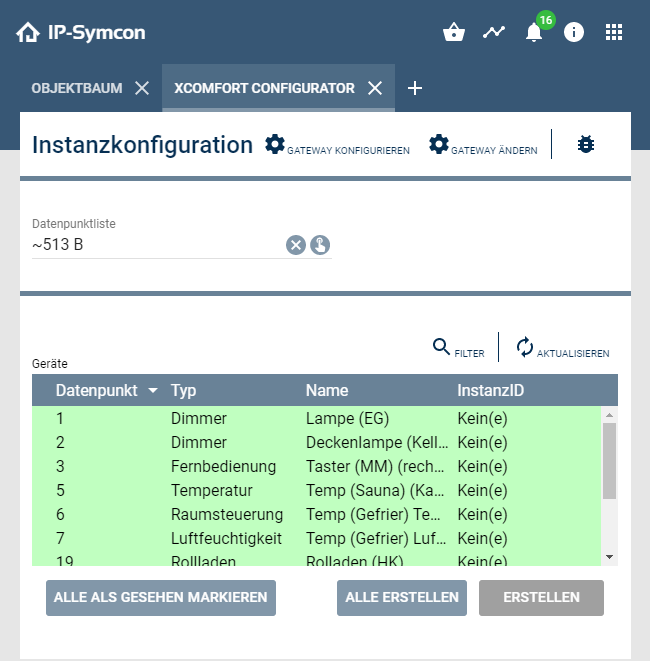
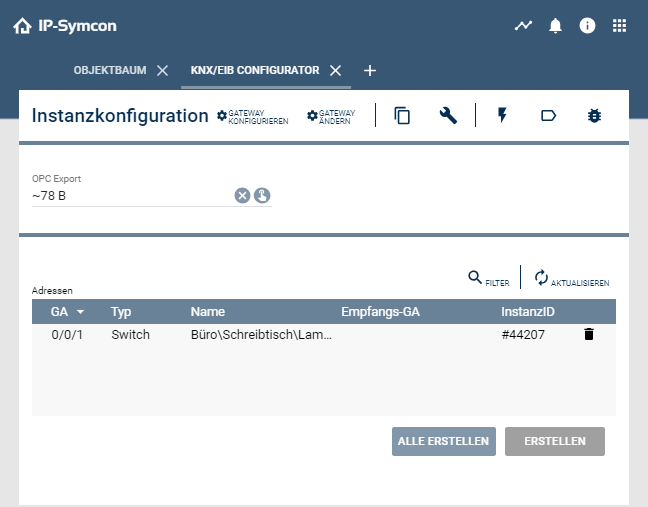
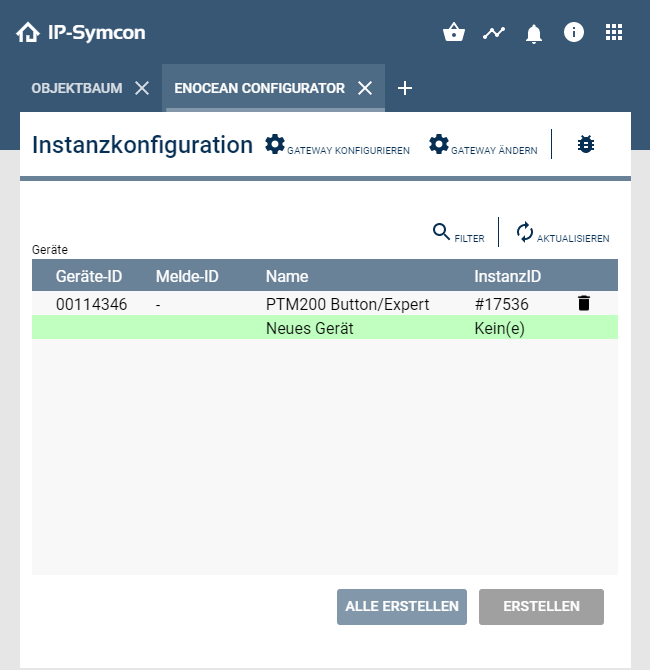
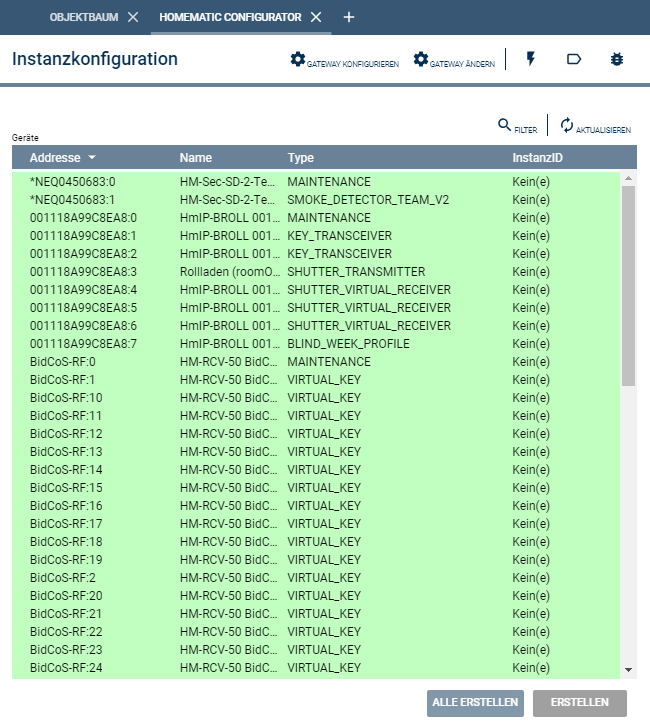
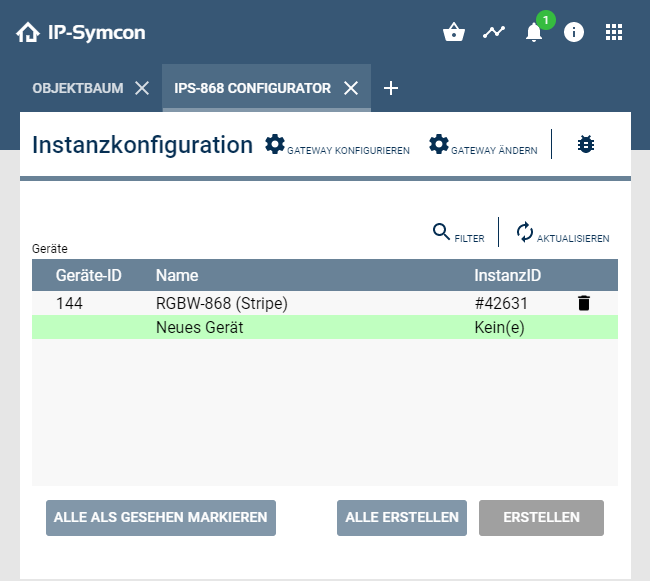
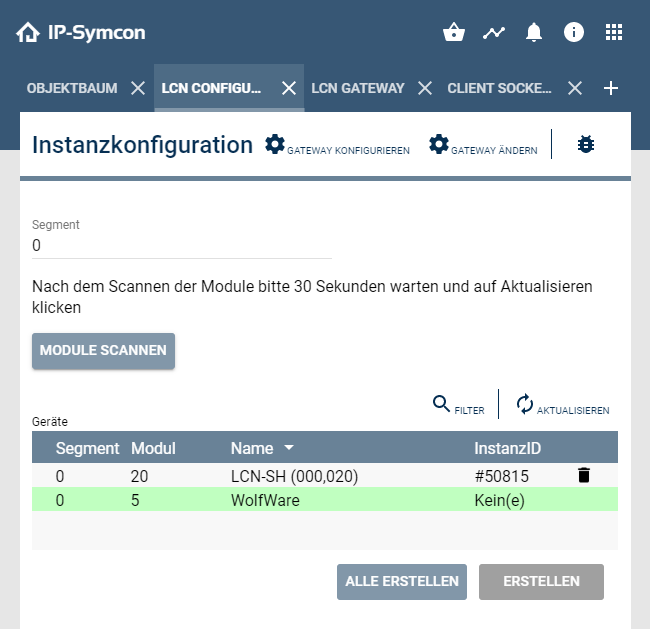
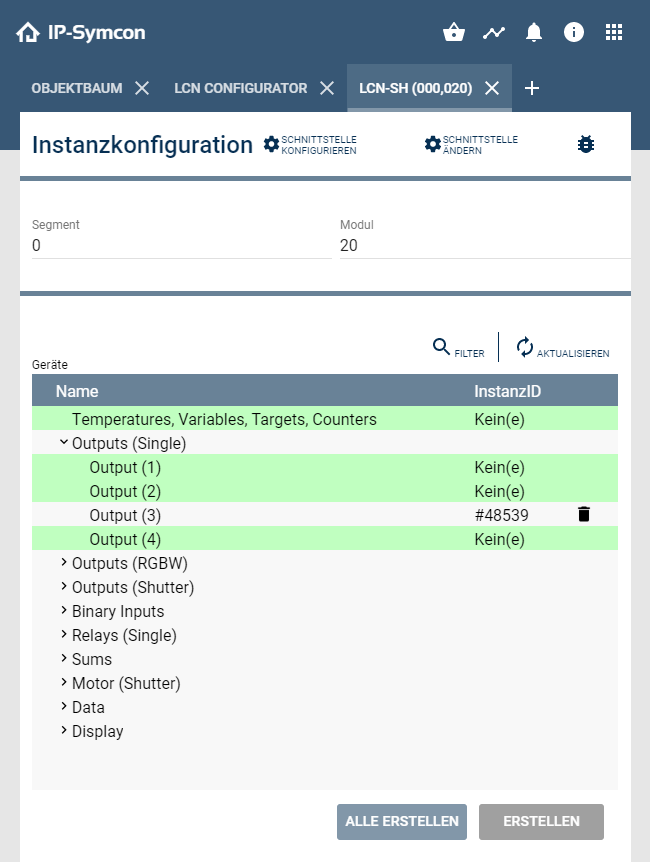
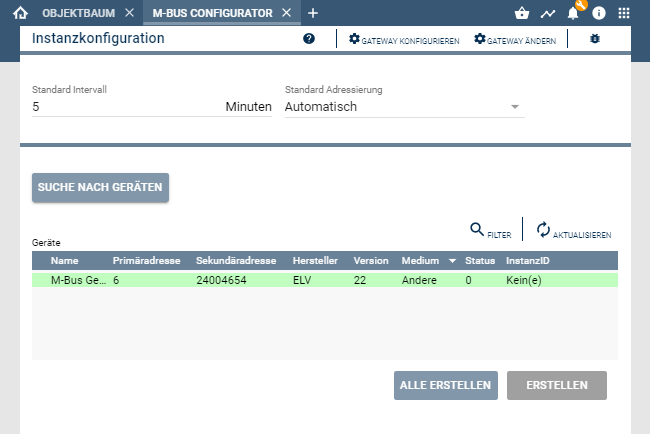
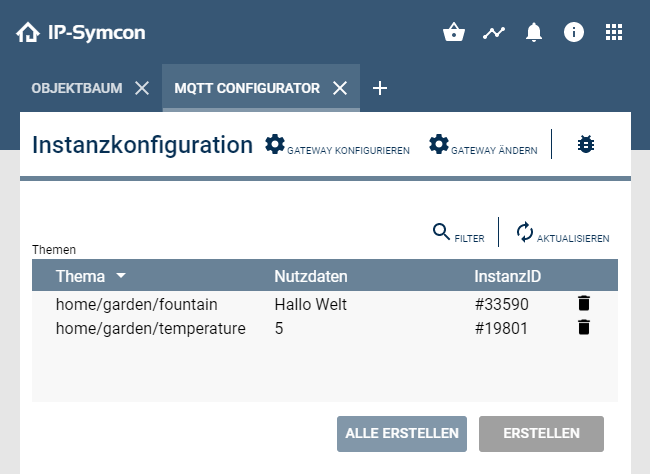
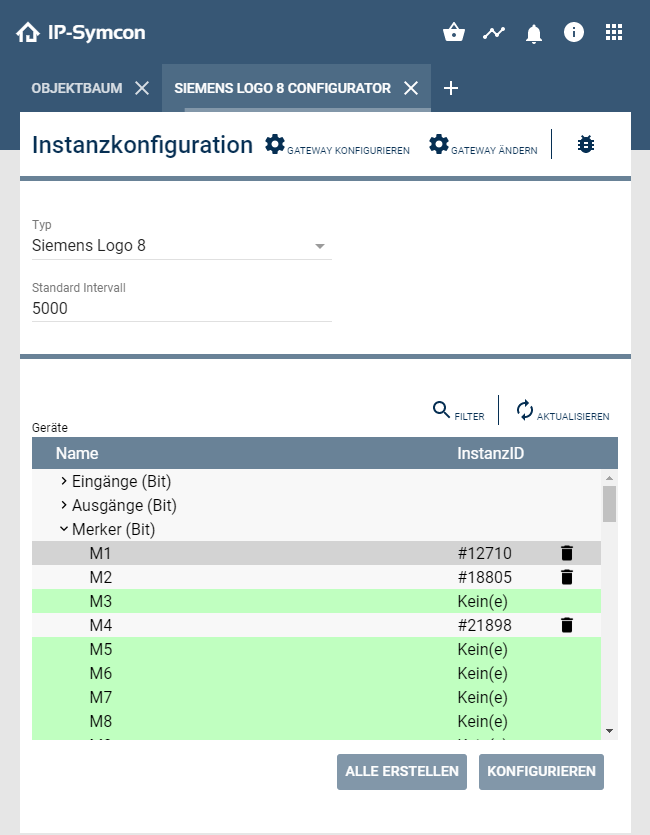
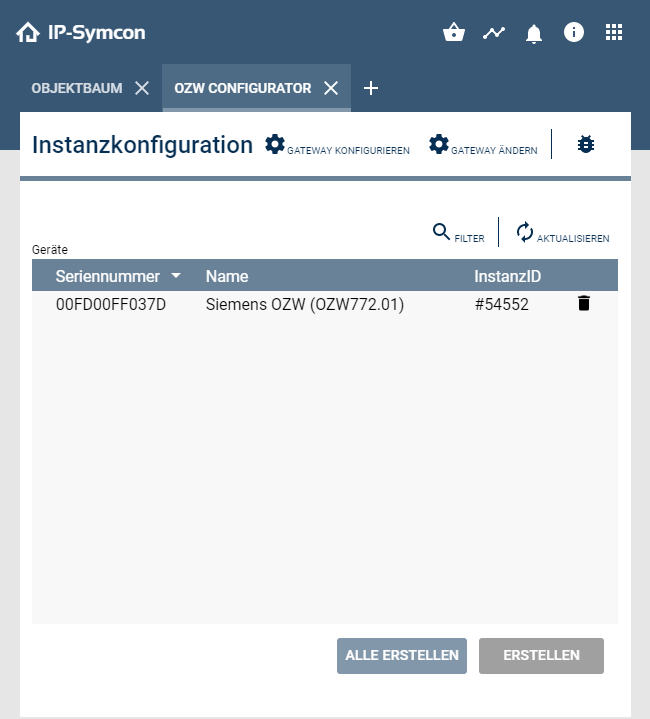
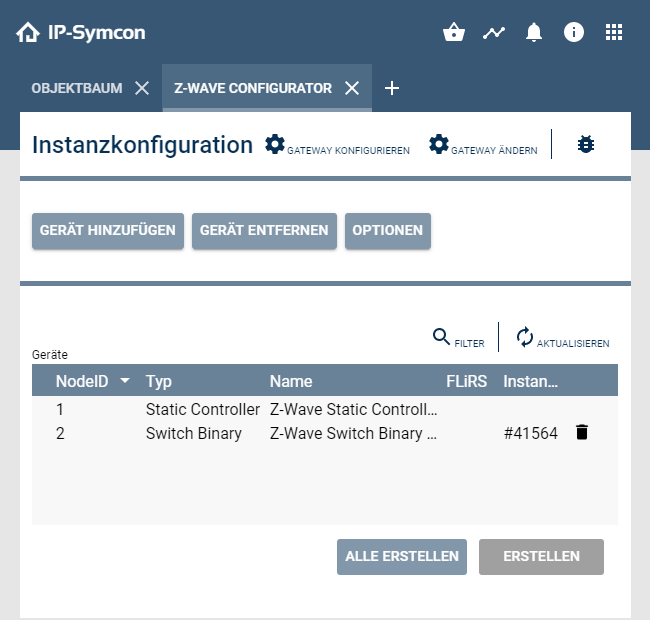
Configurators are a special type of instances. When a configurator is available for a system, it drastically simplifies the configuration of IP-Symcon. Configurators can be created for multiple strands/lines/gateways. A configurator can be created from the Welcome tab of the IP-Symcon management console.
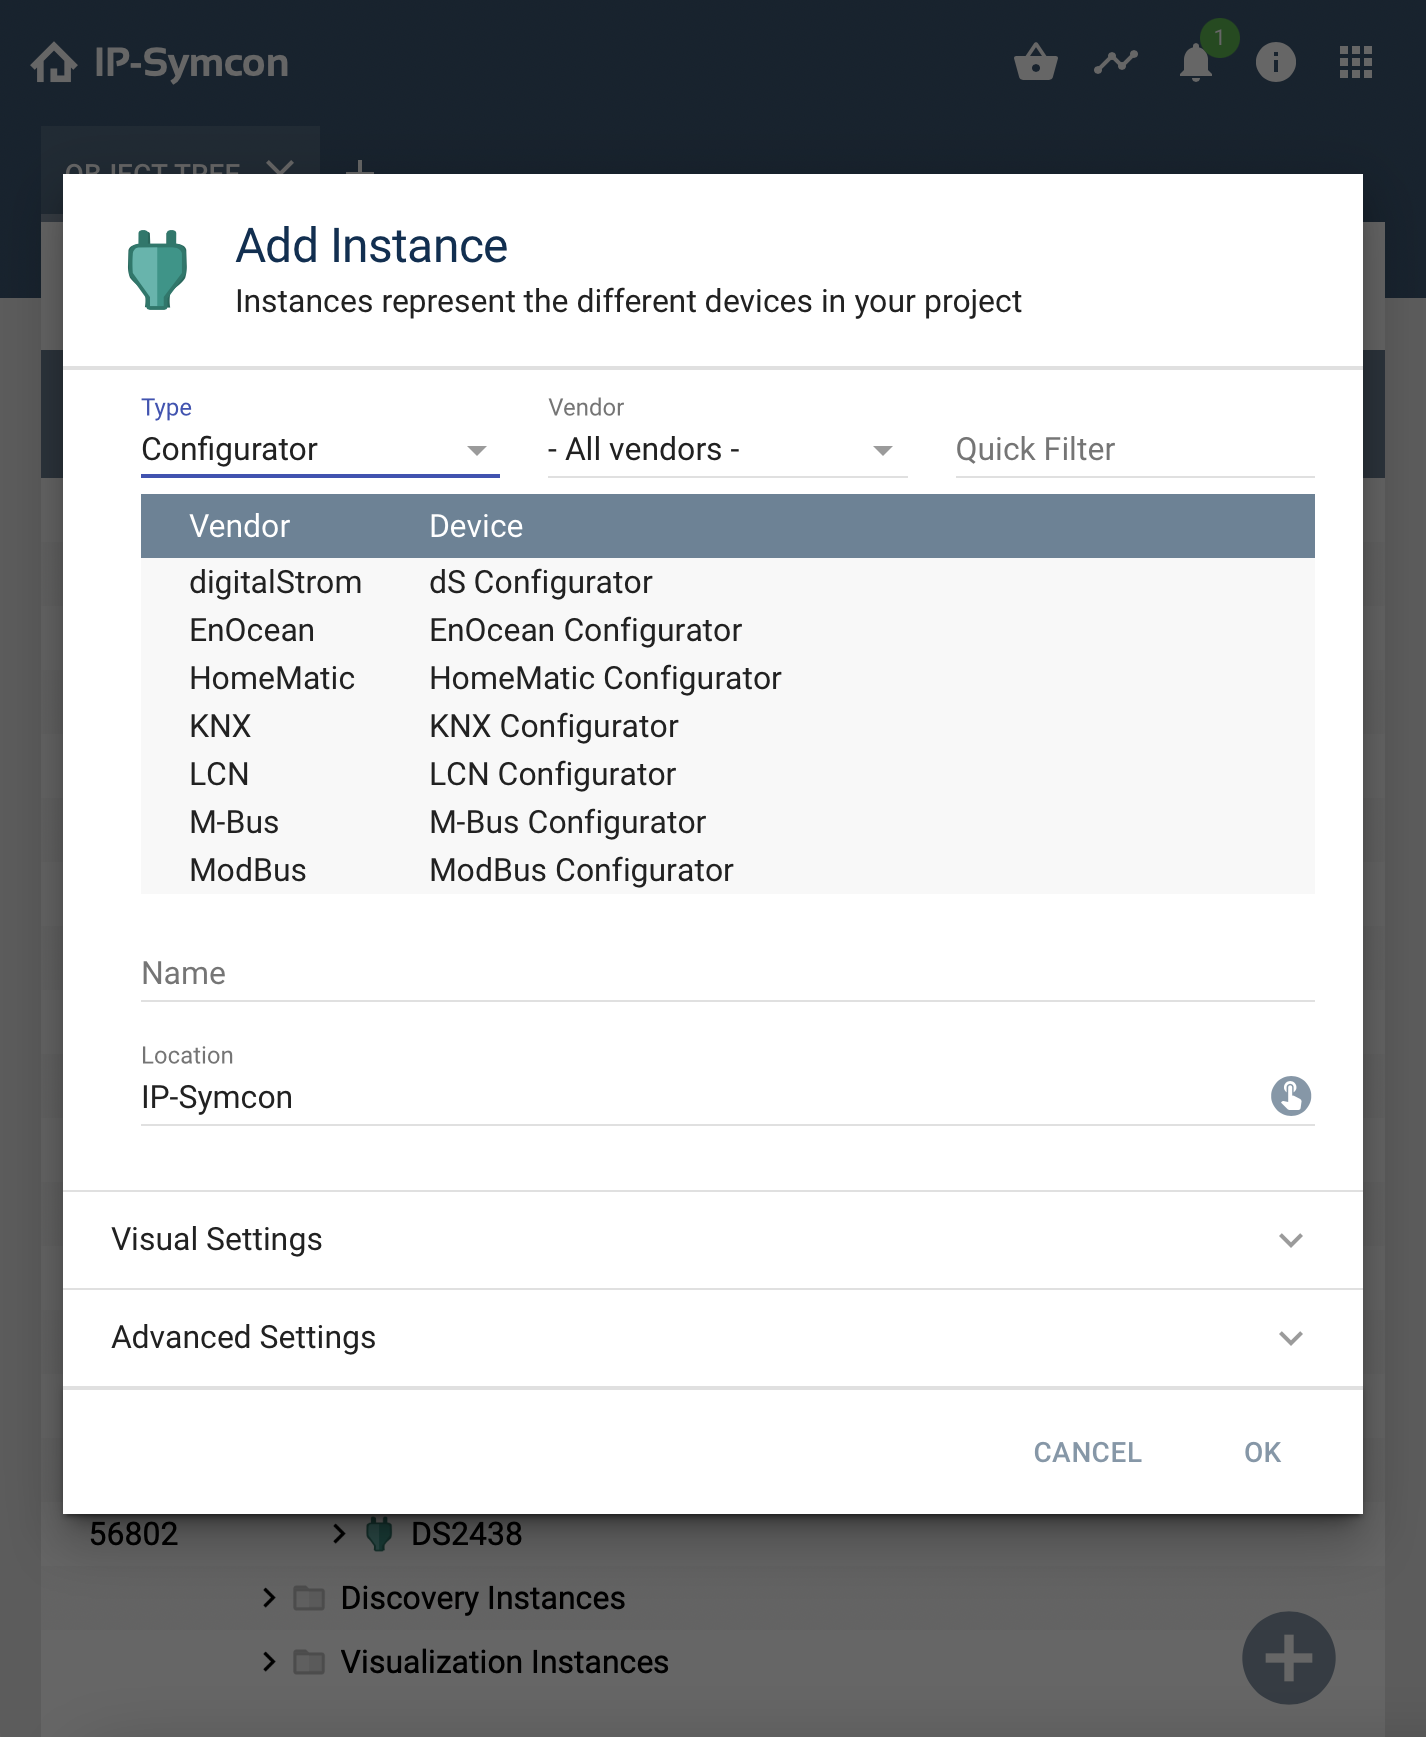
Currently, configurators are available for the following systems:
* [1-Wire](modules/1-wire.md)
* [digitalStrom](modules/digitalstrom.md)
* [Eaton xComfort](modules/xcomfort.md)
* [KNX](modules/knx.md)
* [EnOcean](modules/enocean.md)
* [HomeMatic](modules/homematic.md)
* [IPS-868](modules/ips-868.md)
* [LCN](modules/lcn.md)
* [M-Bus](modules/mbus.md)
* [MQTT](modules/mqtt.md)
* [Siemens Logo](modules/sps-siemens-vipa-logo.md)
* [Siemens OZW](modules/siemens-ozw.md)
* [Z-Wave](modules/z-wave.md)
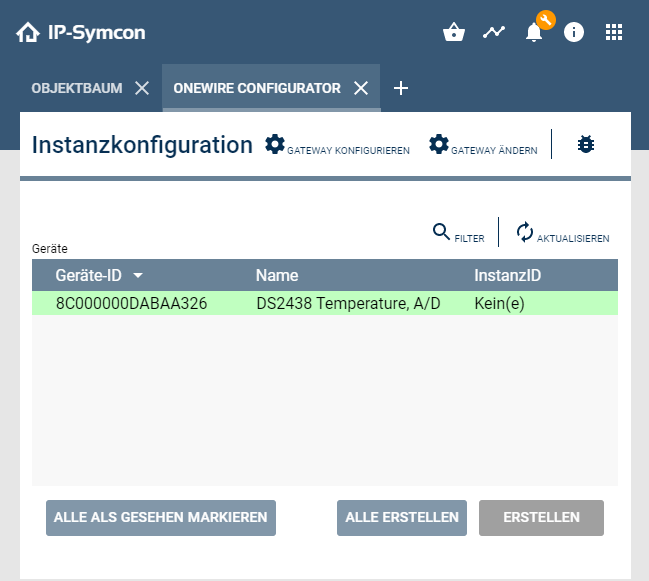
| Color | Meaning | Remark |
| ----- | ---------------------------------------------------------------------- | -------------------------------------------------------------------- |
| Green | New device that was not configured in IP-Symcon yet | Device can be added as instance |
| Red | Device is not available any more, but is still configured in IP-Symcon | Instance can be removed from IP-Symcon |
| Gray | The existing instance is configured differently than recommended | The Create button changes to Review to show the recommended settings |
| White | Device available and configured in IP-Symcon | No further actions required |
### Screenshots
#### 1-Wire Configurator
#### digitalStrom Configurator
#### xComfort Configurator
#### KNX Configurator
#### EnOcean Configurator
#### HomeMatic Configurator
#### IPS-868 Configurator
#### LCN Configurator
#### M-Bus Configurator
#### MQTT Configurator
#### Siemens Logo
#### Siemens OZW Configurator
#### Z-Wave Configurator
## Variables
Source: https://www.symcon.de/en/service/documentation/basics/variables/
A variable is a container for a value. The value can be boolean, float, integer, or string. Usually, variables contain status values of devices. In addition, new user defined variables can be created to store individual values which could be used for visualization or scripts.
> **Note:** [System Variables](concepts/automations.md) are no normal variables in the usual sense as they are only available within scripts.
IP-Symcon uses variables to exchange or store data. Variables that contain status values enable the use of devices, e.g., show the temperature of a thermometer in the visualization or activate and deactivate the lighting.
### Description
There are two types of variables within IP-Symcon:
#### Status Variables
Every instance of a device can have one or more status variables that are created automatically. These variables store the status of the device, e.g., on/off, temperature in °C, humidity, or battery.
The timing of updates and changes to a status or its value depend on the specific system. While a weather station periodically sends environmental data, the status of other systems like window contacts needs to be requested. The request interval is set in the configuration of the corresponding instance.
It is important to realize that status variables cannot be changed by the user. The variables merely reflect the status and datasets of the device.
[w]Do not delete status variables. Deleting can cause unpredictable behavior of an instance.[/w]
__Example 1:__
When changing the wanted room temperature for a heating control system, a command is executed that sends the wanted value to the device. The status variable "Temperature" itself is not changed as it merely shows the current temperature. The required commands can be found in the corresponding [Module Reference](modules/index.md). Alternatively, the command "[RequestAction](functions/access-variables.md) " can be executed directly on the variable. IP-Symcon will check for the dedicated command by itself and execute it.
__Example 2:__
A more abstract example in form of a motor vehicle: To accellerate or decellerate the vehicle, the corresponding pedals need to be pushed. It is not sufficient to set the speedometer needle to the desired speed.
> **Note:** Conclusion: Status variables merely provide information about the device and are explicitely marked as "Read Only".
#### User Defined Variables
User defined variables can be created individually and contain one of four data types (see Table Variable Types ). User defined variables can be manipulated by the user.
__Example 1:__
Integrating a previously unknown device, e.g., an AV amplifier, into IP-Symcon can be done with user defined variables.
__Example 2:__
A user defined variable can be used to convert data, e.g., the temperature in Celsius(°C) into Fahrenheit(°F).
### Variable Types
| Variable Type | Description | Example |
| ------------- | --------------------- | ------------------------------ |
| Boolean | True / False | On or Off |
| Float | Floating-point number | 231.956 |
| Integer | Whole numbers | -10, -4, 0, 32, 472 |
| String | Text | “Hello IP-Symcon. Hello World” |
### Create new variables
[Video](https://youtu.be/wNz7sKdhMKA?rel=0&cc_load_policy=1)
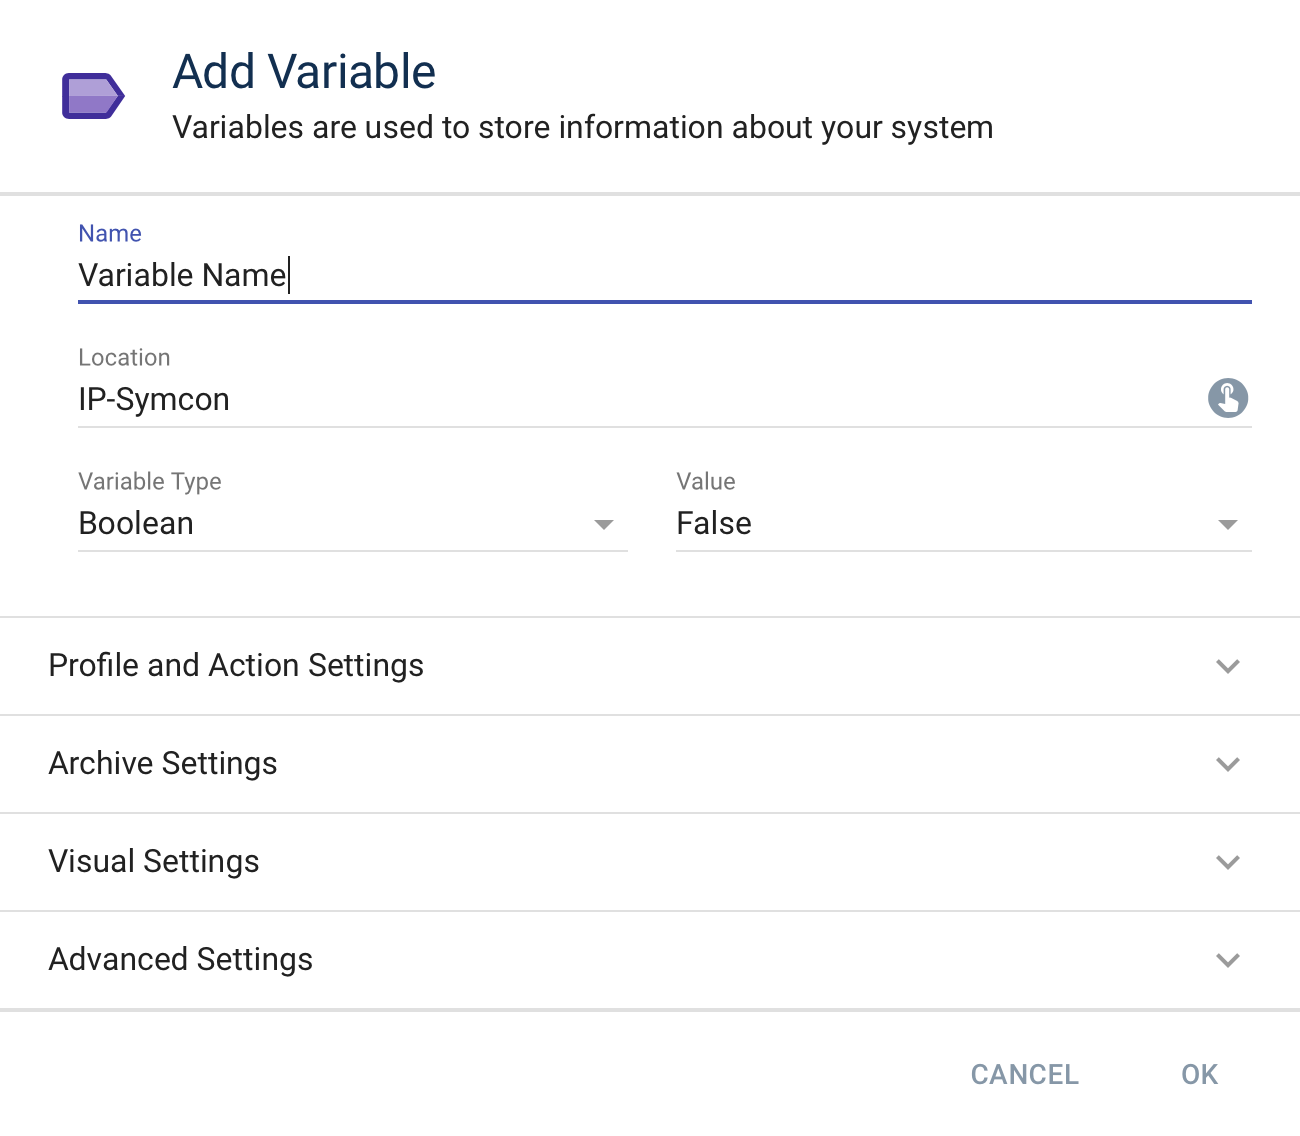
A variable can be created in the object tree via "+" or "Right click" -> "Add object" -> "Variable". When using the second approach, the variable is created directly below the chosen object und does not need to be categorized afterwards. A variable type and a [presentation](concepts.md) are chosen in the following window. [Logging](modules/archive-control.md) can also be activated for the variable. The [Aggregation](modules/archive-control.md) decides the type of logging.
Before confirming the creation with "OK", the variable should have a meaningful name. Optionally, a description and an [Icon](components/icons.md) can be chosen for the variable. The location of the variable is set with the dialog "Location" or can be changed afterwards via Drag and Drop in the object tree.
### Visualization of Variables
The display of the variables in the visualization can be adjusted so that a variable is displayed as a selection or slider, for example. These options can also be changed at a later date. A more detailed description of the options can be found here: [Variable visualizations](concepts.md)
### Edit Variable Values
The profile of a variable or its logging can be changed via double click on the name of the variable.
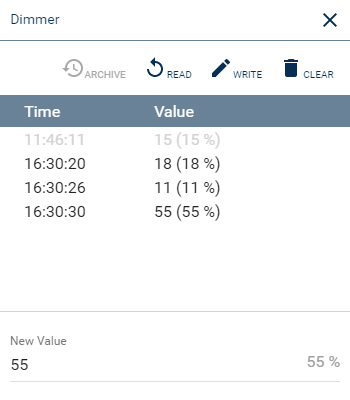
The "Surveillance Mode" can record the values of a variable or change it. It is accesed with a double click on the value of the variable. It is also possible to choose "Modify Variable" via context menu.
This function is meant primarily for testing. For example, it can be verified if the heating is activated on the simulated temperature or check the visualization of the variable in the WebFront.
The following picture shows the window for the "Surveillance Mode" that shows the ongoing changes to the variable and enables the modification. A modification can be repeated by clicking the button "Write".
> **Warning:** The value of a status variable can be modified even though it is marked as "Read Only". When modifying the value all corresponding [Events](concepts.md) are executed. The modification can be used to test user defined scripts but does not change the actual values of the physical device.
### Variable Actions
A [Variable Action](concepts.md) can be assigned to a variable via "Custom Action". It is called when the variable is clicked in the visualization, e.g., WebFront or a mobile app. In addition, the variable action is executed if the variable is switched, e.g., via the function [RequestAction](functions/access-variables.md) .
## Variable Actions
Source: https://www.symcon.de/en/service/documentation/basics/variables/variable-actions/
A variable action is executed when a variable is clicked via visualization.
The prepared [Action Script](concepts/automations.md) is executed. Additional data like the new "desired" value and the ID are passed via [System Variables](concepts/automations.md).
### Choose Variable Action
It is possible to choose an action with the "Edit variable" dialog by choosing "Custom action". The dialog "Edit Variable" is accessible when creating a variable, via double click on the variable within the object tree, or via right click on the variable and choosing "Edit object".
> **Note:** Some variables of added modules contain a "Default action". It can be overwritten with a "Custom action".
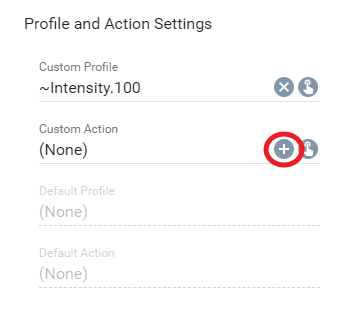
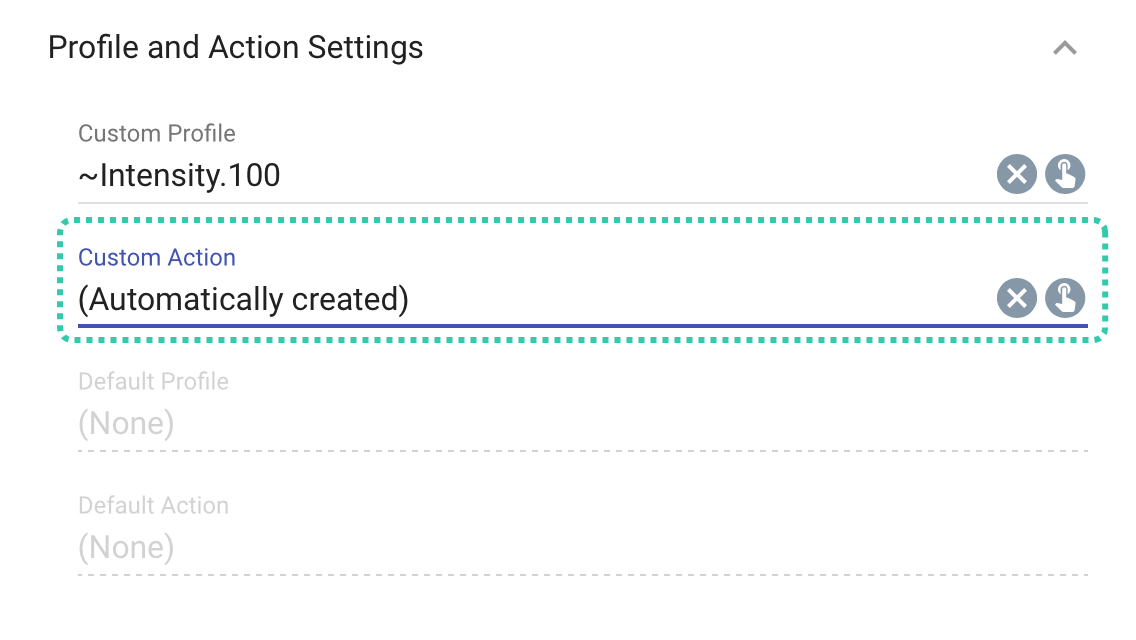
With the "+", a variable action can be created which only handles that the variable changes accordingly if it is clicked in the WebFront. This automatically created action script is displayed as "(Automatically created)"
### Create Variable Action
A chosen variable action is an action script.
For more information, refer to [PHP Scripts](concepts/automations.md) and [Action Scripts](concepts/automations.md).
## Variable Presentations
Source: https://www.symcon.de/en/service/documentation/basics/variables/variable-presentations/
_Requires Symcon >= 8.0_
Each variable has a variable presentation. Variable presentations are used to convert variable values such as True, False or 0, 1, 2, 3 into a human-readable form and to provide them with the necessary context data (e.g. °C). The variable presentation therefore specifies how a variable is displayed in the visualization. It also determines the control element with which the variable value can be changed.
### Select presentation
A presentation can be selected in the "Edit variable" dialog in the "Variable presentation" section. This dialog can be accessed when creating a variable or afterwards via "Object tree" -> "Double-click" or via "Object tree" -> "Right-click" -> "Edit object".
> **Note:** Some variables of added modules contain a "standard display". This can be overwritten by clicking on the "Overwrite default" button. The original status can then be restored using the "Reset to default" button.
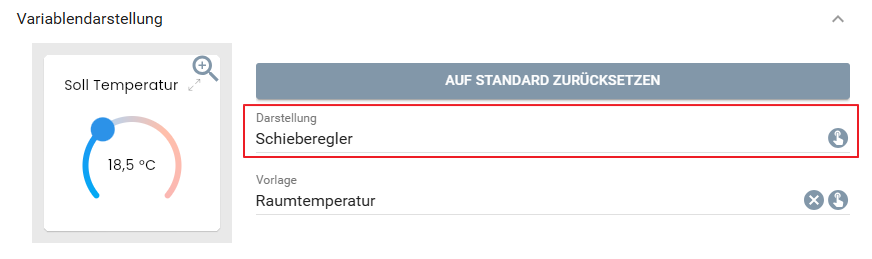
The selection icon for the "Display" entry opens the display dialog in which a display can be selected. All presentations are always displayed in the presentation dialog. If the configuration of the current variable does not allow a display, it is grayed out. When you move the mouse over the grayed-out element, a text is displayed describing which requirements must be met in order for the presentation to be displayed 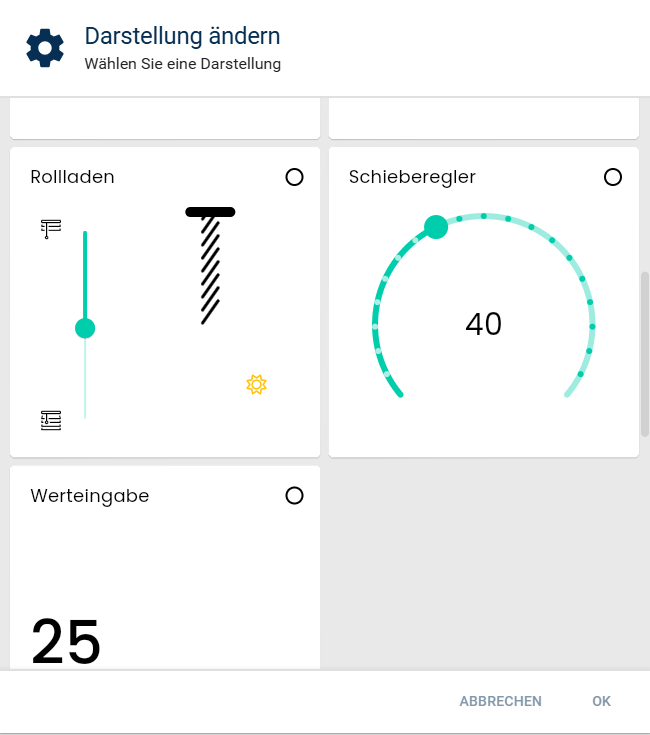.
Each display offers many different parameters to customize it according to the requirements. The available parameters and their function are described in more detail under the respective entries under [Object presentation](components/object-presentation.md).
### Preview
Each adjustment can be observed directly in the preview next to the display selection. The preview can be opened in fullscreen by clicking on the magnifying glass icon. Here, as in the normal visualization, the size of the tile can be adjusted using the pencil icon to see how the display behaves in different sizes.
### Templates
If the parameters of a display are changed, these only apply to the currently selected variable. If several variables are to use the same parameters, templates can be used. Templates can be selected under the field for presentations. If a template has been selected, the presentation uses the parameters of the template, even if these are adjusted later. However, parameters can still be changed in the variable dialog. If the parameters no longer correspond to the values of the template or the higher-level presentation, "(Custom)" is displayed in the Template field and the set parameters apply exactly to this variable again. Custom templates can be created and edited in the [Template manager](concepts.md).
## Template Manager
Source: https://www.symcon.de/en/service/documentation/basics/variables/variable-presentations/template-manager/
_Requires Symcon >= 8.0_
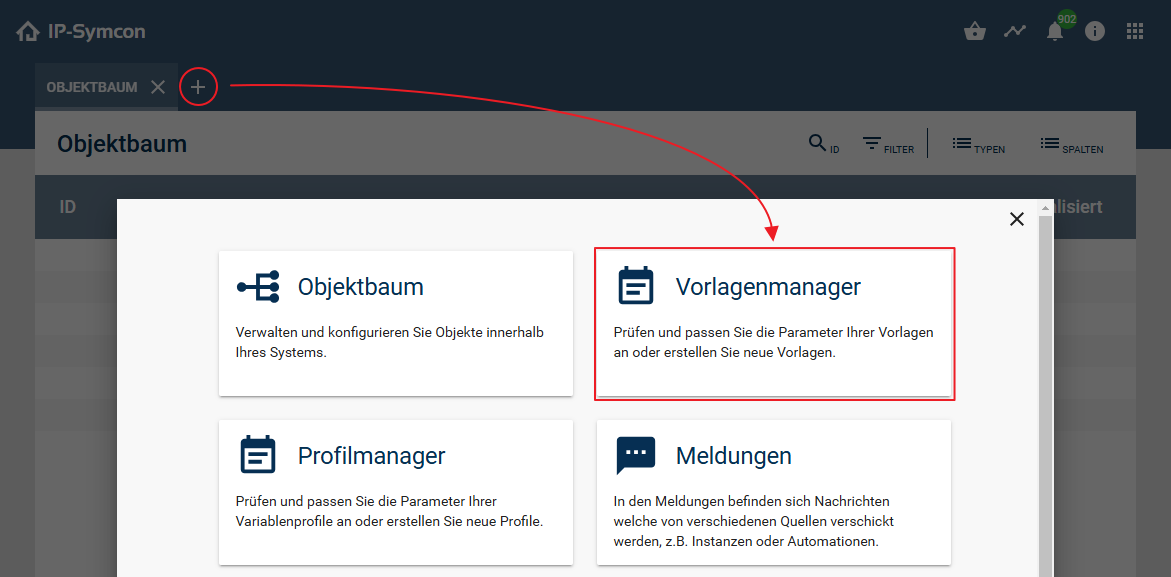
The template manager can be opened via the "+" in the table list.
### Structure
The template manager consists of a tree on the left-hand side, in which templates can be selected, grouped according to presentations, and a central detail area, which adapts to the current selection in the tree. If no entry is selected, all presentations are displayed as a preview in the detail area. As an alternative to the selection in the tree, a specific presentation can be opened here by clicking on the "Open" symbol at the top right of each tile. If a presentation is selected, the detail area shows a preview for each template of this presentation and also enables direct opening here. The "Who uses this presentation?" button at the bottom of the detail area displays all variables that use this presentation. Once a template has been selected, a corresponding configuration form appears, similar to the variable configuration form, in which the parameters of the template can be configured. The name of the template can also be customized. As each template is identified in the background by a unique ID and not the name, the name can be changed without hesitation. It only serves to make it easier for the user to understand. In the lower area, a list of variables that use this template can be displayed via "Who uses this template?". A new template can be created via "Duplicate", which is initially configured with the same parameters.
> **Note:** Information about the individual parameters of the presentations can be found in the [Object presentations](components/object-presentation.md).
### create templates
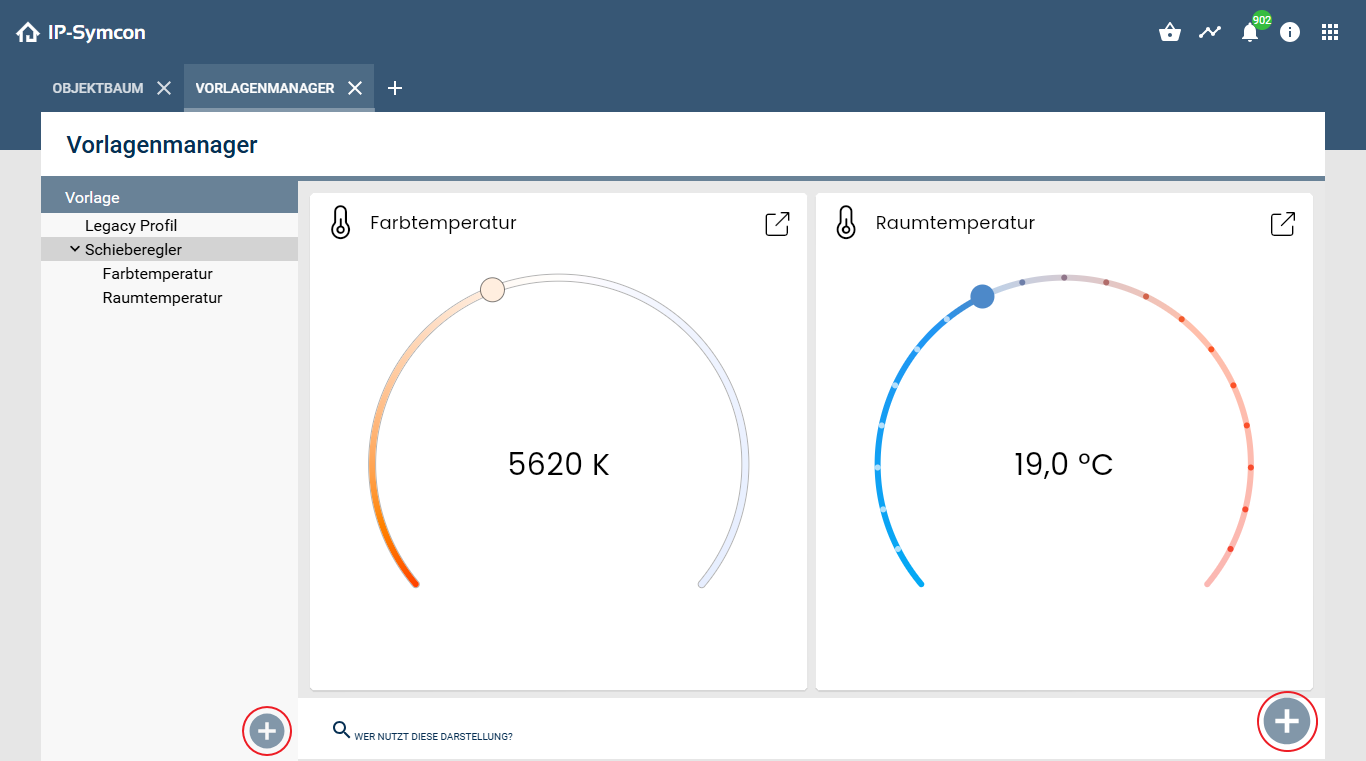
A template can be added via the "+" in the list on the left-hand side. The desired display is selected in a dialog and the template is then configured. If a display is selected, you can alternatively click on the "+" on the right-hand side to directly create a template for the selected display.
To build on an existing template, select it and click on "Duplicate" at the bottom.
### Delete templates
User-defined templates can be deleted via the trash can icon next to the name in the list on the left-hand side. The templates provided by IP-Symcon cannot be deleted.
## Variable Profiles
Source: https://www.symcon.de/en/service/documentation/basics/variables/variable-profiles/
> **Warning:** Variablen Profiles are still supported. However, version 8.0 introduced [Variable Presentations](concepts.md) as modern and flexible way to configure the presentation of variables. Variable Profiles can still be used via the presentation [Legacy Profile](components/object-presentation.md).
Every variable can have a variable profile. Variable profiles are primaryly used to make variable values like True, False, or 0, 1, 2, 3, ... easier readable by adding context, e.g., adding °C to temperatures. Thus, the variable profile defines how a variable is visualized.
### Choose Profile
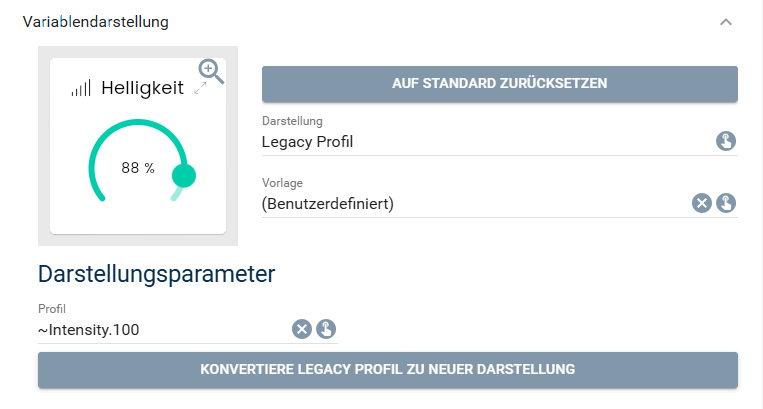
Starting from version 8.0, a variable profile is assigned via the [variable presentation](concepts.md) [Legacy Profile](components/object-presentation.md). The dialog "Edit Variable" is accessible when creating a variable, via double click on the variable within the object tree, or via right click on the variable and choosing "Edit Object".
Within the "Variable presentation" section, first select the presentation "Legacy Profile". Afterwards, the desired profile can be chosen under "Presentation parameters".
### Create Profile
If no included profile suits a variable, it is possible to create individual profiles. A created profile can be used for any number of variables.
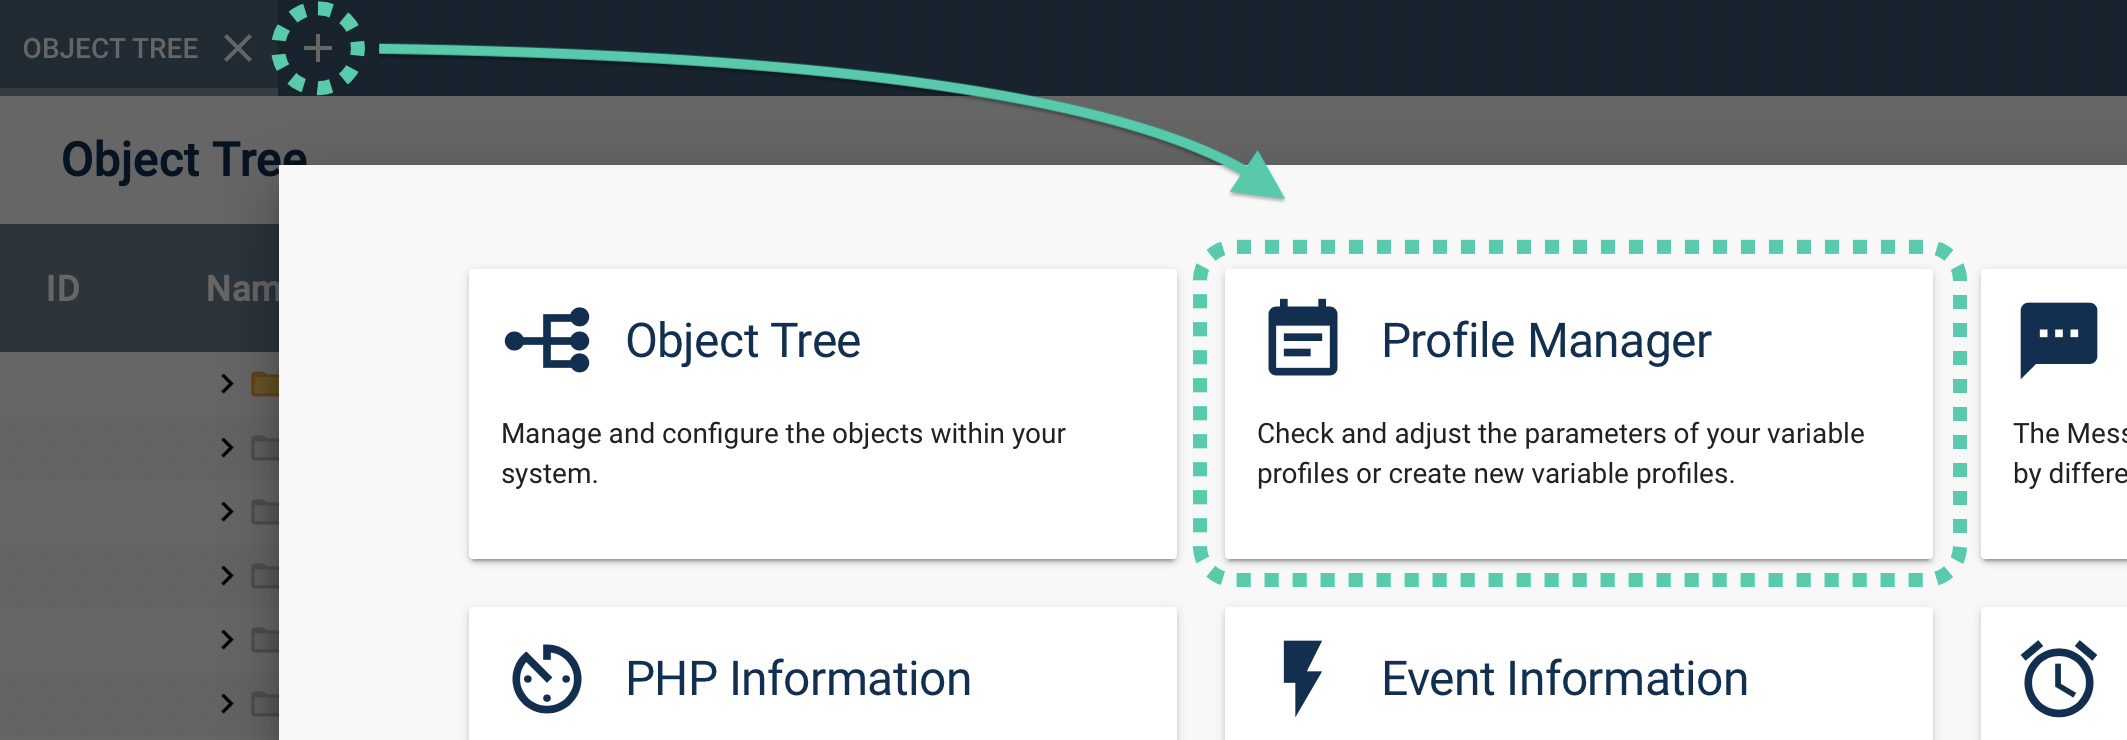
To edit a variable profile, the profile manager needs to be opened. It can be opened via "+" -> "Profile Manager" at the tab list or via the "Edit Variable" dialog using the finger button next to the profile selector under "Presentation parameters".
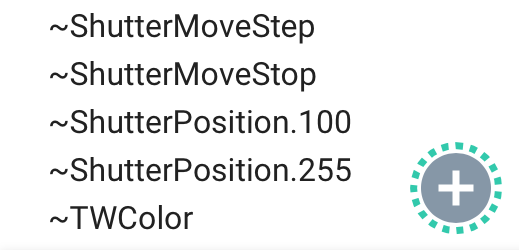
It is possible to choose a pre-defined profile, to duplicate a profile, or create a new one. A new profile is created by clicking the "+" at the bottom left. Afterwards, the profile needs to be named. After saving the profile, it will appear in the list.
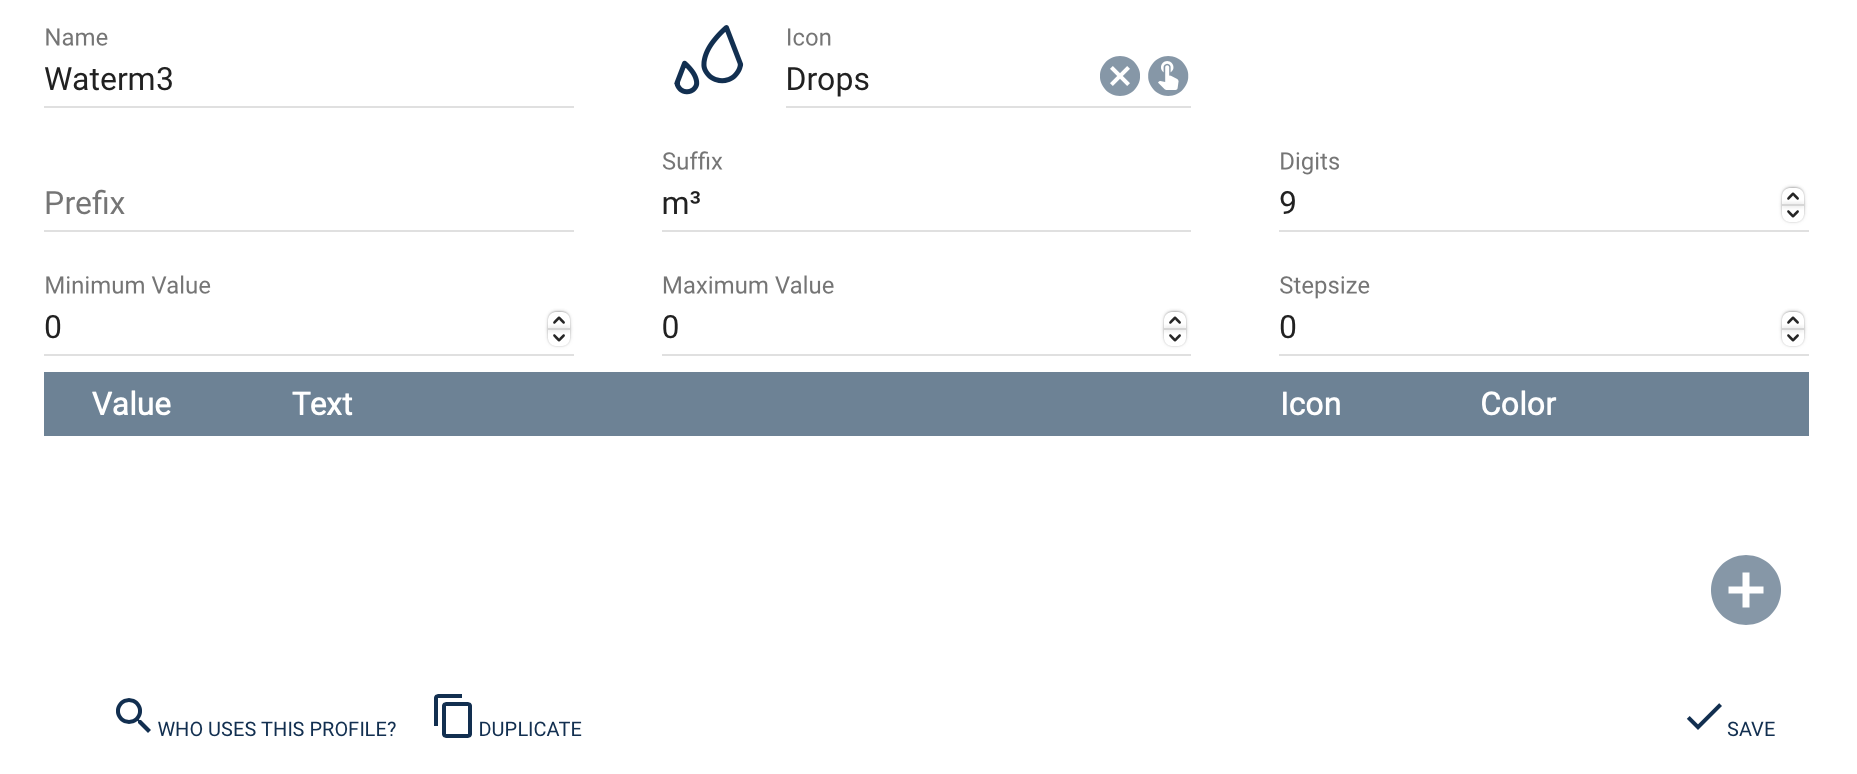
> **Note:** Even though the variable profiles are differentiated after type (Boolean, Integer, Float, String), a profile name needs to be unique
> **Note:** Examples for different visualizations of variable profiles in the WebFront are available at [Object Depiction](components/object-presentation.md)
> **Warning:** Included profiles can be recognized by the tilde (~) in front of the profile name. These profiles are created from the system and cannot be edited. The tilde must not be used in individual profile names.
The following changes to a profile are possible:
| Parameter | Type | Description |
| ------------ | -------------- | ----------------------------------------------------------------------------------------------------------------------------------------------------------------------------------------------------------------------------------------------------------------------------------------------------------------------------------------------------------------------------------------------------------------------------------------------------------------------------------------------------------------------------------------------------------------------------------------------------------------------------------------------------------------------------------------------------------------------------------------------------------------------------------------------------------------------------------------------------------------------------------------------------------------------------------------------------------------------------------------------------------------------------------------------------------------------------------------------------------------------------------------------------------------------------------------------------------------------------------------------------------------------------------------------------------------------------------------------------------------------------------------------------------------------------------------------------------- |
| Prefix | All types | String in front of the current value, e.g., a fixed description |
| Suffix | All types | String after the current value, e.g., °C; Special case: When using % the value is converted into a percentage by using Min/Max.
(Value = (Value – Min) * 100 / (Max – Min)) |
| Min Value | Integer, Float | Smallest possible value of the variable for the visualization |
| Max Value | Integer, Float | Biggest possible value of the variable for the visualization |
| Step Size | Integer, Float | The step size determines the number of clickable selections within the visualization. Consider a profile with Min = 0, Max = 100. A step size of 25 would make the values 0, 25, 50, 75, 100 available. If the step size is 0 and assoziations are available, all assoziation texts are listed. In this case, the usually shown arrows for selection are not available. This field is only evaluated if an action or an action script is assigned to the visualized variable. |
| Digits | Float | Defines the number of decimal places. |
| Default Icon | All types | If no icon is available via assoziations the default icon is used. If the parameter is not set, the object Icon is used. All available icons are listed here: [WebFront Icons](components/icons.md) |
| Associations | All types | __Boolean:__
A text and an icon can be chosen for each possible value (True, False) which is shown instead of the real value. This only affects the visualization. The value of the variable remains the same.
__Integer/Float__:
1. Like Boolean, it is possible to choose a text and an icon. In the simplest case, a text and an icon needs to be defined for each value.
2. The second possibility is to omit values and only choose a text and an icon for some values. In that case, the visualized text and icon correspond to the next lowest assoziated value. For example, if the assoziated values are 0, 50, and 100, the assoziations would refer to the following values: 0(0-49), 50(50-99), and 100(100).
3. It is possible to generate an expression that contains the current value. The placeholder %d (int) or %f (float) are used as placeholder for the current value. For example would be "LightValue%d" shown as "LightValue4". __Remark:__ If one of the two parameters (Text / Icon) is left empty, the normal value or the default icon are used. To show an empty text, you need to use a space character.
__String (since version 6.0):__
A text and an icon can be chosen for each String value. The order of associations is based on the order of creation. Sorting is not possible. Thus, putting new associations in order requires the deletion and recreation of all following associations. |
> **Warning:** Profiles are only used for visualization. If the current value of a variable is outside of the interval between Min and Max or is not described by the specified assoziations, it is possible that the output of the variable is wrong or is not shown at all.
> **Warning:** The maximum number of simultaneous associations per profile is 128.
### Example
When Min=0 and Max=20 is defined in the profile and the suffix % is used, but the variable value is 40, the shown visualizaion is 200%. The values for Min/Max do not limit the variables!
> **Note:** Depending on the variable type the used placeholder is %d or %f. The number of decimal places can be influenced by using the following format: %.2f for two decimal places.
> **Note:** To use a percentage symbol (%) within an assoziation text, a double percentage symbol (%%) needs to be entered.
> **Note:** A possibility to use the variables in a formatted way in scripts is the function [GetValueFormatted](functions/access-variables.md) .
## Events
Source: https://www.symcon.de/en/service/documentation/basics/events/
An event is an automatic action that is connected to a condition.
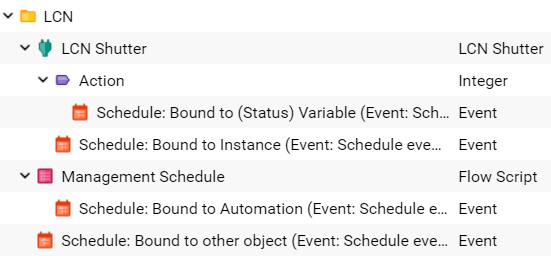
Executed events modify binded objects. The binding is done by attaching the event to the corresponding object in the IP-Symcon management console. (see: [Binding Types](concepts.md))
Events are executed depending on the event type and the configured condition. (see: Event Types)
### Binding to Action Target
Die bound object is used as target for an [Action](concepts/automations.md) . As is common with actions, an action can be selected depending on the target and configured.
The action of an event determines what happens when the event is triggered. For more information, see [Actions](concepts/automations.md)
### Event Types
There are three event types.
| Event Type | Description |
| ----------------------------------------------- | ------------------------------------------------------------- |
| [Trigger](concepts.md) | An event that is connected to a specific variable. |
| [Cyclic](concepts.md) | The event is run at a defined time point once or repeatedly. |
| [Schedule](concepts.md) | A schedule that is configured in the WebFront runs the event. |
> **Note:** Access to system variables:
> IP-Symcon automatically offers a number of variables that can be accessed within a script.
> However, these are only available if the script was called by an event.
> See:
> [System Variables](concepts/automations.md)
### Conditions
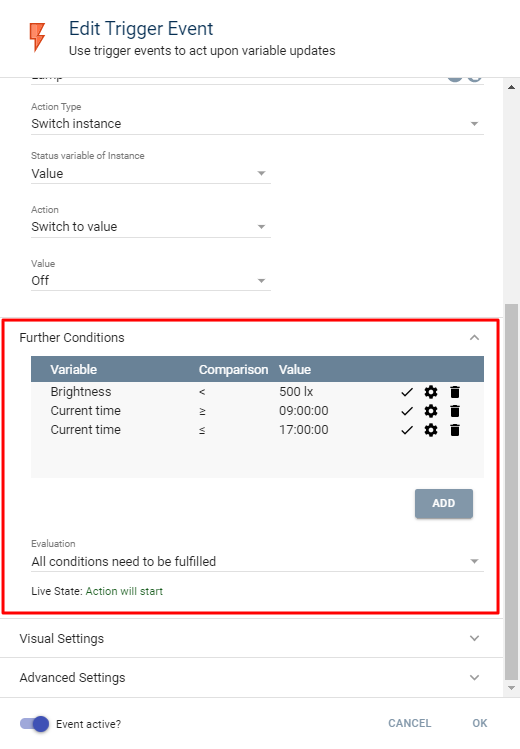
Conditions expand events by further options that need to be fulfilled for the event to trigger. This can be used to realized multiple conditions.
Additional conditions can be added in the expansion panel "Further Conditions". In this panel, new conditions can be added by clicking "Add".
The types Variable, Date, Day of the week, and Time can be selected. For the type "Variable", a variable needs to be selected. Afterwards, the remaining options will appear.
Finally, the comparison operator (see table [Comparison Operators](concepts.md)) and the compared value need to be defined before confirming the condition with "OK".
In the table, all defined conditions are listed. An X symbol shows that a condition is currently not fulfilled while a dash icon symbolizes that it is fulfilled. The gear icon can be clicked to modify the condition, the trash icon will remove it.
In the dropdown "Evaluation" it can be defined whether all conditions need to be fulfilled for the event to trigger or if a single conditions suffices.
The Live State shows if the event would currently trigger based on the conditions or not.
#### Comparison Operators
Comparison Operators describe the behavior when a comparison is fulfilled and when it is not fulfilled.
| Operator | Explanation |
| -------------------- | ----------------------------------------------------------------------------------------------------------------------------------- |
| Equal (=) | Fulfilled if the current value is equal to the comparison value.
(e.g., true = true, 123 = 123) |
| Not Equal (≠) | Fulfilled if the current value is not equal to the comparison value.
(e.g., false ≠ true, 123 ≠ 122 or 124) |
| Greater (>) | Fulfilled if the current value is truly greater than the comparison value.
(e.g., 123 > 122, 09:00 > 08:59) |
| Greater or Equal (≥) | Fulfilled if the current value is greater or equal than the comparison value.
(e.g., 123 ≥ 122 or 123, 09:00 ≥ 08:59 or 09:00) |
| Less (<) | Fulfilled if the current value is truly less than the comparison value.
(e.g., 123 < 124, 09:00 < 09:01) |
| Less or Equal (≤) | Fulfilled if the current value is less or equal than the comparison value.
(e.g., 123 ≤ 124 or 123, 09:00 ≤ 09:01 or 09:00) |
#### Example
A lamp should only be switched on when a motion sensor is activated.
In addition, this should only trigger if it is too dark (Brightness Value below 500) and it is between 09:00 and 17:00.
First, a triggered event is created. The motion sensor is defined as trigger on the value "Present" and the lamp is selected as target instance, switching its value to "On".
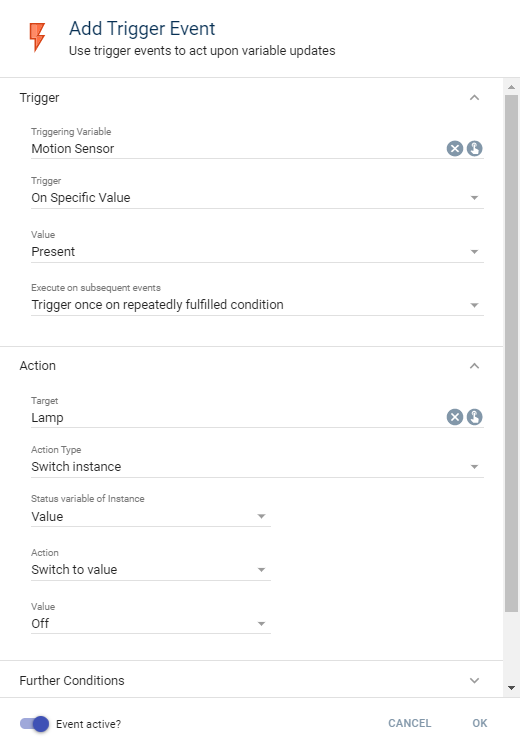
In the tab "Further Conditions", the additional rules are created via "Add".
The light value "Brightness" is configured as "less" than 500.
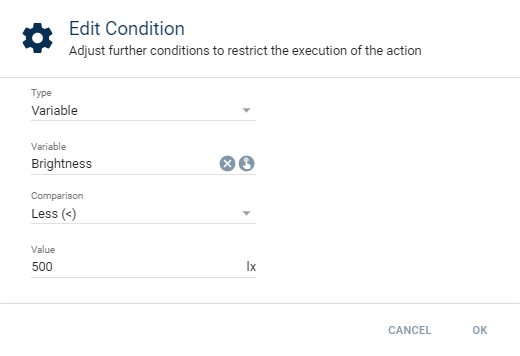
The time is configured as "greater or equal" to 09:00.
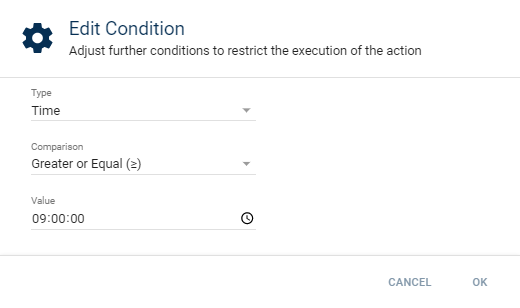
The time is configured as "less or equal" to 17:00.
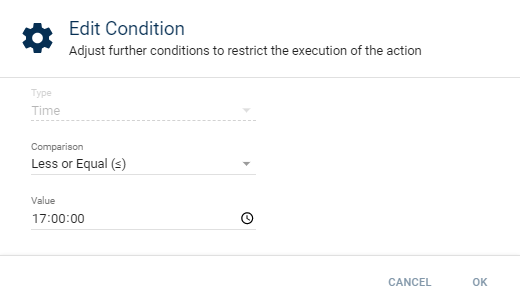
In the overview, all three rules are listed and the live state shows if the light would be switched on if the motion sensor would trigger at this moment.
## Trigger
Source: https://www.symcon.de/en/service/documentation/basics/events/trigger/
This event type is executed when the connected variable is updated, independently of the time point of execution.
There are five usable triggers.
> **Note:** Scripts that are run by a trigger event can use these [System Variables](concepts/automations.md).
### Trigger
| Type of trigger | Description |
| ------------------------------------------------------------------ | --------------------------------------------------------------------------------------------------------------------------------------- |
| On Change | The event is executed whenever the variable changes. |
| On Update | The event is executed for every received variable value. It is also run when the received and the current value are identical. |
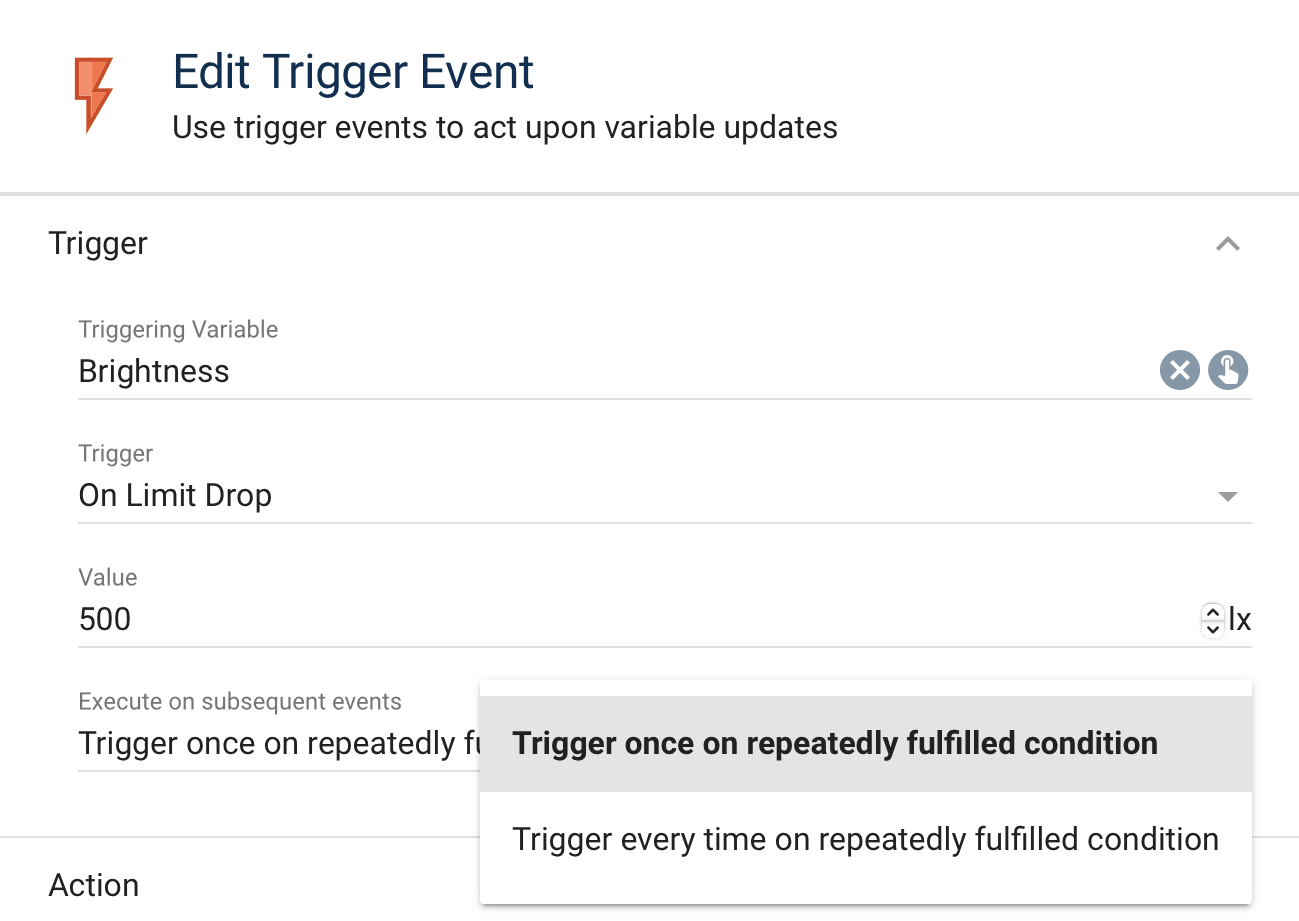
| On Limit Drop/On Limit Exceed (Option "Execute subsequent events") | The event is executed when the value of the variable drops below or rises above a threshold. The threshold is set in the field "Value". |
| On specific Value (Option "Execute subsequent events") | The event is executed when the variable reaches a specific value that is specified in "Value". |
### Options
#### Execute subsequent events
__Trigger once on repeatedly fulfilled condition__: The event is executed once. The event can only be executed again after the condition was not fulfilled at least once. After it was not fulfilled, dropping below, rising above, or reaching the specified value executes the event again.
__Trigger every time on repeatedly fulfilled condition__: The event is executed on every variable update as long as the condition is fulfilled.
## Cyclic
Source: https://www.symcon.de/en/service/documentation/basics/events/cyclic/
This type of event is executed at a specific time and is repeated cyclically. The point of time is defined by a combination of "Day Pattern" and "Time Pattern".
> **Note:** Scripts that are run by a cyclic event offer these [System Variables](concepts/automations.md)
#### Day Pattern:
There are 5 different options
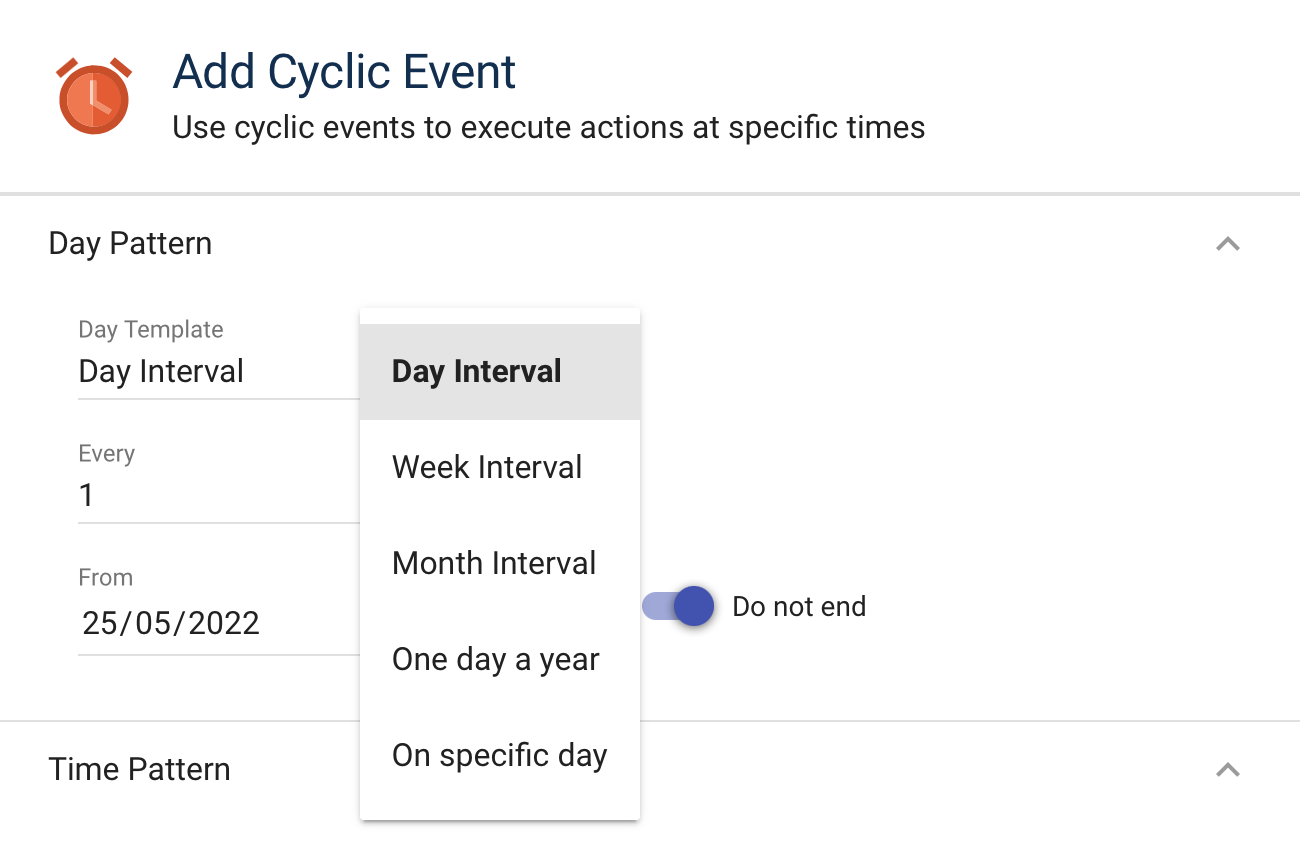
| Day Pattern | Description |
| --------------- | -------------------------------------------------------------------------------------------------------------------- |
| Day Interval | Defines a day interval (1 = every day; 2 = every second day; ...) in which the event is executed. |
| Week Interval | Defines a week interval (1 = every week; 2 = every second week; ...) and the days in which the event is executed. |
| Month Interval | Defines a month interval (1 = every month; 2 = every second month; ...) and the days in which the event is executed. |
| One day a year | Defines a specific day in the year on which the event is executed. |
| On specific day | Defines a specific date on which the event is executed. |
#### Time Pattern:
There are 4 different options
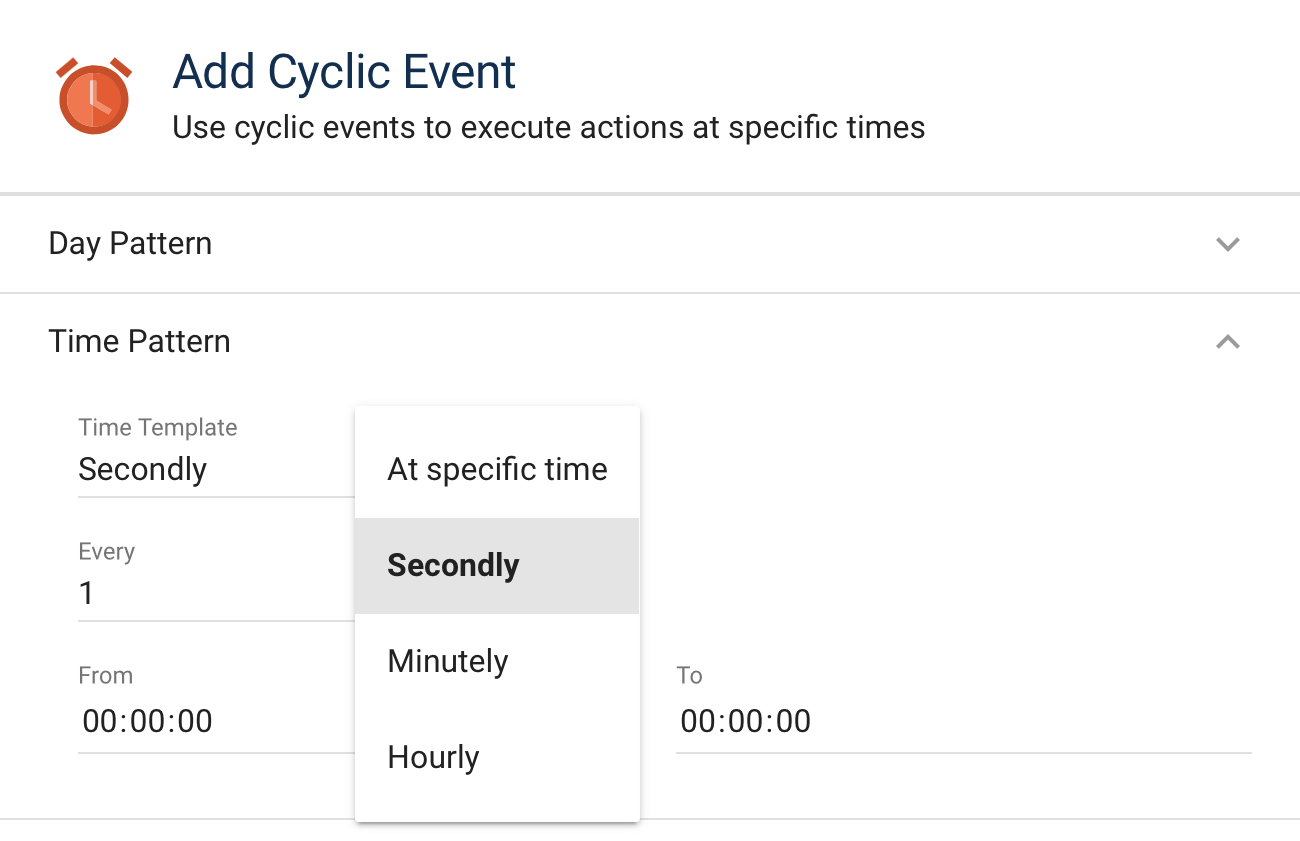
| Time Pattern | Description |
| ---------------- | --------------------------------------------------------- |
| At specific time | Defines a specific time on which the event is executed. |
| Secondly | Defines a second interval on which the event is executed. |
| Minutely | Defines a minute interval on which the event is executed. |
| Hourly | Defines an hour interval on which the event is executed. |
#### Special Options:
__From/To:__
It is possible to define start and end time.
| Setting | Description |
| --------------- | ---------------------------------------------------------- |
| On Day Pattern | Defines the date interval in which the event is active. |
| On Time Pattern | Defines the daily interval in which the event is active. |
| From | Start Time = Defines the beginning of the interval. |
| To | End Time = Defines the end of the interval. |
| "Do not end" | No end time. If deactivated, the "To" option is displayed. |
### Examples:
#### Every friday at 09:00:
Day Pattern = Weekly with value one and Friday checked
Time Pattern = At specific time with 09:00:00
#### Every 5 minutes from 12:02:10 until 16:00:00:
Day Pattern = Daily with value 1
Time Pattern = Minutely with value 5
From: 12:02:10 To: 16:00:00
No hook at "Do not end"
First execution at 12:02:10
Second execution at 12:07:10
...
--continuing until-->
...
Last execution at 15:57:10
## Schedule
Source: https://www.symcon.de/en/service/documentation/basics/events/schedule/
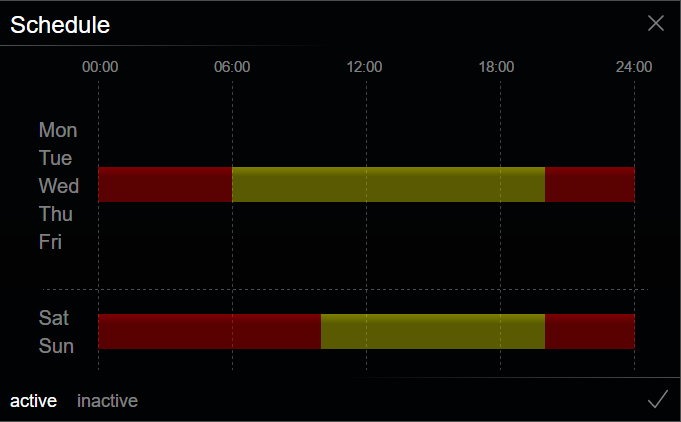
The schedule is a graphical tool for the configuration of weekly procedures.
The plan for the week, the group type, the actions, and the connection type are chosen in the management console.
The schedule actions and its changes are defined in the visualization "WebFront" or the configuration of the schedule.
### Group Types
There are four options
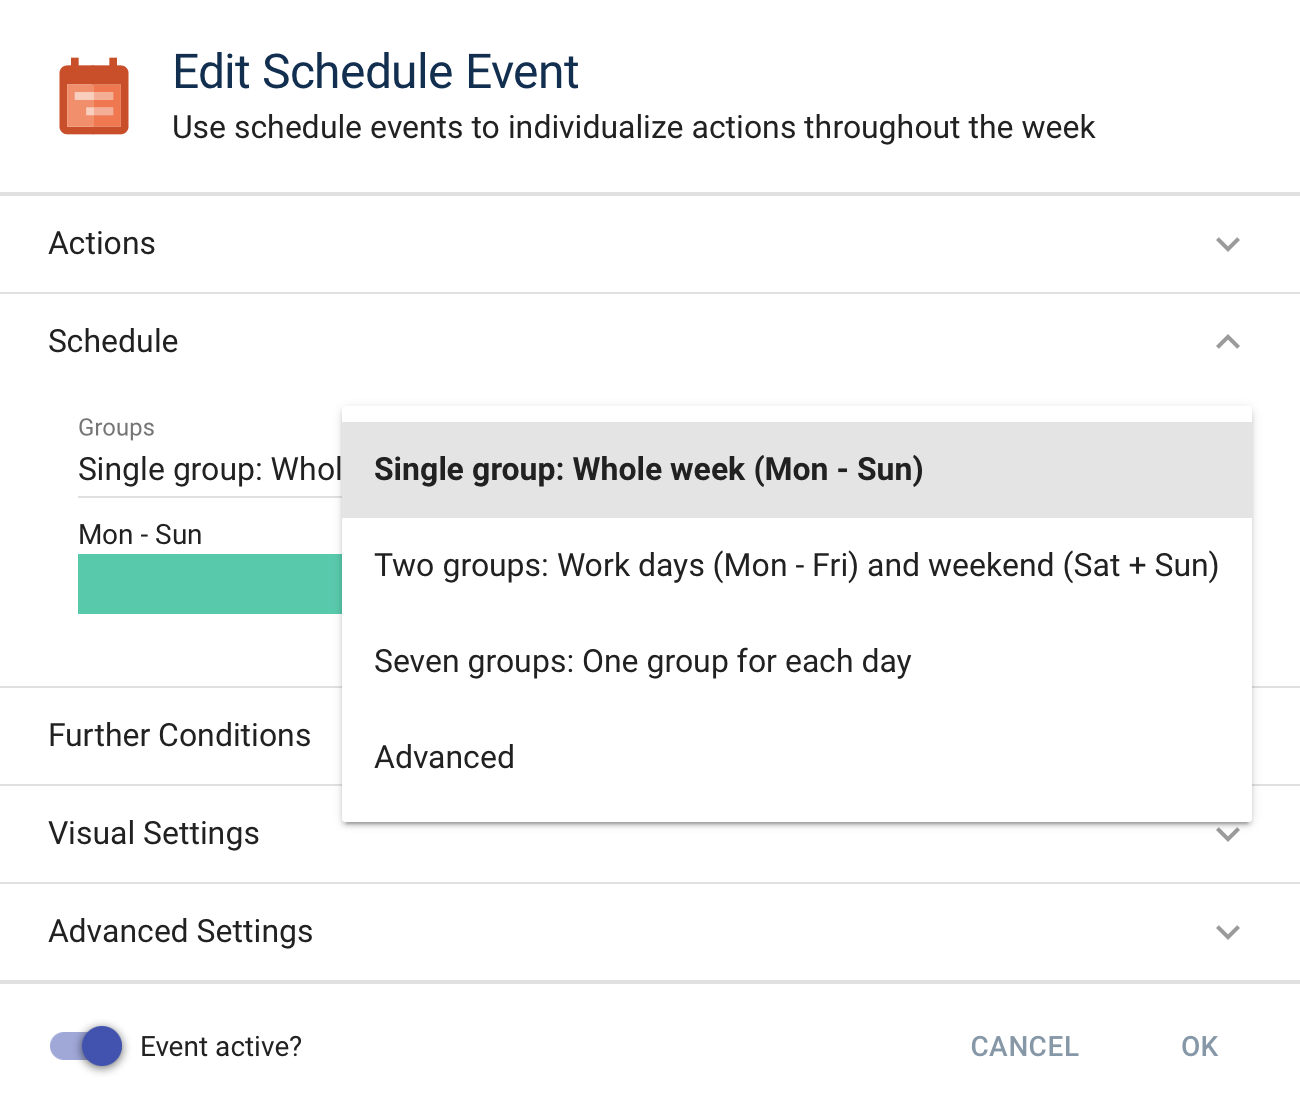
| Type | Description |
| ------------------------------------------------------- | --------------------------------------------------------------------------------------------------------------- |
| Single group: Whole week (Mon - Sun) | All week days are summarised in a single group. |
| Two groups: Work days (Mon-Fri) and weekend (Sat + Sun) | Splits the week into two groups and allows the days from Mon-Fri and Sat+Sun to be configured independently. |
| Seven groups: One group for each day | Every week day can be configured individually. |
| Advanced | The week days can be combined as required. Each combination is summarized into one group and can be configured. |
### Actions
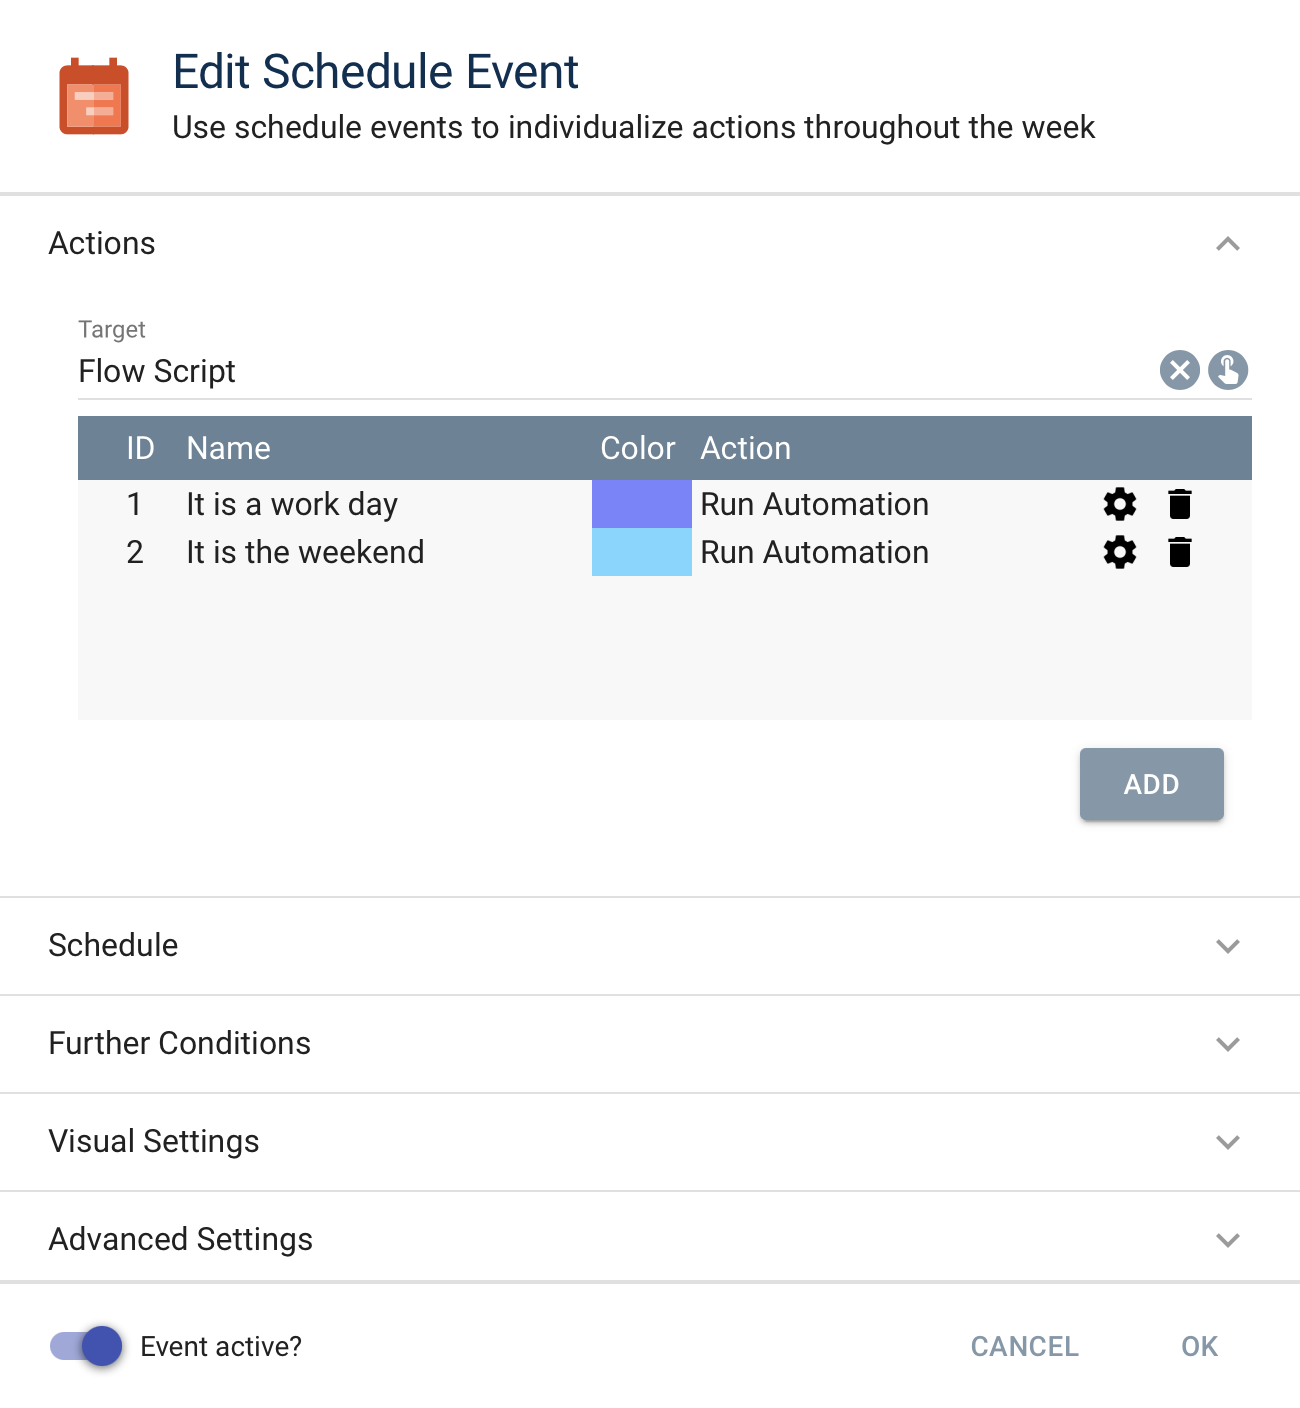
The schedule offers actions depending on the selected target. At least two schedule actions need to be configured. As part of the schedule action, an [Action](concepts/automations.md) is defined for the target.
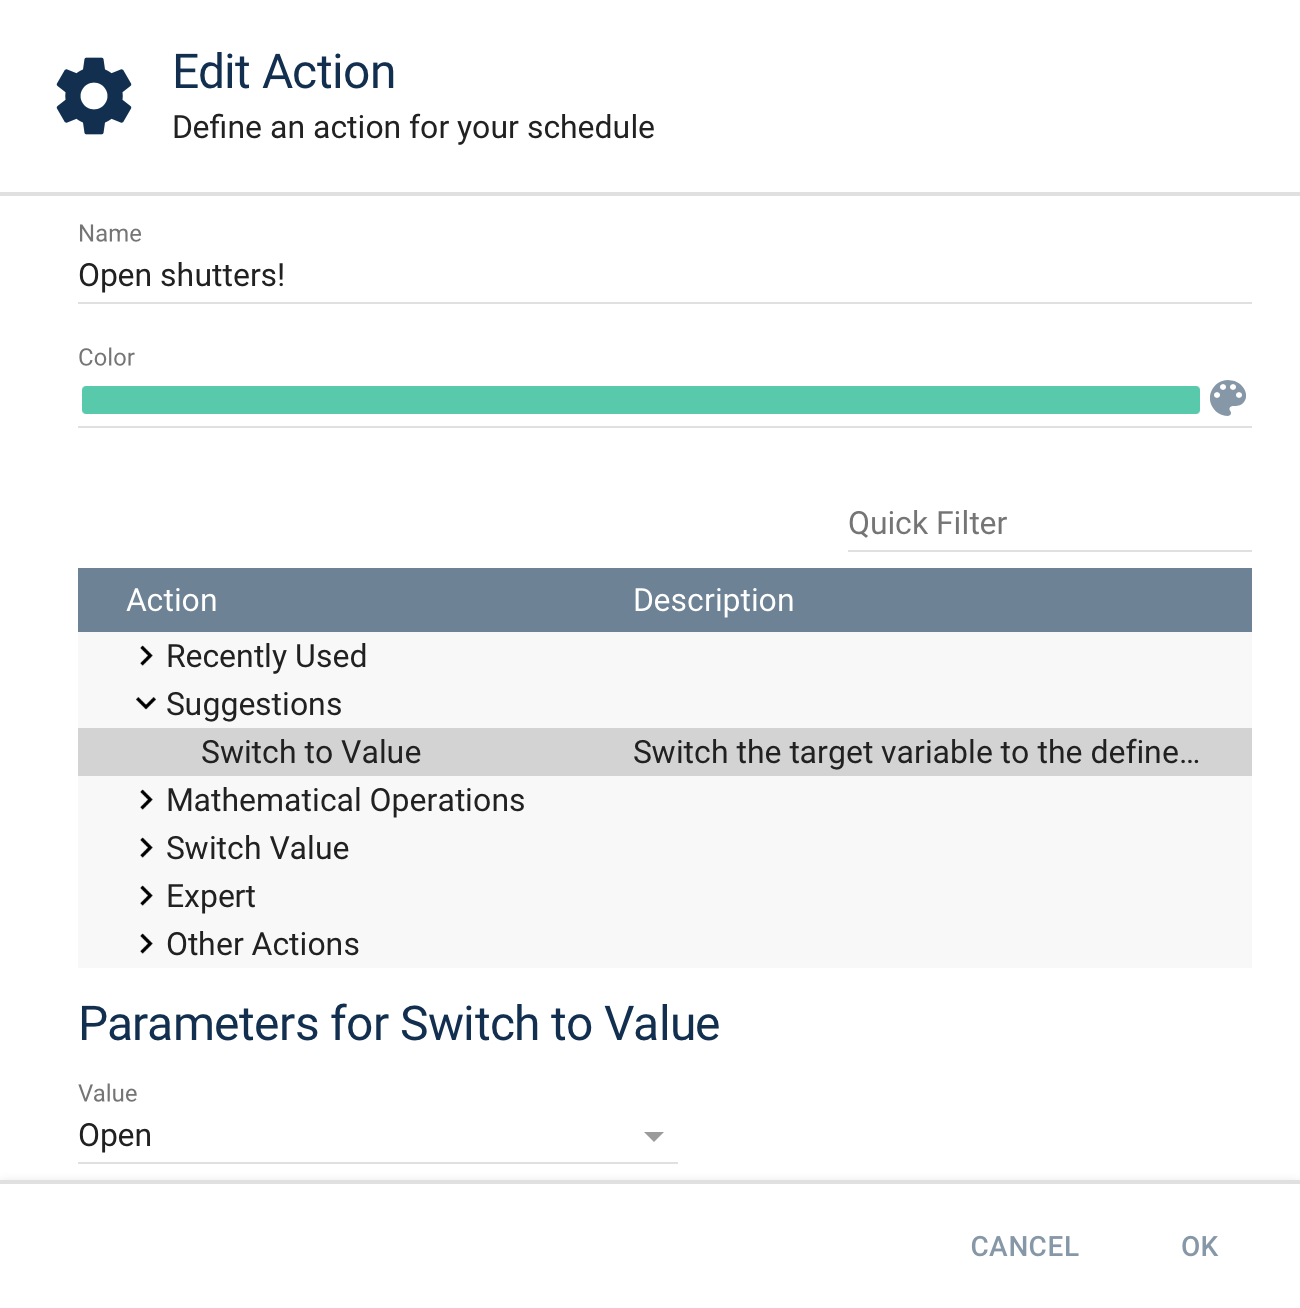
#### Add schedule action
A schedule action can be added by clicking on "Add". For the schedule action, a name, a color, and an [Action](concepts/automations.md) are selected.
### Configuration of the schedule actions
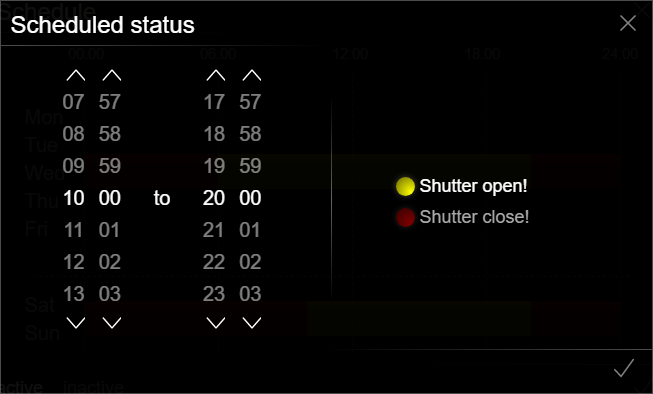
The durations of the actions can be configured within the Management Console or the WebFront.
Within the grafical interface, the following applies:
__Single Click__ configures an existing state.
__Click & Pull__ creates a new state.
> **Note:** The selected action is only executed when the action changes.
> **Warning:** Important remark:
> Previously set actions are not undone by an action change.
> This means, when an action activates a light, it is not automatically deactivated when the action changes unless the deactivation is described explicitely.
#### Bind to flow script
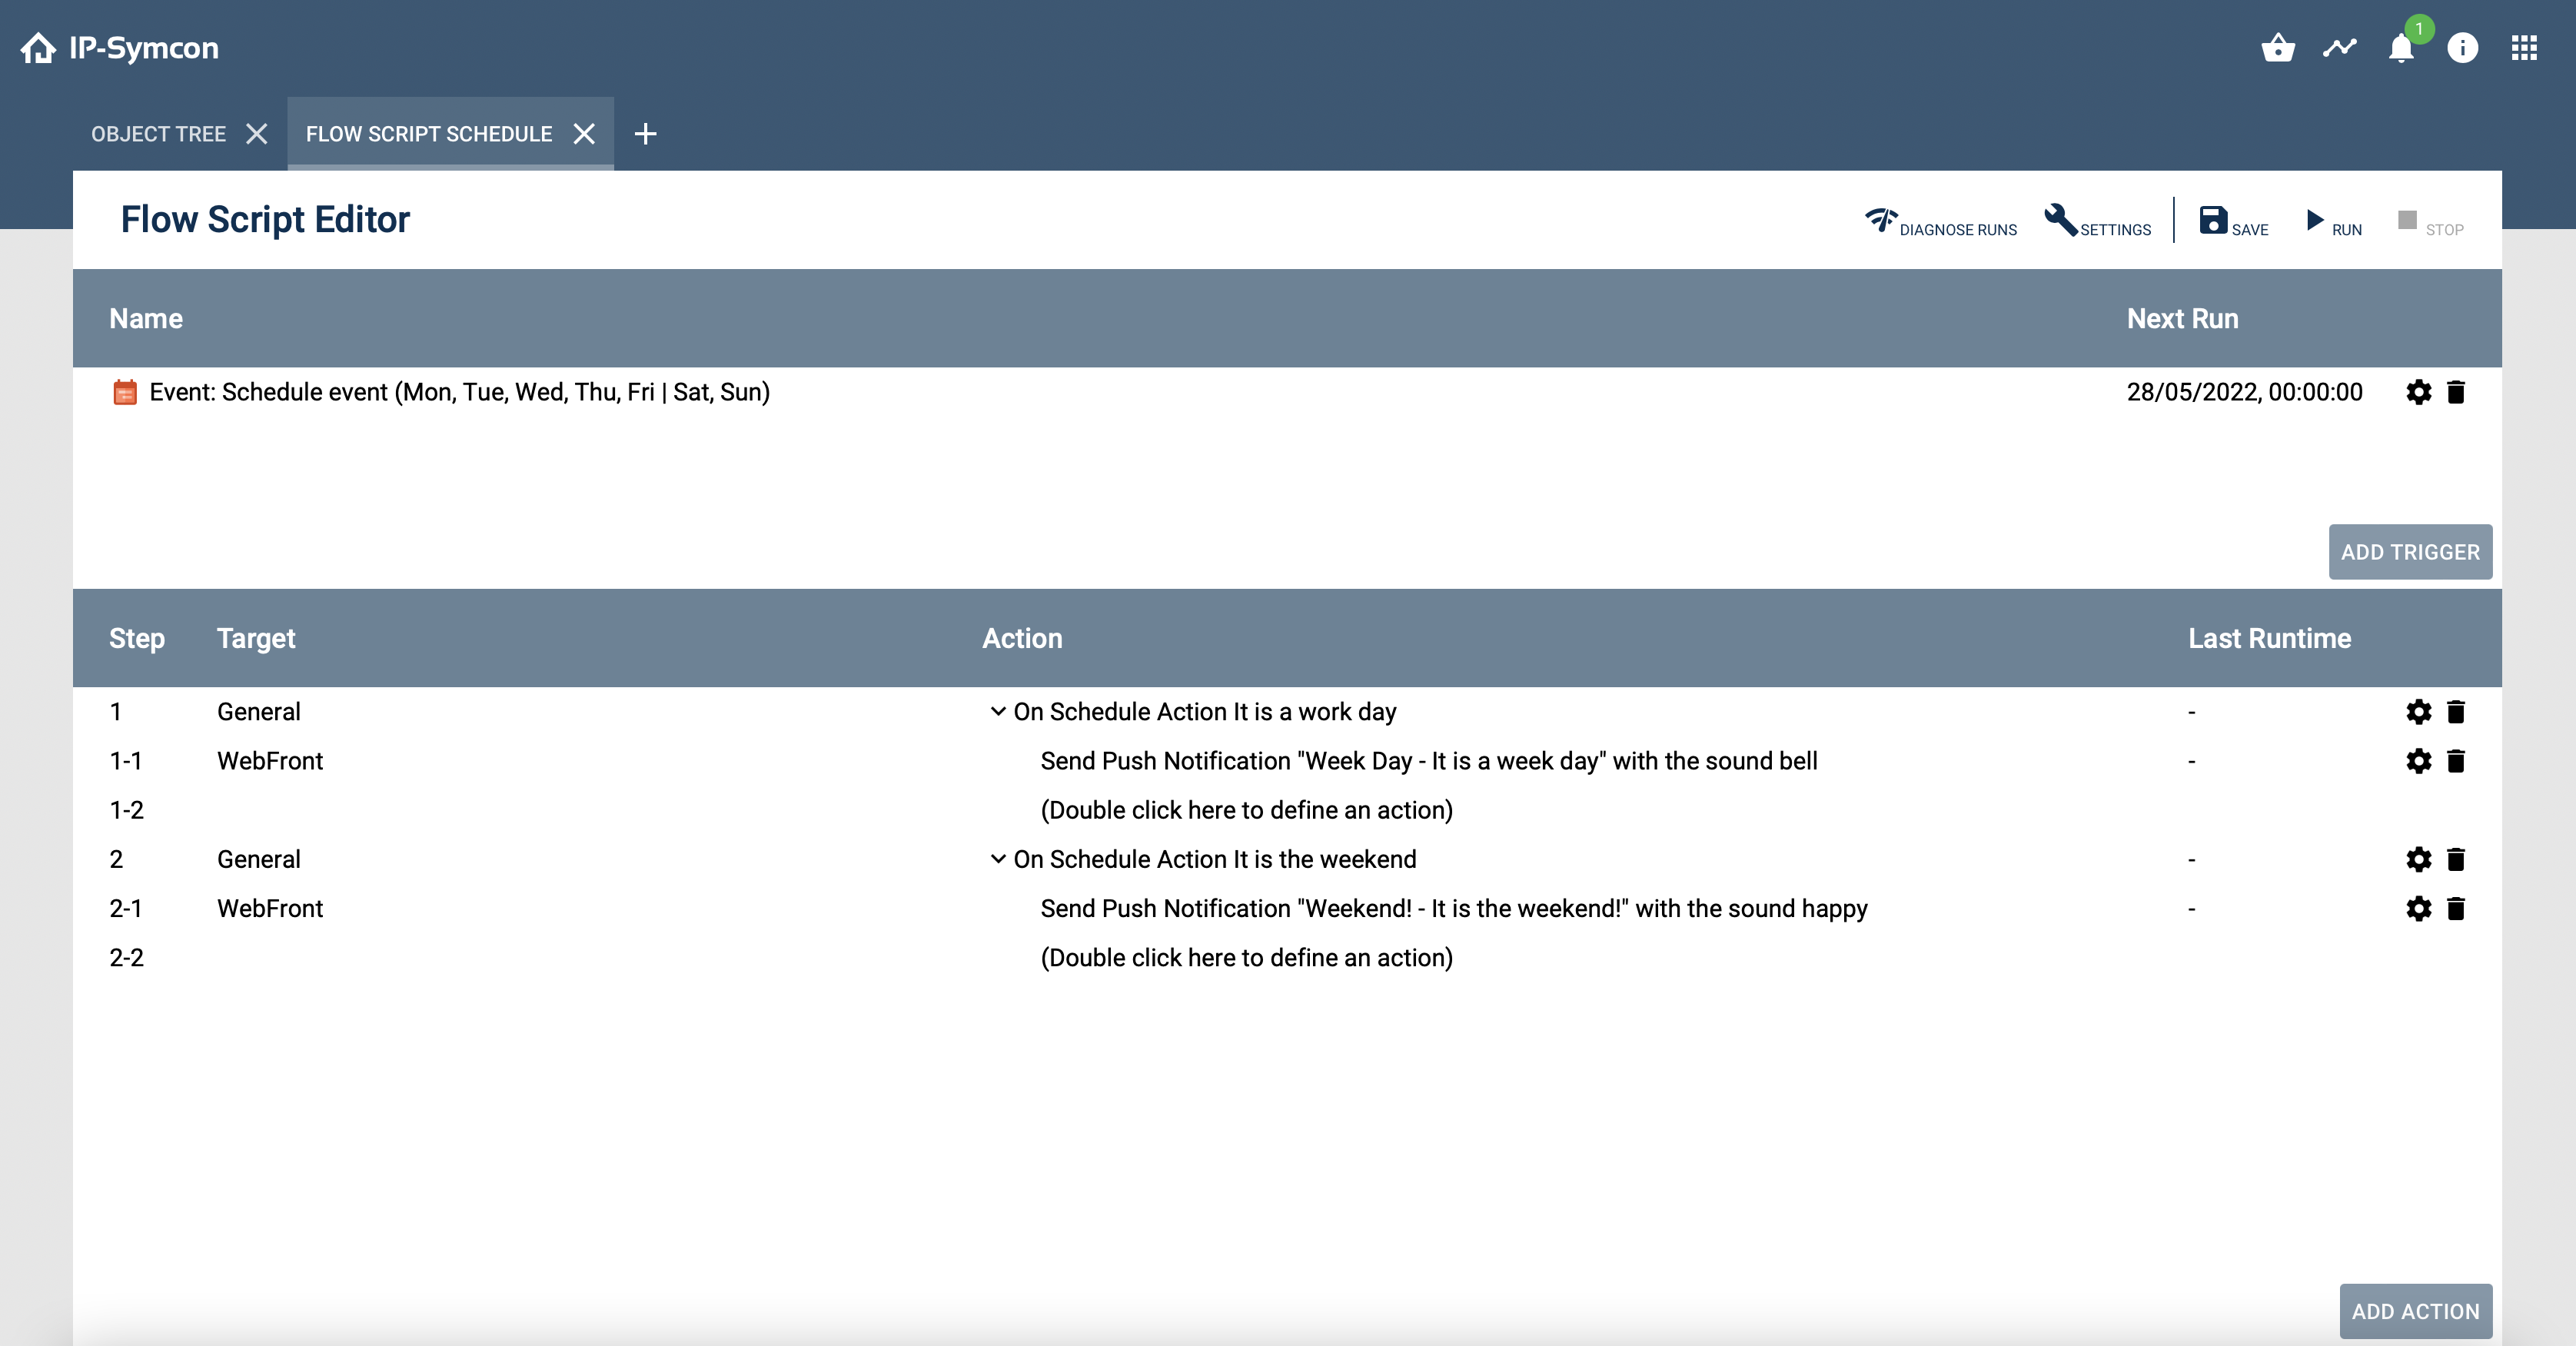
If the action "Run Automation" is selected for a [Flow Script](concepts/automations.md), the action "On Schedule Action" can be used to execute a number of actions on a specific schedule action. When the first schedule is added as trigger, the "On Schedule Action"-actions are added automatically.
### Example with flow script
This is an example flow script which is executed via schedule.
#### Bind to PHP Script
If the action "Run Automation" is selected for a [System Variable](concepts/automations.md) $_IPS['ACTION'].
### Example with script
This is an example PHP script which is executed via schedule.
```php
//switch over the state IDs
switch ($_IPS['ACTION']) {
case 1: //ID 1
SetValueBoolean(39540 /*[Test Environment\WorkDay]*/, true);
echo "Hello World, on a work day";
break;
case 2: //ID 2
SetValueBoolean(39540 /*[Test Environment\WorkDay]*/, false);
echo "Hello World, Yay week end!!";
break;
}
```
#### Hint for Experts
It is possible to check the currently active schedule action via script.
```php
$e = IPS_GetEvent($id);
$actionID = false;
// Loop through all groups
foreach($e['ScheduleGroups'] as $g) {
// Check if the group is responsible for today
if($g['Days'] & date("N") > 0) {
// Search for current trigger point. We exploit the property that the trigger points are sorted ascendingly.
foreach($g['Points'] as $p) {
if(date("H") * 3600 + date("i") * 60 + date("s") >= $p['Start']['Hour'] * 3600 + $p['Start']['Minute'] * 60 + $p['Start']['Second']);
} else {
break; // Once passed, we can abort.
}
}
break; // The loop can be canceled once we have found our day. Every day must be in exactly one group.
}
}
var_dump($actionID);
```
## Media
Source: https://www.symcon.de/en/service/documentation/basics/media/
IP-Symcon supports sound and image files, charts, documents, streams, and views from IPSStudio as media.
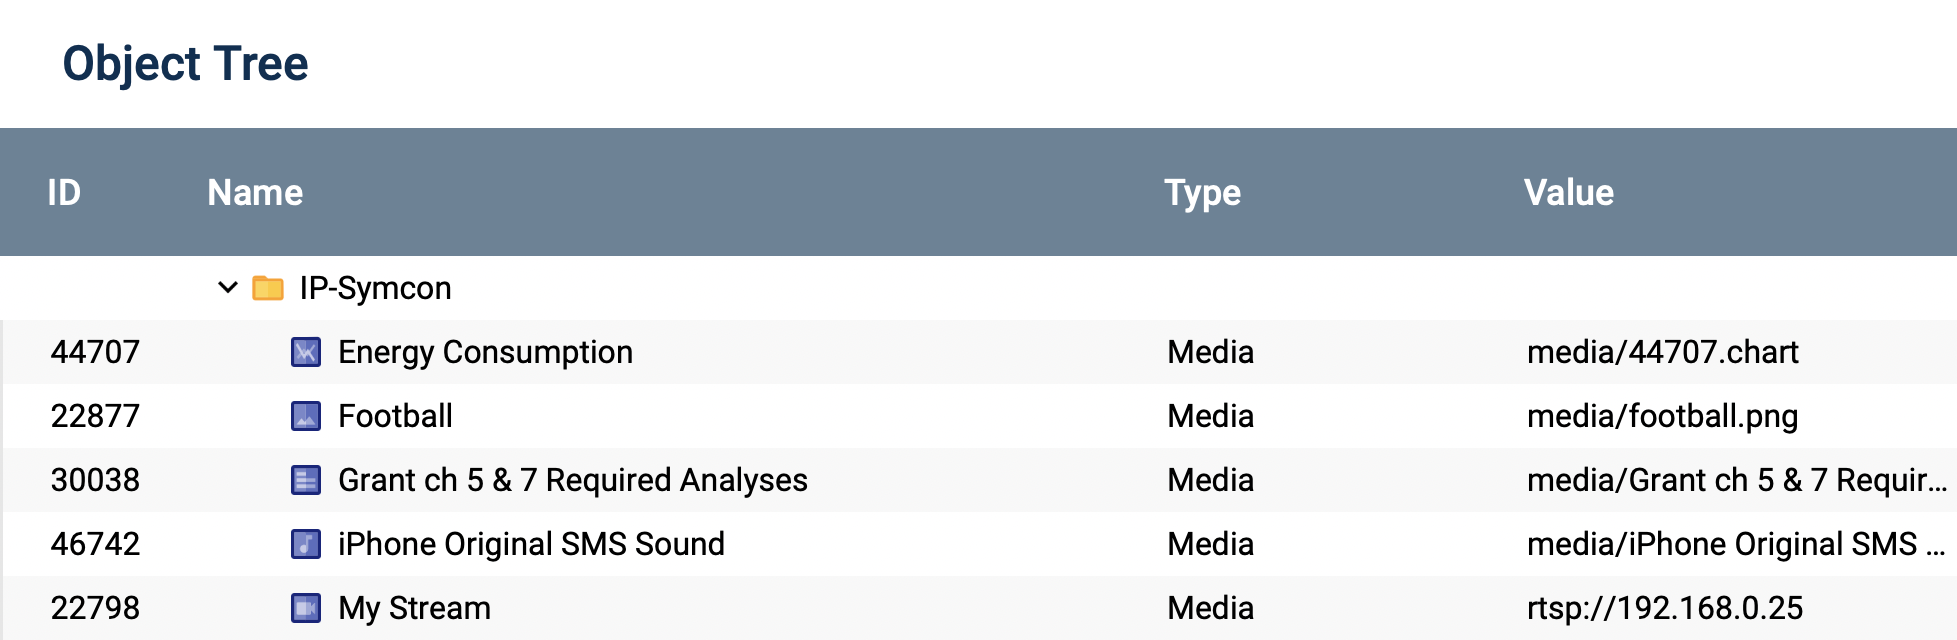
### Add media
The tutorial for the configuration of each type of media is contained within the corresponding subcategory.
It is possible to add the following types of media:
[Image/Sound](concepts.md)
[Charts](concepts.md)
[Documents](concepts.md)
[Streams](concepts.md)
[Views from IPSStudio](https://ipsview.brownson.at/)
## Image/Sound
Source: https://www.symcon.de/en/service/documentation/basics/media/image-sound/
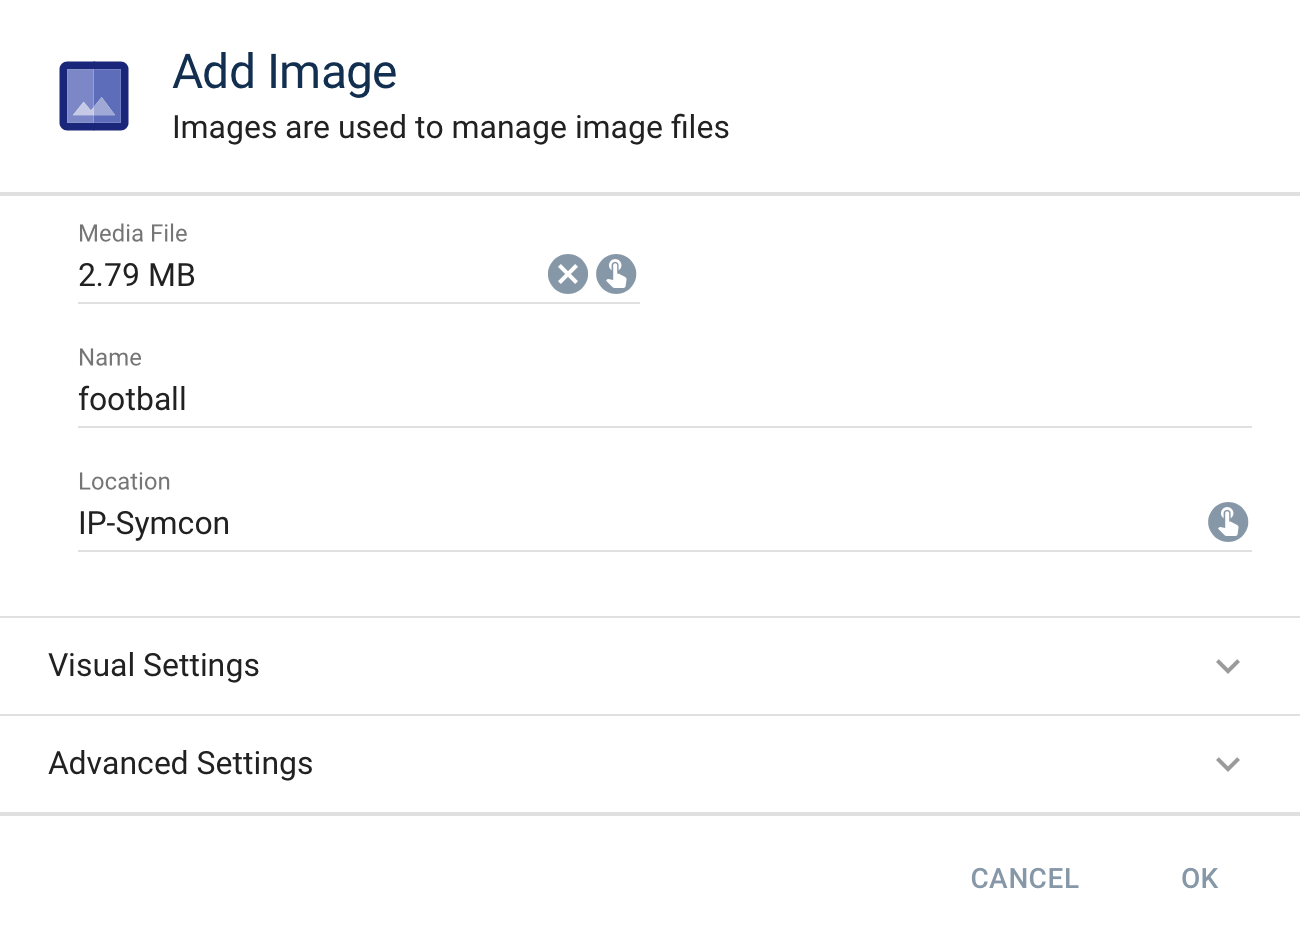
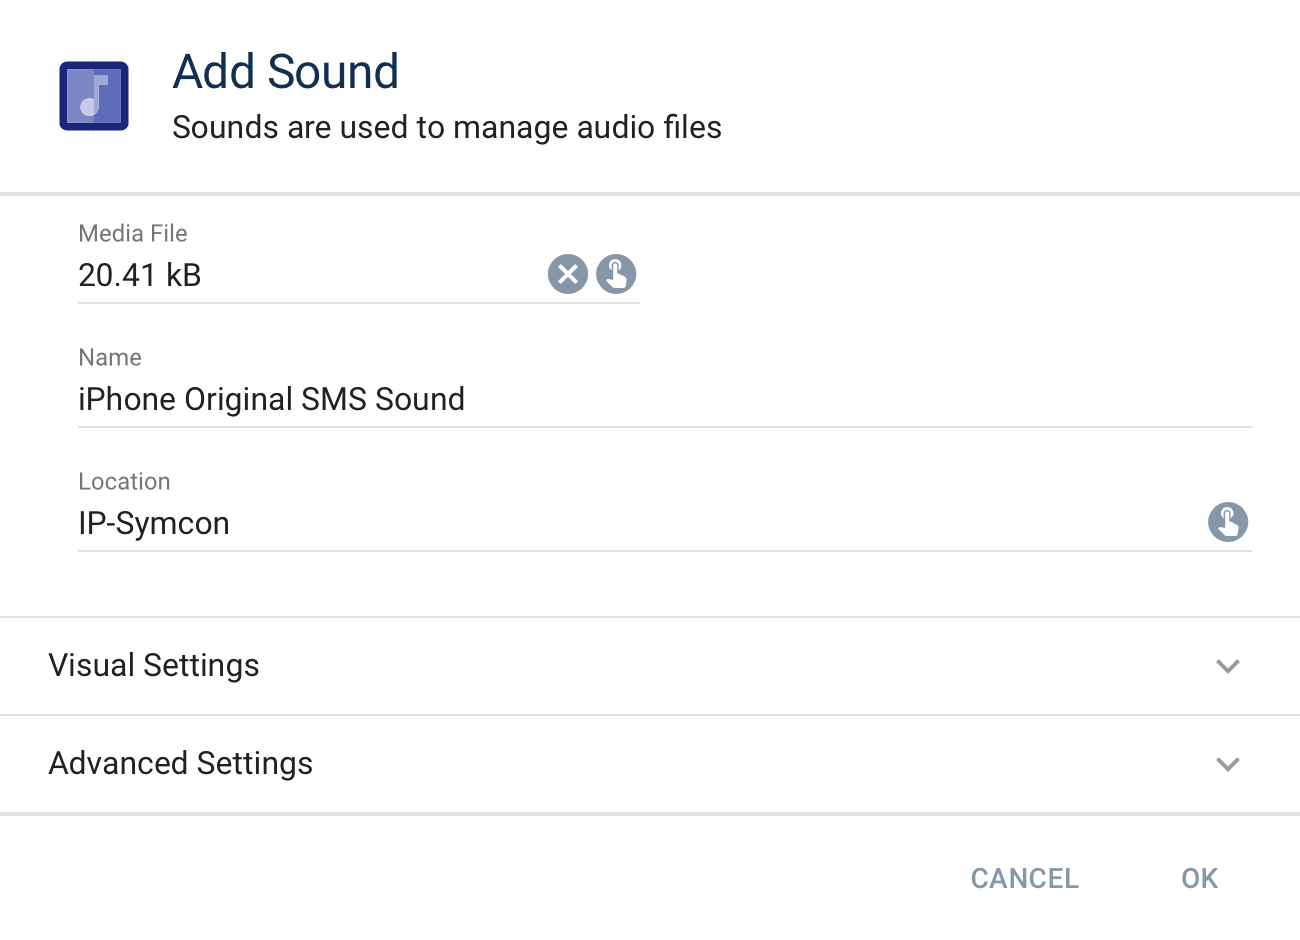
### Add Image or Sound Files
The dialog "Add object -> Media -> Image or Sound" is used to add an image or sound file to the media pool.
Any image or sound file from the hard drive, network, internet, etc. can be chosen for upload and will be copied into the media pool of IP-Symcon.
Added Image/Sound objects are available in the object tree.
A preview can be shown with a double click on the media object in the object tree.
#### Allowed file extensions
| Ending | since version |
| ------ | ------------- |
| .jpg | 3.4 |
| .jpeg | 3.4 |
| .gif | 3.4 |
| .png | 3.4 |
| .ico | 3.4 |
| .webp | 8.1 |
> **Note:** All files can be added - however, the correct display in the tile visualization is only guaranteed for these types
## Charts
Source: https://www.symcon.de/en/service/documentation/basics/media/charts/
Charts can present one or more variables as graphs. Using variables in a chart requires that the variables are logged. Configuring the logging of variables is explained in the [Archive Control](modules/archive-control.md).
### Configuration in IP-Symcon
A new chart can be added via Right click -> "Add object" -> "Media" -> "Chart" at the selected location. The selected (logged) variables are used as data source for the individual graphs.
#### Edit chart
General properties of the chart.
| Option | Description |
| ---------------- | ---------------------------------------------------------------------------------------------------------------------------------------------------- |
| Add | Add a single variable -> Opens the "Configure graph" dialog. If a graph already exits, this dialog can be opened by clicking on the gear in the list |
| Name | Name of the Chart |
| Location | Selection of the location for the chart |
| Type | Selection the type of presentation as line, bar, or bool chart |
| Visual Settings | Here, the icon, visibility, and activation can be configured |
| Advanced Setting | A description can be provided here |
#### Configure graph
A graph represents a single dataset for the chart.
| Field | Description |
| ------------ | ----------------------------------------------------------------------------------------------------------------------------------------------------------------------- |
| Axis Profile | Selection of the [Variable Profile](concepts.md) . The defined Min and Max values are used for scaling the Y-axis (not available for Bool Chart) |
| Axis Side | Selection if the labels for this graph should be at the left or at the right (not available for Bool Chart) |
| Fill Color | Selection of the desired fill color - Transparency possible |
| Line Color | Selection of the desired line color |
| Offset | An offset by the respective time unit (see below for examples) |
| Title | Meaningful title which is shown in the legend. If the title is empty, the name of the variable is displayed |
| Variable | Selection of the displayed variable |
### Display
__Display as Popup Graph__
To display a popup graph, the chart needs to be moved to the desired [category](concepts.md) in the object tree.
__Display as Full Screen Graph__
A full screen graph is displayed by adding the chart as [graph element](components/webfront-visualization.md) with the WebFront editor.
### Additional Options for Presentation
Selectable options that can be activated within the graph to change the presentation.
| Abbreviation | Meaning | Description |
| ------------ | ------------ | ------------------------------------------------------------------------------------------------------------------------------------------------------------------------------------- |
| CON | Continuous | The X axis is adjusted such that the right border is set to the most current value. This shows the biggest possible amount of current data |
| DYN | Dynamic | If activated: The Y axis is scaled according to the minimum and maximum value of the chart
If deactivated: The borders of the Y axis are taken from the selected variable profile |
| HD | High Density | If activated: An increased precision of average values is used for the presentation of the graph. See table __Average Intervals__ |
| Legend | Legend | (Charts only) (De-)Activates the legend |
| MIN/MAX | Min/Max | (Automatically generated graphs for variables only) Two additional graphs with the minimum and maximum values are shown |
| RAW | Raw data | If activated: The raw data is displayed. If deactivated: The aggregated values are shown |
__Average Intervals__
| Timespan | Regular | High Density (HD) |
| -------- | --------- | ----------------- |
| Decade | Years | Months |
| Year | Months | Days |
| Month | Days | Hours |
| Week | Days | Hours |
| Day | Hours | 5 minutes |
| Hour | 5 minutes | 1 minute |
### Example 1 (Type: Bar)
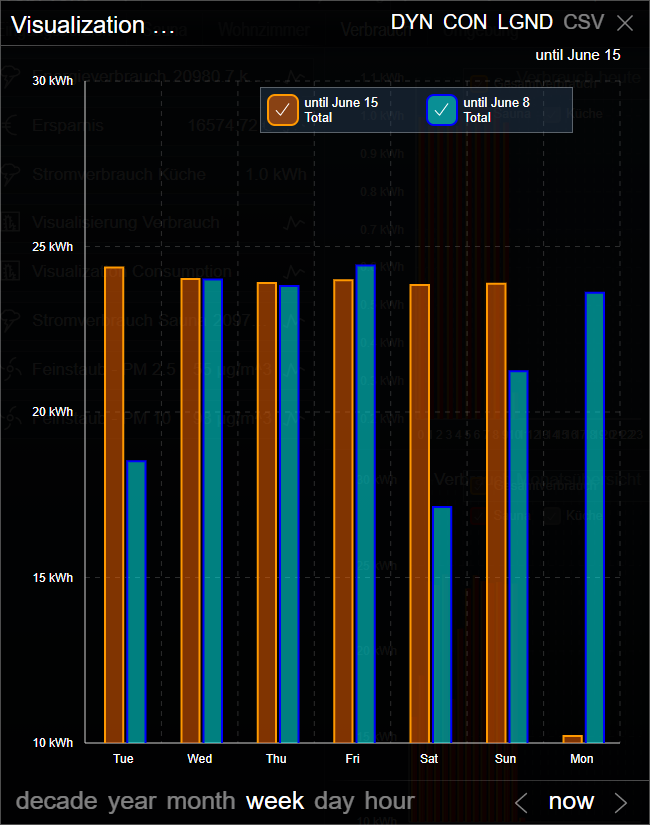
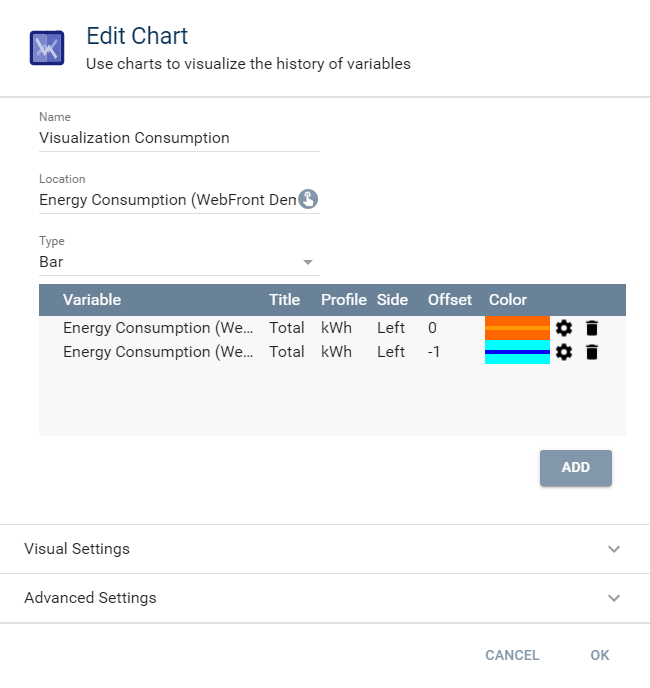
This example shows the comparison of energy costs of a heating system.
The same variable was chosen twice, but one (blue) uses a time offset of -1.
In the week presentation, a comparison between the current and the previous week is shown, in the year presentation, a comparison to the previous year, ...
### Example 2 (Type: Line)
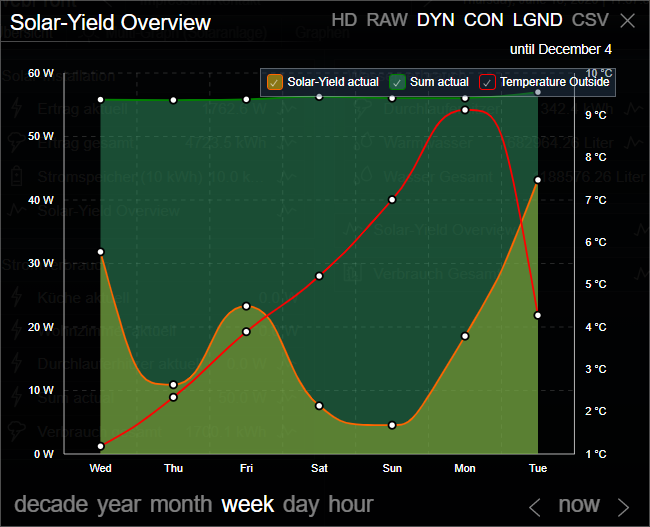
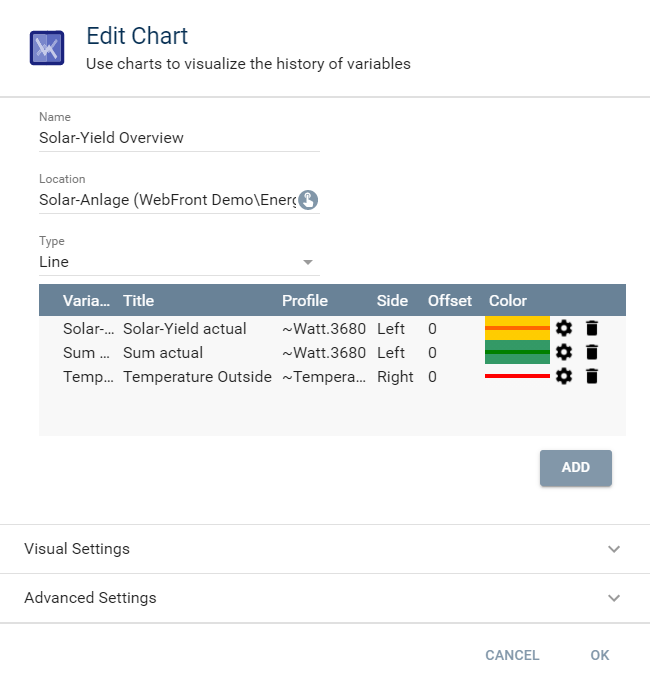
This example displays the gain of a solar collector as well as a sum of the current consumption. The values for these two graphs can be read at the left axis. In addition the exterior temperature is integrated, which uses the right axis.
### Example 3 (Type: Bool)
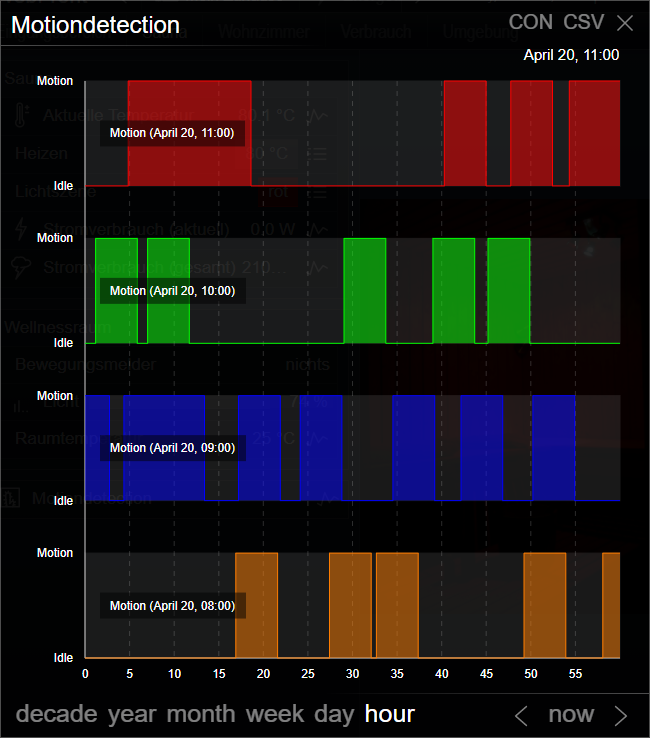
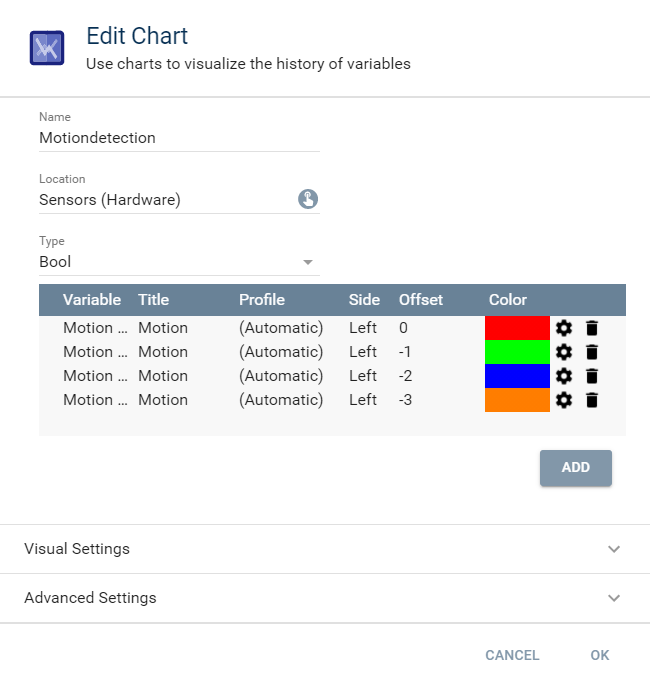
This example shows a bool chart that shows the state of a motion sensor over the course of four consecutive hours.
## Documents
Source: https://www.symcon.de/en/service/documentation/basics/media/documents/
_Requires Symcon >= 4.3_
### Add Media Document
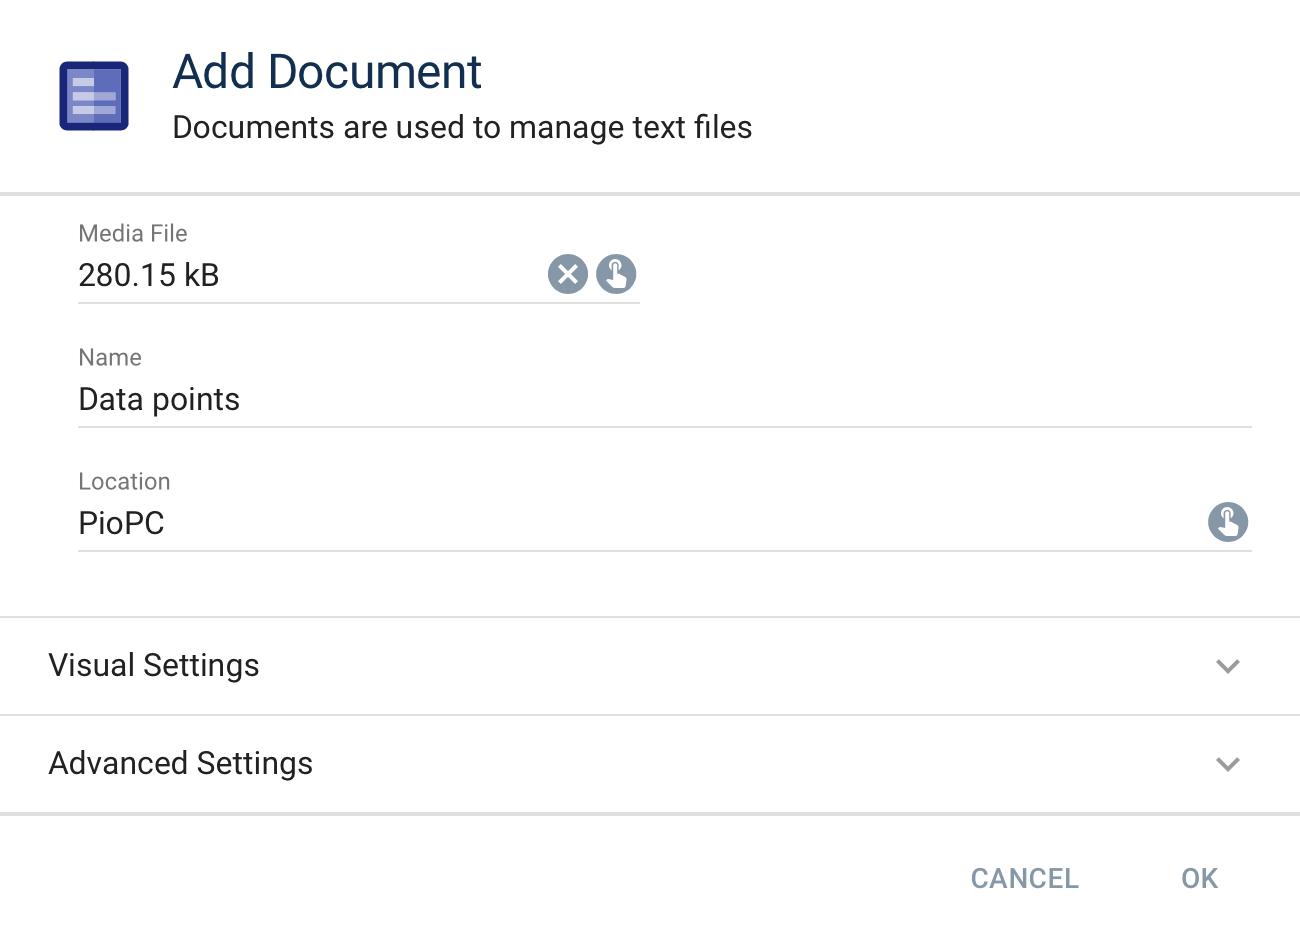
A new media file of the type document can be added via the "Add Object -> Media -> Document" dialog.
A new file can be created or an existing one from the hard disk, network, etc. can be selected, which IP-Symcon then copies into the media pool.
Added documents can be viewed and opened in the object tree under "Media Files".
#### Allowed file extensions
| Ending | since version |
| ------ | ------------- |
| .doc | 4.3 |
| .docx | 5.2 |
| .pdf | 4.3 |
| .txt | 4.3 |
| .xls | 4.3 |
| .xlsx | 5.2 |
> **Note:** All files can be added, but later support via WebFront will only be available for the specified file types
## Streams
Source: https://www.symcon.de/en/service/documentation/basics/media/streams/
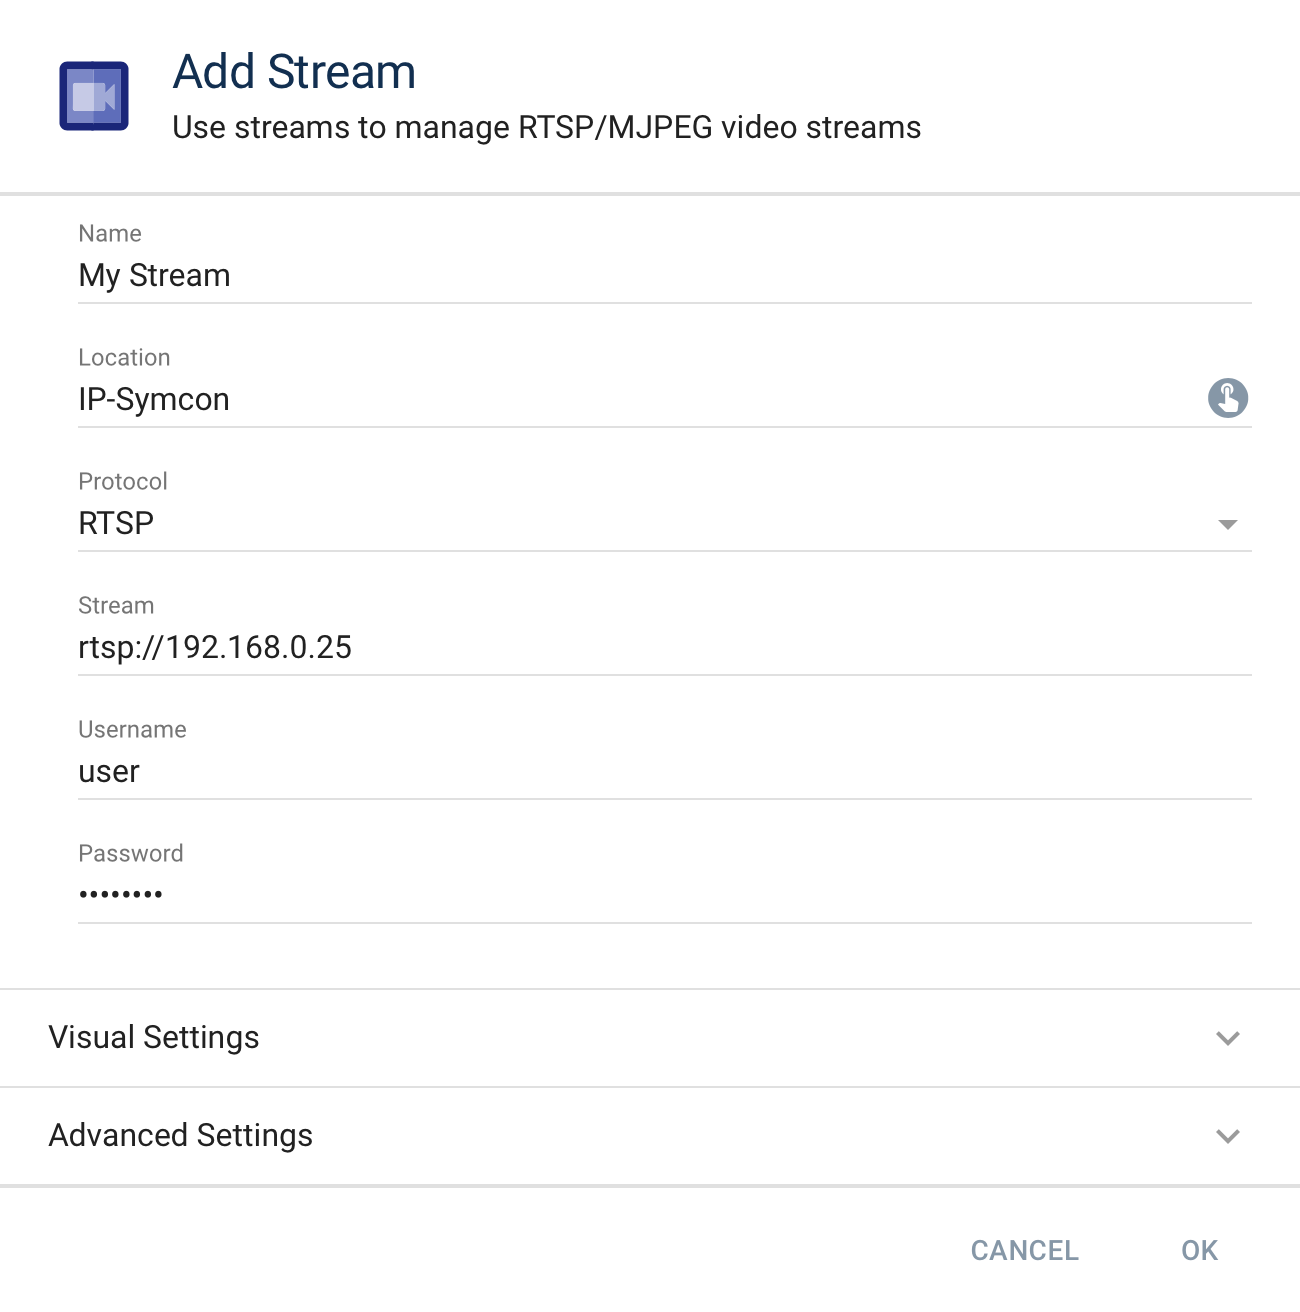
### Add Media Stream
It is possible to add MJPEG and RTSP streams to the WebFront by using the special media type Stream. Further information and the address can be found in the documentation of the utilized web camera. The size of the stream can be parameterized by the configuration of the web camera. The complete address, including the username and password, needs to be entered within the corresponding dialog of IP-Symcon.
> **Warning:** RTSP streams can currently only be displayed in Chrome, Firefox, Opera, Edge, Android (incl. apps since version 5.1), Safari (since version 5.5), and iOS (incl. apps since version 5.5).
> **Note:** RTSP streams need to be h264 encoded. As IP-Symcon acts as distributor for RTSP streams, limits are applied depending on the used [edition](https://www.symcon.de/en/product/editions/).
> **Note:** For **Axis** cameras: To use streams in the tile visualization, you must open “Plain Config” in “Advanced Options” and activate the setting **Image.I0.MPEG.H264.PSEnabled**. Then save with **Save** and reload the tile visualization to load the stream correctly.
## Links
Source: https://www.symcon.de/en/service/documentation/basics/links/
### Description
Links are connected to other existing objects and represent those objects in a different location. This is done without changing the existing structures and sortings.
All properties of the original object are shown.
Only the following properties of a link can be changed:
- Name
- [Icons](components/icons.md) for the WebFront
- Visibility Settings for the WebFront
All objects within the object tree can be linked:
- Categories
- Instances
- Variables
- Scripts
- Events
- Media
> **Warning:** Links of links are not possible. However, multiple links of one object are possible.
### Application
Links are primarily used to position objects in the WebFront in desired locations. Thus, instead of positioning the object itself in the locations, a link of an object is placed there instead.
Another possibility is the creation of an overview tab that centrally shows the properties of multiple distributed objects in a single location.
A link is created by right clicking the object to be linked -> "Link Object" -> Choose a location for the link.
> **Note:** Only the top level categories of the object tree can be accessed within the iOS or Android app. Links can be used to bring objects within subcategories back to the "surface".
### Example
A complex example is found in [Use Links](how-to.md)