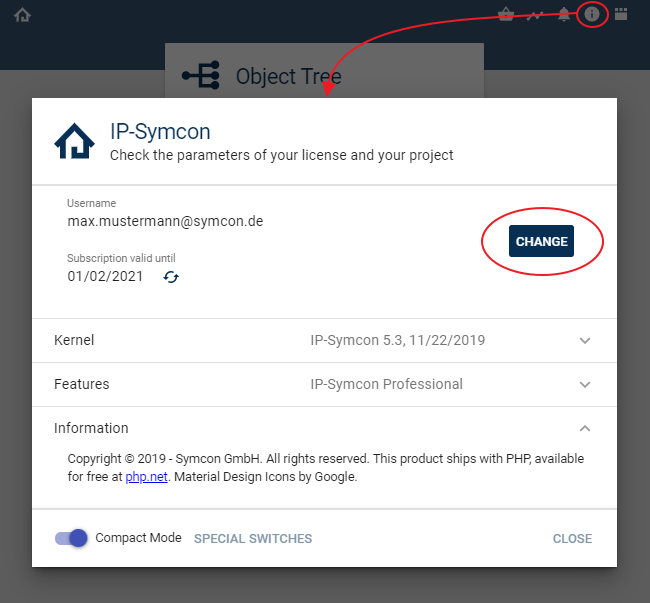
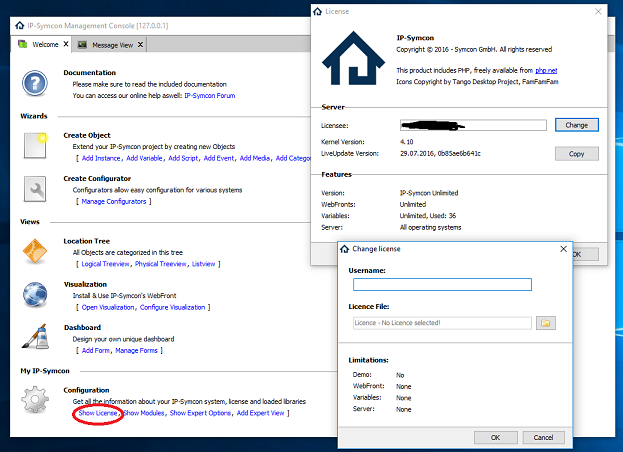
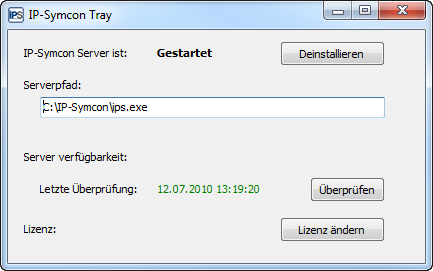
# Getting Started > Symcon documentation · English · generated on 2026-09-26 > Index: https://www.symcon.de/en/llms.txt ## Introduction Source: https://www.symcon.de/en/service/documentation/introduction/ This is the documentation of IP-Symcon. On the one hand it provides technical backgrounds, basic knowledge, and functionalities. On the other hand it supports the development of individual scripts and automation. Examples allow an easy access to the content. The document is available at all times online and offline. The basic features of IP-Symcon are described on the [product page](https://www.symcon.de/en/product/) . ### How does IP-Symcon work? #### Vendor Independence IP-Symcon links diverse devices from different manufacturers within one application. The softwares unified pattern enables access to all devices. ![Overview](https://www.symcon.de/media/pages/service/dokumentation/einfuehrung/98e7300978-1790424938/einfuehrung-uebersicht.jpg) #### Connection IP-Symcon uses its own configurators and the manufacturers protocols to connect to the devices using a simple modular structure. It does not matter whether the manufacturers system is based on radio or cable. The software always interprets the connection with the same pattern: Device instance -> Gateway -> I/O ![Connection](https://www.symcon.de/media/pages/service/dokumentation/einfuehrung/9d63a97b47-1790424938/einfuehrung-verbindung.jpg) #### Device status When the device is connected IP-Symcon can read and write its variables and states. The device can be controlled. ![Device](https://www.symcon.de/media/pages/service/dokumentation/einfuehrung/376d1b2c8b-1790424938/einfuehrung-geraete.jpg) #### Management The management console is the technical nerve center. It controls the devices that are configured and connected to the server. The intelligence and the explicite automation is configured and realized via scripts in the management console. ![IP-Symcon](https://www.symcon.de/media/pages/service/dokumentation/einfuehrung/9b5946f440-1790424938/einfuehrung-ipsymcon.jpg) #### Visualization In a next step, IP-Symcom provides the visualization of the configured devices. The visualization clearly shows all functions and data. Controlling via the visualization is no problem at all. ![Visualization](https://www.symcon.de/media/pages/service/dokumentation/einfuehrung/3b9dc85236-1790424938/einfuehrung-visualisierung.jpg) #### First Steps The [Quick Access](getting-started.md) explains most basics. ## Terms and Conditions Source: https://www.symcon.de/en/service/documentation/introduction/terms-and-conditions/ > **Warning:** Our "General Terms and Conditions of the Software Purchase Agreement" can be downloaded at any time: [Download](https://www.symcon.de/assets/files/legal/EULA.pdf) > **Note:** A detailed explanation of the rights of use can be found here: [Usage rights](getting-started.md). ## Usage rights Source: https://www.symcon.de/en/service/documentation/introduction/usage-rights/ > **Note:** The legally binding, general terms and conditions of the software purchase agreement can be downloaded from [Terms and Conditions](getting-started.md) > **Warning:** An IP-Symcon license entitles you to install IP-Symcon as often as desired within a private household. For commercial installations, a separate IP-Symcon license is required for each server/computer in operation. Only one productive installation per license can be in operation at any one time, which communicates with the server for push notifications or the Connect-Service. Any further installations can therefore only be used for programming and testing purposes. An IP-Symcon license is valid for all terminal devices (operating systems) on which IP-Symcon is available. A valid [subscription](getting-started.md) is required for an online installation. If an installation of IP-Symcon is desired after the subscription has expired, a self-made backup is required. > **Note:** The IP-Symcon Pro console can be [downloaded](https://www.symcon.de/en/downloads/) from the IP-Symcon server and automatically updated using the integrated update function without an IP-Symcon license. ## Subscription Source: https://www.symcon.de/en/service/documentation/introduction/subscription/ A subscription provides the listed services during its duration. These are required by some modules for operation (e.g. Connect Service for Alexa Smart Home Skill) ### Services The following services require an active subscription. #### Installation/Update An active subscription is required for new installations and updates of IP-Symcon. #### Push Notification Push notifications are sent to the mobile apps via our server. #### Connect Service Encrypted access is provided via our Connect Service server enabling the system to be securely accessed from anywhere. ### Period of validity The duration (validity) of the subscription can be determined from one of the following three points: * In the last email of a license or subscription order: "... valid until: DD.MM.YY " * In our forum under "License Management". To do this, one has to register there. * Inquire by email or using the contact form * One month before the subscription expires, an email will be sent to inform about its soon expiration > **Note:** A subscription is __not__ self-renewing. > When the subscription expires, it can be purchased/renewed in the [IP-Symcon Shop](https://www.symcon.de/en/shop/) . > One month before the expiration date, our system will automatically send a notification email. > When ordering, the new time contingent is added to any remaining duration (similar to a prepaid card). There is more information about the license used in the [Management Console](components/management-console.md) via the information icon in the top right corner. ## Quick Start Source: https://www.symcon.de/en/service/documentation/introduction/quickstart/ ### Symcon Symcon is a server software which aims to combine, link and automate different automation systems in one server. This means that systems that cannot communicate with one another are brought together in a uniform, clear configuration. Furthermore, Symcon offers a uniform [Visualization](components/tile-visualization.md) and control, both for the browser and via [Mobile Apps](components/tile-visualization.md) for iOS and Android. A comprehensive description is available on the [product page](https://www.symcon.de/en/product/) . ### Supported Systems Symcon supports a wide variety of well-known manufacturers and protocols. An overview of the native systems can be seen in the [Module Reference](modules/index.md). Additionally, the [Module Store](components/management-console.md) is offered. This is a platform on which modules are submitted, quality controlled and made available by the community to the user free of charge. ### Symcon Editions There are six different editions: Community, Professional, Expert, Basic, Industrial and Enterprise. These are valid indefinitely and offer the same system support. The editions differ in the number of variables, Visualizations and the included [Extensions](https://www.symcon.de/en/product/extensions/). A detailed list of all functions can be found in the [Function overview](https://www.symcon.de/en/product/editions/). An existing license can be upgraded to a higher version at any time. An [overwiev of the upgrades](https://www.symcon.de/en/shop/symcon/bundle-ips-upgrade/) can be viewed in the shop. #### Subscription A [Subscription](getting-started.md) activates features, which are offered by our server. This includes, for example, push notifications, updates, [Connect Control](modules/connect-control.md) (especially important for [Amazon Alexa](modules/amazon-alexa.md) and [Google Assistant](modules/google-assistant.md)). An expired subscription does not affect the running server, only the features associated with the subscription will be deactivated. A subscription can be extended at any time via the [Shop](https://www.symcon.de/en/shop/symcon/ips-subscription/). ### Free Version It is possible to request a [free license](https://www.symcon.de/en/downloads/request/). For personal, non-commercial use, there is a permanently free Community Edition. To test the scope of a Professional or Enterprise Edition, there are demo versions available for one month. ### Hardware requirements The Symcon server must run permanently. A [SymBox](https://www.symcon.de/en/shop/symbox/bundle-symbox/) , Windows, MacOS, Linux Ubuntu, Raspberry Pi or Docker (also QNAP, Synology) system is required for this. Which version of the respective operating system is required can be looked up in the [Version Overview](getting-started/system-requirements.md) in the [System Requirements](getting-started/system-requirements.md) area. Furthermore, so-called gateways are required as an interface for the built-in systems. Which gateways are supported can be looked up in the respective [Module Reference](modules/index.md) and their device list. Some gateways are offered in the [Shop](https://www.symcon.de/en/shop/gateways/) or even as a [SymBox extension](https://www.symcon.de/en/shop/symbox/bundle-symbox/) . #### SymBox Functionalities The [SymBox](https://www.symcon.de/en/shop/symbox/bundle-symbox/) is the in-house server. This can be bought in a DIN rail housing for the electric cabinet or in an aluminum enclosure. In addition to the very low power consumption (max. 3W) the SymBox with SymOS offers a specially adapted operating system and tailored web interface for Symcon. In addition to updates and settings, the [Data Backup](getting-started.md) can be conveniently managed with this. If a Symbox is in use, the SymOS can be reached in the local network via "[symbox.local](symbox.local:3777) ". ### Installation of Symcon The installation is described for the respective system under [Installation](getting-started.md). After a successful installation, the Symcon [Service](components/service.md) starts automatically and is ready for configuration. ### Tray Functionalities After installation, the [Tray Application](components/tray.md) is now available on Windows and MacOS. Depending on the operating system, the tray application is located as a Symcon symbol in the respective system tray. Via the application The service can be started, stopped and updated. Under "Information" there is the possibility to set up [Remote Access](components/remote-access.md). ### Configuration [Management Console](components/management-console.md) is used for configuration. This can be called up from anywhere in the network via a browser. To open it, "[IPServer]:3777/console/" just needs to be entered in the address line. If a SymBox is in use, this is [symbox.local:3777/console/](http://symbox.local:3777/console/) instead. ### Basics The basic concepts and their handling are described in the area [Basics](concepts.md). The next step are the [Components](components/index.md), which explain the functionalities for control, automation and visualization. ### Visualization and Control The [Tile Visualization](components/tile-visualization.md) of the instances set up is created automatically and can be further adapted to one’s personal needs. Control takes place via the visualization. Another option to control the system are the [Free Mobile Apps](components/tile-visualization.md) for iOS and Android. All necessary information can be found under [Tile Visualization](components/tile-visualization.md). ### Security In order to cover the important aspect of security in home automation, external access is not possible by default factory settings. Further information on all security aspects can be looked up in the section [Security](getting-started.md). In addition, a security widget checks the configuration and provides an overview of any passwords that may need to be set. ### Data backup For [Data Backup](getting-started.md) a [backup can be created](getting-started.md). This can be installed onto a different or a new system. Exact steps for this can be found under [load backup](getting-started.md). Such a backup is fully compatible even with a [Change of Platform](getting-started.md). ### Connect Control The [Connect Control](modules/connect-control.md) is used for encrypted external communication. It enables secure control and [Visualization](modules/index.md) outside of your local network. Certain functions and modules (e.g. [Amazon Alexa](modules/amazon-alexa.md), [Push Notifications](modules/notification-control.md)) require a permanent internet connection. This is also guaranteed by the encrypted Connect Control. ### Remote Access The [Remote Access](components/remote-access.md) offers the possibility to configure Symcon from the outside. Only after assigning a password the access from the outside, additionally to the local network access, will be activated. It is thus possible to carry out full remote maintenance. [Connect Control](modules/connect-control.md) is required for this. ### More Information and Videos Further information and examples can be found on the [Symcon YouTube Channel](https://www.youtube.com/c/symcongmbh) and under [Procedures](how-to.md). In addition to the [Documentation](getting-started.md), the [Forum](https://community.symcon.de/) also offers a large amount of information, script collections and ideas, as well as a broad base of professionals and newcomers. ## Video Tutorials Source: https://www.symcon.de/en/service/documentation/introduction/video-tutorials/ For a quick introduction to IP-Symcon, here are some useful video tutorials: > **Note:** [All videos can be found on our YouTube channel.](https://www.youtube.com/symcongmbh) - [Our SymBox](https://www.youtube.com/playlist?list=PLFfIoKt1k0PUFjmnPsa-KxIR0XT0pO9j4) - [Part 1 - Figures, data, facts](https://youtu.be/bNt-C2f_gNk) - [Part 2: Commissioning + Recovery Tool](https://youtu.be/4MMVfNy2txM) - [Part 3: KNX Demo & Pro Console](https://youtu.be/l8GI3wxGHqc) - [Part 4: Tailscale VPN (Module)](https://youtu.be/nOiR9pN83RQ) - [Basics](https://www.youtube.com/playlist?list=PLFfIoKt1k0PXuCWFio7PMbeMKyFM_zqXP) - [Part 1: Basics](https://youtu.be/0nuUJ8YhY0k) - [Part 2: Installations on Windows & Raspberry Pi](https://youtu.be/ba-h_CFgg_I) - [Part 3: Symcon with Docker](https://youtu.be/Ei_OoIpmnQE) - [Part 4: macOS & Synology Installation](https://youtu.be/lJhDhYrHyR0) - [Part 5: Update with Portainer](https://youtu.be/io_6Cgtji14) - [Part 6: Integrating & configuring devices](https://youtu.be/c6329rIbeRQ) - [Part 7: User Interface & Navigation](https://youtu.be/PgD8mOFHGws) - [Part 8: Variable display](https://youtu.be/mqIl7_FUKyM) - [Part 9: Location Control Module](https://youtu.be/oTsHg3Mr-JA) - [Logic plans](https://www.youtube.com/playlist?list=PLFfIoKt1k0PWWtvdDoVemqsNQPZD7I0K0) - [Part 1: Introduction and Basics](https://youtu.be/BAK1sXK4FdY) - [Part 2: Sublogic plans](https://youtu.be/0mTDruQ7l0Q) - [Part 3: Switch-off delay - Sublogic diagram](https://youtu.be/NaTMManlVf0) - [Part 4: Watchdog - Sublogic plan](https://youtu.be/yOcRwvYLGlw) - [Part 5: Doorbell trigger - Sublogic diagram](https://youtu.be/P7GBz3RR9vk) - [Part 6: min/max values logging - Sublogic plan](https://youtu.be/tRUXIyFtkkQ) - [Visualization](https://www.youtube.com/playlist?list=PLFfIoKt1k0PXwU3-PCik9MJZqa58BRNEO) - [WebFront functions and the WYSIWYG editor](https://www.youtube.com/watch?v=523XW-o7d1k) - [Symcon Connect- The secure connection to IP-Symcon and WebFront](https://www.youtube.com/watch?v=nOB0TtsLt68) - [IP-Symcon Webinar: Preview for visualization](https://www.youtube.com/watch?v=nOB0TtsLt68) - [IP-Symcon Webinar: Public beta of the new visualization](https://www.youtube.com/watch?v=XmctZRAYeqA) - [Developer Webinars](https://www.youtube.com/watch?v=7TH6SzA39vs&list=PLFfIoKt1k0PUcBtQMjtIG8aF5BOG-mykB) - [Getting started for developers](https://www.youtube.com/live/c1c0eSEud5U?si=mlWJYPq07J8qi4MI) - [Dynamic modules](https://www.youtube.com/live/7TH6SzA39vs?si=NdcMX_Yy8QL2GOS0) - [Automatic testing](https://www.youtube.com/live/kTcuTO50Jzw?si=9M0uu7vM1acMNQcp) - [Configuration forms and their elements](https://www.youtube.com/live/kYiiNurOD0o?si=EB6clhC8LSaeWHoN) - [Configurator element and data flow](https://www.youtube.com/live/6dcsSfqIlnA?si=UOleUUAWbJV8w8YT) - [Create actions](https://www.youtube.com/live/QskfaDICPWs?si=pc0B7DPdeIP5DhFV) - [Git Basics](https://www.youtube.com/live/iwKZJGTTb48?si=NH0voV3FrDOoiI8G) - [Changes to the PHP SDK for 7.0](https://www.youtube.com/live/ASh-bt55VAw?si=k0MY0FZYJ9szMU6b) - [IP-Symcon Developer Webinar: HTML-SDK](https://www.youtube.com/live/-dIHZRYbqpA?si=HiS0qolTk8ixePbb) - [Presentation in modules](https://www.youtube.com/live/c-QxdRlgS_c?si=XRd9TxaiECZxp1ZQ) - [Basics - Webinars](https://www.youtube.com/playlist?list=PLFfIoKt1k0PUAuuzxXcdNn4WYEgGlry8b) - [IP-Symcon Basics Webinar](https://www.youtube.com/watch?v=6G-OCdxt4co) - [IP-Smcon Basics Webinar - Part 2](https://www.youtube.com/watch?v=kTcuTO50Jzw) - [IP-Symcon Developer Webinar: Automated Module Testing](https://www.youtube.com/watch?v=kTcuTO50Jzw) - [IP-Symcon Webinar Basics Visualization](https://www.youtube.com/watch?v=Iny7lJrqDvo) - [IP-Symcon Webinar: Tabs & Widgets](https://www.youtube.com/watch?v=COg81XzSDOE) - [Releases](https://www.youtube.com/playlist?list=PLFfIoKt1k0PWx3KRFqxhivVVw5f31HPeV) - [Version 8.0 Preview](https://youtube.com/live/uxR4R7sgLSI) - [Version 7.2](https://youtube.com/live/S70oZf_UnEM) - [Version 7.1](https://youtube.com/live/GCPXUTM8dyE) - [Version 7.0](https://www.youtube.com/watch?v=hbIEWVhO5cM) - [Version 6.4](https://www.youtube.com/watch?v=PWMtBzJmap8) - [IPSView & IPSWorkflows](https://www.youtube.com/watch?v=aToRyiR4J5M) - [Energy Management with IP-Symcon](https://www.youtube.com/watch?v=44nygGzHE-Q) - [Version 6.3](https://www.youtube.com/watch?v=kkVA_tpMBrk) - [Version 6.2](https://www.youtube.com/watch?v=f-CPFL5I8hc) - [Version 6.1](https://www.youtube.com/watch?v=sW35lmKgGJ8) - [Version 6.0](https://www.youtube.com/watch?v=T7XVOTLowT4) - [Version 5.5](https://www.youtube.com/watch?v=t274wQCMC18) - [Version 5.4](https://www.youtube.com/watch?v=Y9K2CvwiAsk) > **Note:** Missed the event? [Check it out!](https://www.symcon.de/en/events/) - [Set up system](https://www.youtube.com/playlist?list=PLFfIoKt1k0PWOzjdFWn1_Hwq6pQYGAAJM) - [Set up KNX devices incl. feedback addresses](https://www.youtube.com/watch?v=hDwXGSwMjvc) - [Set up SymBox Pro with KNX Data Secure](https://www.youtube.com/watch?v=aA8mcKEyHOY) - [KNX: Set up IP-Secure](https://www.youtube.com/watch?v=AZo_TwAyn-U&t=17s) - [xComfort](https://www.youtube.com/watch?v=VC8fYf9LB-g) - [dS-Setup](https://www.youtube.com/watch?v=mnR2ab6IMlQ) - [Simens OZW setup](https://www.youtube.com/watch?v=2VoOVEPpbY0) - [XML export using ETS6](https://www.youtube.com/watch?v=-hdo5nrTr3Y) - [Setting up a BACnet device in IP-Symcon](https://www.youtube.com/watch?v=T6NsoRShn2o) - [Setting up an MQTT client in IP-Symcon](https://www.youtube.com/watch?v=dVMgHm5LeX0) - [Setting up an MQTT server in IP-Symcon](https://www.youtube.com/watch?v=5msmo1JSxSo) - [Setting up a KNX system with configurator in IP-Symcon](https://www.youtube.com/watch?v=hgz7nv0SC-Q) - [XML export using the ETS](https://www.youtube.com/watch?v=DeGCLestF_I) - [Setting up a Z-Wave system in IP-Symcon](https://www.youtube.com/watch?v=7jFMxEpCGxU) - [Setting up an LCN system in IP-Symcon](https://www.youtube.com/watch?v=tZMETUfw-_M) - [Symbox - First setup of the IP-Symcon control center](https://www.youtube.com/watch?v=S9yKoKmow2s) - [OPC- EXport using the ETS(from v5.6.5)](https://www.youtube.com/watch?v=lDebGVTDUnw) - [Set up an Alexa controller in IP-Symcon in under 10 minutes](https://www.youtube.com/watch?v=AbvauPdbLa8) - [Set up a HomeMatic system in IP-Symcon](https://www.youtube.com/watch?v=uDd-jdKm0CE) - [HomeMatic firewall settings for a functional feedback channel](https://www.youtube.com/watch?v=sahJdNXUZZs) - [Setting up a 1-wire system in IP-Symcon](https://www.youtube.com/watch?v=JbIdm5x0uxY) - [Finding out the IP address in the ETS](https://www.youtube.com/watch?v=0nEpt1Y_2nc) - [Setting up a KNX system in IP-Symcon](https://www.youtube.com/watch?v=kfv0HSX9PVM) - [OPC export using the ETS(up to v 5.6.4)](https://www.youtube.com/watch?v=WnJ3qRI0qVE) ## Installation Source: https://www.symcon.de/en/service/documentation/installation/ [Installation on Windows](getting-started.md) [Installation on MacOS](getting-started.md) [Installation on Linux](getting-started.md) [Installation on Raspberry Pi](getting-started.md) [Installation on Docker](getting-started.md) [Installation on QNAP](getting-started.md) [Installation on Synology](getting-started.md) [Installation on SymBox](getting-started.md) [Installation für Catan](getting-started.md) ### Installation The initial installation and activation on the various platforms. For this purpose IP-Symcon uses installation steps adapted to the respective system or platform. Detailed information can be found on the respective system’s page. > **Note:** In order to grant IP-Symcon access to certain functions, e.g. updates, from outside, it may be necessary to set them up in the firewall. Further information can be found under [Firewall](getting-started.md) ### Update IP-Symcon can be updated with a valid subscription. How to initiate an update can be read on the respective system’s page. For an update, the IP-Symcon server must be contacted to request the latest packages. If this fails, there are several possible causes: * The subscription has expired. A new one should be purchased from the shop. * The proxy settings are incorrect. * The Internet connection is not established. ### Data Backup To avoid data loss there are several ways to backup IP Symcon data. These are described under [Backup](getting-started.md). ### Change of Platform IP-Symcon can move from one platform to another without a new setup. The procedure is explained under [Change of Platform](getting-started.md). ### Uninstalling How to uninstall IP-Symcon can be read on the respective system’s page. ### Change License Should the license change, it can be changed within IP-Symcon via the [management console](components/management-console.md). The necessary steps can be found under [Change License](getting-started.md). ### Migration Migration from an old version to a new version is possible without data loss. In the left menu all previous migrations can be found. Individual migrations should be performed from version to version. ## Windows Source: https://www.symcon.de/en/service/documentation/installation/windows/ > **Warning:** The installation is only possible with a valid subscription. However, an existing backup can be used to restore the software even without subscription. See [Change of Platform](getting-started.md) > **Warning:** A regular backup is recommended to ensure that your system is as current as possible in case of a defect. Even more, an active subscription is required to download IP-Symcon anew in case of a complete loss of data. ### Installation #### Version Requirements The [version overview](getting-started/system-requirements.md) shows which version of IP-Symcon is compatible with which Windows version. #### Installation __Download:__ [Setup (64-Bit)](https://download.symcon.de/stable/symcon/win/amd64) IP-Symcon is one of the few programs that enables a clean installation and uninstalls without residue as it does not create a huge load of entries in the Windows registry. It merely stores the license key. #### Remark > **Warning:** An internet connection is required to install IP-Symcon. If no connection is available on the target computer, IP-Symcon needs to be installed on another computer and copied to the target computer afterwards. #### Setup The following window should appear after starting the setup: ![Step 1](https://www.symcon.de/media/pages/service/dokumentation/installation/windows/73f031241f-1790424938/setup-firstscreen-en.png) The next step is reached after comfirming the dialog with "Next". #### Provide Lizense Data It is possible to either use a demo version or a complete license by entering a user name and the license file. Afterwards, "Next" finishes the dialog. > **Note:** The user name usually corresponds to the e-mail address used in the ordering process. ![Step 2](https://www.symcon.de/media/pages/service/dokumentation/installation/windows/da9a80e46e-1790424938/setup-licensescreen.png) The subscription is checked now. It is only possible to install IP-Symcon with a valid subscription unless you install the demo version. * When the subscription has expired, an extension can be ordered in the shop: [Shop](https://www.symcon.de/en/shop/) * If no connection to the server can be established, please check to internet connection and the proxy settings. After accepting the terms of license, a fitting path needs to be chosen (e.g., C:\IP-Symcon) and confirmed with "Next". > **Note:** During installation the folder C:\ProgramData\Symcon is automatically created. It includes all server data, the individual data of the local installation. If wanted, it is possible to move the server data since version 6.0. Move Server Data The button "Install" starts the copying of files. After a click on "OK", the installation on the system is done. Depending on the activated options, the IP-Symcon service and the IP-Symcon tray application are started automatically. The IP-Symcon WebFront should be reachable at http://ipadresse:3777/. The IP-Symcon web based [Management Console](components/management-console.md) can be called via http://ipadresse:3777/console/. Alternativly, the [Pro Console](components/management-console.md) can be used. #### Set Remote Access Password [Remote Access](components/remote-access.md) provides a tutorial for configuring remote access. #### Update The newest version can be downloaded and installed by right clicking on the tray icon and choosing "Check for Updates ‑> Download". The service needs to terminate once during the update and is automatically rebooted afterwards. ![Update Windows](https://www.symcon.de/media/pages/service/dokumentation/installation/windows/71a3188ba0-1790424938/win-update-en.png) ### Uninstallation ### Stop Service The service can be stopped by clicking "Stop Service" in the context menu of the tray application. ![Stop service](https://www.symcon.de/media/pages/service/dokumentation/installation/windows/95f21bba2e-1790424938/stop.png) #### Uninstall Service/Server The dialog "Information" can be by the context menu. It should look like this: __Windows__ ![Uninstall](https://www.symcon.de/media/pages/service/dokumentation/installation/windows/1103ee4ab3-1790424938/deinstallation-win.png) "Uninstall" removes the service from the system. #### Delete IP-Symcon Finalize the uninstallation by deleting the complete IP-Symcon folder. ### Move Server Data > **Warning:** The default folder should not be moved. However, in certain constellations it may be useful, e.g. for automatical backups. The following steps are possible since version 6.0. - Stop the IP-Symcon service - Enter "regedit" in the Start Menu to open the registry editor - Go to the path HKEY_LOCAL_MACHINE\SOFTWARE\WOW6432Node\IP-Symcon - Create a new string here and name it "DataPath" - Enter the new full path into the string "DataPath" - Move the files from C:\ProgramData\Symcon to the new folder - Verify that the folder C:\ProgramData\Symcon is either empty or does not exist any more - Start the IP-Symcon service From that time on, IP-Symcon starts from the new path. > **Warning:** Extremely important: The folder C:\ProgramData\Symcon is required to be either not exist or be completely empty ## MacOS Source: https://www.symcon.de/en/service/documentation/installation/macos/ > **Warning:** The installation is only possible with a valid subscription. However, an existing backup can be used to restore the software even without subscription. See [Change of Platform](getting-started.md) > **Warning:** A regular backup is recommended to ensure that your system is as current as possible in case of a defect. Even more, an active subscription is required to download IP-Symcon anew in case of a complete loss of data. ### Installation #### System Requirements The [version overview](getting-started/system-requirements.md) shows which version of IP-Symcon is compatible with which MacOS version. #### Installation __Download:__ [Setup](https://download.symcon.de/stable/symcon/mac/i386) Extract the ZIP file and copy its contents to the programs folder. Start the program. Install service respectively and start. The IP-Symcon WebFront should be reachable at http://ipadresse:3777/. The IP-Symcon web based [Management Console](components/management-console.md) can be called via http://ipadresse:3777/console/. Alternativly, the [Pro Console](components/management-console.md) can be used. #### Where is what? * /Library/Application Support/Symcon (Settings, scripts, media...) * /Library/Logs/Symcon (Logfiles...) #### Set Remote Access Password [Remote Access](components/remote-access.md) provides a tutorial for configuring remote access. ### Update The latest version can be downloaded and installed by clicking on the tray icon and choosing "Check for Updates ‑> Install Update". Once the installation is complete, the service needs to be stopped and restarted via the tray icon. ![Update MacOS](https://www.symcon.de/media/pages/service/dokumentation/installation/macos/fded356995-1790424938/en-update-mac.png) ### Uninstallation ### Stopping Service/Server The service can be stopped by clicking "Stop Service" in the context menu of the tray application. ![Stop service](https://www.symcon.de/media/pages/service/dokumentation/installation/macos/c7c4d97fef-1790424938/stop-mac.png) #### Uninstall Service/Server Via the "information" dialog the context menu can be opened. It should look like this: __MacOS__ ![Uninstall](https://www.symcon.de/media/pages/service/dokumentation/installation/macos/38e3eb6f5d-1790424938/deinstallation-mac.png) "Uninstall" removes the service from the system. #### Delete IP-Symcon To finalize the uninstallation, the complete IP-Symcon folder must be deleted or moved to the bin. ## Linux Source: https://www.symcon.de/en/service/documentation/installation/linux/ > **Warning:** The installation is only possible with a valid subscription. However, an existing backup can be used to restore the software even without subscription. See [Change of Platform](getting-started.md) > **Warning:** A regular backup is recommended to ensure that your system is as current as possible in case of a defect. Even more, an active subscription is required to download IP-Symcon anew in case of a complete loss of data. ### Installation #### Version Requirements The [version overview](getting-started/system-requirements.md) shows which version of IP-Symcon is compatible with which Linux version. #### Preparation Start with executing the following command and verify the correct time or set the time zone if needed ```php date ``` If the time zone needs to be set ```php sudo dpkg-reconfigure tzdata ``` #### Installation ```php wget -qO- https://apt.symcon.de/install.sh | bash /dev/stdin ``` Execute the following commands: ```php sudo apt-get update sudo apt-get install symcon ``` The IP-Symcon WebFront should be reachable at http://ipadresse:3777/. The IP-Symcon web based [Management Console](components/management-console.md) can be called via http://ipadresse:3777/console/. Alternativly, the [Pro Console](components/management-console.md) can be used. #### Update Update to the most current version: ```php sudo apt-get update sudo apt-get upgrade ``` #### How can I start and stop the IP-Symcon service? ```php sudo /etc/init.d/symcon start sudo /etc/init.d/symcon stop sudo /etc/init.d/symcon restart ``` #### Where is what? * /usr/bin/symcon - Executable * /usr/share/symcon/ - Static Data (IP-Symcon installation) * /var/lib/symcon/ - Variable Data (Settings, scripts, media...) * /var/log/symcon/ - Log Files (Logfiles...) #### How can I check if the service runs correctly? ```php sudo ps x | grep symcon ``` #### How can I view/follow the log file? tail -f /var/log/symcon/logfile.log #### Set Remote Access Password [Remote Access](components/remote-access.md) provides a tutorial for configuring remote access. #### Update Update to the most current version: ```php sudo apt-get update sudo apt-get upgrade ``` #### How can I start and stop the IP-Symcon service? ```php sudo /etc/init.d/symcon start sudo /etc/init.d/symcon stop sudo /etc/init.d/symcon restart ``` #### Where is what? * /usr/bin/symcon - Executable * /usr/share/symcon/ - Static Data (IP-Symcon installation) * /var/lib/symcon/ - Variable Data (Settings, scripts, media...) * /var/log/symcon/ - Log Files (Logfiles...) #### How can I check if the service runs correctly? ```php sudo ps x | grep symcon ``` #### How can I view/follow the log file? ```php tail -f /var/log/symcon/logfile.log ``` #### Set Remote Access Password [Remote Access](components/remote-access.md) provides a tutorial for configuring remote access. ### Update The following commands need to be used to update IP-Symcon to the newest version. ```php sudo apt-get update sudo apt-get upgrade ``` > **Note:** When updating from a version prior to 9.0, the new signing key needs to be downloaded once:

> wget -qO- https://apt.symcon.de/symcon.key | gpg --dearmor | sudo tee /usr/share/keyrings/symcon.gpg > /dev/null
sudo chmod 644 /usr/share/keyrings/symcon.gpg The service is terminated and rebooted automatically afterwards. ### Uninstallation The IP-Symcon service needs to be terminated before uninstalling. #### Terminate Service/Server The command to terminate IP-Symcon server needs to be entered via console. This is identical for Linux and Raspberry Pi. ```php sudo /etc/init.d/symcon stop ``` ![Stop service](https://www.symcon.de/media/pages/service/dokumentation/installation/linux/132dbfc59d-1790424938/deinstallation-stoppenrpi.png) ### Uninstall Service/Server The shown command needs to be entered via console. This is identical for Linux and Raspberry Pi. ```php sudo apt-get purge symcon ``` ![Uninstall](https://www.symcon.de/media/pages/service/dokumentation/installation/linux/8752b54133-1790424938/deinstallation-deinstallationrpi.png) ### Delete IP-Symcon Finalize the uninstallation by deleting the complete IP-Symcon-Data folder (/var/lib/symcon). ## Raspberry Pi Source: https://www.symcon.de/en/service/documentation/installation/raspberry-pi/ > **Warning:** The installation is only possible with a valid subscription. However, an existing backup can be used to restore the software even without subscription. See [Change of Platform](getting-started.md) > **Warning:** A regular backup is recommended to ensure that your system is as current as possible in case of a defect. Even more, an active subscription is required to download IP-Symcon anew in case of a complete loss of data. ### Installation #### Version Requirements The [version overview](getting-started/system-requirements.md) shows which version of IP-Symcon is compatible with which Raspberry Pi version. #### Preparation Start with executing the following command and verify the correct time or set the time zone if needed ```php date ``` If the time zone needs to be set ```php sudo raspi-config ``` #### Installation ```php wget -qO- https://apt.symcon.de/install.sh | bash /dev/stdin ``` Execute the following commands on the shell: ```php sudo apt-get update sudo apt-get install symcon ``` The IP-Symcon WebFront should be reachable at http://ipadresse:3777/. The IP-Symcon web based [Management Console](components/management-console.md) can be called via http://ipadresse:3777/console/. Alternativly, the [Pro Console](components/management-console.md) can be used. #### Update Update to the most current version ```php sudo apt-get update sudo apt-get upgrade ``` #### How can I start and stop the IP-Symcon service? ```php sudo /etc/init.d/symcon start sudo /etc/init.d/symcon stop sudo /etc/init.d/symcon restart ``` #### Where is what? * /usr/bin/symcon - Executable * /usr/share/symcon/ - Static Data (IP-Symcon installation) * /var/lib/symcon/ - Variable Data (Settings, scripts, media...) * /var/log/symcon/ - Log Files (Logfiles...) #### How can I check if the service runs correctly? ```php sudo ps x | grep symcon ``` #### How can I view/follow the log file? ```php tail -f /var/log/symcon/logfile.log ``` #### Set Remote Access Password [Remote Access](components/remote-access.md) provides a tutorial for configuring remote access. ### Update The following commands need to be used via terminal to update IP-Symcon to the newest version. ```php sudo apt-get update sudo apt-get upgrade ``` > **Note:** When updating from a version prior to 9.0, the new signing key needs to be downloaded once:

> wget -qO- https://apt.symcon.de/symcon.key | gpg --dearmor | sudo tee /usr/share/keyrings/symcon.gpg > /dev/null
sudo chmod 644 /usr/share/keyrings/symcon.gpg The service is terminated and rebooted automatically afterwards. ### Uninstallation The IP-Symcon service needs to be terminated before uninstalling. #### Terminate Service/Server The command to terminate IP-Symcon server needs to be entered via console. This is identical for Linux and Raspberry Pi. ```php sudo /etc/init.d/symcon stop ``` ![Stop service](https://www.symcon.de/media/pages/service/dokumentation/installation/raspberry-pi/b6a92d472a-1790424938/deinstallation-stoppenrpi.png) #### Uninstall Service/Server The shown command needs to be entered via console. This is identical for Linux and Raspberry Pi. ```php sudo apt-get purge symcon ``` ![Uninstall](https://www.symcon.de/media/pages/service/dokumentation/installation/raspberry-pi/6d1bba25b8-1790424938/deinstallation-deinstallationrpi.png) #### Delete IP-Symcon Finalize the uninstallation by deleting the complete IP-Symcon-Data folder (/var/lib/symcon). ## Docker Source: https://www.symcon.de/en/service/documentation/installation/docker/ > **Warning:** The installation is only possible with a valid subscription. > **Warning:** A regular backup is recommended to ensure that your system is as current as possible in case of a defect. Even more, an active subscription is required to download IP-Symcon anew in case of a complete loss of data. > **Note:** There are specific installation instructions for [QNAP](getting-started.md) and [Synology](getting-started.md) ### Installation #### Requirements * Intel/AMD 64-Bit, ARM7, ARM64 CPU * [Docker](https://www.docker.com/) #### Hints * As containers cannot be "updated", they need to be deleted and recreated in the new version. This does not cause complications as the data is stored outside of the container. * Using KNX or HomeMatic requires the corresponding ports (KNX = 52000, HomeMatic = 5544) to be mapped. In addition, within the special switches NATSupport needs to be activated and the new property PublicIP needs to be set to the IP address of the Docker Host. If this is not done, no responses are received! #### Limitations * Currently, the language is set to de_DE * Currently, the time zone is set to Europe/Berlin * If the container should not run interactive but detached, the flag -d needs to be used * Currently only port 3777 is mapped. If further ports are required, these need to be set as well! #### Install ```php docker pull symcon/symcon:stable ``` #### Start ```php docker run --rm \ --name symcon \ --hostname symcon \ -p 3777:3777 \ -v /opt/symcon/data:/var/lib/symcon \ -v /opt/symcon/log:/var/log/symcon \ -v /opt/symcon:/root \ symcon/symcon:stable ``` The IP-Symcon WebFront should be reachable at http://ipadresse:3777/. The IP-Symcon web based [Management Console](components/management-console.md) can be called via http://ipadresse:3777/console/. Alternativly, the [Pro Console](components/management-console.md) can be used. ### Update 1. Execute Install again 2. Execute Start again * This will delete and recreate the container * Data is stored outside the container and is persistant ### Comfortable Updates with Portainer The tool "Portainer" helps with updating Docker containers and enables updating with the press of a button. The web based tool is available for free and can be installed as Docker container. #### Install ```php docker volume create portainer_data docker run -d -p 9000:9000 -v /var/run/docker.sock:/var/run/docker.sock -v portainer_data:/data portainer/portainer ``` > **Note:** It may be required to run the command "docker run" as "sudo docker run" After the installation, the interface as available under http://127.0.0.1:9000/. Eventually, the IP address needs to be adjusted. During the first configuration, a password needs to be defined and a connection needs to be established to the local server in a next step. After succesfull installation, the interface should look as shown below. ![Startpage](https://www.symcon.de/media/pages/service/dokumentation/installation/docker/51f8375f3e-1790424938/portainer-start.png) In the tab "Containers", the "symcon" container can be selected. The option "Recreate" enables a comfortable update. In this process, the container will be deleted, the new image downloaded, and installed with the same settings. Depending on the internet connection, this may take some minutes. ![Press Recreate for Container](https://www.symcon.de/media/pages/service/dokumentation/installation/docker/c190db5fa1-1790424938/portainer-recreate.png) It is important, that the option "Pull latest image" is activated in the confirmation dialog. ![Pull latest image](https://www.symcon.de/media/pages/service/dokumentation/installation/docker/6415168335-1790424938/portainer-dialog.png) After the update, the following message is displayed for a short time. ![Success](https://www.symcon.de/media/pages/service/dokumentation/installation/docker/4aae44a943-1790424938/portainer-success.png) #### NATSupport for KNX and HomeMatic Due to the container structure KNX and HomeMatic messages contain an IP address as response address that is used only internally and as such, responses could not be received as intended. To receive these messages correctly, NATSupport needs to be set up. 1. The [Special Switches](developer/special-switches.md) "NATSupport" needs to be activated and IP-Symcon restarted afterwards. 2. The port of the affected system needs to be mapped to the container. For KNX, this is 52000 by default and for HomeMatic this is 5544 by default. So, for example, the port 52000 would need to be mapped to 52000 for KNX. 3. A new field "PublicIP" appears in the affected I/O or Splitter instances. The external IP of Docker needs to be entered here. For KNX, this needs to be set at the splitter "EIB Gateway" and for HomeMatic at the I/O "HomeMatic Socket". ## QNAP Source: https://www.symcon.de/en/service/documentation/installation/qnap/ > **Warning:** The installation is only possible with a valid subscription. > **Warning:** A regular backup is recommended to ensure that your system is as current as possible in case of a defect. Even more, an active subscription is required to download IP-Symcon anew in case of a complete loss of data. ### Installation #### Requirements * NAS with Container Station support #### Install * Open Container Station * Search for symcon/symcon in the Docker Hub and install/create the image (choose a tag, e.g., latest) ![Docker Hub](https://www.symcon.de/media/pages/service/dokumentation/installation/qnap/f17bb317ed-1790424938/qnap-dockerhub.jpg) * Choose a name and open Advanced Settings ![Container](https://www.symcon.de/media/pages/service/dokumentation/installation/qnap/46f72352d3-1790424938/qnap-containererstellen.jpg) * Adjust Share Settings (/root, /var/lib/symcon, /var/log/symcon need to be stated!) ![Share](https://www.symcon.de/media/pages/service/dokumentation/installation/qnap/4ffe089c2f-1790424938/qnap-freigabe.jpg) * Adjust Network Settings (3777 to 3777 TCP) ![Ports](https://www.symcon.de/media/pages/service/dokumentation/installation/qnap/741fba41b0-1790424938/qnap-tcpports.jpg) * Confirm with Create to create and start the container The IP-Symcon WebFront should be reachable at http://ipadresse:3777/. The IP-Symcon web based [Management Console](components/management-console.md) can be called via http://ipadresse:3777/console/. Alternativly, the [Pro Console](components/management-console.md) can be used. ### Update Updating requires the removal and recreation of the container, as described under [Install](getting-started.md). The tool "Portainer" can significantly simplify updating. A tutorial can be found in the [Docker Area](getting-started.md) . ### Uninstallation For the uninstallation, the container needs to be stop and removed afterwards. The linked directories for the files need to be removed manually. ### Hints #### NATSupport for KNX and HomeMatic Due to the container structure KNX and HomeMatic messages contain an IP address as response address that is used only internally and as such, responses could not be received as intended. To receive these messages correctly, NATSupport needs to be set up. 1. The [Special Switches](developer/special-switches.md) "NATSupport" needs to be activated and IP-Symcon restarted afterwards. 2. The port of the affected system needs to be mapped to the container. For KNX, this is 52000 by default and for HomeMatic this is 5544 by default. So, for example, the port 52000 would need to be mapped to 52000 for KNX. 3. A new field "PublicIP" appears in the affected I/O or Splitter instances. The external IP of Docker needs to be entered here. For KNX, this needs to be set at the splitter "EIB Gateway" and for HomeMatic at the I/O "HomeMatic Socket". ## Synology Source: https://www.symcon.de/en/service/documentation/installation/synology/ > **Warning:** The installation is only possible with a valid subscription. > **Warning:** A regular backup is recommended to ensure that your system is as current as possible in case of a defect. Even more, an active subscription is required to download IP-Symcon anew in case of a complete loss of data. ### Installation #### Requirements * NAS with Container Manager support #### Install * Search for Symcon in the registry and download the image (choose a tag, e.g., latest) ![Docker Hub](https://www.symcon.de/media/pages/service/dokumentation/installation/synology/88dba70390-1790424938/synology-dockerhub.png) * Choose the new image under Image and click Start * Choose a name ![Image](https://www.symcon.de/media/pages/service/dokumentation/installation/synology/9214ab1c46-1790424938/synology-abbild.png) * Adjust the Volume Settings (/root, /var/lib/symcon, /var/log/symcon need to be stated!) ![Volume](https://www.symcon.de/media/pages/service/dokumentation/installation/synology/87b4a126d6-1790424938/synology-volume.png) * Adjust Port Settings (3777 to 3777) ![Ports](https://www.symcon.de/media/pages/service/dokumentation/installation/synology/0e605b40b7-1790424938/synology-tcpports.png) * Confirm with OK, click Next and start the container with Apply The IP-Symcon WebFront should be reachable at http://ipadresse:3777/. The IP-Symcon web based [Management Console](components/management-console.md) can be called via http://ipadresse:3777/console/. Alternativly, the [Pro Console](components/management-console.md) can be used. ### Update Updating requires the removal and recreation of the container, as described under [Install](getting-started.md). The tool "Portainer" can significantly simplify updating. A tutorial can be found in the [Docker Area](getting-started.md) . ### Uninstallation For the uninstallation, the container needs to be stop and removed afterwards. The linked directories for the files need to be removed manually. ### Hints #### NATSupport for KNX and HomeMatic Due to the container structure KNX and HomeMatic messages contain an IP address as response address that is used only internally and as such, responses could not be received as intended. To receive these messages correctly, NATSupport needs to be set up. 1. The [Special Switches](developer/special-switches.md) "NATSupport" needs to be activated and IP-Symcon restarted afterwards. 2. The port of the affected system needs to be mapped to the container. For KNX, this is 52000 by default and for HomeMatic this is 5544 by default. So, for example, the port 52000 would need to be mapped to 52000 for KNX. 3. A new field "PublicIP" appears in the affected I/O or Splitter instances. The external IP of Docker needs to be entered here. For KNX, this needs to be set at the splitter "EIB Gateway" and for HomeMatic at the I/O "HomeMatic Socket". ## SymBox Source: https://www.symcon.de/en/service/documentation/installation/symbox/ > **Warning:** The installation is only possible with a valid subscription. However, an existing backup can be used to restore the software even without subscription. See [Change of Platform](getting-started.md) > **Warning:** A regular backup is recommended to ensure that your system is as current as possible in case of a defect. Even more, an active subscription is required to download IP-Symcon anew in case of a complete loss of data. ### Installation/Update/Reset For more informations see the [Installation manual](https://www.symcon.de/assets/files/product/symbox-en.pdf) . ## Catan Source: https://www.symcon.de/en/service/documentation/installation/catan/
Warning

Important installation notes

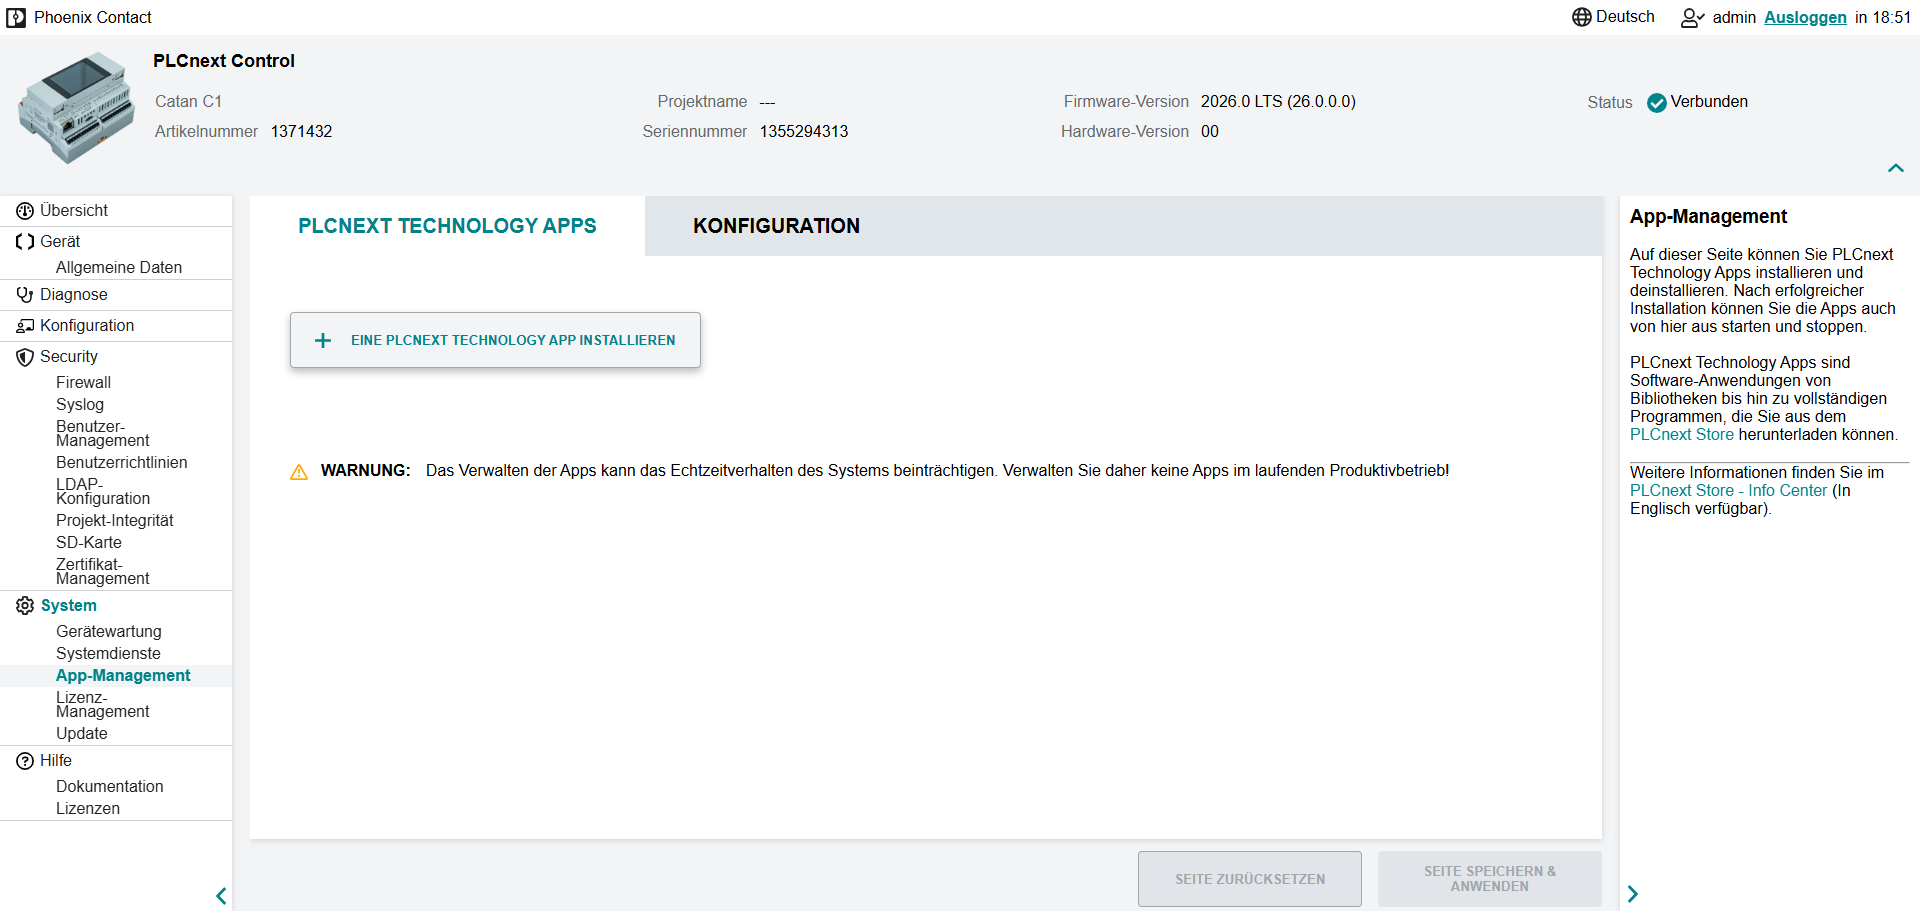
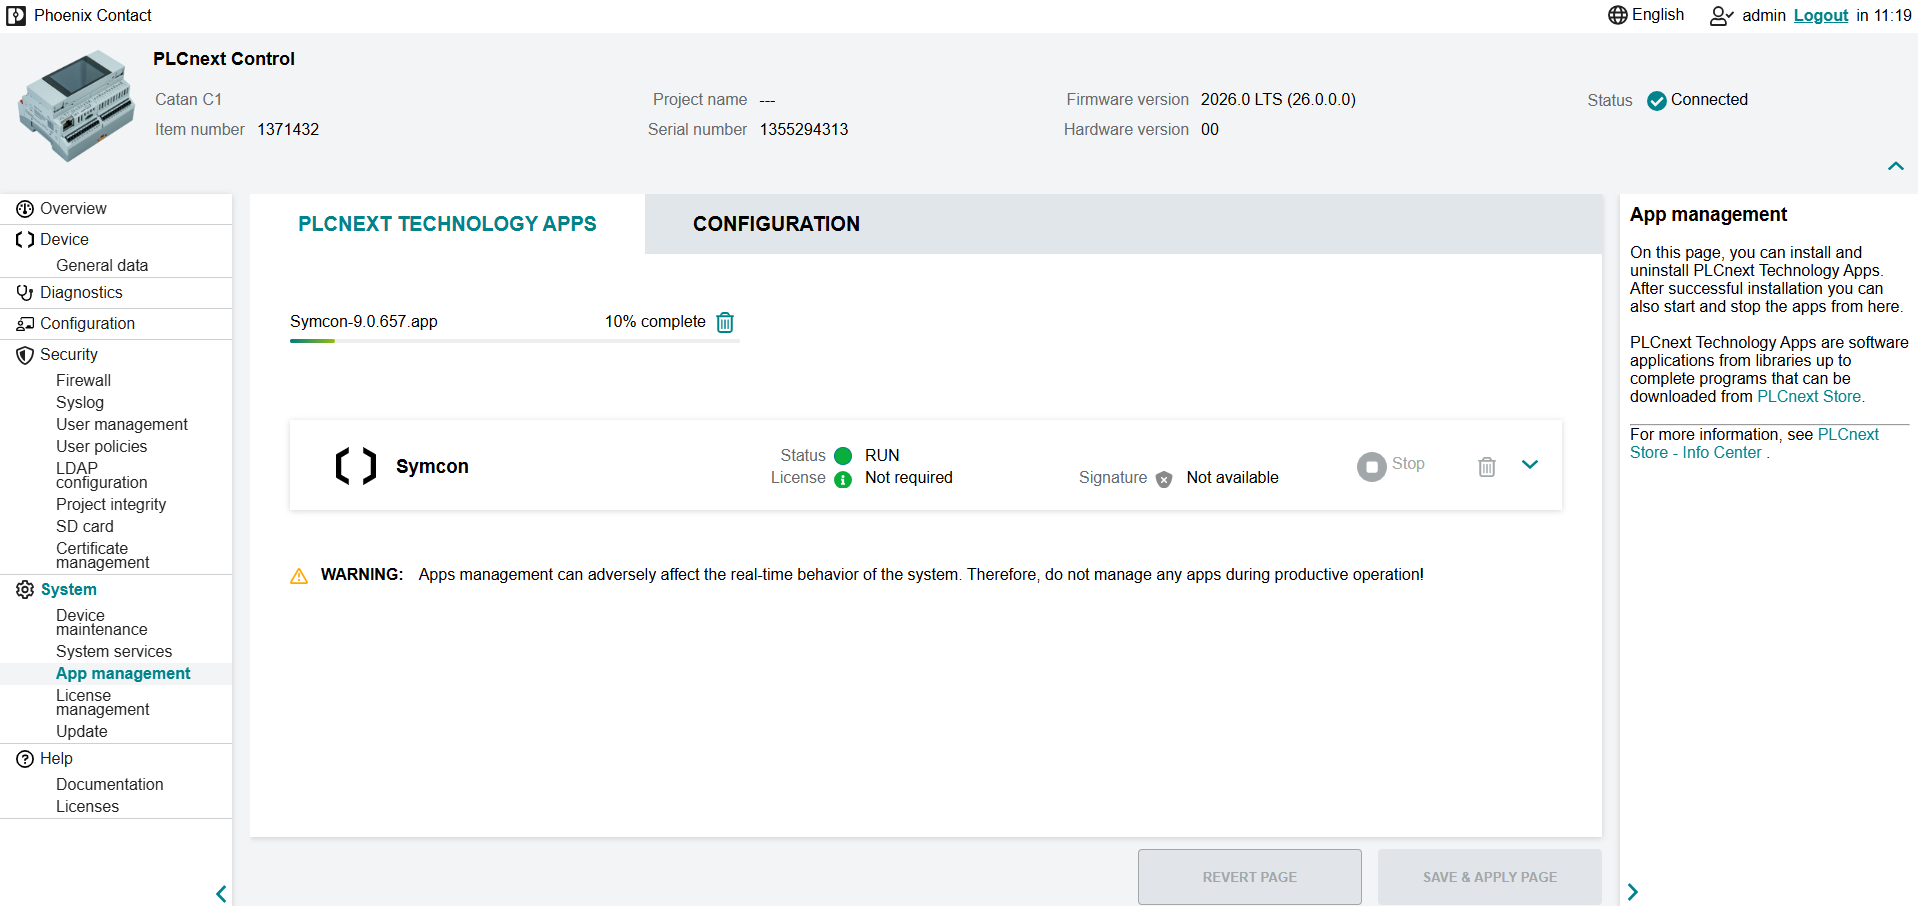
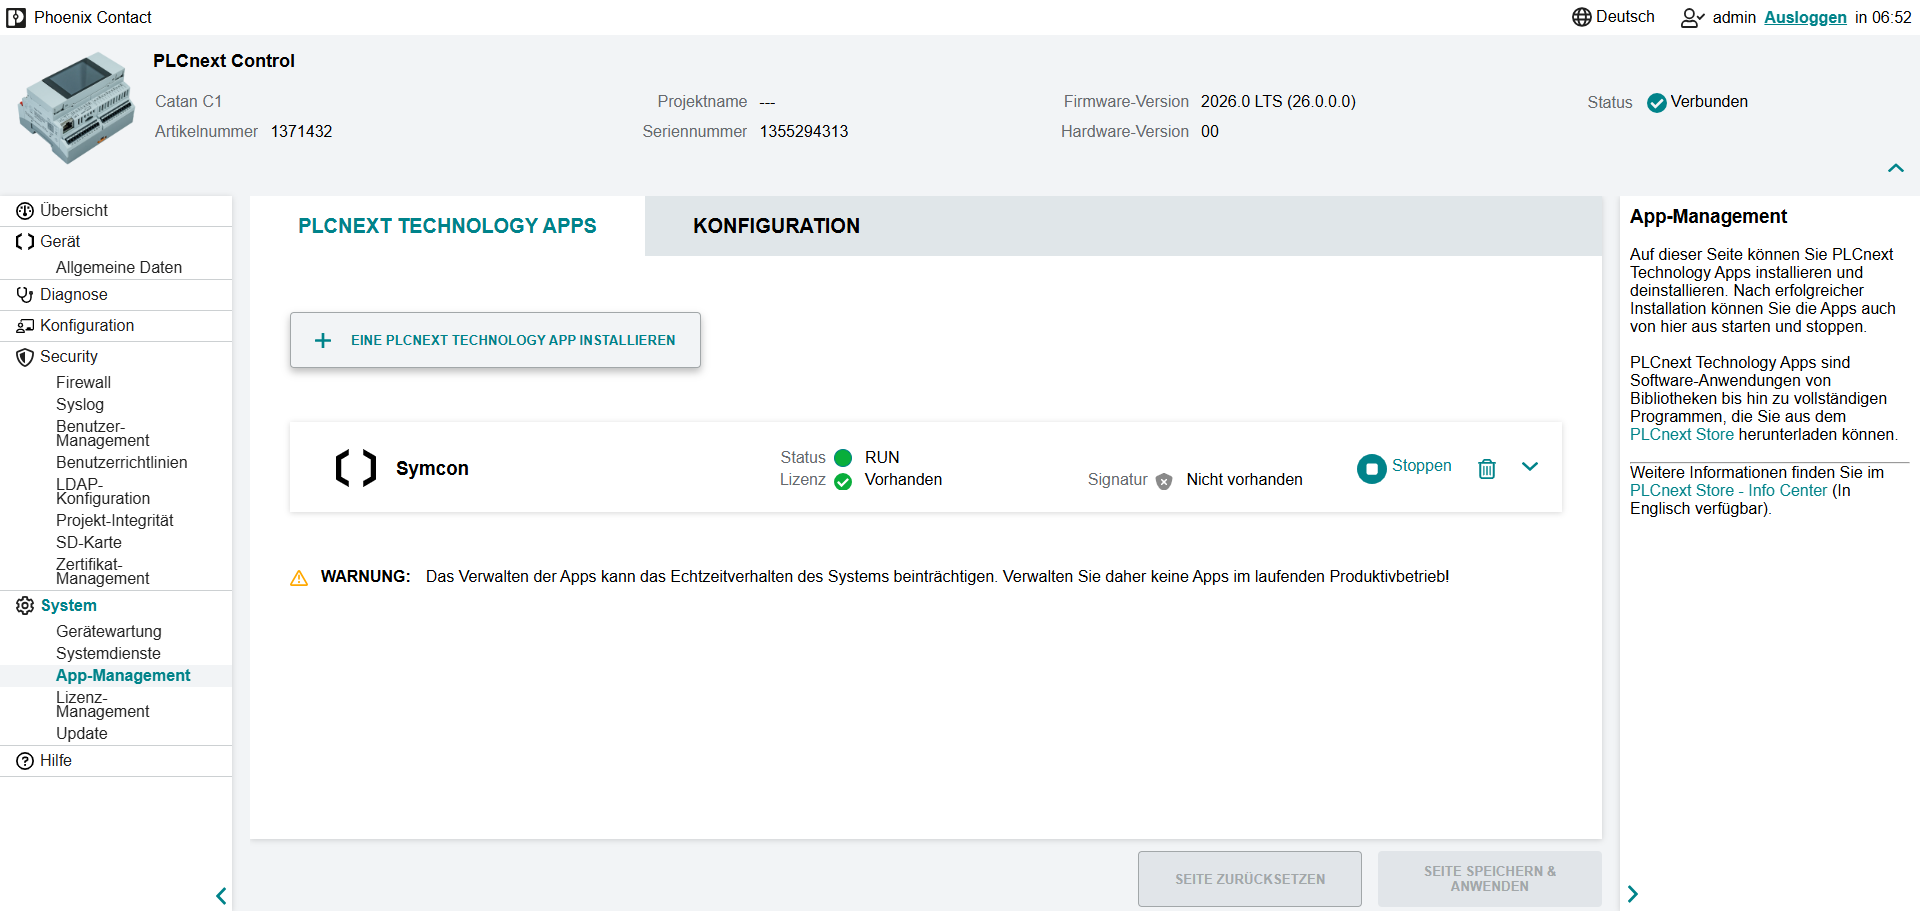
### Installation > **Note:** Symcon can also be purchased and installed via the [PLCnext Store](https://plcnextstore.com). __Download:__ [Appfile (64-Bit)](https://download.symcon.de/stable/symcon/catan/arm64) Symcon is installed as a PLCnext Technology App. The installation is carried out in WBM under Settings -> App Management. The option "Only allow signed apps" must first be deactivated under Configuration. The Symcon app file can now be installed using the corresponding button. Once the process is complete, the web-based [Management console](components/management-console.md) can be accessed via http://ipadresse:3777/console/. There you can change the [License](https://www.symcon.de/de/service/dokumentation/installation/lizenz-aendern/#Lizenz_ändern) in the information menu at the top right. ![Install app via WBM](https://www.symcon.de/media/pages/service/dokumentation/installation/catan/697b18028f-1790424938/installation_app.png) A description of the special functions can be found [here](modules/catan.md). ### Update __Current version:__ [App file (64-bit)](https://download.symcon.de/stable/symcon/catan/arm64) To install an update, the .app file of the latest version must be reinstalled. Symcon is restarted during the installation. All data is retained. ![Catan update](https://www.symcon.de/media/pages/service/dokumentation/installation/catan/4ff1c0ee23-1790424938/catan_update.png) ### Where_is_what #### Where is what? * /opt/plcnext/apps/home/data/60002171301055/data/ - Variable Data (Settings, scripts, media...) * /tmp/appsdata/60002171301055/logs/ - Log Files (Logfiles...) ### Uninstall Symcon can be uninstalled via the WBM under Settings -> App Management. To do this, the Symcon app must be selected. The uninstallation can be started via the trash can icon. All data will be lost when uninstalling. ![Deinstallieren app](https://www.symcon.de/media/pages/service/dokumentation/installation/catan/96362a6c36-1790424938/deinstallieren_app.png) ## Firewall Source: https://www.symcon.de/en/service/documentation/installation/firewall/ In order for IP-Symcon to be able to communicate with the various services from the Internet, the following settings must be made on a firewall. ### Recommended settings | Address | Port | Protocol | Function | | --------------------------------------- | ----- | -------- | ------------------------------------------------------------------------------------ | | apt.symcon.de | 443 | TCP | Installation, Updates | | api.symcon.de | 443 | TCP | Module Store, Personal area | | symcon-store.s3.eu-west-1.amazonaws.com | 443 | TCP | Module Store (Data) | | live.symcon.de | 443 | TCP | Installation, updates, connect, push notifications, display of the subscription term | | zwdb.symcon.de | 443 | TCP | Z-Wave device database | | dwd.symcon.de | 443 | TCP | WebFront DWD weather | | ipmagic.de | 50000 | TCP | IP-Symcon Connect | | github.com | 443 | TCP | Module Control (sofern genutzt) | ### Settings only relevant to SymBox | Address | Port | Protocol | Function | | ---------- | ----- | -------- | ------------------- | | ipmagic.de | 60000 | TCP | SymOS Connect | | ipmagic.de | 53671 | TCP | SymOS Connect (KNX) | | ipmagic.de | 53672 | TCP | SymOS Connect (KNX) | | ipmagic.de | 54114 | TCP | SymOS Connect (LCN) | ### CloudFront-Edge-Server The *.symcon.de addresses are mapped via AWS in the EU West 1 zone (Ireland). The endpoints terminate on AWS CloudFront and have a TTL of 60 seconds. In the case of dynamic resolution, it must therefore be ensured that the firewall determines the currently used IP addresses often enough. Current lists of the IP addresses used can be found here: [Locations and IP address ranges of CloudFront edge servers](https://docs.aws.amazon.com/de_de/AmazonCloudFront/latest/DeveloperGuide/LocationsOfEdgeServers.html) ## Change of Platform Source: https://www.symcon.de/en/service/documentation/installation/change-of-platform/ A change of platform is possible without any problems. No data or settings are lost in the process. ### Steps for a Change of Platform The following steps need to be executed to change from an initial platform to a target platform. * Install IP-Symcon on the target platform. * Terminate IPS service on the initial and the target platform. * [Create backup](getting-started.md) on the initial platform. * Use [Load backup](getting-started.md) to integrate the produced backup on the target platform. * Start the service on the target platform. > **Warning:** Watch out for the IP-Symcon versions of the initial and the target platform. If the versions are different, migrations need to be done eventually. For example, changing from version 3.4 to a higher version is impossible otherwise. ## License Management Source: https://www.symcon.de/en/service/documentation/installation/change-license/ ### License Management For easier handling and overview, it is possible to manage your license at the homepage in the License Management. Among others, the remaining duration of a subscription can be checked or the license file can be sent again in the License Management. The License Management can be found in the [Personal Area](https://account.symcon.de/) . This can be reached via the person icon on the top right of the homepage. After logging in, the License Management can be opened. ![Personal Area](https://www.symcon.de/media/pages/service/dokumentation/installation/lizenz-aendern/38e9dee6ae-1790424938/en-account.png) ![License Management](https://www.symcon.de/media/pages/service/dokumentation/installation/lizenz-aendern/dc7e30c160-1790424938/licensemanagement.png) > **Warning:** The accounts of forum and homepage are currently separate. Combining these accounts is planned in the future. ### Change License > **Warning:** After any change to the license, the IP-Symcon Service needs to be restarted. #### Since Version 5.0 The license can be changed in the [Management Console](components/management-console.md) in the information dialog. ![Change Variable](https://www.symcon.de/media/pages/service/dokumentation/installation/lizenz-aendern/94ec020bc9-1790424938/change-license-console50.png) #### From Version 4.0 up to Version 4.4 The license can be changed in the [management console](components/management-console.md) in "My IP-Symcon -> Show License". ![Change License](https://www.symcon.de/media/pages/service/dokumentation/installation/lizenz-aendern/eb2f67b352-1790424938/change-license-console40.png) #### Up to Version 3.4 A new license that was obtained due to a license upgrade can be entered by choosing the option "Information" in the context menu of the tray application. The context menu can be launched with a right click on the tray application. ![Change License](https://www.symcon.de/media/pages/service/dokumentation/installation/lizenz-aendern/6eb51182f7-1790424938/lizenzaendern-tray.png) The button "Change license" can open the dialog. Here, the user name and the new license file can be chosen. After confirmation, the new license is stored. Restart the IP-Symcon service to activate the new license. ## Security Source: https://www.symcon.de/en/service/documentation/security/ IP-Symcon includes diverse security features that set a password or a special service for different sections. Read this article carefully to prevent illegal external access. > **Note:** The factory settings are only secure while IP-Symcon cannot be accesses externally. If IP-Symcon should be accessible externally some settings need to be adjusted accordingly! ### Remote Access (Password) __Factory Settings:__ _deactivated_ (secure) The management of IP-Symcon can be accessed remotely via the management console. Direct access from the outside of the local network is only possible when a password is set. Further informations: [Set Remote Access](components/remote-access.md) ### Connect Service __Factory Settings:__ _activated_ (secure) The Connect service can access the management console and the visualization comfortably from outside when a subscription is active. The visualization may only be accessed when a password was previously set or the visualization was explicitly marked as public. The management console can access the configuration only when a password is set for [remote access](components/remote-access.md) . Further informations: [Connect Control](modules/connect-control.md) ### Visualization (Password) __Factory Settings:__ _deactivated_ (secure) The factory settings allow access to the visualization without password in internal networks. A set password secures the webbased visualization and the mobile apps. A password or explicit clearance is required if the visualization should be accessible from the Connect service or be accessible from the outside. Further informations:[Tile-Visualizations Security](components/tile-visualization.md) / [WebFront-Visualizations Security](components/webfront-visualization.md) > **Note:** Requests from the following networs are considered internal ([Private IP Adresses](https://en.wikipedia.org/wiki/Private_network#Private_IPv4_addresses)). For internal networks no visualization password is required, if the option "Require password only for external connections" is enabled. If connections are being routed through a NAT it is recommended to leave this options disabled. ### User Folder (User Name/Password) __Factory Settings:__ _deactivated_ (insecure) If the User folder contains individual content it is recommended the secure the content. Usage of the User folder is strongly discouraged. Further informations: [User Folder Security](modules/webserver.md) ### SymOS (Password) __Factory Settings:__ _activated_ (secure) SymOS is the operating system of the SymBox. It is possible to protect the access to its web surface via password. The web surface can set the password. If the SymOS surface should be available externally setting a password is urgently recommended. Further informations: [SymBox Tutorial PDF - Chapter 4.4.6. Security](https://www.symcon.de/assets/files/product/symbox-en.pdf) ### SymOS Connect __Factory Settings:__ _activated_ (secure) Via SymOS Connect it is possible to connect to the SymOS operating system. The external connection is in general only possible if a SymOS password is set. > **Note:** Some functions require internet access and a properly configured [Firewall](getting-started.md). ## Backup & Restore Source: https://www.symcon.de/en/service/documentation/backup-and-restore/ Two different kinds of backups are possible. __Backup:__ A backup that stores all relevant user data like media files, scripts, databases, etc. __settings.json:__ The configuration file is the core element in every installation of IP-Symcon. The file is saved automatically. ### Backup A backup will include all relevant user data. A complete backup is not done automatically. Creating and loading a backup is explained in [Create Backup](getting-started.md) and [Restore Backup](getting-started.md). ### Automatical backup of the configuration file (settings.json) The file "settings.json" in the IP-Symcon folder contains all relevant settings of IP-Symcon. The file is the core element of the configuration. A copy of the file is stored in the folder "backup" every day at 0:00 and can be accessed in case of an error. A maximum of 25 files are stored in the folder. When the limit is exceeded, the oldest file is deleted. The backup of the file is automatically stored with the name "settings1234567890.json", where "1234567890" is replaced with the current Unix timestamp. Thus, the highest number corresponds to the most current backup. > **Warning:** The automatical backup of the configuration file does not replace a regular complete backup. See [Create backup](getting-started.md) ### Restore configuration file (settings.json) in case of an error Different circumstances can cause errors, e.g.: * Unwanted modifications (e.g., wrong instances, deleted variables, ...) * The settings are unexpectedly "lost", "deleted", or "empty". (In most cases, this is caused by an unexpected termination of the software, e.g., in case of a power outage) To restore the configuration file the following steps are necessary: * Terminate the IP-Symcon service * Copy any "settings1234567890.json" from the folder "backup" into the main folder (e.g., the file with the highest number in the file name) * Delete the current "settings.json" * Rename the copied "settings1234567890.json" into "settings.json" * Start the IP-Symcon service again > **Note:** If the chosen backup of the configuration file does not work, try another backup. If no backup works, ask for help in the forum. When you ask for help, you need to attach __at least one logfile__. Posts without logfiles cannot be processed. ### How often is a backup file written? Since version 4.0, IP-Symcon has various mechanisms to minimize the write cycles. This is required if the IP-Symcon is operated on storage media that are showing signs of wear. This is the case, for example, with a Raspberry Pi with an SD card. ### Media and settings.json In general, the settings.json is saved cyclically every 10 minutes (see [special switch](developer/special-switches.md)) and when the service starts/stops. Media files (e.g. from Image Grabber) are cached and are only written at start/stop. ### Variable Raw Data and Aggregation IP-Symcon writes variable raw data, which is saved in the archive, to the hard disk every minute. Since these are constantly growing datasets this is intended. In turn, the aggregation data is only written if an aggregation period is complete. The respective incomplete aggregation periods are restored at startup from the variable raw data. For this reason, starting with many archived variables also takes a little longer. ### Logfiles Log files, which cause the majority of write cycles, are handled differently depending on the system. Normally these end up on the hard drive. However, the SymOS on the SymBox maps /var/log/symcon to a RAM drive, which means that the storage medium is not worn out unnecessarily and the longevity is extended. ## Restore Backup Source: https://www.symcon.de/en/service/documentation/backup-and-restore/restore-backup/ If your installation of IP-Symcon is in a non-repairable state, it is possible to load a backup. Backups can also be used to move from one platform to another. ### Change to another platform The structure of the backup is independent of the system and thus can be used to move IP-Symcon from one platform to another. > **Warning:** When changing from IP-Symcon <=3.4 to IP-Symcon 4.0 or higher, the database needs to be converted into the new CSV format by using the Windows installer. Afterwards, the backup can be migrated to the new platform. #### Load Backup SymOS (SymBox) Windows (Desktop/Server) MacOS Linux (Ubuntu) Raspberry Pi Docker/Synology/QNAP Catan C1 ##### SymOS - Load Backup The backup can be chosen on the web interface in "Settings -> Backup". Afterwards, IP-Symcon (NOT SymOS) needs to reboot. For further informations, see [4.4.4 Backup](https://www.symcon.de/assets/files/product/symbox-en.pdf) ##### Windows - Load Backup The setup automatically installs the required redistibutables. If IP-Symcon was copied into the system some required redistibutables may be missing. The required redistibutables are: * [Visual Studio 2015/2017/2019 C++ Redistributable x64](https://learn.microsoft.com/en-us/cpp/windows/latest-supported-vc-redist?view=msvc-170) ([Direct Download](https://download.visualstudio.microsoft.com/download/pr/b929b7fe-5c89-4553-9abe-6324631dcc3a/296F96CD102250636BCD23AB6E6CF70935337B1BBB3507FE8521D8D9CFAA932F/VC_redist.x64.exe) ) * Bonjour64 Installer ([Direct Download](https://data.symcon.de/Bonjour64.msi) ) The following steps need to be executed to load the backup: * Stop the IP-Symcon service. (Right click on tray icon -> "Stop Service") * Extract the backup.zip into the folder C:\ProgramData\Symcon * The easiest way to access the folder is via "Right click on the tray icon -> Information -> Server Data -> Open" * Restart the IP-Symcon service. (Right click on tray icon -> "Start Service") ##### MacOS - Load Backup * Stop the IP-Symcon service. * Move the backup.zip file into the folder "/Library/Application Support/Symcon" and extract via double click. * Delete the archive and restart the IP-Symcon service. ##### Linux - Load Backup Stop the IP-Symcon service: ```php sudo /etc/init.d/symcon stop ``` Extract the file backup.zip in the home folder into the folder "/var/lib/symcon/": ```php sudo unzip backup.zip -d /var/lib/symcon/ ``` Restart the IP-Symcon service: ```php sudo /etc/init.d/symcon start ``` ##### Raspberry Pi - Load Backup Stop the IP-Symcon service: ```php sudo /etc/init.d/symcon stop ``` Extract the file backup.zip in the home folder into the folder "/var/lib/symcon/": ```php sudo unzip backup.zip -d /var/lib/symcon/ ``` ![RPi Unzip Datei](https://www.symcon.de/media/pages/service/dokumentation/datensicherung/backup-einspielen/dfc2baafec-1790424938/unzip-rpi.png) Restart the IP-Symcon service: ```php sudo /etc/init.d/symcon start ``` ##### Docker/Synology/QNAP - Load Backup First, the IP-Symcon container needs to be stopped. It can be stopped via the container management of the used system. Afterwards, the mounted IP-Symcon folder which references the folder "/var/lib/symcon" needs to be opened. The volume on which the folder was "mounted" can be seen in the settings of the image. According to the installation tutorial, the default is in the format "/Symcon/[MeinIPSymcon]/Data". Extract the backup and copy it into the folder. Restart the IP-Symcon container. ##### Catan C1 - Load Backup * Stop the Symcon App. The app can be stopped in WBM under Settings -> App Management. * If a ZIP file from another system is available, extract it into a folder first. * Copy all files via [WinSCP](https://winscp.net/eng/download.php) into the following folder: ```php /opt/plcnext/apps/home/data/60002171301055/data/ ``` * Make sure that settings.json is exactly in the data/ folder and not in a further subfolder. * Start the Symcon App. #### Hints The following things should be checked and adjusted eventually: * The [server needs to be reactivated](modules/notification-control.md) for Push notifications * Absolute paths in scripts and media files * Occupied interfaces (e.g., serial ports) on the new system * IP adresses like the 'Event Server' for the HomeMatic CCU or 'WebServer' * Required additional programs, drivers, or services (e.g., _BidCOS_) ## Create Backup Source: https://www.symcon.de/en/service/documentation/backup-and-restore/create-backup/ A backup stores all user files. It should be created within regular intervals. ### Create Backup SymOS (SymBox) Windows (Desktop/Server) MacOS Linux (Ubuntu) Raspberry Pi Docker/Synology/QNAP Catan C1 #### SymOS - Create Backup Start the web surface, enter the menu "Settings", and click "Backup". The folder structure is created automatically and backup.zip is downloaded. Further informations can be found within the manual of the SymBox under [4.4.4 Backup](https://www.symcon.de/assets/files/product/symbox-en.pdf). #### Windows - Create Backup The whole content of the folder C:\ProgramData\Symcon needs to be compressed as backup.zip. 1. Stop the Service via Tray Icon. 2. Open the Data folder via "Tray Icon -> Information -> Server Data -> Open" and select all files and folders. 3. Compress the files via "Right click -> Send to -> Compressed (zipped) folder" to create a .zip file. The file needs to be renamed to backup.zip. 4. The backup should be copied or moved to an appropriate medium. 5. Start the Service via Tray Icon. > **Note:** If a message about empty folders appears while creating the Zip file, it can be ignored safely. Missing empty folders are created by IP-Symcon on demand. ![ProgramData über Tray öffnen](https://www.symcon.de/media/pages/service/dokumentation/datensicherung/backup-erstellen/0e73add67d-1790424938/backup-windows.png) #### MacOS - Create Backup The whole content of the folder "/Library/Application Support/Symcon" needs to be compressed as backup.zip. 1. Stop the IP-Symcon Service. 2. Select "Finder -> Go to -> Go to folder" and enter the path "/Library/Application Support/Symcon". 3. Mark all required folders and files in the opened folder (usually all files and folders). 4. An Archive.zip is created on the desktop via "Clipboard -> Compress X objects". 5. Rename the file into backup.zip. 6. The backup should be copied or moved to an appropriate medium. 7. Start the IP-Symcon Service. #### Linux - Create Backup The whole content of the folder "/var/lib/symcon" needs to be compressed as backup.zip. __zip may need to be installed.__ ```php sudo apt-get install zip ``` __First, stop the IP-Symcon Service.__ ```php sudo /etc/init.d/symcon stop ``` __Go to the Symcon folder and compress the folder.__ ```php cd /var/lib/symcon/ //Go to IP-Symcon folder zip -r ~/backup.zip * //Compress the whole folder into backup.zip ``` The backup.zip is stored in the home folder. It can be copied or moved anywhere. __Start the IP-Symcon Service.__ ```php sudo /etc/init.d/symcon start ``` #### Raspberry Pi - Create Backup The whole content of the folder "/var/lib/symcon" needs to be compressed as backup.zip. __zip may need to be installed.__ ```php sudo apt-get install zip ``` __First, stop the IP-Symcon Service.__ ```php sudo /etc/init.d/symcon stop ``` __Go to the Symcon folder and compress the folder.__ ```php cd /var/lib/symcon/ //Go to IP-Symcon folder zip -r ~/backup.zip * //Compress the whole folder into backup.zip ``` ![RPi Zip Datei](https://www.symcon.de/media/pages/service/dokumentation/datensicherung/backup-erstellen/73bd092a16-1790424938/zip-rpi.png) The backup.zip is stored in the home folder. It can be copied or moved anywhere. __Stop the IP-Symcon Service.__ ```php sudo /etc/init.d/symcon start ``` #### Docker/Synology/QNAP - Create Backup The whole content of the folder "/var/lib/symcon" needs to be compressed as backup.zip. As an example we use a Synology system. __First, stop the IP-Symcon container.__ The container needs to be stopped via the container management of the used system. __Afterwards, the mounted Symcon folder needs to be opened to pack the folder.__ The volume on which the folder was "mounted" can be seen in the settings of the image. According to the installation tutorial, the default is in the format "/Symcon/[MeinIPSymcon]/Data". Finally, select all content and select "Compress" via right click. ![Docker Zip Datei](https://www.symcon.de/media/pages/service/dokumentation/datensicherung/backup-erstellen/241df2f0e5-1790424938/zip-docker.png) The backup.zip is stored on the file system and can be downloaded. __Start the IP-Symcon container.__ #### Catan C1 - Create Backup * Stop the Symcon App. The app can be stopped in WBM under Settings -> App Management. * Copy all files via [WinSCP](https://winscp.net/eng/download.php) from the following folder: ```php /opt/plcnext/apps/home/data/60002171301055/data/ ``` * Compress all files into a ZIP file to transfer them to another target system. * Start the Symcon App. > **Note:** The "session" folder sometimes cannot be copied. This problem can be safely ignored