# HomeMatic
> Symcon documentation · English · generated on 2026-09-26
> Index: https://www.symcon.de/en/llms.txt
Source: https://www.symcon.de/en/service/documentation/module-reference/devices/homematic/
Symcon supports integration via the HCU and via the CCU.
- [HomeMatic CCU](homematic.md)
- [HomeMatic HCU (Beta)](homematic.md)
## Device list
Source: https://www.symcon.de/en/service/documentation/module-reference/devices/homematic/device-list/
### Supported Gateways
| Gateway | Description |
| --------------------------- | ---------------------------------------------------- |
| CCU1 | Central for HomeMatic radio and wired components |
| CCU2 | Central for HomeMatic radio, wired and IP components |
| CCU3 | Central for HomeMatic radio, wired and IP components |
| HM-LAN (via BidCos service) | HomeMatic LAN adapter |
| HM-USB (via BidCos service) | HomeMatic USB adapter |
| HCU | Central for HomeMatic IP components |
### Supported Components
IP-Symcon supports all wired and wireless components.
## HomeMatic CCU
Source: https://www.symcon.de/en/service/documentation/module-reference/devices/homematic/homematic-ccu/
_Requires Symcon >= 4.1_
HomeMatic is a primarily radio-based system. A connection to IP-Symcon is established via LAN through the Central Control Unit (CCU). Alternatively, this also works with a "LAN configuration adapter".
> **Note:** The following devices are supported by IP-Symcon:
>
> [Supported devices](homematic.md)
### Installation
The HomeMatic devices are connected to IP-Symcon via CCU (LAN) or [BidCoS Service](homematic.md).
The instructions for setting up via BidCoS Service are located [here](homematic.md).
> **Note:** Advantages of the CCU:
>
> * HomeMatic Wired RS485 components are supported.
>
> * Programs can be executed in the CCU.
>
> * Status of the actuators can be queried via script.
#### HomeMatic Wired
HomeMatic Wired is a wired version of HomeMatic. Separate switching and dimming actuators as well as input and output modules are available for this purpose.
However, "HomeMatic Wired" is controlled by IP-Symcon in the same way as the radio-based components.
This can be enabled on the configuration page of the gateway.
#### HomeMatic IP
HomeMatic IP is the successor to HomeMatic and offers wireless and wired devices. HomeMatic IP is controlled by IP-Symcon in the same way as the original HomeMatic components. Parallel operation of HomeMatic and HomeMatic IP components is possible without any problems.
### Setup Video-Tutorial
[Video](https://www.youtube.com/embed/uDd-jdKm0CE?rel=0&cc_load_policy=1)
### Connection
The CCU is connected to the network by a network cable.
> **Warning:** The antenna of the CCU is used only for radio communication with the individual actuators. However, a WIFI connection with a PC is not possible.
> **Note:** If no LAN network is available, a connection via USB is also possible. This requires extra USB drivers, which can be found on the included CD.
### Installation
If the CCU is connected correctly and a DHCP server is used, the CCU automatically receives an IP address and is connected to the network.
If no DHCP server is available, an IP address can also be entered manually via the menu of the CCU, under the menu item "Network".
The subnet mask and the default gateway must also be assigned here. If the setup is correct, the device "HomeMatic Central" can now be found in the network overview.
> **Note:** If the CCU does not appear in the network, disconnecting the power supply of the CCU for 30 seconds may be helpful. After booting up the CCU and updating the network environment, it is now accessible.
A double click on "HomeMatic Central" opens a window in the lower area of which the IP address of the CCU can be found. (Optionally, this can also be found in the menu of the CCU.) By copying this address into a browser, the HomeMatic WebUI opens.
### Adding secondary devices
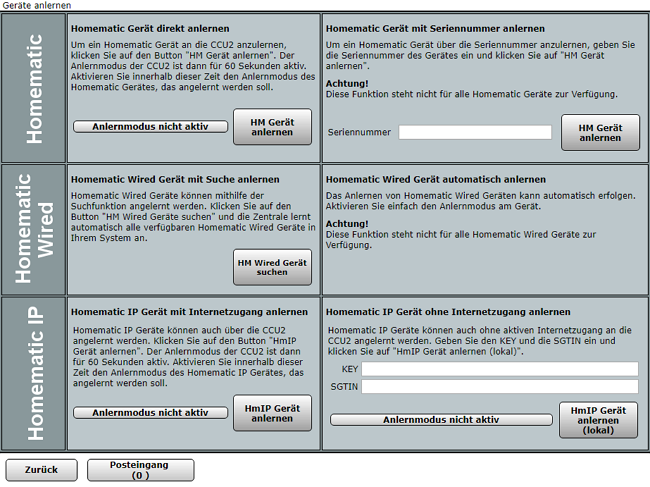
In the HomeMatic WebUI, the secondary HomeMatic devices (e.g. temperature sensors, intermediate plugs, handheld transmitters, etc.) can now be connected to the CCU. To do this, "Teach devices" (top right) must be clicked on and the further instructions followed.
### Integration in IP-Symcon
The CCU can be integrated via the [Device Search](../components/management-console.md). For this, "Homematic Discovery" must be selected as the system. The Discovery instance then offers to create a Homematic [Configurator](../concepts.md). After the configurator has been created, the individual devices can be integrated via it as described below.
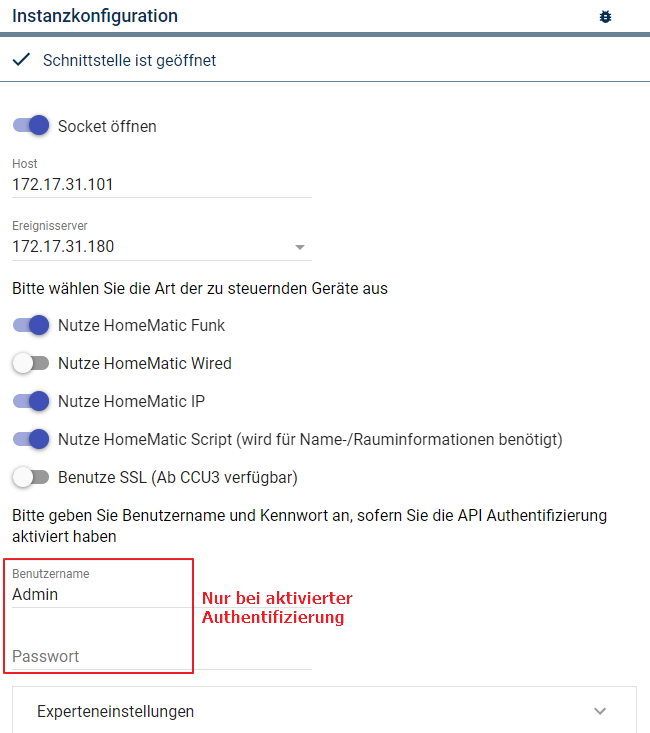
Within the configurator, the configuration page of the "HomeMatic Socket" can be opened via "Configure gateway". To activate the socket, the checkbox "Open socket" must be set. The options displayed tell whether HomeMatic radio/wired/IP is to be used. If authentication is enabled, the user name and password can be entered here.
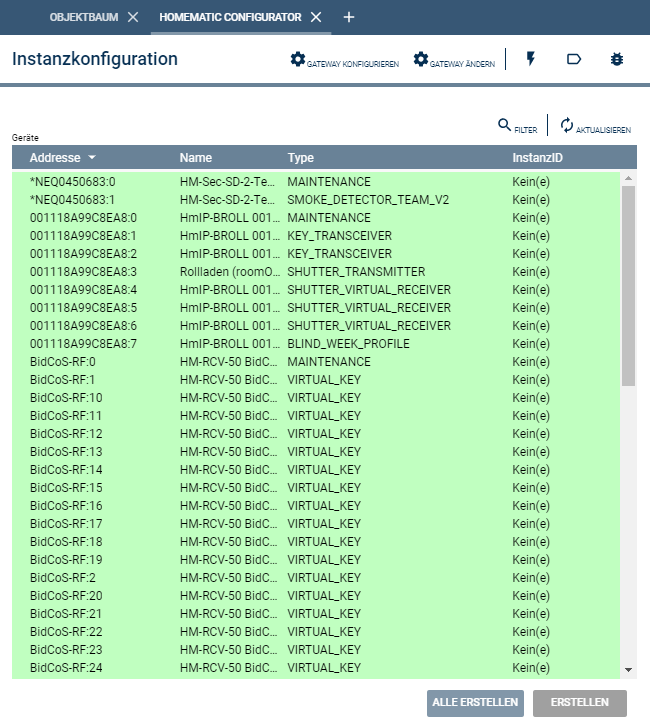
Various devices are now visible in the window that appears in the center. After selecting a device, a device instance can be created with "Create" and then the configuration page can be called up via "Configure".
To test if e.g. a dimmer is working, the proper function can be checked, e.g. in the Visualization.
> **Warning:** In certain circumstances, the return channel may not work. This is noticeable by the fact that IP-Symcon does not visualize if e.g. a lamp was switched via a light switch.
> This problem is often due to the Windows Firewall. This can be configured in Windows under "Control Panel" -> "System and Security" -> "Windows Firewall".
> In the menu "Allow a program or feature through Windows Firewall" -> "Change settings" -> "Allow other program..." there is a button "Browse".
> By selecting the IP-Symcon (IP-Symcon Service) file and then "open", the return channel also works!
> Another way to ensure the functionality of the return channel is to make sure that under the firewall settings in the CCU "HomeMatic XML-RPC API" and "Remote HomeMatic-Script API" full access is selected or the IP address of the IP-Symcon PC is entered.
### Device Configuration
It is recommended to use the HomeMatic Configurator to set up the individual devices.
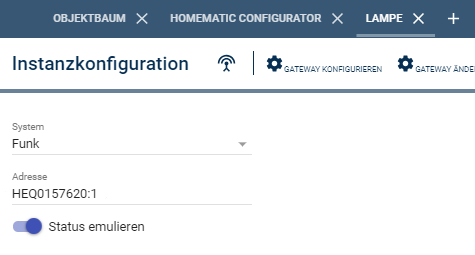
The following settings are possible on the configuration page of the device instance.
| Option | Description |
| -------------- | ---------------------------------------------------------------------------------------------------------------------------------------------------------------------------------------------------------------------------------------------------------------------- |
| System | Select whether the device is controlled via radio, wired or IP. |
| Address | HomeMatic Address of the device. This can also be searched for via the "Search" dialog in the upper bar of the configuration bar. |
| Emulate status | If enabled, the status of the device is updated when a command is successfully sent to the CCU. If switched off, the actual response of the device to be switched is waited for. This can lead to delays. For example, with devices that wake up only every x minutes. |
### Firewall-, Authentication- and Port Settings
Authentication is possible with a CCU3 or RaspberryMatic in combination with IP-Symcon 5.1 or above.
This can be set in the web interface of the CCU. Authentication can be activated under "Settings" -> "Control Panel" -> "Security". This then uses the users that are set in the user administration.

Furthermore, the firewall can be set up under "Settings" -> "Control Panel" -> "Configure Firewall". Further information can be found in the CCU manual.
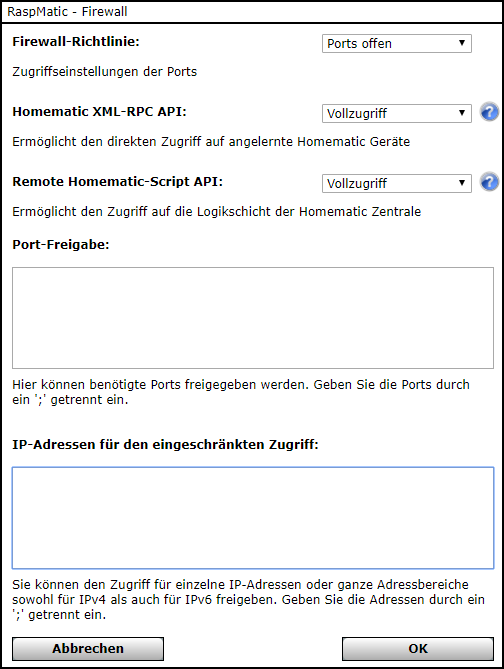
[Video](https://www.youtube.com/embed/sahJdNXUZZs?rel=0&cc_load_policy=1)
### Replacement of Defective Equipment
General information on how an exchange works in IP-Symcon can be found [here](../how-to.md)
For replacement, the configuration of the defective device must be opened in IP-Symcon and the address of the old device must be replaced for that of the new one. The address is either on the device itself or can be selected via "Search".
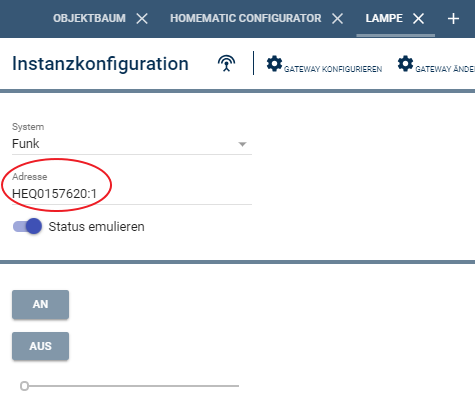
The address in the highlighted area must be replaced and saved with "Apply".
### HomeMatic with QNAP, Synology or Docker
If HomeMatic is to be used with QNAP, Synology or Docker, NAT support must be set up to receive responses from the system. This process is explained [here](../getting-started.md).
### Tips & Tricks
* [Documentation Homematic Data Points](https://www.eq-3.de/Downloads/eq3/download%20bereich/hm_web_ui_doku/HM-Script_4-Datenpunkte.pdf)
* [Documentation HomematicIP Data Points](https://www.eq-3.de/Downloads/eq3/download%20bereich/hm_web_ui_doku/HmIP_Device_Documentation.pdf)
* [HomeMatic Homepage](https://www.eq-3.com/products/homematic.html)
* [It is possible to change the display of the 19 button remote control](https://community.symcon.de/t/display-der-19-tasten-fernbedienung-ansteuern/17472)
* [To query the status of all actuators and sensors (only possible with the CCU!)](https://community.symcon.de/t/homematic-geraet-status-abfragen/22519)
* The duty cycle for an actuator can be specified with "ON_TIME" and for a dimmer additionally a ramp can be specified.
Here is an example script for three dimmers creating a light scene:
```php
$id_bar = 54392 /*[EG\Table Bar]*/;
$id_ecken = 24601 /*[EG\Corner Spots]*/;
$id_tisch = 38758 /*[EG\TableLamp]*/;
$ramp = 2;
HM_WriteValueFloat($id_bar, "ON_TIME", 60*10); // x Minuten ON
HM_WriteValueFloat($id_bar, "RAMP_TIME", $ramp); // X seconds ramp
HM_WriteValueFloat($id_bar , "LEVEL" , .4); // and run on X%
HM_WriteValueFloat($id_corner , "RAMP_TIME", $ramp); // X seconds ramp
HM_WriteValueFloat($id_corner , "LEVEL" , .4); // and run on X%
HM_WriteValueFloat($id_table , "RAMP_TIME", $ramp); // X seconds ramp
HM_WriteValueFloat($id_table , "LEVEL" , .4); // and run on x%
```
Example script WinMatic 60 minutes aeration:
```php
$id_actuator = 49712 /*[OG\Bedroom\HM WinMatic]*/;
HM_WriteValueFloat($id_actuator, "SPEED" , 1.0); // Maximum Speed ;
HM_WriteValueFloat($id_actuator, "RELOCK_DELAY" , 60*60); // Close window again after XX minutes
HM_WriteValueFloat($id_actuator, "LEVEL" , 0.7); // Open window
```
Example script open KeyMatic:
```php
HM_WriteValueBoolean($id, "OPEN", true);
```
Example script to get a feedback if an actuator has executed the switching command correctly:
```php
$id_actuator = 12345;
$err = HM_WriteValueBoolean($id_actuator, "STATE" , False);
//echo "Err: " .(int) $err . "\n";
if ($err === False){
echo "error: Switch actuator - Command was not executed";
SetValue($id_done, False);
} else {
SetValue($id_done, True);
echo "OK: Switch actuator - Command was executed\n";
}
```
Example script to toggle (turn on and off) an actuator (lamp):
```php
$id_actuator = 25404 /*[yard garden\lamp]*/;
$id_state = 55194 /*[yard garden\lamp\STATE]*/;
HM_WriteValueBoolean($id_actuator, "STATE" , !GetValue($id_state));
```
## BidCos Service
Source: https://www.symcon.de/en/service/documentation/module-reference/devices/homematic/homematic-ccu/bidcos-service/
The BidCos service is an alternative to the CCU-supported control of [HomeMatic](homematic.md) devices.
### Configuration of the LAN-adapter
First of all, the latest user software must be installed from the HomeMatic site.
We recommend assigning a fixed IP-address (DHCP: Off):

After successful installation a new directory was created: "x:\ProgramData\Bidcos-Service\"
The serial number (see label) and the IP address of the adapter must be adjusted in the 'bidcos.conf' file.
__Example:__
```php
[Interface 0]
Type = Lan Interface
Serial Number = GEQ0123456
# Key is on the back of the interface.
# The function can also be deactivated via the LAN tool.
# Then the field can be left blank
Encryption Key =
Description = First Lan Interface
# IP address of the LAN interface
IP Address = 192.168.2.61
```
> **Note:** Further settings in bidcos.conf are not required.
> It is essential that the following entry remains unchanged:
>
>
> ```php
> # TCP Port for XmlRpc connections
> Listen Port = 2001
> ```
### Testing the adapter
A successful configuration can now be checked with the "Test-Run BidCos-Service" program. The last line in the DOS window then reads: "… Connected to Lan Interface…".
> **Warning:** A flashing power LED indicates that the BidCos service is not connected.
If necessary, the start options can be adjusted (Control Panel > Administration > Services) or the service can be started manually:

### Configure HomeMatic-Components
In the "HomeMatic Configurator" program, the connection "Remote BidCoS Service" must be selected under "File > Settings". Then the IP address (localhost) and the port (2001) have to be entered.
Finally, the HomeMatic components can now be added one after the other in the "Teach-in devices" menu.
### Client Socket in IP-Symcon
The HomeMatic Socket (in the I/O instances) must be configured. "LAN Mode" must be selected as the mode. If the BidCoS service is running on another PC, its IP address must be entered as the host. Otherwise "localhost" must remain specified as the address. If there are several network adapters, the IP address of the network-adapter, which the LAN-adapter is connected to, must be selected in the event-server. The port (5544) does not have to be changed, it only has to be enabled in an existing firewall.
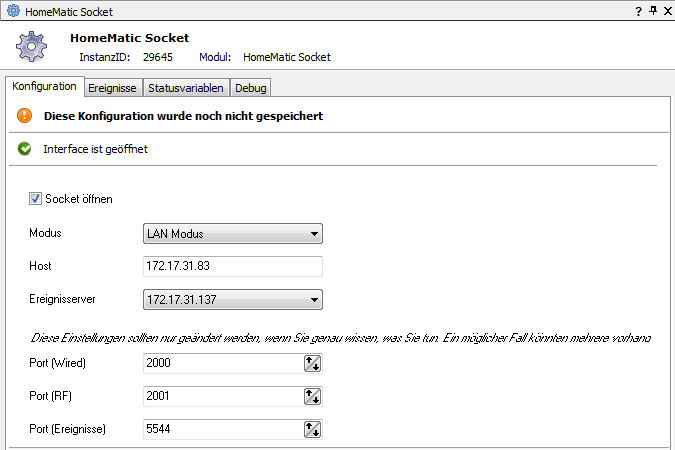
## HM_ReadServiceMessages
Source: https://www.symcon.de/en/service/documentation/module-reference/devices/homematic/homematic-ccu/hm-readservicemessages/
`array HM_ReadServiceMessages(int $InstanceID)`
**Parameters**
- `$InstanceID` (int): ID of the HomeMatic Socket Instance
**Returns** (array): The following information are available as __key => value__ pairs:
| Index | Type | Description |
| ----------- | ------- | ------------------------------------------------------------------------------------------------------------------------------------------- |
| __Address__ | string | Address of the relevant device |
| __Message__ | string | Cryptic description of the error message. Text can be found partially in the stringtable_de.txt from the Home Automatic configuration tool. |
| __Value__ | variant | Value of the error message |
ID of the HomeMatic Socket Instance
**Example**
```php
//Creates a variable that displays all service messages in the Visualization. Copy in a script and run.
//From here change anything
$object = IPS_GetObject($_IPS['SELF']);
$parentID = $object['ParentID'];
//Installer
if ($_IPS['SENDER'] == "Execute")
{
IPS_SetHidden($_IPS['SELF'], true);
IPS_SetName($_IPS['SELF'], "Script");
$parentObject = IPS_GetObject($parentID);
if ($parentObject['ObjectType'] !== 1)
{
$instanceID = IPS_CreateInstance("{485D0419-BE97-4548-AA9C-C083EB82E61E}");
IPS_SetParent($instanceID, $parentID);
$parentID = $instanceID;
IPS_SetParent($_IPS['SELF'], $parentID);
IPS_SetName($instanceID, "Servic messages");
}
IPS_SetScriptTimer($_IPS['SELF'], 300);
}
$texte = Array(
"CONFIG_PENDING" => "Configuration data are due for transfer",
"LOWBAT" => "Low battery condition",
"STICKY_UNREACH" => "Device communication was disrupted",
"UNREACH" => "Disrupted communication devices currently"
);
$str = ""; // Adjust color or remove style
$str .= "| Gerätname | GeräteID | Meldung |
";
$ids = IPS_GetInstanceListByModuleID("{A151ECE9-D733-4FB9-AA15-7F7DD10C58AF}");
if(sizeof($ids) == 0)
die("No HomeMatic Socket instance found!");
$msgs = HM_ReadServiceMessages($ids[0]);
if($msgs === false)
die("Connect to the CCU failed");
if(sizeof($msgs) == 0)
$str .= "
No service messages! |
";
foreach($msgs as $msg)
{
if(array_key_exists($msg['Message'], $texte)) {
$text = $texte[$msg['Message']];
} else {
$text = $msg['Message'];
}
$id = GetInstanceIDFromHMID($msg['Address']);
if(IPS_InstanceExists($id)) {
$name = IPS_GetLocation($id);
} else {
$name = "Device is not set up in IP Symcon";
}
$str .= "| ".$name." | ".$msg['Address']." | ".$text." |
";
}
$str .= "
";
$vid = CreateVariableByName($parentID, "Content", 3);
IPS_SetIcon($vid, "Information");
IPS_SetVariableCustomProfile($vid, "~HTMLBox");
SetValue($vid, $str);
function GetInstanceIDFromHMID($sid)
{
$ids = IPS_GetInstanceListByModuleID("{EE4A81C6-5C90-4DB7-AD2F-F6BBD521412E}");
foreach($ids as $id)
{
$a = explode(":", HM_GetAddress($id));
$b = explode(":", $sid);
if($a[0] == $b[0])
{
return $id;
}
}
return 0;
}
function CreateVariableByName($id, $name, $type)
{
$vid = @IPS_GetVariableIDByName($name, $id);
if($vid === false)
{
$vid = IPS_CreateVariable($type);
IPS_SetParent($vid, $id);
IPS_SetName($vid, $name);
IPS_SetInfo($vid, "this variable was created by script #".$_IPS['SELF']);
}
return $vid;
}
```
## HM_RequestStatus
Source: https://www.symcon.de/en/service/documentation/module-reference/devices/homematic/homematic-ccu/hm-requeststatus/
`bool HM_RequestStatus(int $InstanceID, string $Parameter)`
**Parameters**
- `$InstanceID` (int): ID of the device to be switched
- `$Parameter` (string)
| Value | Description |
| ----- | ------------------------------------------------------------------------------------------------------------------------------------------------------------------------------------------------- |
| STATE | Status of an actuator |
| LEVEL | Dim value |
| ... | An overview for all requestable "readable" parameters can be taken from the documentation of the [Homematic Datapoints](homematic.md) under Tipps & Tricks. |
**Returns** (bool): If the command succeeds, it returns __TRUE__, otherwise __FALSE__.
| Value | Description |
| ----- | ------------------------------------------------------------------------------------------------------------------------------------------------------------------------------------------------- |
| STATE | Status of an actuator |
| LEVEL | Dim value |
| ... | An overview for all requestable "readable" parameters can be taken from the documentation of the [Homematic Datapoints](homematic.md) under Tipps & Tricks. |
**Example**
```php
// This requests an update of all parameters for all Homemeatic instances.
// This strains the wireless communication extremely and is not recommanded as general update.
$ids = IPS_GetInstanceListByModuleID("{EE4A81C6-5C90-4DB7-AD2F-F6BBD521412E}");
echo "Geräte: ".sizeof($ids)."\n";
foreach($ids as $id)
{
$svs=IPS_GetStatusVariableIdents($id);
if(sizeof($svs) > 0) {
if(@HM_RequestStatus($id, $svs[0]) === false) {
echo "Fehler: ".IPS_GetLocation($id)."\n";
}
}
}
```
## HM_WriteValueBoolean
Source: https://www.symcon.de/en/service/documentation/module-reference/devices/homematic/homematic-ccu/hm-writevalueboolean/
`bool HM_WriteValueBoolean(int $InstanceID, string $Parameter, bool $Value)`
**Parameters**
- `$InstanceID` (int): ID of the device to be switched
- `$Parameter` (string): Parameter that should be set. The name of the parameter can be taken from the data point list or as "Ident" in the tab "Status Variables" in IP-Symcon.
- `$Value` (bool): true or false
**Returns** (bool): If the command succeeds, it returns __TRUE__, otherwise __FALSE__.
true or false
**Example**
```php
// Switch device on
HM_WriteValueBoolean(12345, "STATE", true);
// Lock device
HM_WriteValueBoolean(12345, "INHIBIT", true);
// Switch on display light
HM_WriteValueBoolean(12345, "BACKLIGHT", true);
```
## HM_WriteValueFloat
Source: https://www.symcon.de/en/service/documentation/module-reference/devices/homematic/homematic-ccu/hm-writevaluefloat/
`bool HM_WriteValueFloat(int $InstanceID, string $Parameter, float $Value)`
**Parameters**
- `$InstanceID` (int): ID of the device to be switched
- `$Parameter` (string): Parameter that should be set. The name of the parameter can be taken from the data point list or as "Ident" in the tab "Status Variables" in IP-Symcon.
- `$Value` (float): floating point number that should be set
**Returns** (bool): If the command succeeds, it returns __TRUE__, otherwise __FALSE__.
floating point number that should be set
**Example**
```php
// Dim device to 25%. Values allowed between 0.0 and 1.0
HM_WriteValueFloat(12345, "LEVEL", 0.25);
// Set the activation duration to 1 hour. Values allowed between 0 and 85825945.6 in seconds
HM_WriteValueFloat(12345, "ON_TIME", 3600);
```
## HM_WriteValueInteger
Source: https://www.symcon.de/en/service/documentation/module-reference/devices/homematic/homematic-ccu/hm-writevalueinteger/
`bool HM_WriteValueInteger(int $InstanceID, string $Parameter, int $Value)`
**Parameters**
- `$InstanceID` (int): ID of the device to be switched
- `$Parameter` (string): Parameter that should be set. The name of the parameter can be taken from the data point list or as "Ident" in the tab "Status Variables" in IP-Symcon.
- `$Value` (int): Whole number that should be set
**Returns** (bool): If the command succeeds, it returns __TRUE__, otherwise __FALSE__.
Whole number that should be set
**Example**
```php
// Set the number of alarms to the value 25. Values allowed between 0 and 255.
HM_WriteValueInteger(12345, ALARM_COUNT, 25);
// Set the number of service to the value 78. Values allowed between 0 and 255.
HM_WriteValueInteger(12345, SERVICE_COUNT, 78);
```
## HM_WriteValueString
Source: https://www.symcon.de/en/service/documentation/module-reference/devices/homematic/homematic-ccu/hm-writevaluestring/
`bool HM_WriteValueString(int $InstanceID, string $Parameter, string $Value)`
**Parameters**
- `$InstanceID` (int): ID of the device to be switched
- `$Parameter` (string): Parameter that should be set. The name of the parameter can be taken from the data point list or as "Ident" in the tab "Status Variables" in IP-Symcon.
- `$Value` (string): string that should be set
**Returns** (bool): If the command succeeds, it returns __TRUE__, otherwise __FALSE__.
string that should be set
**Example**
```php
// Transfers the value "Hello World". Any string allowed.
HM_WriteValueString(12345, SUBMIT, "Hello World");
```
## HomeMatic HCU (Beta)
Source: https://www.symcon.de/en/service/documentation/module-reference/devices/homematic/homematic-hcu/
_Requires Symcon >= 8.1_
> **Note:** This module is currently still in the beta phase. To use it, developer mode must be activated via HCUWeb. Once this mode is activated, eQ-3 can no longer provide technical support. More information: [Connect API FAQ](https://homematic-ip.com/de/home-control-unit-mit-plugin-support-und-connect-api)
> **Note:** Due to a limitation in the HCU Connect API, some button channel assignments do not match those displayed in the Homematic IP app.
### Integration in IP-Symcon
The HCU can be integrated via [Device search](../components/management-console.md). To do this, "Homematic HCU Discovery" must be selected as the system. The Discovery instance then offers the creation of a Homematic HCU [Configurator](../concepts.md). Once the configurator has been created, the individual devices and groups can be integrated as described below.
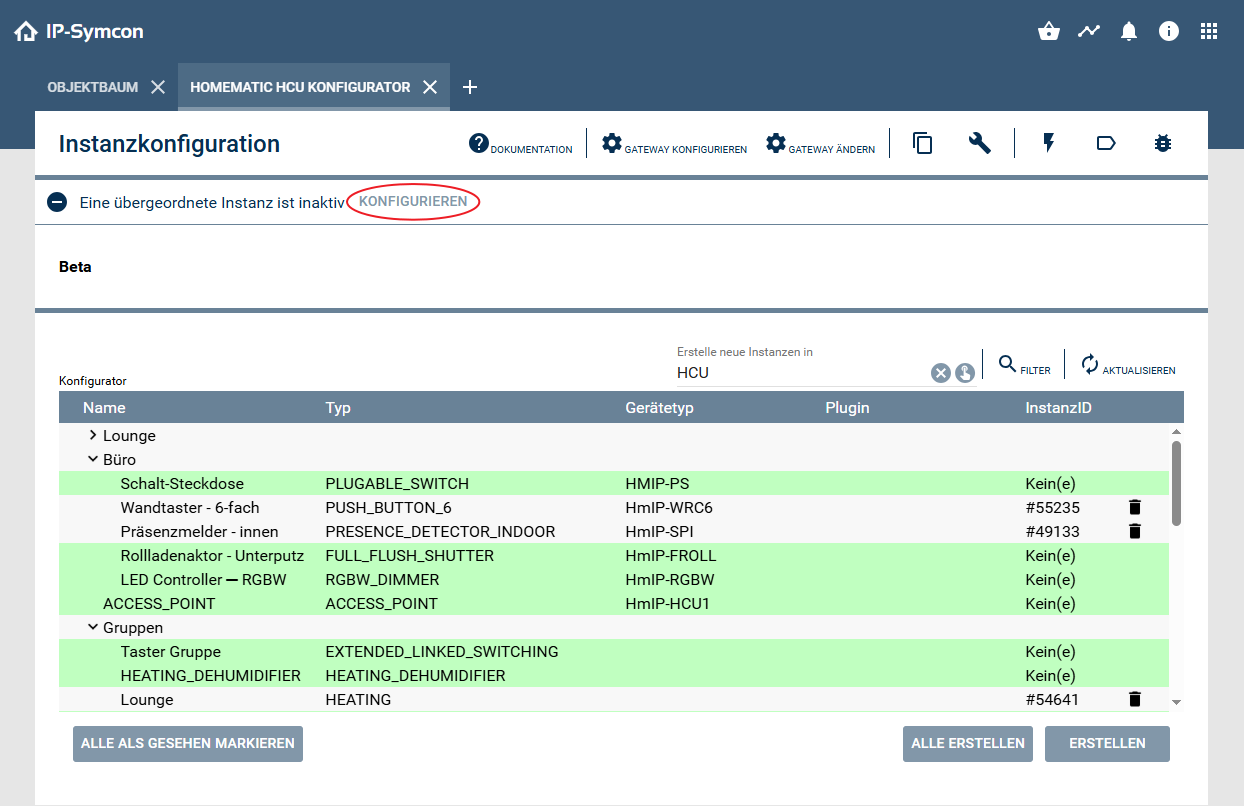
Within the configurator the configuration page of the "HomeMatic HCU Gateway" can be opened in via "Configure". The activation key from the HCUWeb must be entered here. To do this, developer mode must be activated in the HCUWeb and the WebSocket must be enabled. Once the key has been generated and entered in the gateway, the process can be completed by clicking "Apply changes".
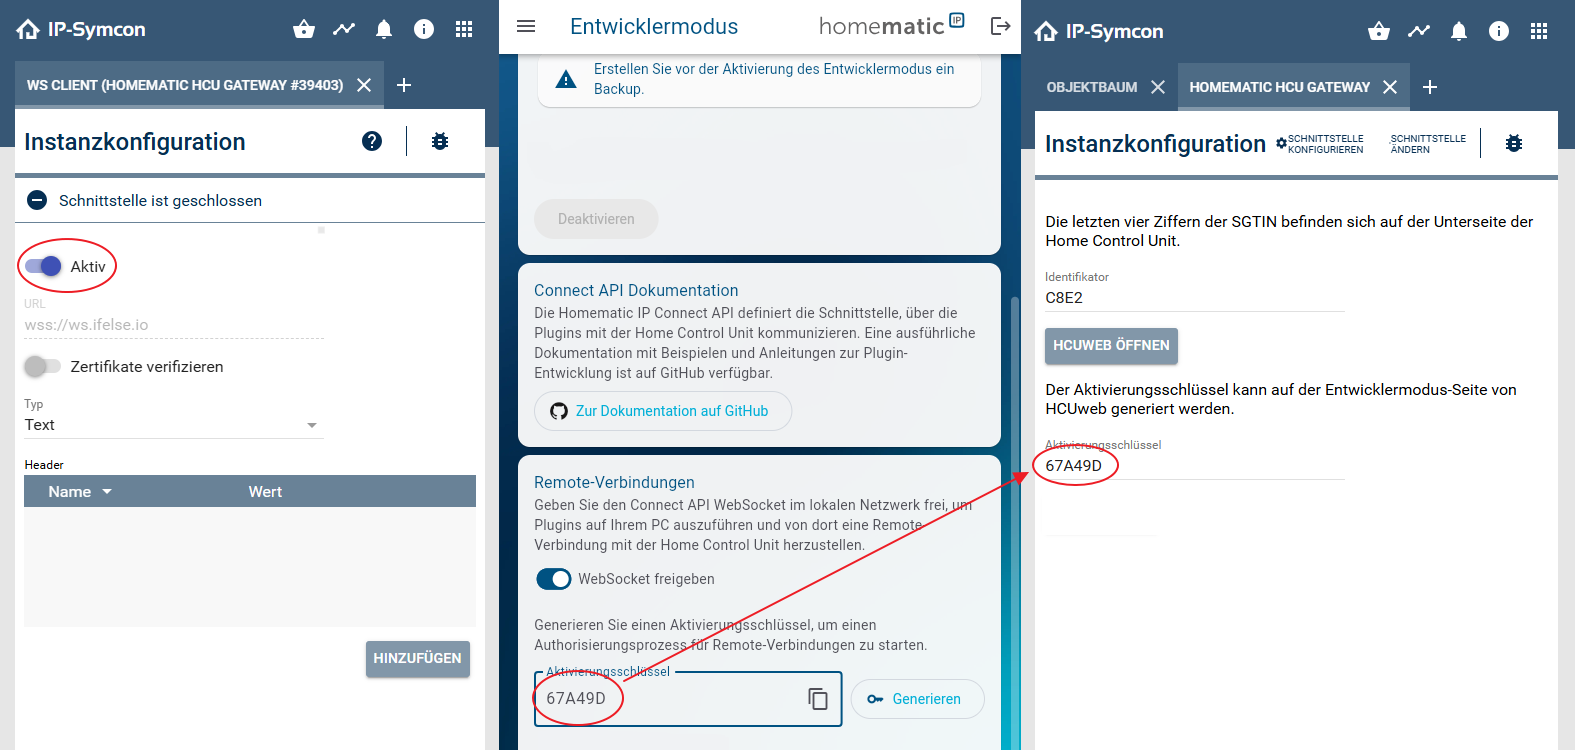
If the HCU needs to be registered again at a later date, a new activation key can be generated and entered in the corresponding field. To complete the process, click the 'Register Again' button in the gateway's expert options.
Various devices are now visible in the configurator and divided into rooms. The groups are summarized under a separate item. After selecting a device or a group, an instance can be created with "Create" and then the configuration page can be called up via "Configure".
### Device configuration
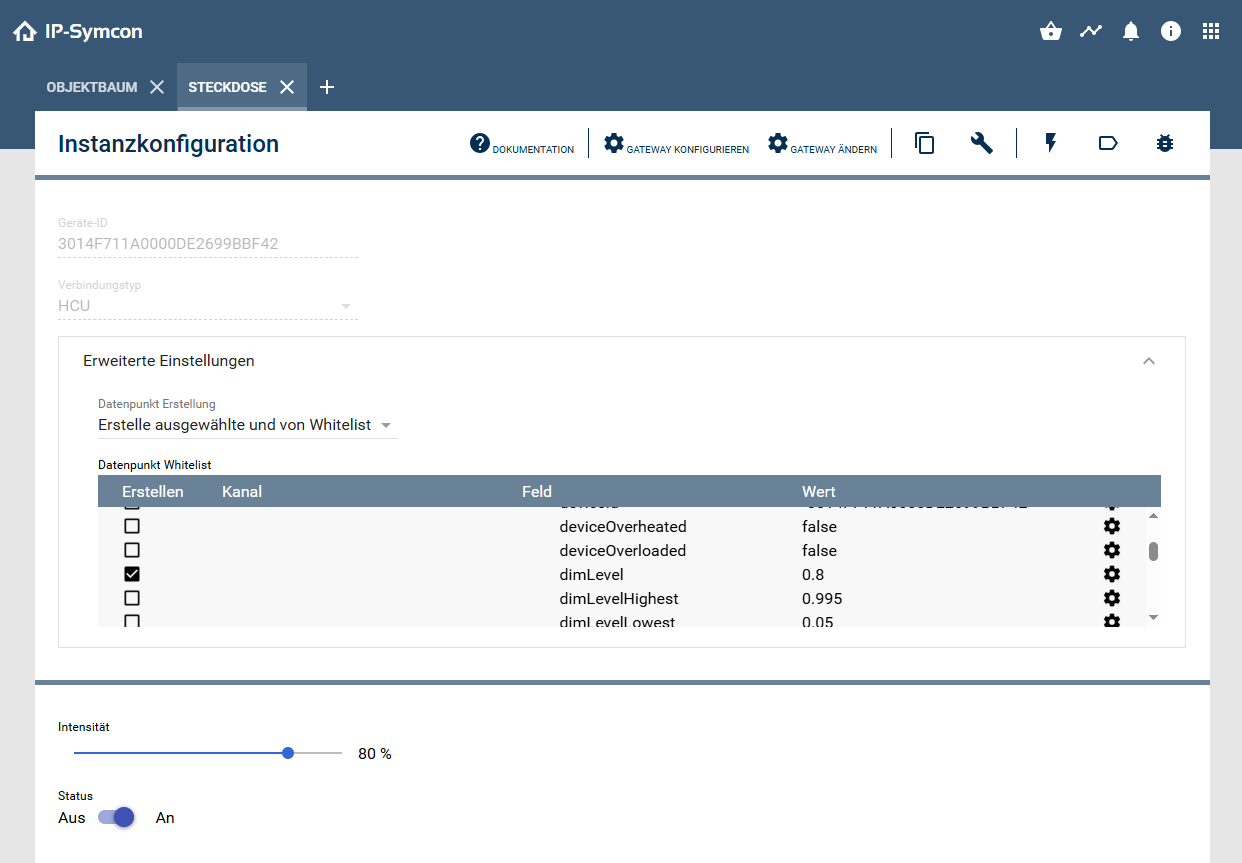
On the configuration page, the connection type is displayed in addition to the device ID. Currently there is only the connection via the HCU. The "Advanced settings" allow you to influence the creation of a device's data points. The option "Create only selected" is active by default. If the device is not known to Symcon, all data points are created.
| Option | Description |
| ---------------------------------------- | ------------------------------------------------------------------------------------------------------------------------------------ |
| Create only selected | If the Symcon device is known, the data points created can be limited to those that are most relevant for the function of the device.|
| Create only selected and from whitelist | In addition to the data points selected by Symcon, further data points can be selected from a list of all data points. |
| Create only from whitelist | Each data point to be created can be selected individually. |
| Create all | All available data points are created. This option is selected if the Symcon device is not known |
All switchable values of the device are displayed at the bottom of the action area.
> **Note:** The configuration of groups is structured identically