Documentation
KNX
KNX is a wired as well as radio based system. A connection with IP-Symcon is possible via a serial or KNX IP interface. For the configuration of the system an engineering tool software (short "ETS") is needed.

The following devices are supported by IP-Symcon:
Supported components (excerpt)
KNX Data Secure and KNX IP Secure are supported!
Summary
Introduction
KNX is a network of home and building control systems according to EN 50090 and ISO/IEC 14543. It controls, for example, heating, lighting, blinds, ventilation and security systems across different trades. The system usually uses cables (designation e.g. J-Y (St) Y 2x2x0.8 EIB or YCYM 2x2x0.8) with two wire pairs (red-black and white-yellow). The KNX system is supplied by a power supply with 30 V nominal voltage [DC voltage]. This voltage supplies the bus couplers via which each KNX device communicates with the other networked KNX devices. The data exchange between the KNX devices takes place via telegrams.
The programming of the participants and the assignment of the group addresses is done with the Engineering Tool Software (ETS). The ETS is provided by the umbrella organization Konnex and ensures the trouble-free cooperation of components from different manufacturers.
The connection to IP-Symcon is done via a serial or IP gateway.
As a rule, all serial gateways "PEI type 10″ with FT1.2 protocol (interfaces of type PEI 16 do not work) are supported and all KNX/IP gateways that offer the tunneling protocol. If a KNX gateway meets these requirements and does not work, Symcon support should be contacted. The problem will be solved as soon as possible.
Since IP-Symcon 6.4, KNX Data Secure and KNX IP Secure are also fully supported. In addition, all KNX IP Secure Interfaces also support the new KNX/IP over TCP, which is much more robust than the older KNX/IP over UDP.
Installation
When all KNX devices are correctly set up and connected, they must be configured with the ETS. The three-stage address assignment is used for this purpose.

Currently only three-level addresses (e.g. 10/2/5) are supported. Two-level or free addresses are not supported by IP-Symcon at the moment. About the Conversion any two-level address can be controlled via the translated three-level address
If the installation was done by an electrician, he should include the OPC/XML export explained below and the associated file of type XML.
To use KNX in IP-Symcon, either a serial FT1.2 gateway or a compatible KNX/IP gateway is required. The setup of the different gateways differs slightly. A KNX instance can be created directly in IP-Symcon and the gateway can be configured from there. Alternatively, the XML export from the ETS can be used.
Using the XML export with the IP-Symcon configurator allows a fast integration of all KNX components.
From IP-Symcon 5.3 the export as XML is recommended, because it supports the new KNX DPT instances
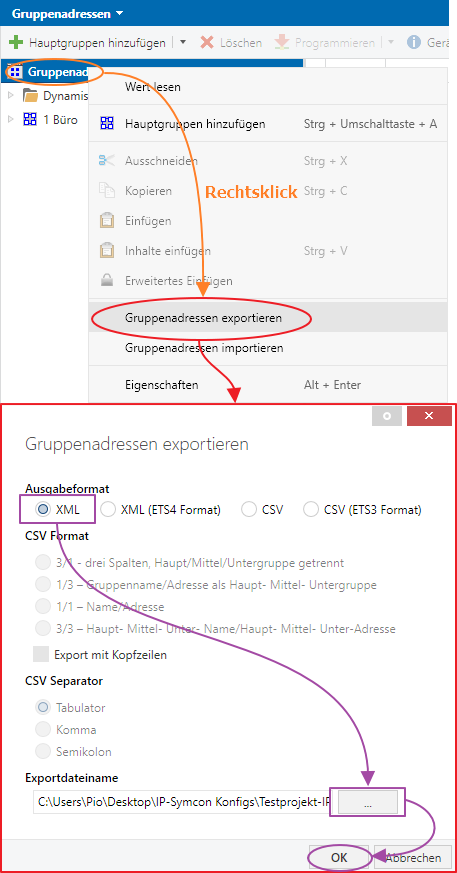
XML Export to ETS
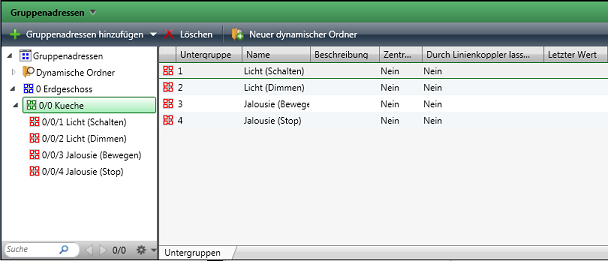
An XML export can be saved within the ETS in the opened project via right click on the group addresses.
Video tutorial for export:
From version 6.0.0
From version 5.6.5
Integration in IP-Symcon
The KNX interface can be integrated via the device-search. For this, "KNX Discovery" must be selected as the system. The Discovery instance then offers the creation of a KNX Configurator. After the configurator has been created, the individual devices can be added via this as described below.

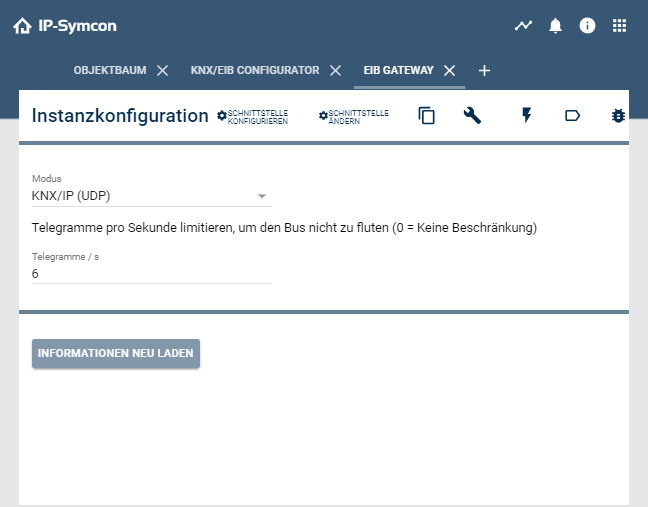
Before the import of the group addresses can be started, the interface must be correctly selected and configured. To do this, click on the "cogwheel" in the upper part of the configuration. The following dialog should open.
If KNX Data Secure should be used, you can read more in the chapter KNX Data Secure
Integration without KNX Data Secure
Under Mode the type of gateway has to be selected. For all common IP gateways the mode "KNX/IP (UDP)" may be selected. For the KNX IP interfaces with secure support, you can also choose the more reliable mode “KNX/IP (TCP)” or the appropriate secure equivalent. Changes are saved with the "Apply" button. To be able to enter the address for the interface, the "Gearwheel" in the upper area must be clicked again. Depending on the mode, either the IP address or the serial port belonging to the interface must be entered. In case of doubt, the IP address can also be found out with the help of the ETS. Further settings are not necessary. The changes are confirmed with "Apply". In the configuration of the gateway, the parameters of the gateway can now be read out via "Reload information". If these have been read out correctly, the configuration is complete.
Video tutorial:
Integration in IP-Symcon with KNX IP Secure / KNX Data Secure
To use KNX Data Secure and/or KNX IP Secure in IP-Symcon, a backup of a keychain is needed in addition to the XML file.
Video tutorial to export the keychain:
In the KNX Gateway the mode "KNX/IP Secure (TCP)" must be selected. In the field "Select keychain" the keychain file is imported and the password is entered in the field "Keychain password". Changes will be saved with the button "Apply". Now the field "Secure tunnel" appears over which the configured tunnel of the interface can be selected. To be able to enter the address for the interface, the "Gearwheel" in the upper area must be clicked again. Here the IP address must be entered belongs. In case of doubt, the IP address can also be found out with the help of the ETS. Further settings are not necessary. The changes are confirmed with "Apply". In the configuration of the gateway, the gateway parameters can now be read out via "Reload information". If these have been read out correctly, the configuration is complete.
Video tutorial for KNX Data Secure with KNX IP Secure Interface:
Video tutorial for KNX Data Secure with SymBox with KNX extension:
find IP address
Single Actuators Setup
In the KNX Configurator after uploading the XML file all previously configured KNX actuators can be integrated and visualized in IP-Symcon.
For this purpose devices have to be created by pressing "Create". The devices are now operable.
The ID that appears on the right side is the instance ID assigned by IP-Symcon. This is unique and unchangeable.
After clicking on a selected KNX device and then clicking on "Configure", the functionality of each individual device can be tested.
The devices can be found again in the object tree.
The created devices can now be switched via the "Visualization".
Automatic detection of feedback addresses
If a device has a feedback address set up, this can be automatically detected and set as a feedback address. To do this, click on the button "Detect feedback GA automatically" in the KNX Configurator and activate this via the item "Activate detection".
Then you must select the levels via which the group addresses are to be linked. If the feedback address and the device are in the same middle group, the item "Link on the same level (1/1/x)" is selected. If the feedback address and the device are in different middle groups, the item "Link over two levels (1/x/x)" is selected. If the addresses are in different main groups, the item "Link on all levels (x/x/x)" is selected.
The linking of the group addresses is done by the specified keywords. If the name of a feedback address is identical with the name of a group address after removing the keyword, they will be linked. The upper/lower case is ignored. The feedback address is then set as the feedback address of the group address.
Video about the setup with automatic feedback addresses:
Examples
Sending temperature values to the KNX bus
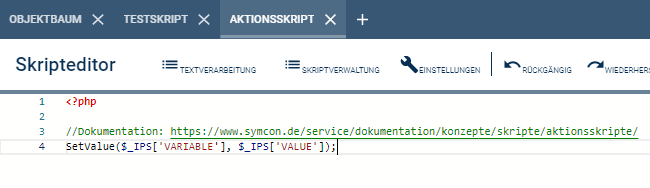
In order to be able to send values such as the temperature to the KNX bus, an action script is required. This forms the link between the visualization and the actuators. A script with the following content must be created:
EIB_Value(IPS_GetParent($_IPS['VARIABLE']), $_IPS['VALUE']);
For each desired device that should be changeable, the corresponding variable must be linked to this action script. This must be done in the configuration of the respective variable. To do this, the variable must be double-clicked. The selection of the action script is located in the "Profile settings" area. Here, the script just created must be selected. In addition, a suitable profile (e.g. ~temperature) should be selected via "Own profile".
The last step can be repeated as often as needed. It is only necessary to create the script once with the above mentioned content
Better Shutter Control with KNX Shutter
Due to the many setting options and linked addresses, shutters cannot be added via the configurator.
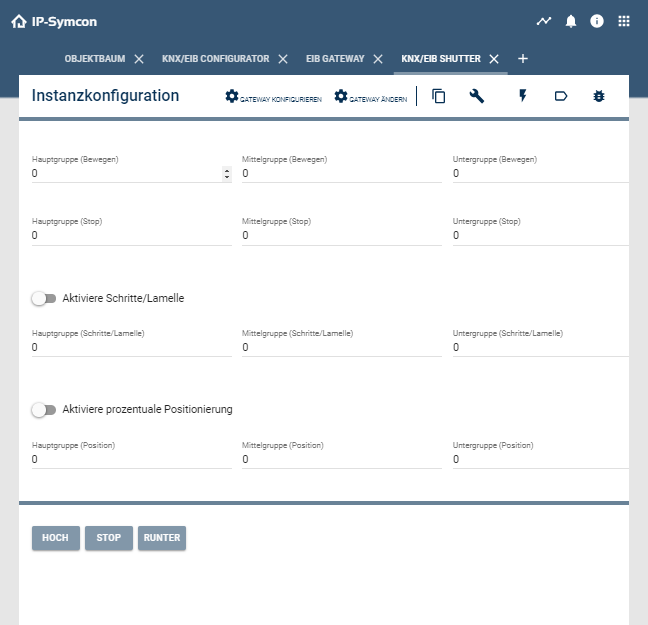
Move
Here the address for the up and down movement of the shutter must be entered. In the area "More?" further addresses can be entered on which the instance for moving up/down should listen.
Stop
Here the address for stopping the shutter must be entered. In the "More?" area, further addresses can be entered to which the instance is to listen for stopping.
Activate_steps/Slat
This address can be enabled and controls the stepwise movement of the shutter. This is used to adjust the slats of the shutter. In the "More?" area, further addresses can be entered to which the instance for step control should listen.
Activate percentage positioning
These two addresses can be enabled and control either the percentage positioning of the shutter or the slats.
Test Center
In the Test Center basic functions can be tested adhoc.
Tips and Tricks
Conversion of group addresses
Convert from two-level group addresses to three-level group addresses
If a two-level representation of the group addresses has been selected in the ETS, the addresses can be converted with the help of this tool. If the OPC export is used, the ETS takes over this process automatically.
Convert free group addresses to three level group addresses
If you have selected the free representation of the group addresses in the ETS, unfortunately an OPC export is not possible. With the help of this tool the addresses can be converted.
KNX with QNAP, Synology or Docker
If KNX is to be used with QNAP, Synology or Docker, NATSupport must be set up to receive responses from the system. This process is explained here.
Script to read states from the bus
Since only variable changes are perceived by IP-Symcon, it is necessary to query IP-Symcon when restarting to see if there have been any status changes in order to ensure a consistent display.
For this a start script can be added in the Event-Control .
$gatewayIDs = IPS_GetInstanceListByModuleID("{1C902193-B044-43B8-9433-419F09C641B8}");
$instanceIDs = IPS_GetInstanceList();
foreach($gatewayIDs as $gatewayID) {
    foreach($instanceIDs as $instanceID) {
        $i = IPS_GetInstance($instanceID);
        if($i['ConnectionID'] == $gatewayID) {
            switch($i['ModuleInfo']['ModuleID']) {
                case "{24A9D68D-7B98-4D74-9BAE-3645D435A9EF}": //Shutter
                case "81F54858-72B1-4C2C-8CE3-7E00A3168378": //RGB (Legacy until IP-Symcon 5.0)
                case "{81F54858-72B1-4C2C-8CE3-7E00A3168378}": //RGB (IP-Symcon 5.1+)
                case "4D7F7548-0979-4ABD-9BB3-81F9477C0903": //RGBW (Legacy until IP-Symcon 5.0)
                case "{4D7F7548-0979-4ABD-9BB3-81F9477C0903}": //RGBW (IP-Symcon 5.1+)
                    EIB_RequestStatus($instanceID);
                    break;

                case "{D62B95D3-0C5E-406E-B1D9-8D102E50F64B}": //Group
                    if(IPS_GetProperty($instanceID, "GroupCapabilityRead")) {
                        EIB_RequestStatus($instanceID);
                    }
                    break;
                case "{FB223058-3084-C5D0-C7A2-3B8D2E73FE8A}": //Device
                    KNX_RequestStatus($instanceID);
                    break;
                default:
                    //DPTs
                    if(strpos($i['ModuleInfo']['ModuleName'], "DPT") !== false) {
                        if(IPS_GetProperty($instanceID, "CapabilityRead")) {
                            KNX_RequestStatus($instanceID);
                        }
                    }
                    break;
            }
        }
    }
}
Script to output the group addresses
The following script can be used to output the group addresses including id, name and location.
echo "ID,Name,Location,GA,MoreGA" . PHP_EOL;

$gatewayIDs = IPS_GetInstanceListByModuleID("{1C902193-B044-43B8-9433-419F09C641B8}");
$instanceIDs = IPS_GetInstanceList();
foreach($gatewayIDs as $gatewayID) {
    foreach($instanceIDs as $instanceID) {
        $i = IPS_GetInstance($instanceID);
        if($i['ConnectionID'] == $gatewayID) {
            switch($i['ModuleInfo']['ModuleID']) {
                case "{24A9D68D-7B98-4D74-9BAE-3645D435A9EF}": //Shutter
                    printGA($instanceID, "GroupMove");
                    if (IPS_GetProperty($instanceID, "EnableStep")) {
                        printGA($instanceID, "GroupStep");
                    }
                    printGA($instanceID, "GroupStop");
                    if (IPS_GetProperty($instanceID, "EnablePosition")) {
                        printGA($instanceID, "GroupPosition");
                    }
                    if (IPS_GetProperty($instanceID, "EnableBladePosition")) {
                        printGA($instanceID, "GroupBladePosition");
                    }
                    break;
                case "81F54858-72B1-4C2C-8CE3-7E00A3168378": //RGB (Legacy until IP-Symcon 5.0)
                case "{81F54858-72B1-4C2C-8CE3-7E00A3168378}": //RGB (IP-Symcon 5.1+)
                case "4D7F7548-0979-4ABD-9BB3-81F9477C0903": //RGBW (Legacy until IP-Symcon 5.0)
                case "{4D7F7548-0979-4ABD-9BB3-81F9477C0903}": //RGBW (IP-Symcon 5.1+)
                case "{D62B95D3-0C5E-406E-B1D9-8D102E50F64B}": //Group
                    printGA($instanceID, "Group");
                    break;
                case "{FB223058-3084-C5D0-C7A2-3B8D2E73FE8A}": //Device
                    printGAs($instanceID);
                    break;
                default:
                    //DPTs
                    if(strpos($i['ModuleInfo']['ModuleName'], "DPT") !== false) {
                        printGA($instanceID, "");
                    }
                    break;
            }
        }
    }
}

function printGA($id, $prefix) {
    $c = json_decode(IPS_GetConfiguration($id), true);
    echo sprintf("%d,%s,%s,", $id, IPS_GetName($id), IPS_GetLocation($id));
    echo sprintf("%d/%d/%d", $c[$prefix . "Address1"], $c[$prefix . "Address2"], $c[$prefix . "Address3"]);
    foreach (json_decode($c[$prefix . "Mapping"], true) as $a) {
        echo "," . sprintf("%d/%d/%d", $a[$prefix . "Address1"], $a[$prefix . "Address2"], $a[$prefix . "Address3"]);
    }
    echo PHP_EOL;
}

function printGAs($id) {
    $c = json_decode(IPS_GetConfiguration($id), true);
    foreach(json_decode($c['GroupAddresses'], true) as $ga) {
        echo sprintf("%d,%s,%s,", $id, IPS_GetName($id), IPS_GetLocation($id));
        echo sprintf("%d/%d/%d", $ga["Address1"], $ga["Address2"], $ga["Address3"]);
        foreach ($ga["Mapping"] as $a) {
            echo "," . sprintf("%d/%d/%d", $a["Address1"], $a["Address2"], $a["Address3"]);
        }
        echo PHP_EOL;
    }
}
Legacy
OPC Export in ETS
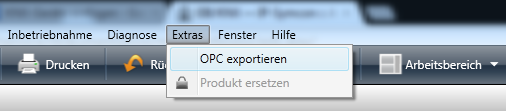
Video tutorial for export:
Setup with OPC
Assignment of individual functions to EIS type/DPT
| function | EIS type | DPT |
|---|---|---|
| EIB_Char | EIS13 | DPT4 |
| EIB_Counter8bit | EIS14 | DPT5, DPT6 |
| EIB_Counter16bit | EIS10 | DPT7, DPT8 |
| EIB_Counter32bit | EIS11 | DPT12, DPT13 |
| EIB_Date | EIS4 | DPT11 |
| EIB_DimControl | EIS2 | DPT3 |
| EIB_DimValue | EIS6 | DPT5 |
| EIB_DriveBladeValue | EIS6 | DPT5 |
| EIB_DriveMove | EIS7 | DPT1 |
| EIB_DriveShutterValue | EIS6 | DPT5 |
| EIB_DriveStep | EIS7 | DPT1 |
| EIB_FloatValue | EIS9 | DPT14 |
| EIB_Move | EIS7 | DPT1 |
| EIB_Position | EIS6 | DPT5 |
| EIB_PriorityControl | EIS8 | DPT2 |
| EIB_PriorityPosition | EIS1 | DPT1 |
| EIB_Scale | EIS6 | DPT5 |
| EIB_Str | EIS15 | DPT16 |
| EIB_Switch | EIS1 | DPT1 |
| EIB_Time | EIS3 | DPT10 |
| EIB_Value | EIS5 | DPT9 |
| N/A | EIS12 | DPT15 |