Documentation
Eaton xComfort
Eaton xComfort is a bidirectional radio-based system. To enable a setup in Symcon the configuration file of the installation or the programming interface (CRSZ-00/01) is required. The connection to Symcon is established with the communication interface CKOZ-00/03 or an Eaton USB or LAN gateway.

The following devices are supported by Symcon:
Installation
For connection to Symcon, Eaton (formerly Moeller) uses the xComfort communication interface (CKOZ-00/03).
For programming the system in Eaton Comfort mode, the Eaton xComfort programming interface (CRSZ-00/01) is used.
Alternatively, it is also possible to connect an Eaton USB gateway or a LAN gateway for connection to Symcon.
The Eaton xComfort wireless system can be used to automatically control the monitoring of windows, air conditioning and lighting systems as well as many other building functions. The system can be retrofitted without the need to lay new cables. It is a bidirectional system, i.e. all sensors and actuators (switches) can communicate with each other, as they each contain a transmitter and a receiver unit.
Video tutorial for setup
port
In order to be able to connect the Eaton Xcomfort system with Symcon, a corresponding gateway is required. In this example this is the communication interface CKOZ-00/03. The programming interface CRZ-00/01 for the Comfort mode is not suitable for this, but is also needed, because it is needed for programming the system in Comfort mode from Eaton.

When using the RS232 port, please note that additional power must be supplied via the USB port. This is possible via a suitable adapter (230V->USB)
The programming interface CRZ-00/01 can also be connected via the USB interface (optional cable: RS232->USB) or via the RS232 port.
Installation
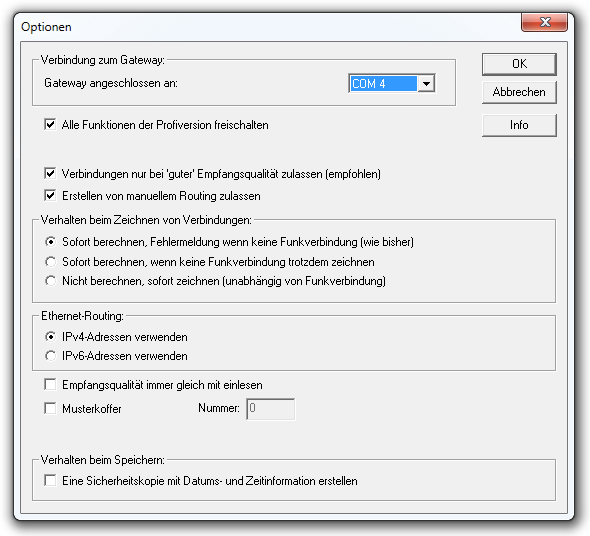
After the correct connection of the device(s), "Control Panel -> Hardware and Sounds -> Devices and Printers" must be opened. There you have to look for "Prolific USB-to-Serial Comm Port". The used port (e.g.: COM4) can be found in the brackets behind it, this should be noted or remembered.
The Eaton Firmware / MRF Software must be downloaded and installed. After starting the software, click on "Edit -> Options", select the correct port (e.g. COM4) and activate the appropriate options.
In the upper tab you can now click on "Gateway -> Read in". The system can now be programmed in comfort mode.
Add secondary devices
With the Eaton firmware, secondary devices from the Eaton company (e.g. intermediate plugs, room controllers, remote control, etc.) can now be integrated into the system.
This can be done in the upper tab via "Actions -> 2x Read".
Now the system will first search for the mains powered devices. If necessary, you have to go near the secondary devices for scanning, if they are not in the immediate reception area.

When all mains-powered devices have been read in, "Continue to battery-powered devices" must be clicked. The battery-powered devices must now be activated so that a connection to the gateway can be established. After this has been done, "Exit" must be clicked. Now a password entry is requested. It should be entered as password "0000" and confirmed.
In the upper tab "Actions" you should then click on "Read reception quality..." and then again on "Read".
If devices with question marks are still displayed, but all secondary devices are already assigned to another symbol, they can be deleted. This can be done by right-clicking on the symbol to be deleted and then left-clicking on "Remove". The following dialog must be confirmed with "Yes" and then "No".
Renaming is also possible with a click on the right mouse button and then on "Rename"
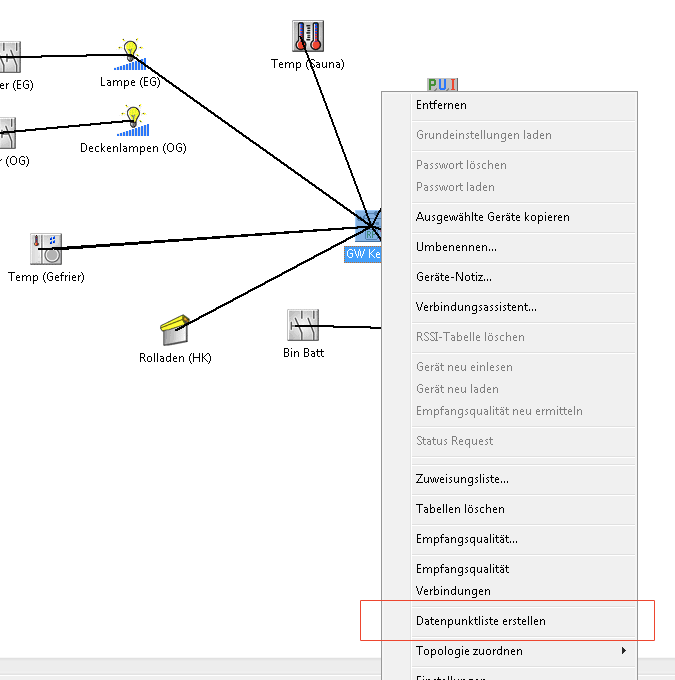
Now the devices are displayed in the Eaton firmware. Now the pencil symbol must be clicked on and the devices connected to the gateway via virtual pencil. After that you have to click on "Load changes" under "Actions".
So that Symcon later knows what is on data point 1 or on data point 2, for example, the right mouse button must be clicked on the gateway and then the left mouse button must be clicked on "Create data point list". This must be saved. Finally, the entire project must be saved. The Eaton firmware is no longer required.
Integration in Symcon
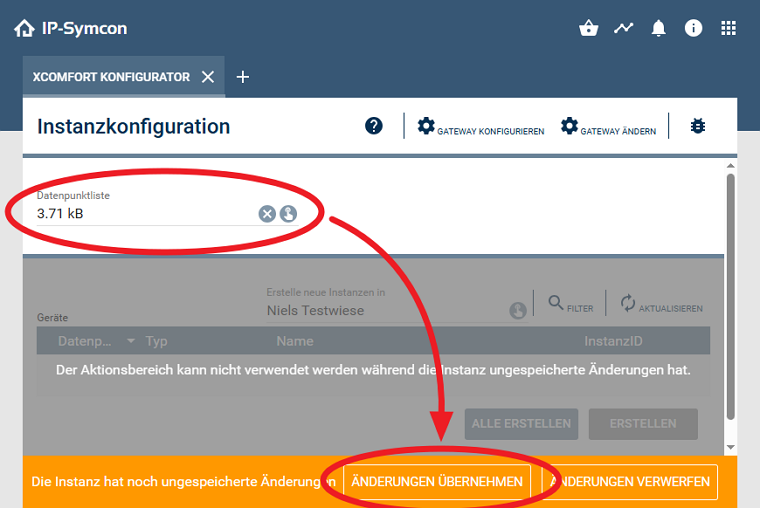
In the management console, an ‘xComfort Configurator’ can be created in the object tree via ‘Add object -> Instance’. After selecting the mode appropriate for the gateway used, the connection to the gateway is configured.
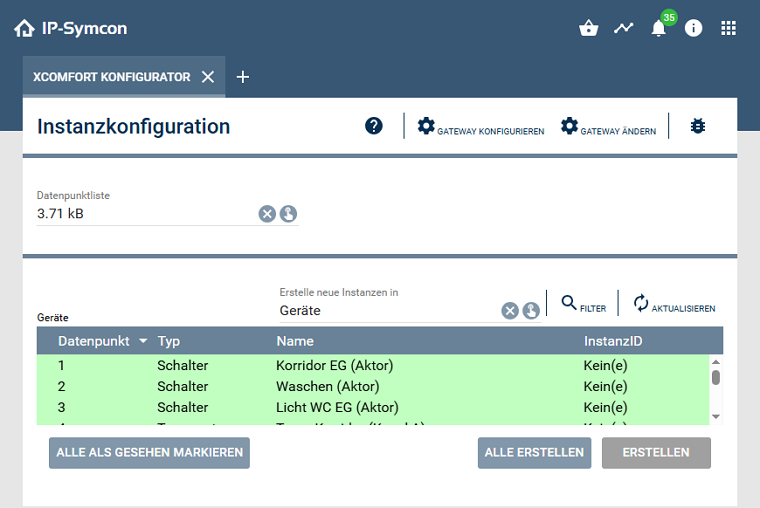
Depending on the mode, an IP address must be entered, the Comport selected, or the appropriate USB device chosen, and the I/O activated. Finally, after confirming the dialogue, the configurator will open. Use the ‘Data point list’ file selection to upload the previously saved data point lists. Once the changes have been applied, the devices can be created.
To receive routable feedback, the data point list must have been loaded in the configurator. This is the only way to assign a serial number to a data point number
tips & tricks
- New versions of the firmware/MRF software can be downloaded here:
Eaton Downloads - The gateway is compatible with all common USB->LAN converters (e.g. from Silex, Lantronix).
- Status variables are not routed by the Eaton Xcomfort system. This means that the gateway must be positioned in a place that all relevant devices are within range.
- Several gateways can be used simultaneously in Symcon and commands can also be forwarded via scripts. So it is common to place one gateway per floor.
- Only from RF version 9.2 (approx. July/2008) the "Acknowledges" sent on the protocol level are evaluated by the USB gateway. In the previous versions it is not recognizable in the system whether a command has been successfully transmitted to a device. The RF version is a hardware upgrade and must not be confused with the FW version, which can be updated via software. (Concerns only PC Manager CKOZ-00/03)
- The new thermostat requires an ECI LAN gateway or a USB gateway with at least firmware 2.6 and RF version 9.2. If the device is too old, the following error messages may appear in the message window: "Invalid RF-firmware revision"
- The port for the ClientSocket configuration from the ECI is 7153